I took some comparison pictures of the two dashes side by side, I thought that those of you who are considering this swap would fine them informative. I can see some challenges from this comparison.
The first three are of course the back/undersides. you can see that the connections to the fan blower boxes are different, the Fiero's is offset towards the passenger while the Stealth's is basically central.
The next two pictures are of the ends of the dashes. I will need to make custom door panels to match the new end cap condition on both ends of the dash.
Here is a view of the tops of the dashes, as you can overall see the Stealth dash is considerably deeper than the Fiero's. As a result there won't be quite as much room in front of the passenger. I suspect that there won't be too much room lost in front of the driver. I will also need to see how this affects the shifter.
[This message has been edited by Sourmug (edited 05-28-2007).]
Edit: Hi Timo, I have seen his thread and I am referencing it below. Thanks!
This next picture is quite telling. The Stealth dash definitely has a sharper radius on the curve where it sits against the front windshield (this picture exaggerates the difference). I will have to take some measurements to see if I will be able to trim enough off of the leading edge to match the stock radius. One good thing is that the defroster vents will line up although the Stealth has longer vents.
And another interesting detail concerns the glove box on the Stealth dash. The stock Fiero ducting cannot be used for the passenger side outer most vent as it will conflict with the glove box. The fan blower box my also interfere but I won't know that until I get it into the car. Here is the Fiero: nd the Stealth:
I have done some additional work on the dash. Here the ductwork has bee stripped out of the Stealth dash: And after marking the names of the connectors that I could identify i removed the wiring harness: Quite a bit of crap came out. I will hang onto it as who knows what may come in useful:
[This message has been edited by Sourmug (edited 05-28-2007).]
And now for the moment of truth, the initial test fitting!
I knew from reading in 4.9 PFI FIERO's thread that it is going to be a reasonably good fit so I wasn't too worried about how it generally sits in the car. One thing that 4.9 PFI FIERO has that I don't is all the support brackets from the donor Stealth, I will have to fabricate all the brackets needed. I guess that one advantage to that is that I can make the brackets to suit what appears to be the best way to anchor the dash. So here we go: It also appears at first glance that the glove box will not interfere with the fan blower box
Here are a couple of pictures of the top corners shot through the windshield. It appears that the front radius curves back about 1 3/4" further on both ends compared to the Fiero dash. I will have to see how much can be trimmed off without affecting the positioning of the top vents. It also looks like some sort of attachment can be made through the round speaker hole and the top vents that would line up with the mounting holes in the Fiero frame.
I will also need to fabricate some fiberglass inserts for the corners. That will be interesting as I don't have a test mule without the front windshield in place.
I am very happy with the overall fit, the side to side fit is exact and the console/steering column holes a excellent as well. I really think that this updates the interior and me likes it a lot!
So what do you think? Nolan
[This message has been edited by Sourmug (edited 05-28-2007).]
I wanted to see how the Stealth console fits. To do this the Fiero's console skeleton needs to be removed. After the first test fit I realized that I had to trimm off the plastic mounting tabs on the underside of the Stealth console as well as trimming off the bottom portion of the "cup" at the back end. Once all that was done I was able to put the console in place, and it just fits although it seems a little on the ticht side: The shifter will sit further forward than the stock Stealth one so the bridge between the front and back console openings needs to be removed as well to allow for this. I will need to make a template of the whole recessed area in order to make a plate for mounting the shifter boot, window/mirror controls etc.
Here are some more pictures through the front windshield. The defroster vents were removed and it looks like I can trim a bit off the front edge.
[This message has been edited by Sourmug (edited 05-28-2007).]
IP: Logged
06:56 PM
Comealongway Member
Posts: 586 From: Calgary, Alberta, Canada Registered: Dec 2002
Nolan, I'm so happy that your local i cannot wait to see this car, you do very nice work and I seriously think that fabricating that stuff to mount that dash and make it look like it belongs there, is harder then my engine swap, I don't think i would have the guts to attempt that amount of work. Your car is quickly becoming one of my favorites.
I made a quick template of the front edge of the Fiero dash by turning the dash upside down and tracing the radius onto a scrap piece of wood. Usually I would use cardboard but I don't have anything big enough at the moment. I marked out the center of the template and using soapstone I marked the center point on the dash: I then lined up the template so it was square and marked it out again using soapstone. Using cardboard would be much easier as you can make it fit the contours of the dash:
It turns out that removing this much material will prevent the defroster vents from lining up so I have decided to leave it as it is and make the fiberglass infill's to suit.
I was also concerned about the fit of the console. I think it is too tight in the pictures above and exerts too much force upwards to make the back end of the console lay flat. I have trimmed the mounting tabs as you can see: Placing it back into the car was easier and feels better. I will have to devise some other method of attaching the dash to the console now.
Thats it for today, I think we will go enjoy some pizza and a movie! Nolan
[This message has been edited by Sourmug (edited 05-28-2007).]
Nolan, I'm so happy that your local i cannot wait to see this car, you do very nice work and I seriously think that fabricating that stuff to mount that dash and make it look like it belongs there, is harder then my engine swap, I don't think i would have the guts to attempt that amount of work. Your car is quickly becoming one of my favorites.
Thanks for the compliment! If you ever want to come by and have a look just send me an e-mail.
I know I said that was it for the night but I can't seem to stop putzing around with this. I'm very excited about this swap, I think it's still the honeymoon stage.
I was thinking about the ducting for the 4 front dash vents. I want to try to use the Stealth branch ducts for the two outer most vents as they likely have the required bends and offsets, or at least are close. I have to use the main plenum from the Fiero as it mates up to the flange on the blower box. So I started making some cuts to the Fiero ducting. The upper ductwork is for the Stealth and the lower for the Fiero with the cuts made:
The first thing was to see approximately where the two Stealth branch ducts would terminate. The left one would run full length but the right one will need to be cut shorter due to the Fiero plenum not being centered in the dash. I then marked out the plenum and cut where the stealth ducts are going to join. Here's the backside of the plenum:
The plenum once cut fit nicely behind the new dash but I could see that it is going to interfere with the left upper corner of the glove box Here's the glove box and it's upper shell: I decided to notch the bottom right corner of the plenum to minimize the interference as much as possible.
So far this is actually quite fun, sort of a giant jigsaw puzzle.
thanks Nolan
[This message has been edited by Sourmug (edited 05-28-2007).]
IP: Logged
12:32 AM
Jul 17th, 2006
RCR Member
Posts: 4454 From: Shelby Twp Mi Registered: Sep 2002
LOL thanks Bob, but the only reason it looks easy is that I'm just ripping things apart, so it is easy. The real challenge will come when I try to put it all back together!
Man am I watching this!!! I must admit I am going to be copying a lot!! Hope you don't mind. Please keep any molds and forms that you make. I know of at least 1 person that is very interested in them.....
I made a bracket to mount the air plenum under the dash. In the stock configuration the plenum and ductwork is actually mounted to the underside of the dash itself however I think it will be easier to install it independent of the Stealth dash and easier to align. The bracket is 10" long over all with a 1" offset using two 45 degree angles. The offset is about 2" from one end. Mine is actually 11" long but it doesn't need to be. I used 1 1/2" X 1/4" flat stock but it probably doesn't need to be that thick. It has also been predrilled so that I can use self tapping screws. Here is the bracket after it has been painted: Here is a picture of the test fit in the car: The bracket is attached to the hollow tube structural member that supports the steering column.
The duct connections on both ends of the plenum were then modified to accept a 2" ABS pipe coupling. I was thinking of using the Stealth ducts but they will need to be modified to fit. So the end result is that by using the couplings I have two options:
1. Use 2" ABS pipe and fittings. The pipe will simply insert into the coupling and the installation can be ridged. The draw back is that it will require more work and measurements to fit up. 2 Use 3" flexible duct. The duct can be clamped to the outside of the coupling. This allows me to ream out the ridge on the inside of the coupling resulting in a larger than 2" inside diameter, probably close to 2 1/2". It will also be easier to run the duct. The drawbacks are that it looks cheap (I know, no one can see it) the other is that the flexible duct doesn't flow air as well as smooth duct.
In order to insert the couplings I first cut multiple grooves in the two plenum ends so that it would give and allow the coupling to sit into the opening: I used a thin cutting wheel in the angle grinder to do this. Make sure you wear long sleeves when doing this. Hot plastic burns
[This message has been edited by Sourmug (edited 05-28-2007).]
Then both ends were coated with fiberglass to seal them air tight and secure the couplings in place. I also gave them a quick sand to remove the loose strands and high points: Kinda ugly. But it will work. The fiberglass does not have a super strong bond to the plenum but the shape if the fiberglass will hold it tight to the plenum and prevent it from coming off. After applying a coat of paint the plenum was then anchored in place:
I also attached a small bracket to the top. This bracket holds the top of the plenum so that the flange sits in full contact with the foam gasket between the plenum and the fan box. The bracket was formed from a small angle bracket:
[This message has been edited by Sourmug (edited 07-19-2006).]
IP: Logged
09:14 PM
Jul 20th, 2006
4.9 PFI FIERO Member
Posts: 189 From: new orleans louisiana Registered: Jul 2004
Great to see that the swap is going good. Keep up the good work. Quick tip, for the top mounts get a 2 pieces of flat iron. Screw it to holes where the 4x6 speakers were on the Fiero dash. Then install the stealth dash back and mark with white out the mounting holes inside the speakers holes. Get self tapping screws (the ones with the cutting tip) and install. ta da
Thanks for the tip, I had noticed the mounting that you had done through the speaker holes while reading through your thread. And yes, self tapping screws are my friends!
By the way, when I find a particularly informative thread that covers something that I will be doing I make a word document of the thread c/w all the pictures and put it into a binder. I have 4.9 PFI FIERO's thread all printed out:
To continue: Here is a shot with the dash, plenum and the plenum in place:
Its a little on the long side and will interfere with the glove box lid. Jeeze, do you think I drilled enough holes in the end? But as you will see shortly it didn't stay this way for long.
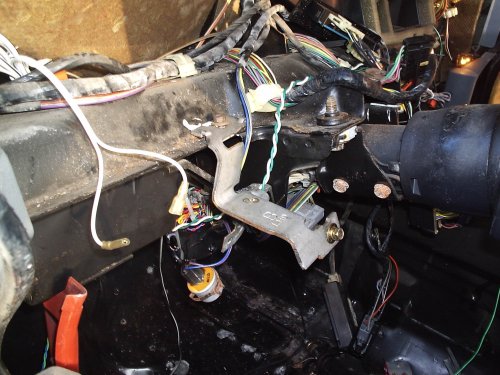
The next bracket that I decided to work on is the center console support. This support is the one that supports the dash at the stereo/HVAC control opening. The dash sits to low just sitting free in the car and needs to rise up to allow the console to slip into place. 4.9 PFI FIERO in his thread built a bracket using some of the stock components: I decided to fabricate one from scratch. The reason for this is that the stock piece is actually too narrow side-to-side and I wanted to maximize the space in between the supports. I made it using a 9 3/4" long piece of 1" X 1/8" flat iron and two 5" long pieces of 1" angle iron. Here it is being fitted up: After welding and pre-drilling: And after painting: And with it mounted in position: This piece needs to sit toward the front of the car when compared to the stock location and it also sits at an angle to match the angle of the Stealth dash.
[This message has been edited by Sourmug (edited 05-28-2007).]
I then popped the dash back in for a test for and connection using self-tapping screws:
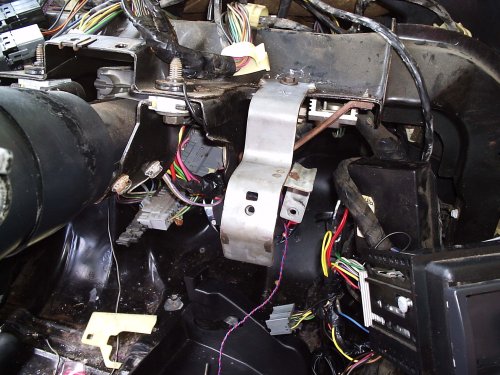
The next brackets I made are for both sides of the steering column. 4.9 PF FIERO was able to use the Stealth brackets but since I don't have those I need to make them from scratch. I decided to make them similar to the Stealth brackets again using the 1 1/2" X 1/4" flat iron. Here are the ones that 4.9 PF FIERO used:
I was originally going to bend these into shape but I think it's harder to maintain the correct dimensions doing this so instead I cut individual pieces to length and welded them together into the correct configuration. Here is how I fit the pieces together: After the pieces were tacked together I did a quick test fit to make sure I didn't mess it up and then welded the joints. Here are the two finished brackets, the one on the left sits to the left of the column and the other on the right. They are to be attached to the hollow structural member that supports the steering column: Sometimes, measuring all this by yourself is difficult and you need some help! Nothing like an extra set of hands.
[This message has been edited by Sourmug (edited 05-28-2007).]
I also noticed that the plenum bracket that I had previously made was fairly close to the left hand glove box hinge/dash mounting hole. You can see how close in this picture:
So I pulled out the bracket and modified it to also pick up this location: The offset in the picture above is in the new drop piece that I added. This will place the tip in the correct location. Here are the brackets installed in the proper locations: The final positions were determined by holding the pieces in place and marking them out using soapstone with the dash in place. They were then fastened in place withe the dash out.
Here are the brackets and dash in place and bolted down: Nolan
[This message has been edited by Sourmug (edited 05-28-2007).]
For the right hand glove box hinge support I am going to connect to an existing Fiero angle bracket that is used to support the under dash passenger side foot well light and apparently the Sub enclosure for the performance sound option. My car did not come with this option however I am adding it in and have replaced the original sub with the replacement that Rodney Dickman sells. It's a much nicer speaker than the original.
I made the bracket using a piece of 1 1/2" angle iron and also welded a strip of slightly bent 1" flat iron to connect to the hinge/dash support: I also replaced the lower mounting hardware on the sub enclosure as the new angle bracket will interfere with the stock bracket: There is a second stock bracket on the left side of the sub enclosure. Whatever it is intended to mount to on the stock dash is no longer present so I made a bracket again using 1" flat iron: And here is the whole assembly in place:
[This message has been edited by Sourmug (edited 05-28-2007).]
Here is a quick shot with the dash back in place. You can see that there is plenty of room for the sub, the ductwork and just about anything else that may need to go under the dash on the right side:
Well it looks like I have been able to more or less finish up the mounting points. It looks like I may have to make the odd adjustment but over all it has gone quite well. Here are the two final brackets for the top of the dash: These are for the screws that will go through the speaker openings similar to what 4.9 PFI FIERO did in his thread. Here is my first attempt at modifying the speaker enclosures to allow an attachment to the new brackets. I first slotted the enclosure so that a modified washer could be inserted and held in place with adhesive: However after thinking about this I realized that it wouldn't take much stress to fracture the plastic at the end of the slots. So I dumped the washers and attached some "L" brackets instead: They seemed to have worked out quite well. The only difficulty is that the pocket is quite recessed and a little awkward to get the screw in place.
[This message has been edited by Sourmug (edited 05-28-2007).]
Here are some pictures of how it's all coming together:
I really, really like it!
There are a few small alignment issues. The lower part of the dash appears to be slightly wider than the space available. As a result the opening for the glove box is compressed a bit (about 1/2") and the lower driver side dash panel is slightly popped so that there is a bit of a gap between the upper and lower portions. The stock Fiero trim will likely need to be cut down a bit to increase the available space. You can see that there is a slight bow in the end pieces.
[This message has been edited by Sourmug (edited 05-28-2007).]
One last picture for now. Here you can see how the stock Fiero console vent duct lines up with the Stealth console vent opening. Up and down is awfully close and a tapered adapter will need to be made to transition from the Stock opening to the wider Stealth opening.
Al in all I am very happy! She is going to look great IMHO.
Any thoughts opinions or suggestions???
Oh, I want to start filling in the "A" pillar gaps, does anyone have any tips or hints?
Thanks Nolan
[This message has been edited by Sourmug (edited 05-28-2007).]
IP: Logged
10:30 PM
motoracer838 Member
Posts: 3751 From: Edgewater Co. USofA Registered: Jan 2006
I hadn't looked in on this thread in some time, I can see that iv'e missed a lot. I'm glad to see somebdy else taking a swing at this dash. I like your progress, the dash is lookin' good.
Cheers Beers n Gearz. Joe
IP: Logged
11:42 PM
Jul 24th, 2006
jscott1 Member
Posts: 21676 From: Houston, TX , USA Registered: Dec 2001
Wow! is all I can say...you have some excellent photo documentation. Great inspiration for anyone wanting to do the stealth dash. I don't know much about the gauges, I wouldn't have the guts to tackle any non-GM dash. I suppose you can always go aftermarket. Keep up the good work!!
I was hoping that you could lend me some insight on how you made the infill piece that sits against the windshield on your dash swap. How did you form it and how did you attach it once it was made?
OK, they are not done yet but some progress has been made.
IIRC, the Firebird dash guys used masking tape to make the form on the dash filler piece that they need. So based on that I decided to do basically the same thing. In order to do this though I needed something to attach the tape to along the "A" pillar and the windshield. On the pillar I cut a piece of plastic angle to length and attached it using double sided tape: I then cut a piece of sheet styrene plastic for the edge along the windshield: And then inserted it against the windshield and taped it to the plastic angle: I then taped the crap out of everything! You will likely find that the tape wont want to adhere well to you dash and trim pieces. I used a degreaser, the same one shown previously that I use prior to painting, to remove the goop that has been applied to the interior over the years. Worked great and the tape stuck! I had a real problem getting the tape along the windshield as my hands are simply too big. I soon realized that I could only get so far with the dash in the car and that it would have to be extended afterward.
Once both sides were taped up I applied the first layer of mat: As you can see, it is tough to get the fiberglass and resin into the corners. I ended up with resin all over the windshield but it can be easily removed later.
[This message has been edited by Sourmug (edited 05-28-2007).]
[booktextOnce these had set I pulled them free and removed all the tape that was still stuck to the pieces. I also removed the dash and re-taped the corners and reattached the styrene plastic to use as a form. I then started to apply more mat and resin to build the pieces up and extend them along the front edge of the dash: These will remain as two separate pieces as the center of the leading edge of the Stealth dash actually makes contact with the glass After these were built up a little more they trimmed and shaped to fit: I also made a cardboard template of the front edge of the Fiero dash and used this to set the curve of the fiberglass pieces.
There is still lots of work yet on finishing these. There is a small gap on the driver side that you can see in the pictures which needs to be filled. I'm not sure how I will attach them. I know the leading edge will sit in the "groove" between the glass and the glass frame. I will need to devise some method of attaching the rear projections. [/booktext] Anyone have any suggestions??
Thanks Nolan
[This message has been edited by Sourmug (edited 05-28-2007).]
I guess I better substantiate this post. Do you think the fillers would be easier to make if you had a test mule with no windshield in it, or would that effect how accurate the fillers were in the corner and along the windshield? Also, do you plan on upholstering them seperatly, or blending them into the dash somehow so it looks like one piece? The corners are the part that concerns me most about when I get to do this swap.
Oh, it would definitely be easier with a windowless test mule. They could be made to match almost perfectly. I don't think that they can be finished in a manner that makes them completely blend in so I'm not yet sure how they will be finished. I may do something to make them more of a feature rather than trying to hide them if you know what I mean.
Nolan
[This message has been edited by Sourmug (edited 07-29-2006).]
IP: Logged
12:57 AM
Blacktree Member
Posts: 20770 From: Central Florida Registered: Dec 2001
So I'm guessing you don't want to reupholster the dash. I can't say I blame you.
Just out of curiosity, what is the dashboard made of? And how thick is the dashboard material (the structure, not the upholstery) near the edge? I might have an idea...


.JPG)
.JPG)
.JPG)
.JPG)
.JPG)
.JPG)

.JPG)
.JPG)
.JPG)
.JPG)
.JPG)
.JPG)
.JPG)
.JPG)
.JPG)

.JPG)
.JPG)
.JPG)
.JPG)
.JPG)
.JPG)
.JPG)
.JPG)
.JPG)
.JPG)
.JPG)
.JPG)
.JPG)
.JPG)
.JPG)
.JPG)
.JPG)
.JPG)
.JPG)
.JPG)
.JPG)
.JPG)
.JPG)
.JPG)
.JPG)
.JPG)


.JPG)
.JPG)
.JPG)
.JPG)
.JPG)
.JPG)
.JPG)
.JPG)
.JPG)
.JPG)
.JPG)
.JPG)

.JPG)
.JPG)

.jpg)
.JPG)
.JPG)
.JPG)
.JPG)
.JPG)
.JPG)
.JPG)
.JPG)
.JPG)
.JPG)
.JPG)
.JPG)
.JPG)
.JPG)
.JPG)
.JPG)
.JPG)
.JPG)
.JPG)
.JPG)
.JPG)
.JPG)
.JPG)
.JPG)
.JPG)
.JPG)
.JPG)
.JPG)
.JPG)
.JPG)
.JPG)
.JPG)
.JPG)
.JPG)

.JPG)
.JPG)
.JPG)
.JPG)


.JPG)
.JPG)
.JPG)
.JPG)
.JPG)
.JPG)
.JPG)
.JPG)
.JPG)
.JPG)
.JPG)
.JPG)
.JPG)


