I've asked questions, I've done my research, and I've been compiling parts and taking pictures as I go. I'm almost ready to start installing in a bit here once I get a few things taken care of. There's a few areas I'm not absolutely positive on, but I think I'll figure them out when I'm there - and that failing, that's why I have you guys, right? Riiight? ...Guys?
Anyways, here's the story and it's looong, sorry in advance: A month or so ago, I bought a 3.4L TDC from an Automatic 1992 Lumina Z34, 106,000 miles (BTW, these cars look pretty cool in person, IMO). Bought for 800, including the ECM and wiring harness. So I'm off to do my swap! Or so I thought... I got it home and started to notice little things wrong. There was muddy, oily fluid seeping out of the throttle body and exhaust ports. So I pulled the drainplug, and this is what came out:
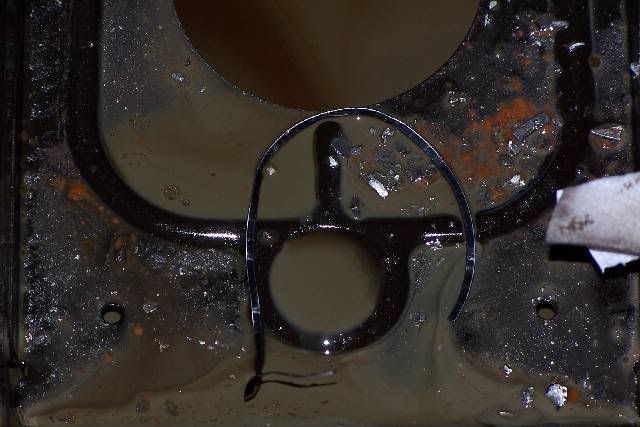
Oh, did I mention that about a gallon of WATER came out first? After that, I decided to pull the oilpan, and this is what I found:
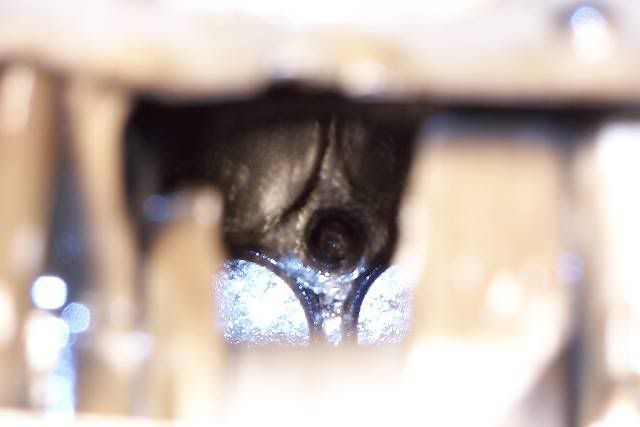
Looking up into the combustion chamber:
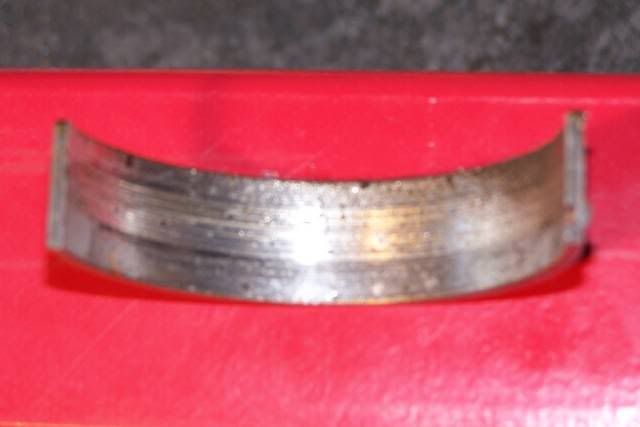
Rod bearings (the ones that were left, anyways) weren't horrible, but weren't great. The crank bearing was pretty darn bad though:
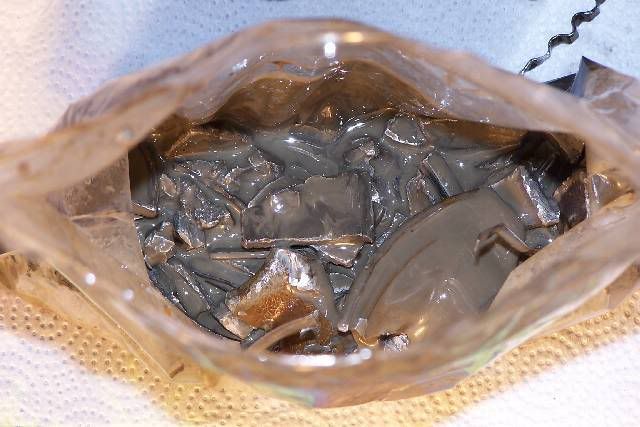
*Shudder*. That musta sounded like *CRAP* from the drivers seat. It turns out that the #5 rod bearing spun, got hammered into tinfoil and spit out in pieces. After that, the loose rod managed to destroy the piston, which eventually broke up and ended up in the pan - after going THROUGH the spinning crank... The rod then punched a hole in the water jacket, letting all the coolant spill into the oilpan. This engine was FUBAR! Oh, and though unuseable, the rod didn't break after all that. Hmm.
So the yard owed me a good engine. I showed the baggie full of piston and bearing remnants and the guy said "hmm.. how did he miss that? He said the motor looked pretty good. Even Ray Charles coulda seen that one...". I spent 2 days standing around waiting for things to get done before they pulled a second motor, mileage unknown from a 91 Olds Cutlass Supreme. Turns out the parts puller cut it all up before the concept of DC electricity came to him, forever making it impossible to read the mileage on the digital dash. Fools! (and I won't even tell you how they pulled it). The idiot parts puller then started stripping all the needed parts off the engine, despite the fact that they were part of the deal. I had to go back and deal with this guy another time or two until I got all the parts I needed. I (and all my friends) had a really severe feeling of getting jerked around the whole time. We also saw two two different people get into a screaming match with him, dissatisfied with their part or his policy. It was ALL bad from day one with that guy. If you're ever in Pittsburg, CA, don't EVER go to the JM Enterprises yard - the guy is shady as hell! I'm embarrased that I even managed to get into that mess. Never again.
In the confusion of playing musical engine (I guess the first engine was especially 'musical' when it blew?!), I snagged another alternator, and the second front exhaust manifold I needed. I think of it as payback for the inconvenience and poor treatment I recieved, not that he'd miss them anyways. Good news is that I have 100 days (more like 60 now) to get the engine running (it's a challenge now!), and if it's bad - I get yet another engine! Better news was that the current motor seems to be in great shape - it even came out of a granny cruiser Cutlass with a "My Kid Is An Honor Student At ____ School" sticker on it. Oil was the approved brownish color, no milkiness. Oilpan was clean on the bottom (though it was badly dented! I swapped it for the good pan on the first motor after a very thorough cleaning). The bearings looked GREAT. Not a single groove that I could even see, much less feel on any of the rod or crank bearing surfaces! The cam belt had been recently replaced and the idler pullies were Dayco, not GM originals, indicating that somebody had it serviced it at least once in it's life. Even the dreaded Distributor Blockoff Cap seemed to be alright. It looks like it had been sealed to an extent, but there wasn't any evidence of oil leaks. The cylinder bores still had crosshatching on them, and compression came up even, if a bit low on completely bone dry cylinders that had been sitting for who knows how long. Despite being irritated with the fact that I don't know the mileage, and I had to replace about everything that had wires on it, this one looks like a keeper.
So finally, the project begins!
------------------ Chris
Blue 1987 GT Getrag 5 speed, 1" lowering springs, 225 50R16 rims and tires, Fiero Store 9 3/4" HD clutch (Soon to be 3.4L DOHC powered!) Silver 1986 2m4 THM 125c automatic Black 1985 2m4 SE Isuzu 5 speed (no paperwork)
IP: Logged
02:36 AM
PFF
System Bot
ltlfrari Member
Posts: 5356 From: Wake Forest,NC,USA Registered: Jan 2002
I noticed that you are in the Repulik of Kalifornia and you sig says you have a manual car. Just so you are aware, that is not gonna pass emmissions as it stands since your engine would be from an automatic, although since it came from a 91 car, the engine as such did come in a manual form but you'll need to install an AIR system on it. Also I don't know if a ref would allow you to swap the rear manifold for a front one since the exhaust has to be stock up to the cat. Otherwise, off to a shaky start but good luck and keep us posted with the obligatory pictures.
That's an interesting story. It makes me fel better to know this kind of stuff is universal and I am not the only one who must valiantly fight the forces of stupidity. Tell us more...and more pics please.
------------------ 84 Sport Coupe 87 GT 5 Spd
IP: Logged
08:42 AM
blkpearl Member
Posts: 367 From: SanDog,CA,US Registered: Oct 2004
Hey , after reading this it sounds like that engine is sheeit. Once you get mine you will be all set. Just SAVE all those parts from the one you have now. End check you're PM's I'm rolling up to LA this weekend. If not now we can do this soon.
Don't worry to much, you will be able to get this car to pass BAR. I know my engine would and Lumina's came with a 284 Getrag in CA. There is a 93' down the street from me and it's a manual. I called and spoke with a ref for a 1/2 hour about this swap and MY engoine and he said I will be fine, just let them know the details of the engine. They are most concerned the smog equipment is OEM.
IP: Logged
02:19 PM
Steven Snyder Member
Posts: 3326 From: Los Angeles, CA Registered: Mar 2004
Originally posted by Blue Shift: The cam belt had been recently replaced and the idler pullies were Dayco, not GM originals, indicating that somebody had it serviced it at least once in it's life. Even the dreaded Distributor Blockoff Cap seemed to be alright.
Dayco is the factory brand. Those may certainly be original pullies and timing belt. Unless you have some other way to know they've been replaced, you should definitely get new ones along with a new belt tensioner. I've heard on the 60* V6 forums that the tensioner does not gradually fail. It may give out spontaneously, causing the belt to flop around side to side and shred itself apart. Good luck getting all the smog stuff worked out. I'm in the same situation with my swap. Luckily I have two years to get it ready since I just smogged my car with the Duke. The hardest part seems to be finding the AIR pump and tubes. You may be able to adapt a system from another car. I think the 96-97 3.4 DOHC engines had the AIR injection tubes, but they also had different manifolds.. maybe the system could be made to work though.
-Steven
IP: Logged
03:52 PM
AaronZ34 Member
Posts: 2322 From: Colorado Springs, CO Registered: Oct 2004
The 91-93 5-speed 3.4s had the AIR injection system, and an electric pump located in the front passenger fender. You won't find one. I had one that I was going to sell, but no longer.
The 96-97 engines also had an AIR system, but it was a little bit different. In order for it to plug into the earlier manifolds, you'd need to block off the current inlets, redrill it, then tap it. The ref will see this for sure. If I were you, I'd build it without the AIR tubes, then attempt to get it passed. The auto manifolds just had bolt plugs into the AIR inlets on the manifolds, so he may let you slide.
Good luck!
------------------ 1992 Lumina Z34 5-speed For Sale, modified(high 13s), or stock 14.78 @ 92.68 1992 Lumina Z34 5-speed Stock, new crate engine and trannsmission 3.4L TDC V6, getting built to about 430hp at 8000rpm for a 88GT
Ah yes... the PRK - Peoples Republik of Kal-ee-fornia... I'd be outta here in a heartbeat if I had that option now (for quite a few reasons), but for the time being this is my home so I'm going to do what I can under the current restrictions. Blah. I bet it'd feel good to make something that'll pass some of the toughest smog laws on the earth though!
I asked TK some questions about the smog issue, since he's done this exact same thing before and got the "blessing" from the BAR. This guy knows his CA smog stuff, it seems. You gotta add the AIR system, no exceptions. You have to supply a VIN number from a manual transmission car, so when they scan it it comes up M/T. They didn't trip about using two forward manifolds (though I guess they could if they want?). The guy in question used one M/T manifold, and drilled and tapped an A/T forward manifold and installed an air pipe - they didn't care. The idea is to be very polite and nice, not ramble on about things, supply the needed information and not much else, supply the correct information, and let them examine the rest. I'm going to do just that. Hope it works, otherwise I might have to swap back to the 2.8 for smog (UGH!) - I'm keeping it as intact as possible just for that reason.
BTW Aaronz34 - on all of the A/T motors I've received (the blown 92 Z34 and the current 91 Cutlass), all 4 manifolds had NO plug - I was hoping they would but they don't. I'm going to have to tap and drill mine really carefully, maybe let it corrode a little from engine heat so it looks factory, etc. I do wonder if I can use a 96+ AIR pump - I think they inject air at one point into the manifold, where the earlier M/T systems injected into each primary. I bet the BAR guys reference manual will point out the difference, so maybe it's not a good idea.
As for the timing set on the motor - the belt looked darn good, it had to have been changed not very long ago. The idlers looked fine too. Turns out my overzealous powerwashing techniques rusted the idler bearings, so I ended up replacing the idlers along with the belt. Even so, I plan on regularly examining the belt. I'd rather do a timing belt job with the engine out (15 minutes), rather than even attempt it in the car (is it even possible to do a timing belt in the Fiero?).
Blkpearl - I definitely have a plan for your motor - I'm going to fire her up on my current junkyard motor, if nothing more than to prove that it works and that my rod bearing job was alright (learning experience), then quickly proceed to drive the remaining life out of it! I need to at least prove that the motor I got was a running motor within the 100 day timespan. After I prove it (and perhaps see what it'll do), I'll put the parts on the crate engine and swap it in and drive nice - worry free for life! Yeah baby! I have a good home for it waiting. I'm just home on a break from work, so I'll shoot you a PM in a couple hours when I get home again.
Another update when I return from work...
------------------ Chris
Blue 1987 GT Getrag 5 speed, 1" lowering springs, 225 50R16 rims and tires, Fiero Store 9 3/4" HD clutch (Soon to be 3.4L DOHC powered!) Silver 1986 2m4 THM 125c automatic Black 1985 2m4 SE Isuzu 5 speed (no paperwork)
IP: Logged
11:46 PM
Feb 13th, 2005
ltlfrari Member
Posts: 5356 From: Wake Forest,NC,USA Registered: Jan 2002
if you want to move to NC I'd swap you, I'd move back to CA in a hearbeat if I could but I guess I coudln't even afford to live in a card board box in K Mart car park, never mind a house any more (used to live there and if you knew what my old house just sold for you'd cry too!).. Oh well, move on I guess. Good luck with the swap and I hope you get it thru emmissions. I think you could do the timing belt in the car but I wouldn't want to. To do that you need to 'lock' the cams in place which is not the most acurate method of doing it and to do it correctly you need to take the cam covers off, not something I'd relish with the engine in. Anyay after a few tries you can pull the engine easily in half a day (I speak from experienace) and it goes back in just as quick.
Ok, time for part two of this long story. You see, I've been gathering parts and cleaning/reconditioning my junker motor for the last month or so, but haven't really posted about it - so now is the time, I figure. Just a couple more things to take care of before I start droppin' and swappin'. I have a mighty ****load of pictures to show you guys, so you'll have to settle for links, as it won't display more than 8 pictures at a time.
Here's my workspace (much cleaner, and rearranged for more room now). The blue car in the background is the one I'm going to swap the motor into:
My current motor is a 1991 Olds Cutlass Supreme motor, pulled from an Automatic car. Unfortunately, mileage is unknown since the parts puller yanked it and chopped everything up without powering it on and noting mileage. They also didn't perform the compression test they promised... Oh hell, I could go on for pages, but I'll spare you all. The car had one of those "My Kid Is An Honor Student At _____ School" stickers on it. So at least it was adult owned, good sign. Then again, maybe granny was a closet street racer? So when I get the motor home, it turns out to be in pretty reasonable shape in all the places that matter the most. Oil came out fine, with no water. I pulled the oilpan, and there was no debris in it. The cylinder bores had crosshatching on them still. My worst fear was that the bearings were going to be ugly. Turned out that both the crank main and rod bearing surfaces were beautiful! Shiny like a mirror, no grooves or gouges visible to the eye. Rod bearing inserts showed what I would assume to be normal wear:
As for the crank main bearings, they weren't even touched! Instead of the trimetal bearings I assumed all bearings were, these main bearings appeared to be aluminum. Are aluminum main bearings stock, or has somebody been through this motor? On average, about 2/3 of the surface of these bearings still had the factory finish on them, and the other third had very minimal wear (note: in a random pattern, not in a way which would suggest crooked bearings) with the factory finish still showing for most of them. Amazing, I decided not to touch them. On the advice of a friend who has a 95 3.4L pushrod Camaro with a leaking rear main seal, I decided to pull and replace mine, just because it'd be a shame to have it leak after it's installed:
I put up a post, asking if it was possible to tap the seal in too far (I bottomed mine out trying to get it all straightened out), and the general consensus was that it'll be fine as it appears in the picture. The stock seal lip was resting on the chamfered end of the crank, this one sits a good 1/16' or 1/8" further back.
As for the timing belt, it looked pretty darn good considering who knows how many miles the motor had on it (I didn't have my digital camera yet and I couldn't borrow my friends). The idlers looked alright too - however I got a little too happy with a pressure washer and a pump sprayer full of laundry soap/water mix (cheap cleaner/degreaser) and the bearings ended up rusted frozen. Damn! 120 dollar mistake... Don't spray a pressure washer at things with sealed bearings... So I ordered a new timing idler component kit from partsamerica.com, since nobody else has the correct part that I could find. At the same time I also bought a digital camera as well. I quickly put it to work taking pictures of things like this:
http://img.photobucket.com/albums/v249/pyromaniacal/TDC%20Swap%20Project/Cam%20Timing/Cam_Tools.jpg http://img.photobucket.com/albums/v249/pyromaniacal/TDC%20Swap%20Project/Cam%20Timing/Cams_Aligned.jpg How do you like my cam hold down tools? I based the design off of the tool on 60degreeV6. Made with 6 bucks worth of materials from the local hardware store. Buy some 1/2" square stock, cut to length, drill a hole and put a bolt with 8x1.25mm thread though. Space it with washers as required. You can add a second bar for strength - mine held the cams solidly as I torqued the cogs to spec (91 ft/lbs I think)! Try this at your own peril, however. I tried to put the new belt on by marking up all the pulleys with white-out, but it just wasn't going to work since the new belt wasn't stretched like the old one and it wouldn't line up - I had to remove the lock rings from the cam cogs (gear puller) and time it right using the tool. After I made the tools, it was a 10 minute job. If you're doing a TDC/DOHC swap, make yourself a set.
http://img.photobucket.com/albums/v249/pyromaniacal/TDC%20Swap%20Project/Cam%20Timing/Locking_Rings.jpg Locking rings that lock the cog onto the cam - the bolt presses that corrugated ring between the cam cog and the cam, locking the cog in place. You need a gear puller to remove the cog once installed. On 60DegreeV6, it says "Then remove cam gear bolt using cam gear holding tool and 15mm socket. The rear cam gear will NOT come off without pulling the cam carrier o�n a 91-93 engine due to the lock ring setup. 94+ can remove all 4 cam gears easily." I don't know if they mean that it'll interfere with something in the engine bay, but all 4 cogs on my 91 motor came off with the help of a gear puller. No removal of the cam carrier needed.
That's a nice write up. Do you have the part numbers for the idler pulley kit you used. I just reused the old ones when I did the belt but you know I should really do the idlers next time I have the engine out (and there will be a next time, I'm pretty sure of that!)
Thank you. The "timing component kit" (contains two idlers and the tensioner pulley) is Dayco 84068, 119.99 at Partsamerica.com or Kragen Auto Parts, since they're the same thing. Oddly enough, they had a little trouble getting ahold of it in the store (woulda taken longer) so I just ordered it online. Kragen seemes to have more of the TDC specific parts available compared to Autozone and NAPA in my area, so that's where I did most of my parts shopping.
After helping my buddy John get his red 85' V6 together yesterday (oilpan removal for new gasket), we spent about 2 hours disconnecting hoses and wiring and getting the motor ready to drop out. Today, we spent several more hours dropping the cradle and jacking the car up. Last time I dropped my cradle to do the clutch I put the car on jackstands (two jackstands in the front, plus a screw jack for load leveling and adjustments), then used a cherry picker to lower the cradle onto a moving dolly. Then we put a 4x4 across the bodypan at the jacking points, and used two hydraulic floor jacks to raise the back end of the car to the required height to roll the cradle out.
This time around, I didn't have two floor jacks. We used blocks and jackstands to support the car at the rear frame rails going to the bumper assembly behind the rear cradle mounts, and lowered the cradle onto a dolly. Then we used the cherry picker to lift the car. I VERY carefully used the trunk lid lock ring to lift the empty rear end of the car - and though it held fine, I wouldn't recommend you do it unless you like to live dangerously. I know, I can see you cringe as you read that. In fact, I need to build a Fiero lifting tool of the type people have built to install into the strut towers, as I'm going to need one here pretty quick. Either way, the motor came out successfully without damage to anything (as far as I can tell), so that went pretty well. Now I have to start stripping down the 2.8 and remove it from the cradle assembly in preparation for installing the 3.4. This is where we're currently at.
Removing the center console to gain access to the ECM and wiring. Remove the shift console to gain access to the front screw holding the center console down. Then remove the screws behind the console glovebox door and remove the center console. John proceeds to rock on with a quickness...
It only takes 5-10 minutes to remove the wiring harness from the ECM, which you then pass through the firewall and wrap around the motor in a secure place - no unplugging sensors and breaking stuff.
And it seems that it's required to stand in your empty engine compartment any time you drop the cradle and have a picture taken. So I decided not to break tradition for fear of bad luck during the project...
More to come soon...
IP: Logged
05:26 AM
ltlfrari Member
Posts: 5356 From: Wake Forest,NC,USA Registered: Jan 2002
To lift the car I just use darn big chain (5000 lb breaking strain) and two large hooks (similar load capacity). The hooks go into the holes in the top of the strut towers where the top of the shock would normally be, with the chain slung between them, hook the cherry picker on to the chain and lift. Works fine.
quote
And it seems that it's required to stand in your empty engine compartment any time you drop the cradle and have a picture taken. So I decided not to break tradition for fear of bad luck during the project...
Now I know what I did wrong, I didn't do that bit. Dang, too late now
Hm chain, why didn't I think of that - since I happen to have one with hooks and all already. I might consider pulling off the rear fascia, and attatching the cherrypicker to the rear bumper so that I have more room under the car for the cradle and dolly - the stupid legs on the cherry picker don't retract and make it a tight fit getting everything in the right place. I'm sure that it's going to suck when I get to the "install, check, pull" phase of the swap...
Today I'm going to pull the 2.8 and get the TDC installed on the cradle, so I'll report how that goes.
Yesterday, I stripped the cradle down to nothing and got everything cleaned up. I also found out that it's pretty easy to remove the rear fascia to attatch my lifting chain to the steel supports - answers my question about why so many people seem to have the rear fascia off when they're pulling the motor...
Basically, I'm going to start cleaning stuff up and getting ready to start moving the TDC over for test fitting. I'm also going to repaint my cradle due to some rust spots at the welded areas (the whole car used to be 100% rust free, which irritates me). I know many people speak highly of PQR-15, but isn't it difficult (and expensive) to get ahold of and require a pneumatic spray gun to apply? I have a gun that's not so great, but never tried to paint anything before aside from a few rattle can jobs. Are there any easier alternatives that'll work? I was thinking Rustoleum Industrial (my favorite rattlecan pain, dries fast and is tough). I'd appreciate any information about this.
I have another question about something that bothers me. My OEM clutch failed a couple years back when the throwout bearing wore through the spring finger tips, and it punched right past it. I've since installed a RAM HD 9-3/4 (or whatever it really is) clutch, and put around 20,000 on it. It locks solidly yet slips like a street clutch. I haven't really pounded on it hard or driven around riding the clutch, but when I removed it the spring fingers had flats worn into the tips already!!! Not nearly close enough to break through, but the same thing is beginning to happen that ate my OEM clutch.
RAM Clutch on my 2.8. Notice that the spring finger tips are developing flats after a mere 20K, is this normal? I don't have a flywheel cover installed so maybe that has something to do with it? Or is something messed up here?
Getrag sitting on my desk - it's amazing to me that you can pick this box up and carry it around, yet there are V8 drivers on here putting 400 Hp through them. I mean yeah, you might have to baby it at that power level, but the concept still amazes me. Mine's awaiting cleaning.
1st POR-15 is easy to aply with a brush and it still comes out nice. It's pretty thick so it smooths out the brush strokes. You do ned to do the prep on the surface to be painted tho first. I got their marine clean and surface prep stuff as well. Came out pretty nice. I believe you have to apply a couat of UV protector to anywhere that will be exposed to sunlight. Not a problem I think for the cradle.
As to the clutch, If the fingers are wearing then they must be binding and the only thing they touch is the throwout bearing so I'd guess that either it is not releasing propery (maybe spindle is binding) or the front plate of the throw out bearing is binding (doesn't it rotate, been a while since I did mine and can't recall). Bear in mind I am NO sort of expert, not even close when it comes to this sorta thing, just my $0.02 worth
Alright, it's time to update again... Hope my Photobucket account can swing all the photos I've been posting...
After stripping the cradle down to nothing, washing, scrubbing light rust spots and painting it (several heavy coats of Rustoleum Industrial gloss black), I let it dry for a day or two, and then reassembled it and fitted the TDC in place. There's no salt on the roads here, and there wasn't much rust at all, so I just wanted to give it a good coat to protect it some. I have a can of this rubberized undercoating stuff that I may try once it's all installed properly for a little protection from water and debris. I still have to install poly bushings on the A-Arms before I reinstall them (thankfully no egging of the bolt holes, like I suspected). I've been told that improving your rear A-Arm bushings really makes a difference you can feel when you eliminate flex under cornering or acceleration. I'm not too worried about a little squeak here and there, as long as it doesn't drive me nuts! I also have a cradle mount poly kit that I'm going to install before final engine installation.
I think somebody must have cursed me with stripped bolts or something, since I;ve run into two stripped bolts so far - one of the mounting bolts on the transmission mount this time. However, the originator of this curse failed to realize that I had already repaired an M10x1.5 bolt and had the Perma-Coil kit on hand already. Sweeeeeet. Strange though, the threads seem dirty like they've BEEN stripped for a bit now. Hmm...
Installation of my 88' Beretta GT flywheel went without a hitch (45 bucks at Kragen after core - they accepted my TDC FLEXPLATE as a core! Hahah...). They didn't have an 88 Fiero flywheel on hand but they had the flywheel for an 88 2.8L Beretta for cheap, cheap, cheap... go figure. It's neutrally balanced, and has the right bolthole pattern and clutch pressure plate bolt holes. The Spec Clutch installed like any other clutch, no big deal there. Notice the last picture - I use metric socket head cap screws to hold my pressure plate in place. There's a couple reasons for this. One, they're my favorite type of bolt in the world... I'd put together everything with them if I could... yeah I know I'm wierd. Two, they're strong as f***! Notice that it says "12.8" on the rim of the bolt. Good stuff. When installing my RAM clutch on my 2.8 a couple years ago, I managed to snap one of the OEM bolts off like it was made of copper. Needless to say there was quite a few 4 letter words expressed, and after sleeping on it for a day, the broken piece spun out of the flywheel at the touch of a finger - whew. Not knowing where to get OEM bolts, I went to the local hardware store and picked up 6 socket head cap screws of the correct length and thread and I've never had a problem since. They stood up to 2 years of hard service without a hitch. I've decided to use them here, too.
As I've mentioned before, my throwout bearing had some odd wear, as did the spring fingers on the clutch pressure plate. I also took a pic of the input shaft sleeve - does this look alright to you guys? The bearing slides smoothly up and down without hangups, even on the cleaned and dry shaft (I realize now how bad that'd sound out of context...)
Now for my very first actual modification to the car itself in the process of this swap - the front engine mount. I did mine just like Darth Fiero did in his thread - I took the mount and held it up to where it was supposed to mount, and mocked up how much needed to be shaved from the mount so it'd slip under the front timing cover. 5 minute mod. Oh - and should **** hit the fan, it'll still work just fine for the 2.8, if that's important to you.
The tape measure is just a guide - I suggest that you take your mount and mark up your own measurements, as it will be plainly obvious how much you'll have to shave off when you get to this point.
Once the motor mount is tweaked and everything is ready, it's time to test fit the motor onto the cradle. Check it out:
She fits! Bolts right in like the 2.8, not surprisingly. Forgive me for ringing my own bell... but the TDC looks so menacing just sitting there. Like it's gonna go install itself in my car and go roaring off to burn some ricers or something (I wish!). It's the sight that makes it all worth it. I'm also struck by how it looks like the motor belongs there, too. The 89 or 90' Prototype had one of these onboard, no?
Now I have to start the test fitting and clearing of obstructions in the engine compartment. Ok, so passenger side decklid hinge requires surgery for sure... and I've heard that the strut tower where it becomes the outer side of the dogbone mount might need some clearing. On an 87GT using OEM engine mounts, is there anything else that needs to be cleared? Is it going to clear the GT decklid? I heard notchies have a problem here sometimes. How much of a difference does the Dodge motor mounts make and how hard is it to implement them? I'm down to try it (especially the 79 interlock mounts), but I've heard that some people are having problems getting it all lined up. I don't have too much fabricating equipment on hand (a MIG gun running flux-core, that's about it), so I can't do too much machining and fab work. Any hints, tips, and words of experience to share as I get to the test fitting phase?
I will update again as progress comes along.
IP: Logged
10:18 PM
PFF
System Bot
AaronZ34 Member
Posts: 2322 From: Colorado Springs, CO Registered: Oct 2004
Every time I read one of these build-up threads I'm impressed with the amount of time it must take to upload all the pic's and type in all the details. This thread stands out in the detail department. Keep up the good work.
I too am doing the same swap only with an 88 GT. Luckily for me the smashed 92 GTP I bought for the swap had a fresh rebuilt engine with less than 5000 miles. I escape the emissions problems by applying for "collector" plates. Here in Ohio this collector status exempts us from emissions testing. Good thing the Fiero is on their list of collectables.
------------------
[This message has been edited by SKIDMARK (edited 10-17-2006).]
Thank guys - I hope to get the cradle bolted into the car today, we'll see how it goes. I need a new dolly, because the one I'm currently using is the biggest piece of ______ ever. The wheels refuse to turn the direction I'm rolling it so I've been DRAGGING 600+ lbs of motor, tranny, and cradle around, and it's not so fun. Update later.
IP: Logged
04:34 PM
crzyone Member
Posts: 3571 From: Alberta, Canada Registered: Dec 2000
More progress today. I made a new dolly out of 2x4's, 2x6, and 4 casters I bought from Home Depot. It's the right height to easily clear the legs of my cherry picker, holds the cradle securely, and it actually ROLLS. My old "1000 lb. moving dolly" soon became a glorified sled, as the wheels decided to stop turning and rolling. Let me assure you that it *sucks* dragging about 600 lbs across the garage floor while trying not to crash it into the car, my leg, etc. I tried to get the cradle mounted up, but didn't quite manage to get it all the way in. I've found a few things needed to be removed or cleared for the motor to fit that isn't common DOHC knowledge (at least not to me). Ok, the thing about the passenger side decklid hinge needing to be trimmed is obviously true. It turns out that I had to remove the cooling pipes for the 2.8 alternator and coil, the cruise control solenoid and vacuum can, and I had to cut into the part that goes from the dogbone mount to the strut tower (which I suspected but wasn't sure of). After all of the cutting and grinding the motor STILL hits the hinge, and interferes with the dogbone mount itself now. WTF? I have more room to cut the hinge back some more, but still... This is all on OEM rubber mounts in an 87' GT.
I'm going to look into using 79' Dodge 318 truck mounts (75' = no interlock, 79' = interlock). I'll be a guinea pig if nobody has used interlock mounts yet, assuming that they work. With the room Dodge mounts would give me, it'd solve a couple of clearance problems simultaneously. Darth, if you're reading this (or anyone whos used Dodge mounts on this motor), I would be most grateful for any information on what you did with the mounts, how they worked out, how difficult, how much lower it set the motor, etc.
I gotta say, this is excellent documentation. I'm watching and learning. All your pain and suffering will help a lot of people... including me. If you decide to do the Dodge mounts, I hope you show as much detail. When I tried it with my junk motor and spare cradle, I had fitment problems. But, I didn't spend a lot of time trying to work it out, either.
MY current plan is to use a poly front trans mount and the dodge mounts for the rear trans mount and the frotn engine mount.. this should rotait it back just enough to help with fitment as well as access to the oil fill cap etc..
BIG UPDATE: 79' DODGE 318 MOTOR MOUNTS (INTERLOCK) WORK!! YES!! Read on to see the installation walkthrough...
I just got the cradle mounted up a couple hours ago. I'm totally stoked! I used motor mounts from a 1979 Dodge 318 2WD truck - these ones have the safety interlock on them, should they fail. The way the interlock is constructed doesn't seem to make much difference for use as a front mount, but will work should a transmission mount fail. Thanks to Darth Fiero for the original idea.
I was worried last time I tried to mount the cradle up with OEM mounts. Yes it makes things easier, but I was hitting the dogbone mount itself, and I was still hitting the hinge even though I had cut a big chunk out of it. Stock mounts also seemed to be pretty soft, allowing a good deal of engine rock with the push of a hand. Needless to say that it'd stress the dogbone out pretty good unless it was strongly built. I had read Darth's thread on his 3.4 TDC/86 GT buildup and he used motor mounts from a 75 Dodge 318 2WD truck. These mounts are considerably thinner than stock mounts, allowing you mount the motor lower in the engine bay for clearance, and a lower CG. They're also much firmer than stock rubber. I had also read somewhere that 79' Dodge motor mounts were the same, but with the addition of safety interlocks which I think is a nice feature to have. I read around, but I don't recall seeing anybody sucessfully use the interlock mounts (though I'm sure somebody has), so I figured I'd be my own guinea pig and and try them out myself.
In the spirit of documenting all the little details that I wish I had access to before I began this project, I come bringing pictures:
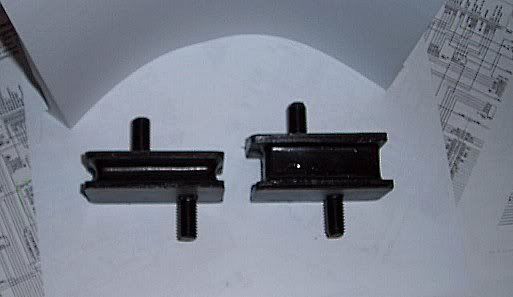
That's more like it. This is the 79' Dodge truck mount. I asked for a motor mount from a 79' D100 2WD with 318 CI motor. They'll ask you if it's 2 or 4 barrel, but I don't think it makes a difference in the part you receive. It's Anchor part number 2469. You'll need 3 of them. Either that, or two of these, and one 75 (non interlock) mount for the front engine mount, since the interlock doesn't really do much for the front mount.
Alright. I'm going to say upfront that you drill holes in your cradle and burn up your stock mounts AT YOUR OWN RISK! Use these as a guide, but double check everything, ok? Don't just do this unless you've verified that it works and I'm not a dumbass. This may also only apply to an 87GT 5Speed.
With the stock front motor mount, the centerline of the top studs on the rubber mount are spaced out 5/16" toward the transmission side of the cradle compared to the centerline of the bottom mounting studs. This means that the centerline of the motor mount bracket holes have to be kicked out 5/16" towards the transmission compared to the holes in the cradle. They couldn't just make it simple and make bolt spacing and pattern the same... (the 4 cylinder mount really sucks). I decided to drill the hole for the dodge mount 5/16" out towards the drivers side and 9/16" towards the front - right underneath where the trunk side mount hole in the motor bracket would be. Now the space between the centers of the studs on the dodge mount happen to be 7/8" apart. So I drilled my mounting hole in the motor bracket 7/8" over from the trunk side mount hole. Therefore, when the front bracket is bolted onto the dodge mount, and the dodge mount bolted into the hole on the cradle, the front bracket will be located in exactly the same location as stock, just lower. You'll need to hit the hardware store and buy some 1/2" Coarse thread (13 tpi?) nuts, and some good 1/2" washers. My local OSH has bags of 1/2" hardened washers, so I bought those. I think it's the most vital to have the front mount lined up straight, or your whole drivetrain will end up off kilter, and that's no good. Note that once you get done, you will likely need to shim the front mount up about 1/4" or so. Darth seemed to do the same in his TDC build thread as well, so it'll probably be nessicary.
The rear mounts are easier to do, once you figure out how to tweak them to fit. You take the two OEM mounts and put a torch to the mounting bracket side. Burn baby, burn! Once the rubber melts off, shitcan the top part and the rubber and hang onto the bottom part which mounts to the cradle. You'll notice that it already has a hole in it, and it's located exactly inline with where the mounting stud was... very useful. Drill it out to 1/2". Do this on both tranny mounts. Take a dremel with a cutoff wheel, and proceed to cut an adjustment slot, based on the hole you just drilled. Make it so you can adjust the mount UP. About 1/4" should do, but make it more if you can. On both of the dodge mounts, there is a raised "button" that may cause interference - grind it down flush. However, if you don't want to, I believe that you can space the mount with a single washer and it'll clear fine. Washers = adjustment tool. You're going to install the mounts so the stud going to the transmission bracket will be lower than the stud going into the cradle bracket. On the rear transmission mount, the interlock will hit a "wall" that's part of the bracket, though it doesn't serve any purpose. Use a Dremel, angle grinder with cutoff wheel, etc. to neatly trim this wall down to where the interlock will clear with space to spare. Set the dodge mounts into the cradle brackets, and space them up about 1/4" in their slots and cinch em down. You might have to play with it some, but you SHOULD be able to bolt the transmission into the mounts. Don't freak out if it doesn't work at first - you might have to put the cradle brackets into the cradle last.
After modifying your transmission mounts to take the dodge mounts, you should be able to mount up your transmission:
Make sure everything is alright and that the mounts aren't badly tweaked, and then install your motor. You might have to shim your front mount up about 1/4" or so to get the motor sitting level.:
I was expecting to have to clearance parts of the cradle to prevent metal to metal contact in low spots. Darth reported having to use the BFH technique to clearance an area between the 4 speed transmission and the cradle. Luckily, I didn't run into ANY trouble spots with my 5 speed. no clearancing required! Long live the Getrag...
This concludes Chris's guide to Dodge Truck motor mount useage and installation.
Anyways, this is the motor as I have it in the car:
I'm still wary about the dodge mounts coming apart even with the interlock..
My plan is still to use the poly front trans mount (takes the most abuse from pulling) that I got from Rodney Dickman and use that dodge truck mount for the front engine mount and a thinner dodge druck mount for the rear trans mount..
should drop the back end about 1-1.5" and rotate the oil fill cap away from the rear window..
Kohburn - Interesting concept. The mount on the outside would then me in compression. However, unless you use one long bolt to bind the two mounts together, the top mount would still be in tension and suseptable to tearing apart.
In addition, I was examining the mouting brackets and they look weak. Has anyone ever experianced any metal fatigue with the front (firewall side) tranny mount?
Roy
I don't think anyone has had a mount strong enough to fatigue the stock metal.. all the poly options come with new stronger brackets..
for my design I was actually going to try to weld a strap from the top to bottom - basicly suspend the bracket in the middle
Kohburn - that's a cool idea. The way I have it mounted up puts the firewall side head pretty darn close to the firewall. There's enough room that I don't care too much, cept it's going to suck trying to get to the dipstick tube and finding space for the firewall passthough. I do plan to turn the firewall passthrough upside down, as somebody suggested. There is plenty of room like no tomorrow on the trunk side of the motor though - It sure wouldn't hurt any to rotate the motor back to an extent like you mention. I might try some shims or something as an experiment later.
Edit: Oh, I also forgot to mention that these Dodge mounts were bigger and tougher than I had expected. They may have single mounting studs but they're 1/2" thick. The backing plates are about 3/16" thick. Very rugged. Used as two point transmission mounts, they're subject to a similar array of shear/tensile forces that you'd expect to find in their native 318 application, except with less torque. I was actually worried about the OEM tranny mounts ripping apart, but these seem much stronger to me. If anything is a weak point, I'd say it's the possibility of the cradle front mount bracket bending where it's bolted to the front mount. However, even that is pretty strong, and I don't think there will be much front mount movement saying how stiff the motor/tranny is mounted. A good dogbone should dampen the rest of the movement.
[This message has been edited by Blue Shift (edited 03-02-2005).]
I was a bit concerned about the front motor mount bending the thin mounting point on the cradle the way I had it set up. With the Dodge mount, it ends up bolted through a single hole near the edge of the cradle mounting point, which probably puts a good deal of stress in a small area which could bend or crack something. Since the motor needs to be shimmed up about 1/4" on the front side anyways, I came up with a simple spacer made out of 1/4" steel that would spread the load over the entire mounting point like the OEM motor mount, also incorporating the unused front side bolt hole. It's so solid now, the only thing that could break would be the mount itself, and I seriously doubt that.
The other thing I did today was dropping my fuel tank to check it out and to investigate a fuel vapor smell that I thought I caught a time or two. Turned out that the seal between one of the pipes and the metal "disc" that locks into the tank had cracked, so I brought out the torch and carefully resoldered it. If you ever have to do this, you'll need to remove all plastic items from the assembly before soldering, obviously.
This is my fuel pump - I'm using a 1987 Corvette fuel pump. Unlike some other pumps, you won't have to touch a thing, it's totally plug and play, a drop in replacement. Though I've heard that it pumps the same amount as the Fiero pump and it's noisier (can anyone verify/disprove this?), I find it reassuring that it's OEM approved for a 250-300 HP V8 so it should be just fine for a 200-250 HP V6.
I was under the car putting the tank in, when I took time to trace the tank vent line - instead of going straight to the charcoal can, it goes to this thing by the passenger rear wheel well, then over to the can - what is this, and what does it do...?
I was under the car putting the tank in, when I took time to trace the tank vent line - instead of going straight to the charcoal can, it goes to this thing by the passenger rear wheel well, then over to the can - what is this, and what does it do...?
My guess is its just a vapor expansion tank.. from what I can tell with the wiring the fuel vent purge solenoid is wired to open at the same time as the egr valve.
Question for you guys: I've heard that A/C lines from an 87' coupe will work with slight mods on the 3.4TDC motor. Is this true? Will it only work in a notchie or has anyone done this on a GT? I'm thinking that my 87' GT lines aren't long enough to do the job, though there's a 87 5 speed 4banger at a local junkyard (am I whacked or do other people feel sorrow to see a Fiero sitting in a boneyard?). If I have good reason to believe that I can use the A/C lines, I'd go snatch them and give em a new lease on life.