is that a new water pump? GM or other? Do you mind saying how much...... $$??
looks VERY nice.......... it just HAS to run great when it looks that good!!
I have a brand new 3.4 DOHC water pump if you are interested, it came out of my 1994-1995 GM crate engine, which has never so much as been turned over. It will work with any year DOHC. You can feel free to make me a reasonable offer, I'll call around the stores and beat their prices enough to make it worth it!
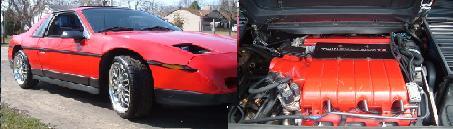
It actually IS cleaner than the crate motor I have by a significant margin... go figure. The front cover, LIM, plenum, valve covers, and a mighty buttload of other things were glass bead blasted. The heads were blasted too by the shop that rebuilt em. I'm mostly a tech-head and have no abilities in the aesthetic side of things, but I'm hoping to keep a nice balance of clean aluminum, black, and blue on the motor to match the same colors on my car. So far, I like how it's turning out!
As for the pump, yeah it's brand new. I got mine for 25-30 bucks from Kragen. You can actually get a rebuilt one for dirt cheap from the same place, but I decided that if the motor was going to be like new, I'd make myself feel better by getting a new one. I have reason to believe that the GM one has a little better quality to it (ie rotor casting on the pump), though I doubt it'll make any real world difference.
I'm back in school now and working, but I'm actually finding myself with more time (?!) to work on it somehow. Hopefully, it won't be much longer. Stay tuned.
[Edit]: Typo fix
[This message has been edited by Blue Shift (edited 08-25-2005).]
Originally posted by fiero308: Intersting about the brake tubing; did it fit into the block nice and tight? THAT is something you don't want popping out.... (messy!!) OR (now that I think about it) wiggling up/out by an inch and thus giving an inaccurate dipstick reading (resulting in overfilling the oil.....)
I think he just welded the brake tubing onto the top where it broke off; not where it actually enters the block.
A little more today. I sprayed some carb cleaner through my injectors, and they all spray a clean pattern and don't leak. One of the injectors buzzes lightly when fed ripple DC from my battery charger, while the others don't. Resistance all measures the same for each injector. I'm going to ASS-U-ME that it's not going to be a problem. I did find out that my new (87') Corvette fuel pump is already dead! Damn it. The stupid thing must have frozen up while it sat. The tank is almost empty, so that probably had a lot to do with it. I read somewhere else about a higher flowing fuel pump that'll drop right in as well. The worst news however, is that I went to flush the dust out of my intake manifold - and ended up having glass beads come out. Apparently it's the same problem I had with my oil pan - beads get stuck in the oily crap inside and remain untill knocked loose or the crud is dissolved. From what I know, a single glass bead can toast an engine in seconds, so this isn't going to do. I left it soaking in gasoline for awhile, which seemed to dissolve a bunch of stuff and I don't have debris coming out anymore. I'm going to take it to the machine shop and see if they can ultrasonically clean it to get any more crap out of the crevices in the manifold. I swear, I'll never bead blast anything again that goes anywhere near an engine, no matter how good it looks!
My new oil pan came yesteday while I was at work - it's a "spectra premium" piece from Rockauto - seems to be almost identical to my stocker, and sliiightly heavier (thicker gauge material?) I installed the windage tray and the oil pump as well. I've been reading about the necessity of brazing the oil pump pickup tube to the pump so you don't drop your pickup (after which your engine will surely die). Problem is that I don't feel so comfortable using an Oxy-Acetyline torch to heat the $^&% out of it until you can braze it. Let's say I've had bad experiences trying to braze before. Now I've been told that you can't weld cast iron - they use a special nickel based welding rod to weld broken castings and such. I took my old oil pump, cleaned it thouroghly, and tried sweat soldering the pickup tube in - no dice. It didn't want to stick to the cast iron, though it stuck to the steel tube ok. Finally, out of curiosity, I pulled out the MIG welder and put down a short bead hot and fast - and it worked like a charm. I dropped it into a bowl of water and it didn't crack from thermal shock, either. Hmm... Cool. I picked up the pump with a bare hand, and the heat was local enough that you could hold it with a bare hand - no worries about ruining the bypass springs temper. So that's what I did... we'll see how it works.
Originally posted by Blue Shift: Try this at your own risk. I love my MIG welder. Both beads would have to crack, and even if they do, it would probably still mechanically lock the pickup tube in. The fact it's not structural is good:
Yes, but you see... the engine hoist is very versatile as well. As you will see.
Joking aside, I made fairly decent progress on the project yesterday. I started out by finishing off a few things like assembling the idler pulley and installing the belt, and basically getting the motor ready to go back on the cradle. Before I did, I took time out to drag the cradle cart outside while it was manageable and cleaned it and installed new poly bushings on the mounts. I have reason to believe that poly is as stiff is as I'll need to prevent cradle flex (unless you're measuing with a strain gauge or a dial indicator), though it'll flex in case of an emergency before the steel does. After I installed the poly, I got everything ready and put the motor on the tranny. After a couple minutes of head scratching and trying to get the thing to mate up, I lined the engine and tranny up by sight as best I could and it clicked right on with a slight nudge. Sweeeeet. Don't forget to lube your input shaft, TOB, and fork tips and bearings. The coolest part, was that it was like putting everything together from a kit, since I had already gotten all the mounts set up and ready to go. Everything just dropped right in, no problems. The last thing I did was bolt the starter on then took a minute to step back and admire before calling it a night (morning, really, 3:30AM).
***Chris's guide to poly cradle bushing installaton*** Time to install that poly cradle kit. For those of your who fought with those front bushings and got really mad, all I can say is that fire solves damn near everything (Fire is very versatile, you see...sorry). I used the blowtorch method - just point the torch at the bushing and the metal sleeve and let it cook for a few minutes - don't be a'feared - roast that sucker and it'll push right out with no damage to metal parts. Be careful, I did get a couple drops of burning rubber stuck to a couple knucles, which didn't feel so good. I had no clue that a burn can ache until yesterday... http://img.photobucket.com/albums/v249/pyromaniacal/TDC%20Swap%20Project/Final%20Assembly/Burn_Baby_Burn.jpg
After you push the bushing out, cool off the cradle and use some solvent or something to clean the sleeve out really good. The new bushing won't push in by hand - some people report that freezing it works, but I just took a rubber mallet and whacked it in - it pops right in with no problems. I would suggest sliding the steel core out before hammering in the bushing, then tapping the core in last. You won't need any sort of lube for the cradle bushings, though it's essential for suspension bushings. http://img.photobucket.com/albums/v249/pyromaniacal/TDC%20Swap%20Project/Final%20Assembly/Front_Installed.jpg
Kohburn apparently used the lockwashers from the AT flexplate with success, and I decided to use hardened 3/8" washers from OSH, as they fit very well. Unfortunately, it doesn't need one, but two to space it correctly. The bolt heads still sit under the surface of the flywheel, and when I put the disc on there, there's no way it could hit them unless the disc suffered a catastrophic failure. Stock torque for the GM bolts is 61 ft lbs. ARP says to torque their bolts to 75 ft lbs with ARP assembly lube, or 85 with 30W oil. Since there's more threads in the hole, I decided to go with ARP's specs, except I used red loctite instead of oil, which will put me somewhere inbetween the GM and ARP specs which I think is safe. Plus, they aren't going anywhere. http://img.photobucket.com/albums/v249/pyromaniacal/TDC%20Swap%20Project/Final%20Assembly/FW_Installed.jpg http://img.photobucket.com/albums/v249/pyromaniacal/TDC%20Swap%20Project/Final%20Assembly/FW_Installed2.jpg
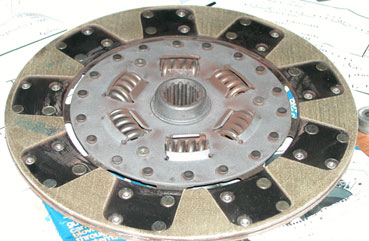
Clutch going back on. I installed the pressure plate with socket head cap screws after my stockers twisted off like like they were made of copper years ago. These things are stamped "12.9" so they're far stronger than stock. Steven actually had his pressure plate bolts come LOOSE on him (tightened to 18 ft lbs), causing all sorts of bizzarre clutch problems for him, but thankfully he caught it before anything bad happened. My W-body book actually says to tighten them to 6 ft lbs, which I ignored. If I recall correctly, Fiero spec is somewhere around 15, and due to the above, I decided to go to 20 plus red locktite. Ain't goin nowhere. http://img.photobucket.com/albums/v249/pyromaniacal/TDC%20Swap%20Project/Final%20Assembly/Disc.jpg http://img.photobucket.com/albums/v249/pyromaniacal/TDC%20Swap%20Project/Final%20Assembly/PP_Installed.jpg
I should take the time out to thank everybody for the comments on the motor, I'm glad y'all like it! I just did a bunch of work ripping out old nasty fiberglass insulation in an attempt to make my engine bay not look so bad in comparison!
Joshua, what do you mean about the clutch hub? I'm pretty sure that it's the only way it goes - even if you removed all the flywheel bolts, you couldn't install the disc the other way around. That being true, the disc is exactly as it came from the package, and appears to fit fine. However, if you see something outta whack, I definitely want to know! {/heart attack}
IP: Logged
11:18 PM
Aug 31st, 2005
joshua riedl Member
Posts: 1426 From: watertown wi USA Registered: Jan 2004
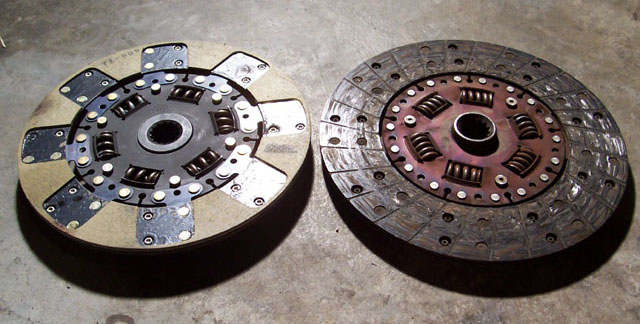
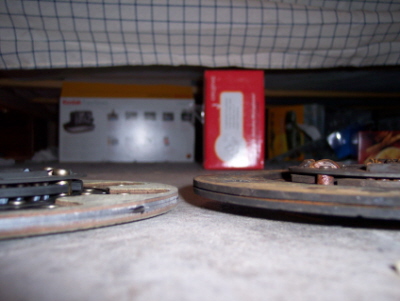
your first picture shows just the disk on the flywheel. the center part of the disk should be flat. spec clutches tend to come with an extended center hub. look at your old disk if you can. it will be flat on the trans side. the spec one looks like it sticks out a good half inch. mine did. it took out the throw-out bearing and puts stress on your thrust bearing. now i have a oil flutter on my gauge at idle that wasn't there before the clutch swap. it's pretty common and i can't guarantee yours is like that unless i can see a side shot, but it looks like it is. i would pull the trans off and compare it to your old clutch. http://img.photobucket.com/albums/v249/pyromaniacal/TDC%20Swap%20Project/Final%20Assembly/Disc.jpg this is the one i'm refering to.
[This message has been edited by joshua riedl (edited 08-31-2005).]
IP: Logged
12:02 AM
t76racer Member
Posts: 233 From: Salt lake, Utah, Salt Lake Registered: Nov 2004
Hey Blue, That color is really good looking! I felt the same way with my swap, everything just fits like it was meant to be there huh? Keep it up I love all the pics!
IP: Logged
01:23 AM
Steven Snyder Member
Posts: 3326 From: Los Angeles, CA Registered: Mar 2004
your first picture shows just the disk on the flywheel. the center part of the disk should be flat. spec clutches tend to come with an extended center hub. look at your old disk if you can. it will be flat on the trans side. the spec one looks like it sticks out a good half inch. mine did. it took out the throw-out bearing and puts stress on your thrust bearing. now i have a oil flutter on my gauge at idle that wasn't there before the clutch swap. it's pretty common and i can't guarantee yours is like that unless i can see a side shot, but it looks like it is. i would pull the trans off and compare it to your old clutch. http://img.photobucket.com/albums/v249/pyromaniacal/TDC%20Swap%20Project/Fin al%20Assembly/Disc.jpg this is the one i'm refering to.
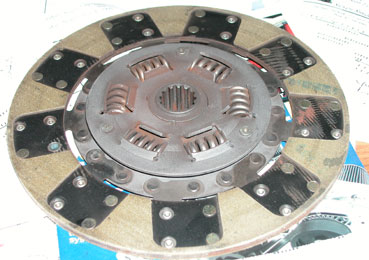
Here are my pictures of the CORRECT disc. The whole center section is different though not significantly. You can see the splined hub is flat on mine, and compared to yours the spring area is held on by a different # of rivets and the springs are also larger and thicker. Flywheel side:
Pressure plate side:
The splined hub must be nearly flush on this side or you have the wrong disc!!!
Note: This is a Spec Stage II purchased at beginning of 2005 from an aftermarket supplier of Spec clutches. I don't remember their name.
[This message has been edited by Steven Snyder (edited 03-09-2006).]
DAMN. Now I'm pissed. I just got done comparing photos and it looks like the hub on my Spec 2 does indeed stick out enough to be a concern. The tranny went together fine with no issues, though it looks like the spring fingers only have 1/2" to move before they get pinned between the TOB and the hub. So after taking time out to repeatedly bang my head on my desk I went downstairs and pulled the engine off the cradle and compared my disc to my old RAM disc:
Ok, Josh you definitely get a plus... and a case of beer of your choice if you're ever in the area (and I'm against alcohol, too!). Now I gotta wait for Spec to replace it. More news as things happen.
[This message has been edited by Blue Shift (edited 08-31-2005).]
IP: Logged
04:20 AM
Sep 1st, 2005
t76racer Member
Posts: 233 From: Salt lake, Utah, Salt Lake Registered: Nov 2004
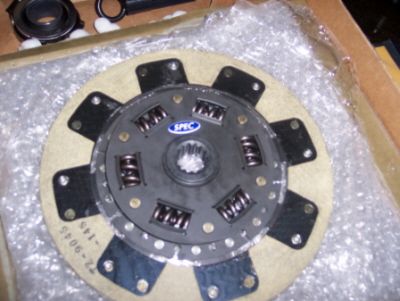
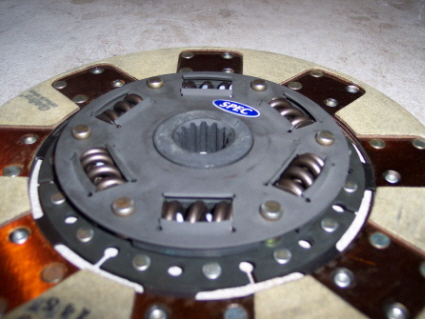
On mine there is another sticker like the one here that says "Spec" it is on the other side and it has the letters "FW" so I installed it with the "FW" on the flywheel. This side is on the pressure plate side. Sorry I dont have a pic of the other side, but now I wonder if mine is installed correctly? I have driven it and dont notice any problems but if it is wrong how will I know? Not hijacking I hope this pic helps.
IP: Logged
08:31 PM
PFF
System Bot
joshua riedl Member
Posts: 1426 From: watertown wi USA Registered: Jan 2004
judging by your picture and your clutch release problem thread i would say it's the clutch disk. i was actually going to say something to you when i saw your thread but i've gotten into some arguements with people on this subject before so i try not to speak up unless i see a picture. i would pull it out before you wreck your engine.
IP: Logged
08:48 PM
t76racer Member
Posts: 233 From: Salt lake, Utah, Salt Lake Registered: Nov 2004
!!! Josh, I will definately take a look as soon as it is done at the exhaust shop. It did give some high pitched screeching sound during the first start. I will definately be p*ssed if it damaged something. Upon studying your pics, and mine and Blues, mine looks more like his and not like yours, so mine is probably wrong too. I will be swapping my 88 cradle so I will have the opportunity, how long did it take to ruin your throwout bearing?
Blue Shift, What has "Spec" said about this, are they going to replace it?
IP: Logged
09:17 PM
joshua riedl Member
Posts: 1426 From: watertown wi USA Registered: Jan 2004
i didn't post pictures but mine looked just like the comparison shot above. i knew right away when i started it. it had the screeching like you described. i cycled the clutch a few times and decided it was enough. i pulled it all apart immediately because i was so pissed, i thought i screwed up but at the same time i didn't see how i could have. the bearing cracked and melted to the transmission input shaft. i had to pry it off. i sent spec pictures and they sent a new disk without any issues. this was at least a year ago, it's hard to beileve they are still sending them like this. the only thing that really worried me was the extra stress on the thrust bearing but spec said the throw out bearing was designed to break up to prevent problems. the bearing did break but time will tell if i have future issues. sorry i didn't warn you earlier.
T76 - I think you're in the same boat as me, dude. Your disc is identical to mine, minus the stickers. See the splined hub in the very center that rides on the input shaft? On all the OEM clutches (and the RAM HD clutch I ran with no problems), the hub is dead flush with the surface of the spring housing on the side facing the tranny. Yours sticks out like 1/4 of an inch or so, like mine does. From Stevens pictures, his doesn't even though it's the same 5 speed Getrag disc as mine. Matter of fact take a good look at the pics Steven posted up of his disk and compare it to yours and mine - everything, from the number of cutouts in the kevlar, to the number and style of rivets holding it together is different. But the real problem is that the clutch hub is just like OEM on his (hub is flush on the tranny side, and sticks out into the flywheel side) and it's not on ours.
I totally understand what Josh is saying now - that protrustion bumps into the input shaft sleeve and rubs until it gouges a nice fat ridge, blocking the TOB from moving. It would require tranny disassembly to push out and replace the bearing/sleeve, and that's not something that could be any fun. That, and looking at it, the spring fingers on my clutch have like 1/2" to move before hitting the extended hub. Also as Josh said, if the hub sticks out too far, the throwout bearing could also push against the clutch disc, which would press on the flywheel, which would shove your crank into the thrust bearing - having the fork directly shove your crank into the thrust bearing couldn't possibly be healthy for it.
I called spec, they wanted to see pictures, so I sent them 8 different pics and a link to the thread where the clutch problem was first reported on here. The guy who handled my call said he sent it to the warranty tech, and they'll get back to me later today. Saying as though it's 6:30 here, it's probably going to be tomorrow when the news comes through, so we'll see. The one thing I forgot to send was a picture of the input shaft and the sleeve surrounding it, so if anybody else gives them a call, see if you can send off a pic of the input shaft too.
I'll post what they tell me when I get word from them.
IP: Logged
09:36 PM
t76racer Member
Posts: 233 From: Salt lake, Utah, Salt Lake Registered: Nov 2004
Well guy's I have to say thanks, Oh those are Stevens pics (thanks steve) I am glad (or not so glad) to have atleast caught the problem before to long, I hope its not to late.
I am kicking myself for not comparing the old disk to the new one, I figured it would be the right part. I doo understand now how it is definately not good. I will wait and see what they tell you Blue, before I call since my car is in the shop. This could have turned out really expensive for me too, that beer offer is going to stand in my town too!
IP: Logged
10:23 PM
Sep 2nd, 2005
sspeedstreet Member
Posts: 2306 From: Santa Maria, CA Registered: Dec 2002
Ok, I got the last word back from spec. They said to me:
"Conrad,
Please send me your shipping address info and a phone number. I will get you a new disk out soon as possible. Also how long ago was this unit purchased and was it from SPEC or a distributor?
Thanks,
Daniel"
For those of you wondering, I did actually order straight from SPEC, about 8 months ago. How bout you T76? Anybody else? I'm curious.
IP: Logged
05:29 PM
joshua riedl Member
Posts: 1426 From: watertown wi USA Registered: Jan 2004
I ordered mine about 3-4 months ago tops. I also ordered straight from Spec. I am glad that they are replacing yours, I will be contacting them this week. Are you required to send the other (wrong) one back?
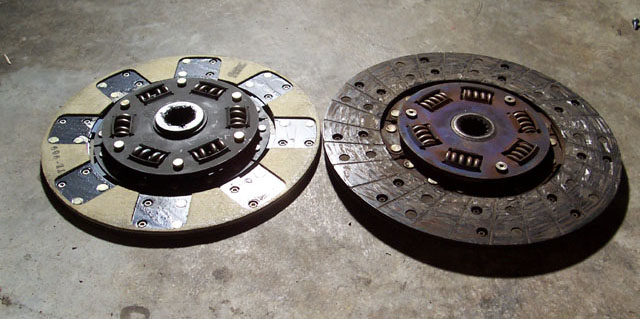
Well, my clutch came today and I'm comparing it to these two pictures Blue Shift posted earlier. It appears to be the same as the one on the left but with the hub shifted toward the flywheel side. I also just noticed they're dual springed, a smaller spring wound the opposite direction inside the larger one.
It is definitely not like Steven's. My splined hub section is flat and about 1/2" wide (same width but stepped on the flywheel side. Looks like it should work. Steven, is your's a II, IIa or III? The springs in yours look massive.
BTW, I ordered thru Clutch Depot, but that's another story.
[This message has been edited by sspeedstreet (edited 09-06-2005).]
IP: Logged
07:17 PM
Sep 19th, 2005
t76racer Member
Posts: 233 From: Salt lake, Utah, Salt Lake Registered: Nov 2004
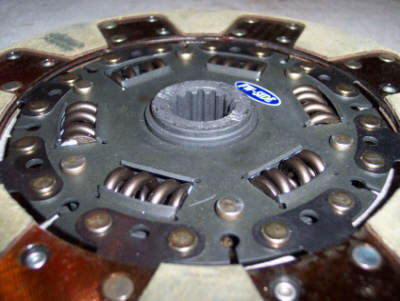
I am wondering if you got your disk back yet from "Spec"? I have mine back and I want to compare pic's. This new replacement still doesnt look like Steven's! Here is the tranny side, now the hub doesnt poke out as much as the last one (my post above)
Heres the flywheel side, doesnt look like stevens or my old clutch that did work!
Here is a pic of them both flywheel side down.
So did "Spec" send me the wrong clutch again? Shouldnt the flywheel side have enough of the hub to actually insert into the flywheel some.
This is getting fustrating, The car is done and I cant drive it.
IP: Logged
10:14 PM
joshua riedl Member
Posts: 1426 From: watertown wi USA Registered: Jan 2004
Ok, I just test fitted this disk to my old 2.8 flywheel and the "flywheel side" hub does not touch the actual flywheel ,only the friction surface material does. Looking at all the pics it looks like the "splined hubs" are sometimes installed backward. Just to make it clear does it matter if the hub extends into the flywheel or not?
Hey you guys. T76 - you got the same disc as I did - just came in yesterday. I'm pretty darn sure that it's going to be fine. The only diff from the old (bad) disc is that the hub is installed the right way. It's flush facing the tranny so the hub isn't going to gall the $^&* out of the input shaft sleeve that the TOB rides on. The hub is supposed to stick out on the FW side, and it's machined to clear. My old tried and true clutch also has the hub sticking out on the FW side, so it's ok.
I've been slowed way down, but I'll be back with some updates in a few, including pics of the disc I have, and comparisons.
[Edit]: I failed to mention that I think Steven got an oddball disc - It works, but it must be an early version or something? Wierd.
[This message has been edited by Blue Shift (edited 09-20-2005).]