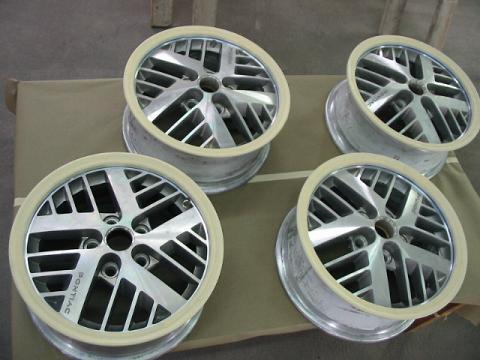
Some had sparked interest in my redoing my Indy wheels. Well, I have not done a thread like this before, but here goes. Bare with me.
The first pic I have, is after I had already got started. You will notice, one of the wheels on the car, had been replaced with a non Indy wheel, and painted, as it had the grey in the slots, under the white, the other three did not. Second from the bottom. More on this later.
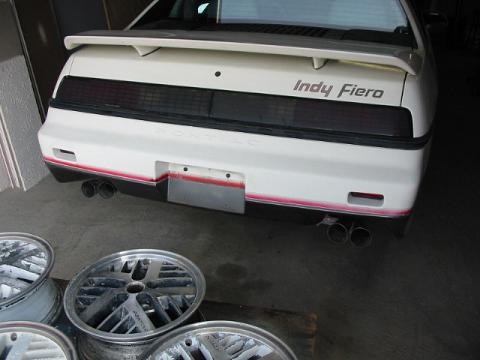
This pic is here, just to show the car exists...
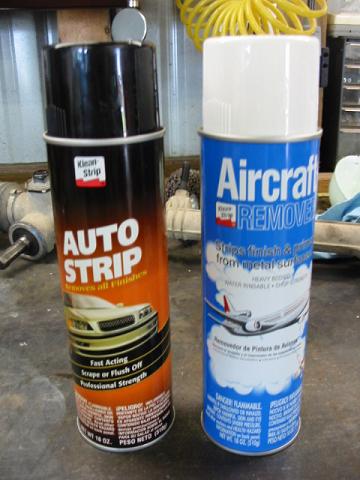
Here are the types of strippers I used. Did not notice much difference between the two, but maybe the blue can was slightly stronger. It was about 75 cents higher. I'm guessing most any auto paint type stripper will work. Used two full cans, and part of another. Don't get it on your legs by the way, if you are wearing shorts!
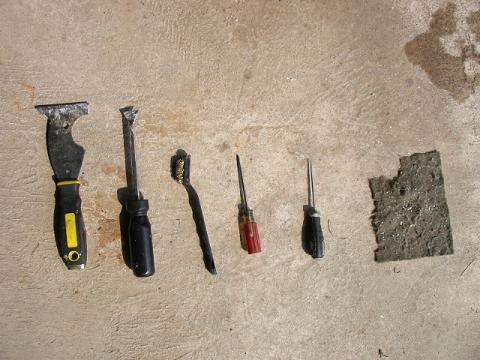
Here are my choice of weapons, to scrap, pic, and prod at the loose paint. Paint scraper, gasket scraper, brass brush, screw driver, seal pick, and far right is what is left of a scotch brite pad.
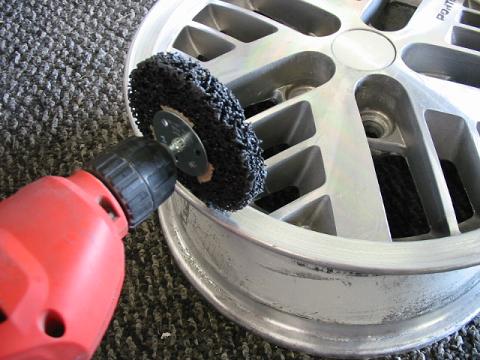
After the paint was all off, I used a paint/rust stripper wheel, to clean up the edges. I kept it at the angle shown, and followed around the edge, to keep the finish all going around the wheel. It worked real nice. It removed almost all the stains of where the wheel weights were, and gave it a real close look to the original machining done on the wheel, as far as I can tell on some wheels on my 84 SE. Once clearcoated, they should look real good.
IP: Logged
04:57 PM
PFF
System Bot
Lambo nut Member
Posts: 4442 From: Centralia,Missouri. USA Registered: Sep 2003
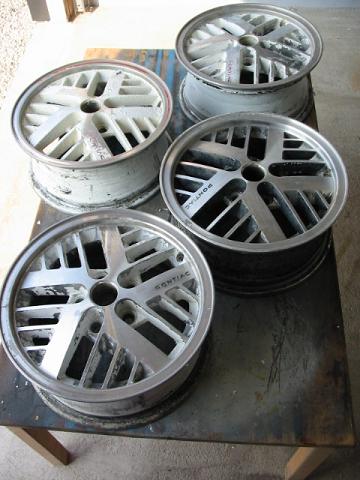
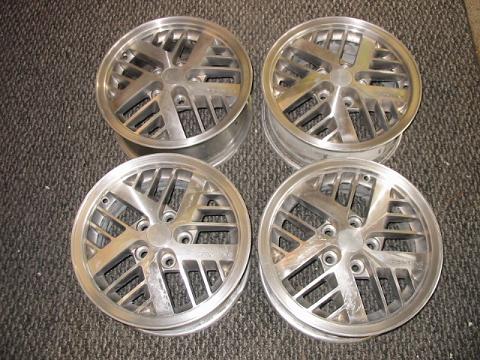
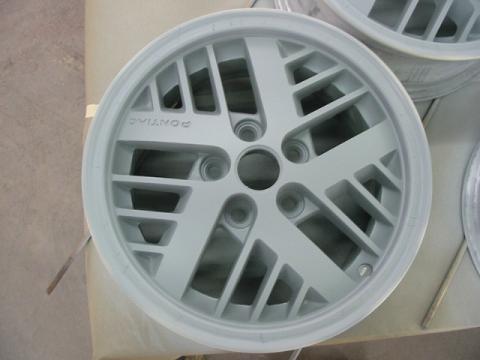
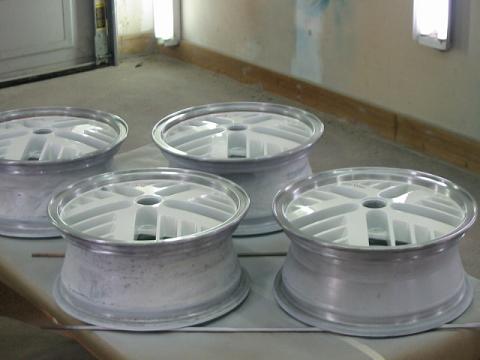
And here they are stripped, and edges cleaned up. I did not strip the back side. I will sand them smooth inside, and paint, as I am not going for a concourse resto, and plan on driving this thing some. Not even worried about the part that will be inside the tire when mounted. Only cleaned those surfaces with laquer thinner.
Now something I want to touch on, if anyone else has done this. I noticed, that the original wheels, look like they might have had the whole face painted, then the clean part that we see on the ege, was machined back off, to expose the metal underneath. Reason I say this, there is a lip I noticed, right were the white and the clean edge meet, a very small lip, but there on three of my wheels. I decided to try and check the thickness, to confirm this, and by golly, the Indy wheels seem to be (at my best attempt to measure with the micrometer), about 15 to 20 thousands thinner then the other wheel, at the outer edge. I was just wondering, if anyone else has an Indy wheel, and a non Indy wheel, to check my findings, or maybe this was done by a previouse owner, (yet I don't think so).
Kevin
[This message has been edited by Lambo nut (edited 09-10-2005).]
Hope to make more progress on the priming, and maybe some painting, on Tuesday. Paul let me know that the new wheel stripe decals will ship out Monday, so I was not getting in too big a hurry.
Kevin
IP: Logged
12:21 AM
Sep 15th, 2005
Lambo nut Member
Posts: 4442 From: Centralia,Missouri. USA Registered: Sep 2003
Masked them off, starting with a 1/4 inch, 3M plastic tape, for a good edge, then finished rim with three runs of 3/4 inch masking tape.
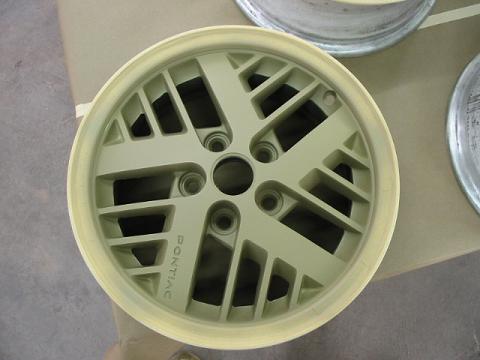
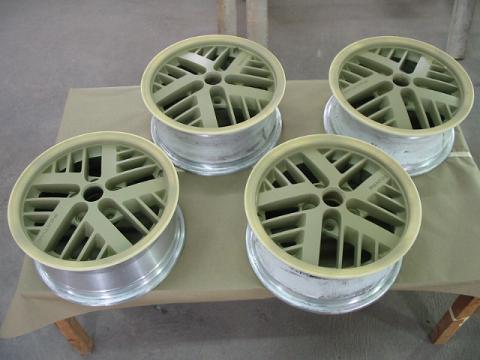
Then followed with two light coats of a Nason, two part mix, etching primer.
Yes I do know, that is one crappy color!
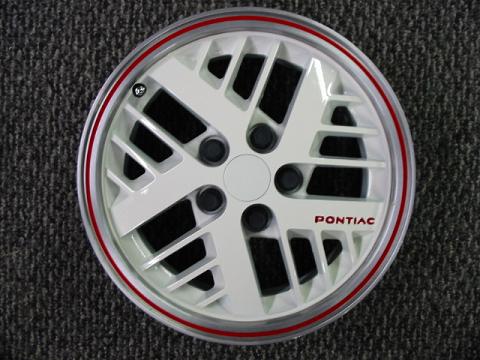
At this point, I am waiting to get my new wheel stripes, so I can get some touch up red to match, to paint the little PONTIAC on the wheel. Plans now are to paint the white, backside and front, then peel the tape, paint the PONTIAC, clear the wheels, then apply the stripe/decal. Will let you know how it goes!
Kevin
IP: Logged
10:03 AM
ohioindy Member
Posts: 2137 From: Wooster Ohio Registered: Nov 2003
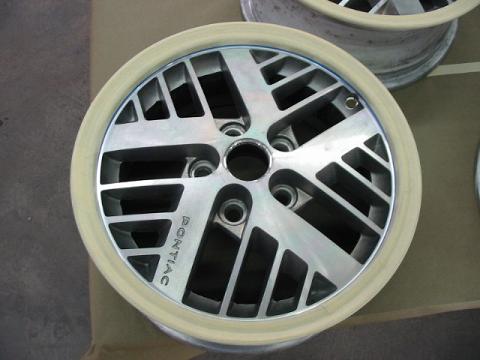
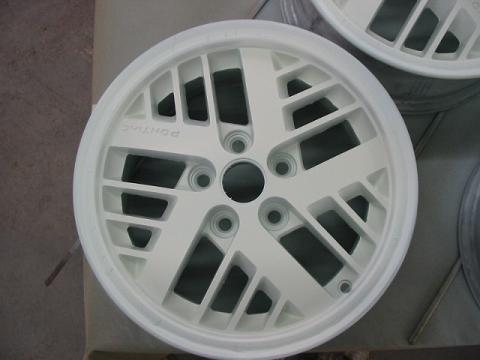
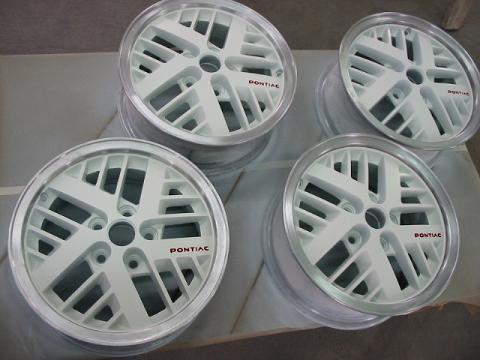
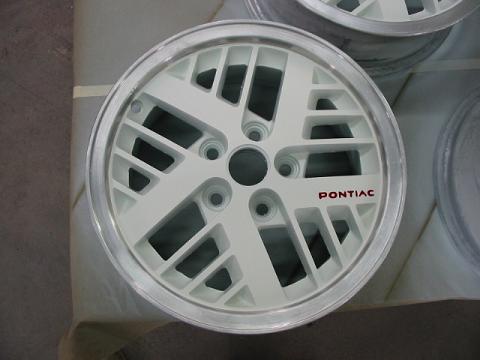
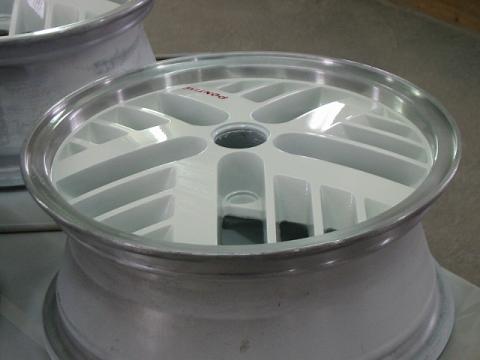
Here is a wheel after a coat of sealer. I use it all the time now, especially on white. I got some bleed through on a 74 Dodge Challenger I did once with GM Bright White. Learned the hard way. Anyway
Then after a couple coats of the body color white, using Dupont's Chroma base.
Here it what one looks like after the masking tape is removed.
Now on the next stage, the fun part of painting the little PONTIAC in the wheel. I've got an idea or two, just trying to decide which one I want to try first.
I was trying to list the stuff I used, as I go, but if I missed anything, or there is any questions, by all means, ask, or email. I have no secrets...
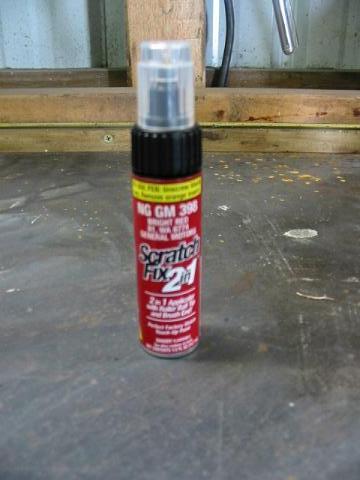
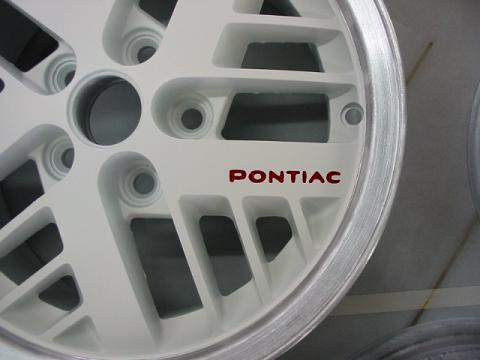
OK, last for today. I bought this paint for the PONTIAC lettering, looking to be as close as match as I felt I needed. Compared to the stripes I got from Paul. It is Dupli color GM 398, BRIGHT RED, code WA 8774.
I poured some out into the cap off a Chap Stick tube, and cut the very tip off a tooth pick. Not too much, but so it was not too sharp, and still fit in the letters with a little room to spare. This is what I ended up with.
Now I would not call what I did painting, but more like flooding. I was getting a drop of paint on the end of the toothpick, and then placing it in the letter, letting it flow, and dabbing it up the sides. I did not drag the toothpick, but dabbed it on the spots I needed paint. I picked up this technic from painting models when I was younger, for the very smallest of parts. Now it is not as perfect as a manufactured piece of equipment, but I am very happy with it! Next will be clearcoat. I plan on doing this tomorrow. I went back and forth on the stripes, weather to put them on before, or after the clear. The stripes I got are too narrow, so the correct ones will go on after the clear. I bought some 1/4 inch pin stripe tape, and might try to make the wheel stripe out of this, but I am sure they will not turn out as round as I would like. I might give it a try anyway.
Kevin
IP: Logged
07:02 PM
PFF
System Bot
ohioindy Member
Posts: 2137 From: Wooster Ohio Registered: Nov 2003
OK I'll send you a set to do. Just let me know how much.
I have thought about it, but I will say, the stripping was the biggest pain in the ars so far. If a guy was going to do this a few times, media blasting would definitly be something to look into.
quote
Originally posted by RWDPLZ:
HEY! The toothpic thing is a model builder's secret! How could you?!
They're looking great BTW
Now go easy on me, I did say I have no secrets.
And thanks for the compliments, from all.
Kevin
IP: Logged
11:01 PM
Sep 17th, 2005
Gordo Member
Posts: 2981 From: East Guilford, NY, USA Registered: Mar 2002
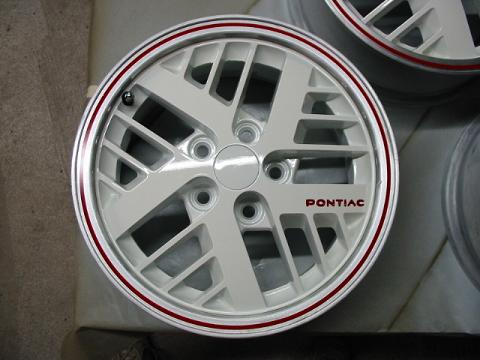
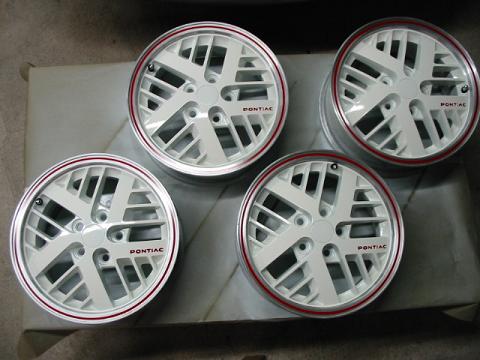
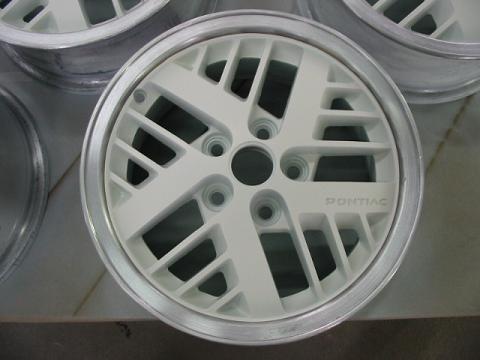
Here are the wheels, after clear coating. Don't look a whole lot different, just have more shine to them
In case anyone is wondering, I have been doing the same proceedures on the center caps, as I have went along. Just nothing exciting to show there. Now on to the stripes. Might be a few days on these, as Paul and I get the details worked out. I might even get the valve stems, and tires mounted next, as I think I can add the stripes afterward, without any problems.
I had not paid attention, but looking at the pics I saved of the low mileage Indy, I see what you mean. I have a new set of the short valve stems, with the chrome sleeves, and the chrome caps I plan on using. I would still be able to remove the sleeves, as they slide off when the cap is removed. Then I could just replace the cap with the grey one. I have seen many a grey caps in my days of tire mounting at a local Wal-Mart Tire center, but not sure where to get then new. I want to say I saw them mostly on Fords, not that they would be of the correct shape/style. Anyone got a good close up picture of the original grey cap(s)?
Went out to check ,and mine does too. That is an odd duck, if mine is original. If I hold it just right, it has the letters "DILL" at the top,"627" at the bottom, and what looks like "06" at the three o'clock position. Plus the ridges around the edge. Don't recall seeing one like this before. Wonder if it is one of those Indy only things?
Kevin
[This message has been edited by Lambo nut (edited 09-18-2005).]
IP: Logged
02:16 PM
PFF
System Bot
Lambo nut Member
Posts: 4442 From: Centralia,Missouri. USA Registered: Sep 2003
Found quite a few more, just all black, I'm sure I could make them the right color with paint/dye etc, but thinking I must be holding in my hand, the wrong thing, as all the years of the vehicle listed in the auctions, are much older. Can anyone confirm these are correct style, just wrong color?
Kevin
[This message has been edited by Lambo nut (edited 09-18-2005).]
Just went out and checked mine, they are also DILL 627. The grey one has what looks like N3 where yours is 06. The black ones I have on my tires, identical to the ones in that Ebay auction, have 5L. But they look to be the same.
Is the bare aluminum finish (clear coat only) on the unpainted portion of your wheels as your drill and paint/rust stripper wheel left it or did you do any additional polishing or sanding? I assume you didn't since it was not in your detailed description, but I thought I'd ask. Where did you get the stripper wheel and is there a courseness rating?
Great job, by the way, and thanks for letting us follow along!
------------------ RickN White 88GT 5spd White 85GT Auto
IP: Logged
03:56 PM
Gordo Member
Posts: 2981 From: East Guilford, NY, USA Registered: Mar 2002
Here are the wheels, after clear coating. Don't look a whole lot different, just have more shine to them
In case anyone is wondering, I have been doing the same proceedures on the center caps, as I have went along. Just nothing exciting to show there. Now on to the stripes. Might be a few days on these, as Paul and I get the details worked out. I might even get the valve stems, and tires mounted next, as I think I can add the stripes afterward, without any problems.
Kevin
Looking absolutely great! The clearcoat adds a lot to the appearance. I love the shine.
When I refinished the wheels on Li'l Dukie a few years back, I watched in horror when they mounted them on the spin balancer at the tire store. It put a circular mark in my clearcoat but it polished out ok. Hope yours don't get scratched.
IP: Logged
05:18 PM
Lambo nut Member
Posts: 4442 From: Centralia,Missouri. USA Registered: Sep 2003
Just went out and checked mine, they are also DILL 627. The grey one has what looks like N3 where yours is 06. The black ones I have on my tires, identical to the ones in that Ebay auction, have 5L. But they look to be the same.
Thanks for the info....
Kevin
IP: Logged
11:30 PM
Lambo nut Member
Posts: 4442 From: Centralia,Missouri. USA Registered: Sep 2003
Is the bare aluminum finish (clear coat only) on the unpainted portion of your wheels as your drill and paint/rust stripper wheel left it or did you do any additional polishing or sanding? I assume you didn't since it was not in your detailed description, but I thought I'd ask. Where did you get the stripper wheel and is there a courseness rating?
Great job, by the way, and thanks for letting us follow along!
Yep, that is how it was after using the tool. No other sanding. I don't have the card, the stripper wheel was attached to, but it was bought at Wal-Mart, in the hardware section. They are available in the single, and double wide models. Auto usually has the double. The single is found in the hardware/tool section. If I remember, I will try to get the part numer of the tool, next time I'm in the store. Pretty sure it was a 3M brand. Paint and rust stripper, black in color, chucks into a drill, with a 1/4 inch shank on it. One courseness fits all kind of thing.
Edit to correct, and add part number...part number of stripper I used was 3M paint and rust stripper, 7771NA
Kevin
[This message has been edited by Lambo nut (edited 09-26-2005).]
IP: Logged
11:40 PM
Lambo nut Member
Posts: 4442 From: Centralia,Missouri. USA Registered: Sep 2003
Looking absolutely great! The clearcoat adds a lot to the appearance. I love the shine.
When I refinished the wheels on Li'l Dukie a few years back, I watched in horror when they mounted them on the spin balancer at the tire store. It put a circular mark in my clearcoat but it polished out ok. Hope yours don't get scratched.
I've got a friend, still working at the old Wal-mart auto, I used to work at. We have already talked about the mounting, and balancing of these tires and wheels. They actually have my tires waiting. New BF Goodrich Radial T/A's,215/60/14 of course! The balancing plans are to dynamically balance them, with a regular aluminum wheel weight on the inner rim, and stick-ons, toward the outer part, but not where you can see them. Will see how this goes. Trying to avoid weights on the outer rim of the wheel, if I can. Not too worried about the scratching part, he is a very careful person, and I feel he will do an excellent job.
Kevin
IP: Logged
11:59 PM
Sep 19th, 2005
Gordo Member
Posts: 2981 From: East Guilford, NY, USA Registered: Mar 2002
I've got a friend, still working at the old Wal-mart auto, I used to work at. We have already talked about the mounting, and balancing of these tires and wheels. They actually have my tires waiting. New BF Goodrich Radial T/A's,215/60/14 of course! The balancing plans are to dynamically balance them, with a regular aluminum wheel weight on the inner rim, and stick-ons, toward the outer part, but not where you can see them. Will see how this goes. Trying to avoid weights on the outer rim of the wheel, if I can. Not too worried about the scratching part, he is a very careful person, and I feel he will do an excellent job.
Kevin
Goodrich Radial T/A's are my favorite! Didn't know that you could get them at at Walmart.
IP: Logged
12:36 PM
Lambo nut Member
Posts: 4442 From: Centralia,Missouri. USA Registered: Sep 2003
Goodrich Radial T/A's are my favorite! Didn't know that you could get them at at Walmart.
They were special order. There is a book usually near the tire display, or at the counter. The price they got me, was only a few dollars off Tire Rack price, once you include the shipping. Seemed to be $57 or so each, at Tire Rack, Plus like $42.00 for the shipping of all four. Then you have to pay for mounting, and balance. They are $67.17 each, here at WalMart, mounted, $7.50 each to balance, with no extra for the special order. Sears wanted over $85 a tire, before anything. Kicker was, at WalMart, they told me 7 to 10 working days to come in, called me two days later,and guess what, they're here! Plan to get them mounted Wednesday.
I LOVE Firestone's Firehawk Indy 500's, best all-season tire EVER. Hell of a lot better than any tire I've ever driven on. I've had them on a couple different cars. I'm getting a set for the Fiero soon because the new Barum Brillantis the car came with are already worn out after less than two years. I think Fiero5 has a set on his Indy. But I'll be buying these until they stop making them (which hopefully is never).
I LOVE Firestone's Firehawk Indy 500's, best all-season tire EVER. Hell of a lot better than any tire I've ever driven on. I've had them on a couple different cars. I'm getting a set for the Fiero soon because the new Barum Brillantis the car came with are already worn out after less than two years. I think Fiero5 has a set on his Indy. But I'll be buying these until they stop making them (which hopefully is never).
Do you know where you can get the 15" versions with white lettering? I can't find them at all . . . do they even make them?
I LOVE Firestone's Firehawk Indy 500's, best all-season tire EVER. Hell of a lot better than any tire I've ever driven on. I've had them on a couple different cars. I'm getting a set for the Fiero soon because the new Barum Brillantis the car came with are already worn out after less than two years. I think Fiero5 has a set on his Indy. But I'll be buying these until they stop making them (which hopefully is never).
I saw those. The Tire Rack has them. Just a few dollars more then the BFG's. I did seriously think about getting them, then opted to not over due the Indy 500 theme of the car. That, and the trouble Firestone has had......maybe just a mental thing for me, but kind of shyed away from them. I will agree, they are a good looking tire, and I did come so close to getting them reguardless.
Kevin
IP: Logged
04:15 PM
Lambo nut Member
Posts: 4442 From: Centralia,Missouri. USA Registered: Sep 2003
Do you know where you can get the 15" versions with white lettering? I can't find them at all . . . do they even make them?
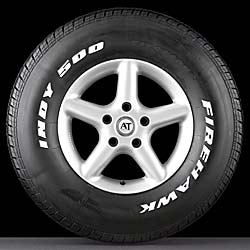
The tire rack has many sizes listed from 175/70/13, up to 275/60/17 in the Indy 500 Firehawk, with about everything in between. I only looked at a 215/65/15, and it had white lettering. Check them out at http://www.tirerack.com/
Here is a pic for others interested.
Kevin
IP: Logged
04:46 PM
Gordo Member
Posts: 2981 From: East Guilford, NY, USA Registered: Mar 2002
Well, I had forgot my tire mounter was on vacation this week. He will be back to work tomorrow. Plan on getting these things mounted then. Will post the progress.....
Kevin
[This message has been edited by Lambo nut (edited 09-23-2005).]
IP: Logged
11:30 AM
87convert Member
Posts: 539 From: Mesa, Az USA Registered: Jun 2003
I recently also did some refinishing on my Indy wheels but used Testors Flat Red for the lettering and touch up of the stripes. After clear coating on the stripes it looks great. I used a similar technique on the lettering but dabbed the paint in with a very fine artists brush. Looks great now.
IP: Logged
07:29 PM
Sep 24th, 2005
amadeus_chavez Member
Posts: 76 From: renton, wa, usa Registered: May 2004
I had a slight change of plans on Friday. Paul's stripes showed up and I could not wait to get them on. I was so excited, I forgot to grab the camera for the install of these, but they were prettty easy. They came with the backing, and the install mask on them. Not sure the correct term of this paper. I cut the sheets down to just about an 1/8inch outside of the stripe, which let it fit down in the lip of the wheel. I then cut about a 10 inch diameter hole in the middle of the sheet, to allow it to set down, and not hit the middle of the wheel, which bulges up higher then the outside lip. I then used some soapy water in a spray bottle, to spray the wheel down, and to spray the stripe, as I peeled the backing off. The stripe stays stuck to the front paper. Spray things down very well as you go, to keep things from sticking when you don't want them to. After laying the strip down on the wheel, I checked to make sure it was where I wanted it, by measuring several points around the wheel. Then I took a small squeegy to start smoothing out the paper and stripe, being very careful to not fold, or push it around. Followed that with a blue shop towel, like you get on the roll, to finish sticking it down good, and speed up the drying of the water. I slowly peeled back the mask, and rubbed the stripe down again, being very careful not to push it around. It sticks pretty quick, but the water gives you some time to adjust as needed. This is the result.....
Now they are not 100% perfect, and I'm sure they will not pass for a concourse resto, but I am VERY happy with them.


 . . . do they even make them?