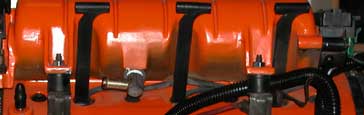
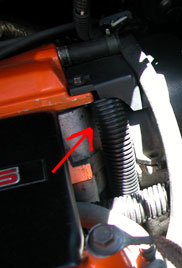
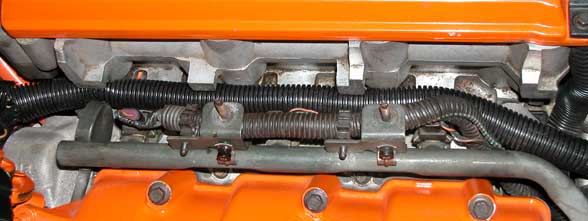
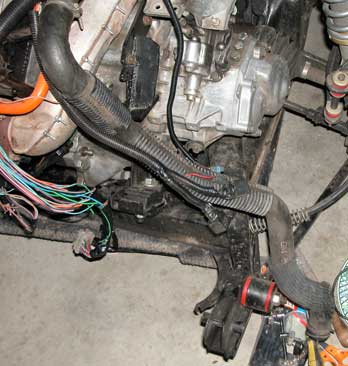
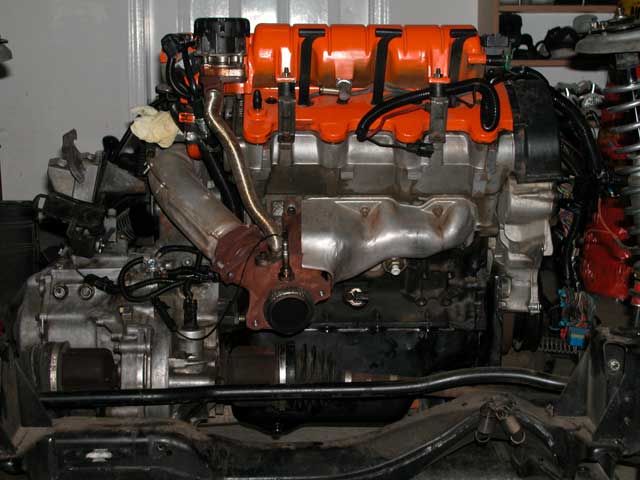
Got the cradle dropped out today and spent the evening shortening and routing wires that I hadn't finished the first time around. Here's how I routed everything. I did my best to keep the wires short and out of sight, but still allow me to easily take the wiring harness off the engine without removing engine parts if I need to repair or modify it. I had to shorten pretty much every wire on the harness. The only things left untouched were the circuits in the miniharness (fuel injectors, throttle body sensors). To hide the rear spark plug wires, I ran them out the bottom of the "handles" so they dont stick up over the intake plenum: From there, they go under the MAP sensor and into some loom. Then, following the routing of the '90 Fiero Prototype, they go under the front cam carrier nose cover: The 90 prototype had wire holders on that little cover, but I've never seen that on a production 3.4 engine. I used zipties to keep them bundled up and away from the front exhaust manifold (my factory plug wire holders are broken). I've seen some layouts that put the plug wires under the nose of the front cam carrier, but then there's a lot of extra wire length with nowhere to go (unless you cut them to fit) and they end up being harder to inspect or replace.
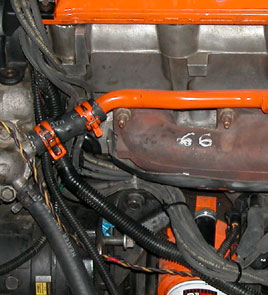
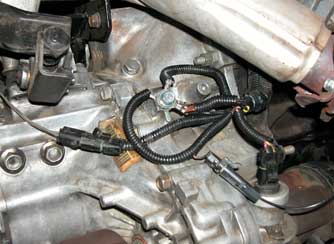
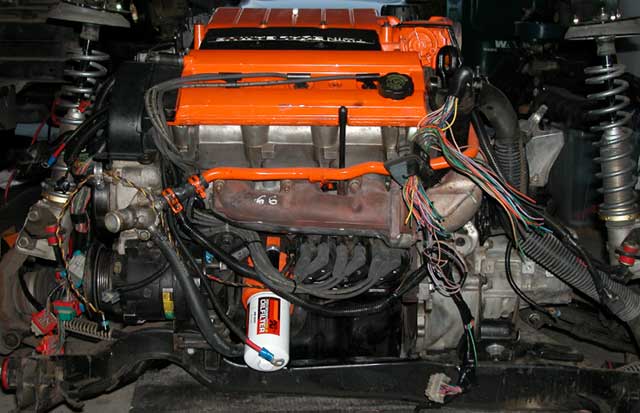
The wires going through the firewall, to the fuel and AC relays, to ground, and to the transmission all go through the valley by the fuel rail wiring. I can just pop off the engine cover and pull this bundle out if I need to add wires to either side of the engine coming from the firewall. Makes it easy to add lights and additional relays and whatnot, as I have already had to do for a few things. I routed all the tranny wires + O2 sensor wire behind the crossover. The loomed wires going off to the left in this pic are for the intake air temp sensor. For now it resides in the factory 2.8 location on the air cleaner housing. The wires run under the intake tubing to stay out of sight. All of the ECM grounds go to this bolt I added to the bellhousing. The boss was already drilled and tapped for an 8x1.25MM bolt but has no purpose in the Fiero. This makes it easy to inspect the grounds or test them with the engine running. Another option would be to use a bellhousing stud, but those are mostly obscured by the exhaust crossover and I hate burning my hands when working on the engine.
Wiring for the ignition module, coolant temp gauge sender, and A/C compressor clutch follow the rear plug wires under the cam carrier nose cover and behind the coolant bypass pipe. I had to shorten all of them to get rid of over a foot of slack.
[This message has been edited by Steven Snyder (edited 06-01-2005).]
IP: Logged
12:00 AM
Steven Snyder Member
Posts: 3326 From: Los Angeles, CA Registered: Mar 2004
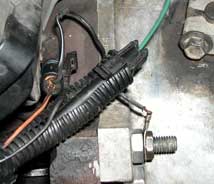
I shortened the DIS ground wire and put it on a bellhousing stud. This the same stud I use for the negative cable from the ECM. I haven't installed one yet, but I also intend to run a ground strap from here to the frame.
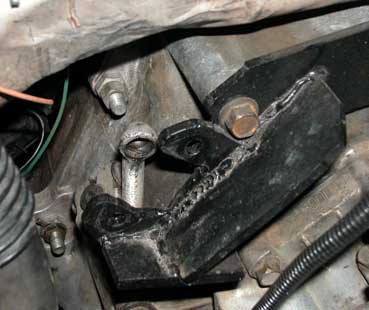
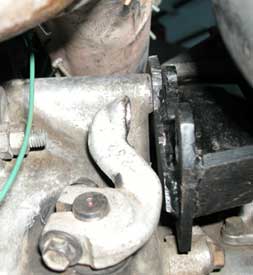
I finally took some decent pics of my solution to the clutch arm's interference with the exhaust crossover. I used a FWD Getrag release arm and welded up a bracket to mount a Fiero Getrag slave in the proper position for this arm. When working properly the clutch disengages at somewhere around half the travel of the pedal, but I had no problems with overextension. See how short the FWD Getrag arm is? Its even shorter than the Fiero Getrag arm. Another option would be to use the Fiero Getrag arm; that would improve pedal feel and create more travel until clutch disengagement. I would have used one had I been able to find one easily..
IP: Logged
12:06 AM
Steven Snyder Member
Posts: 3326 From: Los Angeles, CA Registered: Mar 2004
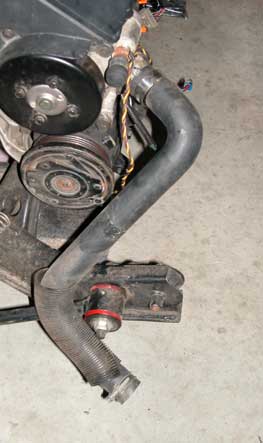
Driver's side coolant hose is from my old 88 2.5L. I dont think I flipped it over, but I may have. It had to make a 90 degree bend at the top.. I don't know if a fresh hose will be soft enough to do that. This hose seems to be staying bent after heating up and cooling down many times.
I found the hose for the passenger side at the parts store in their massive collection of radiator hoses. I bought two that looked like they might work. This is the only one that did. Goodyear part number 61721. I don't know the application.
[This message has been edited by Steven Snyder (edited 06-01-2005).]
IP: Logged
03:18 AM
Jun 2nd, 2005
Steven Snyder Member
Posts: 3326 From: Los Angeles, CA Registered: Mar 2004
I've replaced all the rod bearings so far except #6 because one of the bearings I bought at autozone was scratched up and I need to get another. The bearings are all contaminated with embedded aluminum and have some scoring. The crank journals seem to be fine though there is a scratch in one its not deep and I'm not going to worry about it. I haven't looked at the mains yet... Seems like it would be tricky to replace them without removing the crank, which I'm not going to do. I also would rather not reuse my main bolts for a third run so I need to find a source for them. They're not in the GMPD catalog and they aren't the same as the 2.8/3.1 bolts because the 3.4 TDC has a windage tray that is tied down by nuts on studs on the main bolts. Does the pushrod 3.4 have a windage tray? Maybe it has the same main bolts..
-Steven
IP: Logged
06:28 PM
cptsnoopy Member
Posts: 2587 From: phoenix, AZ, USA Registered: Jul 2003
i am a bit concerned about the engine having more metal in it that will just tear up your bearings again. if the filter gets clogged enough the bypass will open and let the stuff run past the filter. (that is if you have a bypass). best of luck with it.
IP: Logged
07:11 PM
Jun 3rd, 2005
Steven Snyder Member
Posts: 3326 From: Los Angeles, CA Registered: Mar 2004
i am a bit concerned about the engine having more metal in it that will just tear up your bearings again. if the filter gets clogged enough the bypass will open and let the stuff run past the filter. (that is if you have a bypass). best of luck with it.
Yeah, I'm not gonna feel too good about it either unless I find the source of the metal. One possible source is metal shavings from when I tapped some threads in one of the cam carriers. It was a deep hole and I probably didnt get all the shavings out. But if thats the case, I dont know how they got to my bearings. The metal should have flowed to the oil pan and then been filtered out after the oil pump before it got anywhere else.. Unless that stupid Fram filter I used until my first oil change had the bypass stuck open or something. I wish I would have kept the dang thing.. I think I threw it away. I'll take a look though, maybe I still have it. Right now there's a K&N on there. I didnt find any metal suspended in the oil when I drained it out, just some at the bottom of the pan, so I think the K&N was doing its job to prevent further metal from getting around.
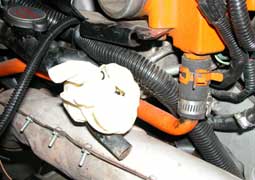
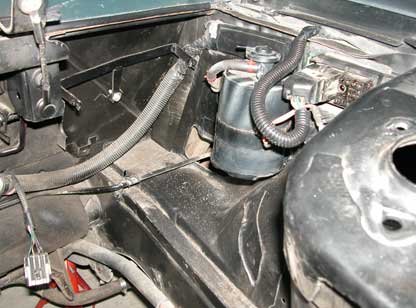
I got back to work on making my swap smog-legal after getting tired of inspecting and replacing bearings. I drilled some holes in the sheet metal to the right of the battery tray (next to the expansion tank in 87-88 cars) and put some bolted in my charcoal canister mount. It fits perfectly there at about the same height as it was originally. I was also able to completely eliminate the hard line that went all the way across the engine bay from the expansion tank to the canister. I didn't even have to make a short line to connect it up in the new location; I moved the hose from the expansion tank through to the larger hole in the sheet metal and coupled it to the hose coming off the evap canister. Its like it was supposed to be here from the factory, were it not for that pesky battery.
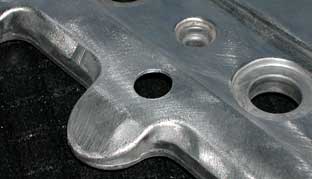
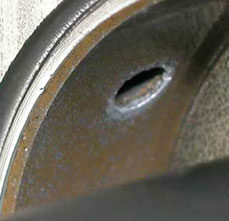
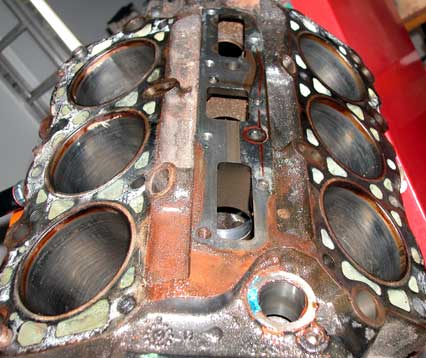
I started working on my modified rear cam carrier cover that I will mount in the front. I am going to find a low profile oil fill cap to fit in this hole. I'm going to grind off the tabs from the left side and weld new ones onto the right so that the timing inspection cover still fits. Not only will I be able to more easily fill the oil, but the engine will look symmetrical once I create my planned custom intake. The old cover was also pressing my tranny cables against the firewall.. this one shouldn't since it follows the contours of the cam carrier.
I'm also almost done with all of my wiring notes. I will post a wiring writeup (probably in a seperate thread) soon hopefully.
[This message has been edited by Steven Snyder (edited 06-03-2005).]
IP: Logged
01:50 AM
Steven Snyder Member
Posts: 3326 From: Los Angeles, CA Registered: Mar 2004
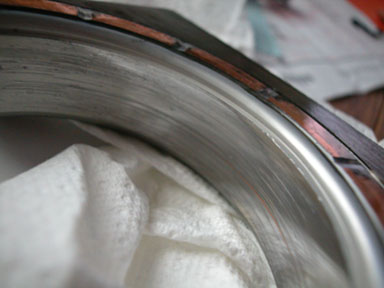
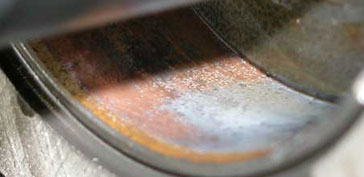
Main #1 looked okay. Main #2 looked worse. Main #3 (thrust bearing) looked like this: Ow. The crank journal looks fine except for one minor scratch. I dont care about that. What concerns me is that I found a good amount of assembly lube on this bearing and crank journal. Does that make any sense? Is it possible that the bearing was not oiled for 1400 miles except for the assembly lube I put on there in the beginning? Otherwise the only way I could think of it getting there is if it ran down through one of the oiling holes in the crank from a rod bearing that I put on..
Anyhow, is it normal to see copper on the sides of the thrust bearing? I seem to recall my old thrust bearing looking like that on the sides. Is it possible to replace the main bearings without removing the crank? It looks to me like it would be okay to just put new bearings on there (unless main #4 is really bad; but I haven' t looked yet), but if I'm going to remove the crank, of course I may as well have it reground.. and I reaaalllly don't want to go through all that again.. so what're my options? And what are my chances? Anyone?
IP: Logged
11:28 PM
Jun 4th, 2005
cptsnoopy Member
Posts: 2587 From: phoenix, AZ, USA Registered: Jul 2003
I hate to see what you have there. I had an engine look like that after 2000 miles because i trusted someone to clean out the crank and they lied about it. the only real solution is to pull the crank and bottle brush the oil passages along with the oil passages in the block. you need to make sure all the metal debris are removed. otherwise it is just a gamble and the odds are against you. I wish i had better news.
IP: Logged
12:19 AM
Steven Snyder Member
Posts: 3326 From: Los Angeles, CA Registered: Mar 2004
I hate to see what you have there. I had an engine look like that after 2000 miles because i trusted someone to clean out the crank and they lied about it. the only real solution is to pull the crank and bottle brush the oil passages along with the oil passages in the block. you need to make sure all the metal debris are removed. otherwise it is just a gamble and the odds are against you. I wish i had better news.
Dang.. I was thinking the same thing might have happened to me. The guy at the machine shop cleaned up the crank for me and said it was ready go right in (he gave me bad instructions for cleaning in it in the first place and I got rust spots so he said he'd do a polish job on it and clean it all out for me). Maybe he really didn't brush all the passages out.. actually.. I think the bearings would be looking worse if it were steel bits goign through, so maybe thats not the case.. But couldn't all the bits have run through the oiling passages by now and get into the filter so if I put new bearings in they wont suffer the same fate (if the journals are indeed smooth enough for the oil film to begin with)? I reaaalllyy don't want to take apart the engine again. Maybe I shouldn't be asking for advice.. I really just want to drive it with new bearings until it blows up and then I'll get a running motor. I'm only gonna be able to drive my car for a few months anyway til I'm off to school. I would not be able to stand having to wait for machine shops to get my parts done. ARgh. Thanks cptsnoopy, even if the news is bad its better than silence.
did you get/see oil pressure on the gauge when it WAS running? What was the pressure, if so? There is maybemabye something you could try, since the motor is unfortunately lunch, anyway. The oil pump has a pressure relief spring in it. You could shim the spring so that it is effectively stiffer and that would increase the oil pressure from the pump.
If there is a prob with getting oil thru some/any passages (but you really have to ask why!?!?!?) this might help. At the same time, if it is a crud/machining particle buildup, then this might blow it out.......... But you HAVE to get some oil to your mains, so your options are limited I guess. Is it possible (I don't have a main bearing set to look at right now) that the oiling holes in the bearings didn't line up with the oil passage holes in the saddles, effectively blocking them off? I am guessing at this one but trying to come up with any idea. Having assy lube for that long is very strange and there has to be a reason. good luck! gp
IP: Logged
08:16 AM
PFF
System Bot
Steven Snyder Member
Posts: 3326 From: Los Angeles, CA Registered: Mar 2004
did you get/see oil pressure on the gauge when it WAS running? What was the pressure, if so? There is maybemabye something you could try, since the motor is unfortunately lunch, anyway. The oil pump has a pressure relief spring in it. You could shim the spring so that it is effectively stiffer and that would increase the oil pressure from the pump.
If there is a prob with getting oil thru some/any passages (but you really have to ask why!?!?!?) this might help. At the same time, if it is a crud/machining particle buildup, then this might blow it out.......... But you HAVE to get some oil to your mains, so your options are limited I guess. Is it possible (I don't have a main bearing set to look at right now) that the oiling holes in the bearings didn't line up with the oil passage holes in the saddles, effectively blocking them off? I am guessing at this one but trying to come up with any idea. Having assy lube for that long is very strange and there has to be a reason. good luck! gp
Oil pressure was 30 or 40 PSI at idle hot, even to the very end, so no problems there. All the damage appears to have been caused by metal bits not lack of oil pressure. I think that assembly lube must have run down the rod bearing oiling hole when I reassembled that rod bearing. I used a generous amount and it had to go somewhere if it wasn't all squeezed out the sides. If the assembly lube wasn't getting washed out from when I first put it in there it would be completely filled with metal bits since they wouldn't be going anywhere.
IP: Logged
03:15 PM
Jun 13th, 2005
Steven Snyder Member
Posts: 3326 From: Los Angeles, CA Registered: Mar 2004
Pulled the front cover and timing chain yesterday so I could look at the intermediate shaft bearings (or at least one of them, because apparenly I can't take the shaft out all the way without removing the oil pump drive assembly which requires removing a head. argh.) I pushed back the shaft to look at the front bearing... @#()(%*^) It doesn't look like any oil was getting to this journal. I'm going to take out the crank today and then pull the heads tomorrow so I can get a better look at everything; I'm thinking I've got a clogged oil passage. I'm gonna rebuild the short block, but it seems like my heads are fine.. I do want to get a better look at the bearing journals on my cam carriers though.
Yeah, I woulda said "@#$%^&*(" too after seeing that. I'm pretty sure that my intermediate shaft bearings did NOT look like that, on the grounds that I would clearly remember that they were messed up. You mentioned seeing assembly lube still on some of the main bearings? After 1000 Mi of driving, you would almost surely think that it'd wash away with a constant flood of hot oil hitting it? It could also explain that tapping we heard after the high rpm run through the hills that one day too - oil starvation --> collapsed lifter? Time to get medieval on the shortblock - Let me know if I can help any.
IP: Logged
03:43 PM
Jun 16th, 2005
Steven Snyder Member
Posts: 3326 From: Los Angeles, CA Registered: Mar 2004
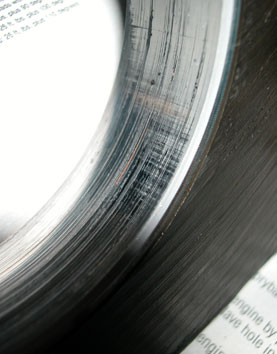
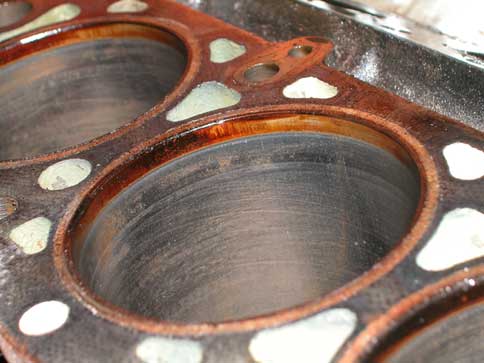
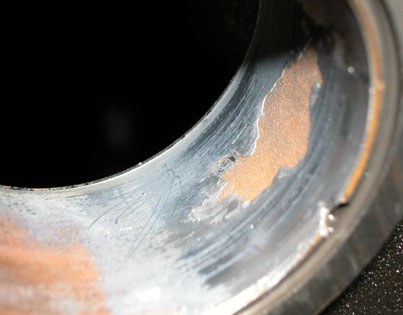
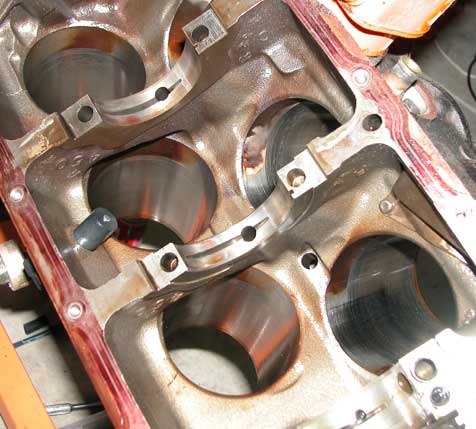
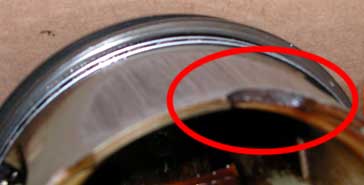
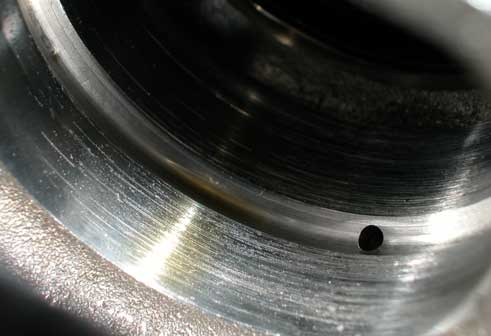
Looks like I'll just end up rebuilding this whole thing. Turns out there was water in the cylinders at one time. Argh. Gonna have to have them bored out. I can't feel the spots, they're just dark colorations, but I'm not going to just hone it when there's that crap all over. Not a big deal; I'll just buy the rebuild kit from newengineparts.com.. pistons are like $23 each, rings are like $80 for the set, etc. Mmmm somebody had an intermediate shaft bearing for lunch: (That's the copper layer, not rust.. my camera likes to make things very orangey) Front one isn't the only bad one:
Somehow the intermediate shaft itself is undamaged. Not a scratch or a dent or anything. My camshafts look the same way, so I guess I'll have to look at the cam carrier journals to make sure they're all right. When I looked at the cams I figured since they are undamaged the cam carrier journals are fine. I'll find out tomorrow.
I'm going to strip down the block and take it the machine shop for cleaning, bore, hone, check mains, check rods and recondition if necessary, crank polishing (I already took it to them, they said it looks fine they'll just polish it up no need for another regrind), install cam bearings, and balance the rotating assembly. I'm going to do whatever head work is necessary myself, including inspection, lapping, and valve stem seal replacement. As far as I can tell the heads are fine except for a few slightly leaky valve stem seals. Its the block that needs attention.
[This message has been edited by Steven Snyder (edited 06-16-2005).]
IP: Logged
11:33 PM
Jun 17th, 2005
Fastback 86 Member
Posts: 7849 From: Los Angeles, CA Registered: Sep 2003
Daaaaaaaaaaamn that sucks man! Well, at least once its rebuilt you want have to worry about swapping it out for a newer engine later on like you planned. Let me know if you need any help with anything.
lousy rotten luck. Just went thru that (sort of) myself with a "...yup, it's a RUNNER!" from a junkyard. Turned out to be a 3.4 litre 'water pump'......
Have you figured out what happened and why? I guess if there is a bad (like unbelievably bad) bearing somewhere it could have gone to bits but it looks like your intermediate shaft ran dry? If you have a blocked oil passage somehow you want to find that or a rebuild will (or could) go the same way and THAT would be a serious PITA ....
Just wondered what you have found. gp
Yeah, I figure I'm going to find a clogged oil passage somewhere once I get the block all apart. The entire block, inside and out, will be cleaned before reassembly of course, so no more metal bits or other junk will remain.
IP: Logged
03:55 AM
Fierobsessed Member
Posts: 4782 From: Las Vegas, NV Registered: Dec 2001
Originally posted by Fierobsessed: Whew...I would seriously consider picking up another motor. That motor seems to need more then what it costs to go 100% new
How so? The only parts I need are available in a standard rebuild kit. Just need cam bearings, cylinder overbore with new pistons, new main and rod bearings (just need to polish the crank, journals are fine), and clean things out real well. All standard procedure for a rebuild. I already have a new timing chain and tensioner on there, I may pick up new gears. I've seen enough bad used motors that I'm not going to bother with another. Both of Blue Shift's used motors were toast (he ended up returning one, got the other, then rebuilt that one), 86GT3.4DOHC blew up his first used motor, mine obviously had some issues, and all of the ones I've inspected at junkyards have had such major problems that they can't even be rebuilt without major new parts like heads. Luckily mine can be rebuilt! I'll make this one new and then I don't have to worry about it anymore.
IP: Logged
02:58 PM
PFF
System Bot
Fierobsessed Member
Posts: 4782 From: Las Vegas, NV Registered: Dec 2001
I take it back, I just looked on ebay, and it seems like the crate motors are going up in price. a 94-95 just went for $1900.+ I bought my 96 crate motor for $500 last year. If you found one for that price, you wouldn't bother to rebuild one. I assumed they were still reasonable in price. I was wrong about that!
I bought my crate (94-95 compatable) for 500 as well, but it was a hell of a deal. Heads need to come off cuz some dust settled in the intake ports and fell into open intake valves. Oops.
The main reason I STILL rebuilt my junker motor, is because like Steven said, it's the second bad motor I got from the same yard, so it was kind of a matter of honor to make it work, costs be damned. I kinda get a little crazy when I'm really mad at something... That aside, the relevent part is that when you rebuild, you can do little things that GM didn't, like precision balancing, good bearings and good oil clearances, adding higher compression pistons (aftermarket with domed tops, and/or later year style). And plus, it's just fun. I dunno bout the rest of you, but I can only have the time and money to build one motor, so why not just go for it and have something to be proud of later? The best part of all is that you can rebuild and improve the motor for less than buying a new one.
IP: Logged
01:43 AM
Steven Snyder Member
Posts: 3326 From: Los Angeles, CA Registered: Mar 2004
I take it back, I just looked on ebay, and it seems like the crate motors are going up in price. a 94-95 just went for $1900.+ I bought my 96 crate motor for $500 last year. If you found one for that price, you wouldn't bother to rebuild one. I assumed they were still reasonable in price. I was wrong about that!
I had the exact same thought as you when I realized I would have to rebuild this one. I thought I could get a crate motor for $1000 or less.. once I encountered reality I found that I would be better off rebuilding this thing.
I stripped it down completely to the bare block today. Nothing new except I did find a small chunk missing out of a piston skirt. The break area is already coated in varnish though, so I think it happened a long time ago if it wasn't just a casting defect from the beginning. Cylinder bore is undamaged and the missing piece was nowhere to be found. I guess it could have been broken into small bits that went through the oil pump, but then I would find damage on whatever parts broke it to bits..
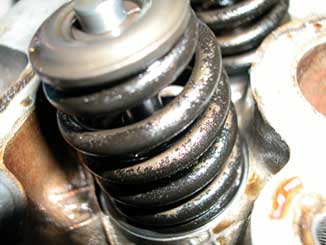
I'm looking for tips on cleaning varnish/crap off the valve springs and etc. I imagine the machine shop has a cleaning process that will get everything on the heads clean? Otherwise I dissassemble and use what?
IP: Logged
02:01 AM
Fierobsessed Member
Posts: 4782 From: Las Vegas, NV Registered: Dec 2001
Usually, solvent cleaners work great for getting varnish and oil residue off of anything. Kerosene, degreesers and even carbuerater sprays do magic on oil based engine residues.
IP: Logged
06:07 AM
Jun 22nd, 2005
Steven Snyder Member
Posts: 3326 From: Los Angeles, CA Registered: Mar 2004
I fully diassembled my front cam carrier. Some of the journals have gouges. All of them are at least slightly scored right next to the oiling holes; I guess aluminum bits came through in the oil and then were smashed flat into the side of the cam carrier journal. Since the dorks at GM decided to not have replaceable bearings up there, I have to get new cam carriers. My lifters are fine. My cams are also fine, though I will probably get them polished. I wonder about reusing my lifters in a new carrier though.. are lifters worn into to their bores or just the cam lobes and valve stem? I have them organized so I can put them with their proper lobes but what abotu the fact taht they're going into a new bore? I'd hate to have valvetrain issues after my rebuild, but I don't want to buy a whole new set of lifters if it isn't necessary..
IP: Logged
12:50 AM
cptsnoopy Member
Posts: 2587 From: phoenix, AZ, USA Registered: Jul 2003
the lifter bore should not be a problem as long as the lifter surface is in good shape. if the bore will be the same size when it is cleaned up you should be fine.
IP: Logged
03:38 AM
Steven Snyder Member
Posts: 3326 From: Los Angeles, CA Registered: Mar 2004
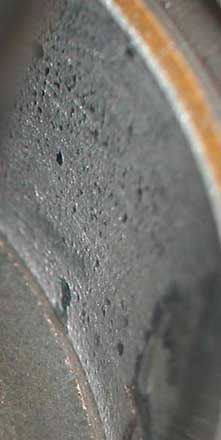
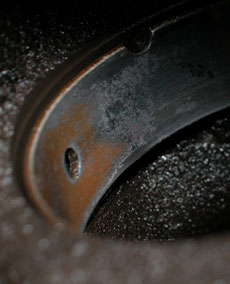
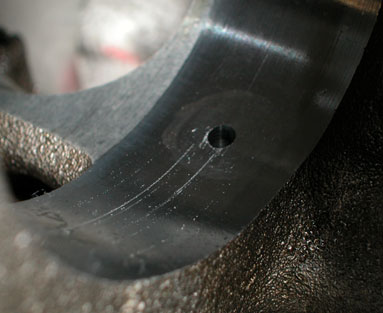
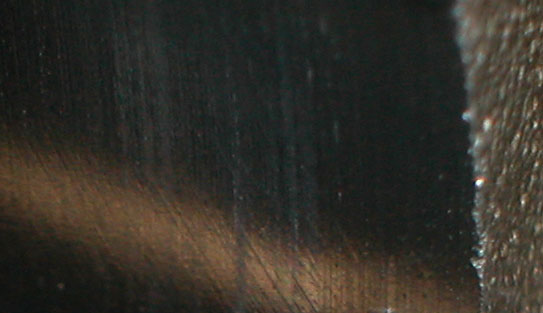
This was by far the worst one. Most of them look like this: Considering that the cams are undamaged and there is not a significant amount of pressure up here (I have to keep reminding myself that these are NOT rod journals), maybe I really can just get away with just polishing out the high edges. It doesn't actually appear that there was damage occuring from after the metal went through, though I can imagine there must be high spots from the aluminum bits embedding themselves into the cam carrier journal. I love the macro function on this camera.. Check that out. Marks from the original bore before they polished these suckers.
IP: Logged
03:54 AM
Steven Snyder Member
Posts: 3326 From: Los Angeles, CA Registered: Mar 2004
the lifter bore should not be a problem as long as the lifter surface is in good shape. if the bore will be the same size when it is cleaned up you should be fine.
So you think I'll be alright just polishing these? I know I can't polish them out completely since it would open up the bore too much, but I can't make them not 'sharp' if there are any ridges that stick up at the edges.
IP: Logged
03:57 AM
cptsnoopy Member
Posts: 2587 From: phoenix, AZ, USA Registered: Jul 2003
I have to answer as if it were my engine. I would take the block to a reputable high performance aluminum engine shop and show it to them. I would not be comfortable unless I did that. Sorry that I could not be of more help.
Engine work was delayed. The custom ordered torque plate did not arrive before my machinist went to Africa for two weeks, so he was unable to finish it in July. It should be there by now, so work on the motor will commence soon. Going to stop by there on Friday to check on it. I'm getting it bored .030 over, balanced, new bearings everywhere, valve springs checked and shimmed where necessary, new stem seals, valve seats reground, and oil drainback passages gasket-matched and smoothed. I'd love to get some port work done but I cannot afford it at the moment, and I dont want to delay the project further since I'm going to school without my car in less than two months. In the meantime, I've been working on cosmetic stuff. Today I finished painting my rims (now both sides have black centers ). Also put in some awesome 85 GT seats I got a while back and stripped out some of my interior to prepare for my dash project. I'll post some pics again once the engine parts come back from the machine shop.
IP: Logged
02:25 AM
Sep 17th, 2005
Steven Snyder Member
Posts: 3326 From: Los Angeles, CA Registered: Mar 2004
I ended up not finishing the car before I moved down to LA for school. I got the motor put together and installed ready to go, but it would not start properly. Turns out I switched the intake an exhaust cams in the rear carrier. Oops. It would start and then kill itself, so it sounded like it was ready to start but never would run. Now its all carboned up already... blah. Hopefully it will clear up once I get the cams in the right place. I am going to try to go home in a few weekends to take it apart, fix it, and put it back together so I can use it for the coast run.
Nah, don't matter any. You just got the wrong 2 valves opening in the cycle. You just got gas being sucking from the exhaust manifolds and blown out the intake. Shouldn't be any valve to piston mashing going down.
IP: Logged
01:22 AM
Steven Snyder Member
Posts: 3326 From: Los Angeles, CA Registered: Mar 2004
I'm just worried about all that carbon, though the engine hasn't heated up all the way yet so I guess I couldn't have burned any valves. I'll probably just run some water mist through it to try and steam clean all that junk out of there before it gets baked in.
IP: Logged
02:12 AM
Nov 3rd, 2005
Steven Snyder Member
Posts: 3326 From: Los Angeles, CA Registered: Mar 2004
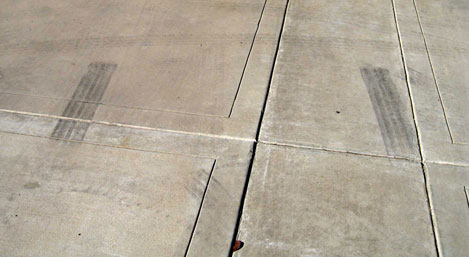
Was only trying to pull forward from the garage to stop from getting fumes in there... rebuilt 3.4 DOHC + 13 degree exhaust retard still makes low end torque apparently! Caught me by surprise
[This message has been edited by Steven Snyder (edited 11-03-2005).]


 ). Also put in some awesome 85 GT seats I got a while back and stripped out some of my interior to prepare for my dash project.