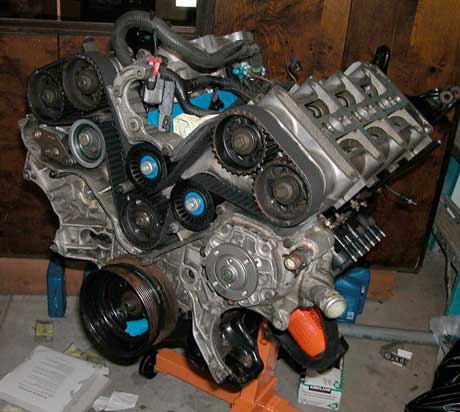
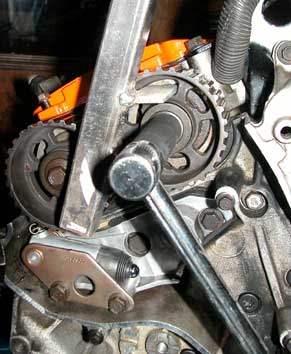
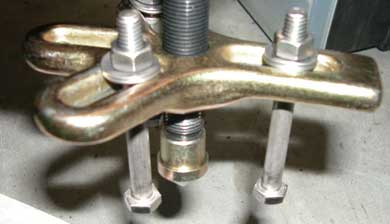
Thanks a lot for the design, Wheelie! I created one for myself with some supplies I picked up from OSH today. It worked great besides having to redo the welds three times because they started to crack (!!) when undoing some of the bolts. I was using my pointer-style torque wrench when undoing them and it was maxed out (140+ ft-lbs). Those things were STUCK! Here's the tool in action: The two flat plates fit into the slots in the cam sprocket, and leave room for a wrench to fit on the center bolt. It allows you to get a whole lotta leverage on that cam sprocket to stop it from turning when loosening the bolt. I also found something I was not expecting... Lockrings on the front cam cogs AND on the rear! I was under the impression that they'd only be on the rear cams. After removing the cam bolts, I used a harmonicer balancer puller with some properly sized bolts to lock into the "keyholes" in the cam cogs to pull the cogs off. This allowed me to pull out the lock rings and stick the cogs back on without them so they could spin freely while I put on the belt and tensioner. Once everything is in place, the bolts should be able to push the lock rings back in when they are tightening, holding the cogs in place. In the above picture I had already pulled off the cogs and then put them back on with the lockrings just sitting out front waiting to be pressed in. With the bolts just loosely tightened the cog wont wobble but will still be able to spin freely on the camshaft. Here's what my cog puller tool looks like: Sorry, I don't have the bolt measurements.. I just found one that fit in my toolbox and had the guy at ACE Hardware give me three matching ones with some nuts and washers. You've got to be really careful with this setup because its easy to get the puller lopsided. You need to pull the cam cog straight off, so count threads or take measurements or something after its set up. A little WD-40 also helps a lot as it can penetrate around the lockring to loosen things up a bit. Just make sure to use a good solvent to get all the oil off when you put it back together. With the cam cogs removed, I installed my newly built cam hold down tools (the other ones got bent up from trying to loosen the cog bolts with only them to hold the cams in place) on the front and rear heads and turned the crank to TDC. I stuck a plastic measuring stick from a tabletop wargame down the #1 sparkplug hole and cut a small notch in it where it lay against the head when I thought it was at its highest. I turned the crank a few times and kept watching to see if it ever got higher, and remarked it until it didn't. That was TDC for piston #1. I snaked the belt in place and installed the tensioner pulley... with everything going so well it was just about time for something to break. This time it was the tensioner mounting bracket's turn. I hate aluminum. Apparently when I was pushing the tensioner actuator around to get the ball end lined up on the tensioner pulley notch, the part where it enters that copper bushing came out of the hole and was just sitting against the bracket... so when I started to tighten the bolts, it snapped it right off! There's I'm going to take it down to the machine shop tomorrow to see if it can be welded. It's a clean break and it doesn't appear to be bent, I think it should be easy to weld back together.
[This message has been edited by Steven Snyder (edited 03-03-2005).]
Yeah, the 60 Degree V6 site says that the rear cams have lock rings and the fronts don't... Not so, as I've found out. Lock rings on all 4 cams. 94+ is probably different. I managed to get my cog bolts off using the cam tools (not advised...), but I built some beefy tools. Used a gear pulled to get the cogs off - which sucked. I like your idea better.
Originally posted by Blue Shift: You gonna do your timing idlers too?
Yeah I already put new idlers on there. I got a new belt, tensioner actuator, tensioner pulley, and idler pulleys... not taking any risks here! ... well, as far as timing components go..
quote
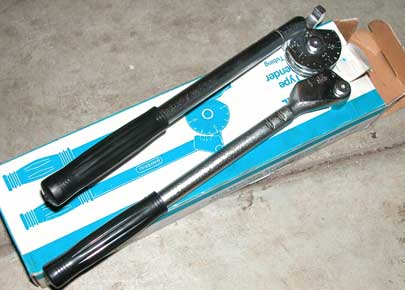
Originally posted by Kohburn: I just bought a similar one from harbor freight for $7
Nice tool, eh? Got a part number for that so others can find it if they need the same? I'm just gonna borrow the nice ones again if I need to bend something.
-Steven
[This message has been edited by Steven Snyder (edited 03-04-2005).]
IP: Logged
10:27 PM
Mar 6th, 2005
Steven Snyder Member
Posts: 3326 From: Los Angeles, CA Registered: Mar 2004
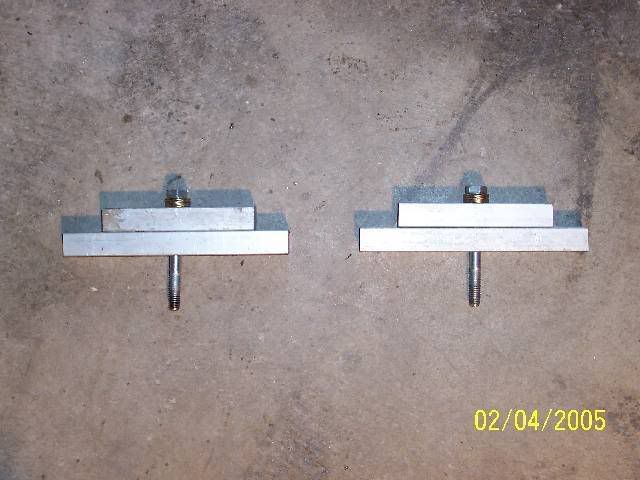
I got my timing tensioner bracket welded up today. It seems to be holding up fine with full tension on it and the actuator still lines up perfect. I put the belt and all pulleys in place, installed my cam hold-down tools, released the tensioner, applied tension to the pulley, and started to spin the engine to seat the belt... it was awfully hard to turn so I checked to see if the belt was binding anywhere. It wasn't. I checked the cogs and pulleys to see if any were at an odd angle or sticking out too far. They weren't. So I turned it some more. It still didn't feel right! Now I put down my socket wrench and looked over the whole engine.. there it was! Another cam hold-down tool bent at an odd angle! Looks like I'd be making these a fifth time for yet another reason. The first time the holes turned out to be at angles because of my shitty drill press. The second and third times were my two sets that turned out fine which I double stacked to try and hold the cams in place while taking off the cog bolts. They bent. *sigh* After removing and retracting the tensioner I took off the belt and inspected everything further. All of the cam cogs spun freely except the front exhaust.. it had siezed to the camshaft for no good reason. I managed to get it loose by pulling it out a fraction of an inch with my puller. With some WD-40 on the shafts to prevent anymore siezing I put it all back together. I can't find any reason why the timing can't be done with just one hold down tool so I put it on the rear cam carrier and set engine to TDC. With my trusty cam holder in one hand and clicky torque wrench in the other I tightened the lock rings into place on the rear cam cogs. It was hard as heck to get those bolts tightened to 96 ft-lbs, but it didn't look like I turned the cams or bent my tool. I removed it and put it on the front cams, then spun the engine 360 degrees so the rears faced down. I put on the front lock rings, tightened 'em up.. and grinned. I was finally done with the awful job! But alas.. when I went over the cams to check if they were flat, the rears were together like 15 degrees before TDC and the fronts were never flat together. It seems my cam hold down tool have bent... again. AND something else must have slipped too. Or I'm just stupid. In any case, I've practically given up. Who wants to come down here to help me do it with some tools that worked and how much do you want to be paid? Also, anyone have 94-95 cam cogs they'll sell me? I hate lock rings. The 94-95 will just install in place of mine, yeah?
-Steven
[This message has been edited by Steven Snyder (edited 03-06-2005).]
IP: Logged
12:48 AM
Fastback 86 Member
Posts: 7849 From: Los Angeles, CA Registered: Sep 2003
I have a set of 94-95 heads, cam towers, and cams located in San Diego, CA that I could sell you. They are from a junkyard motor, and are complete IIRC.
Make me an offer if you are interested.
------------------ 1988GT 5-speed Black with grey leather, I pick it up this May! 1992 Lumina Z34 5-speed 14.78 @ 92.688, high 13s at sea level 1992 Lumina Z34 5-speed Stock, new crate engine and trannsmission
It wasn't long ago when I was doing the cam belt as well. Though I expected trouble, I did my 91 motor without a hitch - I swear to you that it's worth the time and (insignificant amount of) money to make a good STURDY set of tools. I used these tools to pull the bolt off of the cams, and to retorque them to spec - didn't budge a bit and they lined up perfect. If it weren't for the fact that it's good long drive down there I'd come volunteer to help you out, though I'm sure that you'll be fine when you build yourself good tools. Let me find a pic...
What I did was to buy a length of like 5/8" square barstock from OSH, it was like 5 bucks. It's a modified version of the idea on 60 Degree V6 with an extra bar to distribute the load and prevent bending. You might be able to use even thicker stock. Get the biggest piece of squarestock that'll fit in the cam tower alright for strength. Cut yourself two lengths, 6 inches or so, then cut yourself two 4 inch pieces - this will be the lower and upper bars for a pair of tools. Drill a hole through the middle just big enough to fit the bolt in place - I did it by using a dremel to drill a small pilot hole, then used a HAND DRILL to drill the main hole (3/8") since I don't own a drillpress. It came out alright. Put your bolt through, and space it out with washers until you have as many threads in the hole as possible, while still being able to torque it good. I torqued mine down by feel, I didn't know there was a spec.
I don't think you're supposed to use the cam hold down tools to remove/torque the cam gear bolts anyways... but that's why I made mine extra beefy. Once you make a good set, it'll be a 15 minute job. Promise.
------------------ Chris
Blue 1987 GT Getrag 5 speed, 1" lowering springs, 225 50R16 rims and tires, Fiero Store 9 3/4" HD clutch (Halfway through a 3.4L TDC Swap!) Silver 1986 2m4 THM 125c automatic (Current commuter) Black 1985 2m4 SE Isuzu 5 speed (no paperwork)
IP: Logged
04:22 AM
Steven Snyder Member
Posts: 3326 From: Los Angeles, CA Registered: Mar 2004
Ahh... 5/8"! I thought you had used 1/2" with success. That's probably why my tools bent. With the 5/16" hole in the center there just isn't much material left to stop them from creasing around the bolt when using 1/2". I'll get some 5/8" today and maybe try again (might wait for some 94-95 cam cogs). Any reason why you didn't make the top bar the same width as the bottom?
-Steven
[This message has been edited by Steven Snyder (edited 03-06-2005).]
IP: Logged
01:39 PM
AaronZ34 Member
Posts: 2322 From: Colorado Springs, CO Registered: Oct 2004
Yeah - I was just about to recommend 1/2" again... until I had second thoughts and went down to grab one of my tools and a measuring tape - it measures 5/8" wide, not 1/2" like I had posted! It might even be possible to go a size or two bigger than 5/8" - measure how much space you have before you buy your stock. Sorry bout that, I must be getting CRS at an early age...
As for the difference in lenghts between the upper and lower bar? I don't honestly think that a double full length bar is going to make any practical difference in overall strength, though it couldn't hurt. I guess the shorter top bar could be more rigid against folding up, if you look at it that way as well. I kinda had the "triangle" or "pyramid" concept in my head when I was thinking about load distribution and all that (the OEM tool uses triangular gussets for support) - I even considered adding a 2" 3rd top bar even, but decided it would be overkill. Anyways, you'll probably use this more than once, to say the least so I guess it's time well spent to make a sturdy set. Good luck with it and let us know if anything else comes up!
IP: Logged
10:59 PM
PFF
System Bot
Mar 7th, 2005
Steven Snyder Member
Posts: 3326 From: Los Angeles, CA Registered: Mar 2004
I took some measurements before going to work today... it seems ~1" is the largest that might fit! So I picked up some 3/4" (the largest they had) on my way home. I think I've spent about $50 on metal so far for makign tools. Hopefully this time they don't bend ;-). I should have time tomorrow to try it out..
just get a peice of .5"x1" barstock rather than .5" square it'll be a lot stronger than two peices of .5" square stock stacked..
with 1" peice you'll probably strip the threads out before it bents - I don't thiking using the hold down tool for breaking the bolts free or retorquing them is a good idea - you can just use a large crescent wrench on the flatsto hold the cams while you torque the bolts or make one of those nifty cam holders
IP: Logged
06:49 AM
fieromadman Member
Posts: 2217 From: Oconomowoc WI, USA Registered: Jan 2003
Originally posted by fieromadman: how much does thr freaking isuzu weigh? I can lift the getrag with one arm.....
About the same as the Getrag. I'm a skinny boy, I have trouble torquing bolts properly .
quote
Originally posted by Kohburn: just get a peice of .5"x1" barstock rather than .5" square it'll be a lot stronger than two peices of .5" square stock stacked..
with 1" peice you'll probably strip the threads out before it bents - I don't thiking using the hold down tool for breaking the bolts free or retorquing them is a good idea - you can just use a large crescent wrench on the flatsto hold the cams while you torque the bolts or make one of those nifty cam holders
I can't imagine the 3/4" I picked up is going to bend when double stacked. I don't intend on using them alone to hold the cams in place, I also have a cog holding tool, but my old tools bent so easily I couldn't equate the force of torquing and holding the cam in place well enough.
how much does thr freaking isuzu weigh? I can lift the getrag with one arm.....
I did find the concept of picking up and walking around with the box that can hold a V8 somewhat... odd. But then again I'm 6'2" and move 300 lbs blocks of ice around for a living. To each, their own.
Steven Snyder - 3/4" eh? Now we're talking! If you break that, you're SOL bro!
Good luck with it, I was getting a little jittery cranking the cog wheels down - worried that the bolts and their threads were really going to hold 90 some ft/lbs! I did do it with only my cam hold down tools - but if you have yourself a cog holding tool, by all means USE it rather than abusing your cams and tools like I did! Good luck, let us know how it turns out.
IP: Logged
01:05 AM
Steven Snyder Member
Posts: 3326 From: Los Angeles, CA Registered: Mar 2004
Didn't even get that far. The tensioner pulley bolt threads stripped out in the bracket. Yep, the same thing that happened to Blue Shift. I had checked the threads on bolt and bracket for burrs or debris before inserting. I haven't a clue why it stripped out, but its gone good. Guess I have to fork out $30 for another helicoil set... Blue Shift, what size threads was that bolt?
-Steven
[This message has been edited by Steven Snyder (edited 03-08-2005).]
I'm seriously paranoid about aluminum threads after stripping the tensioner and then the tranny mount (though the tranny mount looked stripped to begin with). Luckily both were the same thread. I try to spray all my threads clean with carb cleaner and/or air now... Anyways it's M10x1.5, and for the Perma-Coil kit at least, you'll need a 13/32" drillbit - very handy kit to have, as a great number of the bolts on this thing are this size. I managed to get a Perma-Coil kit from Monument Car Parts for 25 bucks. Not bad at all. If you want to really do it right, you could use a Time-sert as well. Time-serts kick ass, but they're expensive. I coiled it and it hasn't given me any problems.
When you coil it, make sure that you drill really straight (easy) and make double sure that you're feeding the tap in straight (not as easy). Back it out every few turns to break chips, and make sure to use a good oil to help cutting. WD40 worked really good for cutting aluminum in machine shop. When you turn the coil in, it's kind of a ***** to get the tang broken off - I found out that trying to whack it with a punch really doesn't work reliably and I ruined a couple coils that way, so I grab it with a pair of needle nose pliers and gently work it back and forth till it comes off clean. I used two on the tensioner.
Look on the bright side - for every thing you break, that's one more thing that shouldn't break again... Good luck.
IP: Logged
05:18 AM
Steven Snyder Member
Posts: 3326 From: Los Angeles, CA Registered: Mar 2004
I broke it! ... the curse, that is! Progress has been made! The cam timing is done! DOHC fans everywhere, rejoice!
I got it as close to perfect as its going to get. I can hear a tiny tick when I try to rock the hold-down tool on the front head's cams, but I dont see any movement. It can't be off by more than a degree, if it even is at all. I imagine when the hold-down tool was tightened down it got those things straight. My double-stacked 3/4" tools did not bend, but I did also use my cog holding tool for reinforcement. Turns out I was previously trying to torque them to later motor specs. My Chilton's manual says 81ft-lbs for the 91-95 engines. 96-97 motors use 96 ft-lbs. Its not like they're going to rattle loose anyway. I could probably leave the bolts out after pressing those lock rings in and they wouldn't go anywhere!
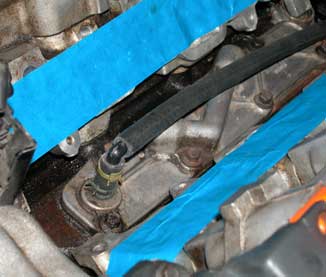
I also continued cleanup of the engine bay. I have decided to relocate the evap canister to the old battery tray location to clean things up a bit on the left side of the bay. With the purge solenoid on the right side of the engine, it'll also prevent me from having to run vacuum lines from one side of the car to the other (the line for the fuel vapor comes from the expansion tank by the right quarterpanel). Once I locate the proper canister for this engine I'll build a bracket and mount it up. In the spirit of keeping things clean and neat, I also devised a way to hide some PCV system ugliness. Instead of replacing my broken PCV hose with a similar piece, I decided to route the line under the lower intake manifold, so it comes out right near the throttle body where it ends.
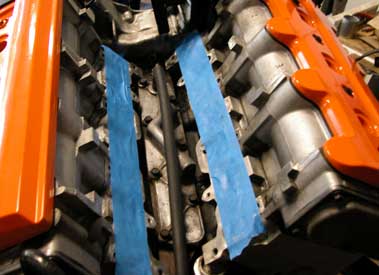
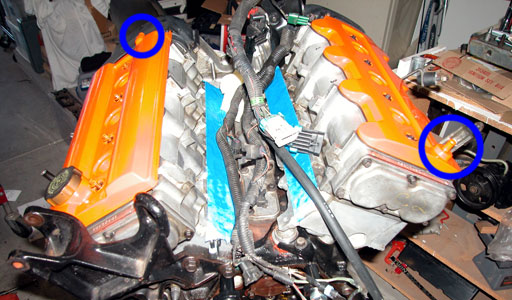
Notice in the last picture the circled valve cover vents? Both need to make their way to the side of the engine closest to the camera. If I could use a rear valve cover (right side in the pic) on the front cam carrier I could make the necessary lines shorter.. but alas, the cam carriers are NOT symmetrical. The rear valve cover will fit on the front cam carrier but it must be flipped around, placing the vent again on the wrong side of the engine and the timing belt cover mounting tabs also on the wrong side. I may end up doing it anyway; I could grind off the tabs, make new brackets to replace them, and just add my vent line connection. I think it would help balance out the look of the motor. I would also add an oil fill cap to the rear cover.
-Steven
IP: Logged
09:11 PM
PFF
System Bot
WHEELIE Member
Posts: 267 From: ROBBINSVILLE NC USA Registered: Mar 2002
All this talk of the cam hold down tools bending and breaking stuff!! I tried to make some but didn't like the way it felt. So I did my cam timing without them. Pretty easy really and no chance of damaging anything. The flats have to be up, correct?I used a small square on the cam flats and a small square on the head surface. I made sure they were parallel to the head.I loosened and retorqued the bolts with the tool pictured above.Mine is a 96 and I had trouble with the rear lockrings. I tapped the cog with a brass punch lightly from the backside to free them up. Then I set the intake at 6 degrees advance and ex at 7 degrees retarded. this is that majic 13 degrees of extra overlap but I am hoping for a better powerband. I checked all my work with a degree wheel.By the way, at these settings the cam centerline for both cams are at 105. Another coincidence?? I have found that four valve motorcycles run best at this setting.Now ... on to the headers wheelie
IP: Logged
11:32 PM
Mar 9th, 2005
Steven Snyder Member
Posts: 3326 From: Los Angeles, CA Registered: Mar 2004
All this talk of the cam hold down tools bending and breaking stuff!! I tried to make some but didn't like the way it felt. So I did my cam timing without them. Pretty easy really and no chance of damaging anything. The flats have to be up, correct?I used a small square on the cam flats and a small square on the head surface. I made sure they were parallel to the head.I loosened and retorqued the bolts with the tool pictured above.Mine is a 96 and I had trouble with the rear lockrings. I tapped the cog with a brass punch lightly from the backside to free them up. Then I set the intake at 6 degrees advance and ex at 7 degrees retarded. this is that majic 13 degrees of extra overlap but I am hoping for a better powerband. I checked all my work with a degree wheel.By the way, at these settings the cam centerline for both cams are at 105. Another coincidence?? I have found that four valve motorcycles run best at this setting.Now ... on to the headers wheelie
The flats have to be up on one bank while straight down on the other, so they alternate each 360degree crank rotation. You might be able to get away with doing it like that on the 96 motor, but thats because you dont have lockrings, just a taper to lock the cog in place. You can just tap your cog to get it loose.. With the 91-93 engines there are rings that have to be pressed in to get the cam cog to stay with the cam.. and once they are in just a little bit, they wont come out without pulling of the entire cam cog with a puller. That means no adjusting the cam if you mess up, without starting all over (take off the belt, tensioner pulley, retract tensioner, etc).
IP: Logged
12:12 AM
AaronZ34 Member
Posts: 2322 From: Colorado Springs, CO Registered: Oct 2004
Thanks for the tip Aaron! It looks like the 94-95 front covers are only different in that they have a corner cut out to clear the cam sensor in the front cam carrier... but the 96-97 covers have that clearance AND move the vent to the proper side! Awesome! Anyone know if the 96-97 valve covers will fit onto 91-93 cam carriers?
-Steven
IP: Logged
01:05 AM
AaronZ34 Member
Posts: 2322 From: Colorado Springs, CO Registered: Oct 2004
They will work perfectly. Try www.car-part.com, they have a lot of otherwise rare car parts. Bear in mind however that you may run into clearence with your intake manifold. I know when switching to 96-97 intakes, you need a 96-97 rear valve cover, becuz the early ones hit. I don't know if this goes both ways tho. I doubt it, you should be ok, but there is a VERY slight possibility.
Glad I could be of help, a + is always appreciated to complement my fair share of minuses recieved after telling SBC guys off...lol
------------------ 1988GT 5-speed Black with grey leather, I pick it up this May! 1992 Lumina Z34 5-speed Stock, new crate engine and transmission
Want custom equal length headers for your V6 Fiero?
They will work perfectly. Try www.car-part.com, they have a lot of otherwise rare car parts. Bear in mind however that you may run into clearence with your intake manifold. I know when switching to 96-97 intakes, you need a 96-97 rear valve cover, becuz the early ones hit. I don't know if this goes both ways tho. I doubt it, you should be ok, but there is a VERY slight possibility.
Glad I could be of help, a + is always appreciated to complement my fair share of minuses recieved after telling SBC guys off...lol
you must not have told em that bad because you still don't have a bar
I was actually thinking of picking up another rear valve cover - I like the looks of them better than the front, and it'll give me an excuse to install an oil fill on the rear valve cover.
Kohburn - I don't know if you meant the 91-93 covers or not, but I experimented with swapping the placement of the front and rear valve covers (91 motor) for the purposes of moving the oil fill. They'll bolt right on, but the intake manifold will hit the forwarard (now rear) cover unless you clearance some material. The other side bolts down, no problem. The only issues remaining after that, are that the intake manifold no longer has a place to mount to on the rear (rubber mounts), and the cam belt inspection covers won't have anywhere to bolt up to. Other than that, it can be done with some creative machining (you have to machine "gear tooth" shaped notches into the front side of the cam cover like the rear cover has to clear the runners on the intake manifold). It can be done with some creativity.
As for the next gen motor, I have no experience with how the cam covers are different - though down the road, I intend to pick up a later year intake manifold and play with my cam timing for some extra HP. Good to know that I'll need the cam covers too - thanks.
I was talking about the rear valve cover - the one that is under the intake stock.. I'm thinking of using two of those since i'm going to pick up an extra intake plenum to gut and sneak an intercooler into.
IP: Logged
07:38 AM
AaronZ34 Member
Posts: 2322 From: Colorado Springs, CO Registered: Oct 2004
I'll be running two rear valve covers on my 3.4L Fiero, I also like the look of them much more. But I won't be running timing belt covers, I want that part open, so I am just going to cut the tabs off.
IP: Logged
12:12 PM
qwikgta Member
Posts: 4671 From: Virginia Beach, VA Registered: Jan 2001
Steven, I don't have PIP working here on the ship (US Navy), but I brought a disc with all my photos. Email me at jensenrw@truman.navy.mil and I can send you some pics of my headers, what I did for fuel lines and any other "Stuff" you may need. I have a few easy fix's for some issues. If you want, if you don't no worries. I am living my build through this thread, thanks.
One comment for the group, I am using a 91 ECM and Harness off a 3.4 5-spd Cutlass. When I was doing up the harness and got to the D22 wire, I found something odd, I dont have one. Thats right, the 91 manual trans cars don't have anything at the D22 position. I have the diagrams and everything for the 91 and no D22. So for me, im not doing anything with the D22 wire, so I wonder if it really is needed. Again just tossed out for discussion.
Rob
------------------ 88 TTop coupe (CJB #95), 96 3.4DOHC/5 speed in progress
Life on hold again for Uncle Sam. Deployed somewhere in the world, fighting the Global War on Terrorism.
[This message has been edited by qwikgta (edited 03-10-2005).]
IP: Logged
02:18 PM
PFF
System Bot
Steven Snyder Member
Posts: 3326 From: Los Angeles, CA Registered: Mar 2004
Today I installed new O-rings on all the injectors and installed the lower intake manifold and fuel rail. The head on one of the LIM bolts got stripped (I guess the curse isn't completely gone) but I put it in the corner closest to the power steering pump so I can still access it when I find a new one to replace it.
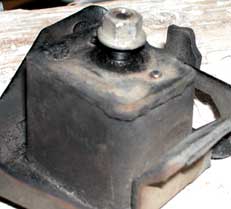
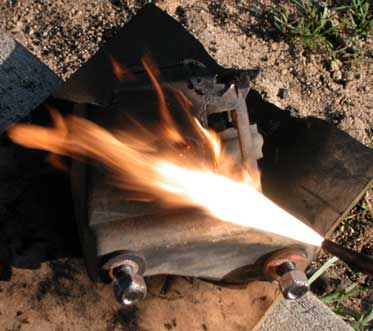
I also started to work on the mounts. I removed my old tranny mounts to burn off the rubber and found this... Ouch! What looks like a shadow from molding lines in the pic is actually the side of a crack that extends halfway through the width of the mount. No problem though, because I'm replacing all that rubber with the shorter Dodge truck mounts (Anchor part # 2265). To remove the rubber, I used a torch to head up the back side of the plate so it would melt the rubber on the other side. It took a few runs at it with the torch to melt the hole bonding surface but if you heat it up enough all over the bottom of the mount the entire rubber piece should just fall off and not have to be pried. I used an old screwdriver (the rubber will stick to it; don't use a good one!) to manuever it out of the interlock. The rubber will probably still be on fire... I keep a shovel handy with a pile of dirt and just cover it up to put out the flames. If you do this make sure you keep a fire extinguisher nearby just in case. And don't do it around dry grass or anything like that... sometimes pieces of rubber will fly around (that means wear eye protection and long pants/shirt too ) and you never know what they might hit!
quote
Originally posted by qwikgta: for the group, I am using a 91 ECM and Harness off a 3.4 5-spd Cutlass. When I was doing up the harness and got to the D22 wire, I found something odd, I dont have one. Thats right, the 91 manual trans cars don't have anything at the D22 position. I have the diagrams and everything for the 91 and no D22. So for me, im not doing anything with the D22 wire, so I wonder if it really is needed. Again just tossed out for discussion.
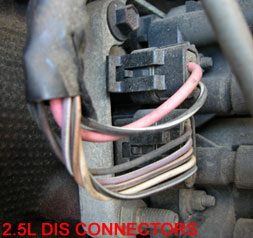
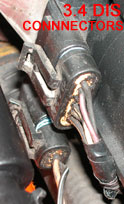
Interesting.. I guess I'll not bother with the necessary mods for the clutch switch until I try it first without. That narrows chassis wiring modifications to just the addition of a A/C pressure sensor. Thanks for the info! While on the topic of wiring... I noticed when creating my harness that the Fiero 2.5L DIS uses a large pink wire to power the ignition... but the 3.4 has a dinky one that I can't believe could pass enough current without melting. Why would the 3.4 use a smaller wire? In the last pic (3.4 DOHC), the very bottom wire is the equivalent to the very top one on the first pic (Fiero). The 3.4's wire is supposed to be pink and black but it got faded from oil exposure and whatnot.
-Steven
IP: Logged
09:12 PM
Mar 11th, 2005
qwikgta Member
Posts: 4671 From: Virginia Beach, VA Registered: Jan 2001
Steven, No help here with the wires, but yea, I remember telling myself a few times that things didn't make sense. All the ground wires off the ignition, the large to small or small to large wires..... Its been about a year since I did mine. Trying to get rid of the RS center, the fuel pump crap, what a nightmare. I have not put wire loom or electrical tape around mine yet, im sure its not perfect. I just used a lot of zip ties and a few spots of tape to get it on the motor. If it works, i'll drop the cradle and loom it up.
Cheers
Rob
IP: Logged
11:50 AM
Mar 15th, 2005
Steven Snyder Member
Posts: 3326 From: Los Angeles, CA Registered: Mar 2004
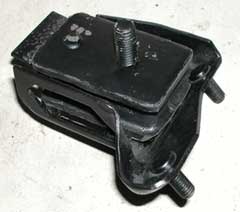
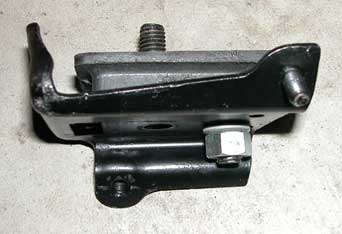
I've been working on the mounts over the past few days in between long runs of hand-sanding the intake plenum (its taking forever). After burning the rubber off the transmission mount brackets, I drilled out the pre-existing holes to 1/2" just in case they would work with the Dodge truck mounts as-is. Front mount bracket: Completed mount: As it turned out, the mount lined up great without having to make a new hole. I did have to grind down the ends of the bottom plate on the rubber mount to get it to sit down all the way though. The tranny bracket also did require some minor slotting just to get the mount stud in place; as it goes together at a weird angle. If I had the entire mount attached to the tranny first then dropped it onto the cradle I probably wouldn't have had to do that. One thing to note about these mounts is that they are built to incredibly wide tolerances. Of the three mounts I bought (Anchor #2265), they all had slightly different stud spacing and even plate height/width and overall thickness. It's possible that there are some that might fit without grinding. The locating hump on the mount does interfere with the transmission mount bracket, I had to grind out a notch for it to fit in (same for the rear mount). The rear mount was a bit more work. I picked up a 2266 mount (similar to the 2265 but thinner) so I could try to tilt the engine/tranny back a bit for better clearance and a more level intake plenum. You can see I had to drill a new hole for the mount stud to go through. I located it so the stud on the tranny side of the mount would be directly over the original hole. This made it so I didn't have to make any modifications to the transmission bracket except to drill the hole out to 1/2" (if I even had to do that, I think it may have actually been large enough already). After putting these new mounts on the cradle, the rear ended up being too short to line up with the tranny so I put a 2265 in place of the 2266 with the hole I had already drilled. The only modification to the cradle was to make a slot where the nut on the rear motor mount interferes. I may still cut it some to make more clearance for the front side of the tranny; it only has half an inch here: I also installed Rodney Dickman's select arm rebuild kit. It replaces the shaft that the arm pivots on which had a lot of play even on my 50,000 mile tranny. Its a lot tighter now, but I couldn't take the forward-to-back slack out of it. Rodney says in his instructions to rotate the select pin so that the unworn sides make contact, but my pin was welded in place. On his website it looks like there is another design arm that has a ball end that is screwed in. I'll have to keep an eye out for one in the salvage yard, or just make a bushing to fit over mine. Thats all for now! -Steven
[This message has been edited by Steven Snyder (edited 03-15-2005).]
I've got rodneys poly front trans mount and noticed that I can drill two new holes to move the replacable poly peice down about 1/2-3/4" then use the 2266 on the front mount to give it a nice drop and tilt.. I just don't trust rubber for the front trans mount - i've torn too many of em apart with less power
IP: Logged
07:10 AM
Mar 17th, 2005
Steven Snyder Member
Posts: 3326 From: Los Angeles, CA Registered: Mar 2004
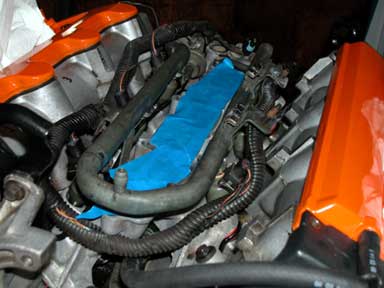
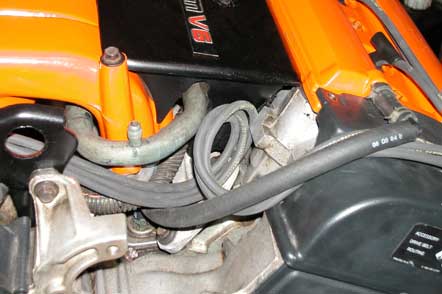
With the engine completely assembled mechanically I fiddled around with getting everything neat and pretty. After optimizing the spark plug routing, I've ended up with all this slack: I don't have any problem visually with just using zipties to keep it together, as I can make most of it stay out of sight, but I'm worried that the extra length is going to affect the quality/durability of the ignition system.. wont the loops and whatnot pickup interference, and the extra length add unecessary resistance? This is a brand new GM plug wire set, by the way. I guess the factory just wasn't very good at routing! Is it easy to shorten them?
-Steven
[This message has been edited by Steven Snyder (edited 03-18-2005).]
Originally posted by Kohburn: If I were you i'd pull that extra length down and tuck it in behind the backside of the waterpump - above the a/c compressor wouldn't have to loop it that way.
I'll do that.
quote
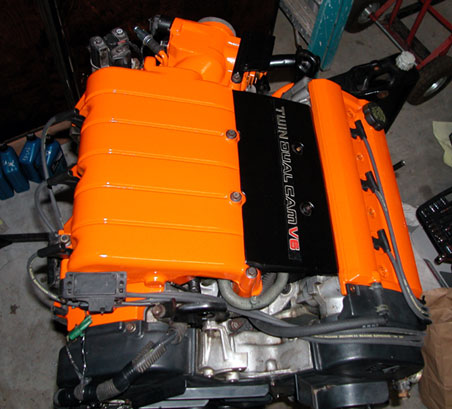
Originally posted by crzyone: Sexy! That is the best looking TDC I've seen yet. Paint adds so much to a motor, my 3.4 looked pretty crappy, installed it as is, oil stains and all. I would love to paint my N* that same color, looks good man.
Thanks! It's Rustoleum Safety Orange. You should be able to find it at any decent hardware store. It's also a newer formula, dries in more like 2 hours instead of 8 like the old stuff. It fills in scratches quite well, so I usually just sand to 150 grit. I have some minor "crazing" and a few scratches on the intake plenum that aren't visible in the pic, but when I take it off next I'll sand it flat and recoat.
-Steven
[This message has been edited by Steven Snyder (edited 03-18-2005).]


 .
.