Hi As some of you know I am in the middle of doing a 4.9 swap, and since I have done a lot of reaserch on this I decided to try to put what I have learned here, so that it might help someone else. I have to say that what I am writing is how I am doing it and there might be other ways to go about it, I hope this tread stays as a good source of info and please lets not turn this into a discussion of 4.9 vs _______ (fill in the blank). The reason I am doing this is because I had to take down the craddle since I had a broken exaust manifold bolt in the head and since I had to take the craddle down, I decided that it was a good time to upgrade, and this upgrade fits what I am looking for.
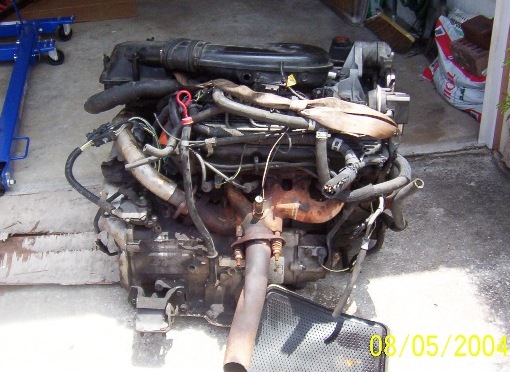
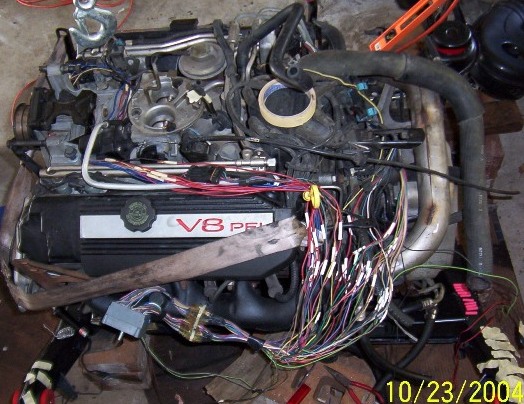
This is what the eng looked like when I got it home, it can be a little bit overwelming thinking you have to connect everything on the eng
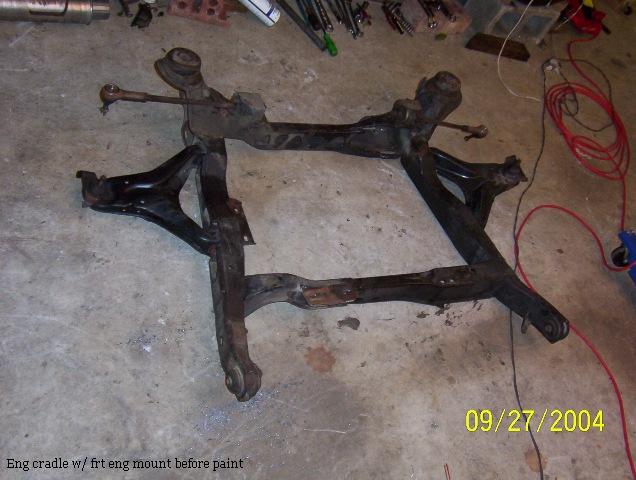
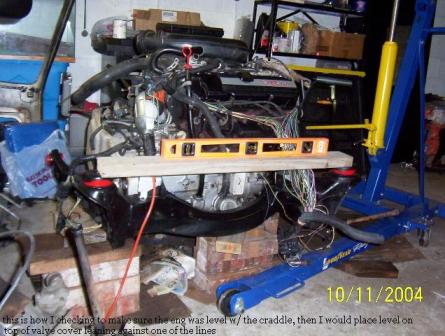
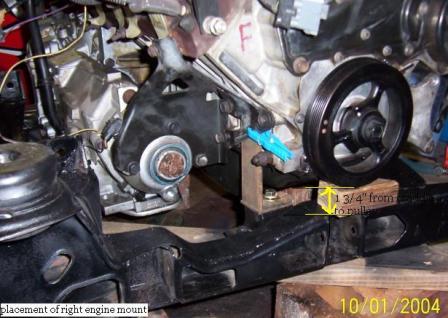
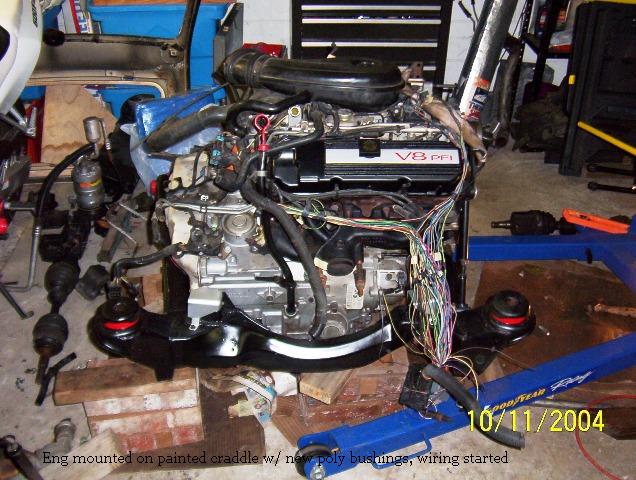
The way I set the eng on the cradle is: -replace both Caddy lower half trans mounts with Fiero trans mounts ( they bolt right up) -place front trans mount on set of holes closer to center of car -slot or drill rear trans cradle holes toward the center of the cradle 1 3/8" -level eng in reference to cradle, I used a big 2x4 between the rear craddle mounts (will post picture later) and place a level there and then place the level on top of one of the lines on the valve cover. -measure 1 3/4'' from crank pulley to craddle -to level eng from side to side, I measure the distance from oil pan to cradle in two places -clearance from trans side pan to cradle is a little more than a 1/4" -once I had the eng/trans located in the correct spot w/ the frt eng mount bolted to eng ( I used Energy Suspension trans mount part # 3.1108G on both frt and side eng mounts ) I put a clamp on the 3x3 angle iron then took eng off cradle and welded the mount -before putting eng back on cradle I sanded, primed and painted cradle and everything else that is bolted to the cradle. I used semi-gloss black since is close to factory. I also took out the factory cradle bushings and replace them w/ poly. The way I did it is I used a small torch (the ones you can get at home depo) and burn the front bushings out, the rear ones I took the top part off and put a piece of 2x4 and hit it w/ a hammer a couple of times and they came out. Before I put eng on cradle I soak it in eng cleaner overnight and gave a good cleaning the next day, I also took the exaust manifold and ported them a little just so that it can breath a little easier, I also painted them w/ hight temp paint. Here is the cradle w/ the front eng mount welded in place and ready to start the cosmetic work
painted cradle, suspension and hubs note: tie rods had been replace as well and poly bushing on control arms
Let me know if there is interest on this, will continue to post later
[This message has been edited by 85LAMB (edited 10-12-2004).]
Yes!!! keep up the pics and documentation, though I'm still trying to decide which engine to go with It's always nice to have someone who hasn't done it yet to let us walk through it with them.
[This message has been edited by ds21 (edited 10-12-2004).]
IP: Logged
03:45 PM
jeffndebrus Member
Posts: 2772 From: Jacksonville, Fl- usa Registered: Aug 2001
Well, Lamb it's too bad that you didn't consult with The Punisher first because he would have told you that you are wasting your money and time and that the 4.9 is simply a boat anchor and probably give you a minus just for having one ------and as you know he is the all knowing best mechanic on this site---why anyone would do a swap without consulting with him is beyond me!
Just to let you guys know I have not done a 4.9 swap before, but I am decent w/ a wrench and have done a lot of reading for this.
Well lets continue.....
Here is the picture of how I placed the 2x4 on the cradle to make sure the engine is level in reference to the cradle, if you do this make sure the 2x4 you use is not warped.
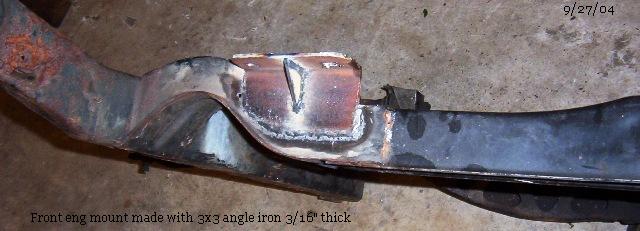
Here is a picture of the placement of the front eng mount. I used a 3x3 angle iron, but I trimed about 1/2" off the top where the mount rest on it, just so I would not have anything sticking out, I also rounded the corners to make sure they are not sharp. I used a Sawall to cut the metal, I wish I had more tools but you make do with what you have.....
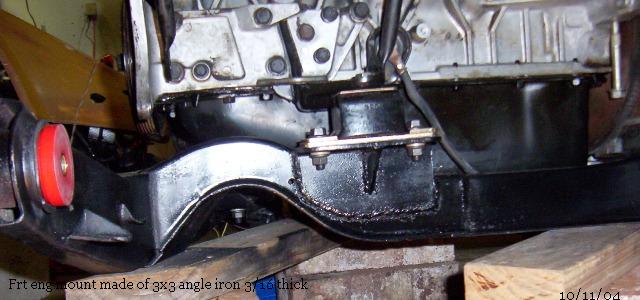
This is the picture of the same mount w/ eng mounted on it and painted
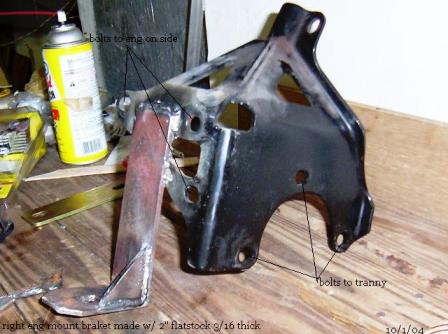
This is the a picture of how I was making the right eng mount, as I stated before first I mounted the tranny, left the nuts loose that way I could move it, level the eng and trans to cradle, then I made the front mount, bolt it in place. The last mount made was the right eng mount. I made it out of 2" flatstock, the picture should be self explanatory. I was really proud of that bead at the bottom of the braket , since my little welder is using fluxcore wire, which splatters a lot.
[This message has been edited by 85LAMB (edited 10-13-2004).]
Here is a picture of how the eng is sitting on the craddle, there has been a lot of time spent on this to make it look that clean, I will post pictures later of how I refinish the valve cover. This is a current picture of the swap.
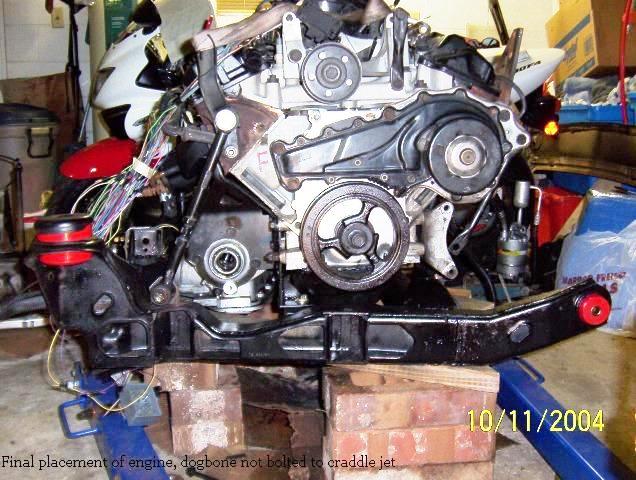
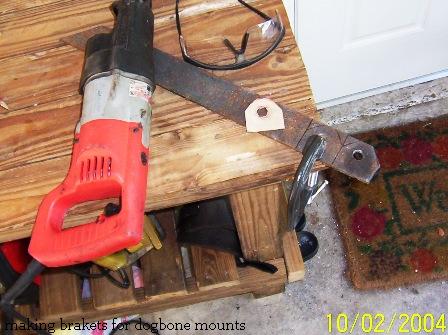
In this picture you can see how the eng should be place on a 85-87cradle. I am not sure about the 84..... I spend over 10 hrs in the "search" part trying to find a picture that would help me place the eng. The dogbone bolted to the head is a rear suspension piece from an early 90s Nissan Maxima, it fit perfectly, I just had to make the braket to bolt it.
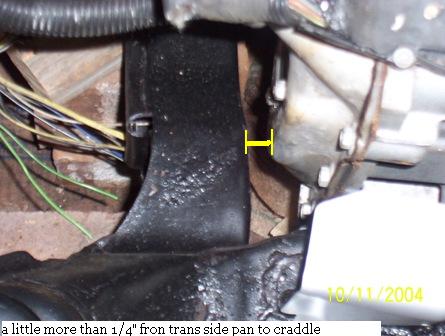
Here is a picture of the clearance between the transmission side pan and the drivers side of the cradle
Is that the original water pump that came with the engine? Now would be an excellent time to replace all the hard to reach things that might need to be replaced a short time down the road.
IP: Logged
07:02 PM
Kento Member
Posts: 4218 From: Beautifull Winston Salem NC Registered: Jun 2003
Is that the original water pump that came with the engine? Now would be an excellent time to replace all the hard to reach things that might need to be replaced a short time down the road.
He has a replaced water pump, I think the date code was 2000 but not too sure. I know it is not original. I just picked up my water pump, had to visit two different parts stores before I found one with a Metal Impeller.
IP: Logged
08:26 PM
paulcal Member
Posts: 2608 From: Jacksonville, Fl Registered: Oct 2002
Great information and pictures! I especially liked your 'spacer' between the crank pulley and cradle for measuring the right height of the engine- I used the exact same thing on mine I also used the urethane tranny mounts as motor mounts and even without a dogbone, the engine is pretty solidly locked into place. I still added the dog bone "just in case" but I used one from a 4 cylinder and made a bracket to attach it to the alternator mount. What kind of exhaust system are you going to run?
Originally posted by Cooter: Great information and pictures! I especially liked your 'spacer' between the crank pulley and cradle for measuring the right height of the engine- I used the exact same thing on mine What kind of exhaust system are you going to run?
Hey Cooter I have to say that I had the "spacer" there but the eng was being held by the eng hoist, when I was making the right eng mount. I knew that the mount would compress some and I wanted to make sure that I had the eng level. As for exaust I will try to run the pipe from the factory outlet to a muffler and two resonator tips, if it's too loud I might decide to route it the factory way ( in the Fiero ) but I would have to make a connection to the factory crossover pipe. How is your Hot Rod van running ? I have to say that I really enjoy reading about it.
Well lets continue....
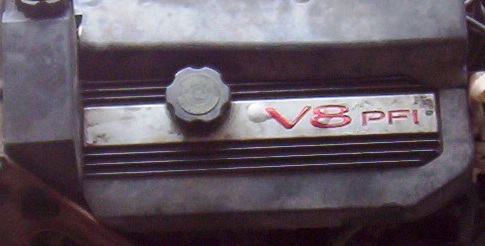
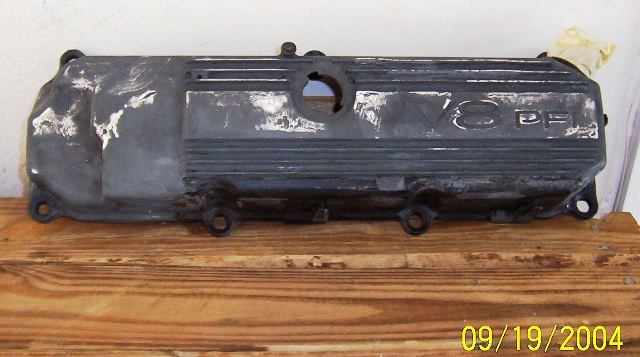
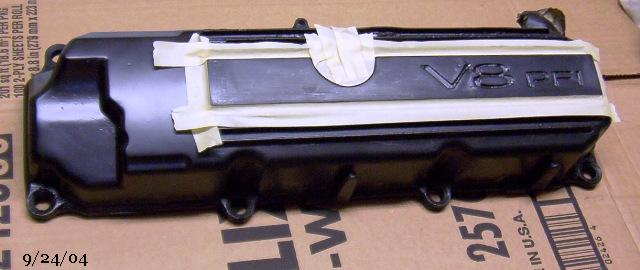
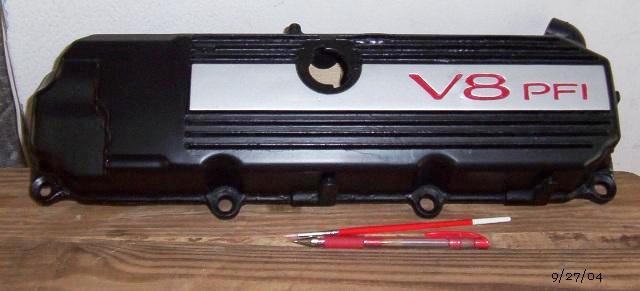
As some of you know the valve covers on the 4.9 are made of some diffent material and they tend to get really bad with time. Well in my case it was not different, I decided to get another valve cover with the oil fill up to put in the back of the eng (when mounted in Fiero) and leave the factory one alone in the front. I know I could have just swap front to back but I wanted to leave the front there so I won't have to relocate the PVC vacum hose. The one I got for the back was about the same as the one in the front, it was bubling up and the surface on the valve cover was very porus. NOTE: I saw a valve cover from an older caddy w/ the 4.5 and the valve cover look a lot better and only said V8, well I am glad I did not get that one because a friend told me that it would not fit, since that valve cover does not have the indentation for the fuel injectors. I think that Caddy was an 89 or 90. Here is a picture of how the valve covers bubble up. What I did to the one I got is: strip paint with paint striper, use grinder to even out surface filled inperfections primed it painted hight temp engine black taped valve cover and painted the center part hight temp silver and last I used a very small brush to paint the V8 PFI, it did not come out perfect but it is 100% better than before. I priced a new one from the dealership and they wanted about 120.00 so I decided to redo mine.
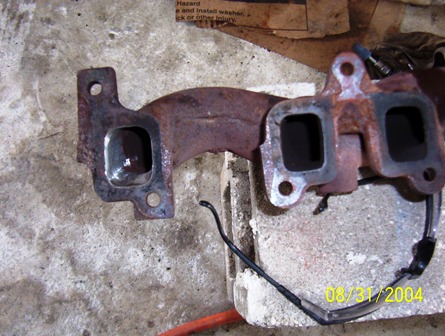
When I was cleaning the eng I decided to sand and paint the exaust manifolds, when I took them out I noticed that there was a little bit of material that could be removed so that it could be a little less restrictive and since every little bit helps I decided to port the exaust manifold. Here is a picture showing one part done to compare to the other ones. After I ported the manifolds, I gave them a very light coat of hight temp paint and made them look a lot better.
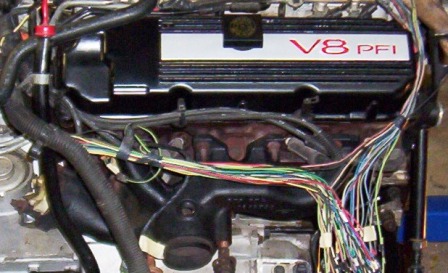
Here is a picture of the exaust manifold painted and the valve cover installed
IP: Logged
07:47 PM
jeffndebrus Member
Posts: 2772 From: Jacksonville, Fl- usa Registered: Aug 2001
i love FL guys doin it them selves i bought my car out there i live in the tampa area and the fiero guys here arnt real good about helping each other any of u orlando guys know of any one i can get ahold of out there i might join yalls club instaed of the tampa one im looking for help in a engine swap on my 2 cars both 86 se 4 cyls
------------------
IP: Logged
10:26 PM
Kento Member
Posts: 4218 From: Beautifull Winston Salem NC Registered: Jun 2003
i love FL guys doin it them selves i bought my car out there i live in the tampa area and the fiero guys here arnt real good about helping each other any of u orlando guys know of any one i can get ahold of out there i might join yalls club instaed of the tampa one im looking for help in a engine swap on my 2 cars both 86 se 4 cyls
Not a Problem. I am willing to assist, I got air tools, Compressor and a Angle Grinder! I can tear apart anything. ! Visit our club site for information, link is in my sig. Shot me an Email and I will be more than happy to give you a call about engine swaps. I am almost finished with my engine mock up and ready to start engine prep for my 4.9 swap. IF I dont get in gear 85 Lamb will be done before me.
How is your Hot Rod van running ? I have to say that I really enjoy reading about it.
My wife has been driving the van for about a year now and other than one starter and a dead A/C compressor, it has been very reliable. It is a blast to drive because a minivan should not launch the way this thing does- you can lay rubber from dead stop and it will spin until it shifts into second gear or punch it at about 10 MPH and it will start spinning the tires. I especially like to play tricks on the youngsters with their loud little cars. The look on their face when a minivan is able to pull ahead of them is priceless.
IP: Logged
11:29 PM
Oct 15th, 2004
86fieroEarl Member
Posts: 2203 From: Orlando, FL Registered: Jun 2002
For some reason it seems all the valve covers on 4.9s bubble up like that.... This problem has boogled me to no end Im doing new valve covers for mine right now.... I cut the ridge like lines off mine to try and make them look different You got lucky on those valve covers.... I saw some on a caddy at A-1 that looked good also.
Everything is looking real good on your swap also.... Keep up the good work.
IP: Logged
08:54 AM
86fieroEarl Member
Posts: 2203 From: Orlando, FL Registered: Jun 2002
Not a Problem. I am willing to assist, I got air tools, Compressor and a Angle Grinder! I can tear apart anything. ! Visit our club site for information, link is in my sig. Shot me an Email and I will be more than happy to give you a call about engine swaps. I am almost finished with my engine mock up and ready to start engine prep for my 4.9 swap. IF I dont get in gear 85 Lamb will be done before me.
Don't forget me I have the most important tool Welding gun.
IP: Logged
08:55 AM
PFF
System Bot
Kento Member
Posts: 4218 From: Beautifull Winston Salem NC Registered: Jun 2003
Originally posted by jeffndebrus: Whahoo!! Great post! What did you fill the valve cover imperfections with? Will it melt>?" lol
Hopefully it wont melt....I first grinded the area down and used very little body filler, I would recomend liquid steel or J B Weld just to make sure but I am pretty sure mine should be ok, otherwise I would not have spend as much time as I did.
[This message has been edited by 85LAMB (edited 10-16-2004).]
IP: Logged
09:31 PM
Mastermind Member
Posts: 1396 From: Chicago, 4.9 IL Registered: Apr 2002
Sept 05? Ok, I thought you were doing it this year?
I am. so when I get it done early people will be surprised! I have all the parts,right now I am doing prep work on the motor and the front/rear suspension.
IP: Logged
12:11 AM
Oct 18th, 2004
opm2000 Member
Posts: 1347 From: Versailles, Ky USA Heart of the Bluegrass Registered: Dec 2000
I'd really likie to hear from the '88 builders if this spacer is the same for the '88 cradles. If not, what dimension would it be? No hijack intended, I think you did a great job.
David Breeze
------------------ Pantera Rebody Kits
[This message has been edited by opm2000 (edited 10-18-2004).]
IP: Logged
06:21 AM
Black-Azz-GT Member
Posts: 2326 From: Florida Keys Registered: Oct 2003
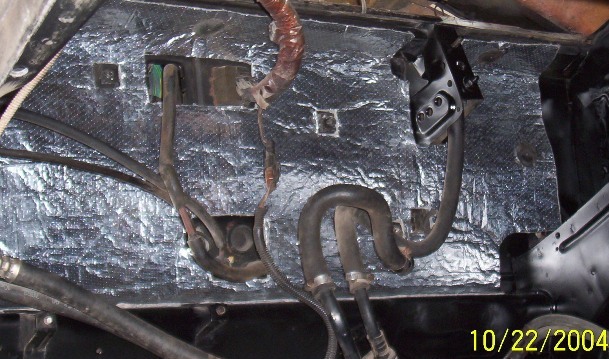
Well, I have been working on cleaning the eng bay for the eng, I took off the fiberglass insulation, that was in really bad shape and replace it with something I found at Pepboys, it looks shiny on one side and the other side is the backing material, it help clean up the eng compartment. I also sanded and painted the rest of the eng compartment. Another thing that I continue to work on was the wiring .... Yesterday I extended several wires to be able to have the harness come out to the front of the eng, by the firewall. I have to say that it seems overwelming specially looking at all those wires together, but I will try to extend or shorted one set of wires per sensor at a time.
Update: I finish detailing the eng compartment and I am pretty happy with the results.
The wiring has been a real pain in the rear, since they had cut the whole harness, I have had to splice every single wire on the eng, it has been very time consuming. I have solder and shrink warp every one of them and I still have to hook up the C500 and C203 plus I have some wires that I have not clue what I will be doing with them.
I am hoping that some of you guys can help me identify some of the wires...
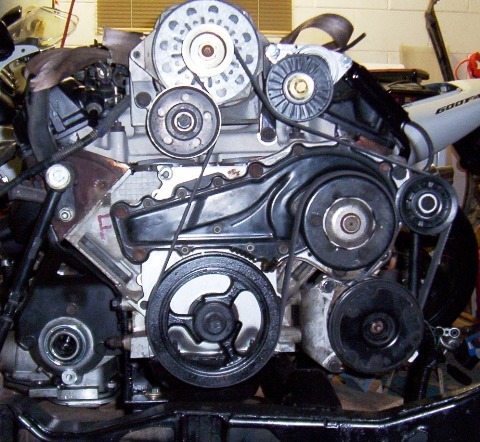
I started to mount the belt tensioner and idler pulley. Since the ritght bolt to the alt is the same that will be holding one side of the tensioner, I had to get a longer one, I though thats is not problem.... to make the story short I had to make 3 different trips to the parts store to be able to find one that would work. In one bolt, the tread was not long enough, the other one was too long and the third one was the good one. Here is my final set up:
[This message has been edited by 85LAMB (edited 11-07-2004).]
IP: Logged
12:07 AM
Nov 18th, 2004
Kento Member
Posts: 4218 From: Beautifull Winston Salem NC Registered: Jun 2003
Any updates as of yet? I know you have been out of town for work so most likely not a lot of time for the project. At this rate you will be finished before me! LOL!
------------------ 4.9 Caddy in Garage! Car in Driveway! ACK! **************************************** http://home.cfl.rr.com/fierose Central Florida Fieros http://www.centralfloridafieros.org Proud Member and founder of the DOWN SOUTH SUNNY WINTER PICK ON SNOW PEOPLE COALITION!
IP: Logged
09:09 AM
Toddster Member
Posts: 20871 From: Roswell, Georgia Registered: May 2001
I have been out of town quiet a bit and I am going out of town again...... but I was able to get some more work on it and working on the wiring some more.
On a side note: My house was broken into > and they turned my place upside down pretty bad, I will be intalling an alarm system and some other little things... just in case they feel like coming back. They took money and jewlery. Looks like they where in my house when I pulled up to my place and ran out the back and jumped the brick wall. I wish I could have cought them...
IP: Logged
01:29 AM
KillerX Member
Posts: 736 From: Ontario, Canada Registered: Oct 2001
KillerX I am sorry it took me so long to respond.... I got the material from Pepboys, it is pretty good stuff, a friend told me that they use that material for insulation on some motor-homes, I am happy with it.
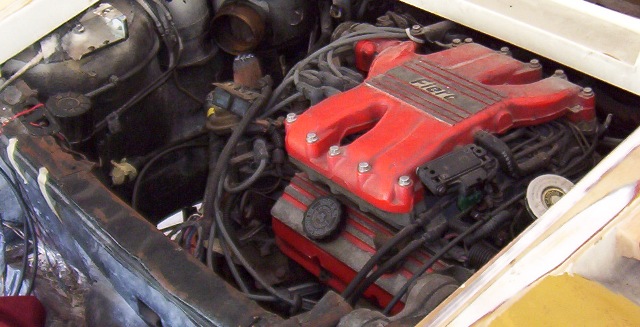
Update time: On this picture you can see how the factory engine fits on the eng compartment. Notice how close it is sitting to the top of the body, look at the right top corner on the picture.
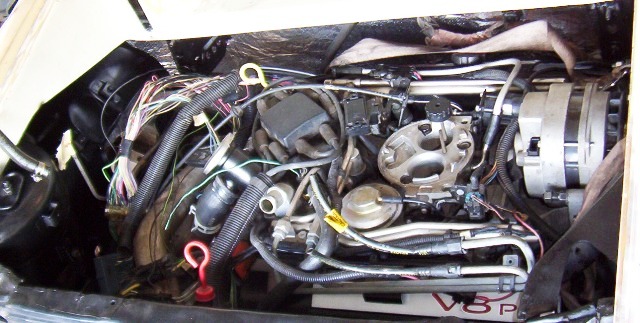
Now here is a picture of the engine mounted in the car I was very happy with the results and I was supper happy to see how much lower the engine sits, compare to the 2.8. Again notice the top of the body and see how much more room there is. As you can see I am not done, I still have to finish the wiring in wich I will need help and I have not connected anything on the eng. as far as coolant, fuel or anything else but it's getting there.
I will start a new tread asking for help on the wiring, I am really hoping that some of you guys will help me.


 and they turned my place upside down pretty bad, I will be intalling an alarm system and some other little things... just in case they feel like coming back. They took money and jewlery.