Well, My Fiero has started to leak like swiss cheese recently. I need to replace both the water pump gasket, and the oil pan gasket.
I'm worried about the oil pan situation though. Can I remove the oil pan without removing the exhaust? If so, is it an immense pain to get it back up there with a fresh gasket with the exhaust still on? What else needs to come down before hand?
As far as the water pump gasket goes. I had to replace the water pump last year and this gasket has lasted about 11 months. Are there any tricks I should be aware of when doing either of these gasket replacements? Thanks~!
I've got a bucket of extra "+'s" here just begging to be handed out!
The V6 oil pan has a gasket? News to me. I pulled mine one time while the engine was out just to check on the main bearings, and black RTV was the only gasket material in there ... so that's what I used when I reinstalled the pan.
The V6 oil pan has a gasket? News to me. I pulled mine one time while the engine was out just to check on the main bearings, and black RTV was the only gasket material in there ... so that's what I used when I reinstalled the pan.
Yes, the V-6 2.8 has a gasket and is not just RTV.
You will need to disconnect the battery and jack up the front of the engine (removing the front rubber mount). Remove the starter and inspection/dust plate from the transmission. Sometimes the pan will wedge on the way down after removing the bolts, it can be pried out like it is spring loaded. The exhaust is not in the way.
IP: Logged
06:25 PM
olaf_fiero27 Member
Posts: 967 From: winnipeg,manitoba,Canada Registered: Oct 2004
I just finished doing this job all of 4 weeks ago.......not the funnest but definetley doable in 2 hours
Well first thing is first unhook negartive battery cable, and unhook all connections going to the starter. -Remove the 2 bolts that hold the starter to the block and pull it off. ( make sure to reinstall the same shims that you removed ) -Remove the clutch cover, ( 4 bolts i beleive ) upon reasembley i would reccomend putting some RTV on the cover just to be sure any water doesn't get in there and make the job much worse. -Remove the bolts that secure the exhaust to the Y-pipe and remove the exhaust springs ( this way the exhaust has some play and you have some more room to work with ) - Now go to the top of the engine and unbolt the dogbone from the trunk side ( when reinstalling the dogbone might not line up with the whole, take a peice of nylon rope wrap it around the plenum and middle manifold and wrap the other end on the hook in the trunk and using a hockey stick etc turn the rope till the holes line up and slip the bolt in) -Loosen the alternator on it's bracket and remove the belt. -Next go down to the passenger side rear wheel well and locate the motor mount beside the crank pulley. Remove the nuts holding it on from the bottom side, and remove the nuts holding it on from the top side. Place a 2 x 4 on your floor jack and put it under the oil pan and lift, once it has raised the engine up place a 2 x4 height wise under the crank pulley securing the engine. -Now finish unbolting the motor mount by removing the bolt that secures the alternator bracket and the other bolt that is on the block. -Now you have your motor mount off, Next grab a socket wrench and loosen all the oil pan bolts ( make sure to make a diagram or whatever to ensure the bolts go back to there proper spots because they are not all the same. -Pull the pan off you may have to wiggle it a little bit but it should be straight forward, when i did mine i used a fel-pro gasket and it is proving to be good..
Good Luck
IP: Logged
07:18 PM
Jul 11th, 2005
Pyrthian Member
Posts: 29569 From: Detroit, MI Registered: Jul 2002
The V6 oil pan has a gasket? News to me. I pulled mine one time while the engine was out just to check on the main bearings, and black RTV was the only gasket material in there ... so that's what I used when I reinstalled the pan.
me too. no oil pan gasket for me - just the rubber rear main part. the rest is all RTV.
Well, I got everything including a new waterpump today to do the job, but then it started raining. So it looks like it'll get done at the earliest tomorrow.
But I was under there today removing most of the oil pan bolts and the starter, and I didn't really see why I would want to remove the motor mount. Does it get in the way? I've got the harmonic balancer off so I can get to the water pump easier, and it looks like I should be able to get the pan off no problems with the motor mount still on.
edit: Plus's have been distributed! Thanks for your help!
[This message has been edited by Oslo (edited 07-11-2005).]
IP: Logged
10:30 PM
olaf_fiero27 Member
Posts: 967 From: winnipeg,manitoba,Canada Registered: Oct 2004
As far as i have read the motor mount is in the way, you can modify the mount by cutting a 1 x 1 square out of one of the corners, i have never been to fond of this idea so i just took a few extra minutes and removed it, but if you have the harmonic balancer you may be able to get it out like that although i have never tried of heard of it being done that way it's worth a shot.
Olaf
IP: Logged
10:39 PM
85-GT Member
Posts: 365 From: Dover, NH, 03820 Registered: Mar 2005
Did it two days ago. Motor mount is the problem. Unbolt, and jack the engine up. Problem solved. Listen to the guys before me, they did a good job of explaining it.
-Shawn
IP: Logged
10:46 PM
Indiana_resto_guy Member
Posts: 7158 From: Shelbyville, IN USA Registered: Jul 2000
The deal is that the crank bearing caps extend almost to the bottom of the pan in the front. That means that the pan must drop close to three inches before it can be removed. Once you get it off you will see what I mean.
IP: Logged
11:05 PM
Jul 12th, 2005
GT86 Member
Posts: 5203 From: Glendale, AZ Registered: Mar 2003
You can cheat and not bother removing the mount. You'll need to cut a notch in it though, in order for the pan to clear on it's way out. If you look at thne mount, you'll see where you need to cut the notch. It's not a huge amount of material that needs to be removed, and it's not in a load-bearing area of the mount. I notched mine just to make it easier if I ever have to pull the pan in the future.
I also unbolted the exhaust at the y-pipe. That way I could move it a little, just to give me some more room. Don't know that it was necessary though.
Well, today I got into the dissassembly stage and I've run into quite the problem:
One of the 2 starter bolts will not come all the way out. I got it out to what I think is a little over half the way out and now it just sits and spins. It is the bolt to the front of the car. The only thing I can think of is that someone tried fixing some threads with a heli-coil and now that heli-coil has come loose and is just spinning... I don't know what to do now...
IP: Logged
02:29 PM
Indiana_resto_guy Member
Posts: 7158 From: Shelbyville, IN USA Registered: Jul 2000
Well, today I got into the dissassembly stage and I've run into quite the problem:
One of the 2 starter bolts will not come all the way out. I got it out to what I think is a little over half the way out and now it just sits and spins. It is the bolt to the front of the car. The only thing I can think of is that someone tried fixing some threads with a heli-coil and now that heli-coil has come loose and is just spinning... I don't know what to do now...
Jiggle it (the starter) a bit, it may be hung up on the shim (if one is present). Or just try to pull it out further.
[This message has been edited by Indiana_resto_guy (edited 07-12-2005).]
When I did mine I noticed that the Felpro gasket is actually U shaped and the additional gasket comes with the timing cover gaskets to cover off the front flange.
Two things, first off, if you are going to jack the engine and pull it out, you might as well clean your oil pump screen. They do get clogged up. Second, you may want to buy a new oil pan. They aren't real expensive and the bolt holes aren't distorted from over-torquing.
If you aren't changing the pan, I would just drop it an inch, clean off the surfaces, put a good bead of RTV on it and do it back up. That is to say if the bolt holes aren't distorted.
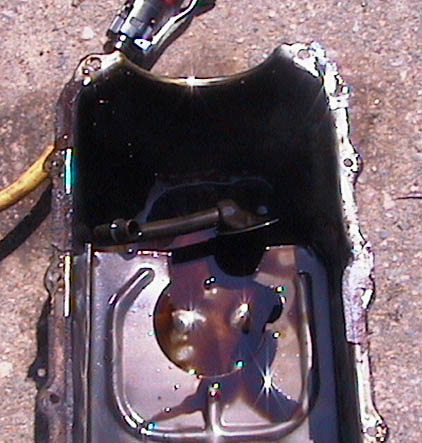
Lookie what I found hanging down in the bottom of my oil pan... I hope it just fell off when I pulled the pan, but I don't think it just happened.
As I had the pan loose on one side, before the whole thing was coming down, I could feel and hear something loose in there and found this when I dropped the pan... uh oh...
the pickup tube falling out is more common than most people think. A lot of people complain of low oil pressure in turns, and find it useful to tac weld that in place or a dab of rtv to try to 'glue' it in place. I'm sure someone will chime in with the 'right' fix.
Well, I certainly didn't have oil pressure problems, both my stock, and an aftermarket mechanical gauge, permanently mounted, read great oil pressure even with my synthetic oil. I'm just going to weld it back on. No biggie.
since i'm late int he game the only tip i can offer at this point is to clean botht he block and oil pan surfaces with brake cleane ron a rag - then apply a thin later of gasket sealant befoe the gasket - I do this with every installation of a component and nothing has ever leaked afterwards