with the safety catch the only downfall i see of those mounts is they offer no side loading protection (engine wanting to slide for/aft left/right..) but that happens with minimal force compared to the torque load..
i'm still a fan of using round bushings like the wcf design only using rubber instead of urethane.. always in compression never tension.
IP: Logged
01:43 PM
Darth Fiero Member
Posts: 5922 From: Waterloo, Indiana Registered: Oct 2002
Today I put the CV axles together. If anyone remembers I spoke of using the Beretta 4T60-E left axle because it is the shortest one GM makes, concerning the inner axle shaft itself. Well the 4T65-E HD axles are a larger diameter and spline count but the outer tripods use the same size components as the manual trans equipped fiero's axles. So basically for both sides the outer cv tripod was stock manual trans fiero, and the inner cv tripod was 4T65-E HD but the actual part that splines onto the inner shaft was manual trans Fiero hardware. The passenger side inner axle needed to be slightly longer stock Fiero driver's side inner axle, by about 1/2". It just so happens I had one of these laying around on the shelf.
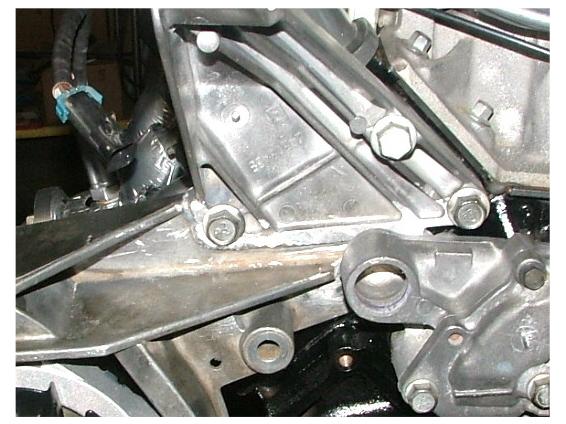
I also "altered" the stock Fiero dog-bone mounting point to bring it in-line with the dog-bone mount bracket on the engine so we could use the stock 2.8L dog bone. I will get some pics up on Tuesday.
IP: Logged
11:17 PM
Oct 13th, 2004
Darth Fiero Member
Posts: 5922 From: Waterloo, Indiana Registered: Oct 2002
Dog bone mount, cooling system, and coversion to auto shifter / brake pedal is all completed.
Notice the coolant fill point will get covered up by the dog-bone bolt access cover. Also built in a w/p bypass system into the heater hoses using some Tee's that will prevent excess pressure from building up in the heater core circuit during high RPM operations when the thermostat is closed. As far as the radiator hoses, for the coolant outlet (thermostat) to pipe I used Dayco hose part number: 71075. For the pipe to water pump I used Autozone brand hose p/n: XL-1004. NOTE: Some trimming will be required.
[This message has been edited by Darth Fiero (edited 10-13-2004).]
IP: Logged
02:24 AM
dizmon_85GT Member
Posts: 377 From: Knoxville, IL USA Registered: Aug 2001
Sure looks nice sitting in there. Looks like the dog bone bracket lines up real nice now. I like the way the fill tube will be hidden under the dog bone bolt cover. Fantastic work Ryan.
IP: Logged
01:15 PM
Darth Fiero Member
Posts: 5922 From: Waterloo, Indiana Registered: Oct 2002
Modified the stock Fiero shifter bracket for use on the 4T65-E. Also had to modify the shift lever to work within the constraints allowed by the exhaust crossover pipe.
I will get some on-car pics later as I painted these items and they are not yet dry. Also installed the throttle cable and took measurements for the custom A/C lines. I am taking the stock Fiero V6 lines to Ace Radiator of Fort Wayne, Indiana this weekend to have them "reclocked" and new rubber hose put on them.
Well there goes Darth again, leaving me at home to take finals while he goes back to Fort Wayne to have some AC lines made for this project and ties up some loose ends to close down the family lake property. School is so much fun!!! Anyway he should be back early next week and getting back to work on this swap, only a few more systems to hook up and finishing touches and it will be all done!
Well this project is on the down hill side. I can't wait to drive it. There has been a few issues (things that I did) and Darth has fixed everyone. I'll tell you what, if your considering a conversion this would be the man to do it. Thanks Darth.
[This message has been edited by dizmon_85GT (edited 10-17-2004).]
IP: Logged
06:51 PM
Oct 19th, 2004
Darth Fiero Member
Posts: 5922 From: Waterloo, Indiana Registered: Oct 2002
Got the A/C lines done and got back home late Sunday night. Unfortuneately I woke up Monday morning with a bad head cold so I am going to take it easy until I get better. Today I feel a little better so I should be able to get back on this project on Wednesday. Never fails, always get this cold every year at about the same time probably due to the major weather change and overworking myself.
IP: Logged
03:17 PM
Darth Fiero Member
Posts: 5922 From: Waterloo, Indiana Registered: Oct 2002
Oh before I forget I just wanted to let everyone know that Precision Turbo and Engine http://www.precisionturbo.net/ has changed the part number for the Walbro 307 fuel pump. The new part number superceides the 307 and 340, which both are now the same part. (previously the 307 flowed the same as the 340 but the 340 just had a higher pressure rating). F2000169 is the p/n for the 255lph high pressure pump and install kit which retail for $105.00. The install kit comes with everything to make the pump upgrade a direct plug-and-play install into 87-88 Fieros, 86 and earlier Fieros will require some modification of the in-tank wiring harness.
darth, have you ever used another fuel pump? or always the walbro.. i've heard people using the gtp pump or the corvette pump..
The GTP pump comes as part of an assembly in a plastic housing that is part of the complete sending unit, which will NOT fit in the Fiero tank. The early GTP pumps can be removed easily from this housing, not sure about the newer units. Independant dyno tests say a NEW oem GTP pump can support at least 420hp. However excessive age does degrade pump performance.
The pre-96 LT1 pumps are similar in design to the stock Fiero pumps but probably flow more volume. The problem is the Corvette pumps are rated for use on a naturally asperated engine that only requires 45psi maximum fuel pressure. The stock L67 has fuel pressure that exceeds 50psi under boost conditions. Modded engines can get to 60psi and higher. While the Corvette pump can support up to about 400hp at 45psi I have not seen any testing that suggests it can support the same flow rate at the higher pressures. While I was in college, I had the opportunity to flow test a few stock pumps. While most stock pumps can "hold their own" pertaining to flow rate up to 45psi, under higher pressures all started significatly dropping in flow rate. While many have used and are still using LT1 pumps in their L67 powered Fieros I don't recommend it. I believe $105.00 is cheap insurance and piece of mind to know you will probably never exceed the capabilities of the Walbro pump.
There is a way to check and see if your current fuel pump can support your engine. You will need a fuel pressure gauge, a friend, and OEM pressure specifications for your particular engine. What you will need to do is connect your gauge to the fuel rail and find a way of positioning it so a friend can watch it's readings while you drive. I find that taping the gauge to the back window works best. Next you will want find a suitible stretch of road where you can get a WOT blast in safely. If during the WOT run your fuel pressure maintains or exceeds OEM specs then your fuel pump is capable of supplying enough pressure and volume to the engine. If the pressure drops off then chances are your pump cannot keep up with the engine, or you have a restricted fuel system or fuel filter.
[This message has been edited by Darth Fiero (edited 10-19-2004).]
IP: Logged
04:12 PM
PFF
System Bot
Darth Fiero Member
Posts: 5922 From: Waterloo, Indiana Registered: Oct 2002
It should be noted that I did use the OEM 2.8 V6 pump in the L36 swap I did for the wifey, but that pump had been replaced just before we bought the car. I did do the pressure/volume test and it held up fine. However this test was done on an L36 with 22lb injectors and a max fuel pressure of about 43psi. I certainly would NOT trust using the OEM Fiero fuel pump on ANY L67 or L32 supercharged engine. In fact I had a couple of my custom chip customers in the past report WOT lean conditions and I did end up finding out that they were trying to use the OEM pump for these applications. They proceeded to upgrade their pumps which fixed the problems.
IP: Logged
04:21 PM
Oct 20th, 2004
Darth Fiero Member
Posts: 5922 From: Waterloo, Indiana Registered: Oct 2002
Feeling a little bit better today I decided to do a few things out in the shop. Since we are relocating the battery to the front (using a Norm's Fiberglass tray) this left pleanty of room to mount the coil on the battery tray. I made a flat plate of 1/8" steel to mount the coil pack to that also doubles as a heat sink. The coil pack bolts to the plate then the plate is bolted to the battery tray using 4 screws. I used screws and not bolts because it would have been a pain to get to the nuts on the underside of the tray and I wanted to make sure the coil pack could easily be removed.
I also made a bracket for mounting the MAP sensor on the front cylinder head just below the SC snout. Will get pics of that tomorrow. As promised I got a pic of the shifter bracket and lever installed on the trans:
Here are the custom A/C lines done by Ace Radiator of Fort Wayne, Indiana. Cost to modify stock Fiero a/c lines and use new hose was $113.98.
IP: Logged
10:29 PM
Oct 22nd, 2004
Darth Fiero Member
Posts: 5922 From: Waterloo, Indiana Registered: Oct 2002
Mounted the Canister Purge Solenoid to the canister bracket and ran all the vacuum lines.
Also started disassembling the wiring harness. First step I always do is remove all the loom and tape.
Note that the ABS wiring is integrated in the PCM harness so all of that stuff will be removed along with anything I don't need for the Fiero install. Example of which would be post cat O2 wiring, enhanced EVAP monitoring sensor wiring, etc. Once I get the harness down to the bare essentials, I will shorten and lengthen wires as necessary to make the install as clean as possible.
IP: Logged
12:31 AM
dizmon_85GT Member
Posts: 377 From: Knoxville, IL USA Registered: Aug 2001
Wow!!! That sure is a mess of wires. I glad you know what your doing cause that part is what scared me from even attempting this install. Looking good.
IP: Logged
01:19 PM
Oct 24th, 2004
Darth Fiero Member
Posts: 5922 From: Waterloo, Indiana Registered: Oct 2002
-3" universal flex joint p/n FT300N8, did have a Napa p/n on it: 735-4793 -3" radius, 3" mandrel 90 degree bends: Napa p/n 41-536
There is one point in the exhaust system just beyond the flex piece that comes very close to the alternator. As a precaution, I header-wrapped this section to help keep heat off the alternator.
Today I installed the A/C lines and evacuated the system for about an hour. Disconnected the pump and the system held 29" vacuum for 30 min so it looks good. Also installed the A/C high side pressure sensor at this time because trying to install it on a full system usually results in the O-ring blowing out before you can get the sensor tightened all the way down.
Also installed the exhaust system using a new flange gasket GM p/n 10356943. With that done, I continued back on the wiring. I completely seperated the harness. This means each connector to each component is now by itself since I will be rerouting the complete harness to "hide" it better. NOTE: You don't have to remove all of the loom and seperate the harness like I did. This can be very time consuming and difficult and most people should avoid this step if they are not that comfortible with wiring. I have worked with GM products for many many years and know most wiring color codes by heart and their purpose. I don't want to scare anyone away from trying to do this swap themselves because of the way I am doing the harness. I only do it this way because I feel it is necessary to take all of the swaps I do to the "next level" of cleanlyness and professional workmanship for my customers.
IP: Logged
11:21 PM
Oct 27th, 2004
RCR Member
Posts: 4454 From: Shelby Twp Mi Registered: Sep 2002
About 70% of the PCM wiring is done. I mounted the PCM to the left inner fender using a plastic PCM holder I found at the junkyard. I have no idea what it came off of but I suspect it is from a newer GM truck or SUV.
Here is a pic of where and how I mounted the MAP sensor. It is mounted to the cyl head by a simple strip of steel that I bent up and drilled.
Injector wiring is done. Can you see it?
I have about 30% of the harness to complete including wiring to knock sensors and everything inside the car that the PCM needs to be connected to. Then everything gets GM-quality wire loom covering for enhanced looks and durability.
IP: Logged
11:54 PM
Oct 28th, 2004
Darth Fiero Member
Posts: 5922 From: Waterloo, Indiana Registered: Oct 2002
Took the weekend off to attend to some family business but got back on it this week. I have finished up the engine compartment wiring. All that is left concerning the wiring is stuff inside the car and the front mount battery hookup.
I mounted the cruise control low to keep it out of sight.
I tried to keep as much of the wiring as possible low and out of sight. While this does tend to clutter up the underside (looking up from under the car) it keeps the engine compartment clean. All wiring is covered using the same split loom used by GM. This is not the cheap Autozone stuff that melts at 180 degrees.
Also got the fuel lines hooked up to the car. This thing should be running by this weekend barring any disasters but I don't foresee anything of that nature being an issue.
Man Darth looks very nice! On the 79 dodge moune (the reinforced one)... When you told me to get the dodge truck one I forgot the year and ended up getting the 79 version.
Well ..it broke! AND the reinforced part with the "catch" dug into the oil pan !!!! No hole but a huge dent! I can only say to you and others is to put the "catch "part AWAY from the oil pan side
Are you elimateing the EGR stuff? Did you strenghten the craddle?
Thanks for the info on the 3/4" tap!! I used a "replacement freeze plug for that part on the WP, and just used the little black tube that came under the blower for the heater hose.........But NOW I will do it right
OH and on the C500 connector area....I placed mine behind the batt. tray and that helped clean up the engine bay a bit more
Very good write up!
------------------ 98 3800SC, Getrag 5sp. only one around Austin Texas !
Man Darth looks very nice! On the 79 dodge moune (the reinforced one)... When you told me to get the dodge truck one I forgot the year and ended up getting the 79 version.
Well ..it broke! AND the reinforced part with the "catch" dug into the oil pan !!!! No hole but a huge dent! I can only say to you and others is to put the "catch "part AWAY from the oil pan side
Are you elimateing the EGR stuff? Did you strenghten the craddle?
Thanks for the info on the 3/4" tap!! I used a "replacement freeze plug for that part on the WP, and just used the little black tube that came under the blower for the heater hose.........But NOW I will do it right
OH and on the C500 connector area....I placed mine behind the batt. tray and that helped clean up the engine bay a bit more
Very good write up!
this is why i like using the round bushings for engine moutns - even if the rubber wears out it can only move so far - and it'd have to snap a 3/8"-1/2" bolt to move farther..
IP: Logged
10:21 AM
dizmon_85GT Member
Posts: 377 From: Knoxville, IL USA Registered: Aug 2001
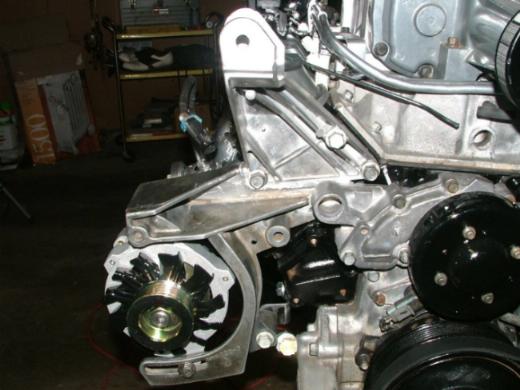
I have seen taht dogbone low mount alt bracket used by many people on here. What I want to know is who makes this? Where can one be picked up?
THanks
SH
I made it myself. Got the idea from Skitime's build. (thanks Ski!!) I used the 3800 dogbone bracket and a Fiero alt. bracket and married the two together. There was some fitting, grinding and welding but after a few trial fits I got it to work. Darth did make modifications to make it work. He had to remove the bracket on the rear firewall and move it a small amount towards the passenger side to make it work. I will post a picture of the mount when I get home from work.
[This message has been edited by dizmon_85GT (edited 11-03-2004).]
IP: Logged
01:15 PM
PFF
System Bot
dizmon_85GT Member
Posts: 377 From: Knoxville, IL USA Registered: Aug 2001
Got nearly all the interior wiring done today, all that is left is the performance shift switch but I have to ask Dizmon where he wants to put it. Tomorrow I will probably work on the fuel pump and battery relocation.
IP: Logged
11:17 PM
Nov 5th, 2004
Darth Fiero Member
Posts: 5922 From: Waterloo, Indiana Registered: Oct 2002
Finally got the battery installed up front using the Norm's Fiberglass kit.
Also got the gas tank and stock Fiero pump out and went to install the new pump but appearantly someone packed the wrong install kit so I will have to wait for the correct one. Still have to swap out the manual radiator for an automatic one and hook up the trans cooler but I can do that stuff Friday.
Well this swap is almost wrapped up. All that remains is the installation of the fuel pump then she can fire up and I can finish charging the A/C system. Coolant and other fluids are in, wiring is done, interior is back together. I did make some drip covers for the PCM and coil pack. For the PCM I used a piece of the plastic spare tire well I had to remove for the Norms Fiberglass battery tray which should keep rain water off the PCM. For the coil pack I used a piece of thick rubber mat. Both covers screw to the body which should prevent them from coming off duing normal driving but will let them be removed easily for car shows.
I will post some pics of the car when I get it running.
IP: Logged
07:56 PM
Darth Fiero Member
Posts: 5922 From: Waterloo, Indiana Registered: Oct 2002
Meanwhile the motor and tranny showed up this weekend for my next swap.
This 2001 Bonneville L67 and 98 Century 4T60-E (w/ 3.29 final drive) will be going into another one of GM's 2-seater cars...a Buick Reatta. I plan on posting the buildup over on the www.l67swap.com forum.
IP: Logged
08:00 PM
Nov 10th, 2004
Darth Fiero Member
Posts: 5922 From: Waterloo, Indiana Registered: Oct 2002
No pump install kit today so I called them. They did not ship it because they did not have any and there will not be any more available because the Walbro 307 has been discontinued. I had to buy the new replacement pump and kit which they are supposed to send out today. Once I have the new pump they said they will give me a full refund if I ship back the 307 w/ wrong install kit.
IP: Logged
01:44 AM
dizmon_85GT Member
Posts: 377 From: Knoxville, IL USA Registered: Aug 2001
What is so frustrating about this whole thing is Darth has worked hard to finish this install and the last thing is the pump. The vendor had the wrong install kit so that pushed the finish date back a week. Now Darth calls the vendor to find out where the kit is and evidently someone dropped the ball again. Now Darth and I have another setback. I'm getting real anxious to get my car back so I called the company and vented my frustrations on them. Now I feel a little better!!