Pennock's Fiero Forum
  Technical Discussion & Questions - Archive
  swap a 96 dohc, auto w/headers with me. warning lots of pics (Page 3)

T H I S   I S   A N   A R C H I V E D   T O P I C
  

Email This Page to Someone! | Printable Version

This topic is 3 pages long:  1   2   3 
Previous Page | Next Page
swap a 96 dohc, auto w/headers with me. warning lots of pics by mike kaas
Started on: 07-06-2003 10:38 PM
Replies: 88
Last post by: qwikgta on 02-14-2004 09:21 PM
mike kaas
Member
Posts: 183
From: leclaire,ia
Registered: Jun 2002


Feedback score: N/A
Leave feedback

Rate this member

Report this Post10-29-2003 10:34 PM Click Here to See the Profile for mike kaasSend a Private Message to mike kaasDirect Link to This Post
lets try that again.

[This message has been edited by mike kaas (edited 10-29-2003).]

IP: Logged
ltlfrari
Member
Posts: 5356
From: Wake Forest,NC,USA
Registered: Jan 2002


Feedback score: (4)
Leave feedback


Total ratings: 127
Rate this member

Report this Post10-29-2003 11:50 PM Click Here to See the Profile for ltlfrariClick Here to visit ltlfrari's HomePageSend a Private Message to ltlfrariDirect Link to This Post
Mike, you need to get rid of that # sign from the image name in the image url or change the # sign in the name in the url to %23.

Like this:
https://images.fiero.nl/pffimages/C100_%231a.jpg

so it appears like this:


P.S. Thanks for the info, keep it coming, I am soon to enter this interesting phase of my install.

------------------
Dave E

www.ltlfrari.com

[This message has been edited by ltlfrari (edited 10-29-2003).]

IP: Logged
mike kaas
Member
Posts: 183
From: leclaire,ia
Registered: Jun 2002


Feedback score: N/A
Leave feedback

Rate this member

Report this Post10-30-2003 08:11 PM Click Here to See the Profile for mike kaasSend a Private Message to mike kaasDirect Link to This Post
thanks for helping me out with that pic dave, i could'nt understand why it did'nt post.

here is the rest of that page.

IP: Logged
mike kaas
Member
Posts: 183
From: leclaire,ia
Registered: Jun 2002


Feedback score: N/A
Leave feedback

Rate this member

Report this Post10-30-2003 08:35 PM Click Here to See the Profile for mike kaasSend a Private Message to mike kaasDirect Link to This Post

mike kaas

183 posts
Member since Jun 2002
this electrical information is written for the 96 obdII swap. some or none of the wiring may be the same as 95 and earlier obdI systems, you will have to reserch for the earlier swaps.

The 96 obdII swap was not overly difficult to perform, but the original dohc drivetrain configuration needs to be retained. this means the 96 dohc was never offered with a manual transmission so the 4t60e automatic tranny must be used.

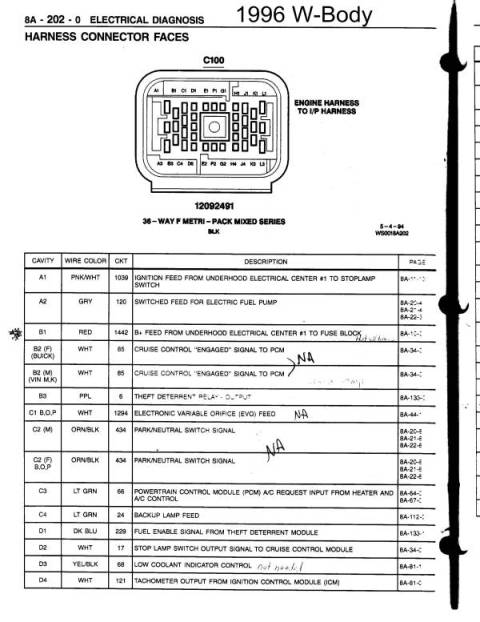
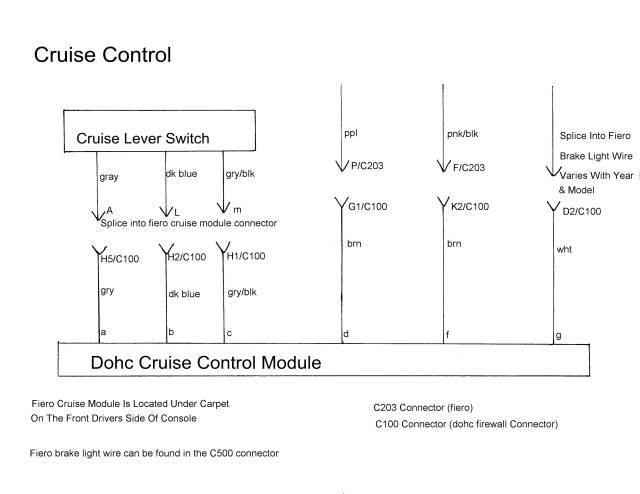
In using the obdII pcm it's best to keep the U/H electrical center #1 in the swap. it contains relays that the pcm controls and will set codes if not present. but this makes the electrical splicing easier because the only wires that need to be cut are the dohc C/100 firewall connector that will be spliced with the fiero C/203 & C500 connectors.

To start the wire splicing procedure i unpluged the C/203 connector under the console and removed the whole harness with the pcm harness through the firewall. I then dissassembled the firewall rear bulkhead wire harness plug and removed all the wires from the plug. out of all of these wires i only used about 11 of the wires of the C/203 harness and put these back in the plug.

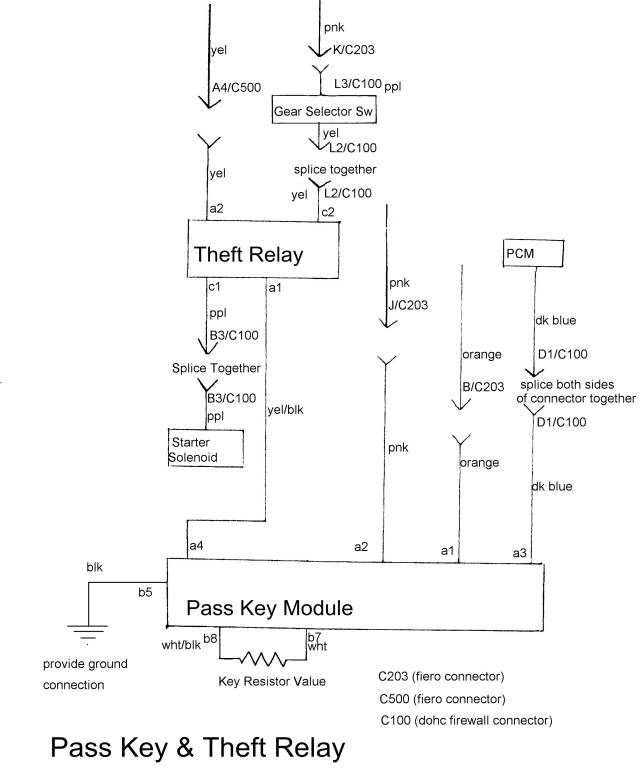
On my swap i installed the passkey module where the fiero original pcm was located, longer wires must be run through the firewall to the module, and i left the theft deterent relay in the engine compartment. this relay must be used because the wires in the transaxle range switch are not heavy enough gauge wires to use directly for the starter solenoid.

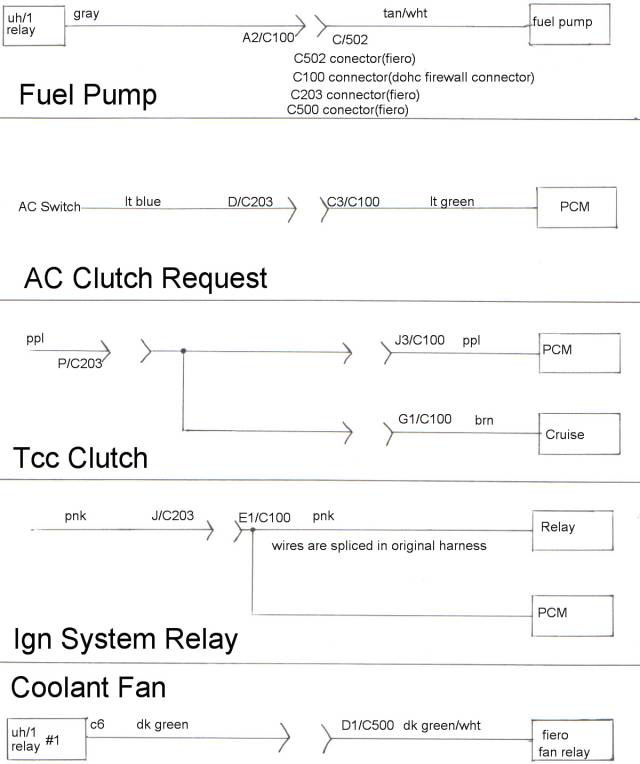
On the U/H #1 center the #2 coolant fan and the air injection pump are not used but the relays are left intact.

The EVAP system vacume hoses has to be hooked up because the pcm will control & monitor the system.

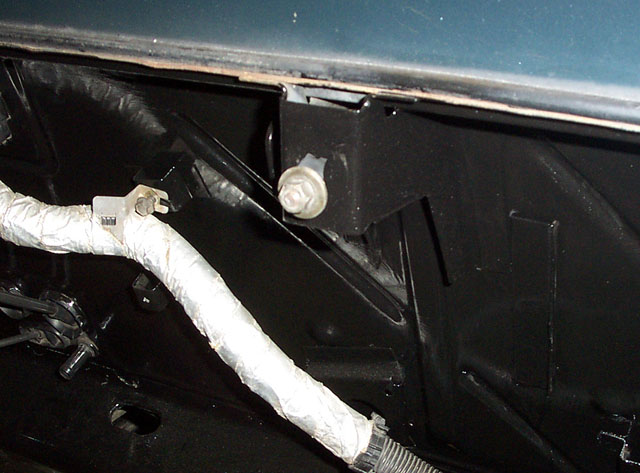
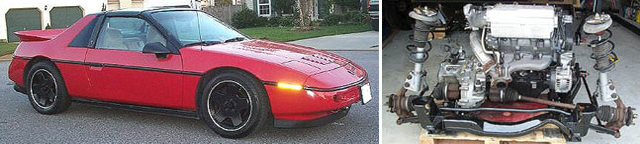
The fiero battery junction block will not be used. only the 2 heavy red wires of the fusable link A & B will be used. these are screwed to the U/H #1 bus bar (see pic). the + battery cable will be connected to the starter solenoid. the battery - cable will be connected to the engine block.

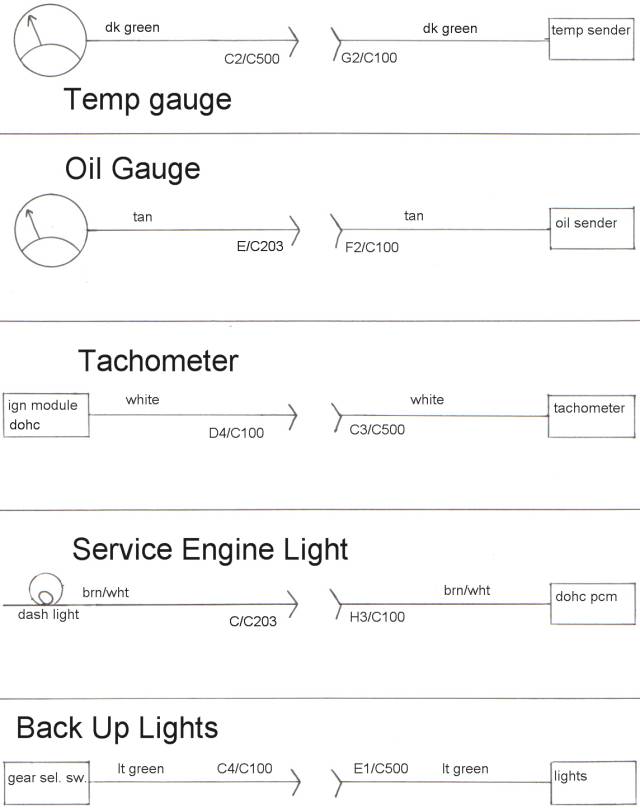
On my swap, my fiero had a oil gauge and the 2.8 fiero sending unit will screw into the engine block and the dohc sending unit connector will fit the fiero send unit.

The OBD system uses 2 oxygen sensors, one before and one after the cat converter these sensors and the converter must be used.

Because i had to keep the pcm in the same general location as in the dohc doner car to aviod splicing a lot of wires i removed the fiero battery and battery tray and installed the pcm in the original plastic case where the battery was located. I moved the battery to the front of the car.


On my swap i moved the C/500 conector forward about 10 inches and installed the U/H #1 center where the C500 used to be

The 88 fiero has a narrower strut towers so i had to relocate the coil packs to the strut tower area, on the earlier fieros this may not be nessessary

in the circle are the fusable link a&b wires bolted to the u/h #1 bus bar

IP: Logged
mike kaas
Member
Posts: 183
From: leclaire,ia
Registered: Jun 2002


Feedback score: N/A
Leave feedback

Rate this member

Report this Post10-30-2003 08:51 PM Click Here to See the Profile for mike kaasSend a Private Message to mike kaasDirect Link to This Post

mike kaas

183 posts
Member since Jun 2002
here are the wire diagrams i made for the 96 obdII swap.


IP: Logged
qwikgta
Member
Posts: 4671
From: Virginia Beach, VA
Registered: Jan 2001


Feedback score:    (21)
Leave feedback


Total ratings: 84
Rate this member

Report this Post10-31-2003 01:45 AM Click Here to See the Profile for qwikgtaSend a Private Message to qwikgtaDirect Link to This Post
WOW, thanks... i will have to lay it all out on the deck when i get home and look it over.

Thanks for the info, post more info and pics when you get a chance...

Rob

IP: Logged
Nashco
Member
Posts: 4144
From: Portland, OR
Registered: Dec 2000


Feedback score:    (8)
Leave feedback


Total ratings: 74
Rate this member

Report this Post10-31-2003 02:30 AM Click Here to See the Profile for NashcoClick Here to visit Nashco's HomePageSend a Private Message to NashcoDirect Link to This Post
Amazing documentation, very well done! Bravo!

Bryce
88 GT

IP: Logged
fieromadman
Member
Posts: 2217
From: Oconomowoc WI, USA
Registered: Jan 2003


Feedback score: (1)
Leave feedback


Total ratings: 63
Rate this member

Report this Post02-14-2004 02:58 PM Click Here to See the Profile for fieromadmanClick Here to visit fieromadman's HomePageSend a Private Message to fieromadmanDirect Link to This Post
Before this gets archived i thought i would give it a bump! Besides, I plan on putting this information to use some time. I really like what you did with the headers but if i understand correctly the engine that im looking at is a 92, so i can just flip the manifolds around and it should work out to exit in the stock location? I like your dogbone but i will be using manual so im kinda worring about the added abuse that it WILL recieve. Perhaps it is possible to use that mont and another one in addition to it to keep the engine in its place? The only other thing that i would like to know is if i will need to modify any of the engine bay to fit the motor in? I have heard that you need to cut some of the decklid hinge off? Thanks alot!

-jeff

------------------
REMEMBER: If you cant win the race you loose the argument!!

www.geocities.com/j_depies

IP: Logged
qwikgta
Member
Posts: 4671
From: Virginia Beach, VA
Registered: Jan 2001


Feedback score:    (21)
Leave feedback


Total ratings: 84
Rate this member

Report this Post02-14-2004 09:21 PM Click Here to See the Profile for qwikgtaSend a Private Message to qwikgtaDirect Link to This Post
I cut off half the pass decklid mount, and removed the intire dog bone mount area. I drilled out the spot welds that held the mount and ground down the high spots, i think it cleans up the area, makes it look like the drivers side, clean...

Here is the decklid, no pics of the bone area yet, not done.

Rob


------------------

88 TTop coupe (CJB #95), 96 3.4DOHC/5 speed in progress

IP: Logged
Previous Page | Next Page

This topic is 3 pages long:  1   2   3 


All times are ET (US)

T H I S   I S   A N   A R C H I V E D   T O P I C
  

Contact Us | Back To Main Page

Advertizing on PFF | Fiero Parts Vendors
PFF Merchandise | Fiero Gallery
Real-Time Chat | Fiero Related Auctions on eBay


Copyright (c) 1999, C. Pennock