bv motorsports> that looks like a good place for a dogbone, but unfortunatly that won't work for me. i am using the compressor for airconditioning so that leaves me with no room on the bottom of the engine for a dogbone. i like you're idea with the front cover and been thinking about replacing the whole plastic cover with a aluminum plate and using this as a starting point for a dogbone. there is just no place on top of the front of the engine for a sucure dogbone mount.
drexter> the headers are looking great. got my engine in the car and as tight as i made my headers to the engine there is not much room between the front header and the heatshield on the firewall. keep this in mind with yours
IP: Logged
09:45 PM
ltlfrari Member
Posts: 5356 From: Wake Forest,NC,USA Registered: Jan 2002
Bobby is making these parts. If you are interested call him @ (757) 722-6247
I have a similar setup in that general area but mycompressor is there and functioning. My dogbone attaches to the stock lower AC compressor bracket and to the front cradle crossmember in the general area shown in that pic. I used a stock short DOHC dogbone as can be found in early 90s DOHC equipped cars
IP: Logged
04:13 AM
ltlfrari Member
Posts: 5356 From: Wake Forest,NC,USA Registered: Jan 2002
Seems to me that the dogbone being that low down and close to the rataional axis of the engine would put a lot of strain on the mouning points. not saying it is not effective, just that a mount with more leverage would put less strain on the components.
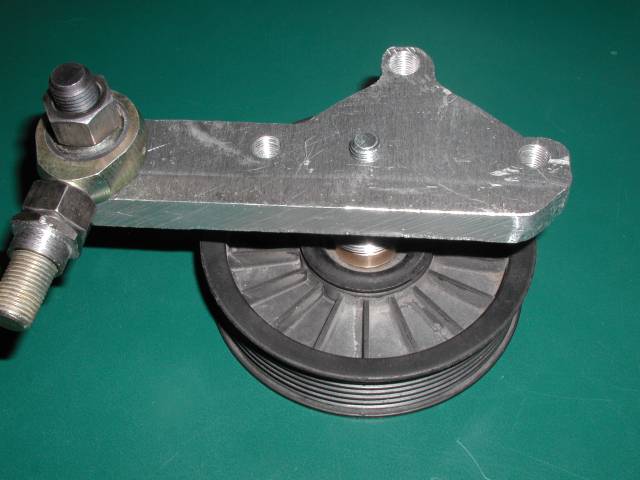
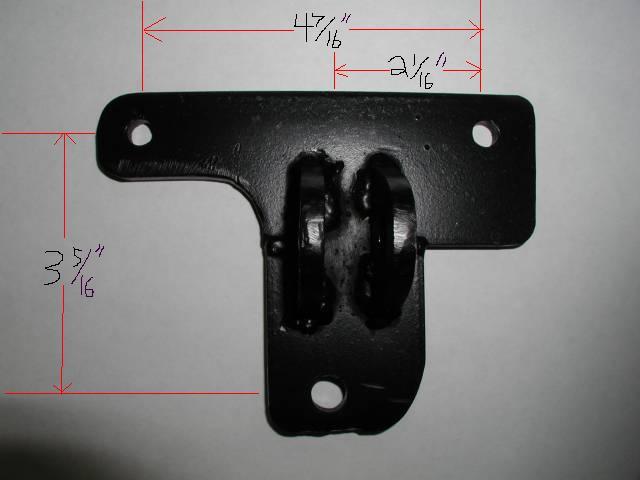
now the dohc engine has a power steering pump and this not needed for the fiero so this has to be replaced with a idler pulley. i had a idler assembly laying around that replaces the air cond. compresser on a chevy s-10 and it was about the same diameter as the ps pulley so i used this. now i made a mount out of aluminum that bolts onto the original the ps mount and then used spacers to align the position the pulley to be aligned with the belt. now the idler pulley was 20mm smaller than the ps pulley so you can see in the pic that i raised the center hole 10mm to put the new pulley about the same height as the old pulley so the belt was about the same fit as it was originally. you might also notice the arm on the bracket, this is for the dog bone coming up next.
Mike, do you have a part number for that pulley (or the complete idler assemble even)? I have been trying to find something the same size but all I can find as a 70mm idler.
dave> the pulley that i am using is a idler pulley that replaces the air cond. compressor on a 1991 chevy s-10 with a 4.3 engine that has air delete. on the pulley is a marking ,dayco 00163. hope this helps.
IP: Logged
09:38 PM
BV MotorSports Member
Posts: 4821 From: Oak Hill, WV Registered: May 2001
Seems to me that the dogbone being that low down and close to the rataional axis of the engine would put a lot of strain on the mouning points. not saying it is not effective, just that a mount with more leverage would put less strain on the components.
dave> the pulley that i am using is a idler pulley that replaces the air cond. compressor on a 1991 chevy s-10 with a 4.3 engine that has air delete. on the pulley is a marking ,dayco 00163. hope this helps.
Mike,
Thanks for the info. For anyone else who might be interested I found the part at napa. Dayco part no (using the engine info) is 89014. Napa part no is NBH38024. $29 and something with shipping. Sure beats the $120 + shipping it was going to cost me to get one custom made in the UK.
BV. Nice setup. I was looking at my engine last night and it seems that I might be able to do something similar using the original engine mount as it sits behind the a/c.
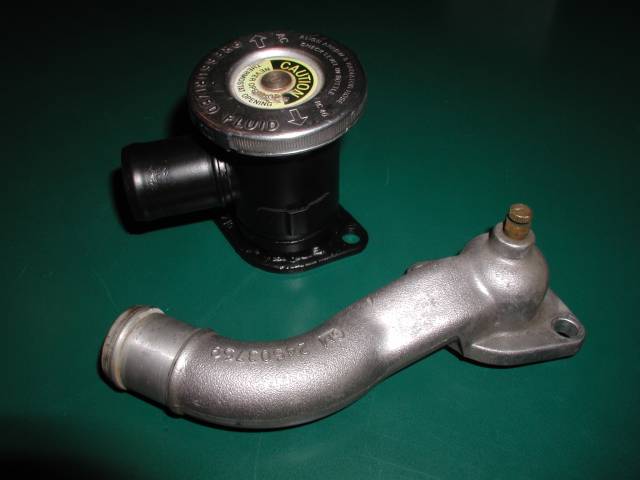
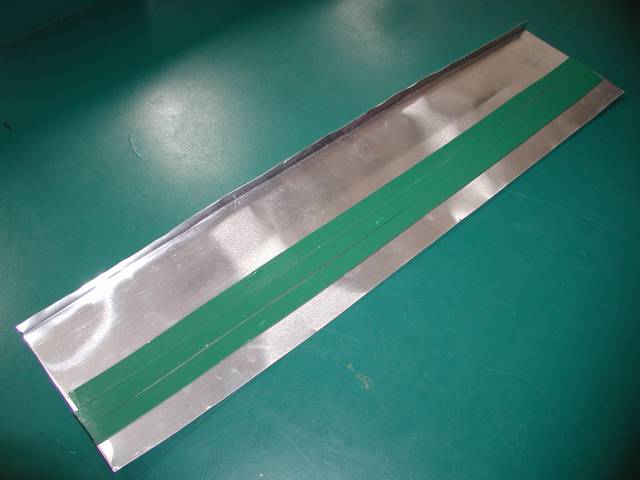
i have the engine coolant hoses connected in the car. i tried a lower waterpump to tube hose (passenger side) that was for a 97 4cyl fiero and the hose fit but i had a problem with the hose rubbing against the pulley on the air cond. compressor. i have the radiator hoses from the montecarlo and thought i'd try to see if i might be able to use either of these and to my amazement the upper (drivers side) was a perfect fit to use on the waterpump. it had the right shape and was no problem with the clearance with the compressor pulley. i would highly recomend this hose for the waterpump. i had a problem with the thermostat outlet housing that was from the dohc engine, it was rather long and put the hose connection out where the head is. my problem is that this far out puts the hose right up against the exhaust y tube. what i ended up doing was to take the original 2.8 housing and cut a 3" section out to get rid af the smaller fittings and braze it back on to the base ( see picture). this gives me a cap to add coolant because the radiator cap is lower than the engine and the hose fits better with my exhaust. for the hose on the drivers side i used a fiero 4cyl. outlet hose (drivers side) turned upside down then added a hose section with a 90 degree angle to connect with the thermostat housing.
IP: Logged
09:34 PM
Aug 4th, 2003
Rickady88GT Member
Posts: 10657 From: Central CA Registered: Dec 2002
Looking great with some awesome info!!! Don't forget to send some pics and the info over to webmaster@DOHCFiero.com and I'll post it up there as well. It's these kind of details than make all the difference in the swap. Great Job!!!
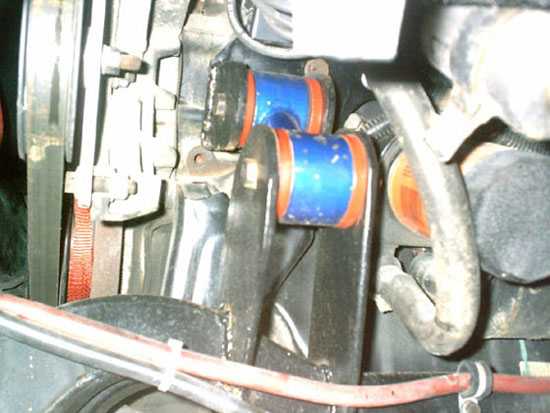
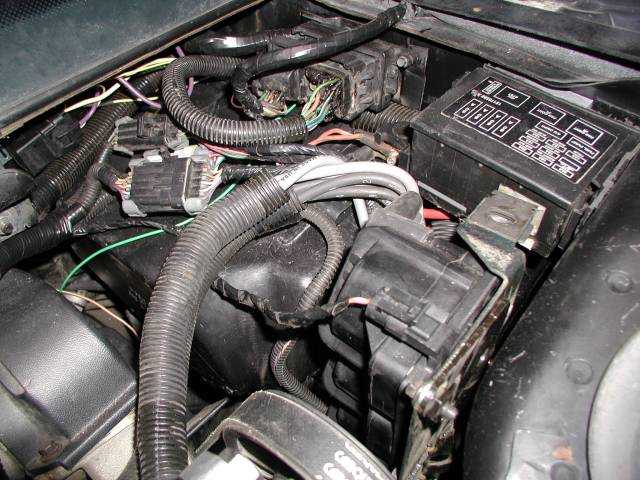
i have the wiring finished for the swap and i have to admit this was probably the most challenging part of the swap so far, not so much as how to do the wiring but how to get everything to fit in the car. with the engine in the car it does not leave room for much else. the largest component was the pcm which was in a large plastic case. because i used the engine wiring as it was in the montecarlo i had to put the pcm in about the same location in the fiero as it was in the monte. because of the size of the pcm i had to remove the battery box from the fiero and use this room for the pcm and wiring. the battery will go in the trunk at the front of the car. the wiring i had to splice were the wires going into the firewall from the monte (c100) and connect to the wiring of the fiero (c203 & c500) connectors. the first thing i did was to take the c203 wiring and seperate the wires going through the firewall from the fiero pcm wiring. this left me with about 15 wires that i used seperated from the birds nest of wires coming from the pcm. i want to describe what you can see in the picture. under the mess of wires you can barely see the black box that the pcm is in. at the top center of the pic is the c500 connector that i had to move over about 10". at its right is the dohc u/h1 electrical center. right below that is the coilpacks mounted to the strut tower and plug wires.as you can see everything is pretty tight, it was a challange to get it all to fit. the pass key module was installed where the fiero pcm used to be. at a later date i will post the data for the wire splicing.
IP: Logged
01:40 AM
88-DOHC Member
Posts: 442 From: San Jose, CA, USA Registered: Dec 2001
DO NOT use the idler pulley bracket for your dogbone. It will break if you do! Regardless whether you have got an automatic or a manual, the idler pulley area can not handle the stresses that the dog bone will create. Do yourself a favor and do it right the first time so you don't have to replace broken parts later. Make or purchase a bracket that attaches to the engine/tranny in a more secure manner for your dogbone. You'll regret it otherwise.
Hell, I have 2 dogbones on mine. One in the Fiero Stock location mounted to a custom made bracket that bolts down onto the block/heads and a small custom made one that uses the 3.4DOHC dogbone mount on the firewall.
[This message has been edited by 88-DOHC (edited 08-06-2003).]
IP: Logged
04:20 AM
bHooper Member
Posts: 4157 From: greensboro, nc Registered: May 99
For a dog bone on mine I have figured that if I modify the clutch slave cyl mouning bracket I can mount a dog bone to that. I figure that would put it about the same place on the rear firewall as the original dogbone but on the left side instead of the right. Looks like it will have plenty of clearance past everything on the engine.
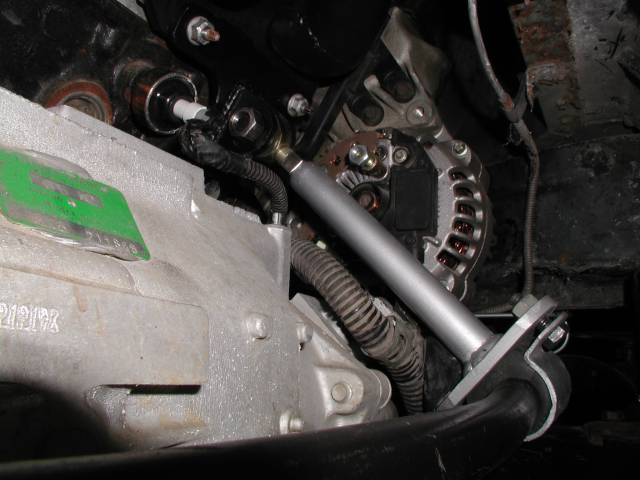
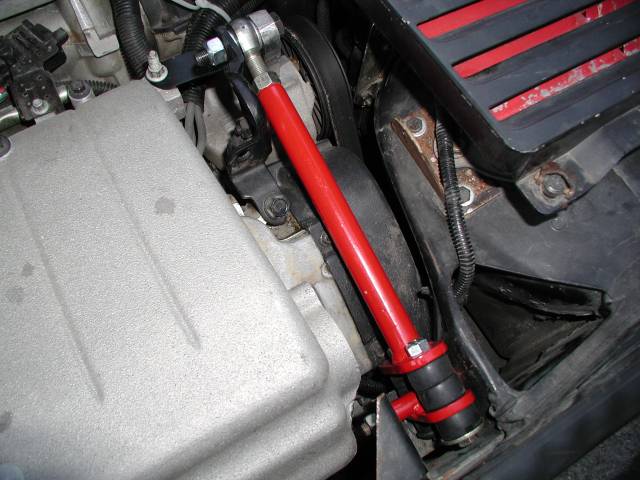
with the advice from people with experience in this matter i decided to change my dogbone mounting point from the ps pump bracket. the farther you can install the dogbone away from the center of the engine mount the less force it will have to endure, but there is just no place on the top of the engine to securely mount one. so i decided to see what i had to work with from the bottom. becaust the engine wants to rotate to the rear of the car under acceration i decided to mount the dogbone on the rear of the engine instead of the front so the mounts would be under compression instead of tension. i decided to make a mount that bolts up to 2 of the exhaust manifold studs and a mounting bolt for a alternator brace. at this time i secured the other side with a swaybar bushing mount onto the swaybar. i thought the spring steel of the swaybar would absorb a little of the force under acceration but if it moves too much i might have to drop the engine & cradle and weld a mount onto the cradle. i want to thank everybody for the advice on this dogbone issue, this is a tough problem to work out and i believe in listening to people with expierence who have been there.
IP: Logged
06:17 PM
bHooper Member
Posts: 4157 From: greensboro, nc Registered: May 99
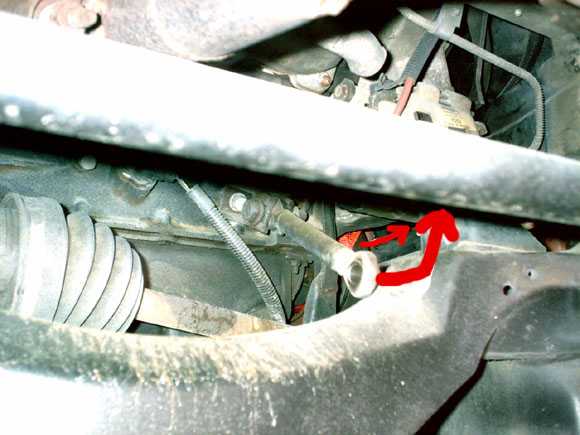
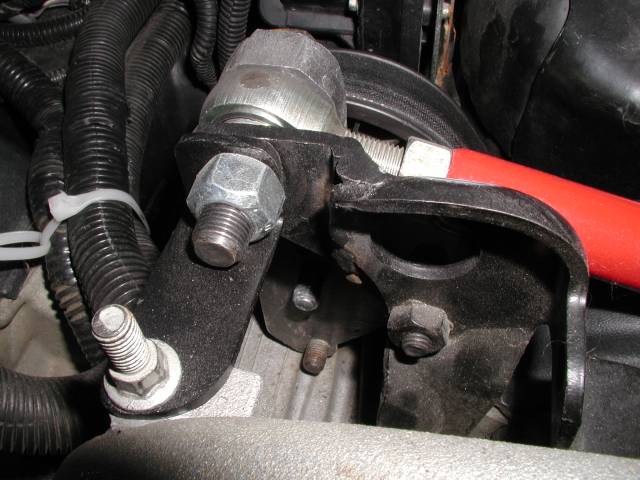
Using one of your pics. I am going to try mounting mine around the area ponted to by the arrow. Basically a plate fastened to the top two bolts on the bell housing. On mine the plate that holds the clutch slave cyl and gear shift assembly is there and it looks to be plenty solid. It's also away from the center line of the engine so I figure less torque as well. Course I gotta get the dang engine in the car first
dave> that looks like another good option, and looks like there is plenty of room to work with. the bottom of the engine has been a tough one to work out for me, it is way crowded on the front and on the back i have a muffler to work around.
IP: Logged
07:39 PM
ltlfrari Member
Posts: 5356 From: Wake Forest,NC,USA Registered: Jan 2002
Just eye balling it for now I think that the other end of the rod would end up pretty much in the same position as the stock dog bone but on the left side of the car instead of the right. Even with the standard eahaust system on along with it's ruddy great crossover tube it looks like it would work. We shall see
I dont know how the hell you spot that in that pic. :O
Actually its a later model 5 speed Isuzu, its model code is MK7. It bolts w/o problem, just need to do a thread in a existent hole. Also the shift mechanism isnt the same. This tranny is from a 99 cavalier/sunfire 2.2L. I used the MR3/MT2(Older tranny) Isuzu shifter mechanism and modify the cables bracket. Also use another hydraulic line. This tranny use the hudralic relase bearing type. So far it have a slight higher final ratio, its like 3.58 or so. Its near the one in the getrag. Also this model is stronger that the one that came in 4cl Fieros. The second gear use 3 sychros instead of 2 in the Fiero Isuzu. Lets see how it performs. I really dont have a doubt that will better that the older model.
I have been driving my fiero daily for almost 2 months now and i thought i would start updating some things that i had done since my last post. One thing about this swap is, where one bank of sparkplugs are located puts them right underneath the gap between the deck lid and the back window. when it rains the water falls right on the top of the head and leaks into the spark plug holes. i found this out by having to blow the water out the plug holes after a misfire developed after a heavy rain. the solution turned out to be a easy one. i made a metal deflector shield out of aluminum roofing flashing. i installed the shield on a lip under the rear window with some automotive trim molding tape. with my trunk open i measured from the back of the lip to the edge of the lid ( was about 4.5" on mine) and added 1/4" to bend a lip then painted it black. when installed you have to look hard to see it there and it's taken care of the water problem. also because of where i installed most of my electrical system i had to cover the bottom of the pass. side vent grill with a piece of sheet metal.
IP: Logged
09:27 AM
David DeVoe Member
Posts: 1358 From: Grand Blanc, MI US Registered: Jul 2001
Mike, I've been following your swap and what I would really like to hear are some of your impressions from driving your car. I think that when people are considering a swap and all the work and problem solving involved its good to have some idea of how it feels when its finished.
david, i think any of the swaps people have been doing are a big improvement over the stock fiero set up. i myself have been really enjoying my 3.4 dohc. most people have been doing this swap with a manual tranny car but my car was is a auto car and most of the original dohc cars were also auto cars. i decided to go with this set up because this swap costs at least half of what a sc3800 swap would cost and i think this engine has a lot of potential turbocharged. now in driving this car it is well balanced, it is a little soft out of the hole with a automatic because of the large ports but the engine really lites up when it hits about 3500 rpm and it will rev all the way up to 7000rpm. i have been having a lot of fun with the auto tranny ,when it downshifts into the powerband it pulls hard and has a unique sound that is really cool. with the overdrive of the tranny it gets around 30mpg on the highway and is very economical to drive. i have raced alongside a very nice stock 2.8 auto fiero gt on the dragstrip and my 3.4 is a solid 2 seconds and over 10mph faster in the quartermile. in the near future i plan on putting a higher stall torque converter in then installing a turbocharger.
Thanks for your impressions of the 3.4 DOHC. I am very intrigued with this swap as well, but there are no 3.4 DOHC engines installed near where I live so I am not able to really evaluate how it performs.
It would be nice if some of the others who have done this swap could provide their impressions as well.
Keep up the good work!
Sour
IP: Logged
12:02 AM
Rare87GT Member
Posts: 5088 From: Wichita, KS USA Registered: Oct 2001
i decided to go with this set up because this swap costs at least half of what a sc3800 swap would cost and i think this engine has a lot of potential turbocharged.
As far as being half of what a 3800 supercharged costs. I think if you do the 3800 supercharged right it is very very cheap. Got the motor for $1,000, clutch for $300, flywheel for $130, ac compressor used $20, flywheel bolts, $10, alternator $core through autozone, gaskets for oil pan, valve cover, intake, supercharger, $100, knock sensor $50, wires and plugs $40, belts and ac fittings $60, heat wrap $60, fuel pump $100, mounts $220 and probably $200-$250 in misc. So as of now I maybe have $3,000 in the entire swap. What was your total on the 3.4DOHC if I may ask. Then again my good friend is doing the entire swap for me for virtually free being he is a nice ass guy.
-Amir
------------------
Maroon 1987 GT 5 spd: 2.8L Ferrari Red 1988 Formula 5 spd: 3800 Series II Supercharged In Progress..... Need any parts? Got 2 parts cars: 86GT 4spd 87 Coupe 4cyl
Then again my good friend is doing the entire swap for me for virtually free being he is a nice ass guy.
Why your "nice ass" buddy is doing you such huge favors is between you and him, I think you've already given too much info. As badly as I'd love a friend to do my swap for me, I don't think I'll be getting THAT friendly with any dudes.
Mike: Thanks for the update, I always love good documentation. I'll be working on installing a 96 DOHC with Getrag into a purpose-built racecar very soon, so you can see how this is very applicable to me. I'll do my best to document things as well!
amir> i didnt want to make this statment to pi$$ off any 3800 guys, infact i own a 3800sc car and these engines rock! but they are very popular and command a high price. i dont know if my swap is a typical swap cost, but i wanted a complete drivetrain setup so i ended up buying a complete 96 montecarlo Z34 that was rolled at a salvage auction for $700 and used many parts from this car in my swap.( engine,tranny,fuelpump ,electrical system,cruise control,catalatic converter,a radiator hose and one axle shaft).i had to find a couple of tranny mounts at a junkyard for $10, the engine mount is the stock 2.8 mount, rebuilt axle half shafts $120, new set of plug wires $45, a custom dogbone mount and idler pulley setup that cost me more time than money. and not typical of most swaps, i made custom headers out to a flowmaster 80 series muffler. all together it was probly less than $1500.
IP: Logged
09:52 AM
Oct 26th, 2003
normsf Member
Posts: 1682 From: mishawaka, In Registered: Oct 2003
Wow great pictures, I can appreciate all the work that goes into this swap. we have been running our Z34 5spd for a few years now and there always seems to be something different from each year to year, mostly electrics, but its our experiance that the dog bone mounted to the power steering bracket is not strong enough by itself. Have fun its better than a V8.
IP: Logged
05:42 PM
Oct 29th, 2003
qwikgta Member
Posts: 4671 From: Virginia Beach, VA Registered: Jan 2001
Mike, I posted to this thread when you started it, and i have not seen it since. WOW.
I am still deployed for the USN and will be home soon, finally got access to the internet and the first stop was here.
I have a few questions for you, these are not in any order but i have been doing this swap in my head for the last 3 months.
Fuel pump, which one. How did you route the lines. Water coolant lines, which of the two small tubes near the trans did you use or cap, how did you run the coolant lines. Would you be willing to make and sell any of the parts you have, looking at the Radiator cap specifically. Electrical, can you post more info on it. This is going to be my nightmare when i start working on it again. Im sure there is more, but i still have time before i get home.
Thanks and i love those headers, im still jelous about them.
Rob
------------------ 88 TTop coupe, soon to be fitted with a DOHC 3.4/5spd (on hold again for Uncle Sam)
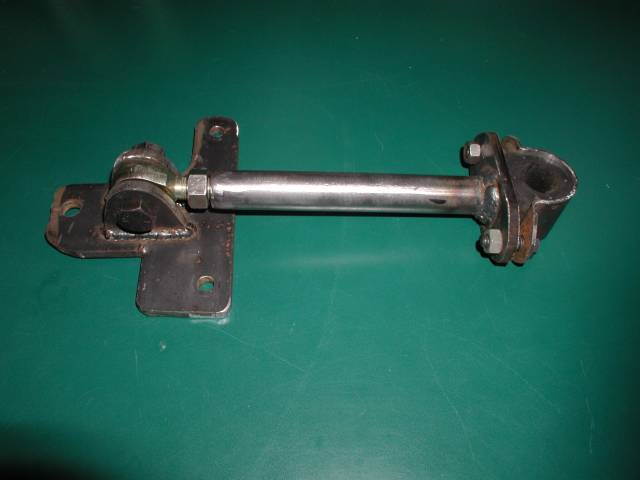
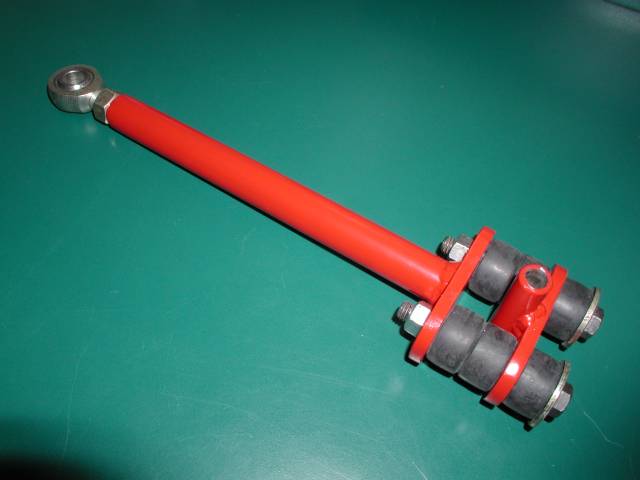
i have been contiplating on whether to put this in here because it is a controversal matter, but this is what i have been running for the dogbone mount. with the current stock dohc power level and with me using the 4t60e auto trans i have thoughly tested this set up and it has been working with no signs of failure. it may not stand up the abuse of a manual tranny but i have run this repeatably down the dragstrip and with mild 2.20 sec 60ft times it is holding up well. i plan on installing a turbocharger in the future and with the power increase i will probly relocate the dogbone to the bottom of the engine with the power increase.
the dogbone was made out of steel tubing and 1/4" flat steel. the rubber bushings are from a front swaybar kit from something like a early 70s chevelle ( use stock rubber bushings, performance urethane bushings are too hard)
the way i have the brackets with the ps pump mount are important to the strength to the system. a piece was welded to the engine lift bracket and i have a piece connected to a intake manifolt bolt to tie everything together