
 
     |
| A 3.4 DOHC Build then... F40 Turbo (Page 27/57) |

|
Fierobsessed
|
AUG 26, 06:40 PM
|
|
Just a little more for today,
I got the itch to test out my suspension links, and the custom axle cups. Mainly to verify the depth of the tripod assembly.
I built my axle cups a long time ago but here they are as I was making them
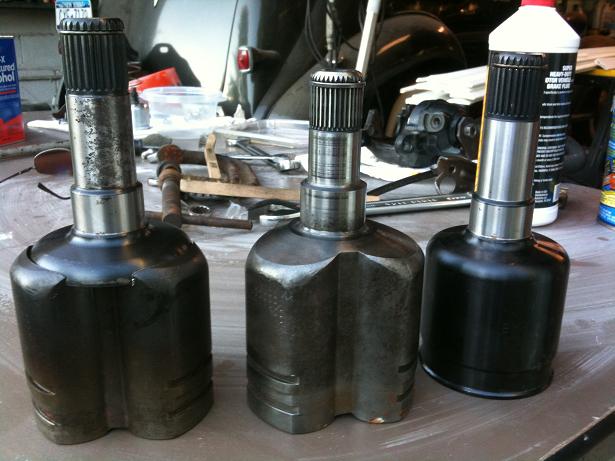
So it is an EMPI aftermarket axle for a Chevy Equinox that was the donor for the stub shaft, and I machined a stock manual Fiero cup to press onto it, then welded it in place. On the one, I had to add a sleeve to extend the sealing surface to mate with the seal.
That was 4 years ago.
Today I wanted to test fitment. My drivers side axle shaft is from a 90 something, probably 93, Corsica with a 4T60. I knew it would have a beefy short axle shaft. the outer CV is the original to the Fiero. The passenger side has the same treatment, but it just uses a stock manual Fiero axle shaft and outer CV, with the custom axle cup. The passenger side cup didn't need to be tested, because it's in the stock location almost perfectly, but I needed to test the drivers side because the axle line has shifted forward for the G6 transmission. It's substantially closer to the crank itself then it was on the Getrag, and the axle cup is further out on the drivers side as well, and the angularity on a shorter axle can spell disaster if it is not considered.
The links look good!
I did wind up drilling out 1/2" nuts to turn them into spacers. They fit absolutely perfect!


All the zerk fittings are pointing downwards except for the rear inboard, they can all be greased easily. Also, there are seals on either side of each rod end. the seals will allow pressurized grease to escape, but should prevent any dirt from getting in. I hope this combination will provide exceptional life span on these rod eyes!
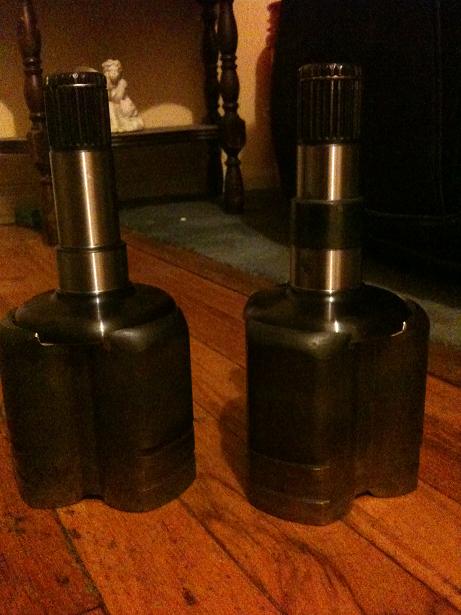
And for the axle test,
All the way up to the bump stop.

About mid-travel.

Free hanging was fine as well.
So now I know I don't have to worry about the axles. That's another check mark on my to-do list.[This message has been edited by Fierobsessed (edited 08-26-2013).]
|
|
|
|
fieroguru
|
AUG 26, 07:48 PM
|
|
| quote | Originally posted by Fierobsessed:
Today I wanted to test fitment. My drivers side axle shaft is from a 90 something, probably 93, Corsica with a 4T60. I knew it would have a beefy short axle shaft. the outer CV is the original to the Fiero. The passenger side has the same treatment, but it just uses a stock manual Fiero axle shaft and outer CV, with the custom axle cup. The passenger side cup didn't need to be tested, because it's in the stock location almost perfectly, but I needed to test the drivers side because the axle line has shifted forward for the G6 transmission. It's substantially closer to the crank itself then it was on the Getrag, and the axle cup is further out on the drivers side as well, and the angularity on a shorter axle can spell disaster if it is not considered.
And for the axle test,
All the way up to the bump stop.
|
|
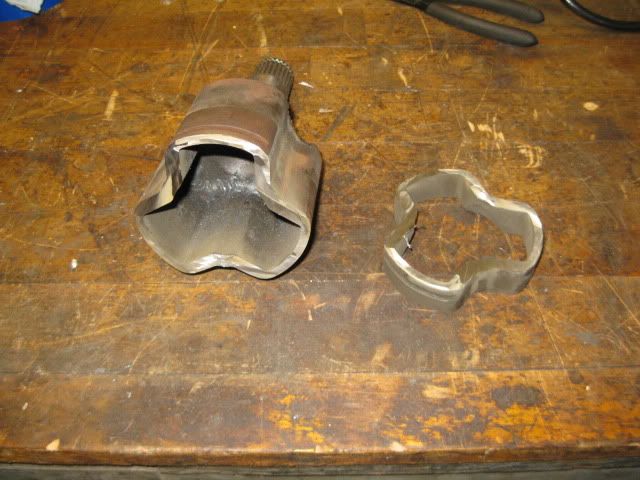
Did you spin the tripod while it was full compression? I went the same route with the hybrid tripod/corsica axle and at full compression the axle hit the inner surface of the tripod housing. However, I had the upper strut hat flipped and the tubular cradle had the drivetrain lowered 1", but then I rotated the transmission back up, so my setup was slightly different than yours. I ended up cutting the tripod housing back so there was 1 groove for the boot vs. two to gain the needed clearance.

|
|
|
|
doublec4
|
AUG 26, 11:03 PM
|
|
Not sure how I've missed this thread until now! Great work!
|
|
|
|
Fierobsessed
|
AUG 28, 04:47 AM
|
|
Thanks!
Guru, looking at your pictures made me want to recheck. I feel better now that I did. My axle still clears the cup, but it turns out that when I tested it the first time, I did NOT hit the bump stop like I thought I had. But this time I had the whole car sitting on that one spring. I think I got it this time. It looked much closer to your picture.

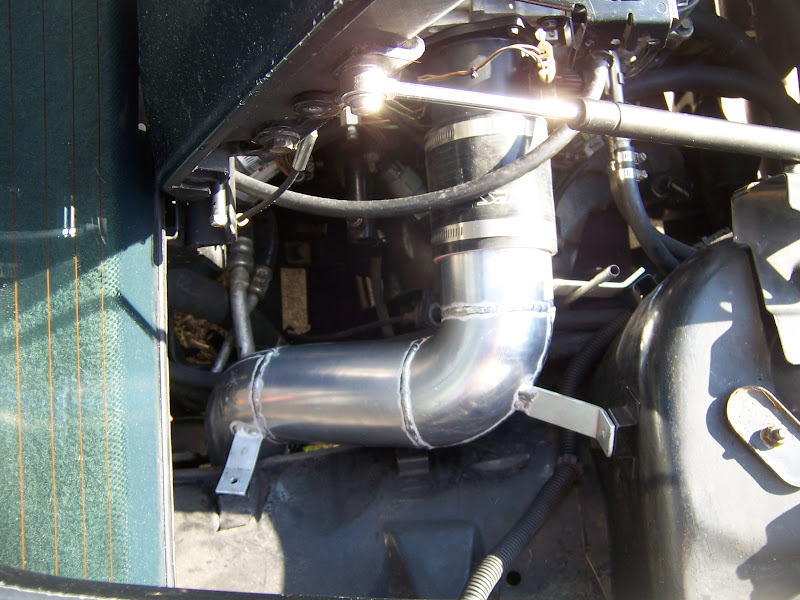
My next task while the engine is still in the car was to make yet another bracket (I've long since lost track of how many brackets I've made) to hold the Air/Oil separator that I built. I was running out of space in the engine bay, but I could just squeak this in where the old air cleaner used to be. That got me thinking... What if I made a bracket that mounted exactly like the air cleaner assembly?
That was the answer!
So I bent up some metal I had laying around and found building the mount was pretty easy.


Next, I made a clamp like bracket that would hold the can, and welded that on.

A couple of bolts, and it all comes together pretty nicely!

And it slips right in, and the old air cleaner bolts hold it all in place.

It's been a very productive day again.
I am ready to pull the engine out for the very last time so I can put the clutch in, and do a bunch of finalizing so that I can put this project on the road. It's getting exciting!
|
|
|
|
fieroguru
|
AUG 28, 06:21 AM
|
|
| quote | Originally posted by Fierobsessed:
Thanks!
Guru, looking at your pictures made me want to recheck. I feel better now that I did. My axle still clears the cup, but it turns out that when I tested it the first time, I did NOT hit the bump stop like I thought I had. But this time I had the whole car sitting on that one spring. I think I got it this time.
|
|
I normally do the axle check w/o a spring on the strut, so its easy to cycle the suspension from full compression to full droop while spinning the tripod assy.
|
|
|
|
Will
|
AUG 28, 10:05 AM
|
|
| quote | Originally posted by Fierobsessed:
What if I made a bracket that mounted exactly like the air cleaner assembly?
|
|
I did something similar with my CAI:
http://www.fiero.nl/forum/F.../000121-20.html#p774
GM went to the trouble of welding all those little top hats to the body metal in order to hold things in the engine bay... Why shouldn't we take full advantage of them?
|
|
|
|
Fierobsessed
|
SEP 19, 05:41 PM
|
|
It's been a long time since I've had any updates. Life is busy! But I'm back at it again.
After a little axle testing, and building that bracket, It was once again time to remove the engine. This should be the last time it comes out! I promise!
It's time to install the flywheel and clutch. As per instruction, I put Loctite on the bolt threads, and a grease just under the bolt heads to aid in getting the correct bolt torque. Done. Note, that I decided to use grade 8 studs in place of bolts to hold the pressure plate. I was finding that the cast iron threads in the flywheel tend to gall. There is only one solution to keeping that problem at bay. They were loctited in, as well.

Next I had to bolt up the pressure plate and center the disc. And that is done! hopefully this is the last time I will need to see the clutch for a long time.

With the clutch being bolted in, I slipped the engine back into place and mated it up with the transmission. It all went very smoothly. Then I decided to build the axles. But since these axles have 240K on them, I figured it would be a good idea to disassemble and thoroughly check them over. I'm glad I did, because I found some damage to the outer star on one axle. No worries, I had a donor axle to pull another star from.

I cleaned, greased and assembled the axles, new boots, new clamps.

And, installed! I also painted everything before assembly, It's nice to see it done.

You can see that the F40 actually has its axle holes closer to the crankshaft then the Getrag. The 3 shaft design pulled the differential closer. So this axle will always be a little out of alignment, and will probably not last quite as long as it should. But that's just how it has to be.
I had one more little welding task on the crossover. I needed to add a 8AN stainless fitting to the crossover to connect the EGR to. No problem. Drill a 3/4" hole, and weld away!

Installed.

When I purchased this 12" Gas line, It was painted yellow. I stripped the paint off using paint stripper. I accidently destroyed one when I attempted to use the wire wheel and sand blaster on it. Apparently, it was a little too powerful and I poked through. But the paint stripper did a perfect job.

Hoping to cut down on unnecessary heat in the engine bay, I began wrapping the exhaust with the Lava rock header wrap. This should keep me from cooking the wiring and the compressor housing on the turbo, since the pipes pass kind of close to the compressor. It would suck to heat that up too much.

So I'm back on track and will be working on it almost daily. Soon I hope... Soon![This message has been edited by Fierobsessed (edited 09-19-2013).]
|
|
|
|
zkhennings
|
SEP 23, 06:40 PM
|
|
Everything looks good! The header wrap is nice too, just a shame it covers up those nice welds. I love the look SS gets when the welds change the color.
If you run out of places to bolt things to in the engine bay, I bought a bag of these along with some ss flange locking nuts from McMaster. ("These" is referring to the right angle weld studs)
I tore out all those right angle brackets and welded in studs anywhere I needed them. I used cushion clamps to hold the miscellaneous wires and tubes and fuel lines. They are easy to remove and it cleans up the engine bay a lot.
It took me a few hours to remove all the brackets and decide where I needed studs and weld them in place. It's a good day project.
|
|
|
|
Will
|
SEP 24, 10:30 AM
|
|
| quote | Originally posted by Fierobsessed:
Note, that I decided to use grade 8 studs in place of bolts to hold the pressure plate. I was finding that the cast iron threads in the flywheel tend to gall. There is only one solution to keeping that problem at bay. They were loctited in, as well. |
|
That's odd. I've never heard of cast iron being prone to galling... exactly the opposite, in fact. In my experience it's very resistant to galling.
| quote | Originally posted by Fierobsessed:
I cleaned, greased and assembled the axles, new boots, new clamps.
|
|
What's your axle setup? (You don't have to go over it again... just linking the post where you talked about it would be fine...)
| quote | Originally posted by Fierobsessed:
So this axle will always be a little out of alignment, and will probably not last quite as long as it should. But that's just how it has to be.
|
|
That's a non-issue.
|
|
|
|
Fierobsessed
|
SEP 25, 06:26 PM
|
|
I was having a ton of issues with galling on the flywheel. This is something I have not encountered in the past. Testing my various clutch combinations required me to mount the pressure plate multiple times. Each time I dissassembled it, the theads were clearly damaged on the bolt. (10.9 grade) So I used the tap a couple of times to fix the threads. It didn't really matter because the 6 pressure plate bolts on this flywheel were not located correctly on the flywheel in the first place. So I drilled and tapped 6 new bolt holes centered around the flywheels true center and installed studs. The donor flywheel was shockingly poorly machined from the factory. It's all good now I hope!
For the axles, it's just a couple of posts up, here...
http://www.fiero.nl/forum/F...L/127002-7.html#p260
And, the CV alignment, I agree It's no big deal.
|
|
|
|