
 
     |
| A 3.4 DOHC Build then... F40 Turbo (Page 1/57) |

|
Fierobsessed
|
FEB 04, 03:59 AM
|
|
At this point, Im already about half way through this entire swap/build already. But, as it is a build, It is a story. So I will start from the very beginning.
About this project:
I swapped the 3.4 DOHC into the car 5-6 years ago.
I got the turbo itch, and had the funds. So I purchased some parts, most courtesy of eBay!
First I bought a F40 Six speed.

Then I bought a turbo, Garrett GT3582R. With a T3/3" V-band outlet, factory Garrett anti-surge housing.
Then I went to Tial for a 50MM blow off valve
Again to Tial for their MV-S 38mm V-band waste gate
Once more to Tial for their Stainless V-band exhaust housing


About this car:
I purchased this car in the June of 2003 in Long Island, NY. It is a Silver 1988 Fiero GT. Fully optioned, with leather and sunroof and a 5 speed. 183,000 miles.


It's been to the 20th Fiero anniversary. I've driven it from the atlantic coast to the pacific coast.
The original engine dropped its timing chain, just due to its high mileage.
The second engine was a refreshed 86 Fiero 2.8 with a cam. I spun a bearing around a tight turn at max RPM in second, It lost oil pressure momentarily. The oil level was a little low. I did take it to the track for just one quarter mile before it spun the bearing. It ran a 16.3 @ 80.03.
I replaced the engine with a 3.4 Pushrod engine 7/4/04
I moved to Las Vegas with the car 02/05.
10/31/06
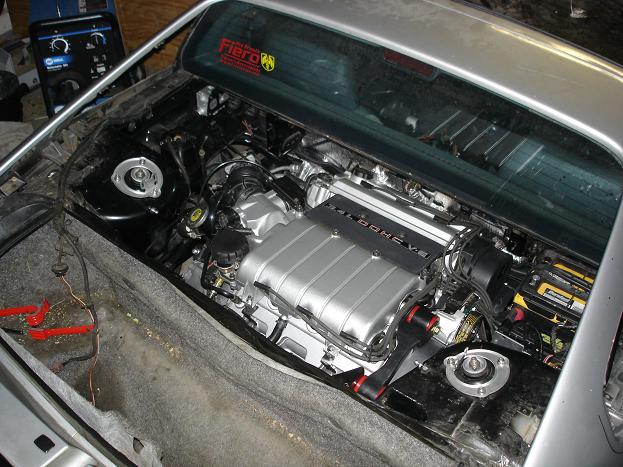
The 3.4 DOHC Swap begins.
I got bored with the pushrod 3.4 and due to a couple issues, I decided it was time to swap it out.
My goal for this swap was to do a complete 94-95 3.4 DOHC swap with factory style routed exhaust, using my cars original (216,000 mile) 282 Getrag. The engine management system was on the 94-95 OBD 1.5 platform. I made some modifications to the program to enable the use of the manual transmission. The code was already there, just needed to be turned on and some values programmed in.
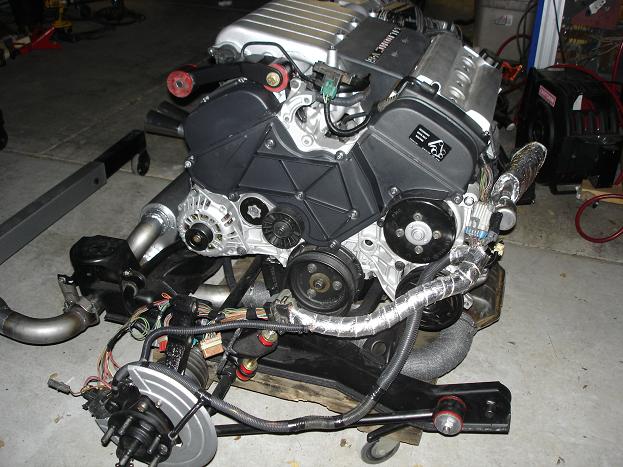
Heres the donor engine/car


To do a 3.4 DOHC Swap, there are a lot of things to be done.
You need to:
Build an exhaust system
Build a fuel delivery system
Build a harness
Fabricate an upper mount or an alternate method of anchoring the engine against axle torque
Clearance the decklid hinge box
Clearance the strut tower near the dogbone brace.
More later...[This message has been edited by Fierobsessed (edited 02-04-2013).]
|
|

|
Joseph Upson
|
FEB 04, 06:02 AM
|
|
|
How is that non F40 inboard tripot held in the F40?
|
|
|
|
FieroWannaBe
|
FEB 04, 10:57 AM
|
|
|
Doesn't the G6 passenger intermediate shaft bolt up to the 3.4DOHC?
|
|
|
|
fieroguru
|
FEB 04, 11:07 AM
|
|
| quote | Originally posted by Joseph Upson:
How is that non F40 inboard tripot held in the F40? |
|
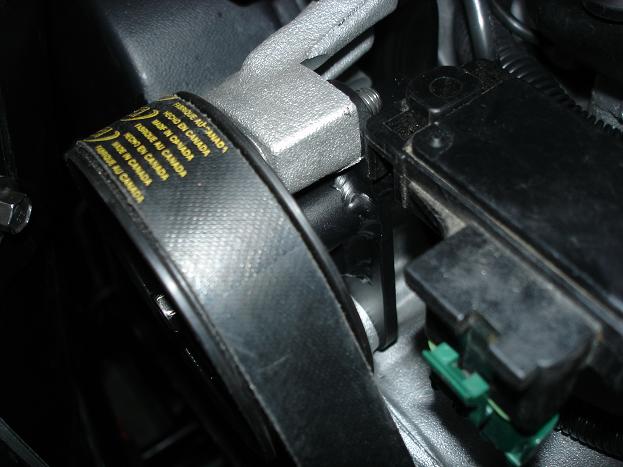
Snap ring. He also pressed on a sleeve to extend the seal surface to the new location.
That is a hybrid tripod with a F40 compatible male spline section and a fiero style tripod cage welded to it.
|
|
|
|
fieroguru
|
FEB 04, 11:51 AM
|
|
| quote | Originally posted by FieroWannaBe:
Doesn't the G6 passenger intermediate shaft bolt up to the 3.4DOHC? |
|
It probably does, but with the hybrid tripod he has, he can use the stock fiero axle shaft and same $$$ and need fewer parts.
|
|
|
|
stickboy
|
FEB 04, 03:12 PM
|
|
|
|
|
Fierobsessed
|
FEB 04, 04:37 PM
|
|
Guru, you're on the ball! Made that cup some time ago, I just hope that with the major diameter being what it is where it is welded, that I won't have any strength issues. This engine should rather easily turn out 400+ RWHP, as all turbo 3.4 DOHC's have.
Anyway... More detail on the swap itself, keeping in mind this all happened about 6 years ago, long before I decided to turbo,
Building an exhaust system:
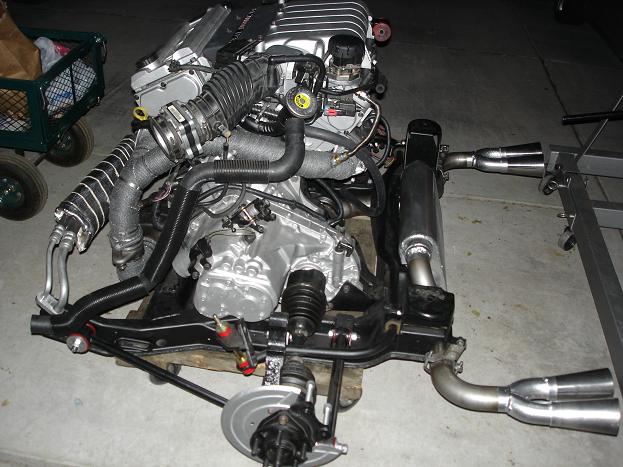
I chose early on to go Fiero style routing, using two front manifolds, 2.5" 409 grade stainless and a Flowmaster 80 series muffler, which everyone knows on an 88, it will not fit! It needs to be modified. I cut up and patched 3 mufflers before I finally got it right.

First attempt (yikes!)

Second attempt

Third and final attempt

Much better!
And this is its final configuration

Shown with an old muffler
after some cleaning, polishing and painting


Exhaust. Done!!
Fuel delivery:
I really dont have any pics of what I did. But simply, I scavenged the plastic fuel lines from a 4th gen firebird, and used that to run the fuel to the quick disconnects that were already on the 3.4 DOHC. I also used a 90 TTA fuel pump in the tank. Nothing special or difficult.
Wiring harness:
Again, I didn't take any pictures of this process this time. But I can say that It takes me roughly 40 hours to build a harness from the time I have the complete donor harness in hand. Much of the time is spent dissassembling the harness. I always start by stripping all the tape and split loom off, then I de-pin the ECM connectors. Next, I cut all ground and power splices out. At this point the harness just comes completely apart.
All the connectors get plugged into the engine where they are needed, then all wires get routed an taped in to eachother. All wires get shortened and lengthened as needed and the new power and ground splices are made. I reuse the bulkhead passthrough from the Fiero. That thing is a pain in the butt to dissassemble and clean! I then tape and loom the whole harness. Then it is done.
That's my process for harness building. I do need to build a completely different harness for the Turbo build, I will document that process more closely when I get there.
Fabricating an upper mount:
Many 3.4 DOHC owners know that this is risky business. I've never broken my timing cover. I am not afraid I might. I know that the reason theirs broke, is solely because their dogbone applied a strong twisting force on the lifting bracket. I designed mine to only place a straight back pushing force on the lifting bracket.
This is the raw structure piece I built.

I chose this shape because It would be low enough profile so that there would be no need, or reason to have to trim the decklid.
I welded an 1/8" plate to the top, then using a flap disk cleaned it up, and painted it. The lifting bracket itself was cut up and I welded a sectioned piece of pipe, that the bushings fit into, in place.

You can see in this picture the two main mounting points for the bushings, the one on the cam carrier is doing most of the work.

It just clears the decklid!

Clearancing the chassis for this engine:
This engine CANNOT be mounted without some minor clearancing of non-critical structure.
The decklid hinge box

The dogbone brace

Tight fit when done!

In the process of the build I also found a need to build a custom fill housing using pieces of an old 2.5L thermostat housing and the 3.4 DOHC's plate. I also discovered why it is important to use the engines original thermostat in this configuration. I had a LOT of trouble getting the Fiero style thermostat to work in this housing. It was too isolated from the engine heat to function at all.

Once all of that nonsense is done, It's time to move on to installation!
Heres the 4 sides of the engine package that got loaded into the car.
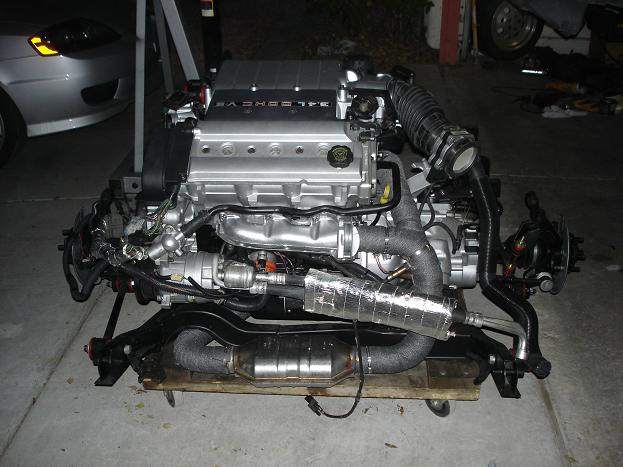
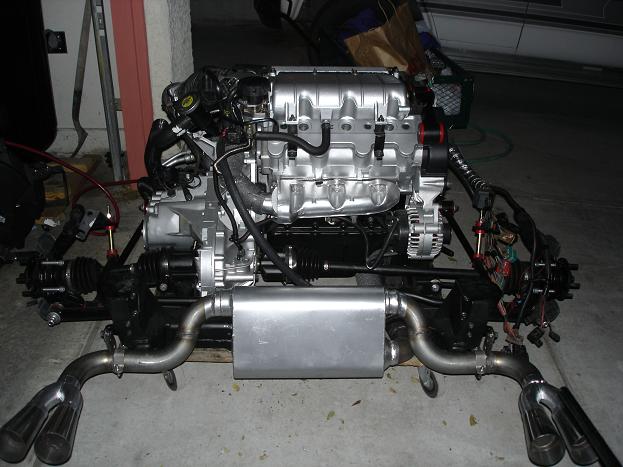
And as it was for the last 6 years:
That's pretty much it for the original swap.
Upcoming, the problems I had with the engine, and the beginning of the turbo installation!
|
|
|
|
Fierobsessed
|
FEB 04, 05:44 PM
|
|
Before I get into all the nasties about turboing this engine, It's important to know what kind of resources I have in my garage. I am working out of a 3 car garage, that doubles as a personal metal fabrication/prototyping shop. I very recently got the bulk of the large tools.
First up is my mill. It's a relatively cheap benchtop mill, Bolton Tools ZX45. Since it is not a Knee mill, the whole head is able to be raised and lowered as needed (at the expense of my arms). I have a rotary table and a mouting vice and various collets, chucks and endmills.

Second up is my Lathe. Birmingham 12X36 Geared head Gap bed lathe. It's pretty nice, still chinese built, but it seems decent quality. I got the Aloris style quick change tool post and a few other accessories. This is my favorite tool in the garage.

Next is my TIG welder. It's an OLD 1979 Miller Dialarc HF-P. It weighs as much as the mill at around 700 LBS, but it is good for 310 amps, and can weld ANYTHING. I recently found a few problems with it that once corrected made this things welds come out so much better. It's a wonderful piece of equipment! However, Since it's power requirements were so great (100A single phase 240) I decided to tack on a breaker box, with cam-lok feeds and a few auxiliary 240 volt outlets, and a few 120V outlets to the sides of the welder. This way my power comes from a slightly modified breaker box, to my welder, and that feeds power to all my large equipment. So in effect, my shop is mobile.


Slight mod to an extra panel cover


A MIG welder is a fabrication MUST HAVE. This one is a Millermatic DVI. It runs on 120 or 240. uses gas, It's rated to 150 amps, so it can weld some pretty heavy stuff. It comes in the same package as the famous Miller 250/251.

I recently came across a SMOKIN' deal on a blasting cabinet. An elderly gent offered it to me for about 1/4 its price new, and it was still very new. It is a TP Tools 960-SE This was something I've always wanted, but I never though I'd get one like this! It even came with extra glass protectors, gloves, 100 lbs of glass bead... It was a deal I could not pass on!


My girlfriend Dayna wanted to try it out!

Whatcha doin Dayna? Ohh, an Allante Intake. Nice work!

Fortunately, I already had a 60 gallon air compressor. I've always been a fan of the Craftsman compressor. My dad had one for 20 years before the compressor head finally quit. So I figured I'd get the larger unit that used that very same compressor head.
I went cheapo on this piece of great equipment, Straight to harbor freight for a belt sander. I've always needed one of these for fabricating exhaust. I do most of my pipe cutting with a Sawsall, then I flatten the cut surface with this belt sander. The fitup is perfect. I can then TIG weld without any filler in most cases. It comes out beautifully. This belt sander makes that possible.

I also have an engine hoist, an arbor press and plenty of other odds and ends. It's crowded, but capable.
Then there is my little dinky, crowded work table. Having a 3 car garage doesn't offer a heck of a lot of wall space. Especially when things like shelving, Lathes, Mills, Compressors, welders, and Blast cabinets, Jet engines... take up said precious wall space.
My dad playing with the TIG for the very first time, on my work table.

Overall, This is my garage/workshop


Oh, and Just incase anyone feels the need to ask, this is another project for another build thread in the future, but It's being worked on a little while this project is going on. So none of that rhetoric about what engine I should have put in my car. Because I'm doing THAT too.
 [This message has been edited by Fierobsessed (edited 02-04-2013).]
|
|
|
|
fieroguru
|
FEB 04, 06:18 PM
|
|
| quote | Originally posted by Fierobsessed:
Guru, you're on the ball! Made that cup some time ago, I just hope that with the major diameter being what it is where it is welded, that I won't have any strength issues. This engine should rather easily turn out 400+ RWHP, as all turbo 3.4 DOHC's have.
|
|
I remember when you made it, because I copied the idea. My LS4/F40 has a hybrid tripod for the driver side and I also had one like yours for the passenger side, but it wouldn't clear the LS4 block... so I "had" to use an intermediate shaft.
Great looking stuff so far!
|
|
|
|
joshua riedl
|
FEB 04, 08:01 PM
|
|
|
Did you port match the manifold when flipping it? It blocks a good bit of the exhaust port when doing that.
|
|
|
|
