
 
     |
| Bringing a 88 Fiero Back to Life with a LFX Swap (Page 3/15) |

|
Notorio
|
JUL 30, 06:45 PM
|
|
|
For the casters on the Cradle were there any existing holes you could use?
|
|
|
|
Rickady88GT
|
JUL 30, 07:45 PM
|
|
I do like the bird cage. I was fortunate enough have a Fireo parts car that was a front end total. I cut off the rear end and used it as a mobile Fireo engine bay that had hinges. It was a little difficult to move around, but I could move it by my self without any help.
I will be watching closely
|
|
|
|
Rickady88GT
|
JUL 30, 07:51 PM
|
|
Just a suggestion, can the Impala cradle be modified to fit in the Fiero rather than modifying the Fiero cradle? It all depends of the extent of modifications.
Don't be afraid of cutting and modifying the strut towers. You can gain several inches of room with this mod. But this modification requires a coil over strut. You may already consider coil over struts anyway because of the versatility of spring rates and weight jacking.
|
|
|
|
Dennis LaGrua
|
JUL 31, 05:42 AM
|
|
|
It sounds like you are figuring it all out. I would venture to say that your measurements confirming a tight fit are exactly why the LFX auto swap is not popular. I'm sure that you will get this installed and running but only after some real fabrication work is done. It may be inspirational to know that some Fiero owners have fit the LS4 V8/auto swap in their cars ------------------
" THE BLACK PARALYZER" -87GT 3800SC Series III engine, custom ZZP /Frozen Boost Intercooler setup, 3.4" Pulley, Northstar TB, LS1 MAF, 3" Spintech/Hedman Exhaust, P-log Manifold, Autolite 104's, MSD wires, Custom CAI, 4T65eHD w. custom axles, Champion Radiator, S10 Brake Booster, HP Tuners VCM Suite.
"THE COLUSSUS"
87GT - ALL OUT 3.4L Turbocharged engine, Garrett Hybrid Turbo, MSD ign., modified TH125H
" ON THE LOOSE WITHOUT THE JUICE "
|
|
|
|
Will
|
JUL 31, 07:43 AM
|
|
A Northstar fits an early Fiero chassis with the bellhousing in the stock location and cutting on the trunk wall dogbone mount and the right hinge box.
For an '88, there's some carving on the right strut tower required.
The LFX is smaller than the Northstar and probably won't require cutting the strut tower unless you need to move the bellhousing flange to the right for transmission fitment reasons.
It most likely will require cutting the trunk wall dogbone mount.
Although... does the 3.4 TDC require cutting the trunk wall dogbone mount?
|
|
|
|
MikesFirstFiero
|
JUL 31, 07:51 PM
|
|
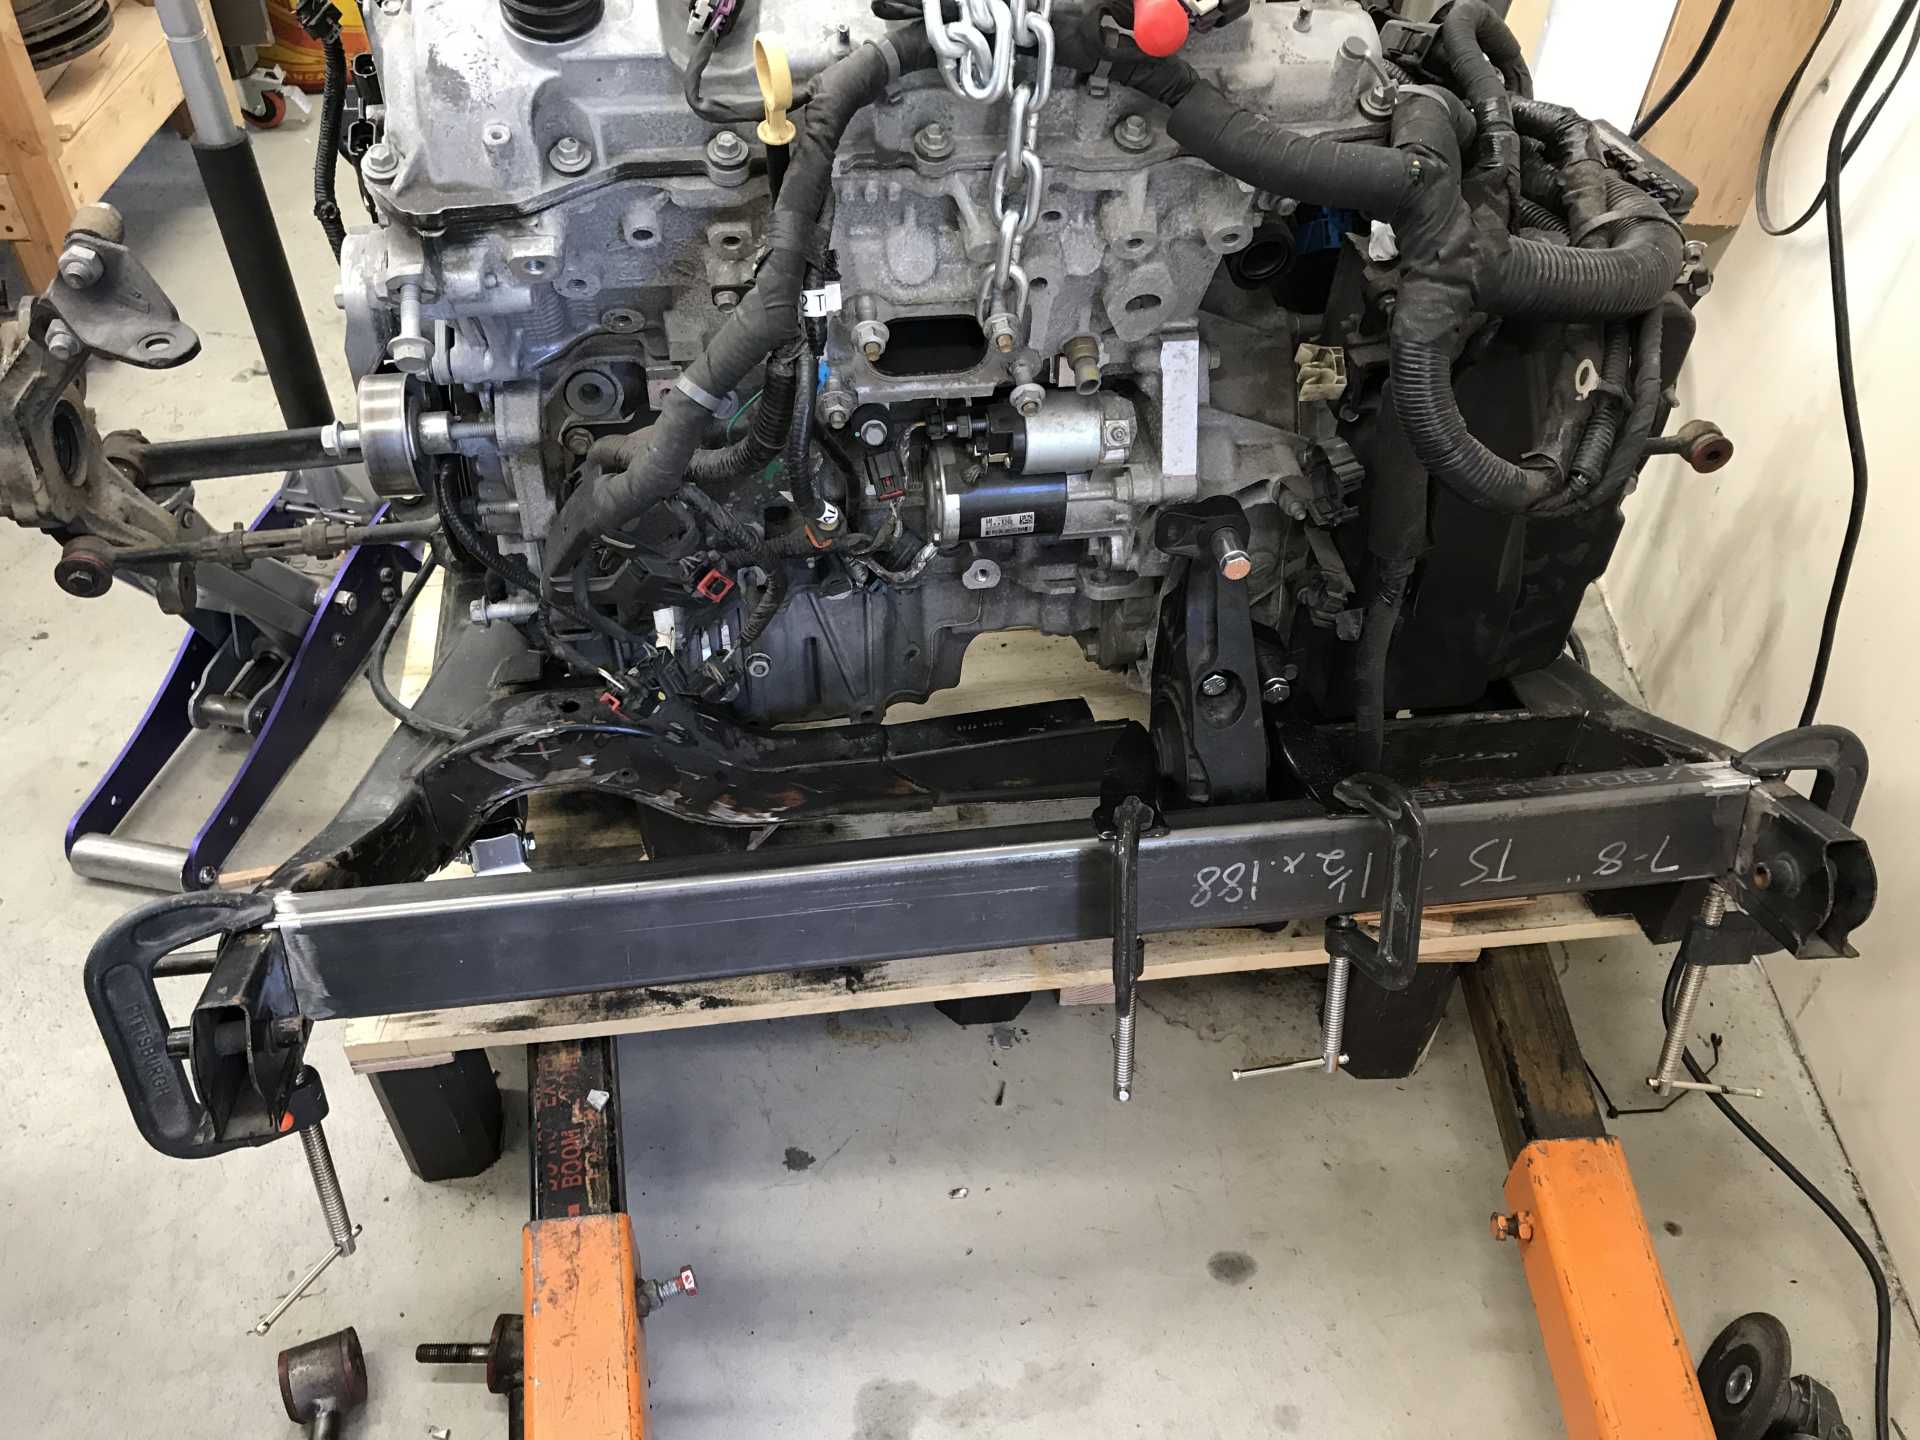
The casters are from Home Depot. I've used them on very heavy shop tables and they seem to hold up well. There were no holes in the cradle so I jacked up the car and placed them on the flat bottom part of the cradle. Three of them were simple, the fourth was more of a problem and required a shim. The front ones are fairly close to the center of mass but I've had no problems with it tipping. I drilled & tapped 16 holes in the cradle and mounted the casters carefully since the bottom plate isn't very thick. I figure that 16 screws holding 900 pounds was an acceptable load since half of the screws are normally in compresson and the other half in tension with a longer arm distance. So far it has worked well, even with the LFX, sway bar, trunnions, & hubs on it. Besides being easy to move it also provides a low ground clearance so the car does not need to be raised too high since my hoist is not that tall.
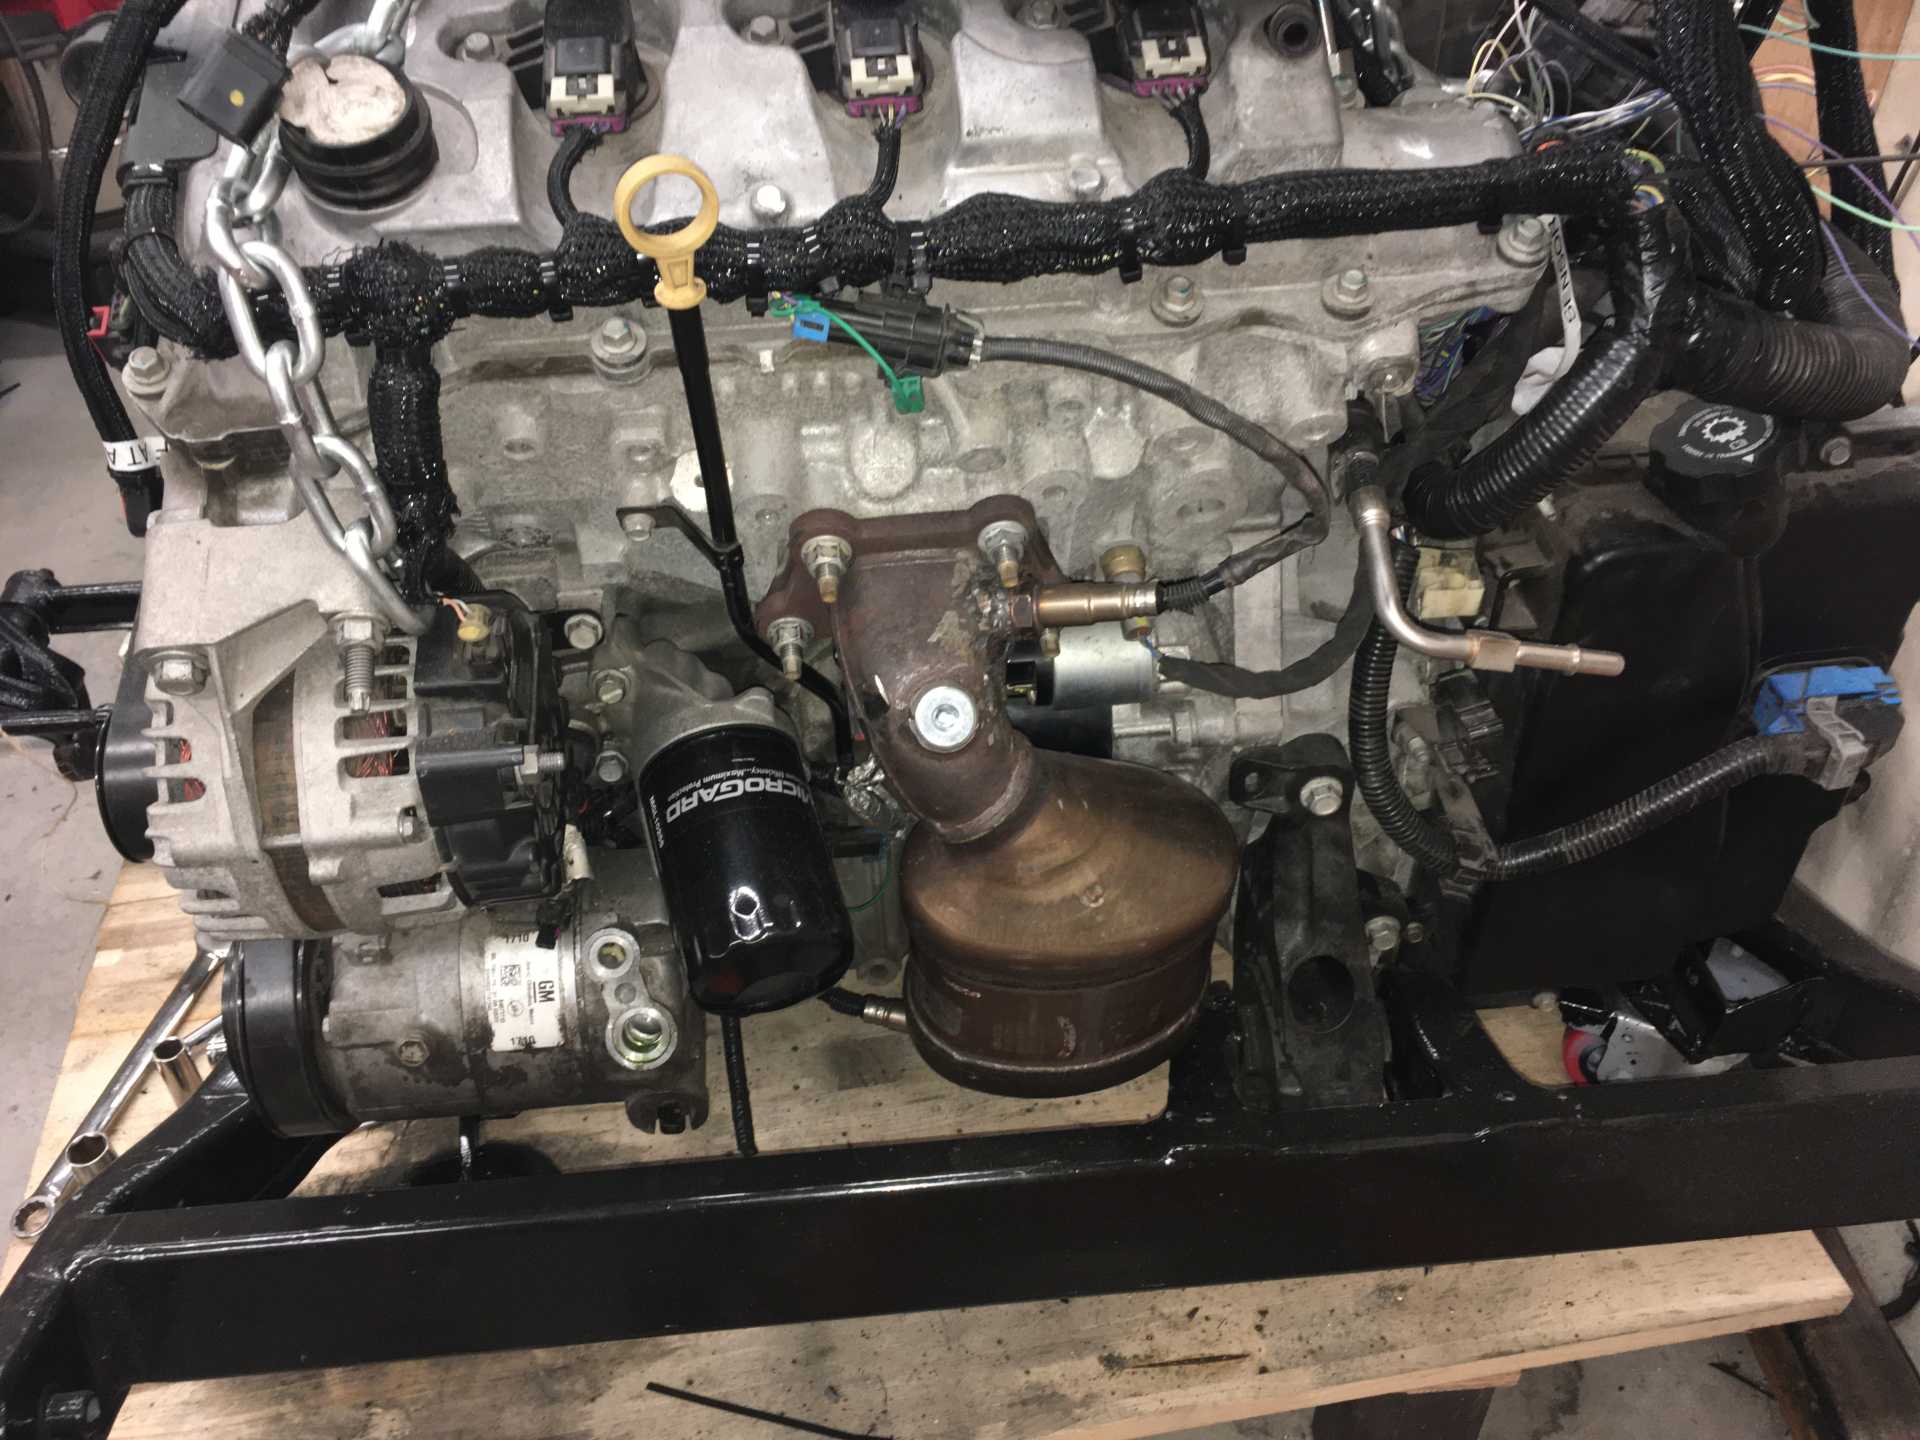
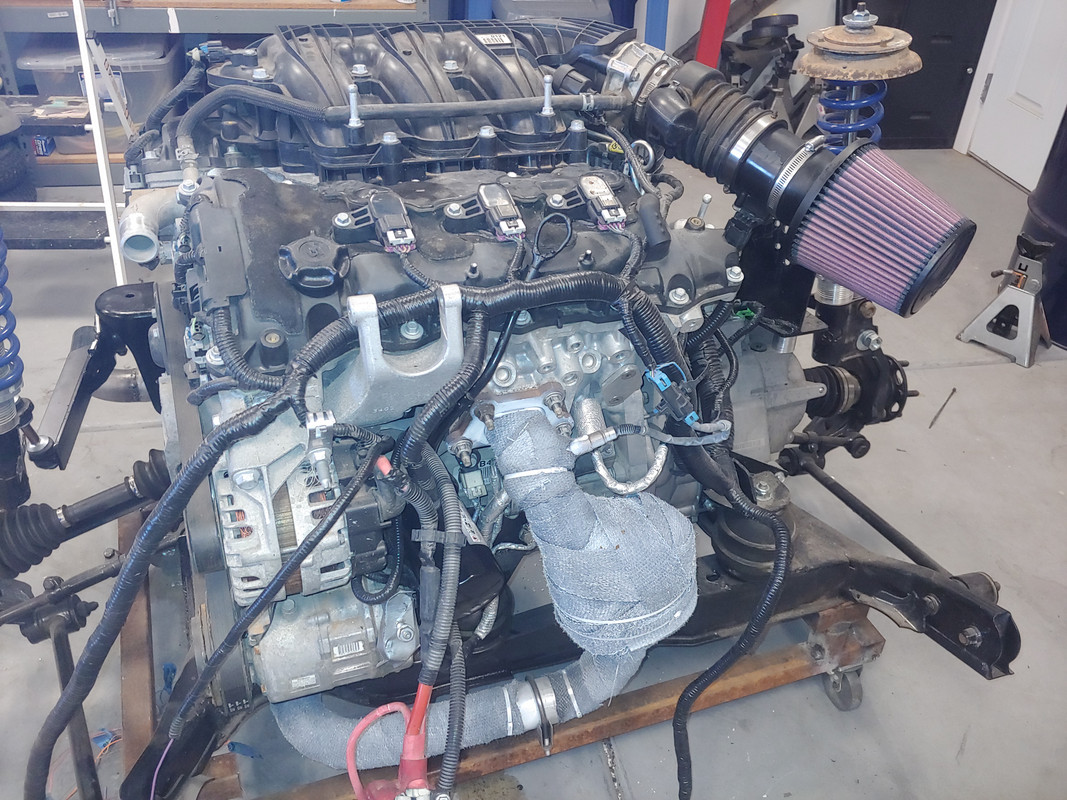
Having some kind of engine bay template is a great help in sorting out the location I've lowered the engine as much as possible so the bottom of the oil pan is flush with the bottom of the cradle side rails. if the engine with the Intake Manifold is too high then adding a bigger hump in the deck lid is not so difficult to do. The fore-aft and side to side locations are really the problem. I've thought of trimming the right side shock tower but I think it will fit on without doing so. At least the birdcage says it will fit. Front to back was important so the alternator would fit in front of the engine (stock LFX location) above the A/C compressor. Nice thing about this engine is other than some sensors, the starter & oil filter there is nothing needing servicing on the engine flanks. Plugs are on top and there are only 4 bolts per downpipe and all of them are easily accessible.
The Impala cradle is very long and flat and seemed to be a lot of work to convert it to fit the Fiero mounting points. In my next update you will see that i did re-use two of the Impala motor mounts and two of the cradle isolators.
Mounting the engine required moving it to the left about 3/4" so the aft head cam sensors are clear of the right shock tower. It could be moved even more since the 6T70 is only about 12" wide. The real hassle was getting the engine as low as possible in the cradle. And yes the dogbone mount is gone.
Finally the work of others fitting this same transmission and the LS4 / NorthStar engines was a good sign that there is really a lot of space in the bay for making this swap work. Right now I'm fixing a leaking front crank seal on the LFX and about to have the Impala axles cut down fit the Fiero outer CV joints. I've got a shop in Boise, ID that does axle work. With luck the cradle goes in the car this coming week and I'll have axles in 2 weeks.[This message has been edited by MikesFirstFiero (edited 08-01-2021).]
|
|
|
|
MikesFirstFiero
|
AUG 07, 12:48 AM
|
|
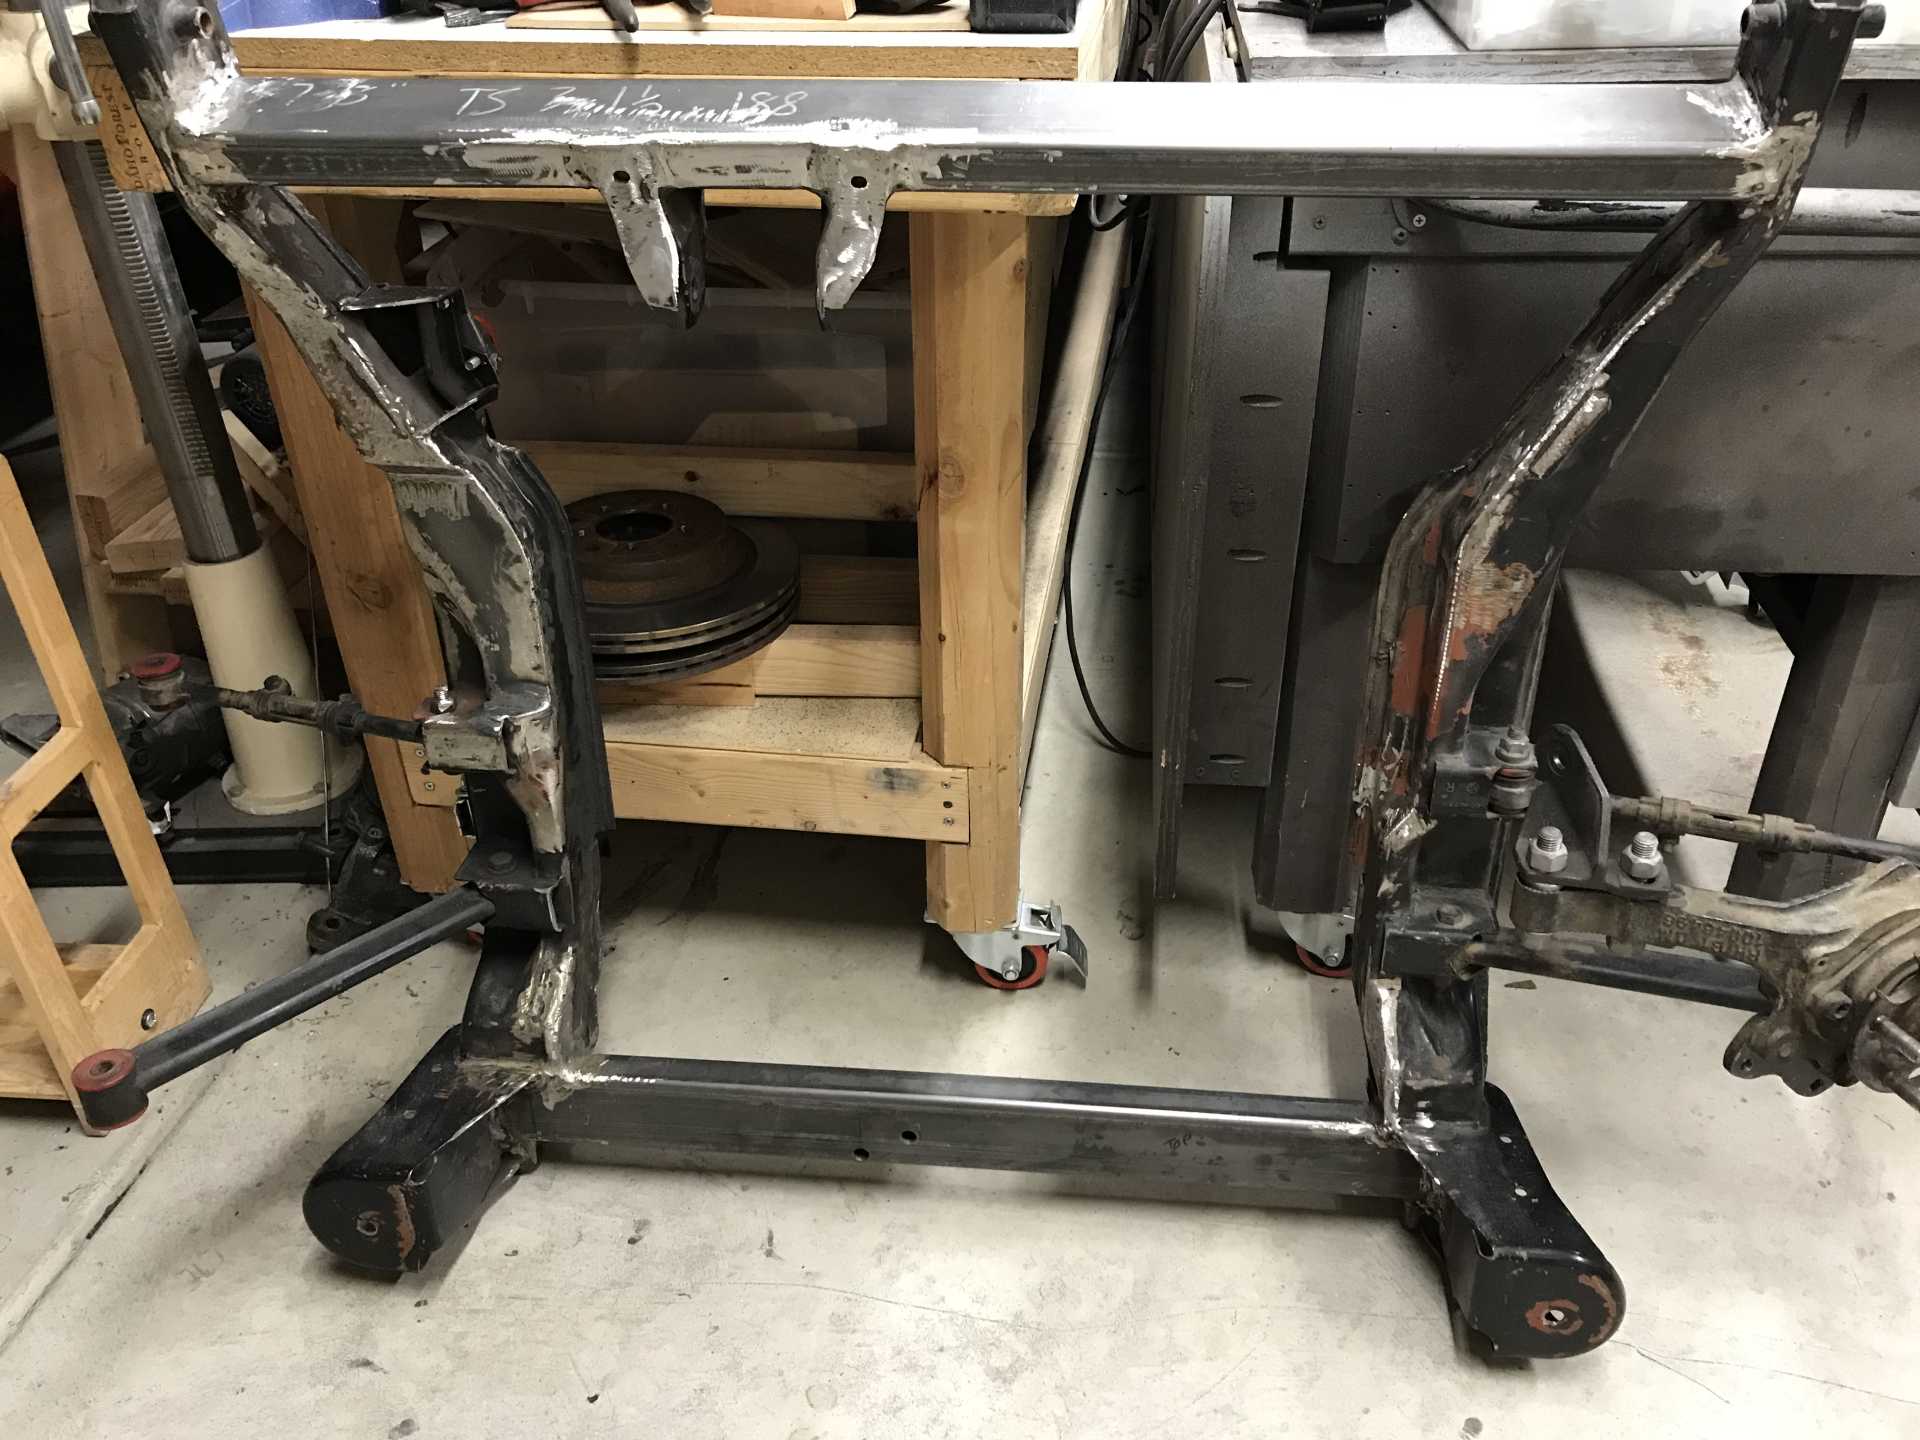
The cradle has been the first part that needed significant changes. To marry the engine and the cradle I lifted the engine with a hoist and placed the cradle on the ground with a wooden platform inside it, still mounted on casters). Then the engine was lowered onto the platform and shimmed to be level to the floor. On the LFX the oil pan is a structural part and the engine-transmission rests on the transmission at the torque converter and the front of the oil pan behind the harmonic dampener. Just looking at the fit a few problems became obvious.
-The cross members of the old cradle were intended for an engine that was much narrower, one or both would need modification.
-The new motor mounts would be a problem since there are only the mounts at the transmission on both sides but nothing on the front of the engine. It was suspended from above.
-The engine would need to be as low as practical to clear the right shock tower and to give a lower CG.
-Both side rails would need some cutouts to clear the transmission and a sensor on the front of the engine.
-There would need to be something to provide a torque reaction force to the cradle with as long of an arm as possible since there is no dogbone.
Interference on the left side with the transmission, one of many
The first thing I did was to make a pair of jigs from some scrap Oak, they were placed on top of the suspension arms mounts. These were cut to mate to the Impala tripod outer housings. The axle/engine location front to back (relative to the car) and the height of the axle were determined by the jigs. the Forward side of the engine was held up by a piece of a 4 x 4 with shims for height adjustment. Left-right positioning was by eyeball using the cradle rail as a reference. Lowering the engine showed that all the old 2.8 motor mounts would need to go. As I lowered the engine& transmission the jigs I made were sliced thinner on a bandsaw so they were always a good reference. The birdcage was used many times to check the engine-tranny location, without it the mount would be guesswork. I'm planning on mating the engine assembly to the car one time only.
These jigs saved loads of time making sure the position was repeatable. I must have lifted and set the engine 5 times.
At this time I decided to look at the motor mounts before I went any further, I knew the tranny would require a cut on the left cradle rail but that could wait for now. This is a low-budget swap so re-using anything from the Impala was free. I checked many engine mounts and the cost, size and location pretty much ruled them out and I did have a set of Impala mounts already. To use the Impala mounts I would need to move the cross bars out and weld the impala brackets to them. So one at a time I located the new cross bars and tack welded them in place and then cut out the old cross bars. Since the front crossbar mounts the handbrake I left the driver side stub in place. But for now there is no handbrake. To keep the rear cradle mounts aligned I used a U-channel of steel bolted to the cradle-to-car mounts to keep the original geometry accurate. I then welded in the new one and cut the old bar out. I really didn't want to have to fight bad cradle mounting points when it goes back in.
Both cross bars were made from 2 x 3 rectangular tubing. The fore transmission mount was welded to the crossbar at an angle after fiddling with the engine placement. The aft cross bar was mounted flat so the Impala bolt-on mount could be reused. This solution solved several problems.
-It was cheap, $60 for steel.
-It moved the attachments to the cradle closer to the ends of the cradle. This reduces the bending stress on the cradle rails and gives the same arm distance as the Impala to reduce the torque reaction force.
-It allowed the stock exhaust Impala to be easily routed to the rear of the car. The muffler would be located under a reduced-depth trunk. I got this idea from the LS/LFX conversion by Dan86GT (https://www.fiero.nl/forum/Forum3/HTML/000136-2.html) and it makes really good sense. The original Fiero muffler was tiny and putting a bigger one between the engine & trunk was not going to work. Now I'll have room for a Camaro transverse muffler (and maybe a resonator if it is too loud when crusing).
View of forward of engine with Impala mount in place. The existing cross bar just does not work.
Trying the Impala cradle cross bar as an experiment. It's too short to use.
Front new 2"x3" crossbar ready for welding, old bar is partly still in place.
The bar covers the trailing arm nuts that were welded in place.
Positioned to weld the Impala mount bracket to the front cross bar
Keeping the rear cradle mounts aligned so I can cut off the rear crossbar.
The aft mount is the black drumstick laying on the platform.
The tranny still bottomed on the cradle rail and on the aft left side suspension mount. The only way to solve the suspension interference was to cut off a rib on the tranny that was exactly in the wrong place. That made the mount lower but not enough. The cradle needed to be notched on the left side by about 3/4" to eliminate the interference. The tranny was now lower fore and aft and solved the clearance issues with the cradle.
Notch to transmission web to clear left rear arm mount.
Cradle with both cross bars replaced, forward mount bracket in place. Notch in both rails.
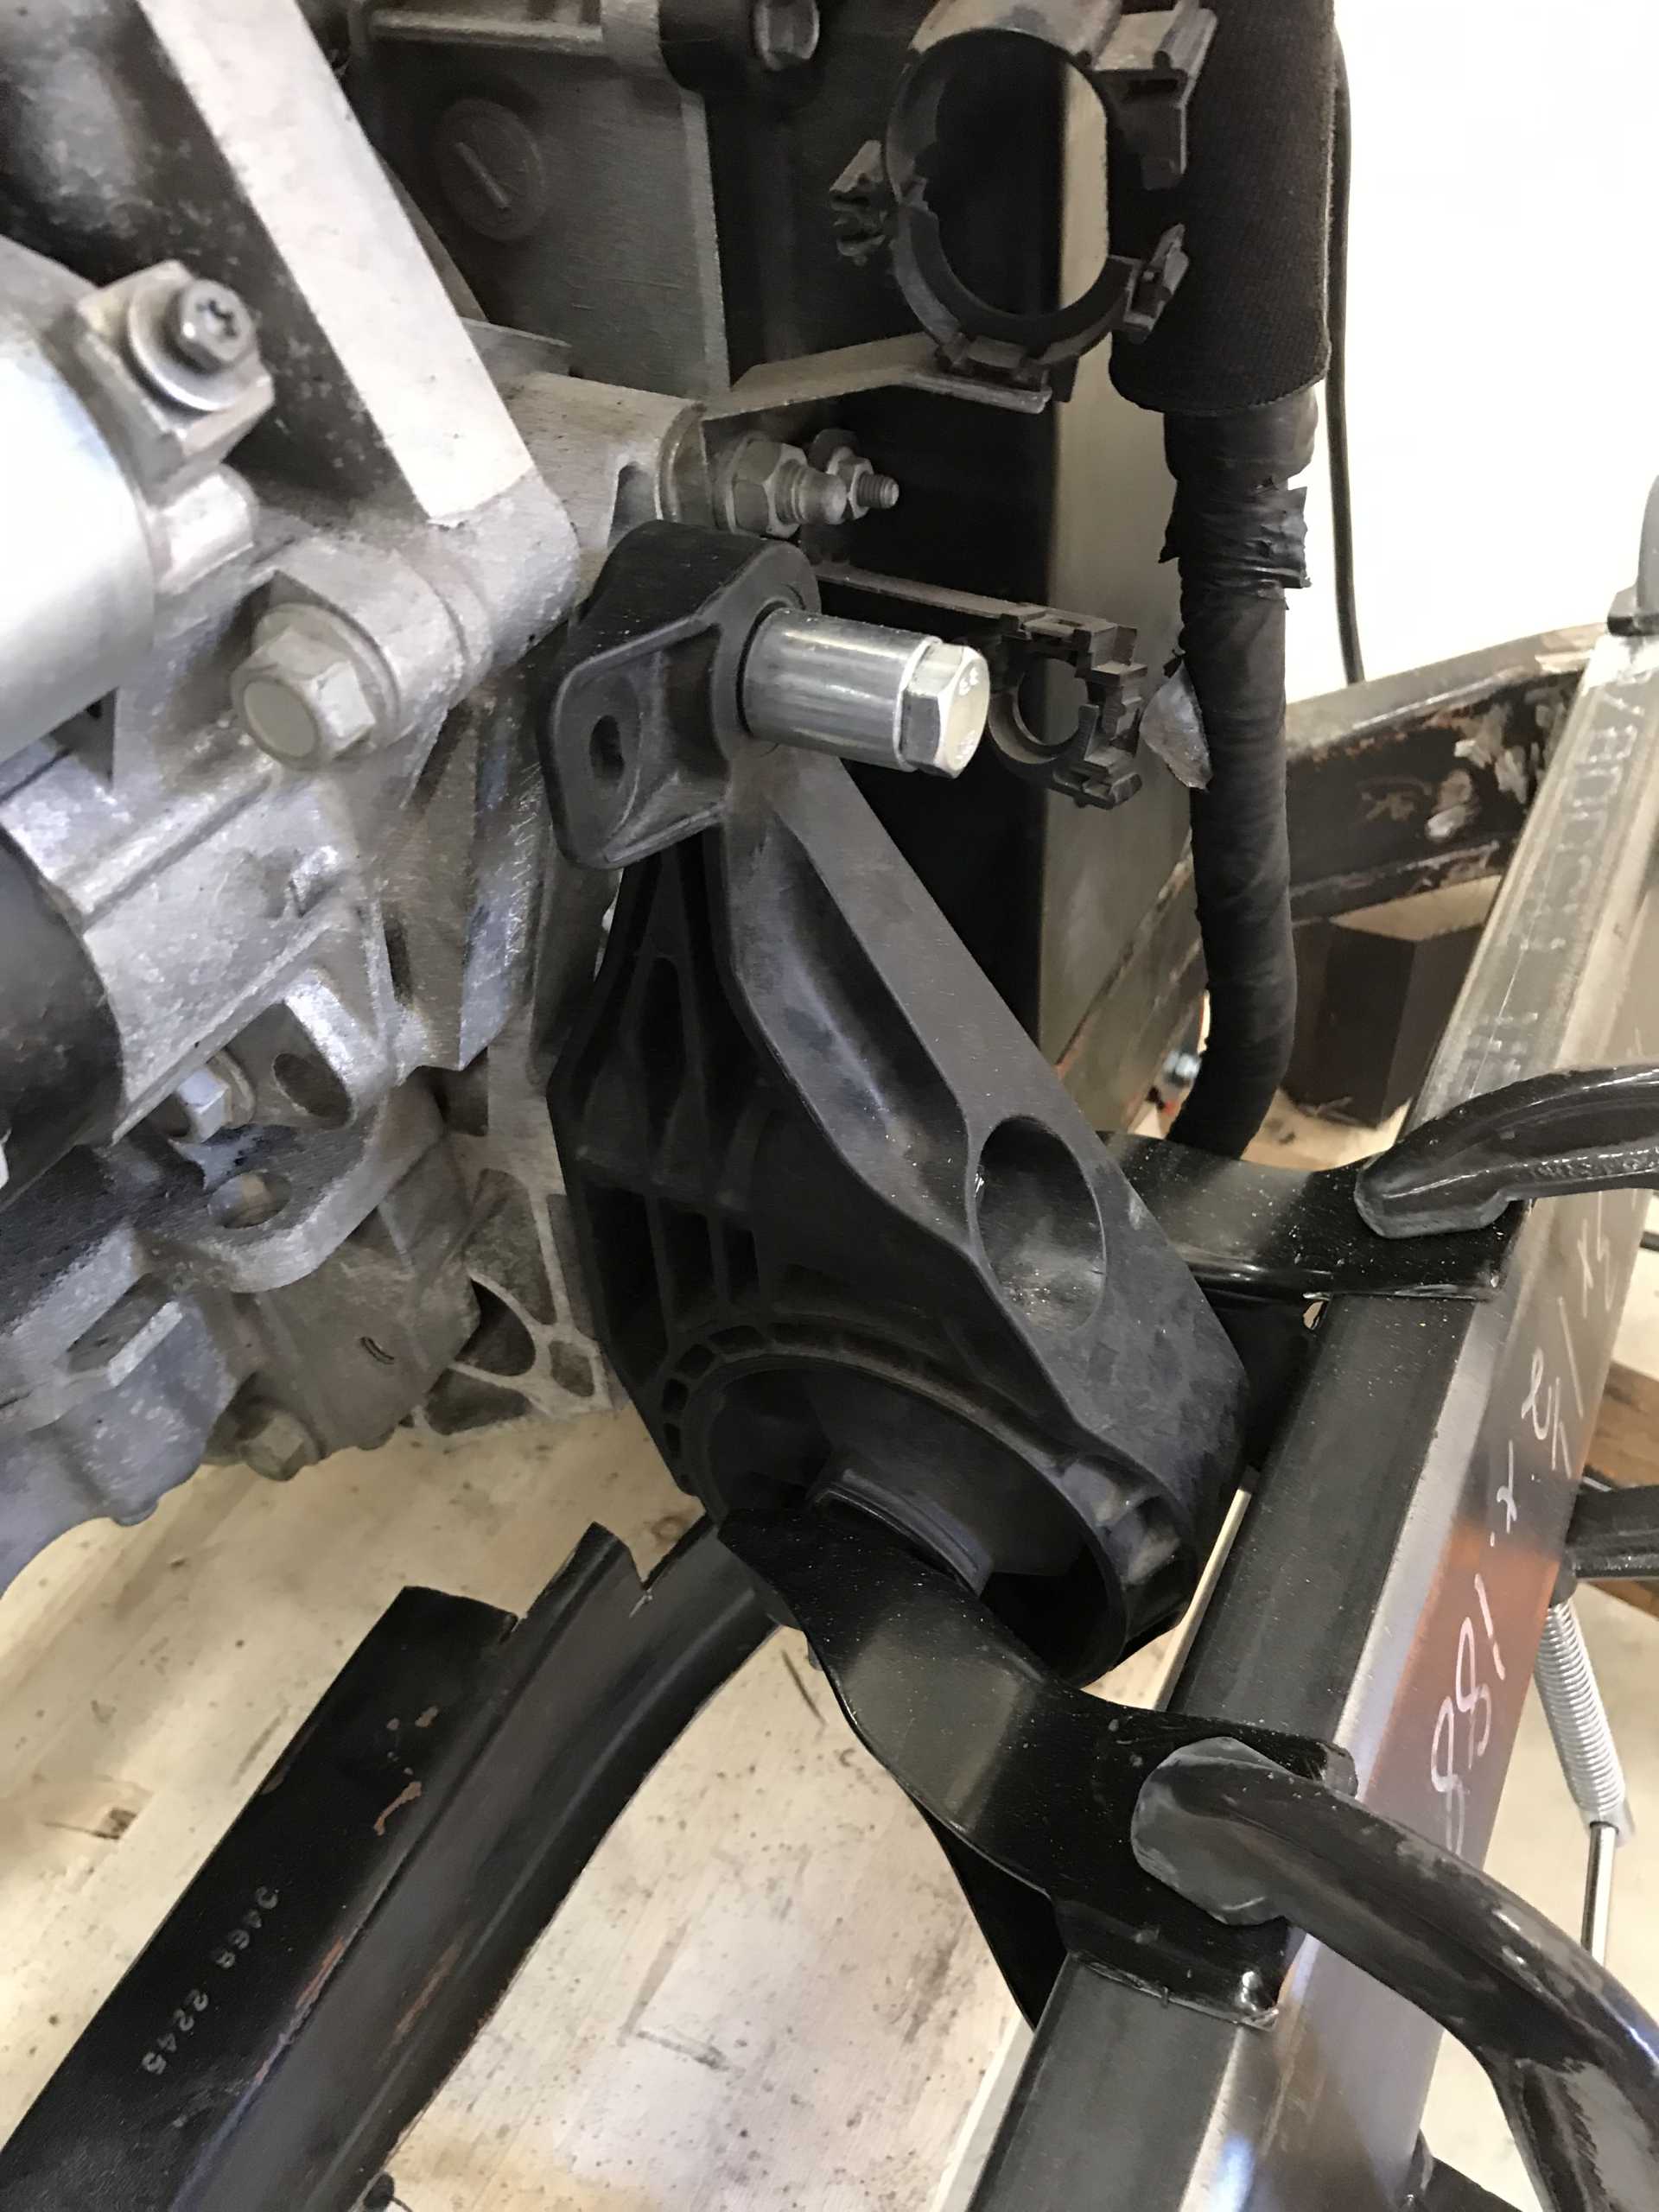
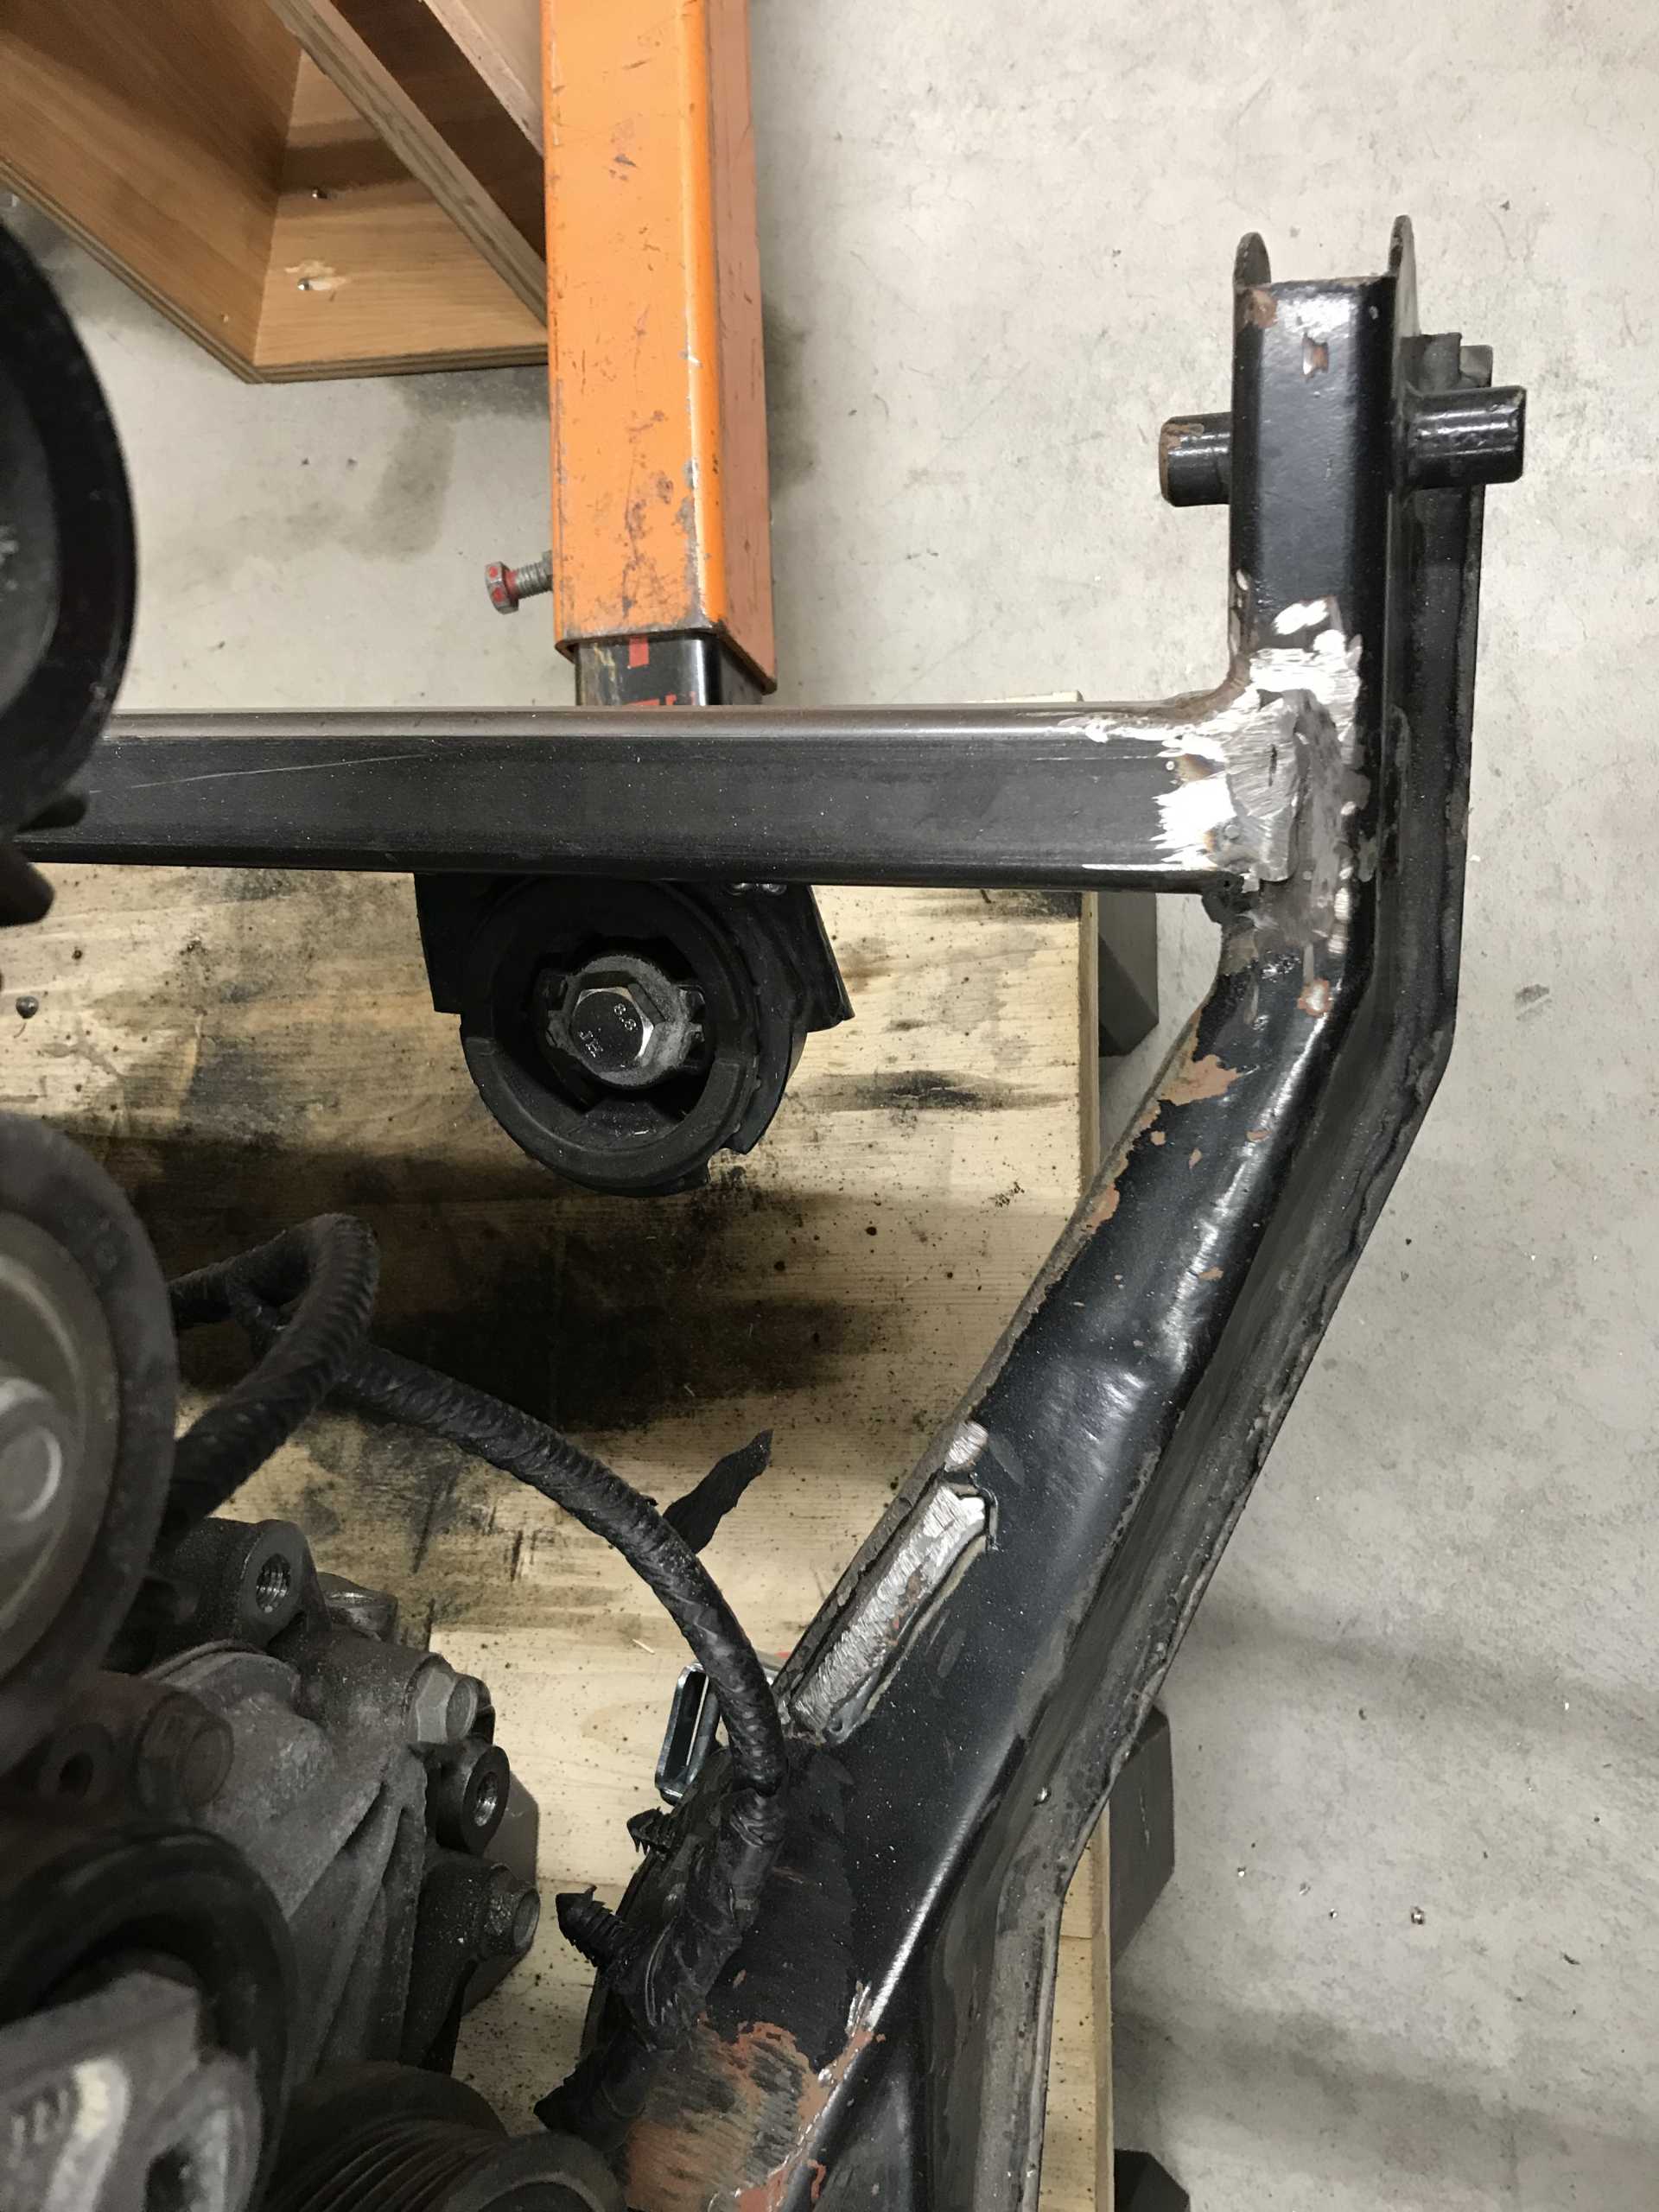
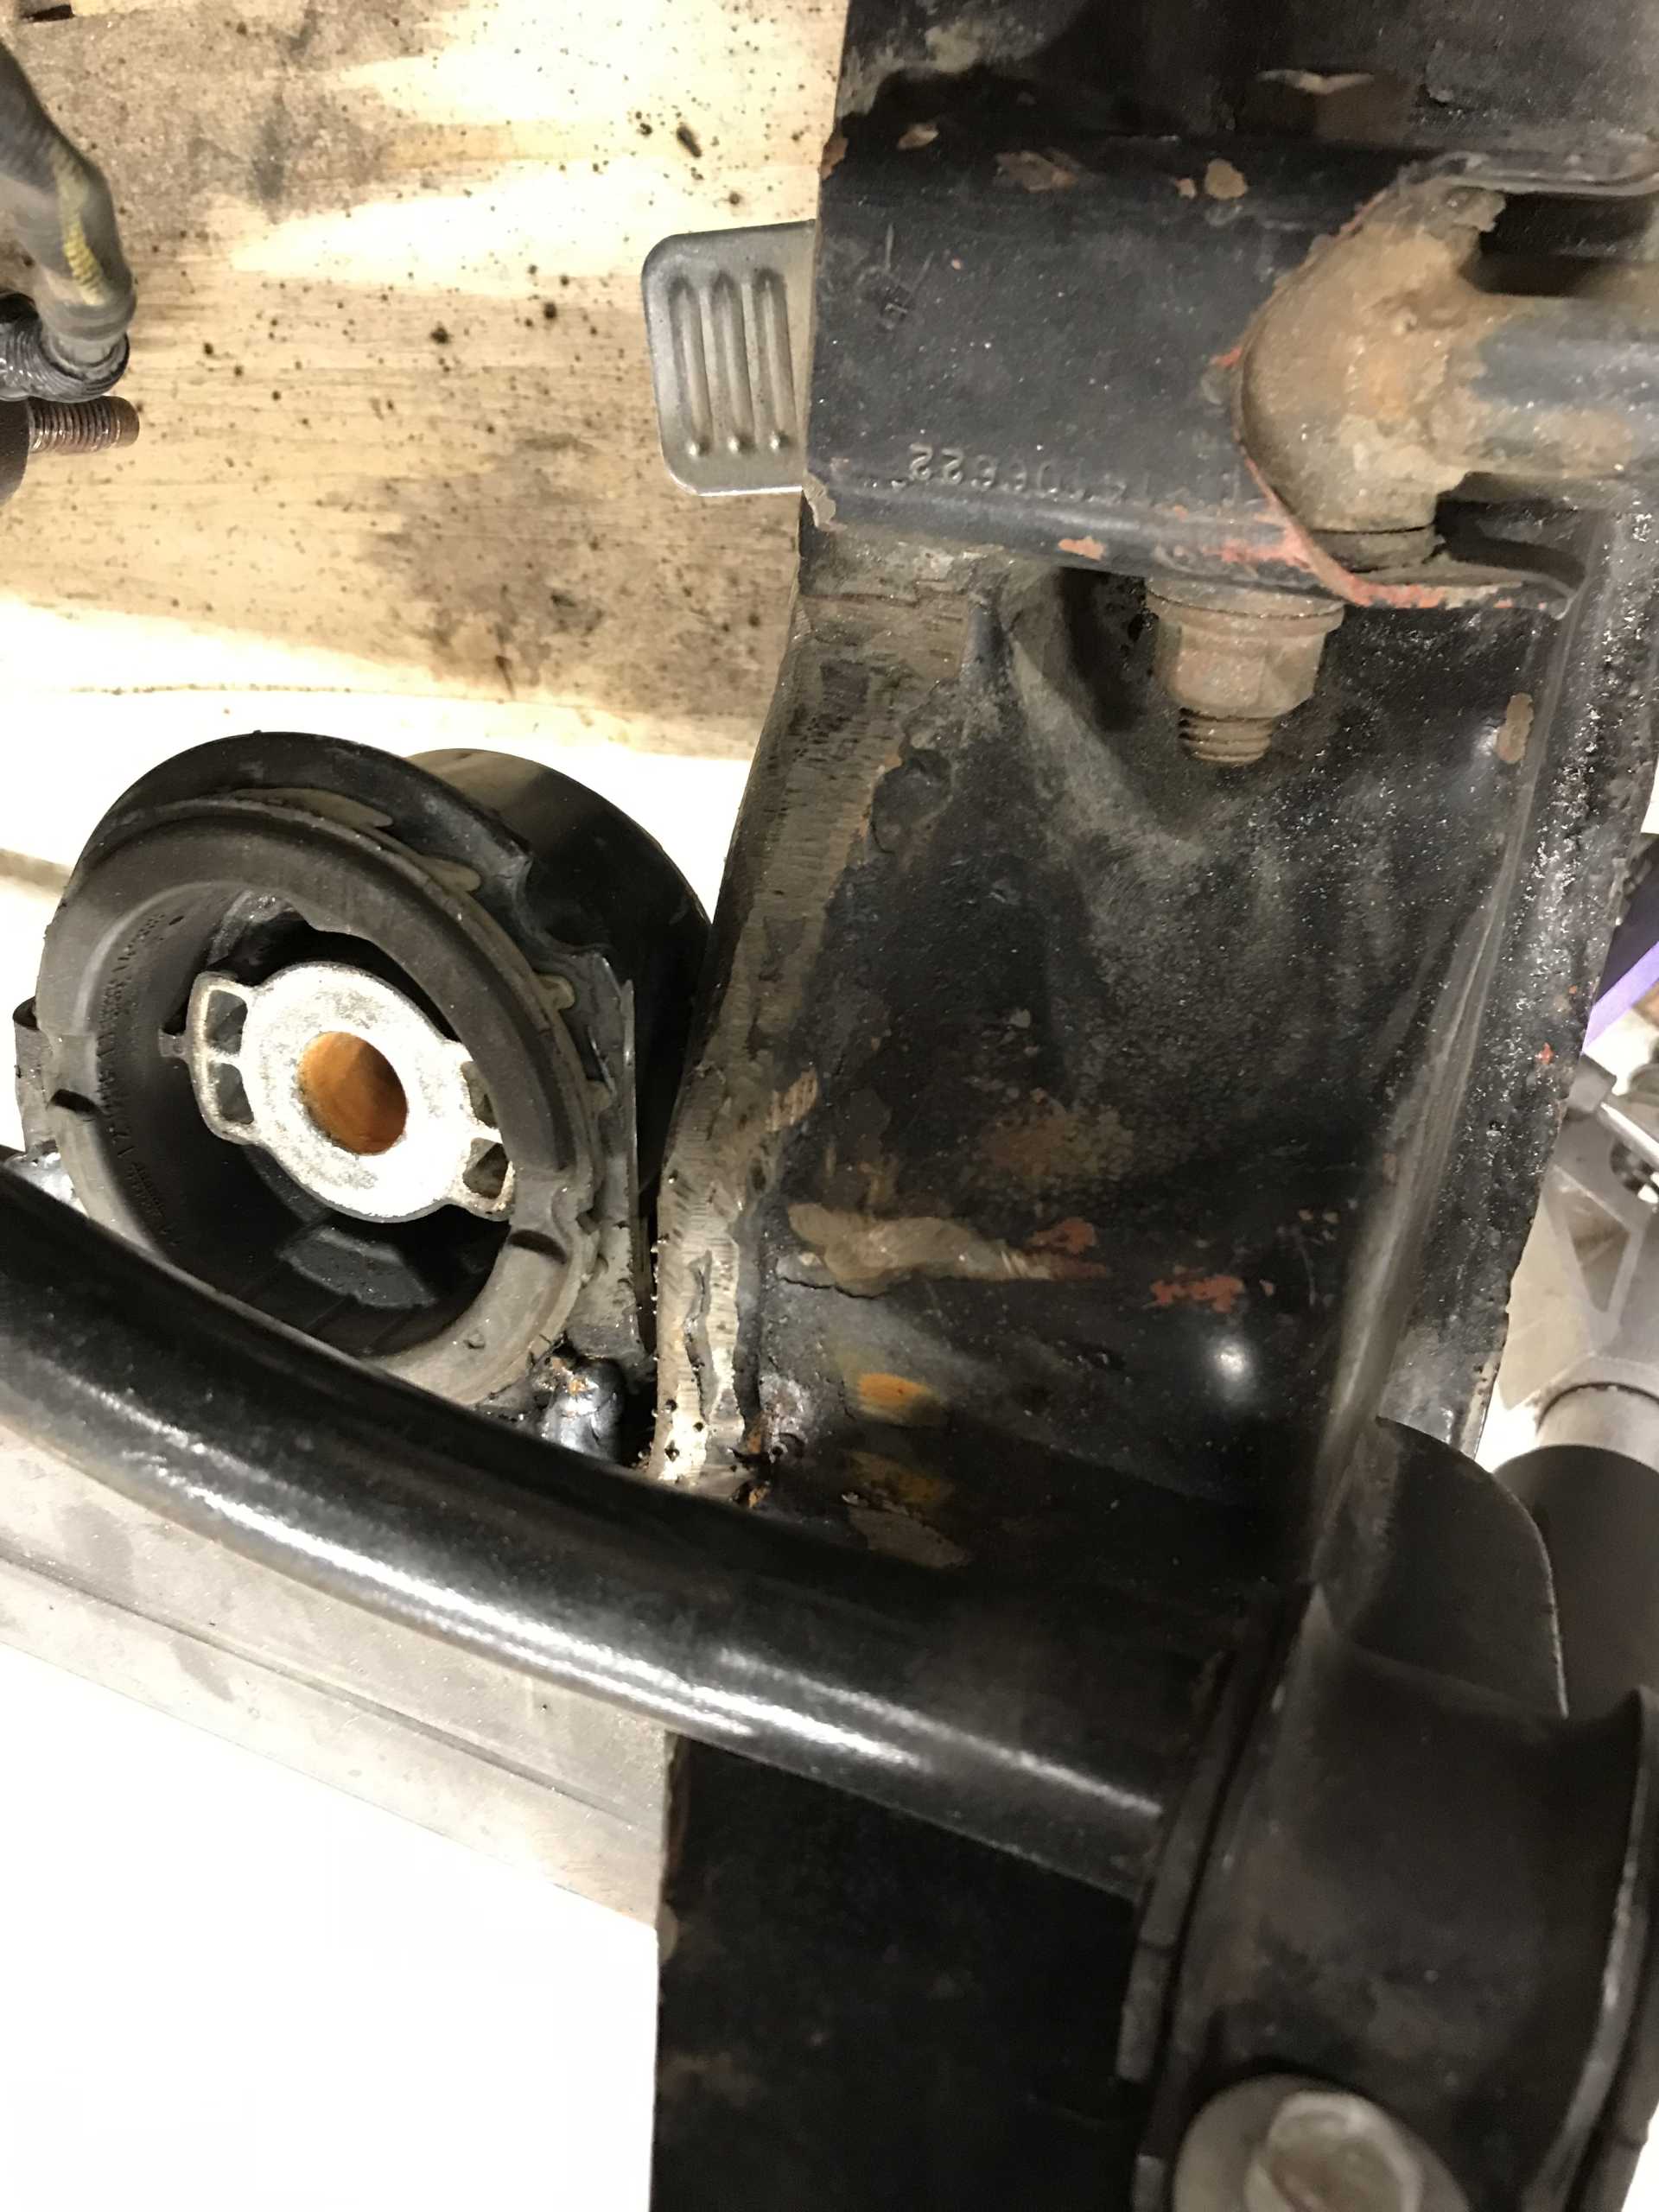
The aft rear transmission mount bolted up to the cross bar from below with spacers to determine the rear height. The fore transmission mount height needed to be lowered too; this was done be slotting the mounting bracket and welding heavy washers at the new height. What about the front of the engine? Well I mulled this over and eventually figured out a solution that was cheap, gave a long lever arm and provided some vibration isolation. On the side of the engine there are some possible mounts on the aft flank by using the transmission shaft mounting points. But what about the forward side? That has the alternator, oil filter & sender and A/C compressor taking up most of that space. And there isn't much lateral space between the engine and the cradle rail.
Then I discovered there are two unused 14mm tapped holes on either ends of the oil pan front near the top. I took some measurements and made a cardboard template of what a mounting bracket could look like except fpr the ends. I had no idea what the ends of this bracket would connect to, I wanted vibration isolation but had no idea how to get it. Then I remembered I still had the Impala cradle isolators in their steel collars. The collars I welded to the cross bars, one to each bar. The isolators look like plastic & rubber donuts with an aluminum hub in the center. A little bit of thinking gave me the strange snake-like ends to the mounting bracket. One end of the bracket has the mounting bolt welded to it and the other has a mounting pad. This was needed since the isolators are canted and both mounting bolts can't be welded to the bracket. Next came a wood template and a test fitting. It worked well enough to make the real thing from 1/4" steel plate with a bottom flange to stiffen it laterally. The result is two engine mounts that are widely spaced from the transmission centerline and fit in the limited space and should provide adequate torque reaction since there is no dog bone.
Template and rough-cut engine mount bracket.

Forward mount on cross bar
Aft mount on cross bar
Preparing to drill the holes for bolts to the oil pan. The V shaped jig was drilled and checked for correct fit.
Finally I needed to make a notch on the right side rail to clear the sensor on the oil pan below the crankshaft. The photo below shows the engine on the mounts with the cats and accessories installed.
Completed front mount bracket with stiffening flange on bottom.
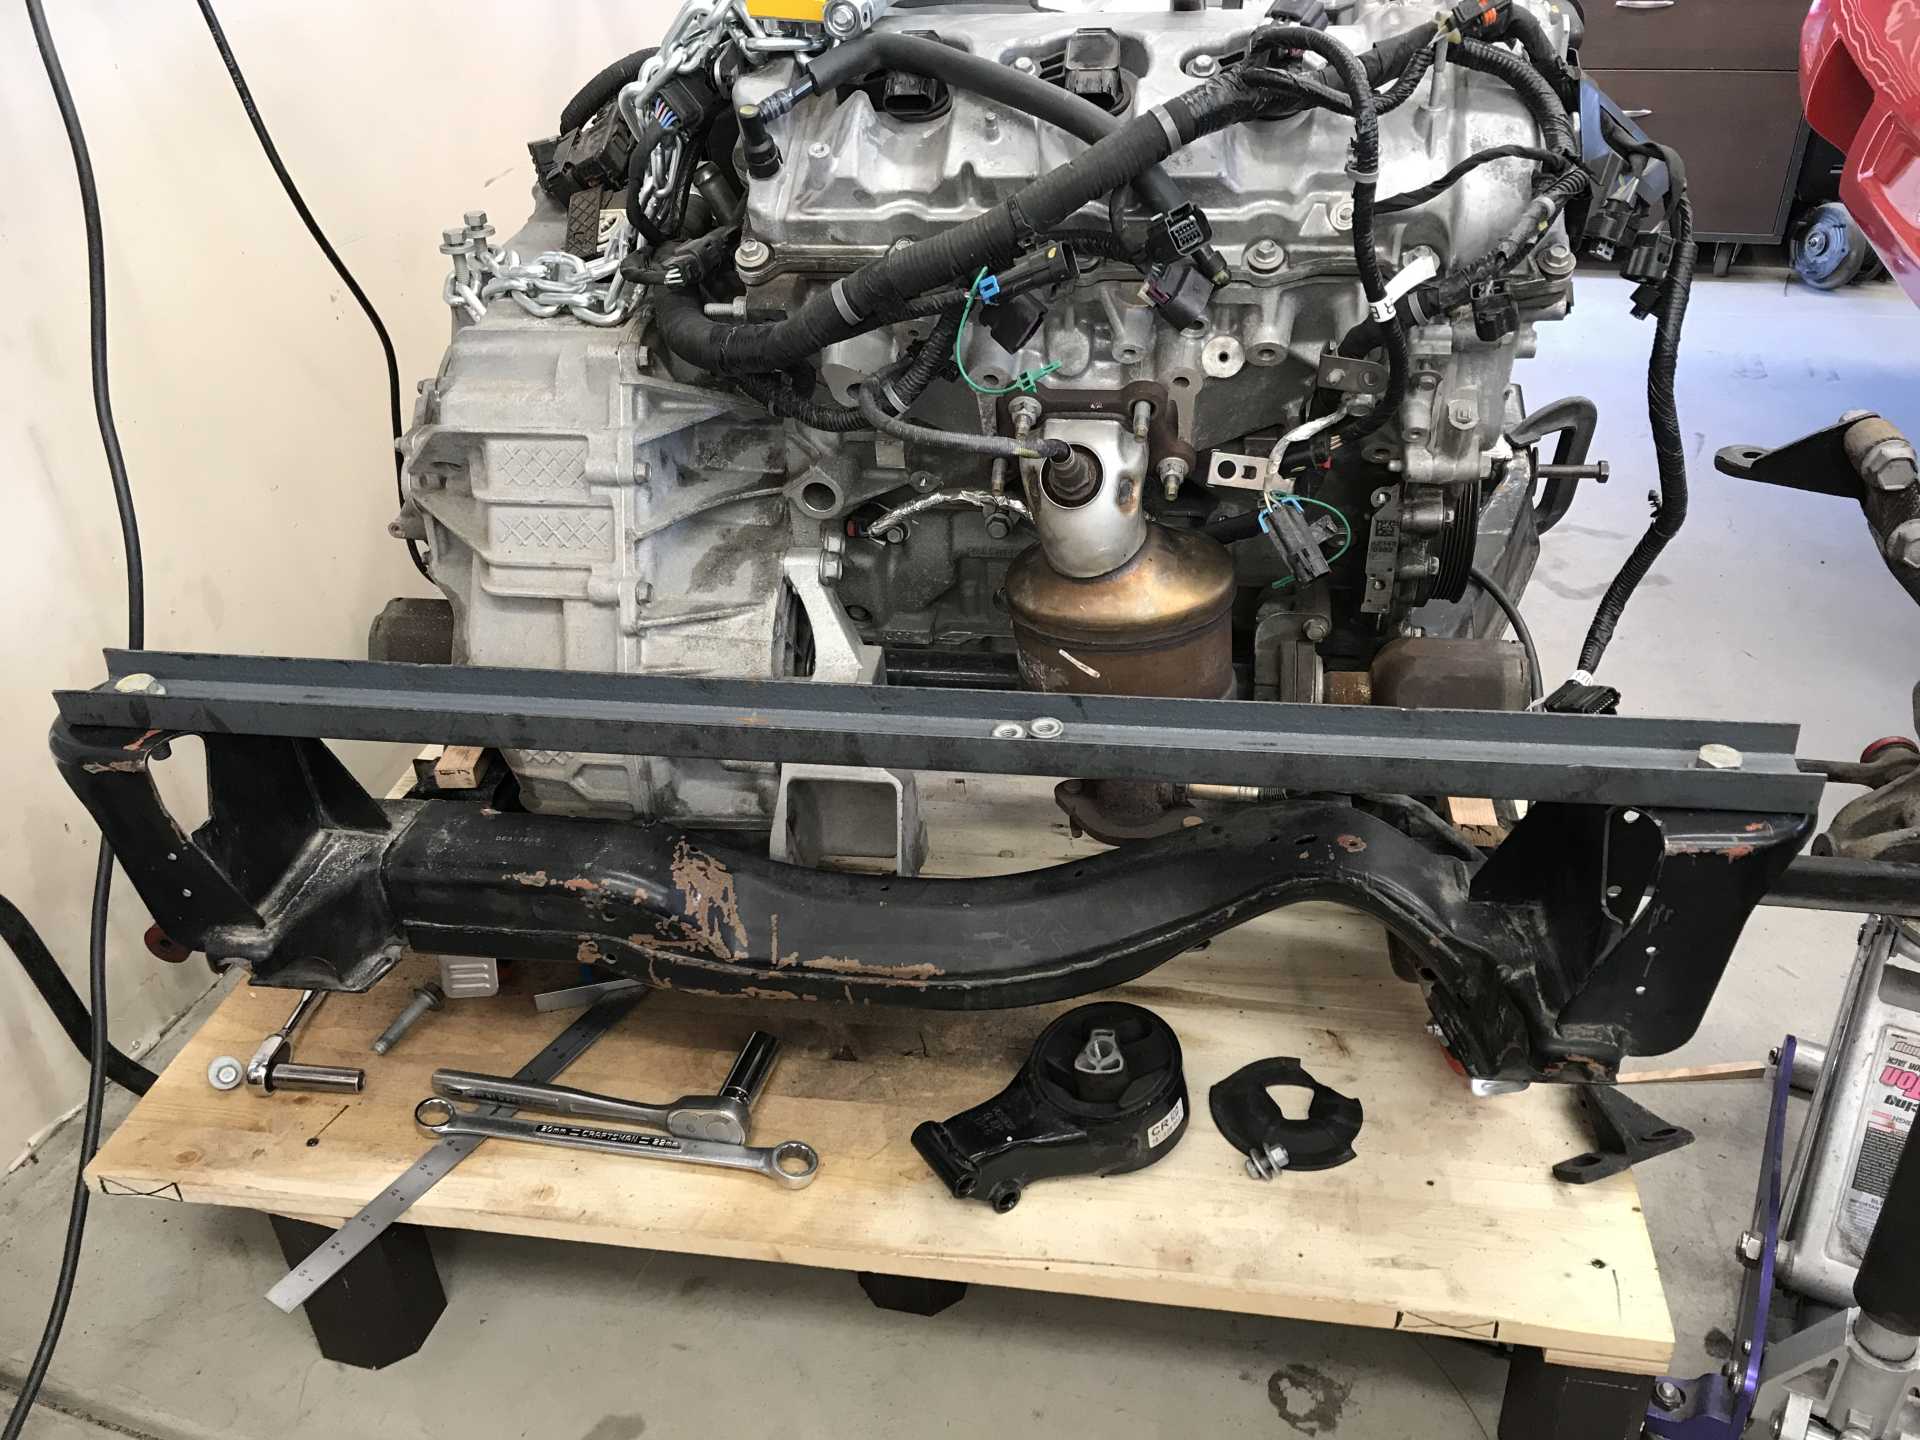
Completed cradle ready for the engine.
The O2 sensors have been moved to the sides of the cats with the original O2 holes plugged for now. Later maybe a patch will replace the bungs since they do stick into the exhaust flow. The engine wiring has been re-loomed with the connections to the Throttle Body and Mass Air Flow moved since the Intake Manifold is now reversed (I might consider a Camaro IM later). Two other issues were the fuel inlet hose needed to be rebent to feed from the other side of the engine. Finally the thermostat and housing has heater hoses pointing in the wrong direction. I removed the hose pipes and drilled & tapped the housing for AN-10 and AN-12 connectors that point them in the right direction. The thermostat and housing are a single non-repairable part, dealer cost is $190, I'd better not break it. A leaking front crank seal has been replaced while it's out in the open. The Fiero oil pressure sender has been added to the filter oil mount (so my rally gauges work), the Alternator & AC are mounted and the belt is on. Now "all" we need is to put it in the car, make the wheels turn and hook it up.
Aft end, aft motor mount is bottom left-center of photo, bolted below cross bar. Engine mount at opposite end of crossbar.
Wiring is re-loomed to move it and make it look better.
Cross-under front exhaust is just below left end of cat flange.
Front & rear are joined up to the single pipe hidden behind the cat. It's all stock Impala parts.
View of aft end of engine mount. Bolt drops in with nut below to hold it to isolator.
Forward side of motor. All accessories in place. Engine mount hidden below AC compressor.
Next: Axles on the cheap.[This message has been edited by MikesFirstFiero (edited 08-07-2021).]
|
|
|
|
Daryl M
|
AUG 07, 03:07 AM
|
|
| quote | Originally posted by MikesFirstFiero:
The cradle has been the first part that needed significant changes. To marry the engine and the cradle I lifted the engine with a hoist and placed the cradle on the ground with a wooden platform inside it, still mounted on casters). Then the engine was lowered onto the platform and shimmed to be level to the floor. On the LFX the oil pan is a structural part and the engine-transmission rests on the transmission at the torque converter and the front of the oil pan behind the harmonic dampener. Just looking at the fit a few problems became obvious.
-The cross members of the old cradle were intended for an engine that was much narrower, one or both would need modification.
-The new motor mounts would be a problem since there are only the mounts at the transmission on both sides but nothing on the front of the engine. It was suspended from above.
-The engine would need to be as low as practical to clear the right shock tower and to give a lower CG.
-Both side rails would need some cutouts to clear the transmission and a sensor on the front of the engine.
-There would need to be something to provide a torque reaction force to the cradle with as long of an arm as possible since there is no dogbone.
Interference on the left side with the transmission, one of many
The first thing I did was to make a pair of jigs from some scrap Oak, they were placed on top of the suspension arms mounts. These were cut to mate to the Impala tripod outer housings. The axle/engine location front to back (relative to the car) and the height of the axle were determined by the jigs. the Forward side of the engine was held up by a piece of a 4 x 4 with shims for height adjustment. Left-right positioning was by eyeball using the cradle rail as a reference. Lowering the engine showed that all the old 2.8 motor mounts would need to go. As I lowered the engine& transmission the jigs I made were sliced thinner on a bandsaw so they were always a good reference. The birdcage was used many times to check the engine-tranny location, without it the mount would be guesswork. I'm planning on mating the engine assembly to the car one time only.
These jigs saved loads of time making sure the position was repeatable. I must have lifted and set the engine 5 times.
At this time I decided to look at the motor mounts before I went any further, I knew the tranny would require a cut on the left cradle rail but that could wait for now. This is a low-budget swap so re-using anything from the Impala was free. I checked many engine mounts and the cost, size and location pretty much ruled them out and I did have a set of Impala mounts already. To use the Impala mounts I would need to move the cross bars out and weld the impala brackets to them. So one at a time I located the new cross bars and tack welded them in place and then cut out the old cross bars. Since the front crossbar mounts the handbrake I left the driver side stub in place. But for now there is no handbrake. To keep the rear cradle mounts aligned I used a U-channel of steel bolted to the cradle-to-car mounts to keep the original geometry accurate. I then welded in the new one and cut the old bar out. I really didn't want to have to fight bad cradle mounting points when it goes back in.
Both cross bars were made from 2 x 3 rectangular tubing. The fore transmission mount was welded to the crossbar at an angle after fiddling with the engine placement. The aft cross bar was mounted flat so the Impala bolt-on mount could be reused. This solution solved several problems.
-It was cheap, $60 for steel.
-It moved the attachments to the cradle closer to the ends of the cradle. This reduces the bending stress on the cradle rails and gives the same arm distance as the Impala to reduce the torque reaction force.
-It allowed the stock exhaust Impala to be easily routed to the rear of the car. The muffler would be located under a reduced-depth trunk. I got this idea from the LS/LFX conversion by Dan86GT (https://www.fiero.nl/forum/Forum3/HTML/000136-2.html) and it makes really good sense. The original Fiero muffler was tiny and putting a bigger one between the engine & trunk was not going to work. Now I'll have room for a Camaro transverse muffler (and maybe a resonator if it is too loud when crusing).
View of forward of engine with Impala mount in place. The existing cross bar just does not work.
Trying the Impala cradle cross bar as an experiment. It's too short to use.
Front new 2"x3" crossbar ready for welding, old bar is partly still in place.
The bar covers the trailing arm nuts that were welded in place.
Positioned to weld the Impala mount bracket to the front cross bar
Keeping the rear cradle mounts aligned so I can cut off the rear crossbar.
The aft mount is the black drumstick laying on the platform.
The tranny still bottomed on the cradle rail and on the aft left side suspension mount. The only way to solve the suspension interference was to cut off a rib on the tranny that was exactly in the wrong place. That made the mount lower but not enough. The cradle needed to be notched on the left side by about 3/4" to eliminate the interference. The tranny was now lower fore and aft and solved the clearance issues with the cradle.
Notch to transmission web to clear left rear arm mount.
Cradle with both cross bars replaced, forward mount bracket in place. Notch in both rails.
The aft rear transmission mount bolted up to the cross bar from below with spacers to determine the rear height. The fore transmission mount height needed to be lowered too; this was done be slotting the mounting bracket and welding heavy washers at the new height. What about the front of the engine? Well I mulled this over and eventually figured out a solution that was cheap, gave a long lever arm and provided some vibration isolation. On the side of the engine there are some possible mounts on the aft flank by using the transmission shaft mounting points. But what about the forward side? That has the alternator, oil filter & sender and A/C compressor taking up most of that space. And there isn't much lateral space between the engine and the cradle rail.
Then I discovered there are two unused 14mm tapped holes on either ends of the oil pan front near the top. I took some measurements and made a cardboard template of what a mounting bracket could look like except fpr the ends. I had no idea what the ends of this bracket would connect to, I wanted vibration isolation but had no idea how to get it. Then I remembered I still had the Impala cradle isolators in their steel collars. The collars I welded to the cross bars, one to each bar. The isolators look like plastic & rubber donuts with an aluminum hub in the center. A little bit of thinking gave me the strange snake-like ends to the mounting bracket. One end of the bracket has the mounting bolt welded to it and the other has a mounting pad. This was needed since the isolators are canted and both mounting bolts can't be welded to the bracket. Next came a wood template and a test fitting. It worked well enough to make the real thing from 1/4" steel plate with a bottom flange to stiffen it laterally. The result is two engine mounts that are widely spaced from the transmission centerline and fit in the limited space and should provide adequate torque reaction since there is no dog bone.
Template and rough-cut engine mount bracket.
Forward mount on cross bar
Aft mount on cross bar
Preparing to drill the holes for bolts to the oil pan. The V shaped jig was drilled and checked for correct fit.
Finally I needed to make a notch on the right side rail to clear the sensor on the oil pan below the crankshaft. The photo below shows the engine on the mounts with the cats and accessories installed.
Completed front mount bracket with stiffening flange on bottom.
Completed cradle ready for the engine.
The O2 sensors have been moved to the sides of the cats with the original O2 holes plugged for now. Later maybe a patch will replace the bungs since they do stick into the exhaust flow. The engine wiring has been re-loomed with the connections to the Throttle Body and Mass Air Flow moved since the Intake Manifold is now reversed (I might consider a Camaro IM later). Two other issues were the fuel inlet hose needed to be rebent to feed from the other side of the engine. Finally the thermostat and housing has heater hoses pointing in the wrong direction. I removed the hose pipes and drilled & tapped the housing for AN-10 and AN-12 connectors that point them in the right direction. The thermostat and housing are a single non-repairable part, dealer cost is $190, I'd better not break it. A leaking front crank seal has been replaced while it's out in the open. The Fiero oil pressure sender has been added to the filter oil mount (so my rally gauges work), the Alternator & AC are mounted and the belt is on. Now "all" we need is to put it in the car, make the wheels turn and hook it up.
Aft end, aft motor mount is bottom left-center of photo, bolted below cross bar. Engine mount at opposite end of crossbar.
Wiring is re-loomed to move it and make it look better.
View of aft end of engine mount. Bolt drops in with nut below to hold it to isolator.
Forward side of motor. All accessories in place. Engine mount hidden below AC compressor.
Cross-under front exhaust is just below left end of cat flange. They are joined up to a single pipe behind the cat.
Next: Axles on the cheap.
|
|
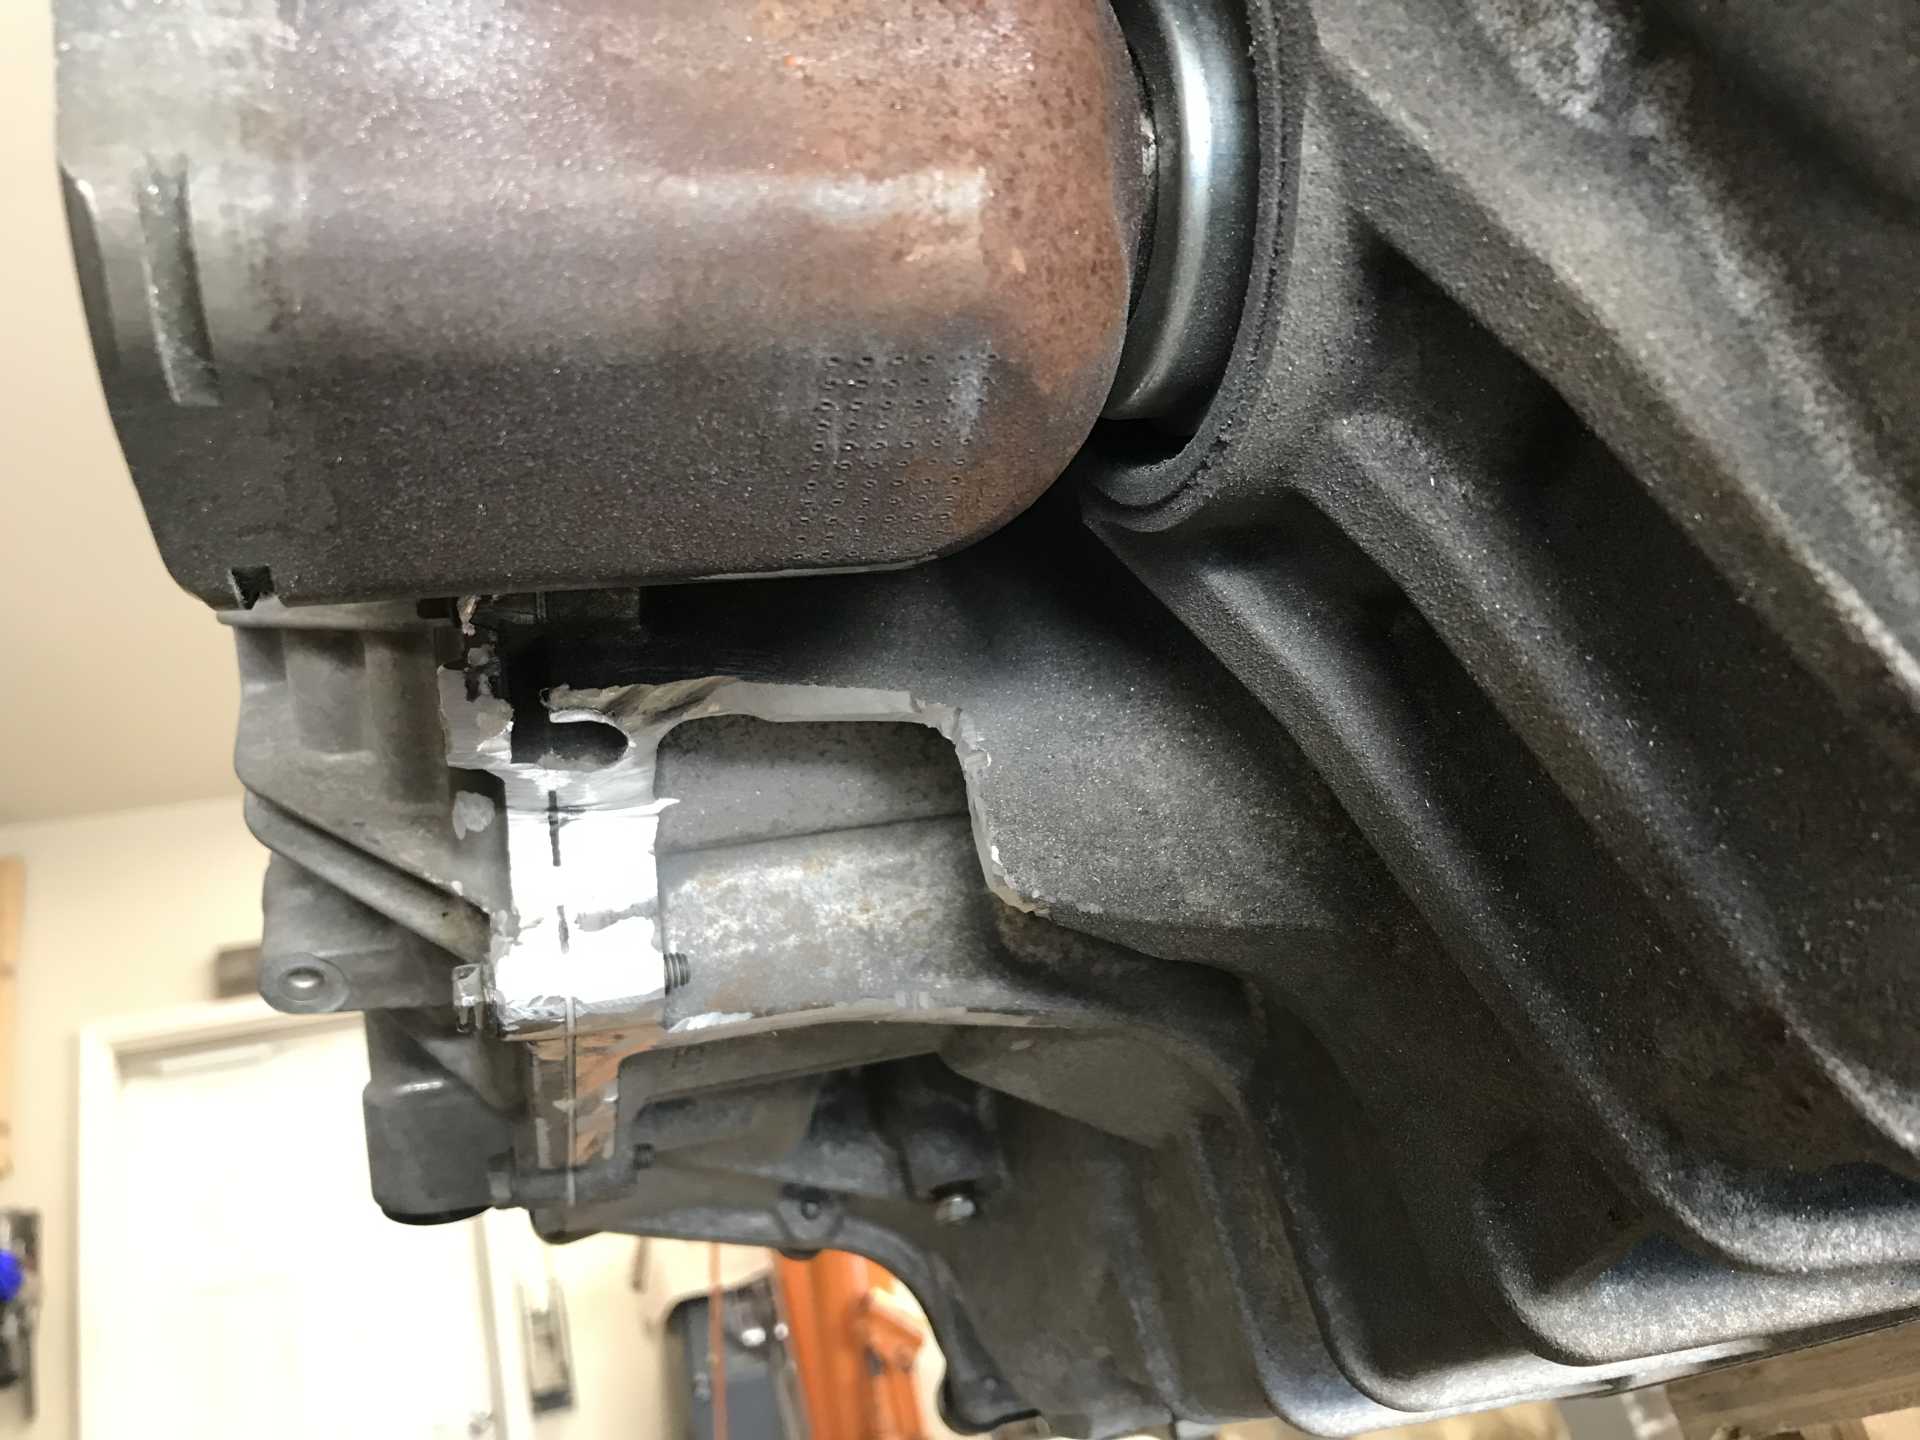
Do yourself a favor now, while you have the cradle out of the car. Your engine oil dipstick will not be accessible unless you put a bend about 2 inches from the end and fabricate a flexible cable dipstick.
Looking great so far.
|
|
|
|
MikesFirstFiero
|
AUG 07, 03:14 AM
|
|
|
I just now gave it a tweak to move it out from under the rear window hidden space. Thanks.
|
|
|
|
Daryl M
|
AUG 07, 03:30 AM
|
|
| quote | Originally posted by MikesFirstFiero:
I just now gave it a tweak to move it out from under the rear window hidden space. Thanks. |
|
This is how mine looked after modification. The stock dipstick was near impossible to remove after I bent the tube so I made a cable dipstick.
|
|
|
|