
 
     |
| Bringing a 88 Fiero Back to Life with a LFX Swap (Page 15/15) |

|
zkhennings
|
MAR 08, 02:47 PM
|
|
Nice work, be careful with the Fiero driving in winter and rust. My Fiero had never seen snow (200K miles) and was pretty rust free in the upper and lower rear frame rails. I drove it for one winter in MA, and now upper and lower frame rails are rusty. Granted I did a lot of snow drifting where salty snow was getting chucked everywhere, but I don't think the factory chassis paint is the greatest. Eastwood makes a great internal frame coating paint, can't get the link to work for some reason but it is: ITEM # 15275ZK. Comes with the 3 foot long whip with a 360* nozzle. Ain't cheap at $30 a can but you get what you pay for.
I will be using it on my Fiero, and have used it with good success on other cars in the past. Very watery paint though to let it get into all the cracks and crevices, but keep that in mind when using it if you ever get some.
I have also successfully used zip ties for CV boot clamps on my WRX, I use two and offset the heads 180*. Used on the large and small end of the boots. They have held up just fine for 40,000 miles, and seen 130+mph many a time. Got sick of leaking factory clamps. Bought some high strength zip ties from McMaster, not even sure if that is necessary though.
I like how your headlights turned out too![This message has been edited by zkhennings (edited 03-08-2024).]
|
|
|
|
MikesFirstFiero
|
MAR 13, 12:43 AM
|
|
The Fiero fuel tank is really a pain. Not enough capacity and long & skinny so the fuel can slosh away from the pickup. The idea of using a venturi to fill a small cup is clever. I'm thinking that the Impala had a similar solution but the impala unit would never fit into the tiny tank opening. So when I plan to drive quickly I make sure there is a half tank minimum.
I'm planning on going over the frame rails and check their condition. Putting in a rust preventitive sounds like a very good idea. Around here they use some kind of a de-icing fluid on the roads but only on interesctions, roundabouts and highways. Other roads are simply plowed. We don't usually get more than 6-8" in any one storm so the roads may be slippery but they are usually drivable. Since I go to work at noon and drive home at 9pm there is little traffic to contend with. And it's only 3 miles each way. If the weather is really bad I'll take our Toyota AWD Venza.
With winter coming I replaced the wipers with Rain-X Rugged ones. Pricey and NOT worth the money. Rugged they are not. Replaced with Bosch Pure Vision (we had them on a 2-for-1 sale). These seem to be holding up much better. Also determined that the driver side wiper can be 21" and the passenger 19" to give better coverage.
The new headlamps are working well but need some tweaking the aiming. But it's too cold to do it on a deserted road now. Maybe in April. While I like the results it was really a time consuming pain. If someone offered the 90mm buckets again I'd buy them before modding the originals.
Just changed to summer tires and did a quick check under the car and found nothing wrong. The CV boots are still well retained and there are no new leaks other than the already discovered vent pipe.[This message has been edited by MikesFirstFiero (edited 02-20-2025).]
|
|
|
|
zkhennings
|
MAR 13, 01:47 PM
|
|
I *think* the main problem with the fuel tank is the baffling system inside is plastic, and breaks apart easily. I know in my tank the baffles are all broken and don't hold any fuel around the pump anymore. There is a really steep really tall one way road off main street in Worcester MA that I got stuck on once, I had a 1/4 tank of fuel and halfway up the hill the car died from all the fuel running to back of the tank. I had several people behind me and we all had to back up into main street, and I had no vacuum assist for the brakes exiting backwards out of a one way into a very busy road. Fun times!
I believe Rodney D's replacement tanks have all metal baffling and the pump sits in a little sump to solve these fuel issues and higher capacity, I think they are pretty well priced too and bolt right in. I am strongly considering buying one. Edit: looks like he does not have anymore and is not making anymore, he is selling the tank making business, but maybe a member has one for sale.
|
|
|
|
MikesFirstFiero
|
MAR 16, 12:35 AM
|
|
|
Putting the tank under the center spine is a clever way of utilizing that space - and an awful solution for providing a constant fuel flow. I've had the car die when stopping quickly several times with 1/3 of a tank of fuel. It could use a way of transfering fuel surging forward back into the central baffled chamber. I'm going to pull mine to fix a leaking vent tube and might give it some thought. It is really irritating as it now operates.
|
|
|
|
MikesFirstFiero
|
MAR 27, 10:49 PM
|
|
Had something popup (literally) while driving a few nights ago. Took a guy I work with for a quick ride after dark. I found the headlight lids were fine up to about 80 and then they started flopping around when going faster. The lids do have built in stops for the original lamps but it needed new lower ones for the slimmer Hella projectors. I dug out some HDPE (high density polyethlene) laying around and carved them on the bandsaw. Now the lids are mechanically stopped at the lower position. No more dancing covers. The fasteners are #6 x 1-25" cabinet screws.
The original stop, this lid is in the new open position.
The revised stop, this one is closed
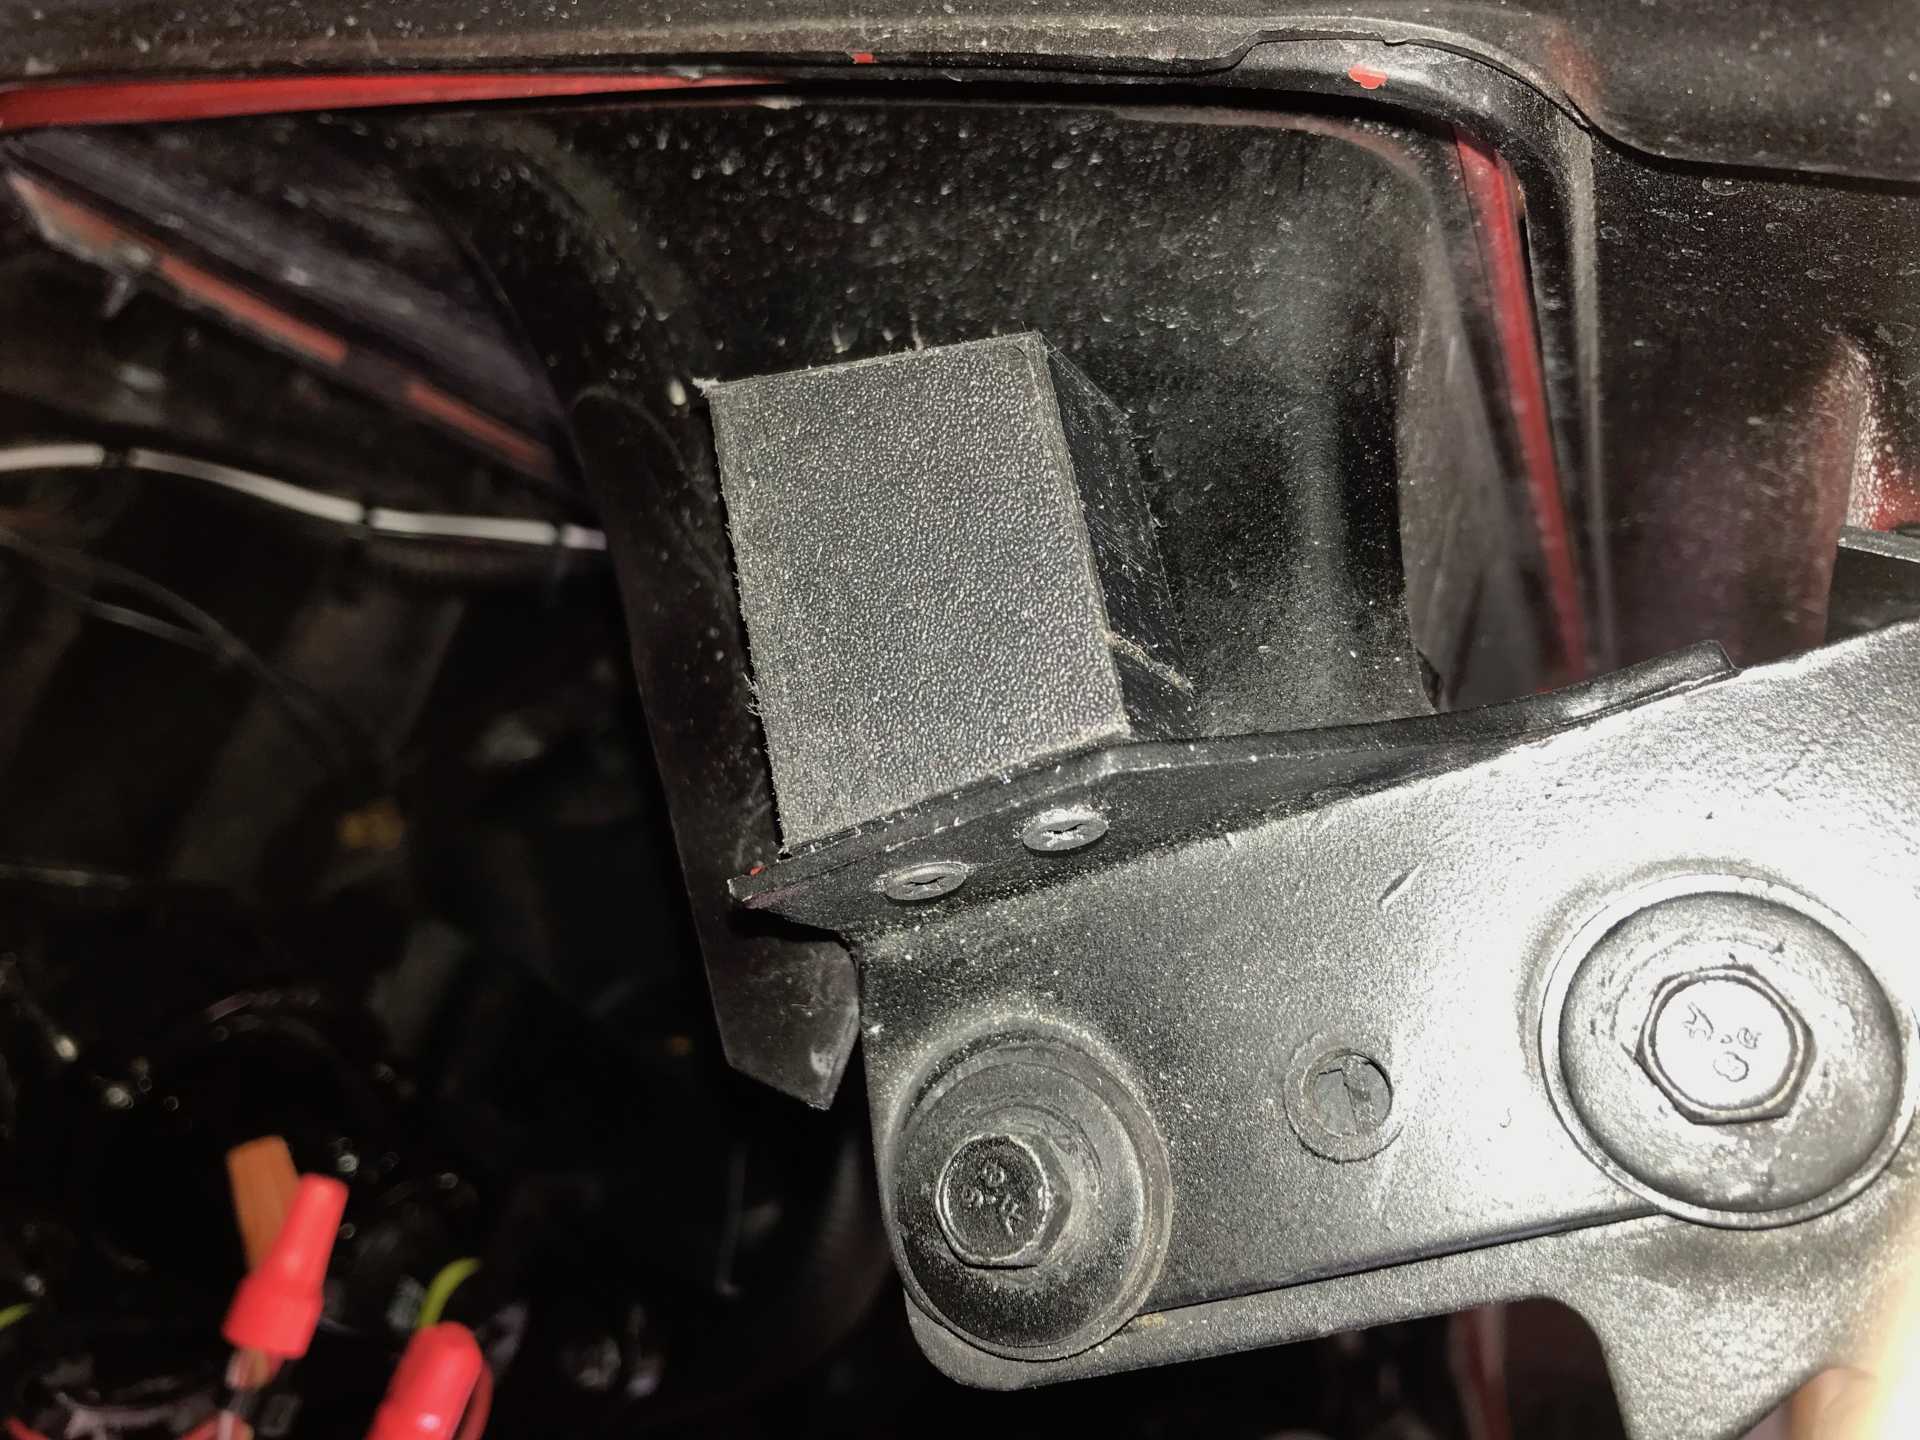 [This message has been edited by MikesFirstFiero (edited 03-27-2024).]
|
|
|
|
MikesFirstFiero
|
FEB 11, 10:07 PM
|
|
By now You've probably thought I'd lost interest in playing with my Fiero. No, just life and work mean not as much time for playing with cars. Everything takes twice (or thrice) as long as my mind thinks it should. Here is the last year's work in one post.
First I'd thought I would answer a PM here since the answers may be of interest to others considering this swap. GTPCAR asked the following:
I have started on wiring on my LFX/Fiero swap, was looking over your build thread ( excellent job as many others on Pennocks commented during your build ) and have several questions:
AC control: It appears to me ( using Impala FSM ) the AC turn-on signal is sent to the ECM with a 2 way data signal from the Impala AC control module in the dash.
You mentioned not using the Impala's AC control module and how you accomplished control of the compressor solenoid valve but how did you control the AC clutch solenoid? Using the Fiero AC control head would energize the clutch solenoid but without ECM control the clutch would not cycle, also that method would remove the AC pressure switch from the control circuit.
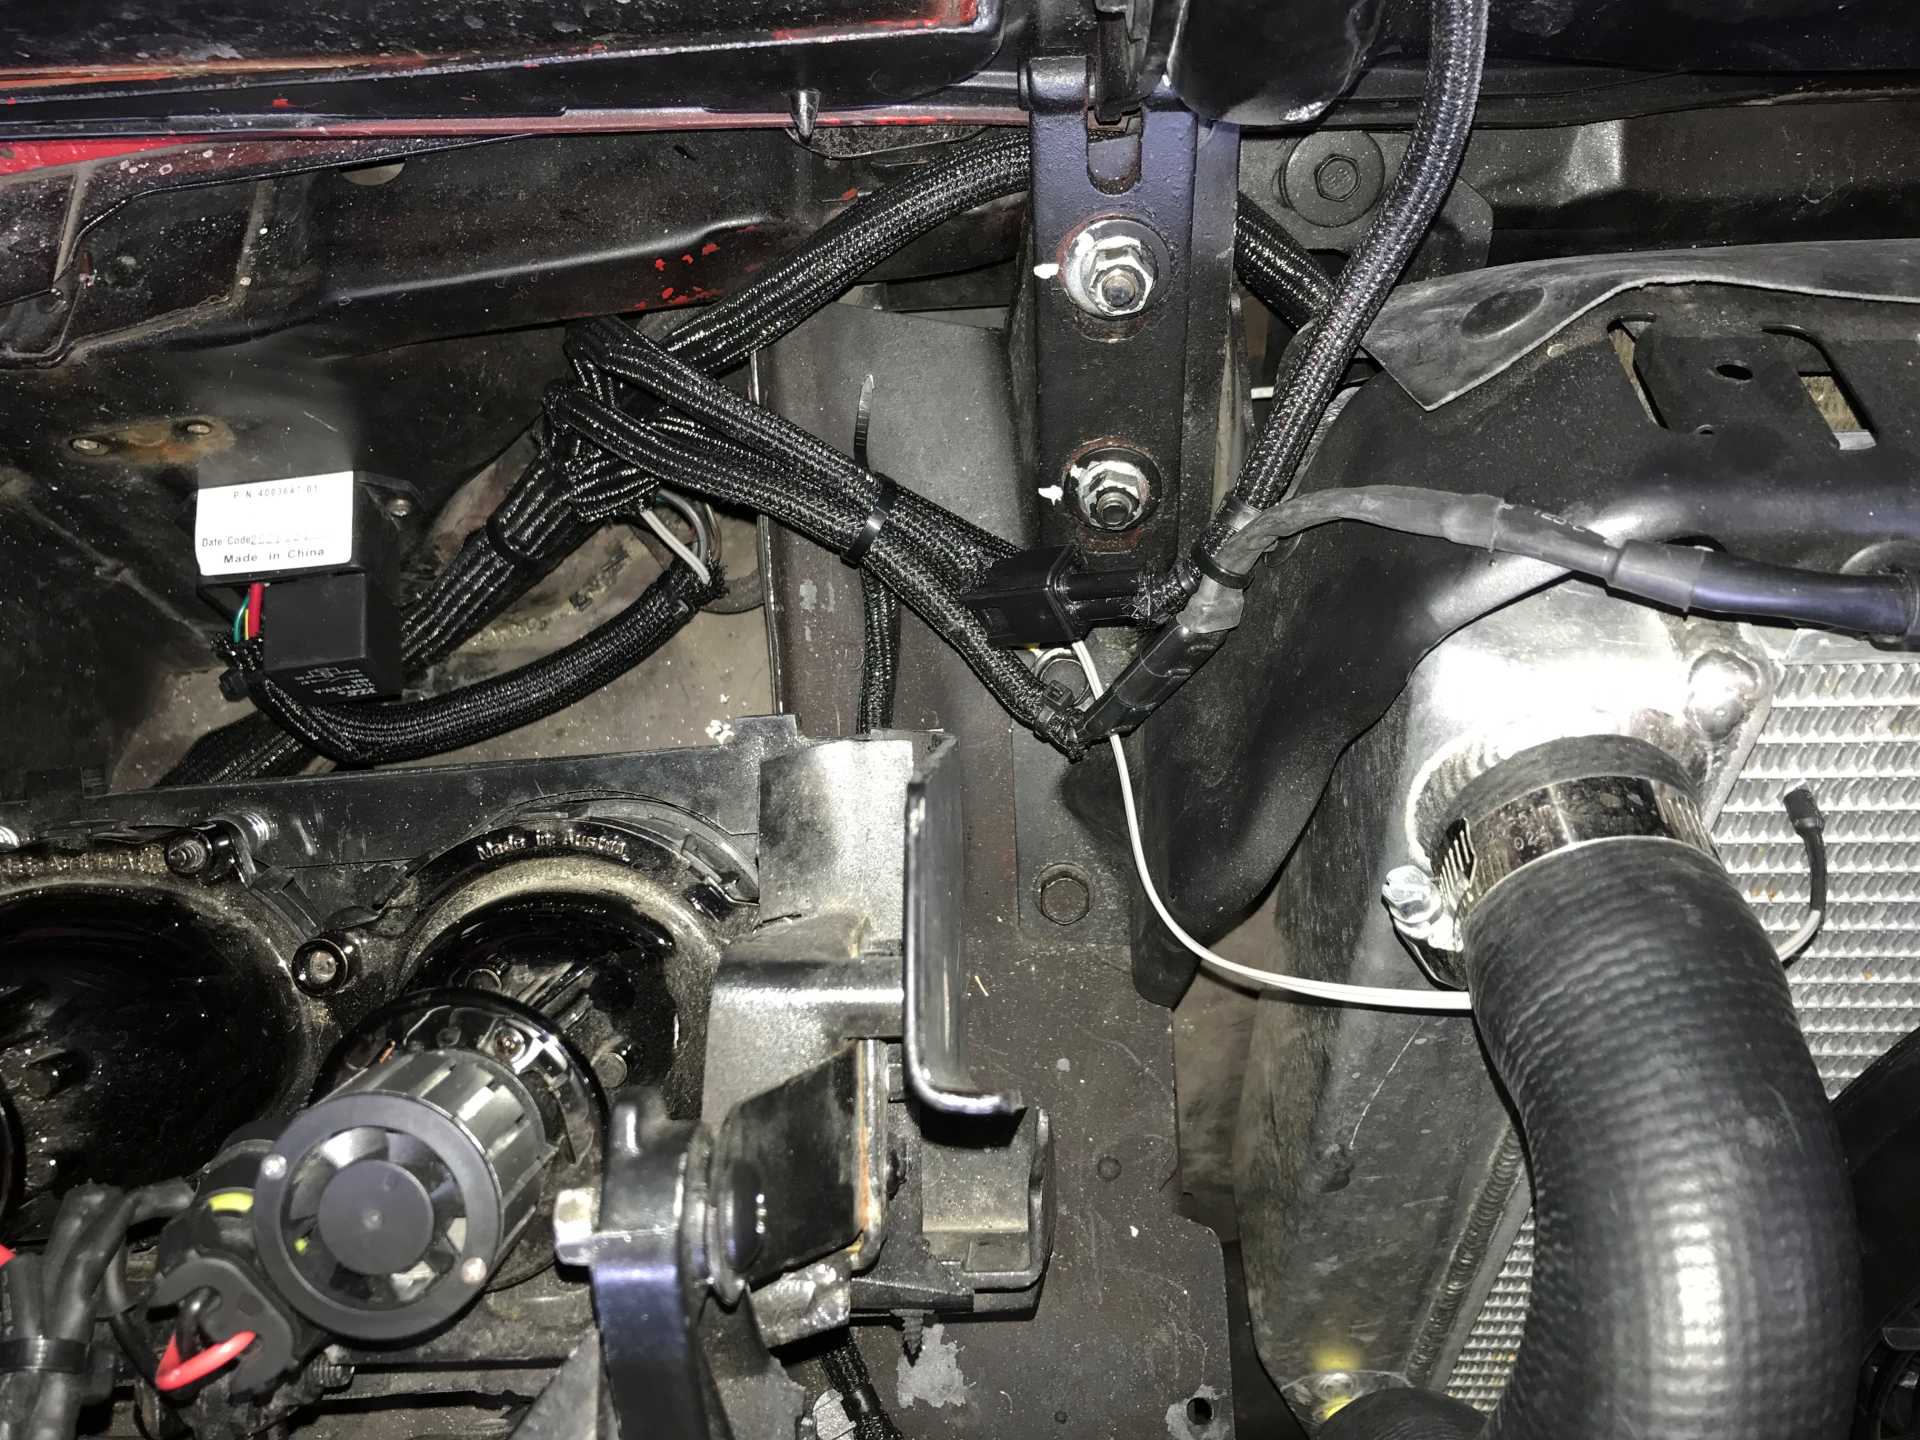
Fuel tank pressure sensor: You mentioned the fuel pressure sensor located in the fuel line ( and provided photo of location ) but I did not see any mention of the fuel tank pressure sensor being added to the Fiero fuel tank. While the former is controlled by the CCM the latter has direct inputs into the ECM.
The Impala A/C has two connectors. One is connected to the Fiero A/C clutch signal. The second PWM (Pulse Width Moculation) connector controls the variable output compressor function. Unlike older on/off compressors this compressor runs continuously when enabled. The Impala cooling output is controlled by a PWM signal from the A/C controller that allows variable output. PWM signals are used with inductive loads and are able to produce a net current that varies depending on the pulse width percentage. With a 50% high - 50% low signal the net current is zero as seen by the electro-magnet in the compressor. With a 75% high - 25% low signal the net current is about 50% of rated coil current. This produces 50% magnetic force giving 50% cooling output. When the full output is required the PWM percentage is about 95% high - 5% low. The frequency of the signal does not much matter as long as it is "fast enough" to have the coil not saturate. These PWM devices are used in many applications and are generically known of as PWM inverters. I used them to run elevators. Big ones.
My solution was to determine coil resistance of the compressor and then put a resistor in series with it to provide about 40% current when the A/C was turned on. A bit of trial and error determined what the resistance would be, 8 ohms at 20W if I remember rightly.
I don't recall there being a in-tank fuel pressure sensor on the Impala. All it seems to wants to know is the pressure being delivered to the HP pump on the engine. The original pressure limiter was built into the Impala in-tank assembly. My fuel pressure regulator is part of the Corvette fuel filter providing 55PSI. Maybe I missed something but it works well as is.
A followup on the axle boots. I used the Gates heat shrink hose clamps on both CV boots at the shaft ends when I replaced the inner joints. Those have worked out with no movement or leakage unlike the usual crimp-on metal bands. I notice that Gates is using heat shrink clamps on complex new car cooling hose designs having several rubber hoses connected to plastic connectors. So they must believe in them. The bad news is those complex hoses can cost big bucks, but that's a trend. You don't see parts to repair an alternator anymore, just rebuilt ones.
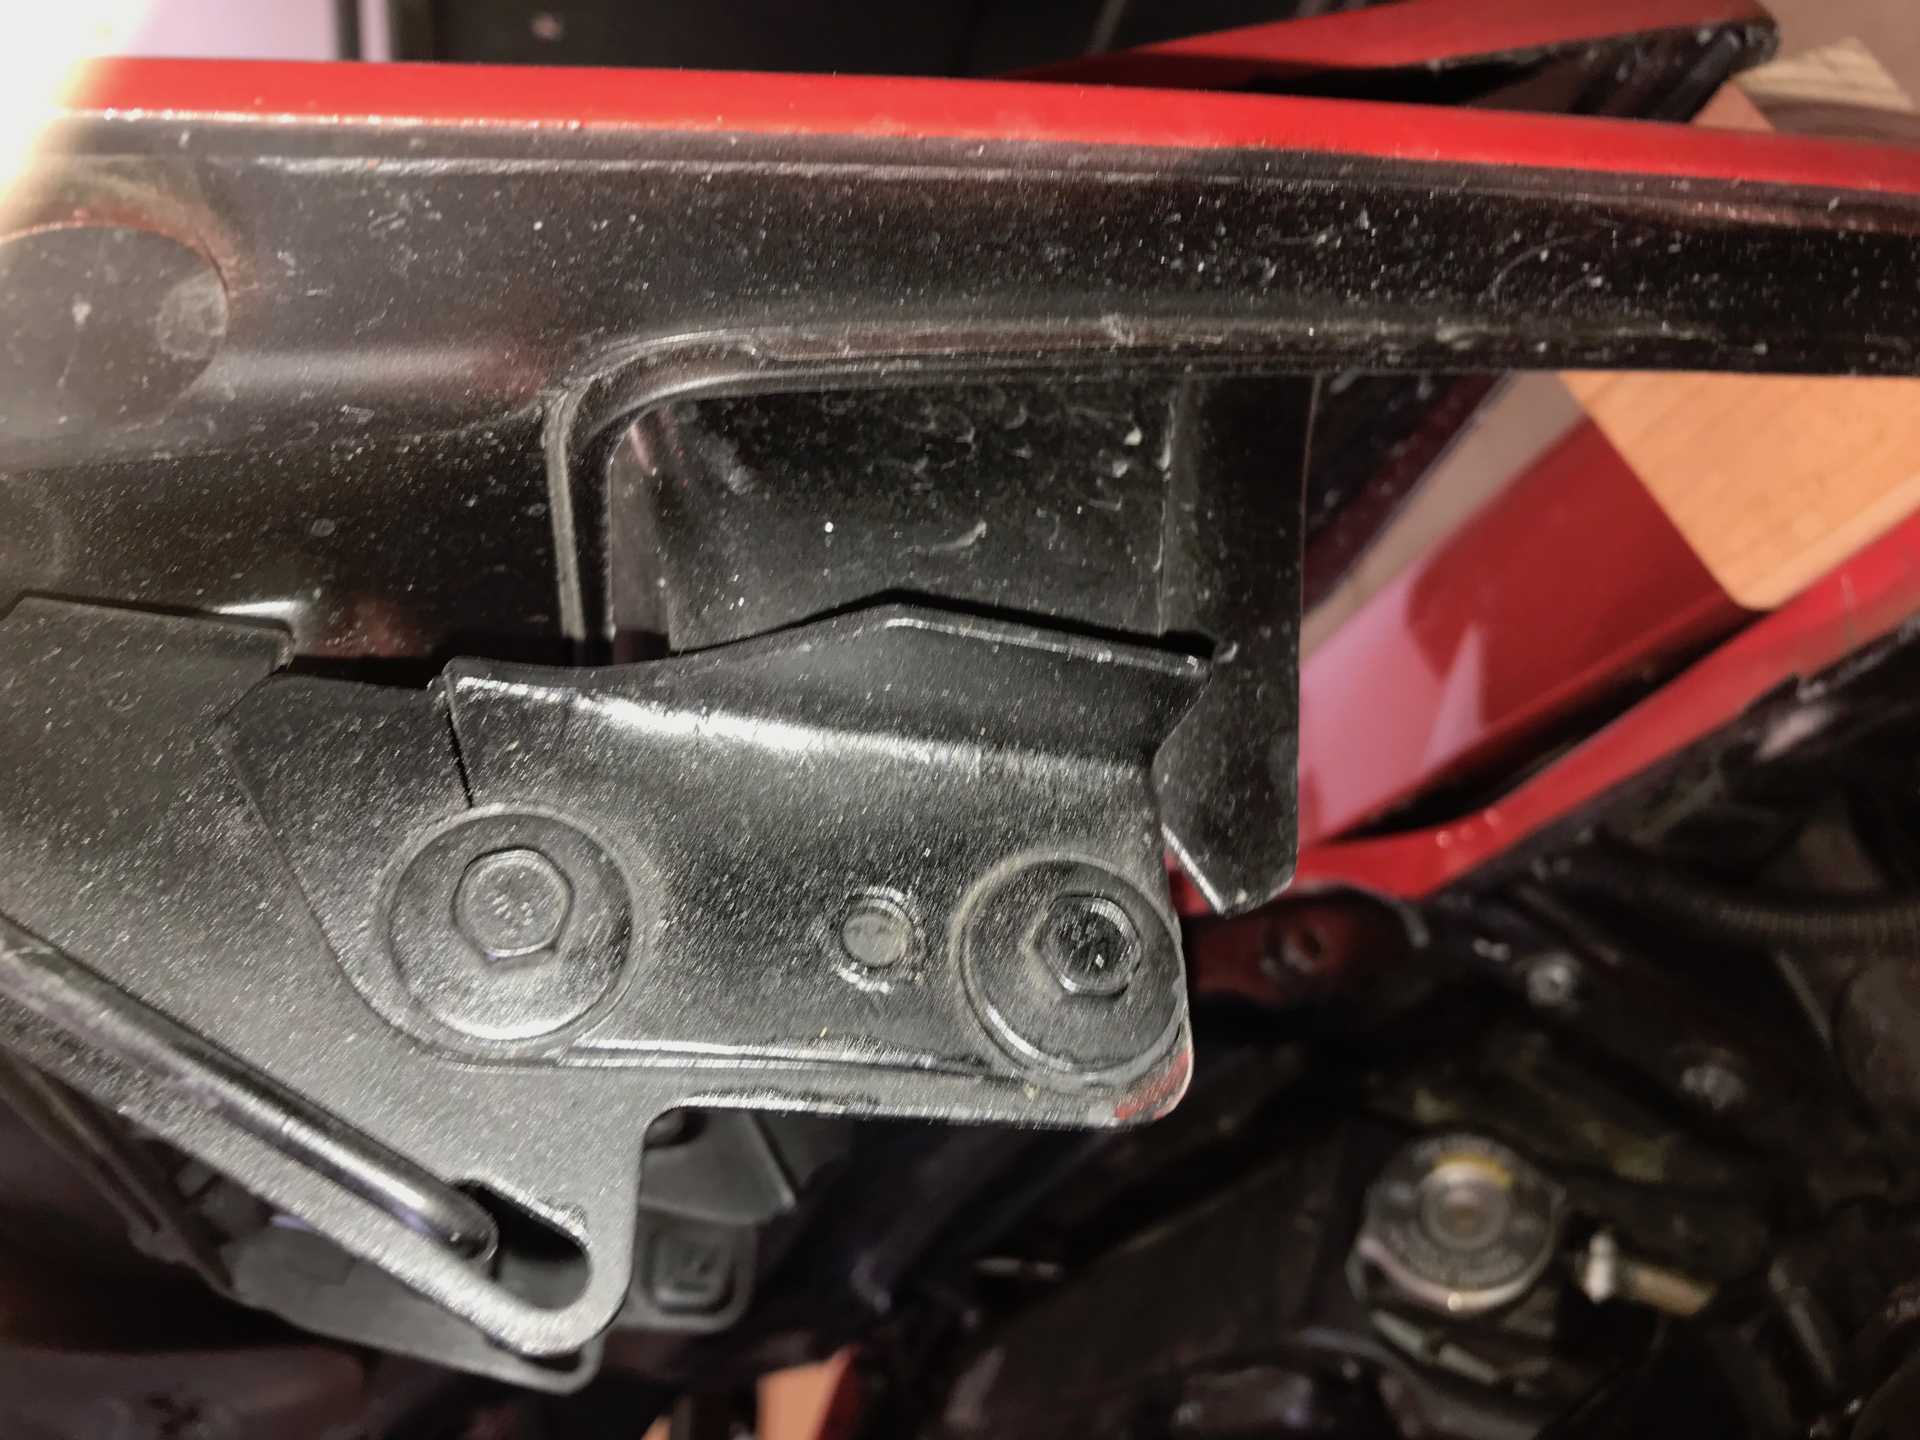
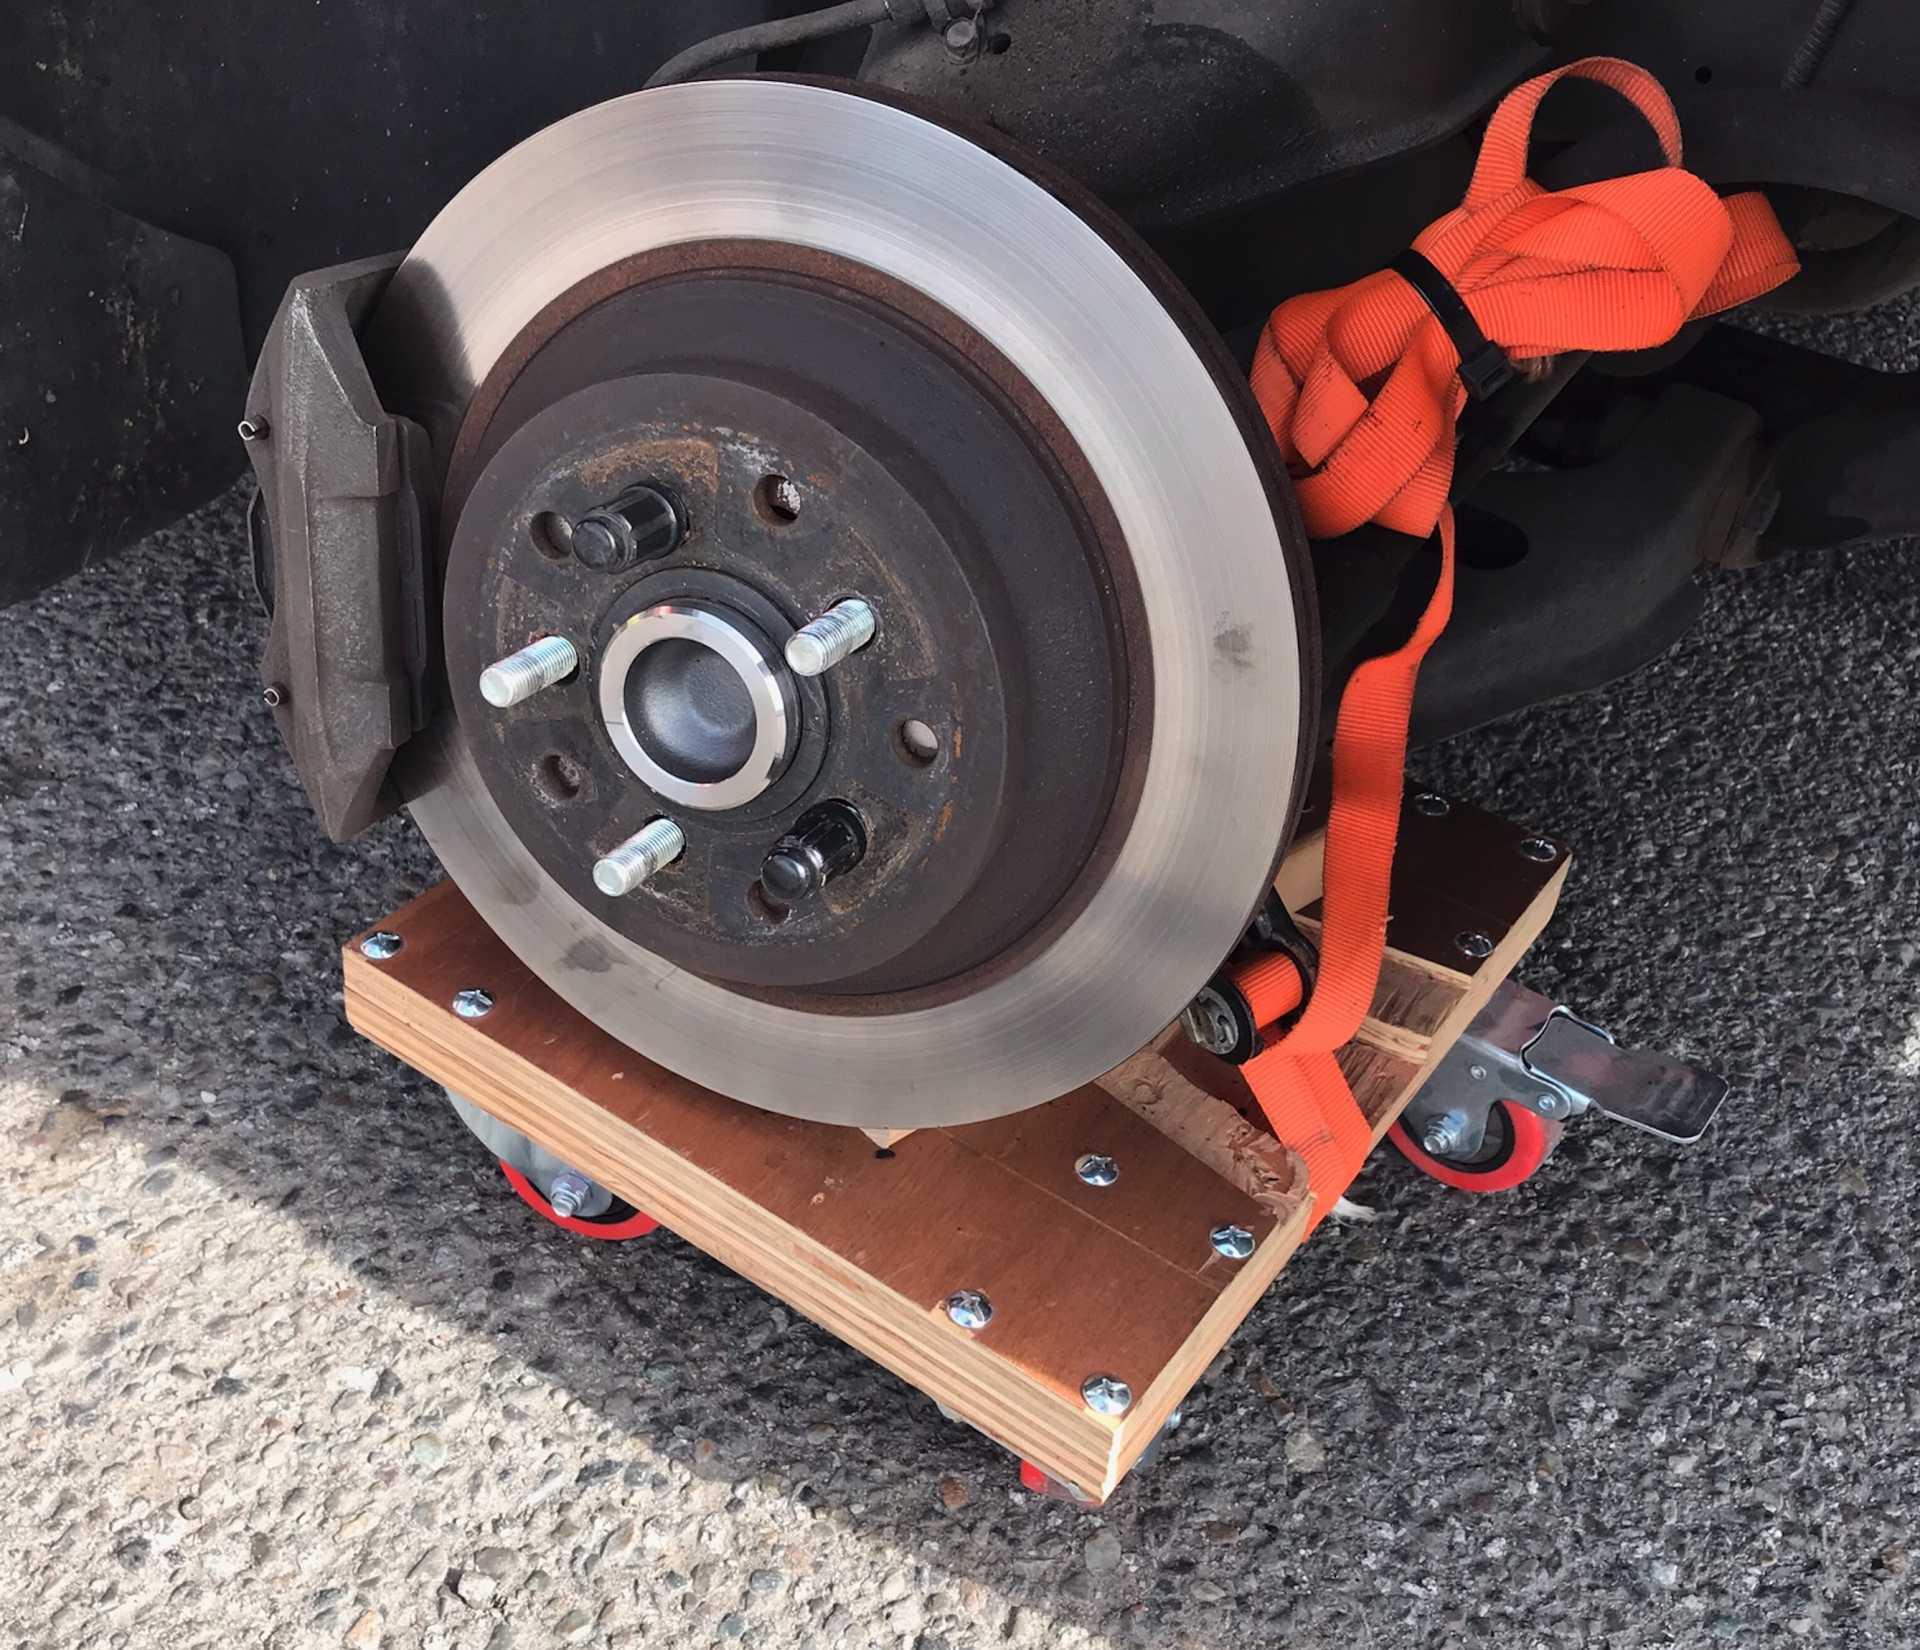
I did have one failure of note. I had cut the A-arms to clear the 14" wheels when using the lowering ball joints. That worked for a few years, then I drove to work normally (3 miles) and when I reversed into a parking slot the RF BJ separated from the arm. The wheel was turned left so it was pulled from the arm. A company named Rare Parts had original arms available so I replaced them both ($200ish each). Bad news is the new BJ is a normal one and the nose popped up. As a temporary test I installed spring clamps to remove one turn from the springs. That brought it back to about level. I'll think about cutting a turn off the coils when I do new calipers.
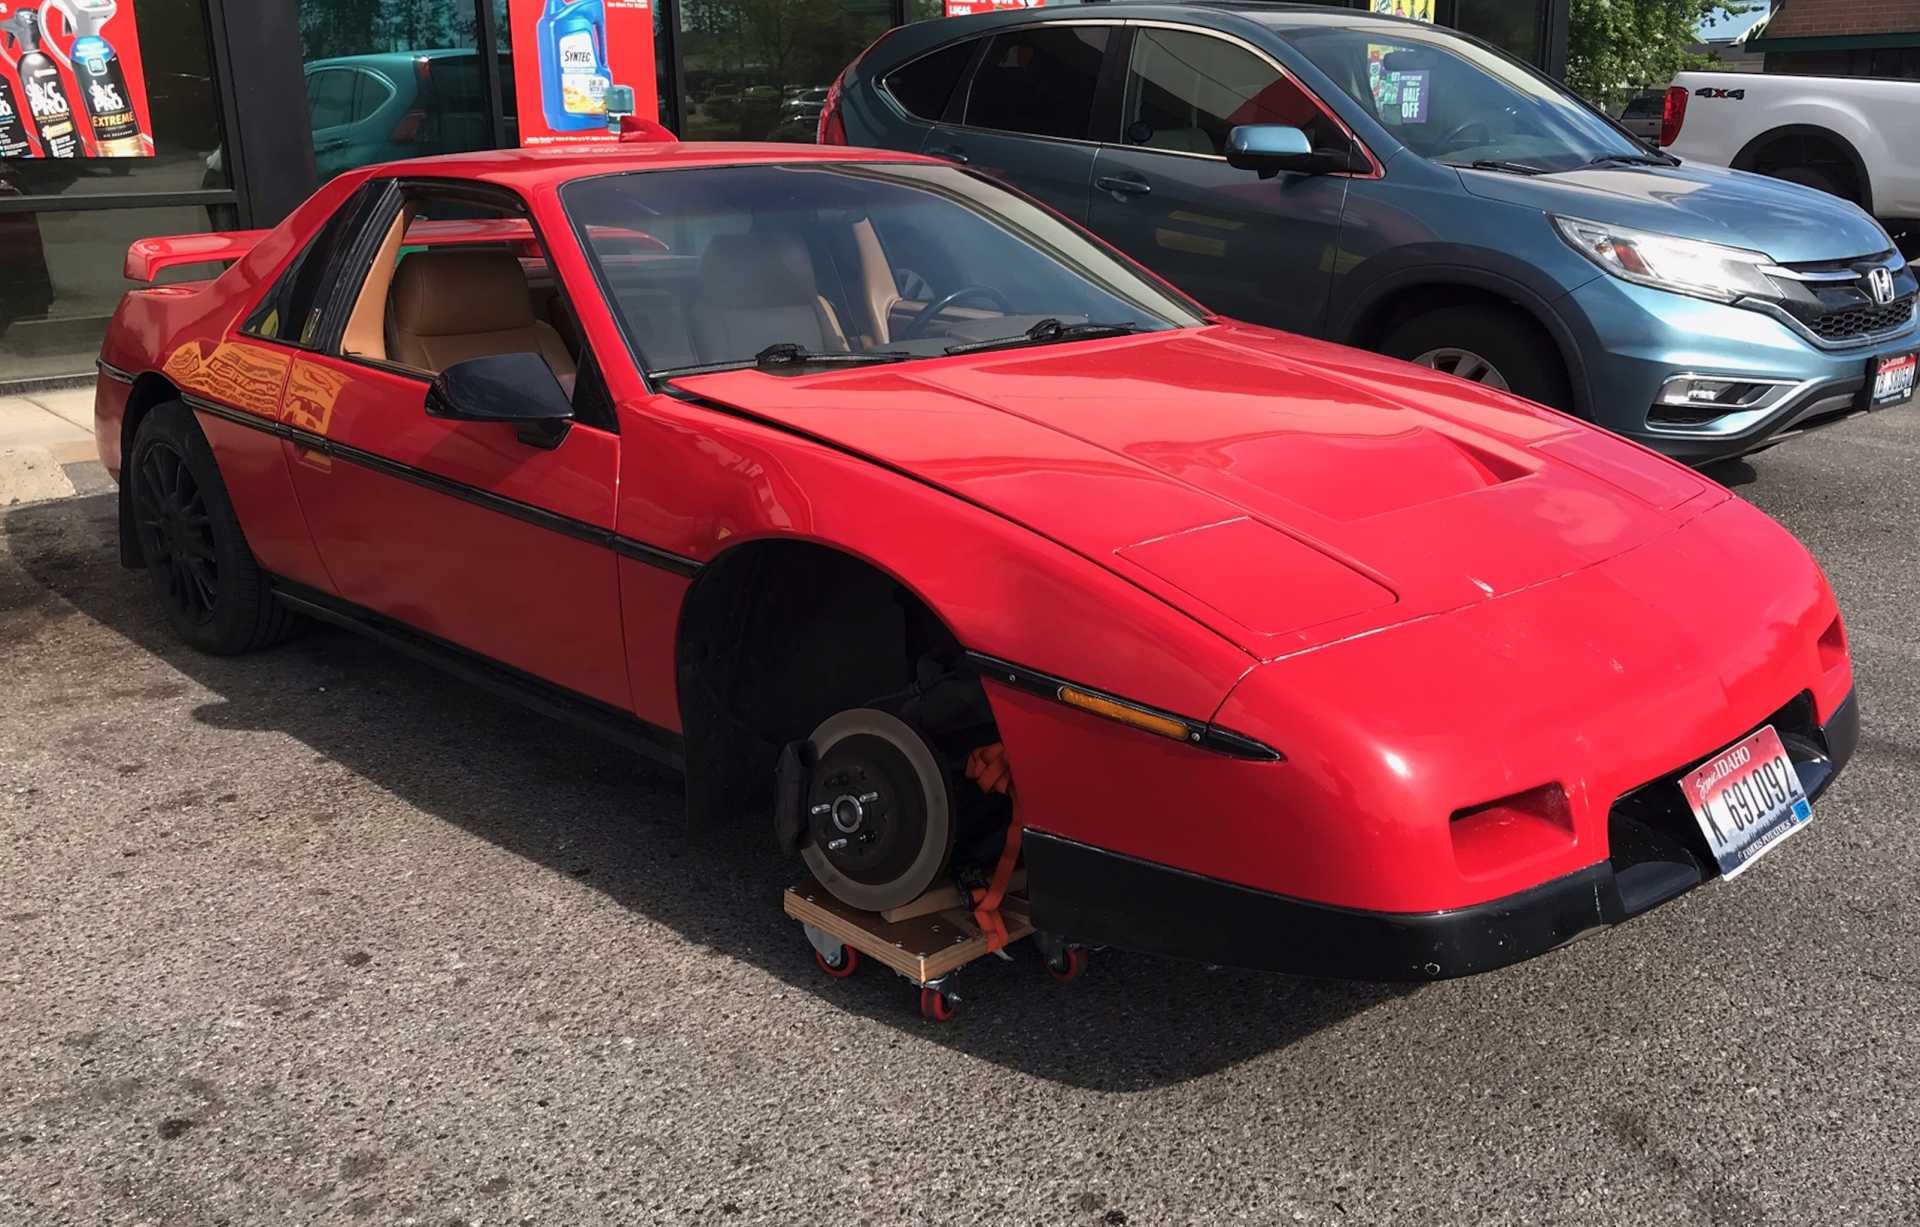
Put a dolly that I made for wheel alignment under the arm and slowly drove it home 2 miles. Dolly was damaged but car was not.
Just strapped it together. Had no curbs to deal with except my driveway. Made a ramp.
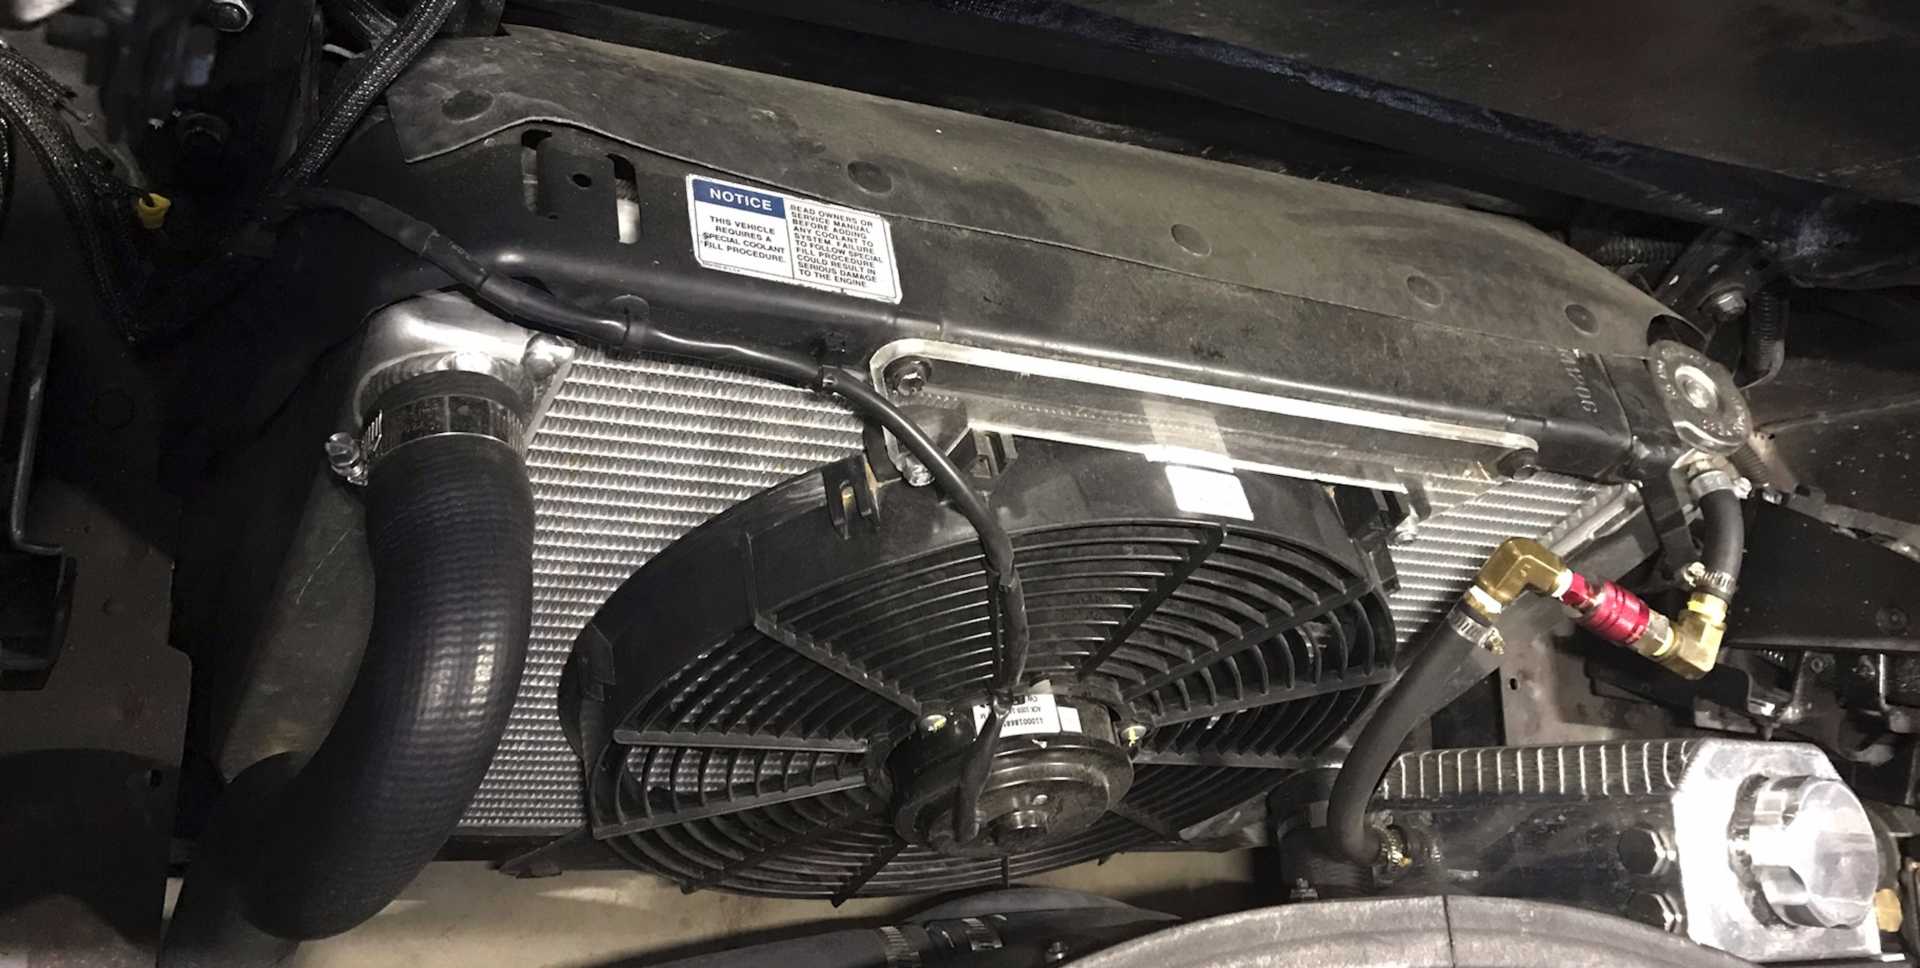
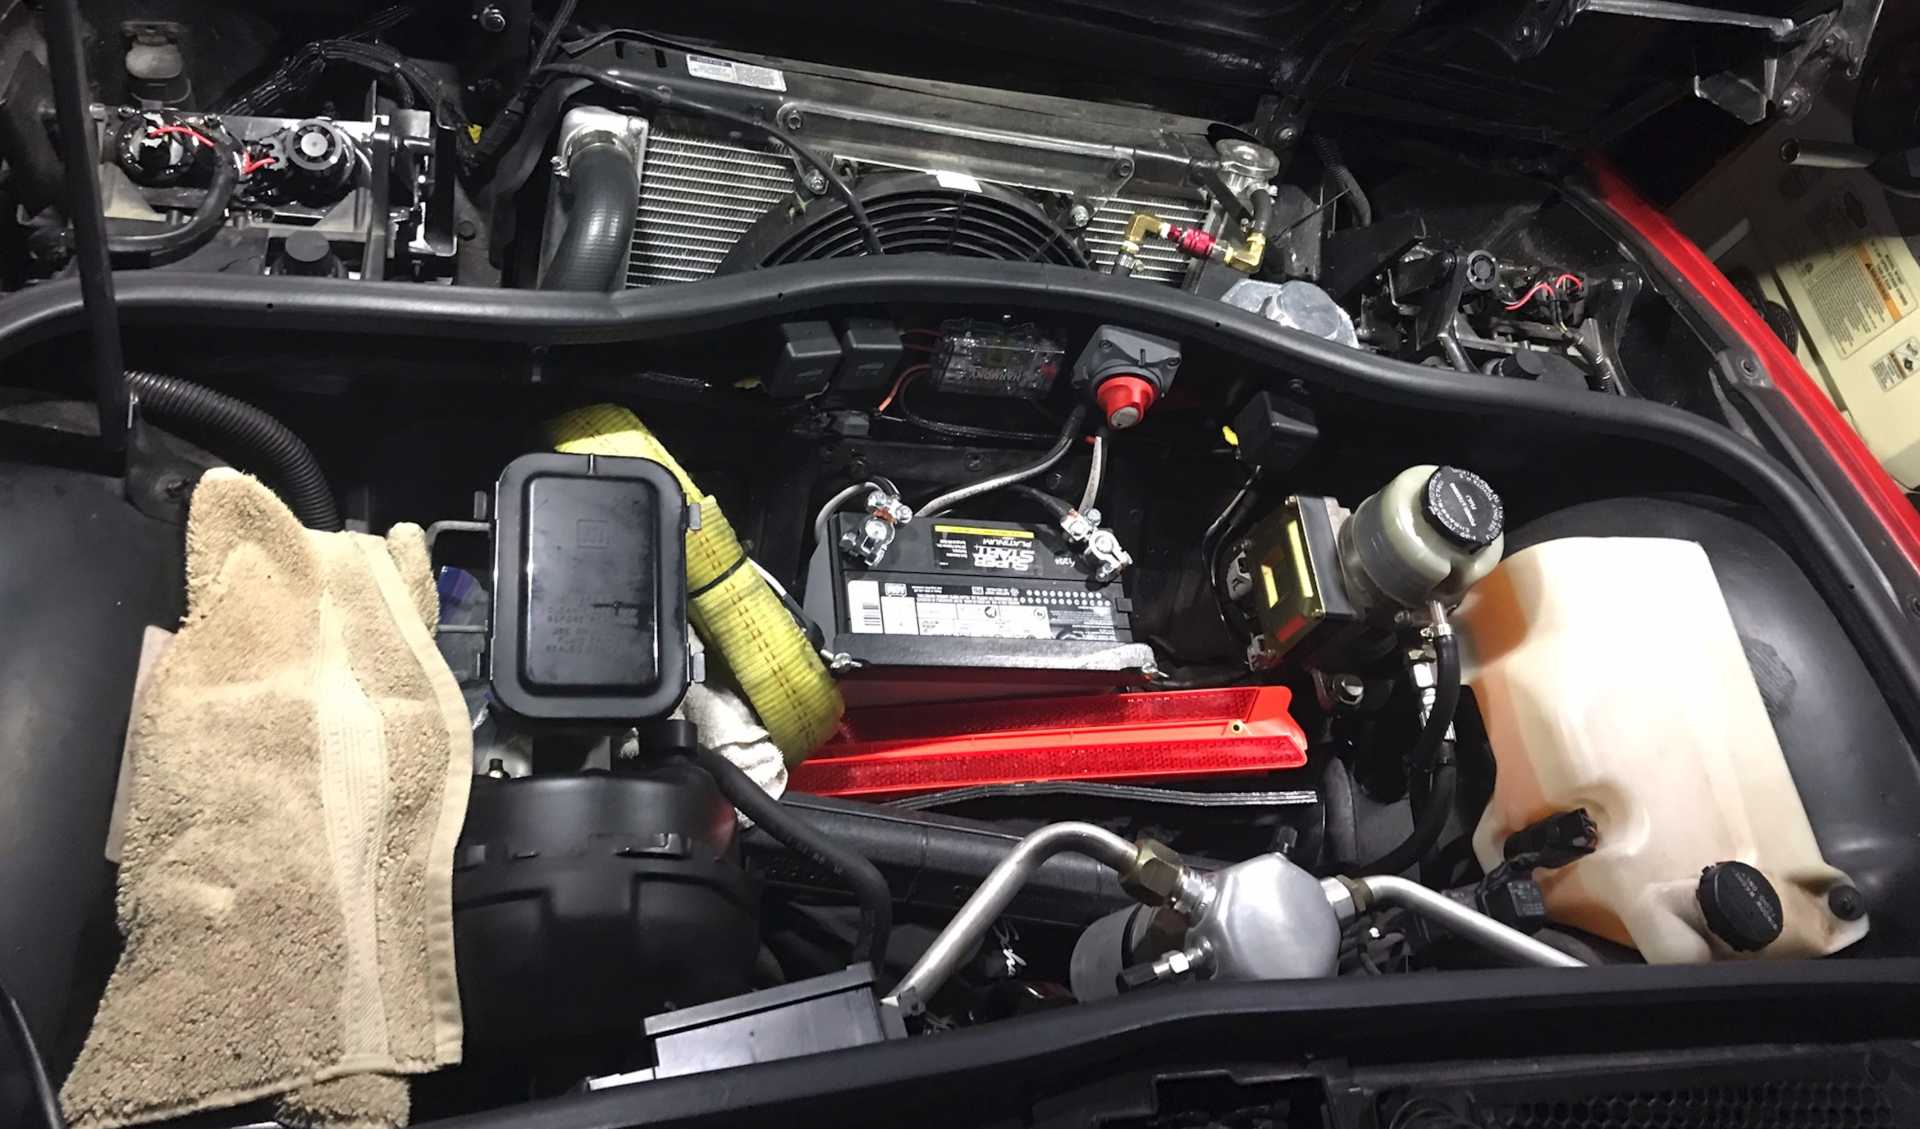
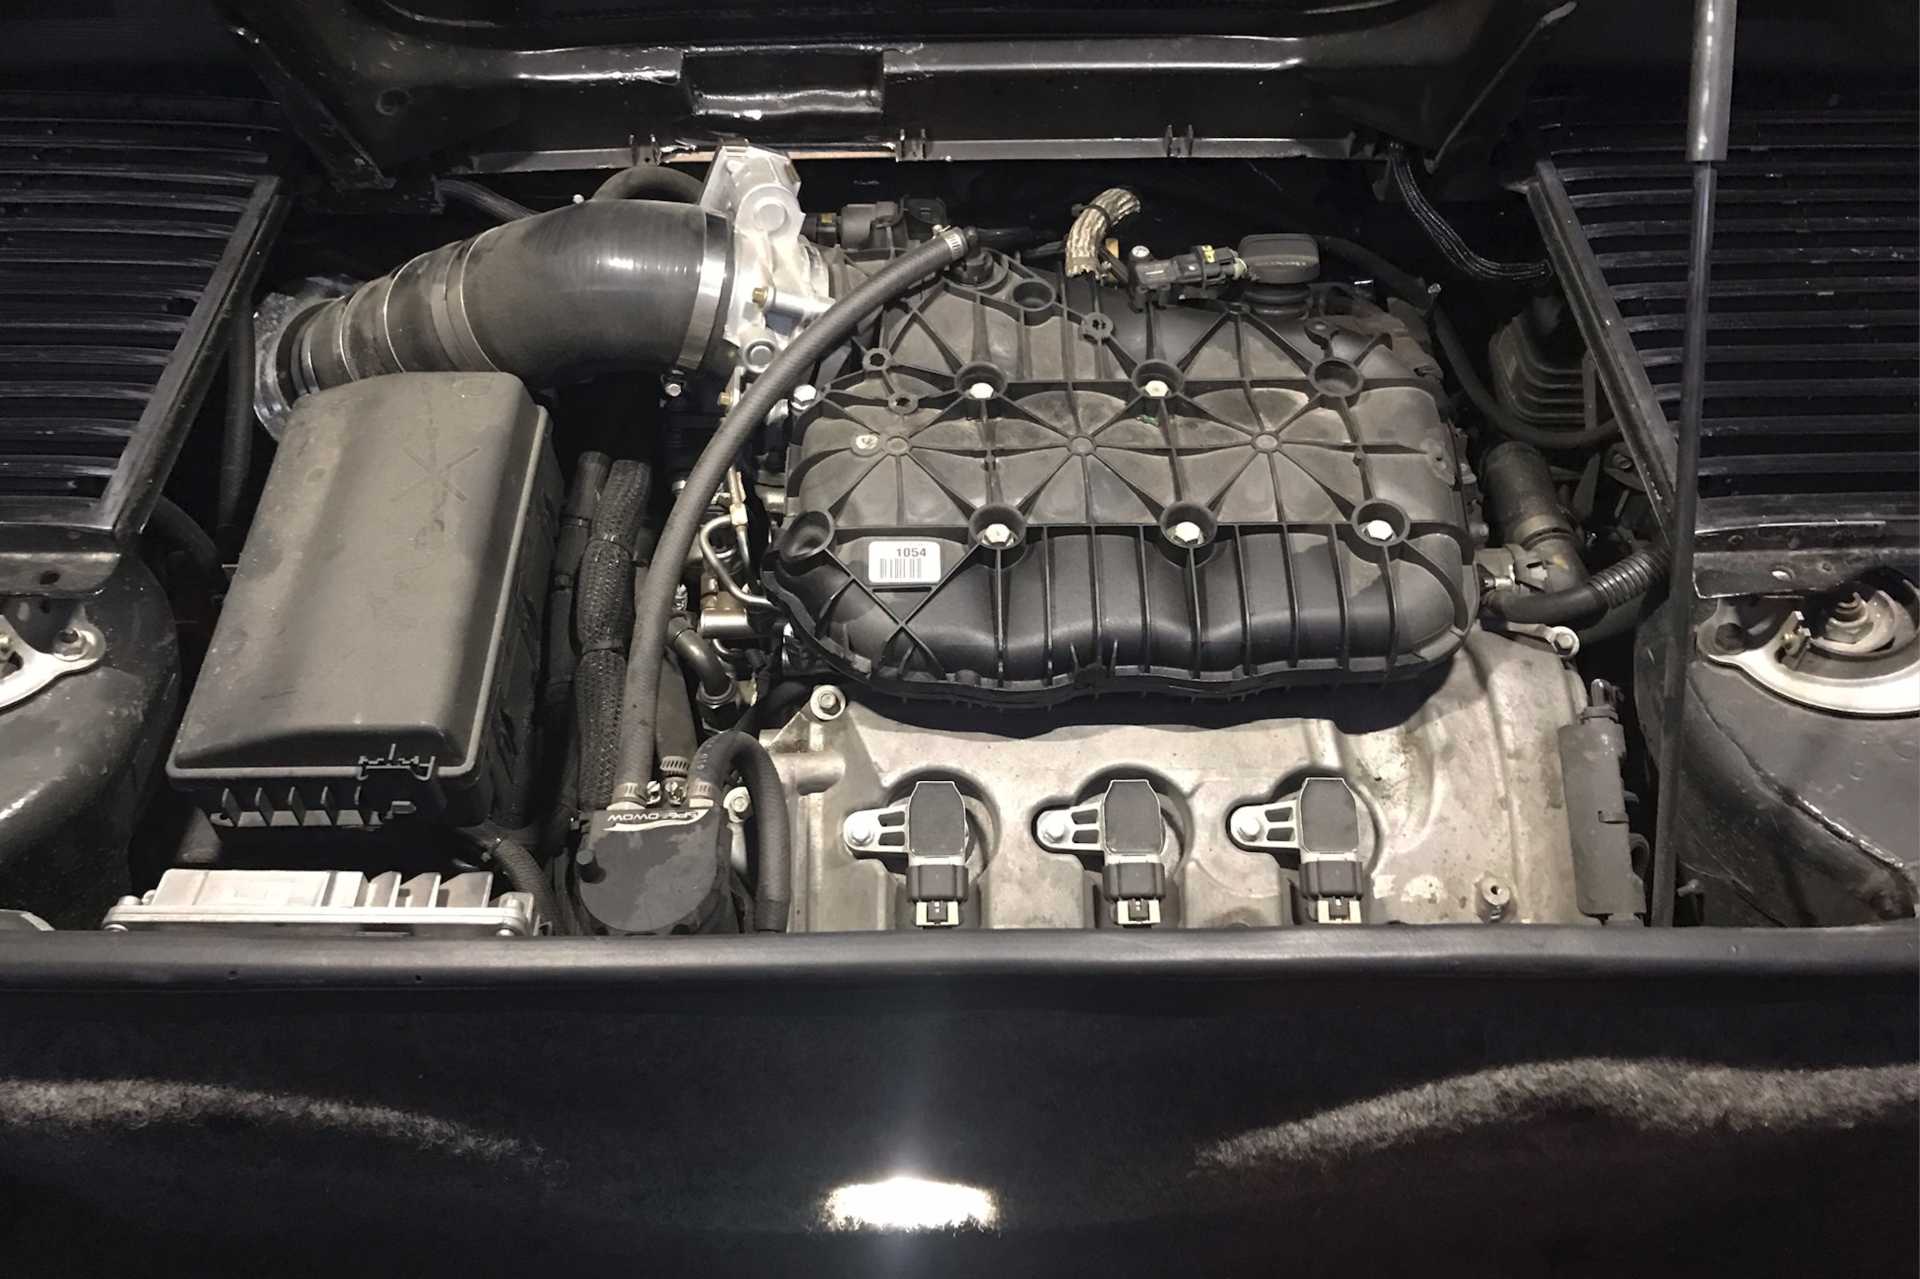
Since the exterior tranny oil cooler was added and the original radiator was getting old I replaced it with an all aluminum Griffin one from Summit Racing and added a new electric fan. Worked out well without any real drama. Added a new catch can for looks and added a quick disconnect between the radiator and the can. Now the coolant won't flow into the overflow can from the radiator when I lift tail of the car to work under it.
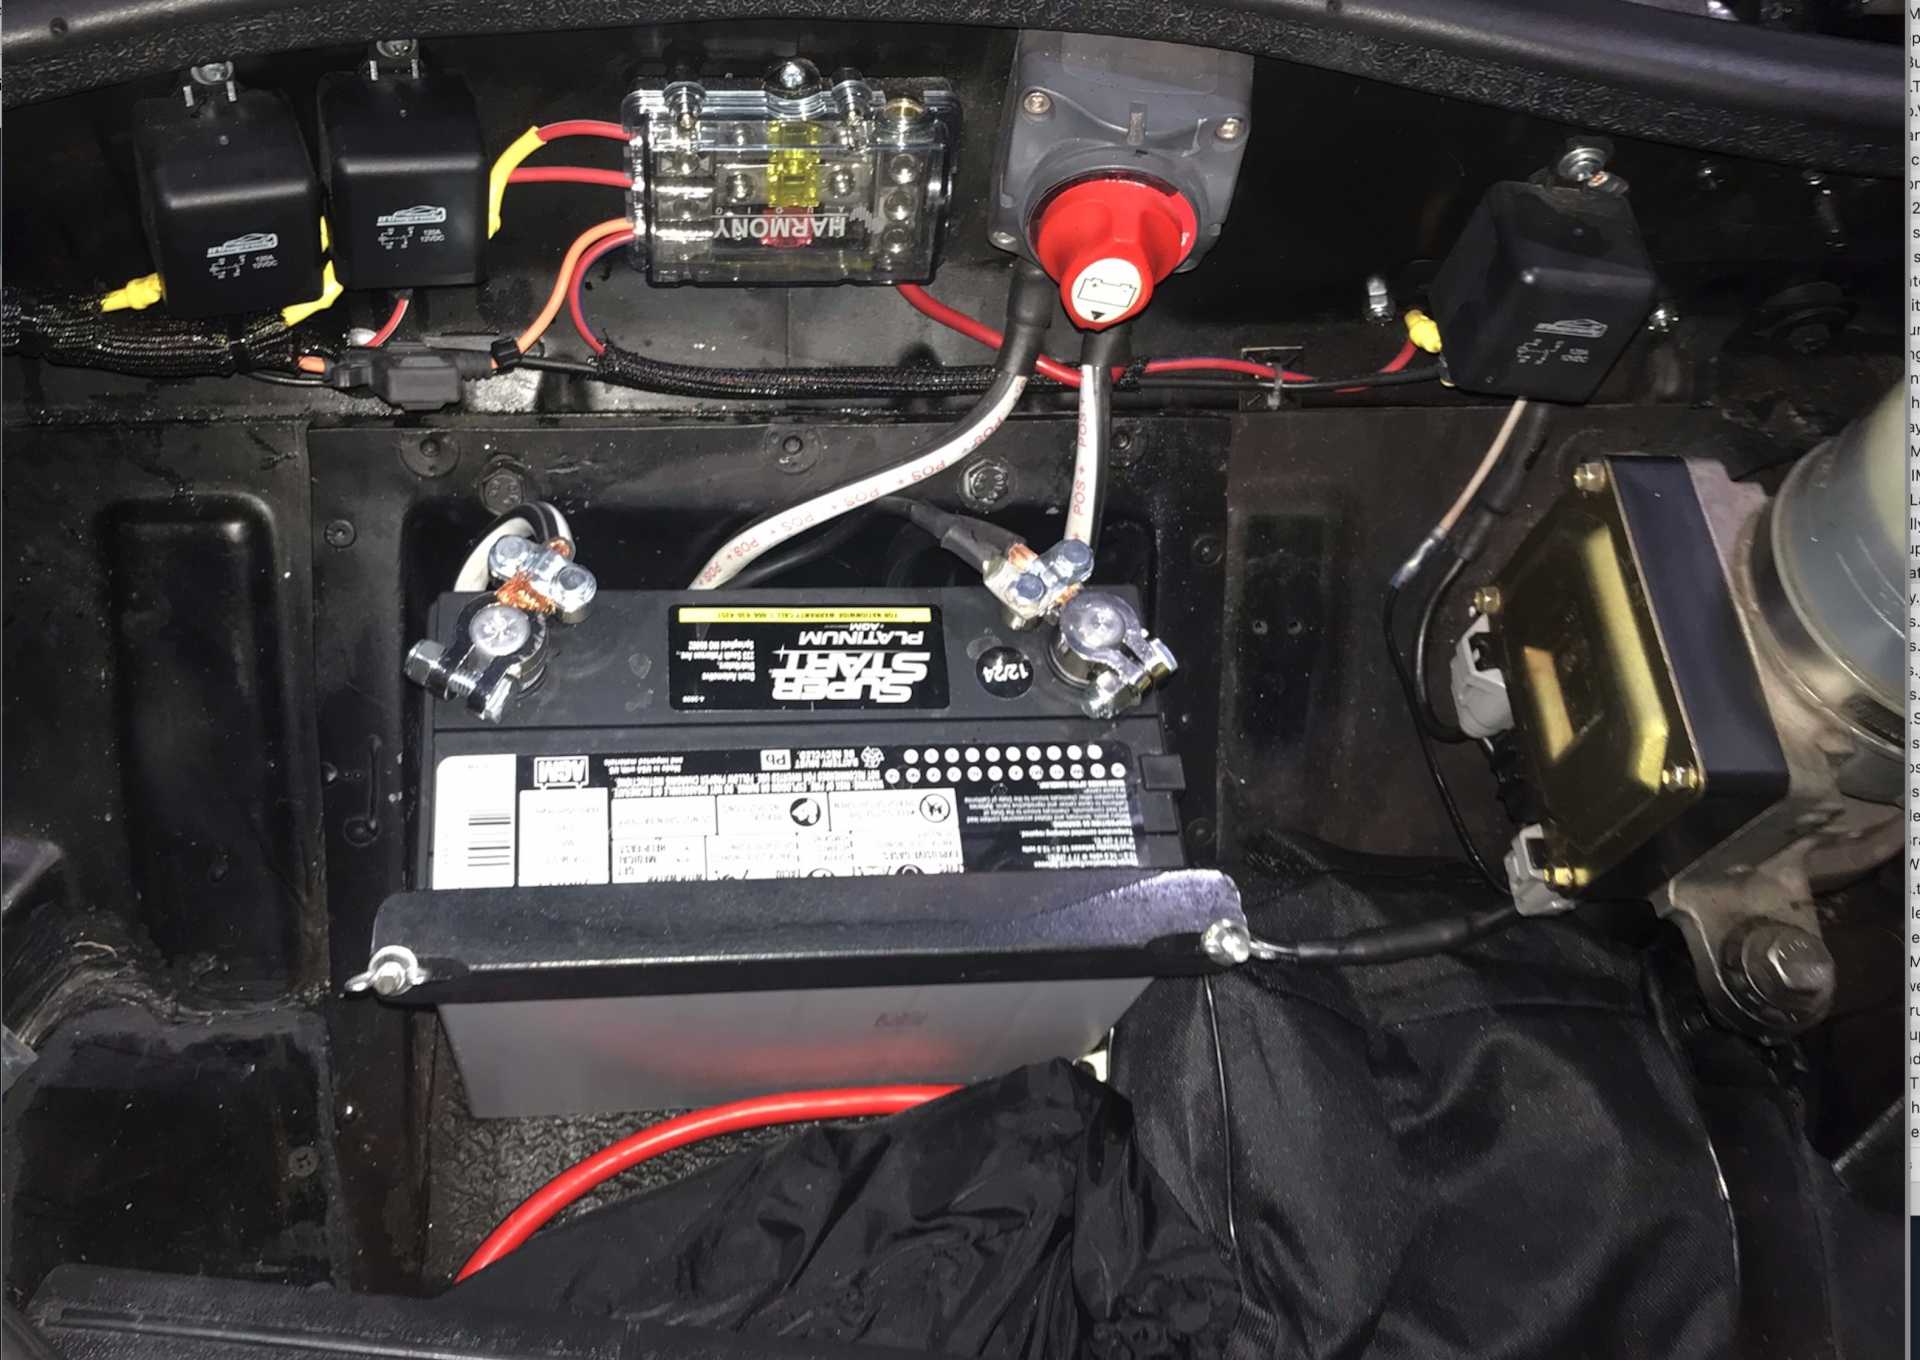
Installed a new battery since the old one was 2 years old and did not like cold winter starting. Starter would tic-tic-tic (Probably the ECU) several times before turning the motor over. I changed to a group 51 AGM which has a better CCA rating and is much narrower front to back. This gives me more room to store stuff up front. So far the starter engages first time. The standing voltage on the new battery is about 12.8V. Think the new battery is able to provide more current even in cold conditions.
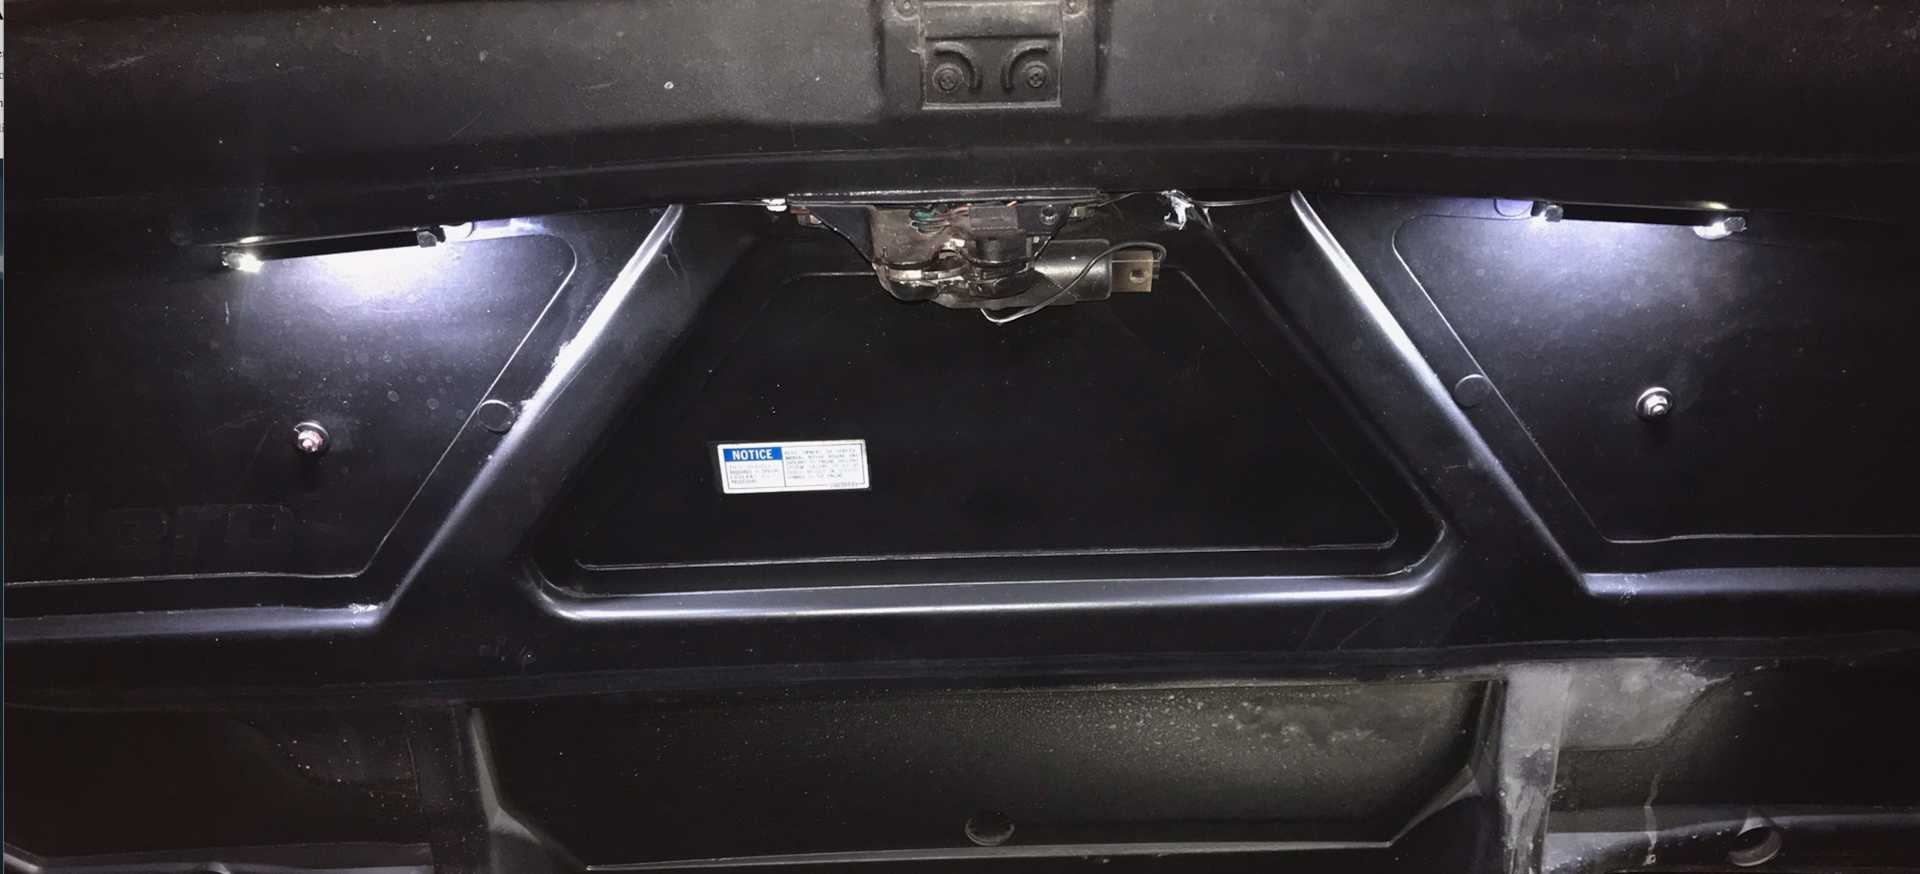
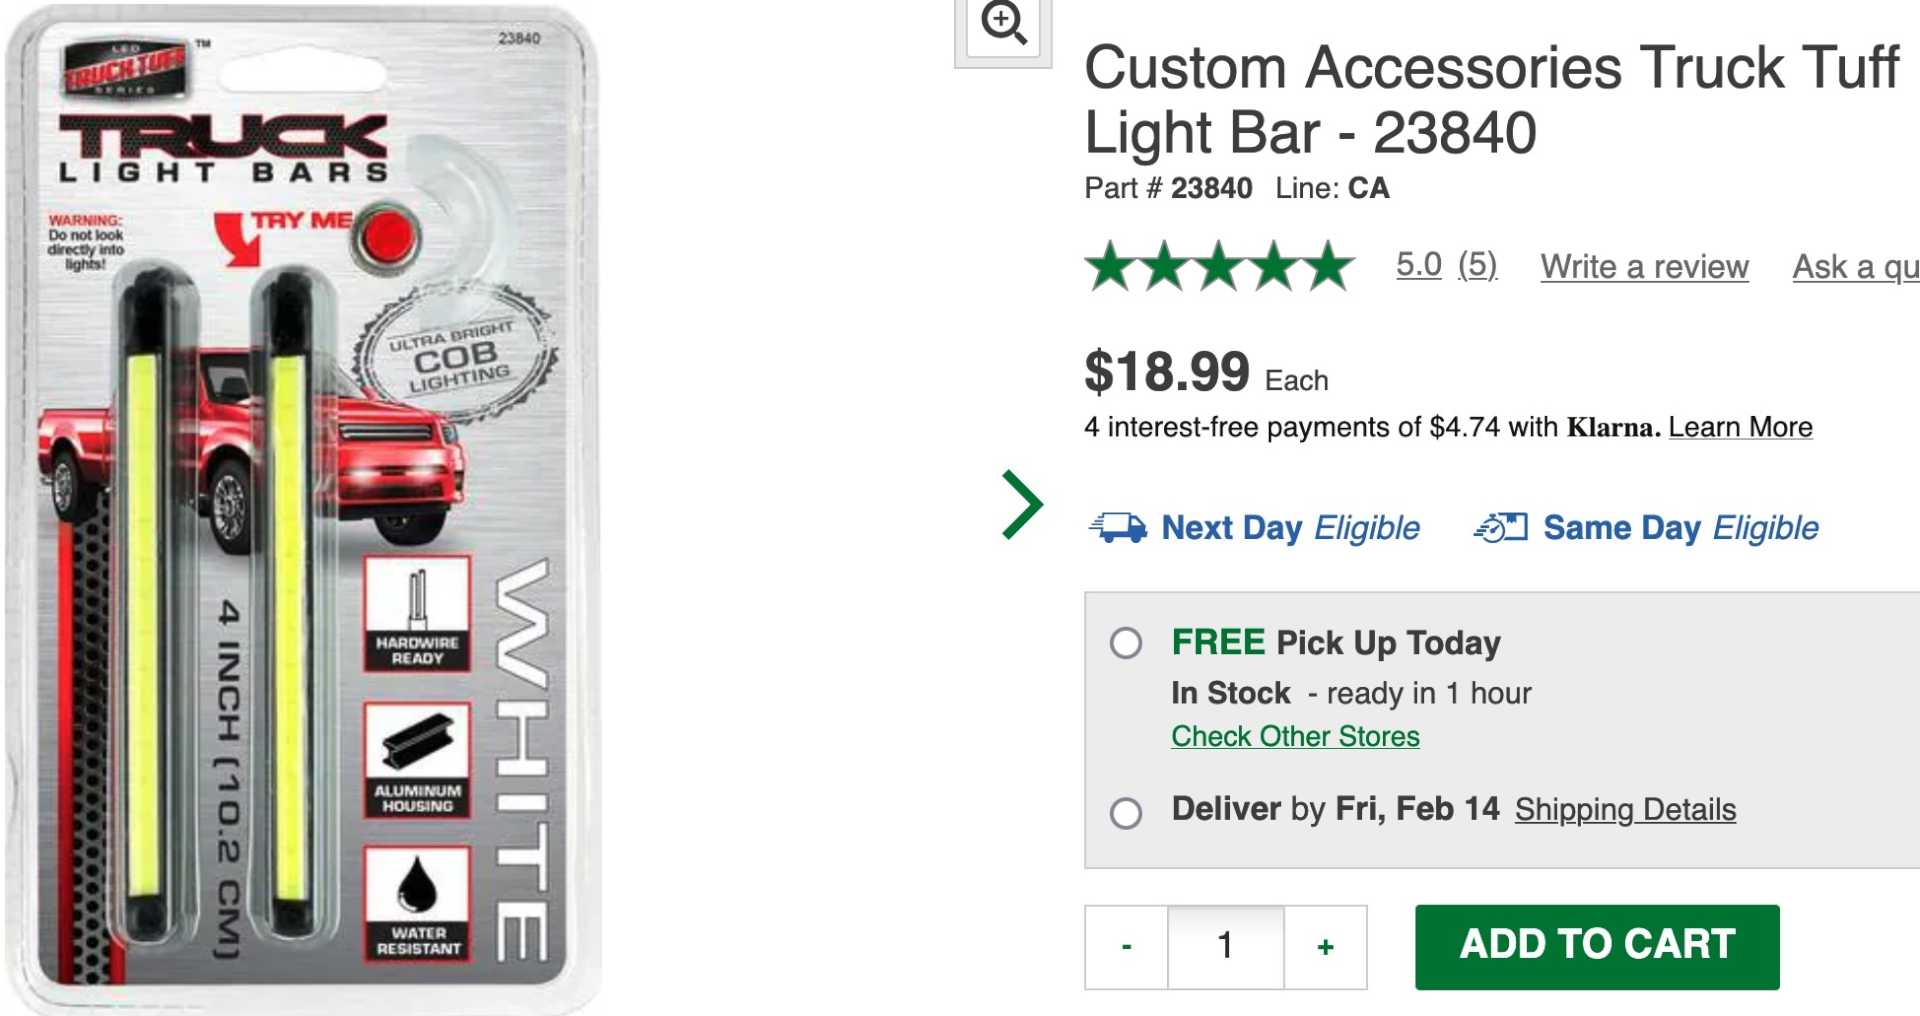
I've wanted better lighting under the hood and trunk for a long while. Then the connector from engine bay to rear lid broke. Good enough problem to make the rear trunk light, deck unlock work and add both front & rear trunk lights. I found a small set of LEDs (5 x 1/4 x 1/2") at work. These have a switching power supply that makes them the same brightness from 11V to 14V and they are very bright. Used a tilt switch up front and re-used the trunk opened switch in back to control them. The O'Reilly's part no for the LEDs is 23840. Very good results. These photos taken in a dark garage.
I've been unhappy with the around town exhaust sound, too loud for my taste. I purchased some motorcycle muffler packing, opened the muffler and installed the packing in the center section. Held in place with expanded metal, then welded it closed. Also removed the Borla tips and replaced with Hedman dual tips. These are much closer to the original tips design and do contain small resonators. These changes made the sound level about 6db quieter when on flat ground at 60-70. Still loud enough when I put my foot into it. And the new tips don't draw attention to the car as being modified.
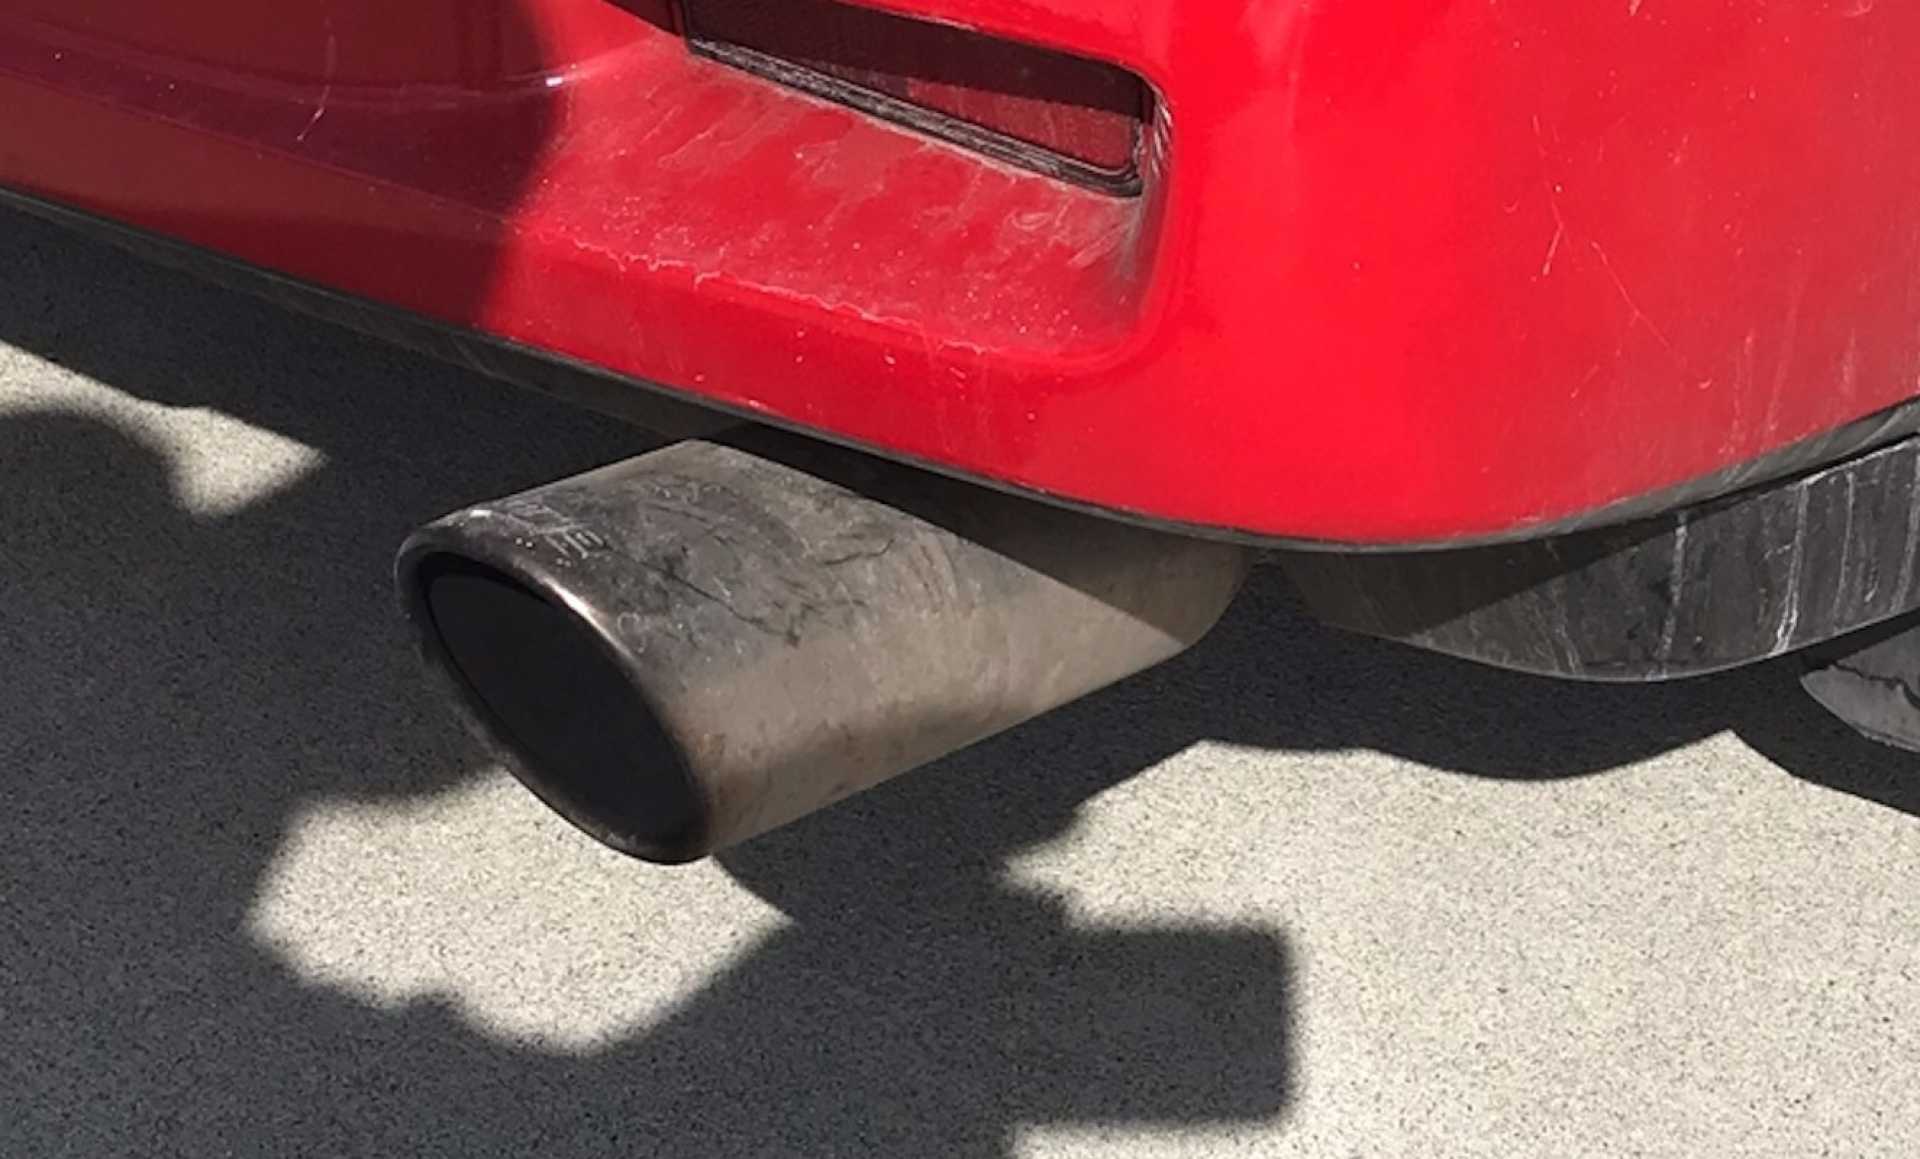
Just look too big.
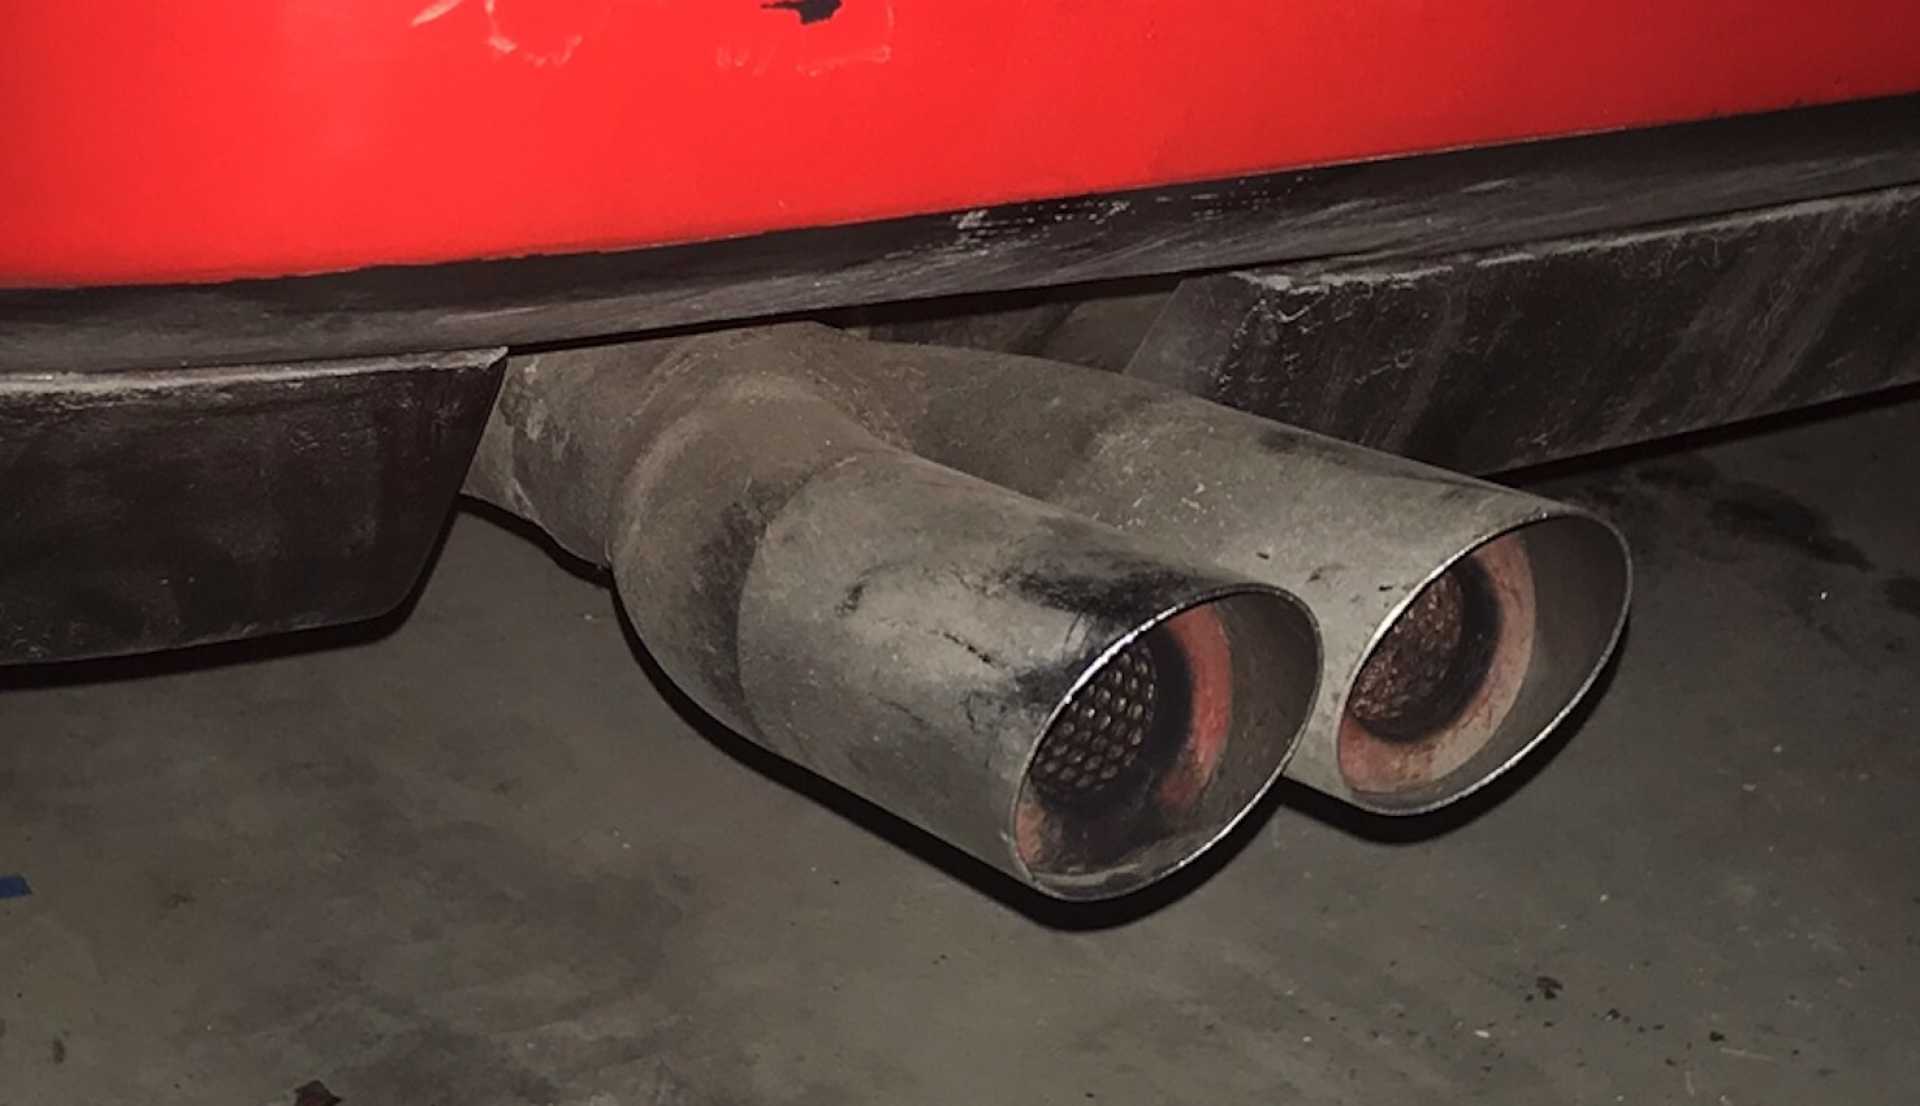
These look similar to the originals.
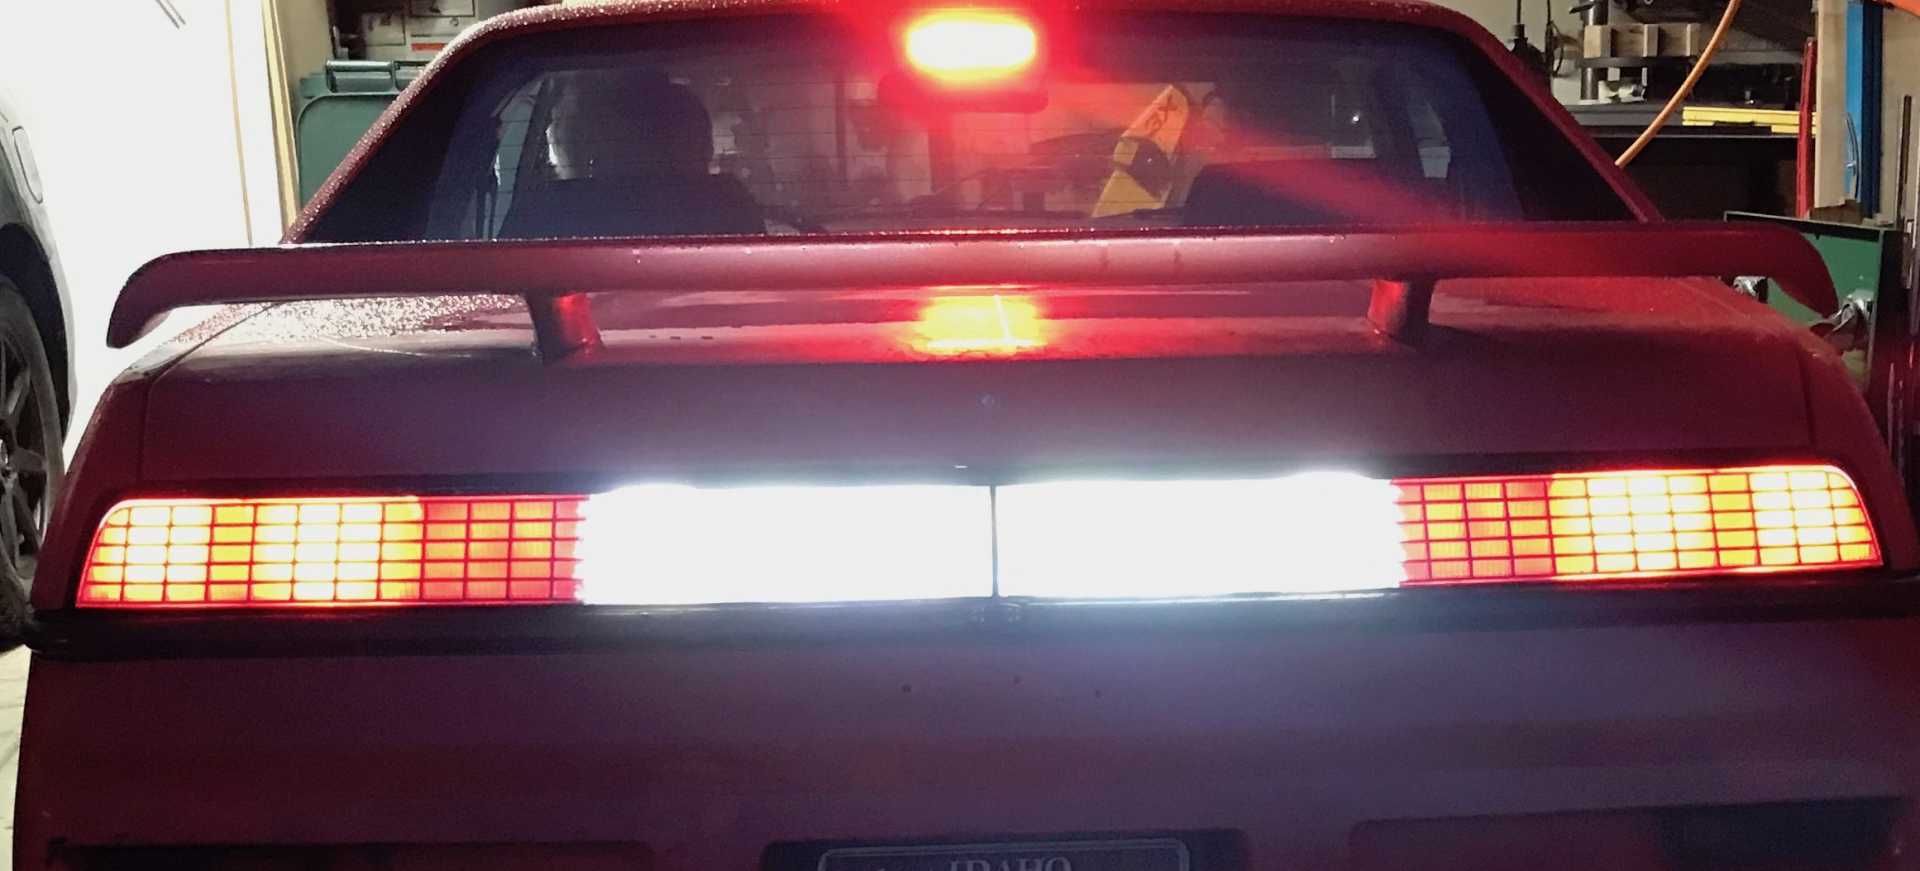
I'vealso been unhappy about the tail light covers. Too many cracks letting dirt get in. Then I found the Fiero Store has notchie style replacements in polycarbonate. Not cheap at $350 per pair but an exact match to the originals. Took the old ones apart with the old cover breaking, cleaned up all he old sealant and got to work updeating them. The lamps have all been changed to LED but the center section was unlit. Cut off the divider between the backup light and the unlit center. Added in a pair of the same 23840 LED lamps for white backup lighting and a pair of O'reilly 23805 Red LEDs for tail lights. The red strips extend into the backup light section. I added a relay so the backup lights turn on when in reverse and the Red tail lights operate with the lights on and not in reverse. Came out nicely. Added a thin translucent plastic inside the covers to diffuse the led light sources. Matched the red intensity by adding 120 ohm resistors in series with the red LEDs.
Tail Lights Only
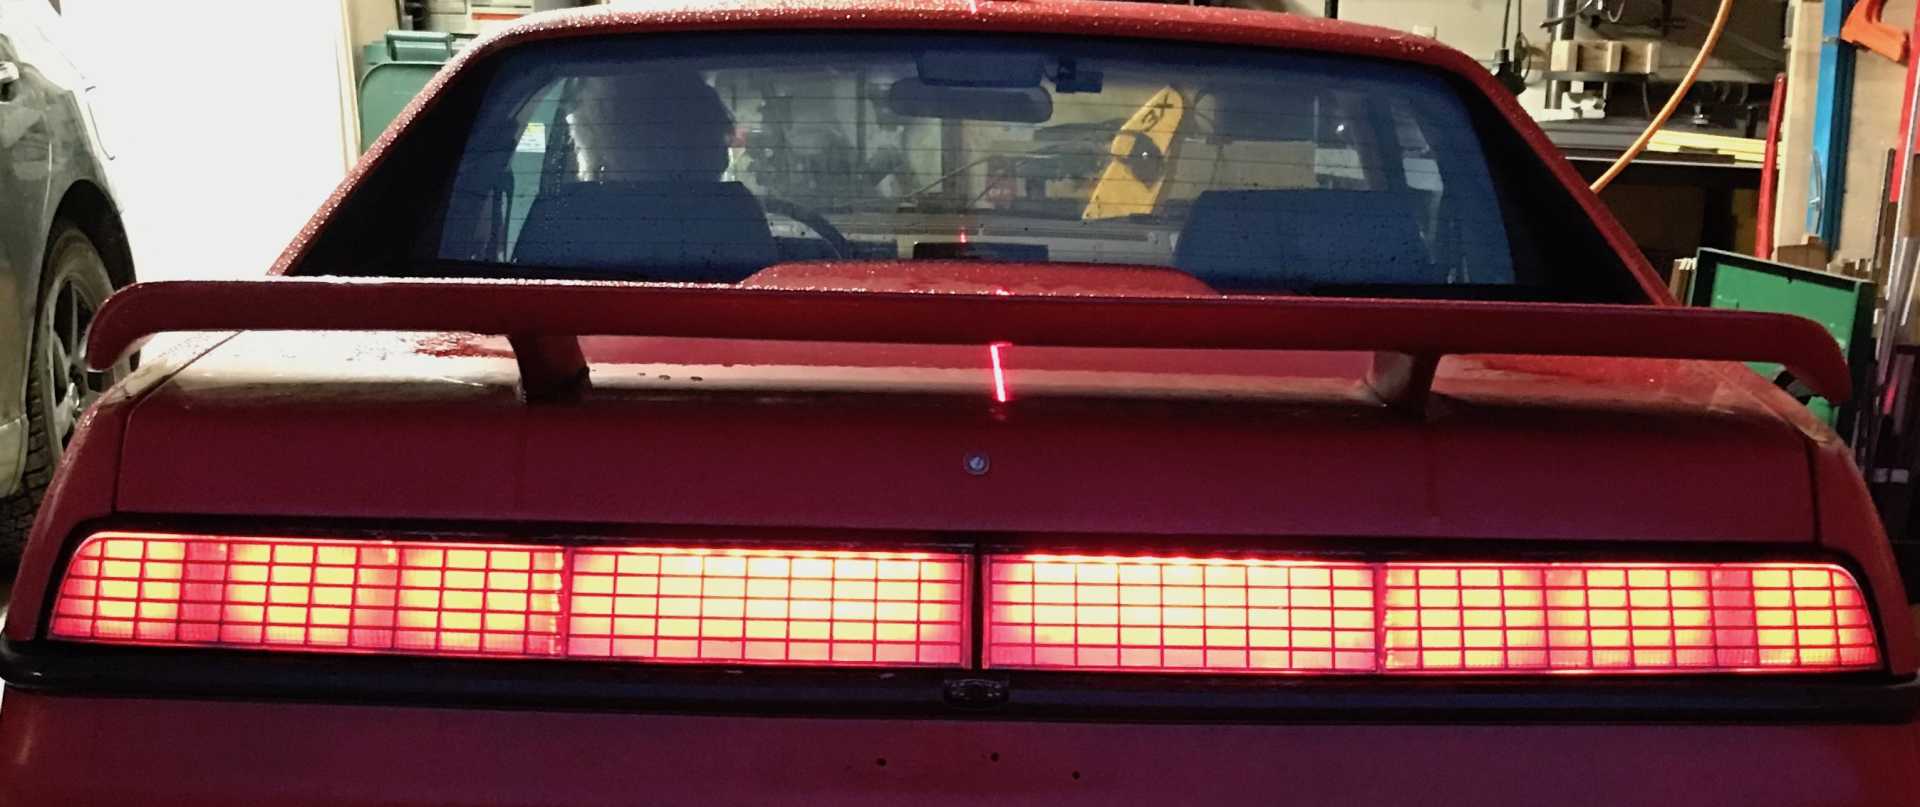
Tail and Brake
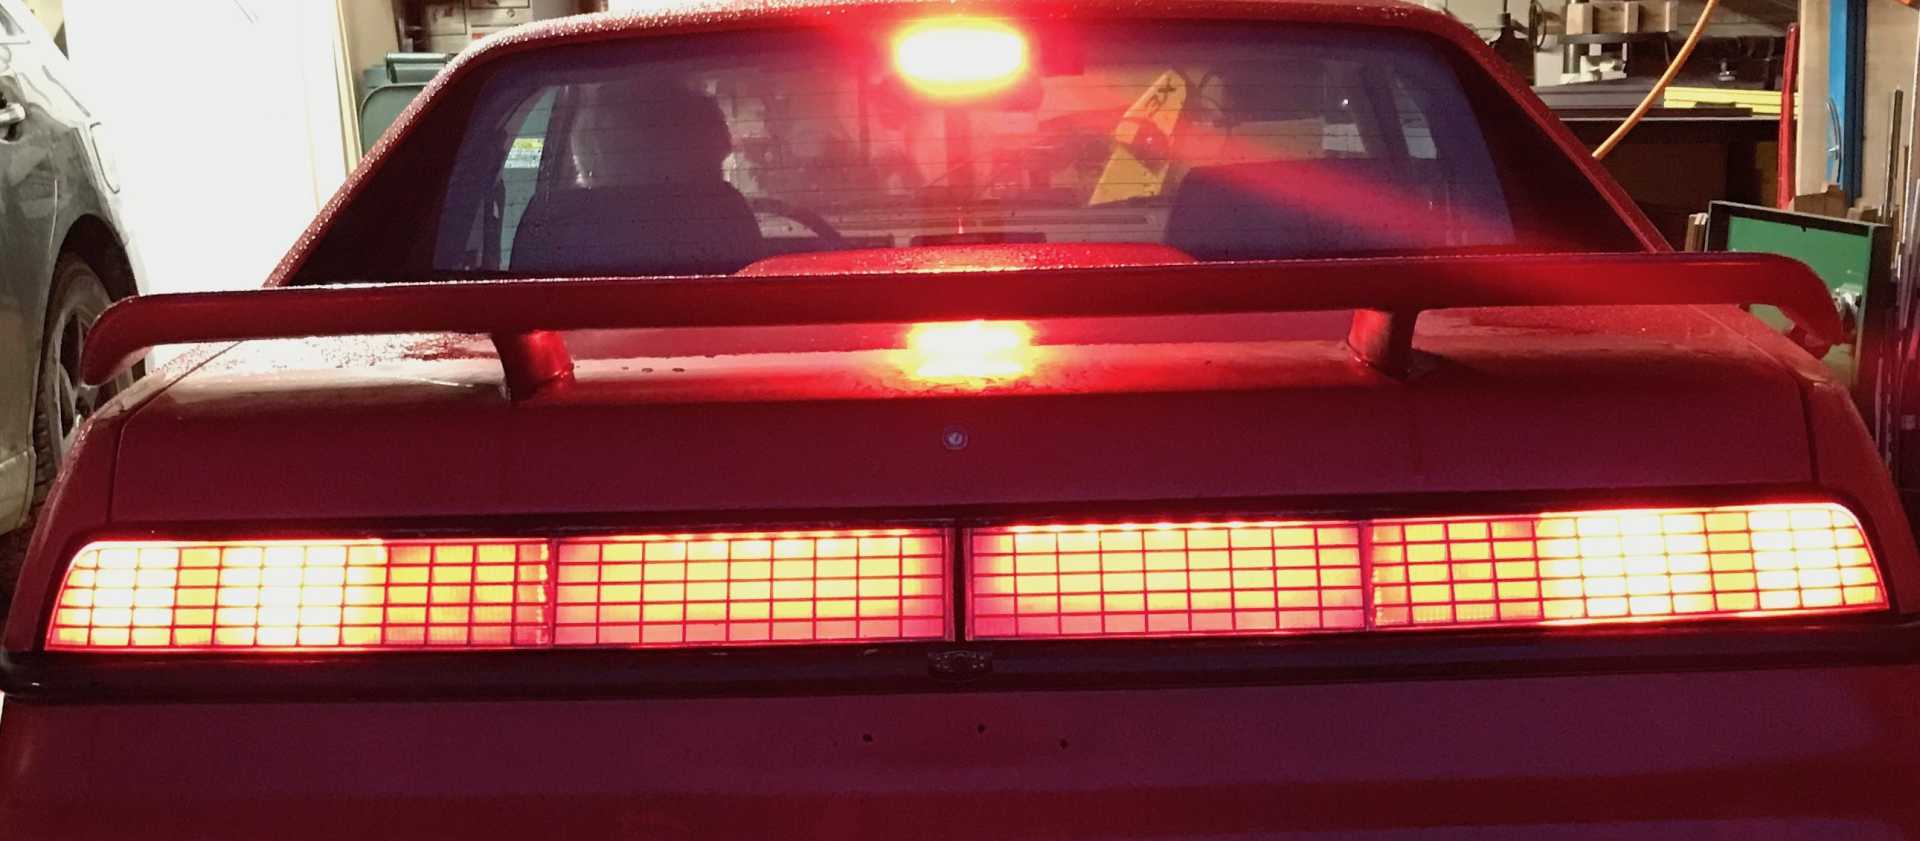
Tail, Brake and Reverse. Original reverse section now has both white and red LEDs. Center section is white/grey when lights are off
Also added a power feed for a future reversing sensors. I park bass ackwards to a concrete wall and sometimes the camera is useless with rain or dirt. The problem is mounting the sensors in the rear bumper without removing it. I may add only the center sensors in the license plate cutout
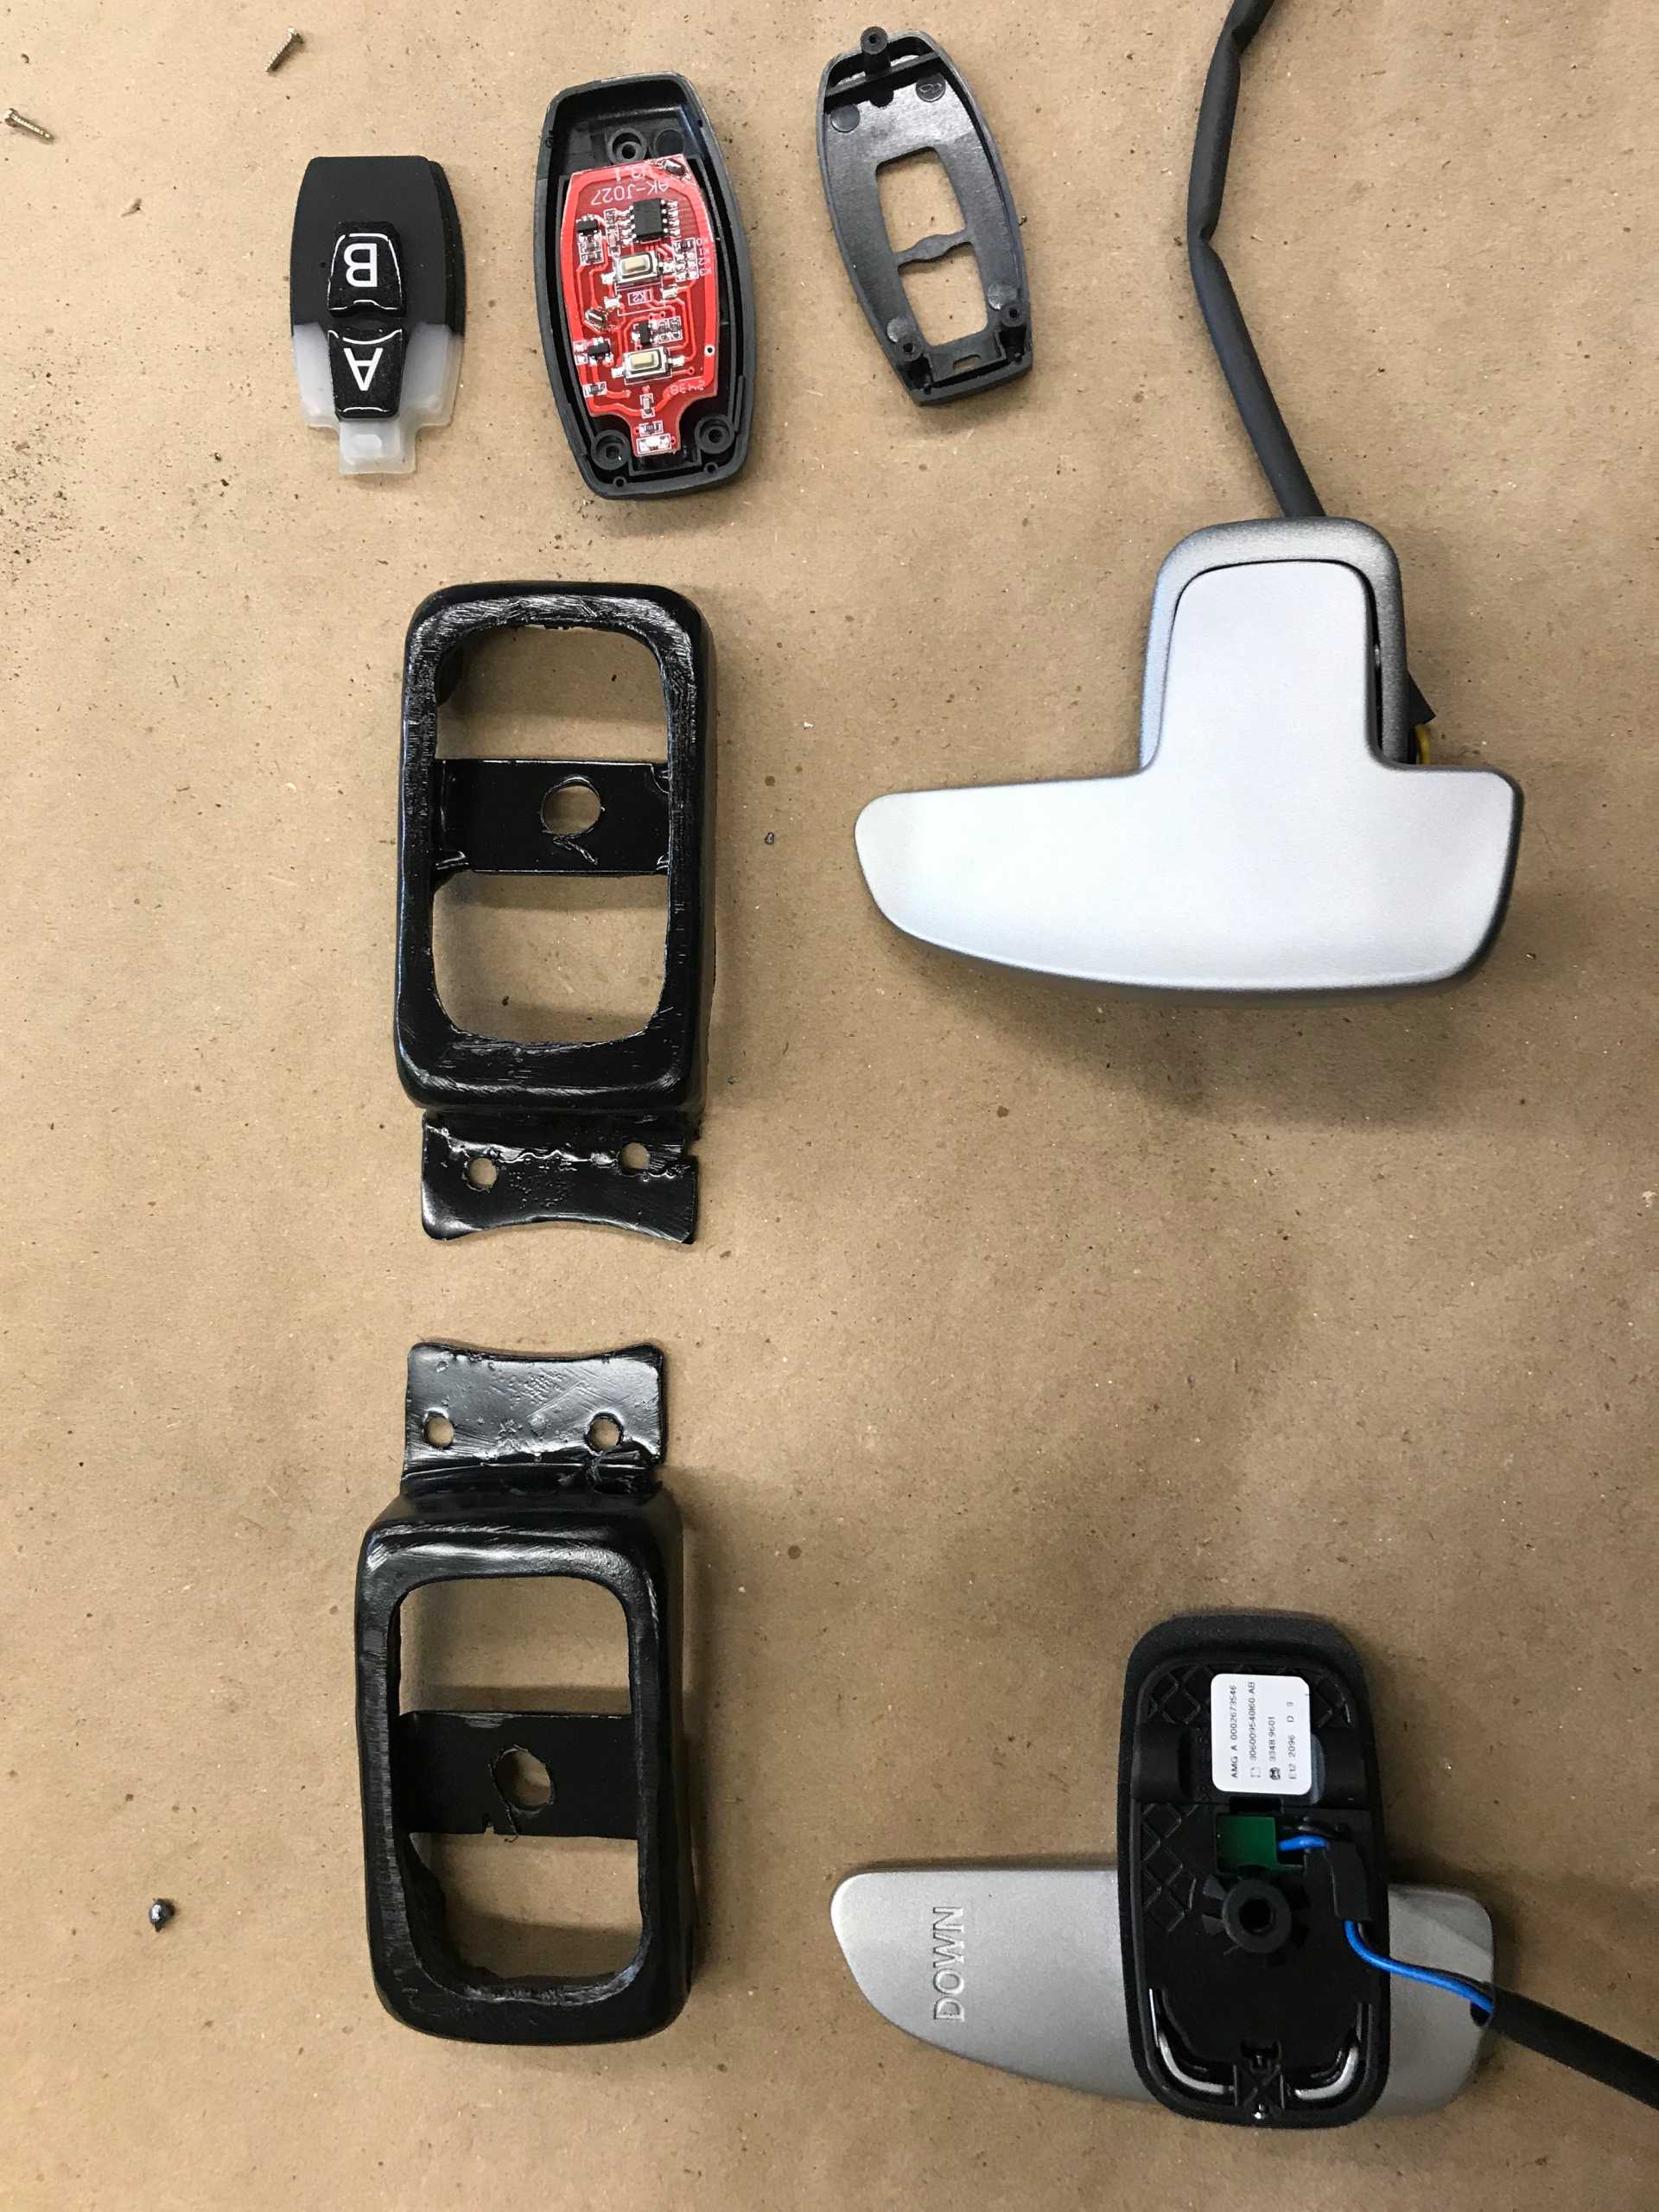
And Finally Paddle Shifters. The Impala has a switch on the shift lever for manual up/down shift but I've had paddle shifters before and like them. I found a set of good looking paddle shifters by Mercedes-Benz and bought them last year. Last year the pair cost $172, this year the cost is $248, that's inflation in action. Should be called deflation since the dollar is worth less but it's still the same switches. Now the problem is how to mount them to the 3-spoke wheel that looks good. I fabricated two metal boxes that mount to the back of the wheel and hold each shifter in place; two screws each hold them to wheel spokes. Wiring them to the shift lever was simply not possible so I decided to go wireless. Amazon had a set of two key fobs and a two-relay circuit that looked good. Bought it ($20.00 ) and was satisfied the on-off push was not delayed and did not hang on when released. Took a key fob apart and threw away the exterior metal bits. Mounted it to the back side of the third spoke with 3M double sided tape. Removed the original switches from the fob PCB and soldered the paddle wires in place. Added the back cover and it works well and looks good, has a red LED that glows when you shift so you can tell if the lithium coin cells in the fob need replacing. The receiver module was mounted in the center console with resistors added to duplicate the Impala shift knob circuit then wired to the Impala harness. And it works just as it should. With these paddles added the shift lever switch has been disabled since two sets of resistors would give the wrong values when pressed.
The Parts for the Steering Wheel

Paddle on Mounting Bracket
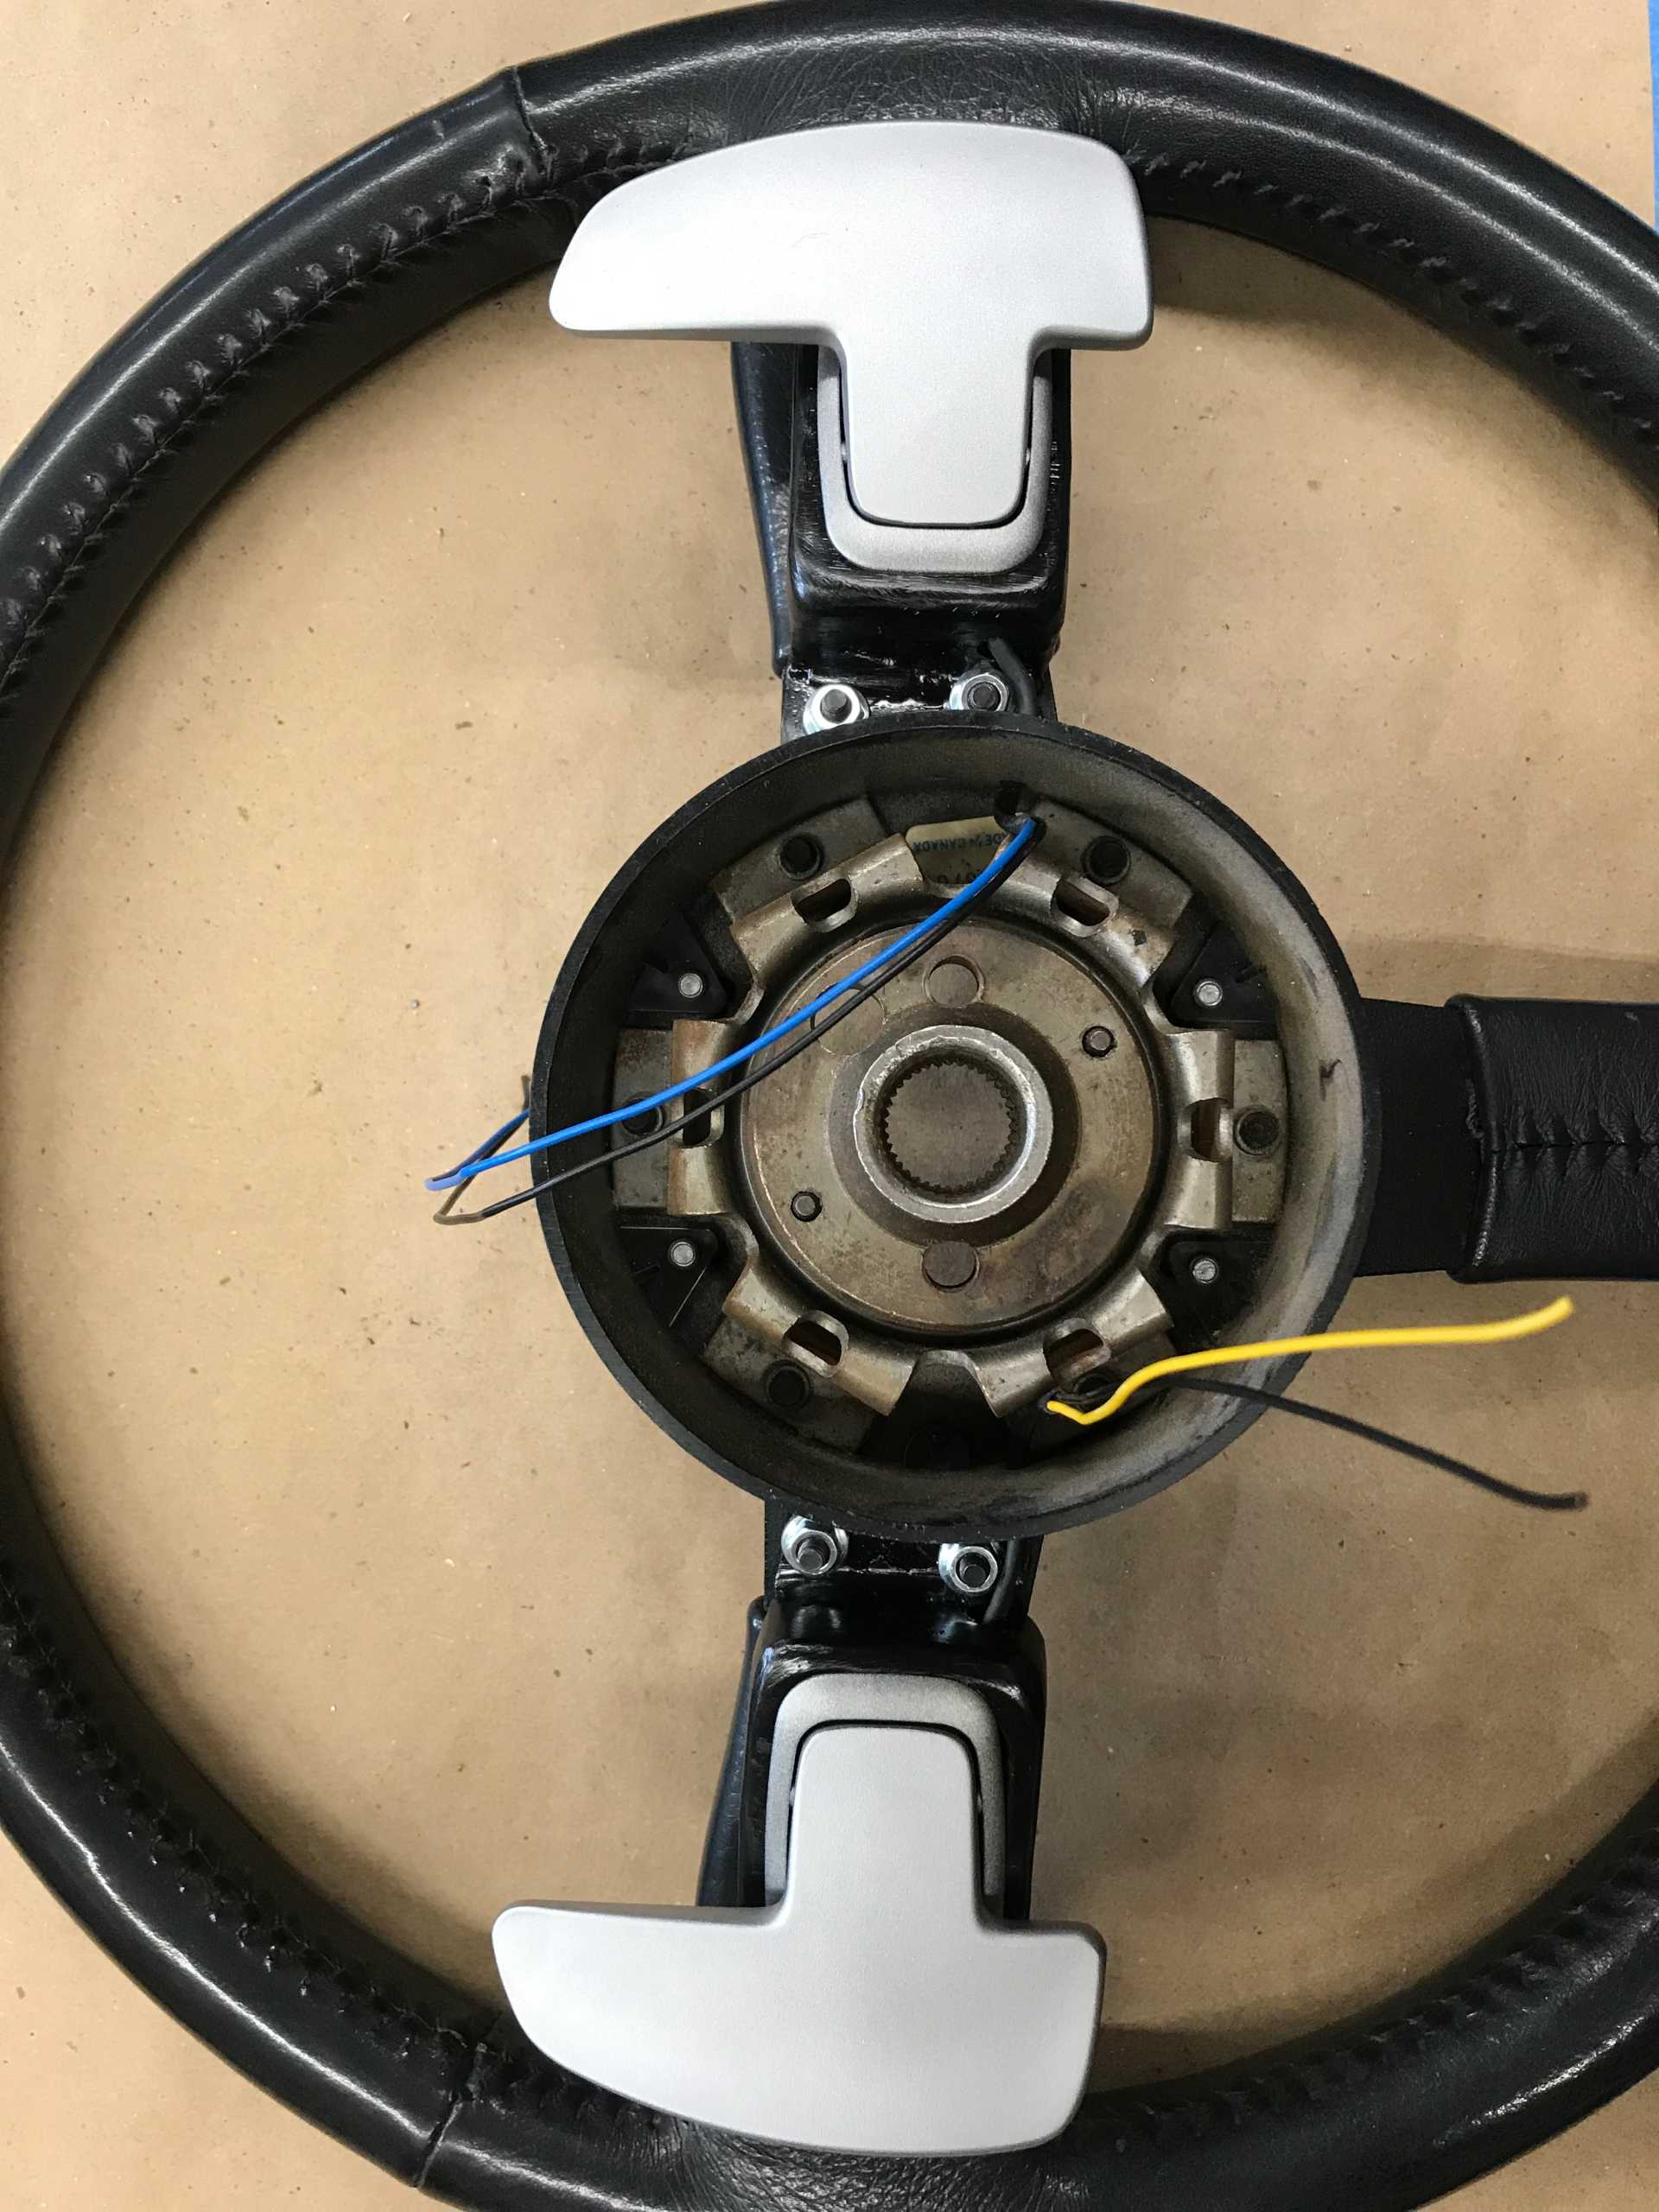
Paddles on the Wheel
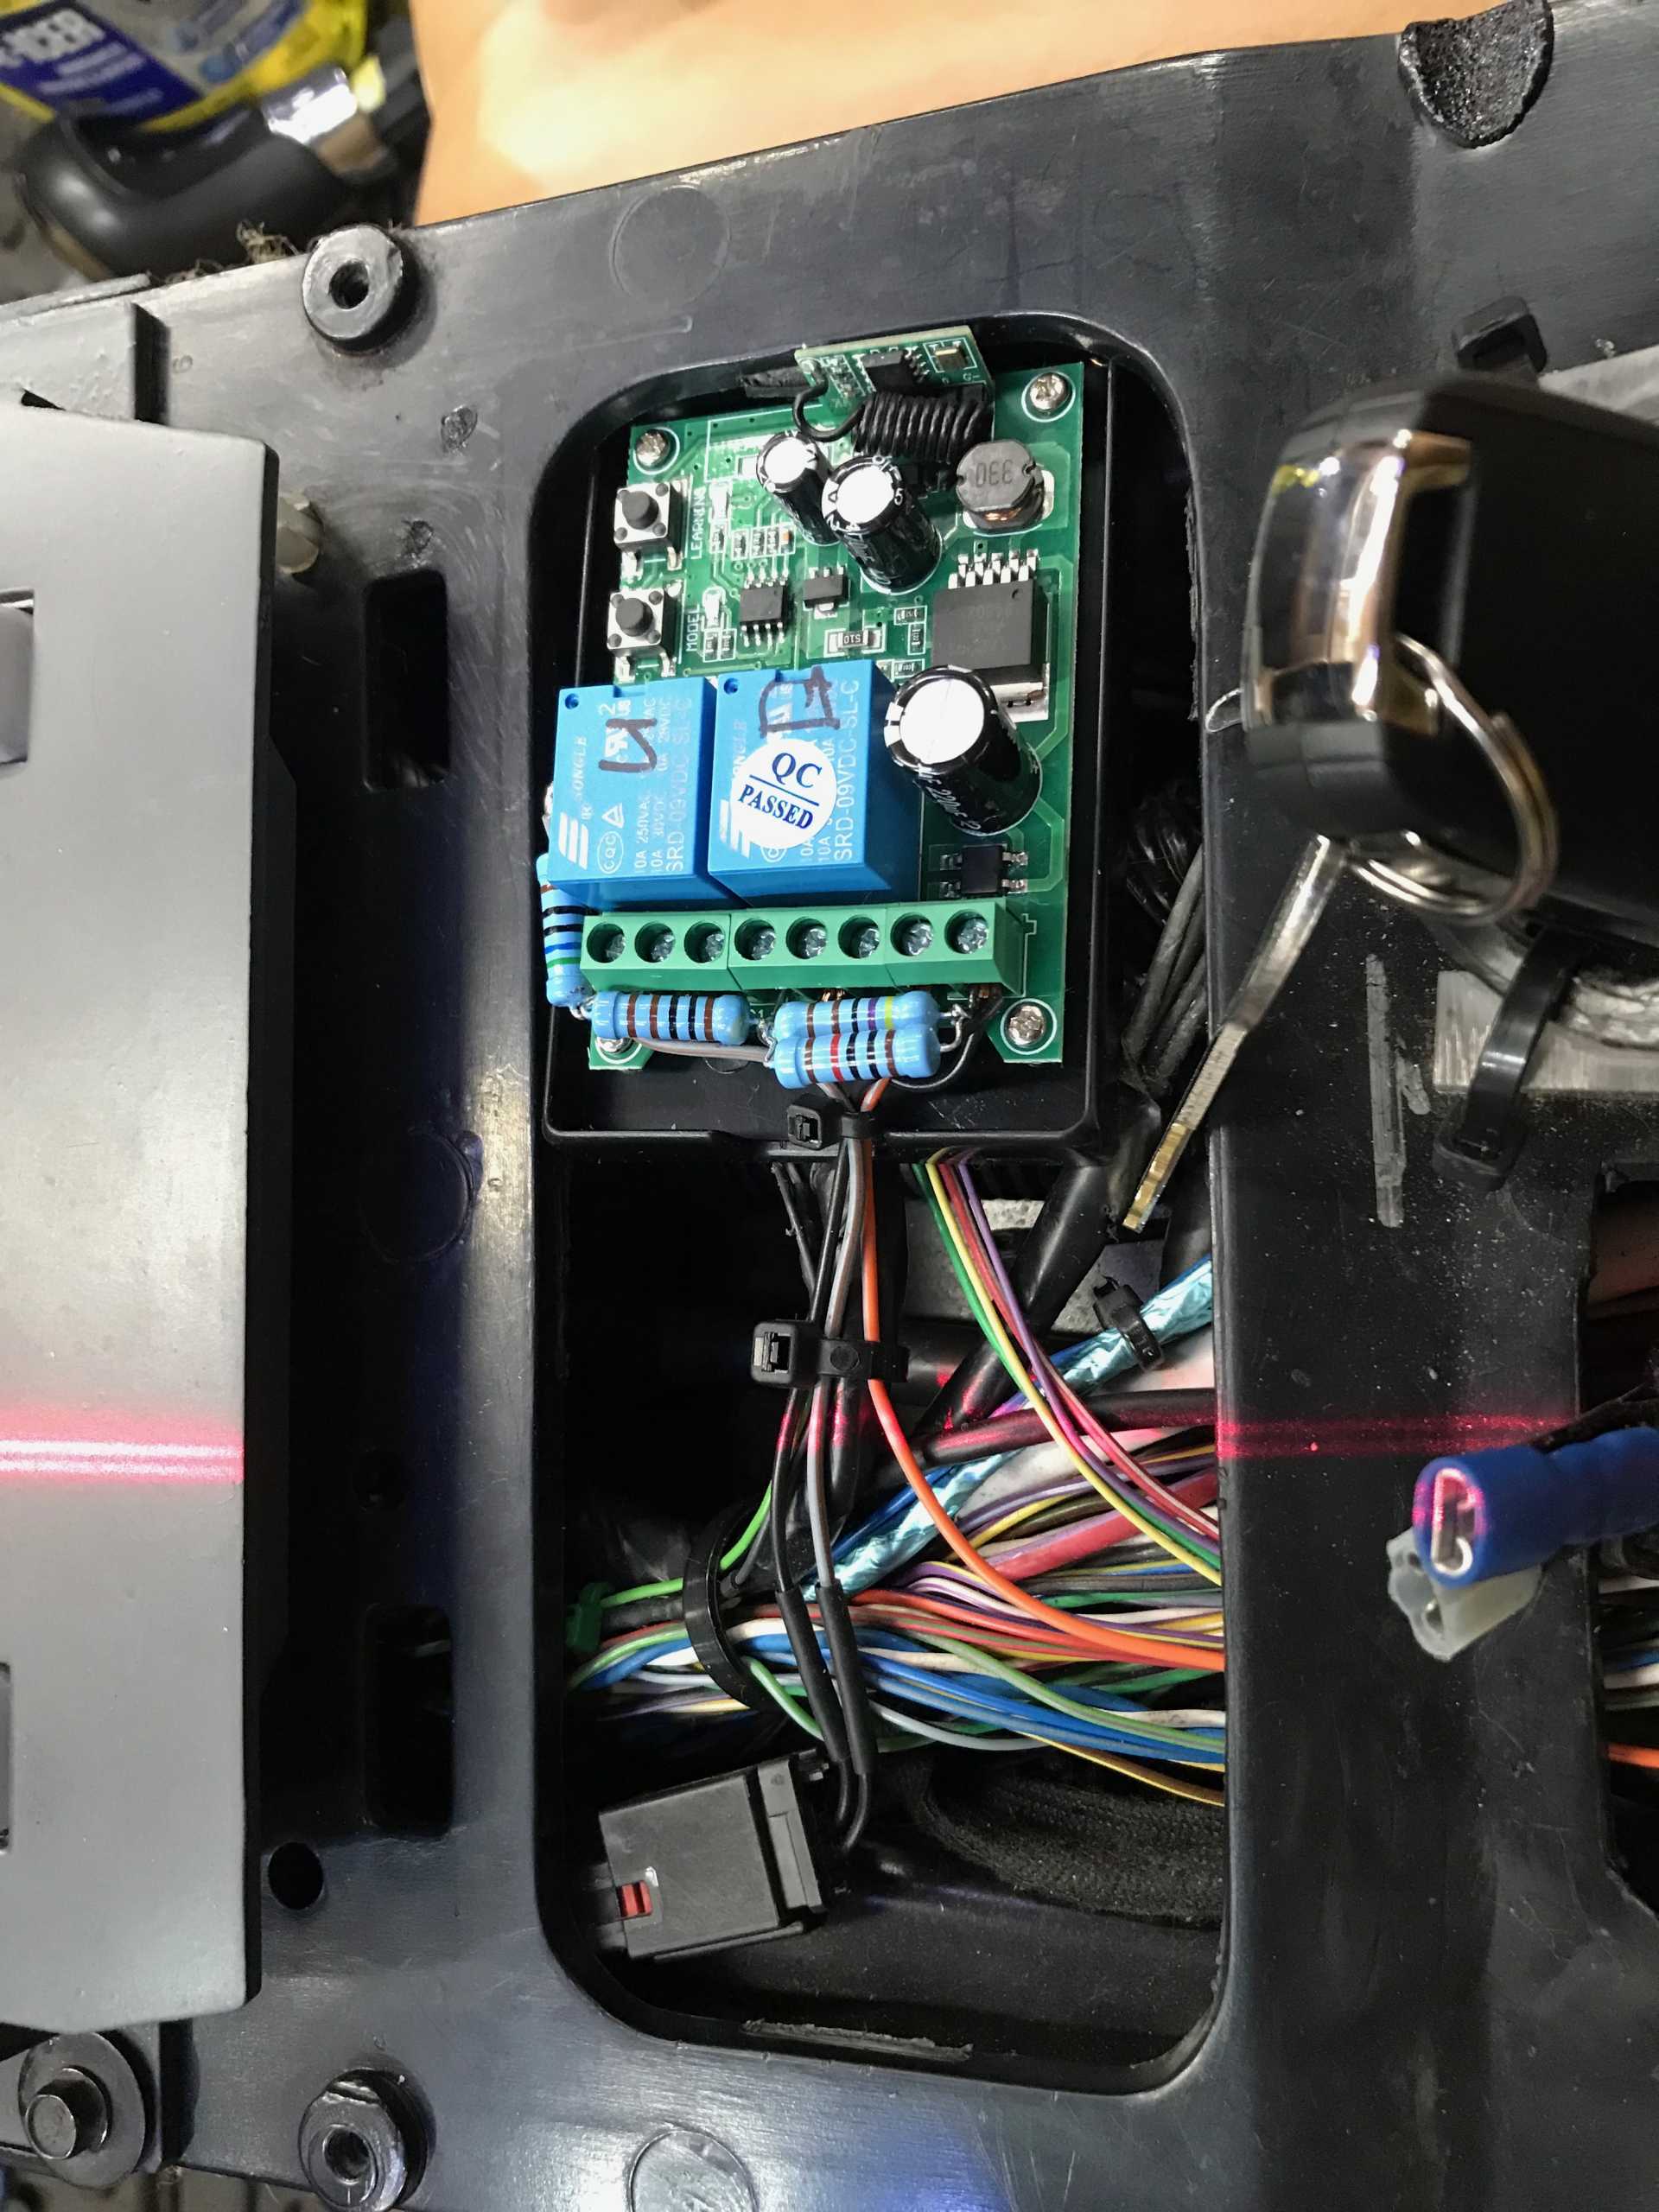
Receiver in Console, Resistors Determine which Paddle is Operated. So what's that red line? It's my parking laser. Since my parking place needs to be precise otherwise I hit the Wife's car door when exiting or run into my table saw and air compressor. It hangs from the ceiling and goes on with the garage door lights.

Not too Shabby
I've bought a set of Wilwood calipers to replace the old ones (all 4 + parking), a front-rear proportioning valve, a new S-10 booster and new master cylinder. I've planned the new brackets and hope to get them fabricated and installed around April-May.
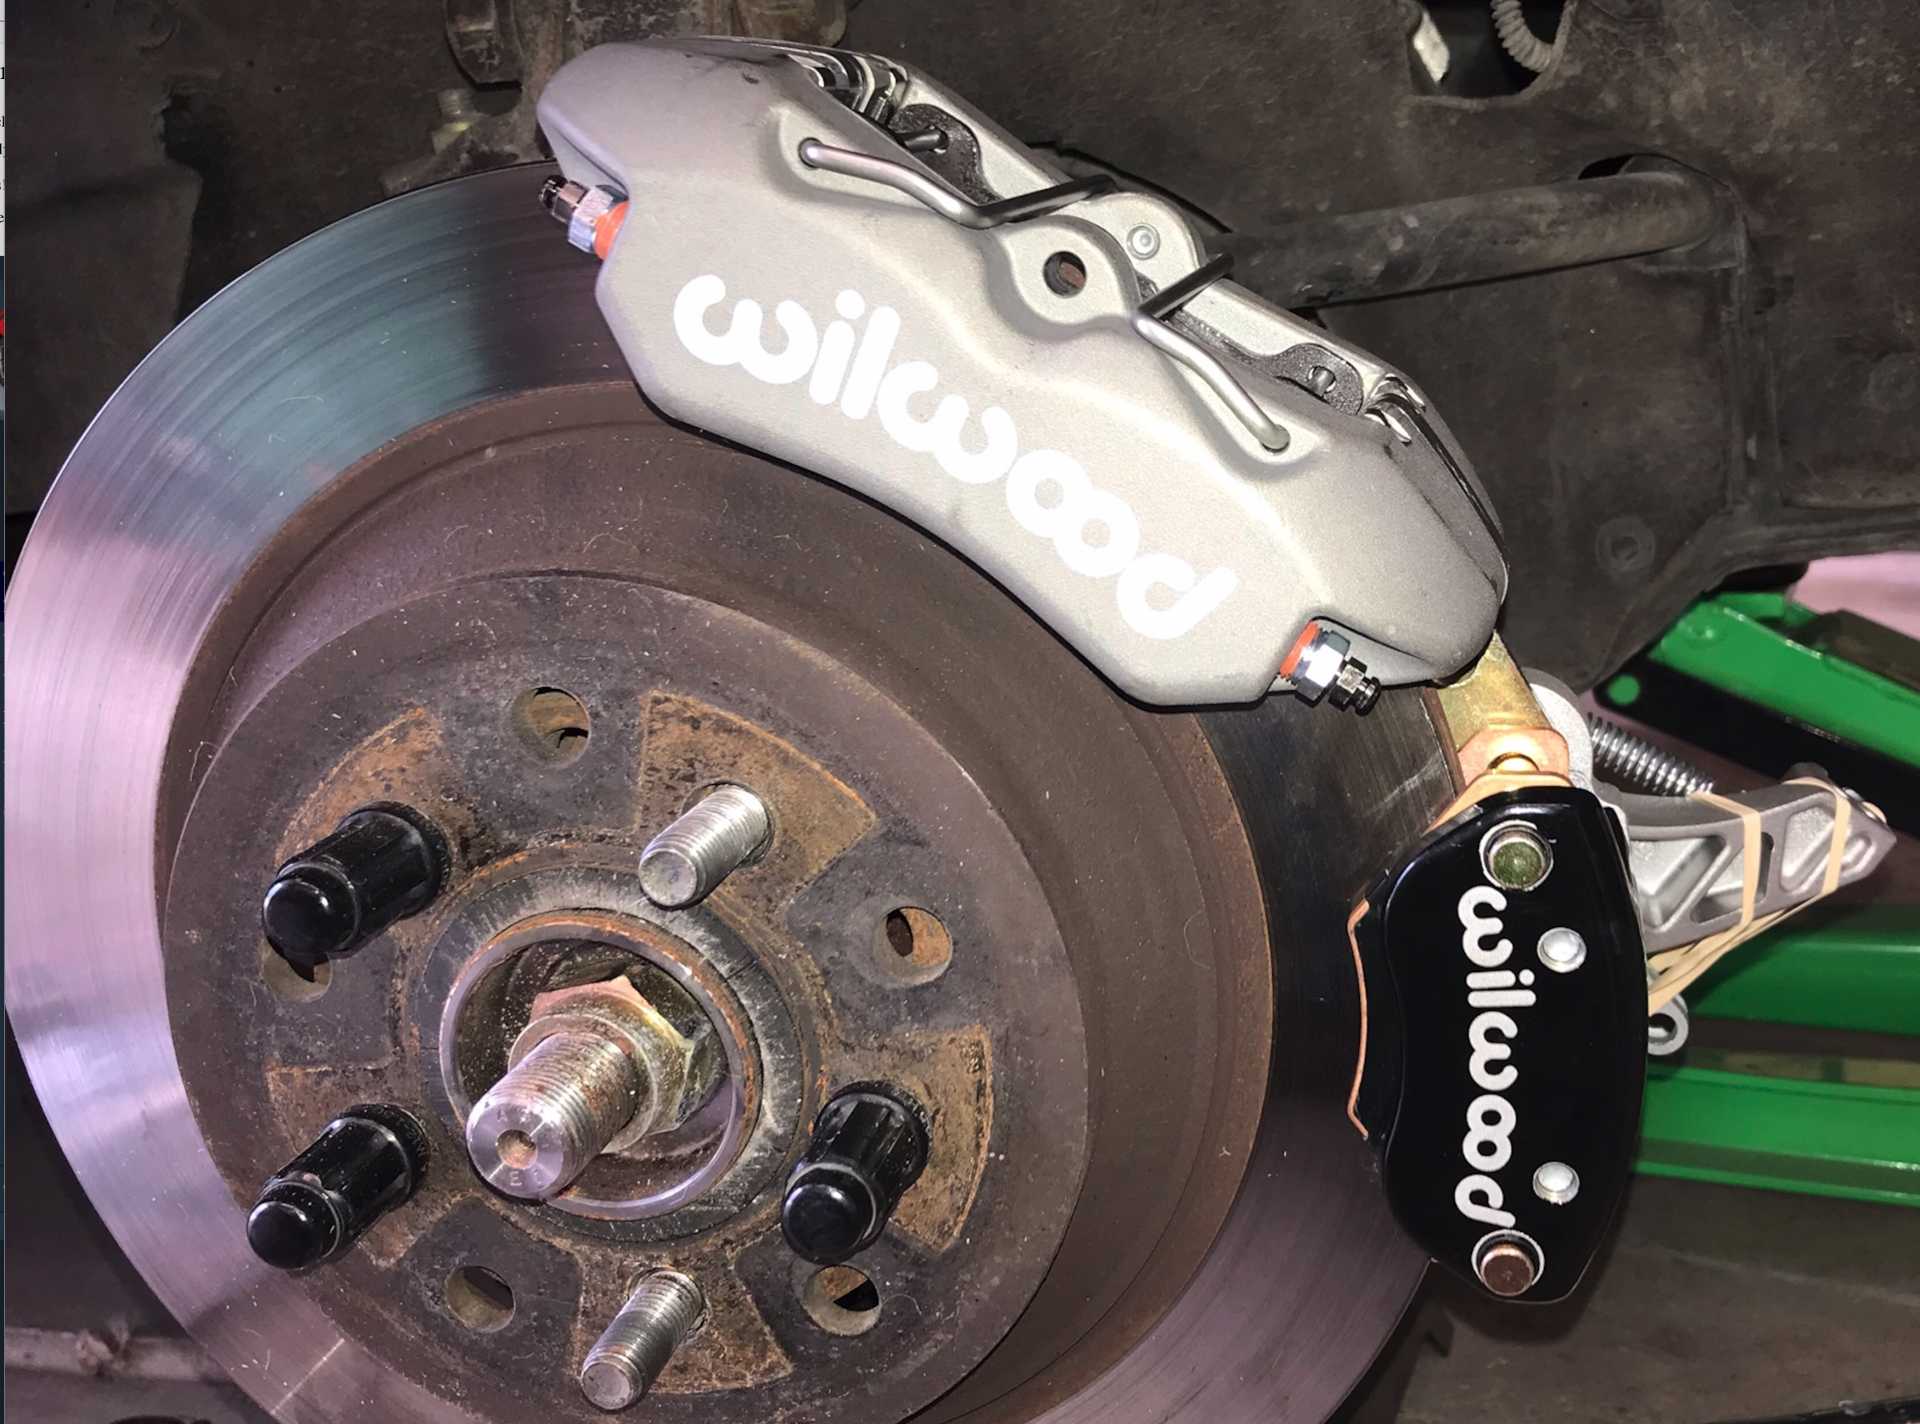
The brake calipers are 121-16190 for discs about 0.75" thick. The parking brakes are 120-12069 and 120-12070
And I'm considering wrapping the car black too...[This message has been edited by MikesFirstFiero (edited 03-07-2025).]
|
|
|
|
Dennis LaGrua
|
FEB 11, 11:10 PM
|
|
|
Been following this post and all I can say is terrific job. Wish that I had the energy to do the LFX swap but after retiring and working solo, my garage is now only used for light fabrication and repair. Keep up the great work. ------------------
" THE BLACK PARALYZER" -87GT 3800SC Series III engine, custom ZZP /Frozen Boost Intercooler setup, 3.4" Pulley, Northstar TB, LS1 MAF, 3" Spintech/Hedman Exhaust, P-log Manifold, Autolite 104's, MSD wires, Custom CAI, 4T65eHD w. custom axles, Champion Radiator, S10 Brake Booster, HP Tuners VCM Suite.
"THE COLUSSUS"
87GT - ALL OUT 3.4L Turbocharged engine, Garrett Hybrid Turbo, MSD ign., modified TH125H
" ON THE LOOSE WITHOUT THE JUICE "
|
|
|
|
MikesFirstFiero
|
FEB 12, 02:49 AM
|
|
|
Thanks Dennis. I am lucky enough to have an understanding wife who let me kick her Venza out of the garage for 6 months. Though she did threaten to sell it if I wasn't done on time. [This message has been edited by MikesFirstFiero (edited 02-20-2025).]
|
|
|
|
MikesFirstFiero
|
MAR 07, 02:07 PM
|
|
Finally added the tail light photos to the previous post.
Just replaced the fan controller which was not compatible with the LFXCU/BCU controls, Until now fan only came on when the A/C was on. Now it turns on when the Radiator temp exceeds 160 or the A/C is on. No computer involvement.
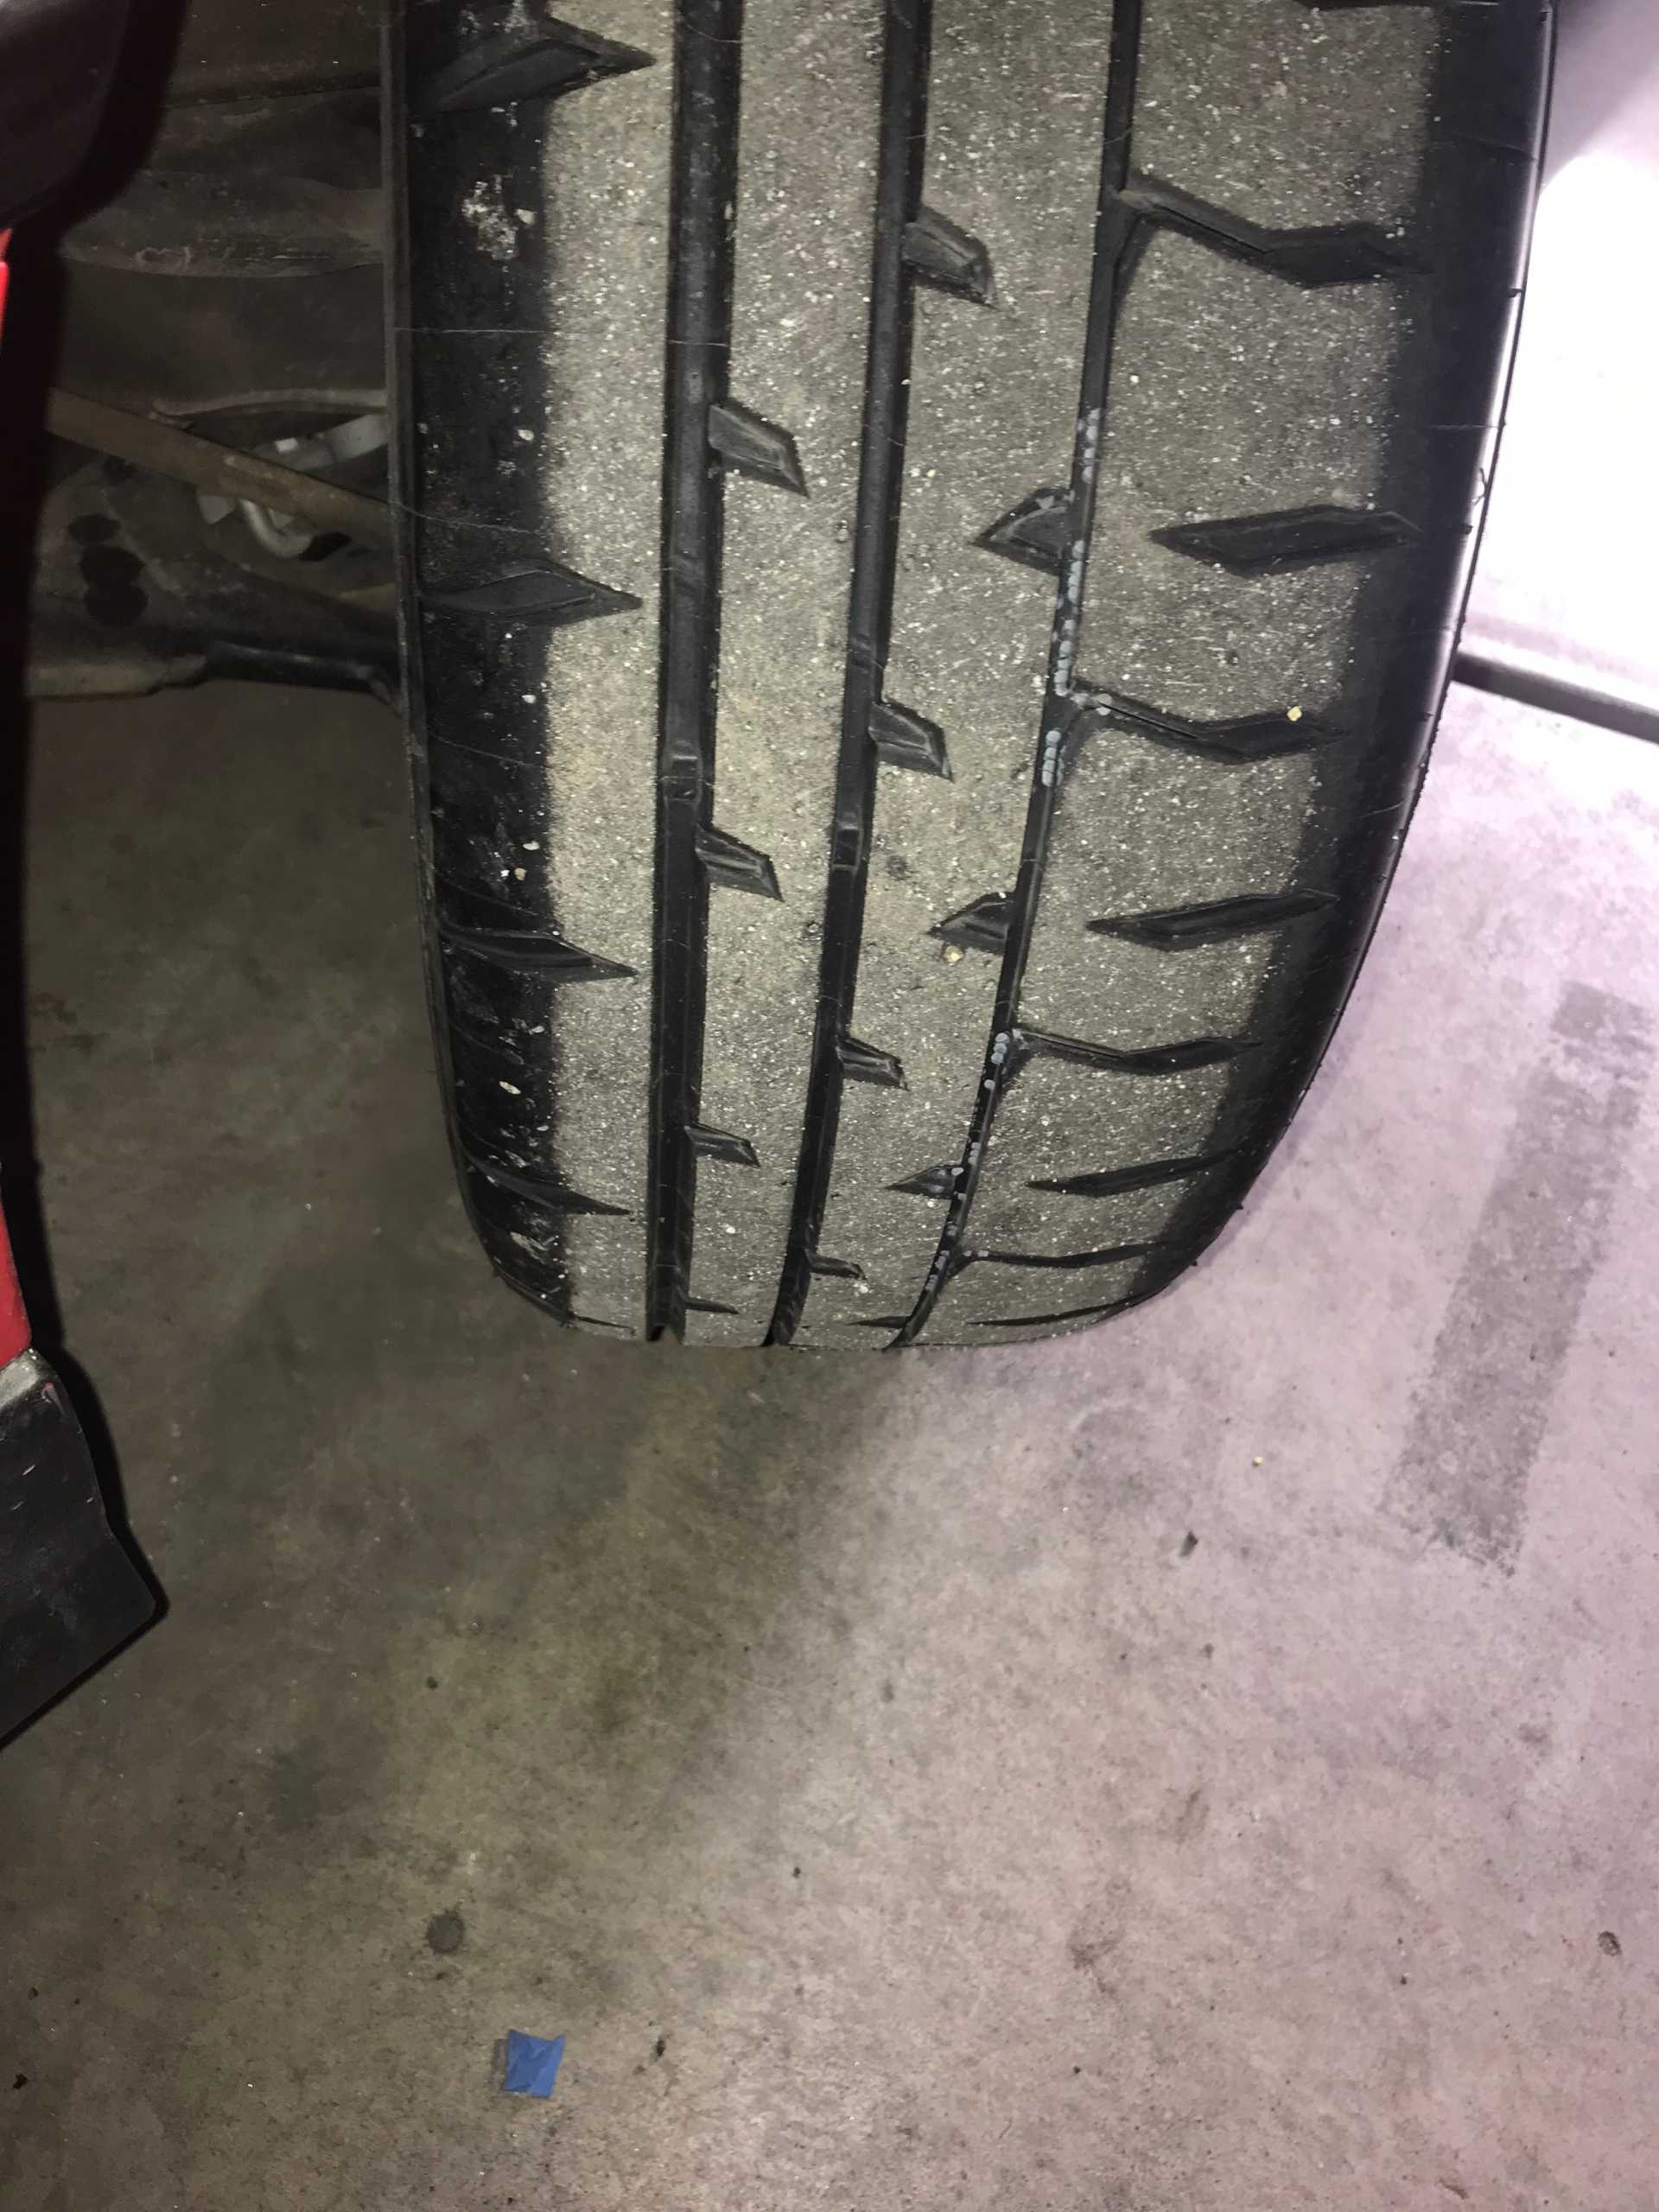
Also got a killer deal on Bridgestone RE-71RS tires. Tire Rack had closeout discount plus another discount if you use their credit card. End price was about $70 each. I bought two sets. Very sticky, Ok in moderate to light rain. Summer use only, very responsive, noise is fair. You feel all pebbles on the road and did I say very sticky.
 [This message has been edited by MikesFirstFiero (edited 03-08-2025).]
|
|
|
|