 
     |
| LFX 3.6/F23 option (Page 2/13) |

|
mender
|
FEB 25, 12:26 AM
|
|
Okay, so I'm blind.
Getting there: apparently the images are too large, how do I reduce them?
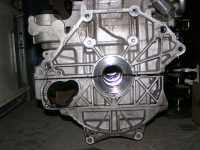
While I'm waiting: I used a 2010 Acadia? engine with a broken rod for mock-up purposes and a Camaro 3800 iron flywheel redrilled to the proper bolt pattern to check starter engagement and such. I machined some material off the crank side of the flywheel, will have to look up the numbers for that, plus opened up the hub id to fit the LFX crank. I just got my clutch and pressure plate (basically the same dimensions as the stock Fiero) but haven't bolted things together to measure finger height yet, so I don't know if/how much material needs to be machined off the Camaro flywheel to work with the F23 slave cylinder. I don't know if that's already been researched; if so, chime in with the results.
Does anyone know how close the HF and Ecotec bolt patterns are? I see the Ecotec F23s laying around on the ground at the pick n pull places and if they can fit as well, that really opens up the cheap transaxle option.[This message has been edited by mender (edited 02-25-2016).]
|
|
|
|
wftb
|
FEB 25, 06:25 AM
|
|
|
|
|
dobey
|
FEB 25, 08:27 AM
|
|
Ecotec:
 | | CLICK FOR FULL SIZE |
HFV6:
 | | CLICK FOR FULL SIZE |
Metric (60v60) and Q4:
.jpg) | | CLICK FOR FULL SIZE |
As you can see, they are all different. I'd definitely like to see how much hacking up of the Q4 bell housing you had to do, in order to mate it to the HFV6 though.
|
|
|
|
Gall757
|
FEB 25, 09:24 AM
|
|
|
Microsoft Paint will re-size your pictures. Make them about 850 pixels wide.
|
|
|
|
mender
|
FEB 25, 11:02 PM
|
|
|
|
|
mender
|
FEB 25, 11:22 PM
|
|
| quote | Originally posted by Gall757:
Microsoft Paint will re-size your pictures. Make them about 850 pixels wide. |
|
Thanks, that worked!
|
|
|
|
mender
|
FEB 26, 12:55 AM
|
|
| quote | Originally posted by dobey:
Ecotec:
| | CLICK FOR FULL SIZE |
HFV6:
| | CLICK FOR FULL SIZE |
As you can see, they are all different. I'd definitely like to see how much hacking up of the Q4 bell housing you had to do, in order to mate it to the HFV6 though. |
|
Looks like the Quad4 is the only one that'll work, thanks!
|
|
|
|
Gall757
|
FEB 26, 08:46 AM
|
|
| quote | Originally posted by mender:
Thanks, that worked!
|
|
Thank you!
On your last posted picture, can you mark which dowels and which fasteners are working? Do you have any on the bottom of the housing? You can do that in 'Paint' also.
|
|
|
|
ericjon262
|
FEB 26, 11:03 AM
|
|
|
so do the dowels line up and maintain the same center as the crank? this is an interesting development, and I may pursue this if I swap to a HF engine next... ------------------
"I am not what you so glibly call to be a civilized man. I have broken with society for reasons which I alone am able to appreciate. I am therefore not subject to it's stupid laws, and I ask you to never allude to them in my presence again."
"The day I tried to live, I stole a thousand beggars' change and gave it to the rich."
http://www.fiero.nl/forum/Forum2/HTML/119122.html
|
|
|
|
mender
|
FEB 26, 11:08 AM
|
|
The dowels are the only ones on the block. Two of the bolts go through the dowels, the third bolt is the one on the far right of the picture.

I'll be fabbing a bracket to pick up the two upper bolts on the left plus another bracket under the F23 to secure the transaxle to the engine oil pan structure as per factory.[This message has been edited by mender (edited 02-26-2016).]
|
|
|


