
 
     |
| LS4 / 4T65E-HD Swap - fieroguru (Page 1/7) |

|
fieroguru
|
AUG 02, 10:02 PM
|
|
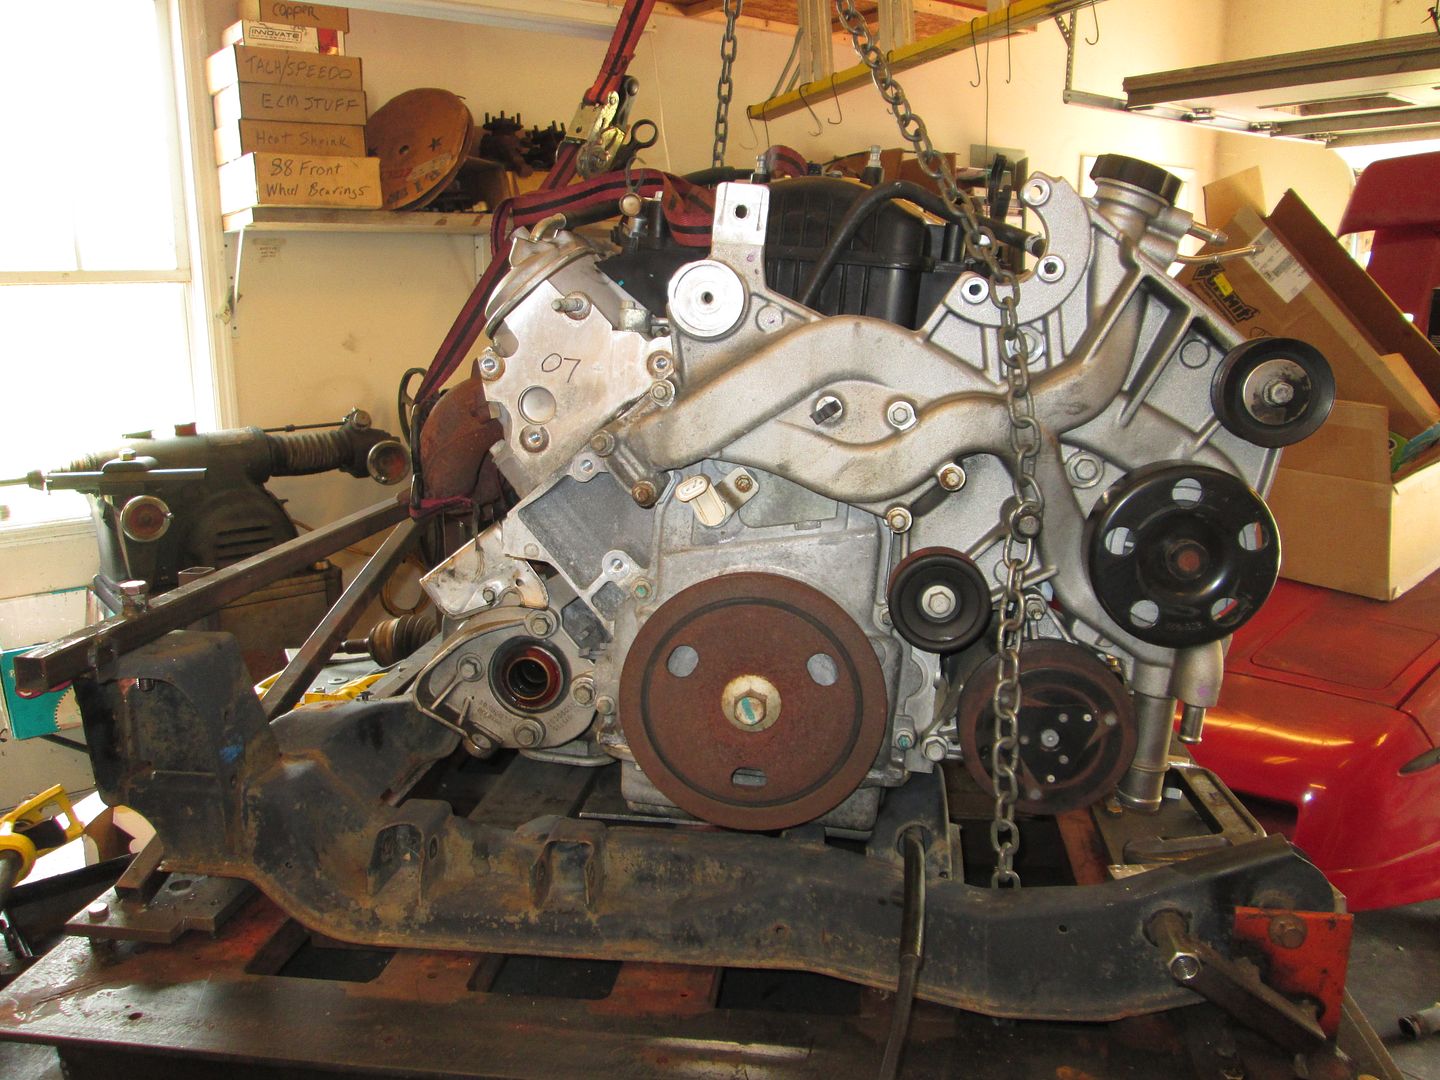
A couple of weeks ago, I picked up two LS4 dropouts,. I was looking for one to start another LS4/F40 swap, but I was able to work a good deal on both.

So I have decided that the one from the 07 Impala SS will be an automatic swap. The tentative plan is to do the swap in my 88 GT Clone that is currently a 4cyl/125C:

A few ground rules for the swap...
1. No performance upgrades. This swap is more about better understanding the similarities and differences between the Auto and Manual LS4 swaps, so it will stay bone stock from MAF all the way through the exhaust manifolds.
2. Keep things simple. I would like this swap to be something that others could do on their own.
3. Custom parts will be kept to a minimum but there will still be several: mounts, alternator bracket, harness (stock 203/500 connections), exhaust, etc.
4. Once the swap is done and I have used it for what I need it for, I will likely sell the car or the swap as a dropout for someone else to play with. Sorry, no calling "dibs".
First order of business was to remove all the crap that I won't be using:

In case anyone wants to know, the aluminum cradle as shown weighs 42 lbs. Stock 88 cradle is 50lbs.

Here is the pile of parts that will be reused:

Then it was off to the car wash to clean it up some. Here it is after it dried in the sun:

------------------
Website: fieroguruperformance.com
Products: 88 13" Brake Kit, 88 12" Brake Kit, 88 Lateral Link Relocation, 84-87 Machined Front Hubs, Custom Machining
Engine Swaps:
LS4/F40, HSR/SBC/F23, Pro-Flo/383/Getrag, 4.3CPI/4T60, Ramjet SBC/Getrag, 4.9/Isuzu, Carb SBC/Isuzu, 4.5/Isuzu
|
|
|
|
katatak
|
AUG 02, 11:06 PM
|
|
Perfect timing - on your part Guru - A guide to follow for sure.
Pat
|
|
|
|
Danyel
|
AUG 03, 12:00 AM
|
|
|
Added to my favorites ..... cant wait for more THX GURU
|
|
|
|
FieroMaster88
|
AUG 03, 12:33 AM
|
|

Going to sell a swap kit in the future?------------------

88 Coupe: 2.0L Turbo 4 Cylinder, W2A, T25 Turbo.
84 Indy #64: Restoration Project, Super Duty 4 swap
|
|

|
Nebiros88
|
AUG 03, 02:45 AM
|
|
Will be watching for sure.
Will you be keeping the AFM?
|
|
|
|
fieroguru
|
AUG 03, 06:53 AM
|
|
| quote | Originally posted by FieroMaster88:
Going to sell a swap kit in the future?
|
|
This swap is more geared towards a how-to for the DIY group, but as I develop parts for this swap, I may offer them for sale depending on time/effort/cost for each one.
So a swap kit certainly isn't the goal at this time, but I will likely offer a few parts for this swap... especially if the parts can be common between the Auto/Manual versions.
| quote | Originally posted by Nebiros88:
Will you be keeping the AFM? |
|
I am not removing it from the engine, but it will not function in the swap. The 07+ LS4 require the BCM to be wired up for DoD/AFM to work and I am not going through the added work to wire up the BCM.
|
|
|
|
fieroguru
|
AUG 03, 03:50 PM
|
|
I went ahead and mounted the 88 cradle to my fixture and set the LS4/4T65e-hd onto the cradle. It won't even fit between the cradle right now as there are interference issues in multiple areas.
Starting at the pulley side, the front cross member tapers out some as it attaches to the cradle, this tapered portion is hitting the side of the oil pan.

The stock 88 engine mount pad interferes with the oil pan as well. It will either need to be notched on that side at a minimum.

The protruding portion of the transmission will not clear the lip on the rear crossmember. The lip will need to be removed and the seam welded up.

The driver side of the cradle hits the tapered portion of the transmission case. Its hard to see, but that cradle side rail is tapered for the majority of its length, but right behind the rear lateral link it stops and becomes a sharp 90. Cutting and welding in a new section of metal to extend the tapered portion will help this area.

The oil filter is pressed against the oil filter so this area will have to be notched for clearance around the oil filter.

With all the interference issues, the pan of the transmission is still about 1" higher than the bottom of the cradle. My goal is to have it flush with the bottom to maximize room on the topside.

As you can see the front/back placement of the LS4/4T65e-hd only has about 1/2" of available room, so unless you want to do more cradle mods, there isn't much flexibility in the front/back placement.
My wife isn't feeling well today and trying to rest, so I can't proceed with all the cutting/grinding to address the clearance issues at this time.
|
|
|
|
fieroguru
|
AUG 03, 04:14 PM
|
|
Since I can't make much noise, I decided to check out clearance options for the using the stock water pump fill location. The idea is that with my decklid hinge box mod it could free up enough room to use the stock LS4 coolant fill which would eliminate the need for any aluminum welding!
The LS4/F40 in my daily driver has this decklid hinge mod and its engine is flush with the bottom of the 88 cradle, so I should be able to do some visual comparisons of the available room.
First I started with a tape measure and from the rounded top edge of the valve cover the cap protrudes about 3" at its highest point (mounts at an angle):

So then I went and measured my car and it has about 4" of room to the bottom of the hinge plate:

The next step was to "see" where the edge of the hinge will be. So I found a socket that was the right diameter to rest against the lip on the valve cover and the edge of the cap:

Then back to the car to check the edge of the socket to the edge of the hinge. The upper portion of the hinge is about even with the edge of the socket, so when I rework the hinges to remove the hinge boxes, I can offset the hinge plate to the other side to free up vertical clearance above the water pump fill point.

Now I wanted to see if the fill would be blocked by the back glass. So using the socket to get a side shot profile:

Similar view at the car... from the looks of this it might be partially under the rear glass, but I need to check the front/rear placement of my LS4/F40 and the range of placement (only 1/2" of the LS4/4T65e-hd) to see if it helps, makes it worse or doesn't matter.

Rickady88GT was able to keep the stock fill point by relocating the decklid hinge boxes to the side, so I am pretty sure the use of my hinge mod will work as well.
The big unknown is engine placement side to side. If it goes further to the PS, then there is more room for the coolant fill, but then the frame notch for the rear low mount alternator will need to be larger. I would like to minimize any frame notch if possible.
As I move onto the alternator mounting, I will explore both the low rear mount (hidden, but requires frame notch) and top cantilevered mount (no frame notch, but you now see the alternator) options.
|
|
|
|
Rare87GT
|
AUG 04, 11:51 AM
|
|
|
Very cool man. Looking forward to the swap and all the key info behind it. Will definitely help down the road for people that want to do this swap. Thanks for keeping our community going strong! ------------------

Best 1/4: 11.7 @ 115mph
Best 60ft: 1.60
|
|
|
|
fieroguru
|
AUG 04, 10:31 PM
|
|
I had very little time tonight, but did check/verify some things...
The idler at the top corner of the water pump needs to be relocated no matter what you do with the alternator setup, so this flange will need to be trimmed back some. The black mark is the cut line to make sure it clears the belt and pulley. The # is a measurement to help simplify the pulley alignment in the new location.

To make the line, I placed a scale tightly behind the pulley and used a sharpie to mark the line. When I cut it I will cut on the engine side of the line, which should leave the thickness of the blade/disk for pulley clearance.

For the measurement I used some digital calipers and measured from the engine side of the pump to the point on the first pulley rib. The back of the pump is cast, but looked very consistent, so its a good place to start. I can verify this and make further tweaks, but this should get it within +/- 1/32 on the very first try.

I am planning to make brackets to mount the alternator in a couple of places. One of them is to cantilever it and use the alternator pulley in place of the upper corner pulley by the fill point. Something like this, but with the rib cut out so the alternator could be slid into position. Placement will be critical for the belt to clear the pump and for the alternator to fit under the rear glass.

Here is a first thought on the lower mount point. Pick up 2 M12 bolts that go into the head/block and use some longer bolts and some 3/4" OD sleeves with some metal plates welded between them and a metal tab to mount the alternator. Still working on the top side, but there are a few bolt locations to pick from.

The belt routing for such an alternator location would look something like below. I am hoping I can find a small/compact tensioner that will fit in that spot and push the belt away from the engine. This area is very tight because the strut tower starts encroaching in the engine bay, so the tensioner/ belt path needs to remain as low as possible. This picture also shows a circled area to watch for belt interference with the pump:

I would love to find a tensioner that could use both of these holes in the lower block:

Here is the tensioner I use on almost all my swaps:

Unfortunately the bolt pattern is a little long to work with both of the holes in the block, but it can be used to show some options. Mounted like this, it would work as I want, but would require a custom bracket to mount the 2nd hole. The pulley would also need to be swapped out with a smaller ribbed pulley.

By flipping it, I can add another pulley above (from a hole in the head), but I think that new idler will hit the strut tower:

Over lunch on Tuesday I am going to go to the parts store and check out every tensioner they have in stock looking for something compact and hoping to find something with the needed bolt pattern spacing.
|
|
|
|