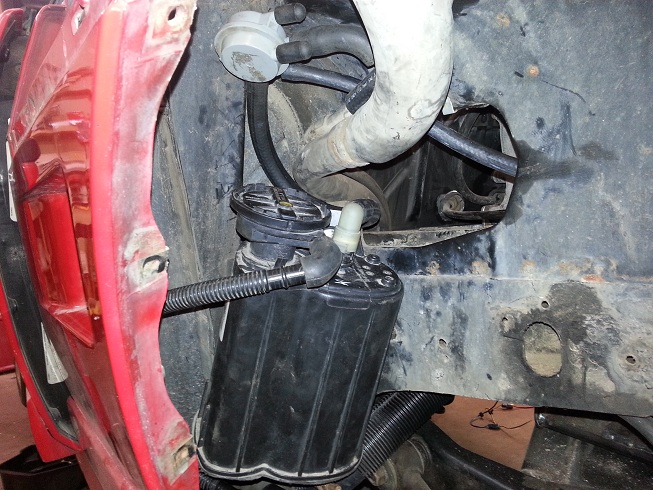
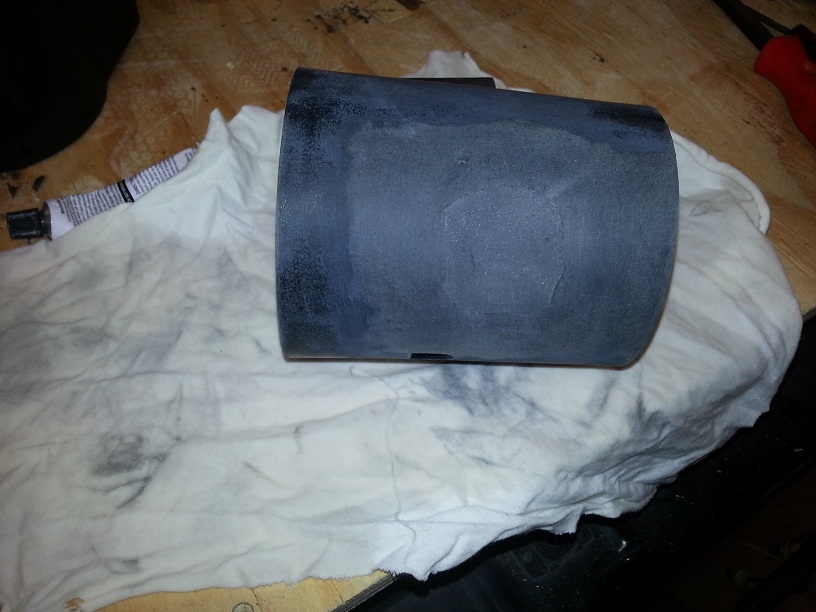
I use this one for my chargecooler.. Its off a FWD GM car. It even has a sensor in the bottom for the fluid level. I tied it into the coolant light so if I ever have a leak the light should come on in the dash. Malibu maybe??
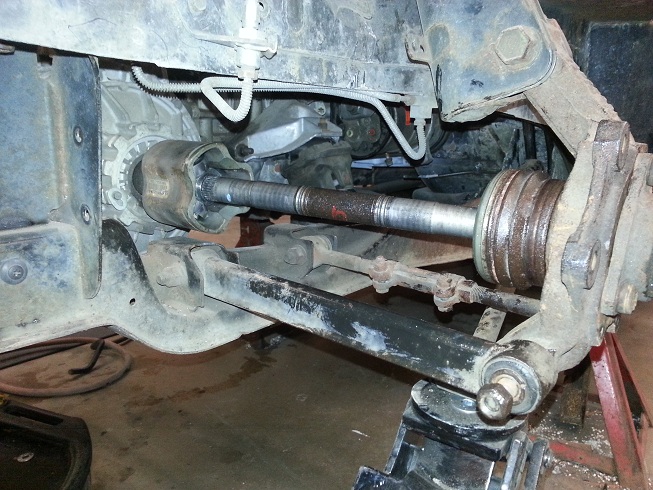
Got my RT side axle built today, and much to my amazement, the Chrysler parts are the same diameter and spline count as the GM parts.
The axle is built using parts from three different cars. The outer C/V joint is from a 2002 Chevy Caviler with a manual transmission. The axle shaft is from the drivers side of a 1999 Buick Le Sabre, it was about an inch shorter than the Cavi shaft and is the perfect length. The inner tripot joint is a hybrid of Chevrolet and Chrysler. The "star" part of the joint on the Chrysler axle is held to the shaft with a snap ring but the Le Sabre shaft had the small round ring / snap ring combo so the Chrysler "star" couldn't be properly attached to the shaft. The Caviler inner "star" attached the same way as the Le Sabre and had the same diameter roller bearings as the Chrysler but different rollers. So I removed the rollers from the Chrysler "star" and installed them on the Caviler "star" and installed it on the shaft. I slid the assembly in the car and it fits like it's always been there. I'm just bewildered how simple it was mixing GM and Mopar........and relieved too. Bought new long lower control arm bolts from Fastenal M12x220 HCS 10.9. p/n# 35111
Gotta go back to the pick-n-pull tomorrow to look for an axle for the left side, everything I bought today was too short.
[This message has been edited by seajai (edited 09-28-2023).]
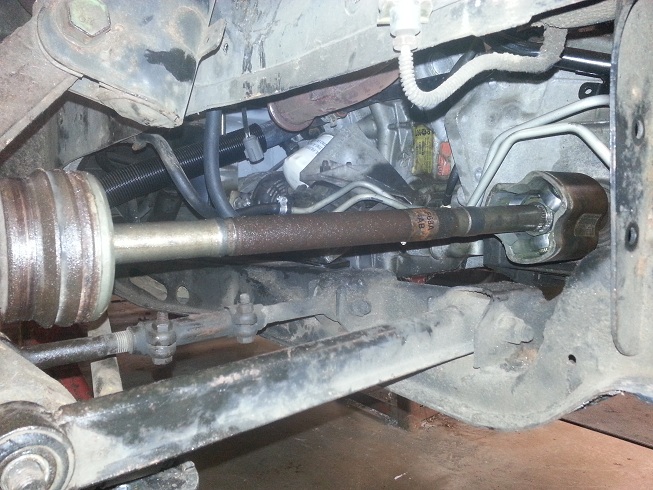
The drivers side axle was a bit more of an adventure. The longest axle I could find in GM was from the right side of a 1990 Buick Century with a TH125 trans (18" long) but it turned out to be 3/4" too short. So it was back to the pick-n-pull to see what I could find, but after an hour in the snow, I found nothing long enough. I decided to look through the Ford section just on the off chance that maybe........ well, I found that the Windstar van passenger side axle looked close in length and the axle diameter was the same @1.070" so I grabbed one. I brought it home and pulled it apart, and whaddya know, it's the right length ( 18 3/4" ) has 32 splines and the GM joints slide right on!
So here is the complete drivers side axle: 02 Cavi outer-> 97 Ford Windstar shaft-> 02 Cavi tripot w/Chrysler rollers in the Chrysler cup . Whoda thunkit! I was looking at spending hundreds of dollars of custom length shafts but ended up building 2 axles for less than $100 bucks.
[This message has been edited by seajai (edited 09-28-2023).]
that is awesome work with the axles and this whole project in general is one of my favourites .when i started my ecotec swap , i thought i would have to buy custom axles .when my ecotec arrived they shipped a cavalier axle with it by mistake .i looked at it , looked at my fiero 4 speed and i shoved it in to the transaxle and it fit perfectly .after 20+ years , no change in axle design .saved a lot of coin .
A little more progress to report... I had a bit of a setback last week, my PCM was sent back to me without being reprogrammed, no explanation, no phone call from Arrington. After 3 days and multiple calls, I was told the reason was that they didn't have the software to do it, even though I was told they could do it. So I decided to save the $350 and just run the systems I was going to remove. The first one is the evap system. The Chrysler uses a leak detection solenoid (NVLD), a canister purge solenoid, and re-fueling vapor recovery (ORVR). After a little head scratching, I think I got it adapted to the Fiero. The NVLD and purge will turn on the SES light if there is a problem but the ORVR will not, so I eliminated the ORVR and just went with the other 2. I tapped in to the fuel filler vent pipe up by the filler neck to feed the vapors to the canister through a valve that has a built in orifice to meter vapor flow into the canister. The "tee" points up and I'm far enough up that I hoping no liquid fuel finds its way into the canister during re-fueling.
The second system is the catalyst monitor or downstream heated oxygen sensors. I found plans on the interweb for building simulators using off the shelf parts from Radio Shack, so I'm gonna give that a shot because I don't want to run cats. These may require a little fiddling once everything is up and running but hopefully they will work.
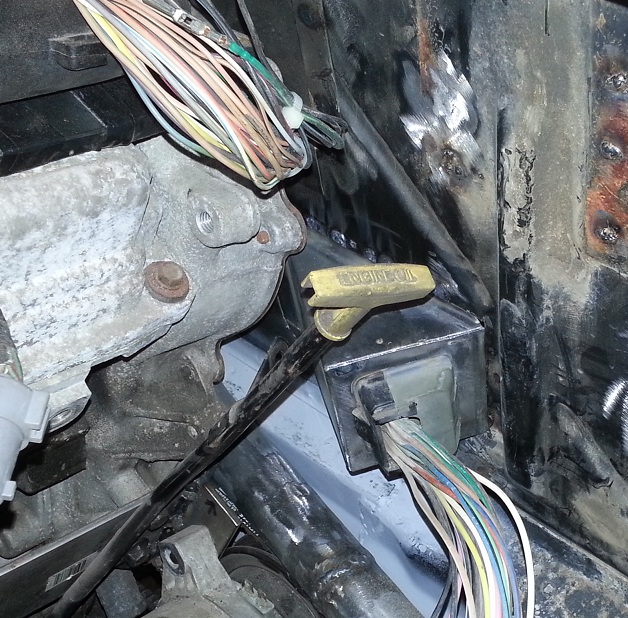
The other big thing is the Sentry Key Immobilize Module (SKIM). This is Chrysler's anti-theft system. There is a ID chip in the head of the key that is read by a ring around the ign lock cylinder, if the ID chip matches what is in the PCM memory, the engine will start. If not, then it start and die. I am going to try and bypass this by taking the SKIM off of the steering column and putting the head of the key inside the ring and holding it in place somehow.
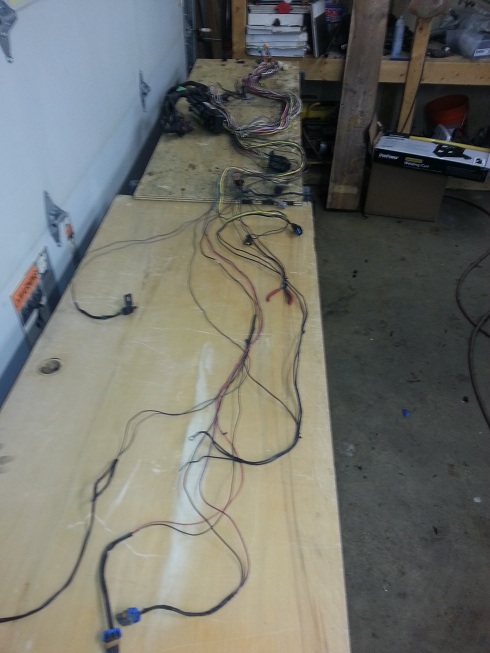
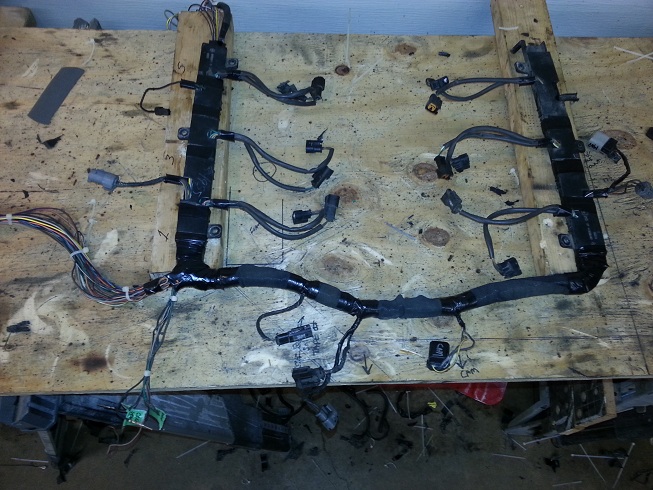
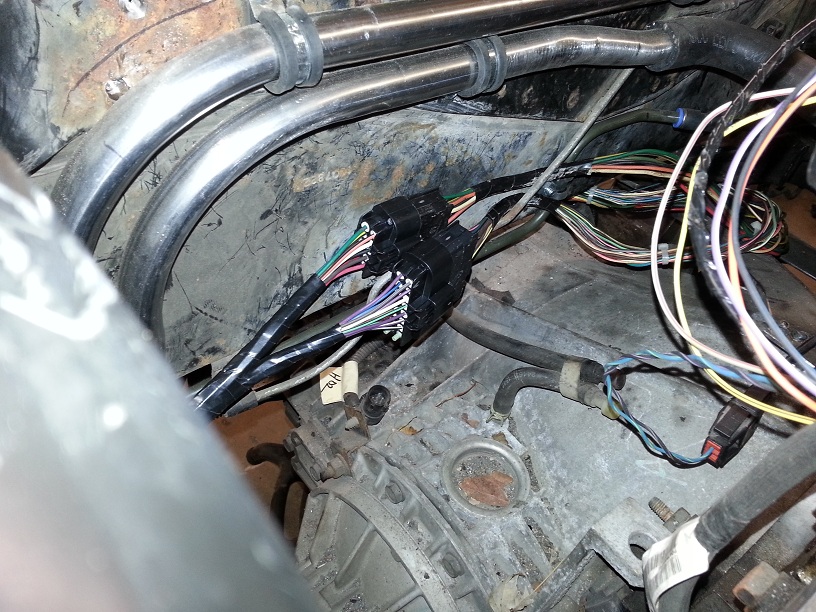
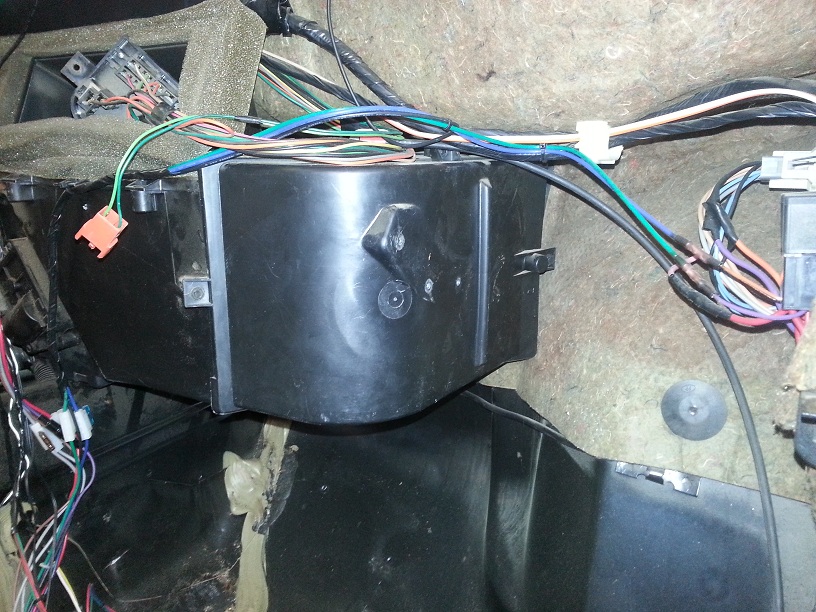
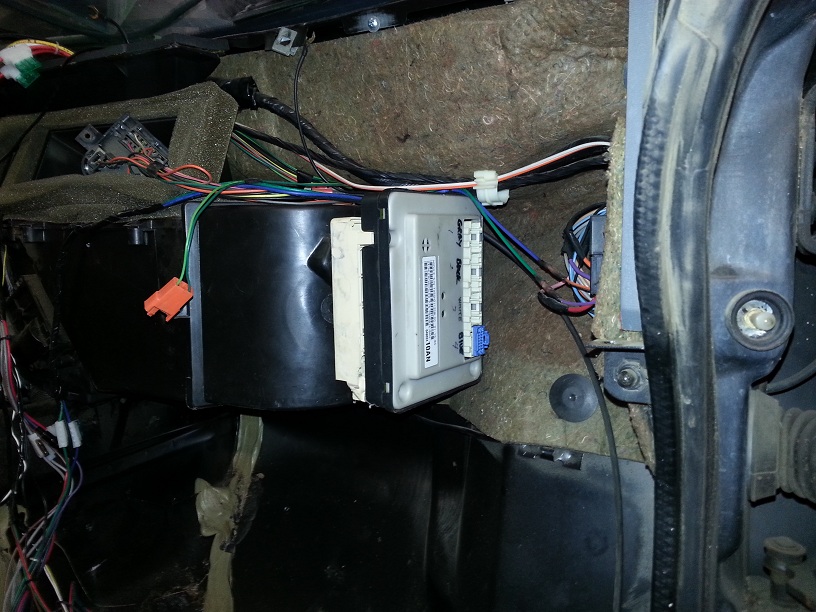
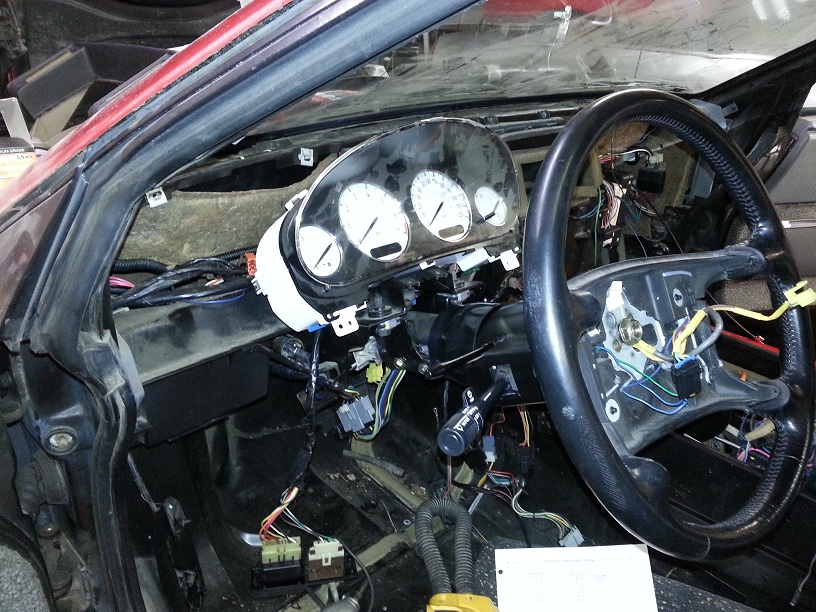
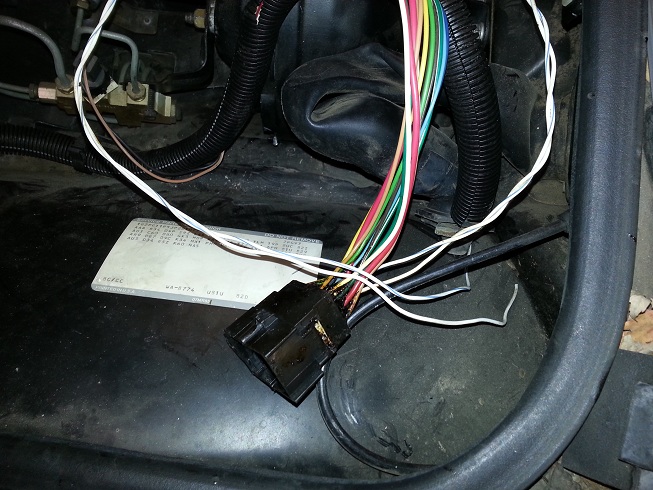
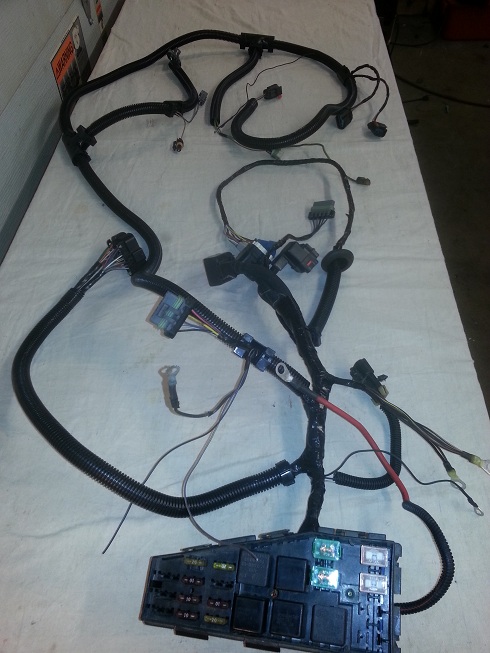
I also got started on my wiring harness this week. There is a power distribution center under the hood (fuses and relays), and a junction block inside the car which holds even more fuses and relays, as well as the BCM. Under the hood was a big harness that fed the front of the car, engine, and transmission. This connects to the junction block inside the car, and the junction block has 2 more big harnesses attached to it. The amount of wiring in this car is truly amazing. I had downloaded a factory service manual for the 300m, without which, the wiring part of this project would have been impossible.
So here are the 2 of the 3 main harnesses on the bench before removing all unneeded circuits:
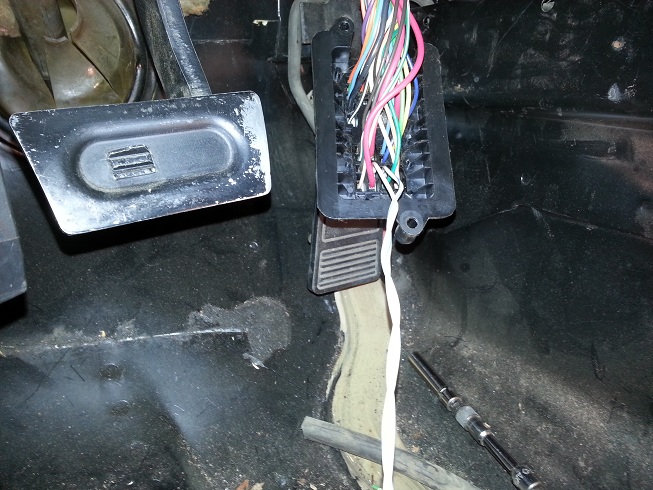
The 3rd harness was the main body one that I just left in the car because 99.4% of it was not needed.
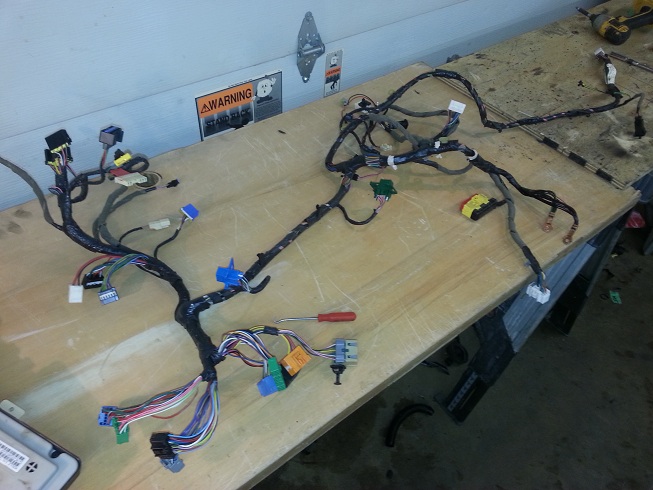
Here is what remains:
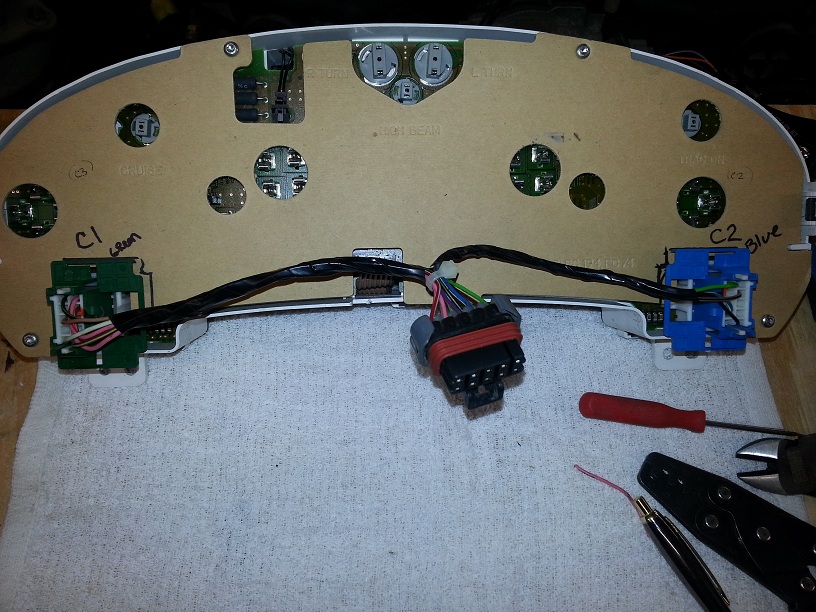
Basically what i ended up with is PCM/BCM, instrument cluster, and autostick switch. The nice thing is the cluster works on a PCI BUS so only 1 wire is needed from the BCM to run all the gauges. I am running the Chrysler cruise system, so I will need to figure out how to adapt the steering wheel mounted switches to the fiero. I'm hoping the wiring will only take 3-4 weeks but ya never know. There isn't much room to start with in the Fiero and now I need to add 2 more fuse panels and a BCM.
[This message has been edited by seajai (edited 09-28-2023).]
I know its a bit extra work, but a lot of the kit guys adapt the Chrysler steering column to the Fiero. This wold give you the key you need and the cruise control controls.
I recall that early in the 3800 swap days before the PCM was all worked out, guys would have to run the GP ignition w/Key in it. It was left in the run position and then the Fiero Key would start the car. The GP key could be removed and it acted like a anti-theft device because the car would not run with out it. Maybe you can do the same.
Great score on the Axles, I hope I have the same luck building my 3800 swap axles.
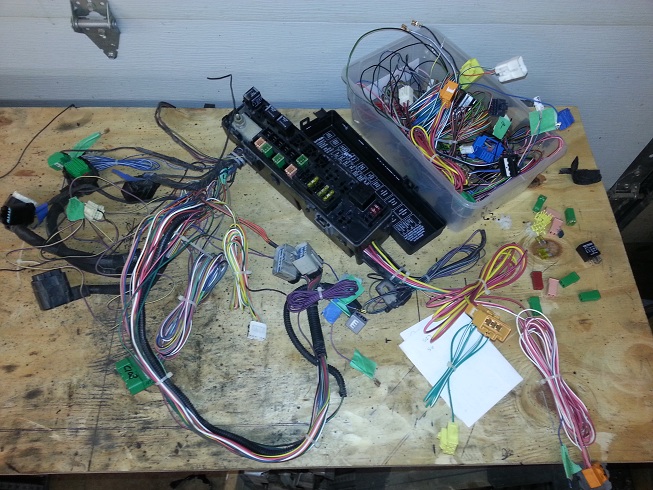
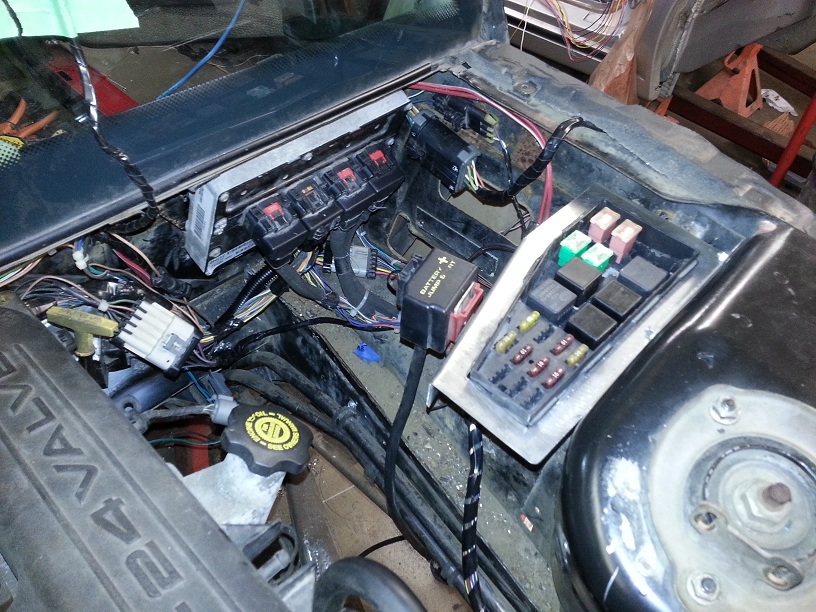
Well the wiring part of this job is turning out to be more work than I anticipated. Turns out, finding Chrysler wire terminals is about impossible. They used multiple vendors for their connector bodies and each one has its own unique terminal and nobody carries them. So I have abandoned the Chrysler junction block and underhood relay center and will be wiring things into a GM relay center, as well as switching out Chrysler connectors where I can for Delphi metri-pack ones because the terminals are readily available. I'll post some pics of that when I get 'em done.
The engine harness had a PCM connector and another connector coming out on the drivers side, the only problem with that is my PCM is going to be mounted on the passenger side. So I had to take apart the harness and flip the wiring 180deg to get it to point to the right. This meant 1,3,5 coil and injector plugs were now on the 2,4,6 side and vice-versa, so I had to switch the terminals in the PCM connector. Other circuits needed to be lengthened and some shortened to accommodate the new arrangement.
Before:
After:
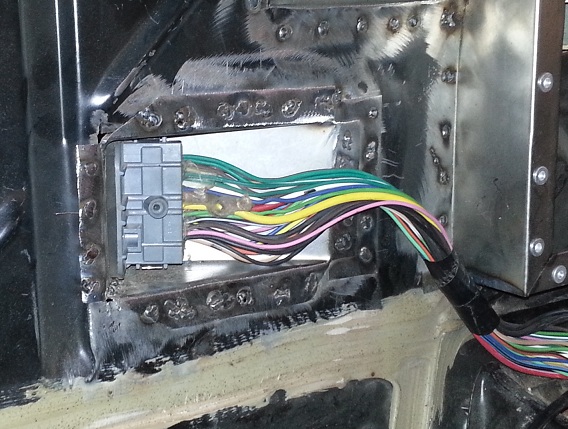
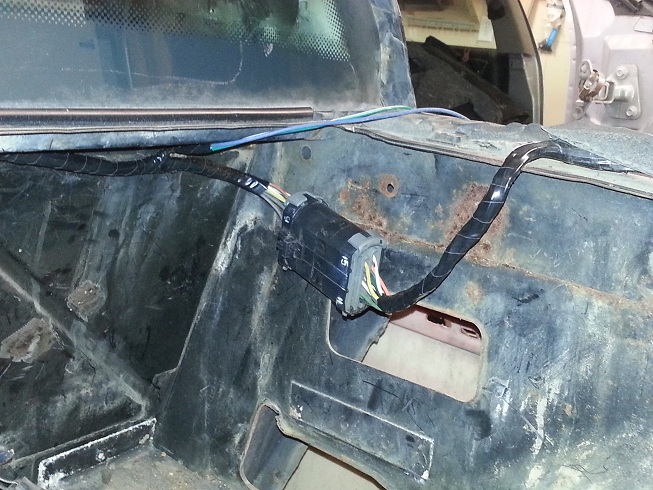
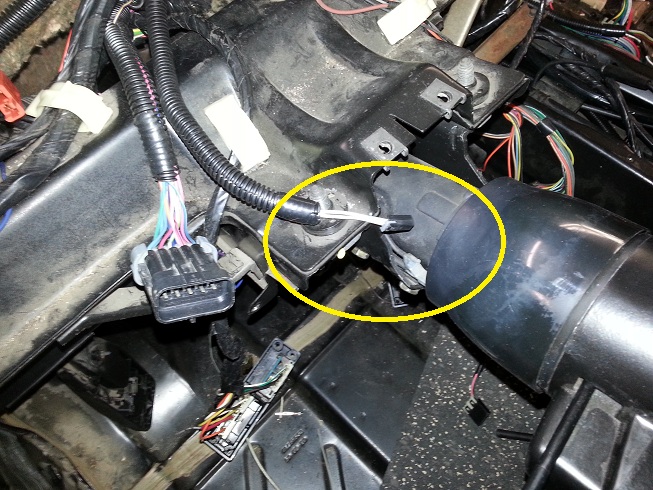
The other issue I needed to tackle was routing the main body harness back out into the engine compartment. The hole where it used to run through is gone, so I figured I'd just move it over behind the passenger seat but the pass-through and wiring stick out too far. After a bit of head scratching I came up with this:
The angled bump out will allow the pass-through to tuck nicely behind the carpet. My next task is to unpin C500 and shorten the harness about 12" or so. Luckily it just uses a mix of metri-pack 280 and 480 terminals, the toughest part is gonna be dealing with the black goo in the connectors.
[This message has been edited by seajai (edited 09-28-2023).]
A little more progress today. With the extent of the harness mods needed I decided to abandon the old sticky gooey C500 connector and use a modern sealed Metri-Pack one instead. I spent a few hours at the pick-n-pull Friday harvesting connectors. I scored three 15 cavity ones from a Riviera, Aurora, and Sunfire. As well as four 7 cavity ones from a Caddi and an S-10 Blazer. After sorting out all of the wires from the taillight harness, I removed the 5 wires for the cruise servo and installed the remaining wires into my new 15 cavity connector and did the same procedure with the rats nest of wires from the pass through. This is the result, much cleaner and no more black goo. The remaining wires will be integrated into the new relay center and PCM harness. The 2 wires taped out of the harness are the feed and return for the back up lights. I am replacing the two Chrysler transmission harness connectors (24 wires total) with new Metri-Pack GT280 connectors when I shorten the harness and will hook them up at that time.
[This message has been edited by seajai (edited 09-28-2023).]
Lots of progress over the last 3 weeks. Wired in my new Delphi GT280 connectors for my transmission harness. One is a 10 cavity and the other a 16.
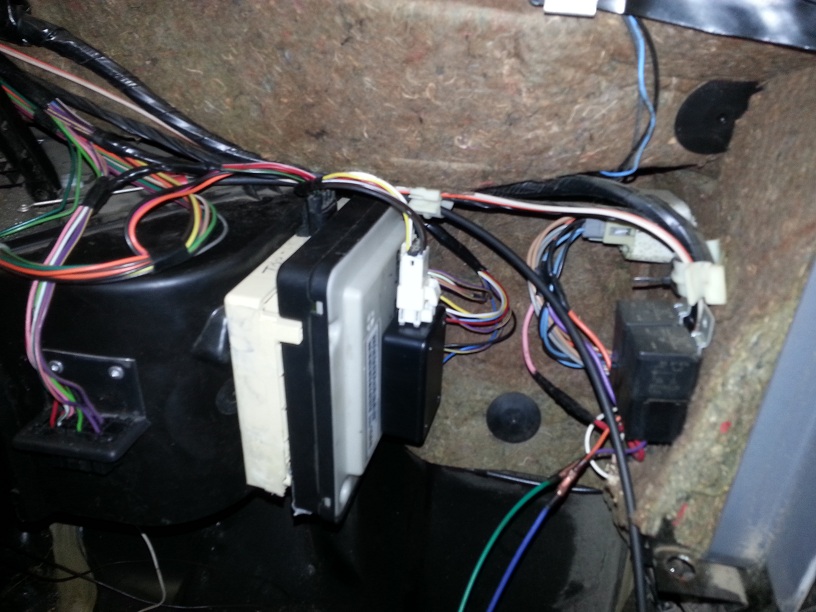
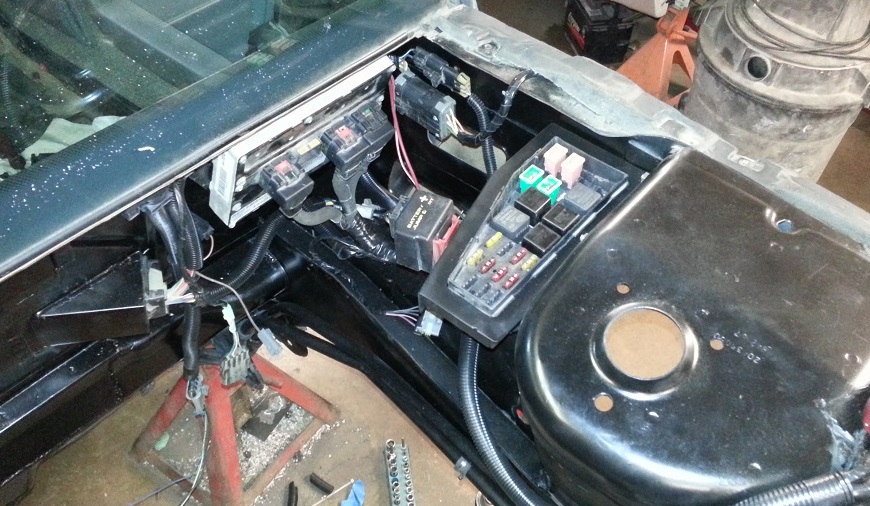
Picked up a W-body under hood relay center, stripped it bare, and re-wired it with the Chrysler circuits. I made a custom bracket and mounted it to the strut tower. Modified the factory PCM bracket and mounted it to the firewall and got all my wiring harness routed.
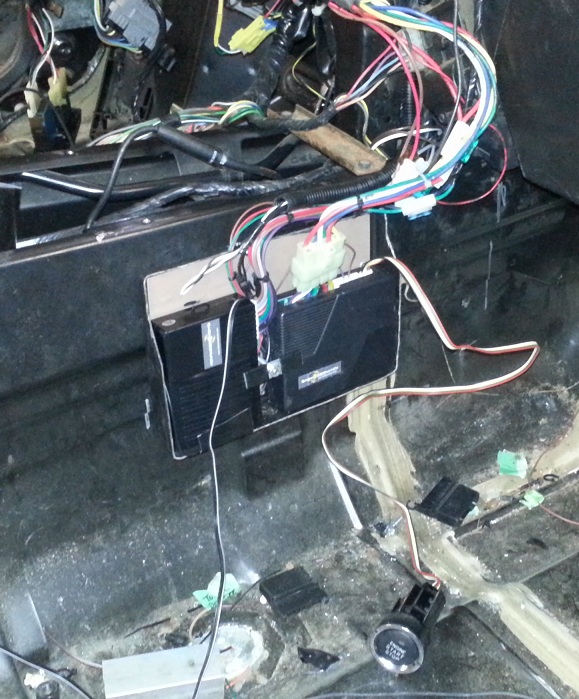
Inside the car I removed all of the unneeded wiring and ran new harnesses for the in-car PCM circuits.
I re-did my push button start / keyless entry system wiring to clean it up a bit.
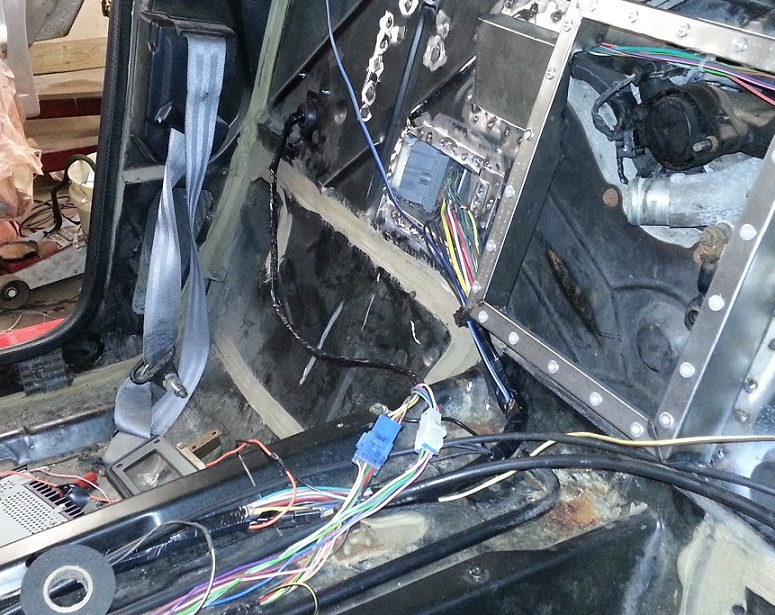
I decided to mount my BCM where the blue dingy-thingy lived. First I removed the bracket.....
I modified the Chrysler BCM bracket and riveted it in place....
BCM installed on the bracket
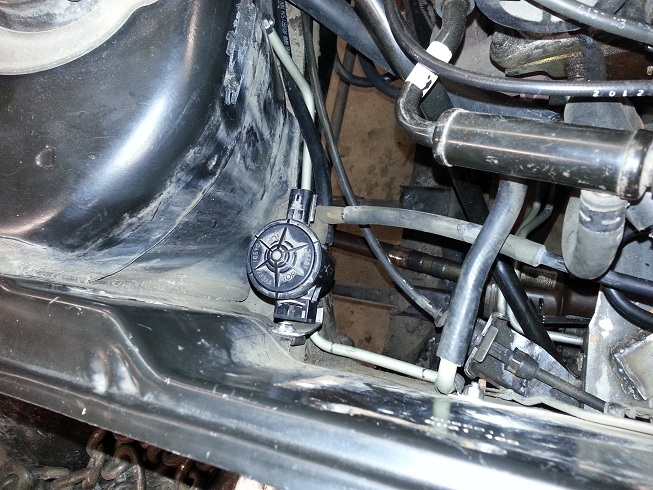
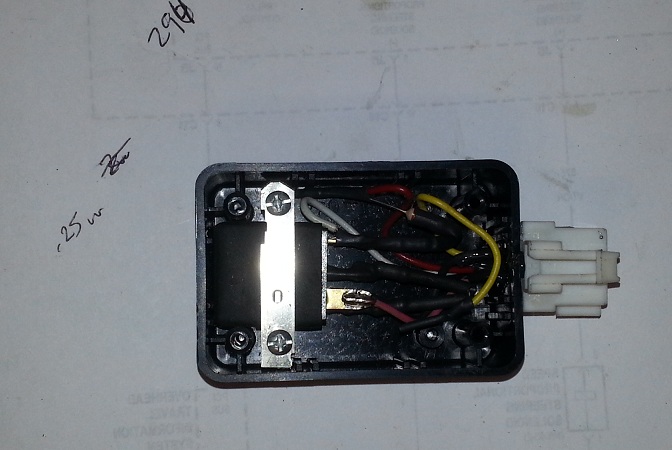
I needed to make a headlight switch simulator to get my cluster to dim when the headlights are on. I used a relay and a few resistors, mounted it in a project box from Radio Shack, and added a GM wire connector.
Here is everything mounted and wired in place. I mounted the data link connector to the air box too. It is just hidden when the dash is in place but still easily accessible.
I combined the wiring for the cluster into one connector and did the same thing in the car.
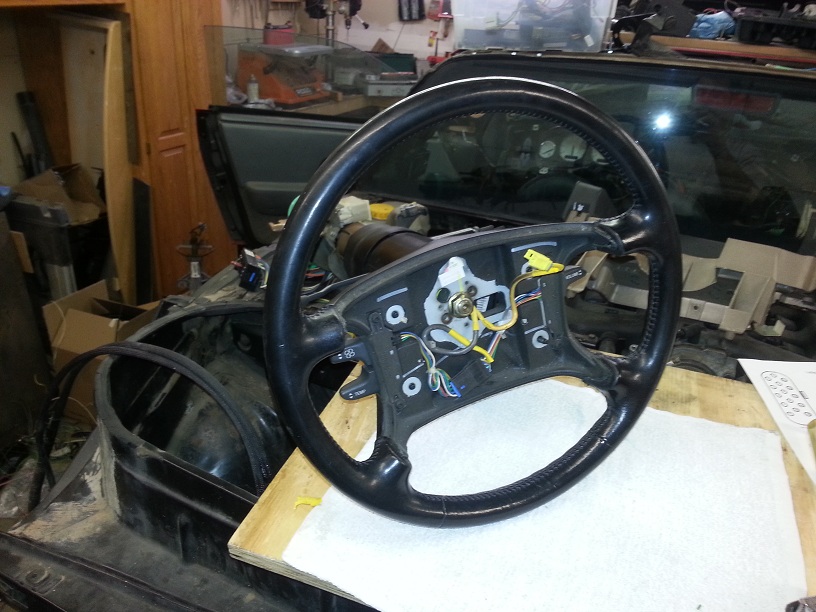
I was unable to make the Chrysler shifter work which meant finding an alternate way to make the autostick feature work. Also, I needed to use the Chrysler steering wheel mounted cruise control switches. My solution to both issues was to use a modern air bag equipped steering column. So I wandered around the pick-n-pull looking for a suitable donor and found this:
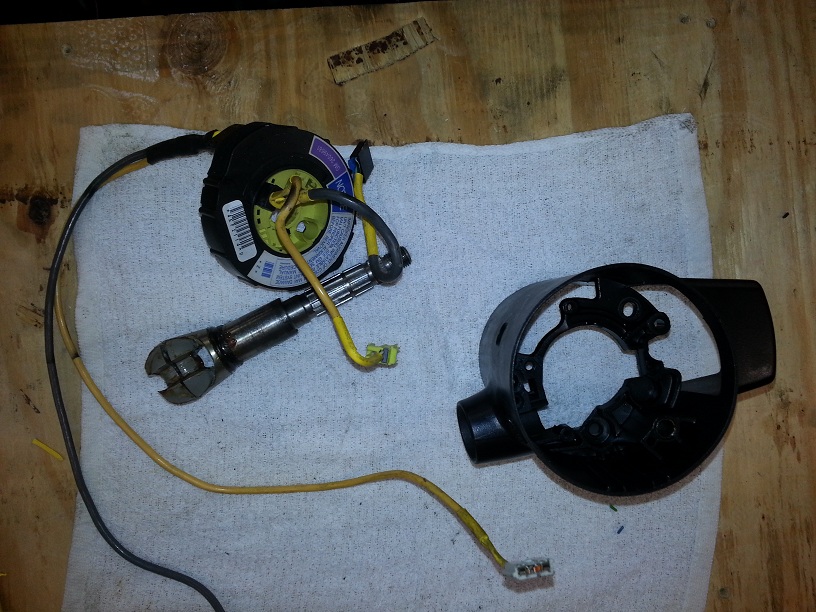
Its from a 1997 Cadillac Seville. It has heater/radio controls mounted either side of the airbag. I will be using the radio control levers as paddle shifters and the air bag wiring for my cruise switches. The Cadi column wont fit in the Fiero, but (the round) GM columns are essentially all the same. With that in mind, I tore down the Caddi column and harvested the pieces I needed to modify the Fiero one. The lock housing on the newer columns is taller to accommodate the air bag clockspring, and the upper shaft is also longer. Esentially those are the only parts I need, along with the clockspring.
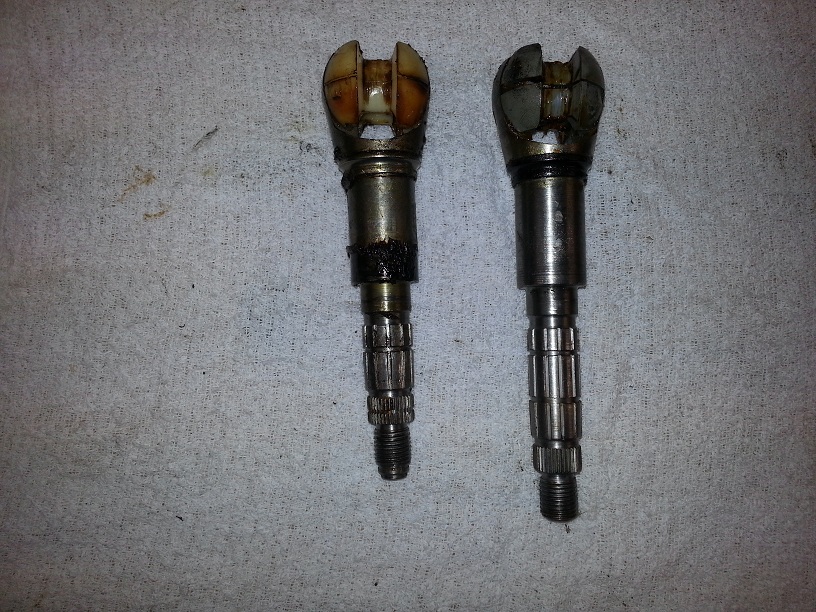
You can see the difference in the length of the upper steering shafts.
With my push button start system, I don't need an ignition key, so I removed the lock cylinder part from the lock housing and filled the hole.
So here is the finished Fiero / Seville steering column.
Installed in the car:
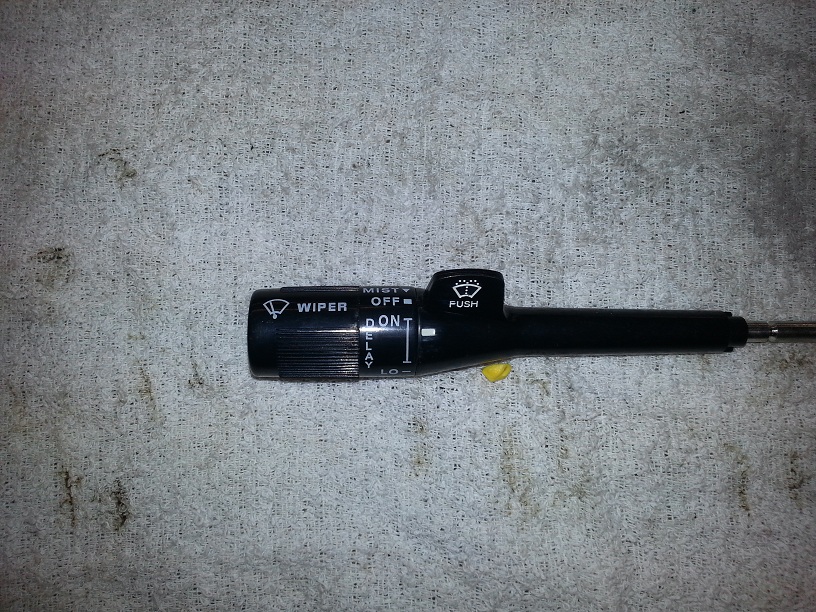
I need to make a dummy airbag to mount the cruise switches and finish off the column. And because the switches moved, I replaced the turn signal lever with a non-cruise one.
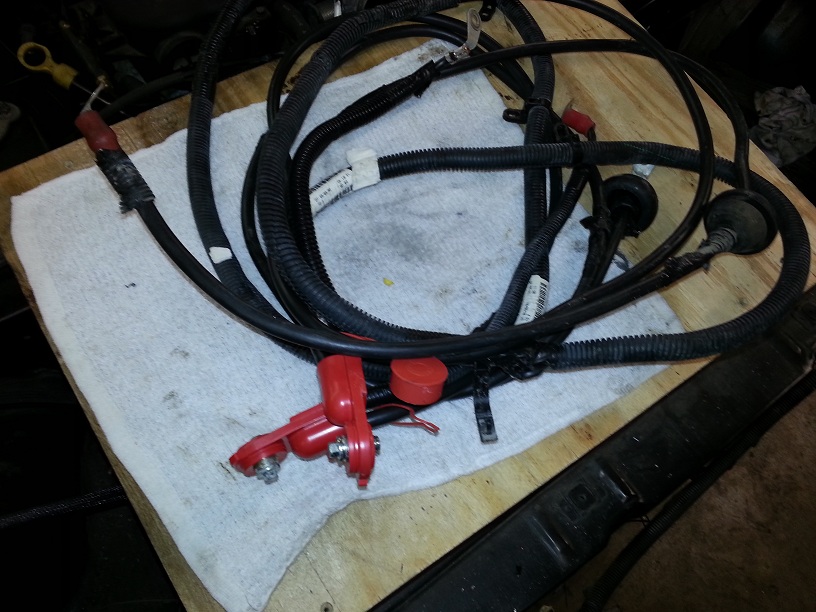
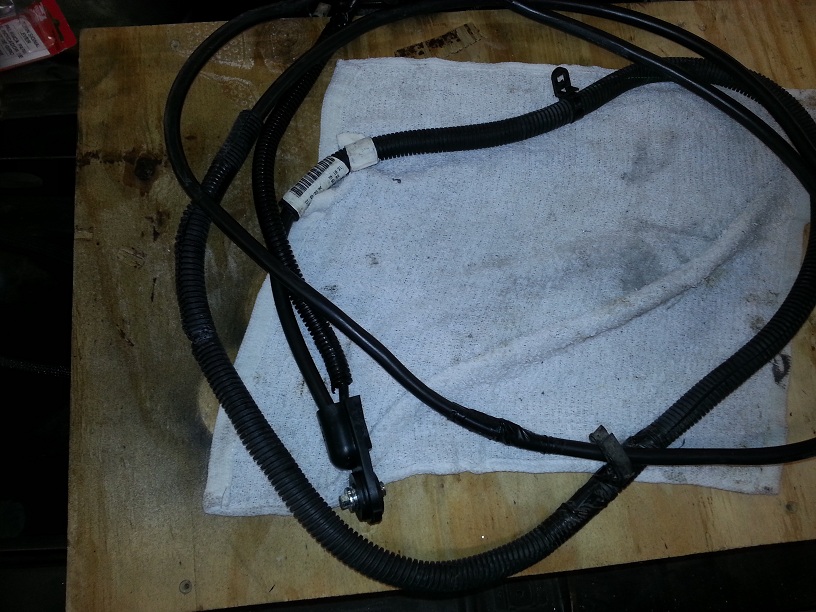
I need to mount the battery in the front, which means long cables. I went to my local yard and picked up a couple Buick LeSabre positive cables (the one with the battery under the back seat), and a negative cable. The positive cables are 137" long but the negative cables are only 20"
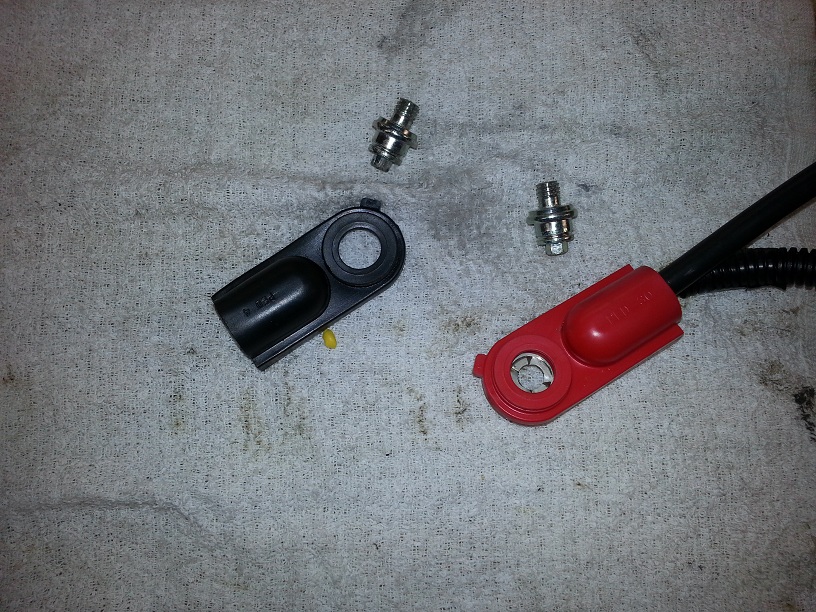
The protective ends are removable, so I took the black one off the neg cable and installed it on one of the long cables so I'd have a pair.
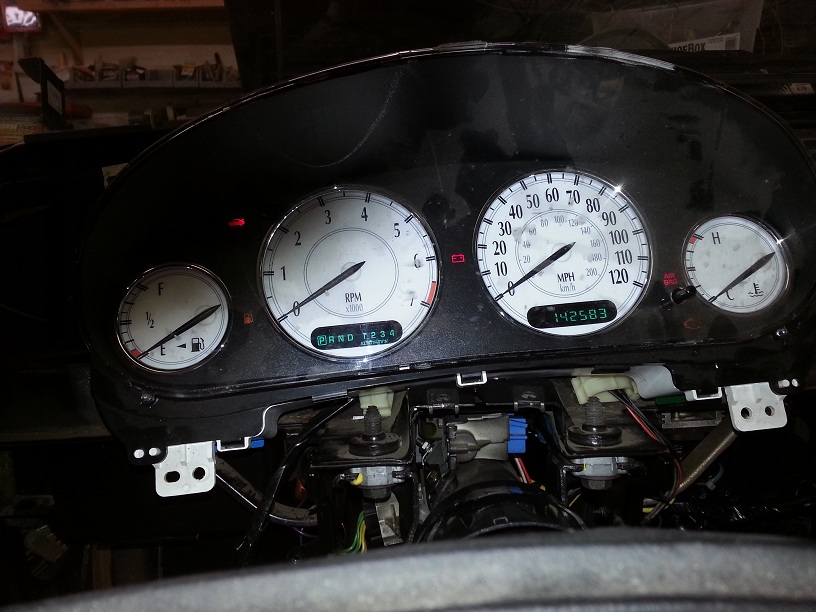
I hooked up the battery and powered her up to function test all of my work.
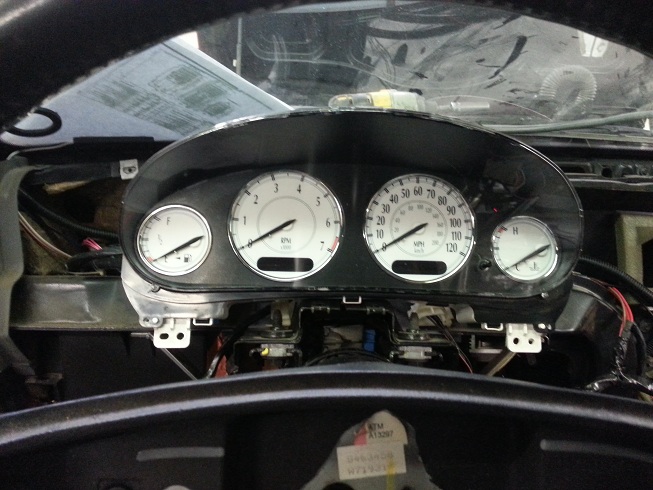
No smoke and everything works! The display on the cluster even dims when the lights are turned on! The electroluminescent backlighting on my cluster is not working, but it was intermittent when I bought the car so that's not a big surprise. I think it's a common problem for Chrysler. Also, I am not able to start the engine right now so I'm not able to test if I was successful in bypassing the security immobilizer. I'm sure there will be an issue or two to deal with on that. I need to finish the fuel system and install the tank as well as some engine stuff before I can start it. There is a light at the end of this long tunnel!
[This message has been edited by seajai (edited 09-28-2023).]
I had completely overlooked this build until a friend pointed me to it. (Thanks Carey!)
This is amazing! All the solutions seemed to be "right there". I know a lot more went into it than that. What I'm saying is that you have almost made this look easy. Amazing fabrication and implementation. I look forward to seeing the rest.
After a bit of Google-ing I'm pretty confident I have a solution to my dash light issue. It seems to be a pretty common issue to have a bad electroluminescent inverter with the white faced indiglow gauges causing intermittent/inoperative backlighting. Luckily Glowhut.com has the one I need and it's only 14 bucks with shipping. I'm also going to try adding a lighting gel filter to change the green glow to red.
[This message has been edited by seajai (edited 09-28-2023).]
Im taking a collision repair class and we have a Mitsubishi Eagle Vison TSI that was donated to the school for auto body repair... The engine is a 3.5 24 Valve V6 with a dual holley throttle body setup... I really want to get the intake manifold off of it and send it to you. I have pictures, and ill actually try to get it if you want it.
Edit for pics
[This message has been edited by mitchjl22 (edited 03-14-2013).]
I appreciate the thought, but that manifold won't work on the high output version of the 3.5L engine. The HO version uses a larger bore single TB, a "manifold tuning valve", and a "short runner valve" which re-directs the incoming air through a shorter set of runners during WOT above 5K RPM. The PCM is programmed for these and I don't think the engine would run right with the older style manifold. Also the HO uses coil-on-plug ignition wouldn't fit under that intake.
This kinda explains the different generations of 3.5
[This message has been edited by seajai (edited 03-15-2013).]
Ah i see! I remembered reading something about the dual tb setup and it was hercimer that has one. I just went back to re read... The swap is looking amazing!!! Cant wait to see a video of it fun!
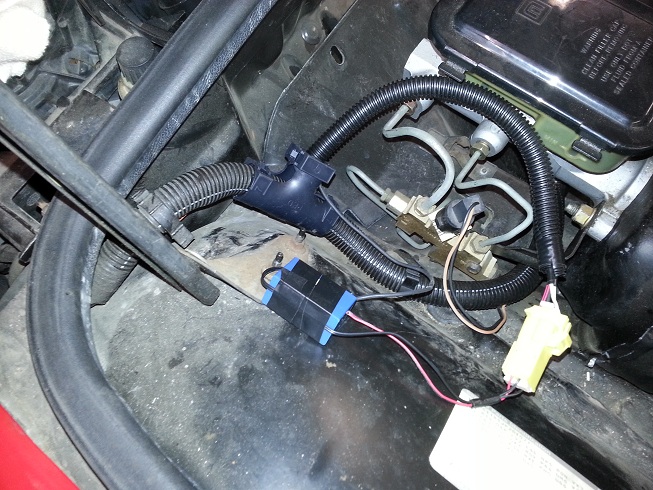
I received my new electroluminescent inverter the other day and got it hooked up. Much to my dismay, it made a high pitch "eeeeeeeeeeeeeeeeeee" sound when on, not too loud but loud enough to be annoying inside the car. After a bit of Google-ing, I found out that this is normal and that some are worse than others. So I decided to put the inverter out under the hood where I cant hear it and run wiring into the car. Luckily there a couple empty spots in C100.
First, I harvested a twisted pair of wheel speed sensor wires from the Chrysler and wired them into the open spots on C100.
I added a Metri-Pack connector to the cluster and the wiring from C100 up to the cluster.
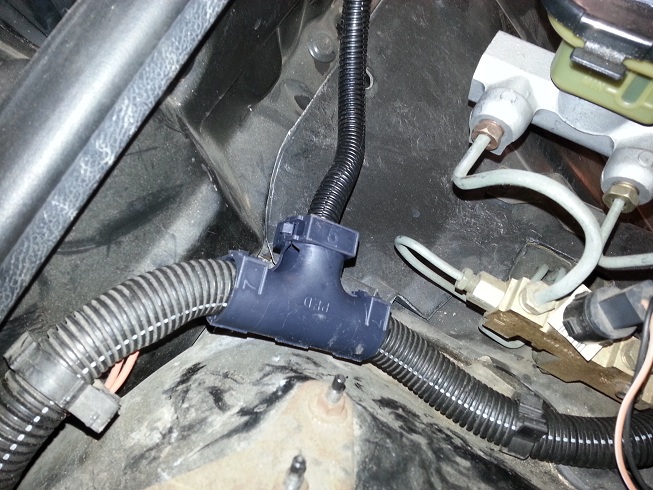
I bought some of these wire loom tee fittings from Waytek wire, it makes for a nice clean install and loom routing.
So here is the inverter hooked up, I'm not sure on a final home for it yet so it's just hanging out for now. I tapped power off of the brown park light wire so the dash only on when the lights are on.
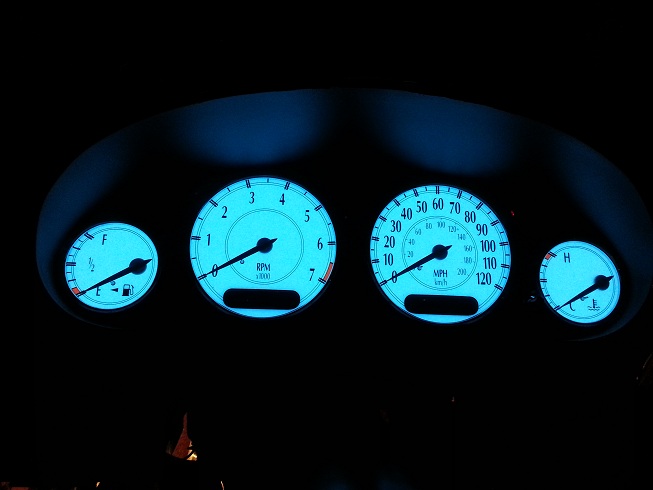
A couple pics of the cluster from a drivers seat point of view. I turned off the garage lights for the "ON" pic. I think it looks cool as hell. The new inverter is slightly different than the stock one so the lighs are more Blue than the factory Green. I was thinking about a red filter to match the lighting on the aux gauges but now I'm thinking I want to make White EL faces for them to match the Chrysler cluster.
[This message has been edited by seajai (edited 10-02-2023).]
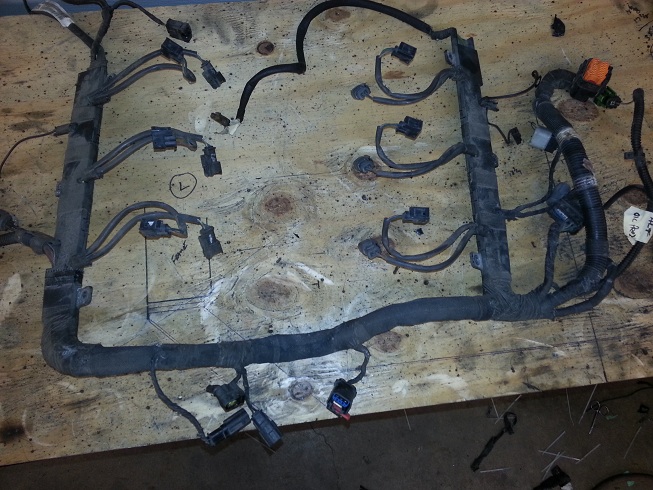
Now that the wiring is finished and tested, I am moving on to the penultimate phase of the project, taking it all apart again. I pulled the engine/trans out which allowed me to finish looming the engine compartment half of the harness. Now it's time to start filling spot weld holes, cleaning rust, painting brackets, etc. The engine will be getting a thorough cleaning/degreasing as well as a new timing belt and waterpump. I still need to do the Fieroguru hinge modification as I had to cut off the hinge boxes to make more room for things. Here is a pic of the finished engine compartment wire harness.
[This message has been edited by seajai (edited 09-28-2023).]
I ran it to some clearance issues between my fuel sender "dome" I had to put in the tunnel and the shifter cable. The cable won't fit in it's factory location, it needs to move to the left a couple inches. Last summer, I bought a shifter out of a 90 Olds Toronado, I always liked the 2 bar design and I wanted to try and make it work somehow. Well this cable issue was the perfect excuse to have a go at it. I cut off the front and rear mounting tabs and made my own. The cable stud needed to be relocated, which solved my cable routing issue by moving everything over to the left. I still have a little more fab work but I'm close. It's about 3/4" taller than the stock one but I like the way it looks. I will need to make a custom shift plate for it but I'm already making custom everything else so what's one more thing on the to-do list.
Originally posted by seajai: Already looking into a WRX 2.0 turbo swap for my next one. The wife looked at me kinda sideways when I mentioned it to her though. I almost got the feeling she was questioning my sanity
Progress has been a little slow. I got all the spot weld drill holes filled in, seam sealed my new sheet metal and painted the engine bay. I was hoping to get more done but I've been fighting a flu bug for more than a week now, and it's been kicking my a$$. I will try and post some new pics soon.
My illness turned out to be CMV ( cytomegalovirus). It's a nasty virus that zaps all your energy and causes really high fever. I was sick the last week in March and almost the entire month of April. So I haven't worked on the car in over a month, much to my dismay. I'm almost back to normal and hope to get back to it next week. I got some stuff done before my illness, I just need to get some pictures taken to post......... stay tuned.
Ok, here are a few pics of the painted engine bay. I'm hoping to resume work this week, and barring any illnesses or other catastrophes, the plan is to have it on the ground and running by the end of May.
[This message has been edited by seajai (edited 10-02-2023).]
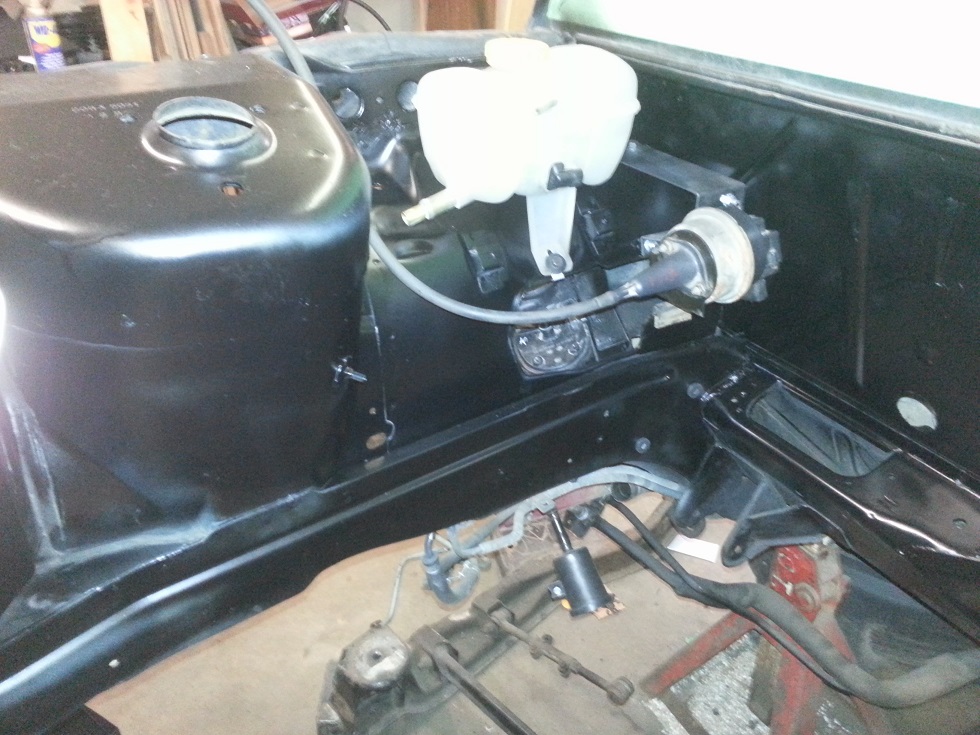
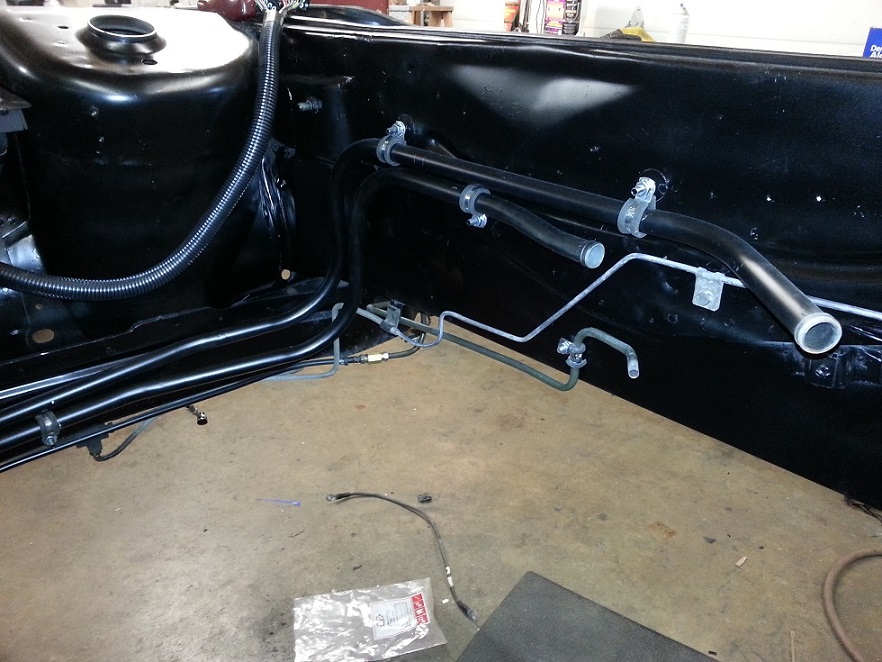
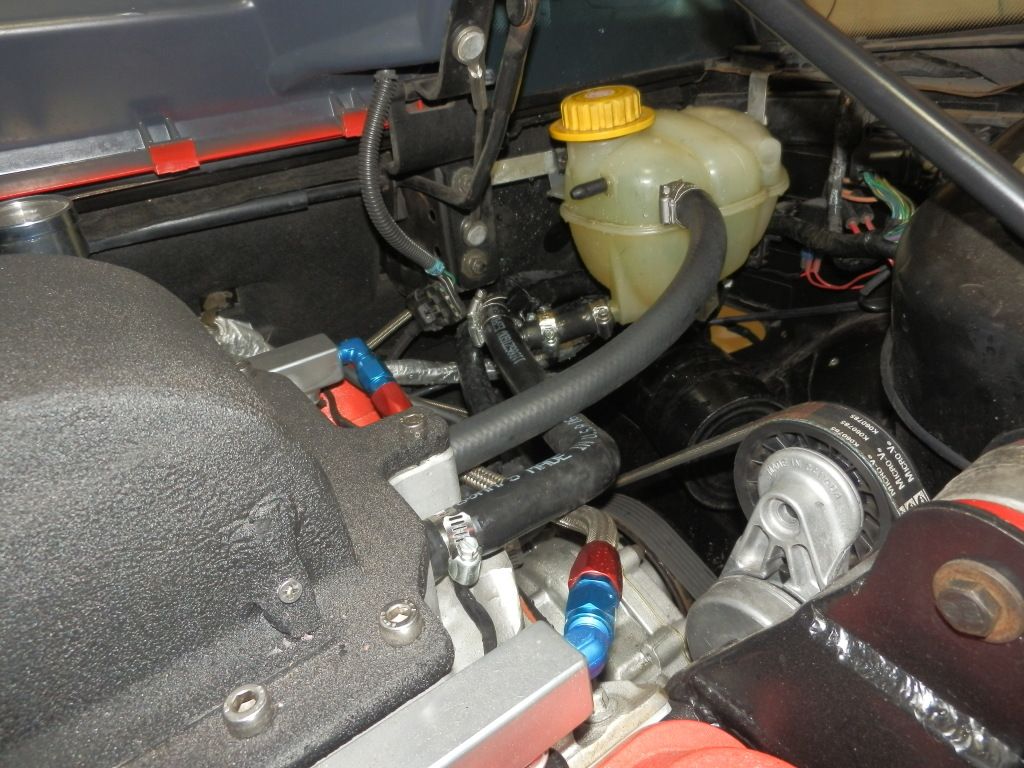
I got the fuel tank reinstalled yesterday. Hooking up the filler hoses was a huge pain though since my lower firewall mods left me with very little wiggle room. I also installed the heater core coolant tubes, fuel line, and cross-car brake line.
Relay center and engine bay wiring harness.
[This message has been edited by seajai (edited 10-02-2023).]
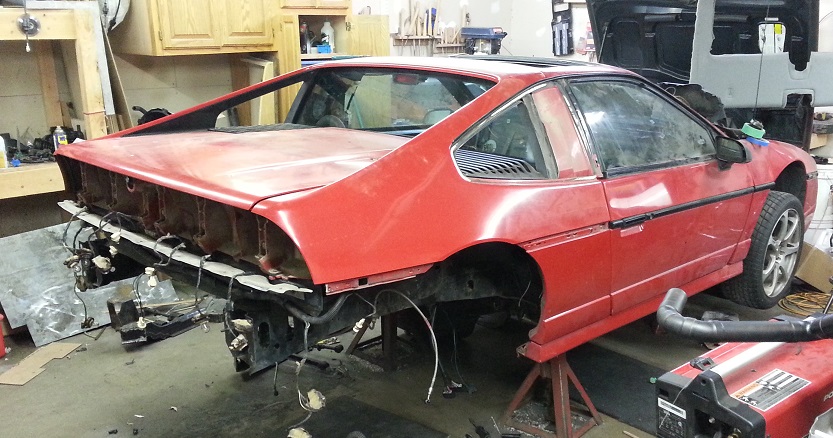
More progress. I still have to do the hinge modification so the deck lid is just sitting there but the clip is bolted back on. It came off in November so it was a bit of a challenge remembering how it went together.
[This message has been edited by seajai (edited 10-02-2023).]
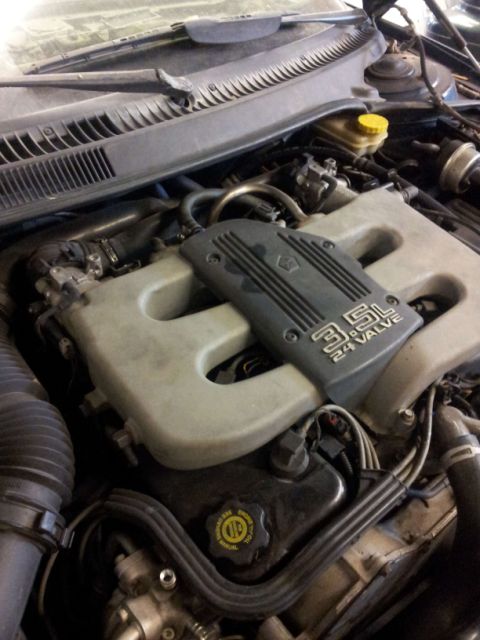
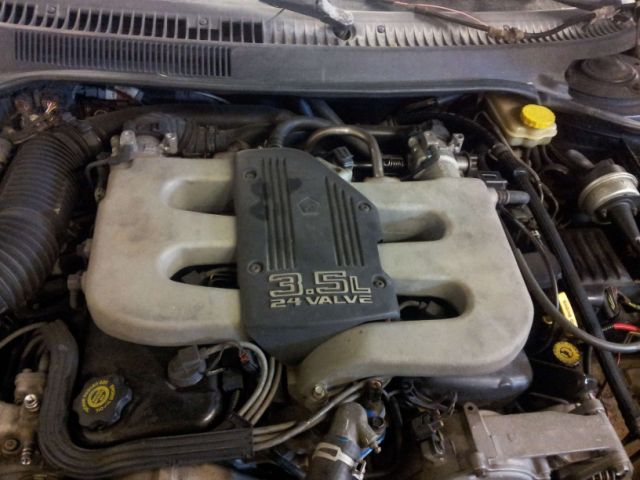
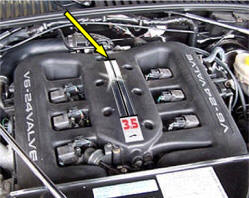
This is FYI, seajai, in regard to a photo you posted at the outset of your thread here, showing much of the topside portion of the 3.5L engine you're transplanting from a 2003 Chrysler 300M into your Fiero.
After seeing that picture you posted, two things quickly occurred to me:
The topside appearance of the 3.5L engine you're transplanting from a 2003 Chrysler 300M into your Fiero looks very similar to the topside appearance of the 3.5L Chrysler engines in 1997, and 1999 through 2002 Prowlers.
In turn, that means that if you wanted to better show off your 3.5L engine swap after you've completed it successfully1, you presumably could accomplish that using any of the topside engine dress-up items curently offered for 1997, and 1999 through 2002 Prowlers.
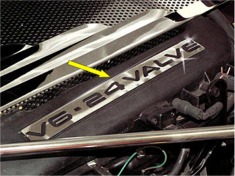
Some of a few such items offered by TheProwlerStore.com2 are two laser-cut, highly polished stainless steel plates that fit over the raised black letters on the 3.5L engine's valve covers, and two narrow, highly polished stainless steel strips that draw more attention to the 3.5L designation on the intake manifold:
Of course, given your creativity and the rapidity with which you're acquiring various metal-working skills, I suppose I shouldn't be too surprised to learn you've already fabricated some pieces like those.
In any case, good luck to you on your 3.5L engine swap project!
------ Notes:
1Notice I said in my second bulletpoint with regard to your 3.5L Chrysler engine swap, "after you've completed it successfully" --- NOT "if".
2TheProwlerStore.com ( http://www.theprowlerstore....oducts_Main_Menu.htm ) can be pricey on some items. However, unlike TheProwlerStore.com, the large, "discount-oriented" mail order firms like Summit, Jeg's, or J.C. Whitney, don't have real engine dress-up parts for the Chrysler 300M 3.5L V6. When they're not being candid about that, and one examines on-line what those "discount-oriented" firms like Summit, Jeg's, or J.C. Whitney actually offer as so-called dress-up parts for that engine, it typically consists primarily of silly things like "universal", push-in, valve cover breathers (which a 300M doesn't use in the first place), or PCVs that one could buy at any local NAPA auto parts store.


 Bought new long lower control arm bolts from Fastenal M12x220 HCS 10.9. p/n# 35111