I'm pretty sure Don did all that work already. My yellow windshield is a model of our extended glass and it suits it very well. I think even the air vents in the hood have been moved forward as there is plenty of room between it and the rear edge of the hood.
Also Fieroguru, you had mentioned about the front wheel opening being about 1" too high. I notice that the front quarter panel has been raised about 1" by extending the mounting flange. I will have to check Dons notes to see why this was done. I suspect it was so the the doors and rockers would all match the lines on the car as you move rearward. That is why it appears like there is alot of room between the hood and the windshield.
Edit: sorry for the long pictures. I have to stop turning my camera on its side.
[This message has been edited by Yarmouth Fiero (edited 08-17-2013).]
Panels are looking good on the frame. Too bad they look so terrible with all the duraglas on them. They need to be primed to get a decent image of them and the lines. The front hood you have is my old one. The new, grey gel coat one is actually a better option really.
The front clip mounts were redone because I didn't like the way the old ones were shaped. I took some Fiero fenders and took some quick molds and made new mounts. The height of the front fenders are the original height though. The front wheel wells were always high on the car. I lowered the rears down an inch or so when I straightened the body line out but the fronts were always too high. Made me have to lower the front down quite a ways.
I would see about maybe looking at lowering the wheel wells down a bit....
Good luck with getting everything lined up.
Cheers Don
[This message has been edited by 355Fiero (edited 08-18-2013).]
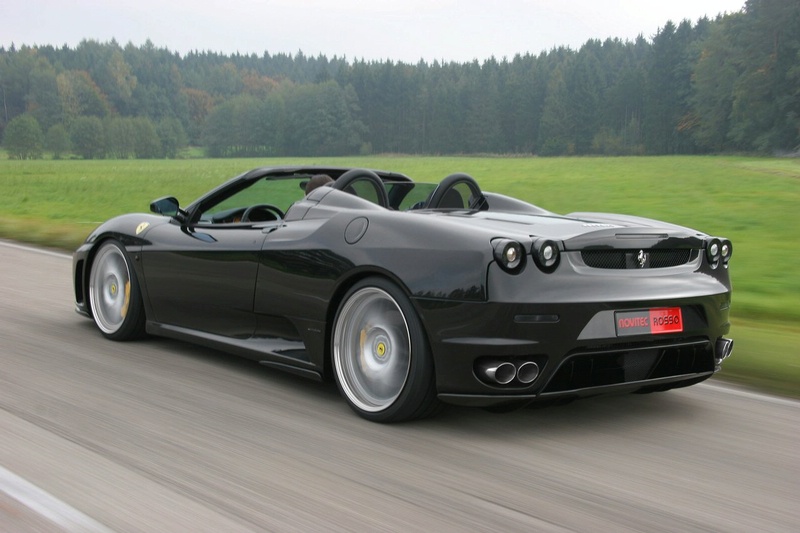
The panels look great and except for the chassis interference around the doors, which we knew about in advance, they literally just sat right in place. It was very exciting to see my car with a body on it for the first time since I stripped the original Fiero panels off it. I've seen Blooz's coupe a few times and was always amazed at the shape of the 355 body but there is something about the spider that makes it look so damn wide and low........ I love it.
I think Blooz is stopping by this afternoon and we'll go over everything and make notes along the way. I have taken a ton of pics as well just to record the baseline before we dive into the body work.
Well Don, I took your advice and removed my transverse frame and roll over hoop for the body fitting today with Blooz. With that new structure out of the way, the rear body section slid right up over the firewall like you said. We reviewed all the panels today and came to the conclusion that the rear end is pretty damn good and will probably be the starting point for our panel developement. I think Blooz managed to convince me that we'll be cutting the bottom off the doors to suit the rocker panel and doors skins as you have them. He reassured me it would be a "piece of cake".
With regard to the front end, we didn't manage to come to a solution yet with regard to the wheel well opening. That is going to take more time.
Here is the rear body moved all the way forward without the rollover hoops.
Thanks for the very cool photoshop fourpoint9. I infact did use that style as inspiration for my hoops. Although the final shape was dictated somewhat by the pipe bender die. I do like the image you have posted though. I will definitely give it some thought. I do have to take into consideration that the rear deck I have shown this weekend has to also accommodate a coupe style as Blooz and I will be sharing moulds and his current roof and pillars will have to be bonded to whatever deck shape we end up with. I will probably make some changes to the rear deck that Don supplied so that it can be moulded easier. There are a few reverse curves in the flange that would house the convertable roof that I may have to alter. But I could certainly see a style similar to what you have shown.
Thanks for the inspiration and taking the time to photoshop.
Blooz is right, cutting the bottom off the doors and welding in a new support brace for the rockers is quite easy. That was one of the easier parts I did.....
As for the convertible top areas, I added the convertible top mount lip to the original sail panel areas after everything was there. I would add in a filler piece to fill in the area under the convertible mount lip so that your convertible top area mold will slip right off. As for Blooz's hard top fitting on, the convertible pieces I grafted in are put in pretty much in the same place as the old roof came off so if you lay the roof section on to the rear clip when all in place, you can trim the roof sail panels a bit to fit to the top of the rear fenders, and then fill any gaps if any, and mark where the roof mats to the top of the rear clip. Make a mold barrier at that mating point so you can make both roof and convertible mold pieces in that section. I can visualize it in my head and it make sense so far. The convertible lip along the top of the firewall should be pretty close to what the roof will need as well. Not 100% at that though....
Pieces looking good overall though.
Cheers Don
quote
Originally posted by Yarmouth Fiero:
Well Don, I took your advice and removed my transverse frame and roll over hoop for the body fitting today with Blooz. With that new structure out of the way, the rear body section slid right up over the firewall like you said. We reviewed all the panels today and came to the conclusion that the rear end is pretty damn good and will probably be the starting point for our panel developement. I think Blooz managed to convince me that we'll be cutting the bottom off the doors to suit the rocker panel and doors skins as you have them. He reassured me it would be a "piece of cake".
With regard to the front end, we didn't manage to come to a solution yet with regard to the wheel well opening. That is going to take more time.
Here is the rear body moved all the way forward without the rollover hoops.
Blooz was just here and we had a chat about the parts and which direction to proceed next. We are feeling pretty good about the whole process. Then we packed the panels up in his trailer and he drove away. But if I close my eyes really tight I can still see my chassis covered with a body. I guess he didn't want me getting too attached to them yet...ha-ha-ha
I think my next steps will involve finishing off the top of the windshield frame, welding in my transverse frame and capping my B pillars. Plus I have a little welding to do to cover up the chassis extension on the passenger side. There are a hundred little tasks to complete this fall.
I did get a good measurement of the front fenders so I can work on my suspension drawing and get my control arms ordered. I'd love to have this chassis rolling before winter so the boys can push me up and down the driveway.
Tonight I decided to start working on my task list posted above. The first thing on the list was to finish the roof chop by deciding on a line along the top of the windshield. Looking at a few different convertables, there seemed to be a wide range of styles regarding bodywork along the top of the windshield. I decided I wanted to keep it fairly thin yet a little more than the windshield sides. So I scribed a line that ran parallel to the top of the glass ( yellow plastic) and also saved two original body mounts from the original roof.
I bent a wooden batten and clamped it in place as a guide for the zip wheel.
I cut a nice fine line through the top layer of sheet metal. However, my zip wheel was getting a little small and it was my last one in the pack, so once I had the top layer cut from side to side I got out the trusty reciprocating saw with a fine blade and cut through the lower layer of sheet metal. The whole proceedure took about 2 minutes. After dressing the razor blade edges that the cuts left I had a pretty decent finished edge.
From the top of the windshield to the rear edge, I left about 2 3/4"
I'll work on a suitable design to finish off the steel work and strengthen up the edge at a later time.
edit typo.
[This message has been edited by Yarmouth Fiero (edited 08-21-2013).]
Tonight I tackled number 2 on the list of unfinished tasks........ weld the transverse frame into the chassis. We got a good bead on the upper and lower frame rails and you could feel the chassis stiffen up. It even took some of the rattle out of the shortened B pillars. I will finish welding the top flanges of the transverse frame once I have the B pillars capped with some 1/8" plate. I had every intention of stitch welding the top of the firewall to the transverse frame but I'm still not 100% sure how I want to finish the sheet metal off. Right now, I'm not loving the condition of the top flange of the firewall and I may remake this area with some new sheet metal. I'll keep looking at it for now.
[This message has been edited by Yarmouth Fiero (edited 08-22-2013).]
Just received my engine cradle poly bushings from the Fiero Store. Not as flashy as a full suspension order............... baby steps till then.
Any thoughts on installing zerk fittings to the cradle bushing housings and machining an annular groove around the perimeter of the poly bushings to allow for periodic lubrication? There is alot of talk about squeaky poly bushings once in service.
There's virtually no relative movement between the cradle, the cradle mount bushings, and the frame, so you don't need to worry about squeaking on these bushings. The ones you have to worry about are on the control arms.
You know Blooz, that 4 x 8 sheet of black poly skid plate in my garage is going on my car just so I can visit and drive down your road one day. Hey, there is going to be a provincial election this fall, maybe your road will finally get resurfaced. I should have mentioned it to Dexter this week when he toured the shipyard ha-ha-ha
Maybe one nice day I'll bring the lasar transit and we'll mark all the high spots that our 5" ground clearance won't clear.
Still working on my list of little jobs to do Klasse_GT. This weekend it's been fabricating top caps for the exposed B pillars. I used 1/8" plate for this. Here is the drivers side done but not welded yet. But even just pressed into place, it tightened up the door rattle in the B pillar.
[This message has been edited by Yarmouth Fiero (edited 09-01-2013).]
Still plugging away at the to-do list generated after removing the rood structure. After capping the B pillars, I have moved on to the windshield transverse structure. I'm stilll unsure if the car will get a soft top right away but regardless I want to strengthen up this area as much as possible while still allowing the option of adding some sort of soft top securing mechanism in the future. This has proven to be a bit of a tough part to fabricate as its less than 3/4" high and it gets a little messed up at the ends due to my cut passing through a couple factory placed holes in the sheet metal.
I am now on my second attempt, as my first try did not offer enough support and strength over the span. Luckily I hadn't yet welded the first attempt in place. I decided to use 1/16" sheet metal and form it in a way that there will be tabs along the entire top and bottom edge. This will provide maximum stiffness as well as provide the opportunity to weld it to the existing sheet metal along most of its length.
With the top edge formed, I will proceed to fabricate the lower edge and then once complete, get it blasted and primed and welded into place.
I had considered adding a solid rod down each side of the windshield pillars to add strength to them but access at the bottom is very limited and not having a strong welded connection at the lower end would have made them pointess. Does anyone have experience with this?
I forgot to share what I did for my cap way back when... I took some 1/8" metal and pressed it to the frame to get the curve, then marked it to the roofline (outer panel line) cut the top so it was close. Set it in place again, stitch welded it top and bottom. Slid the front panel section back on then ground the metal down to the body. On the inside I marked it about 1" from the bottom and cut it off and smoothed it as well. It was a true roadster, so it didn't need any provision for sealing surface.
You could probably scribe the shape of the current gap between the top/bottom metal parts, cut it out of some 1/8" and slide it in and weld it up.
Thanks for the photo and construction suggestion Fieroguru. I think my car will probably be a roadster as well. I see you left the lower edge lower than the inner sheetmetal, was this to act as as a finished edge for the remaining headliner? Did you cap the 1/8" plate with something or paint it to match the body work / interior? At this point I really have no idea how I'm going to finish it so I just want to get it stiffened up and finish off the welding. I am sure when I get to the body work stage, some inspirational solution will strike me..... in the middle of the night.
I left it long so I could do something with the headliner, then trim it to fit, but never got around to it before I moved to KY in 2006 and sold many of my fiero projects.
Well it's been a couple weeks so time for an update. We finished welding the B pillar caps in place. As I had hoped, it made a huge difference to the stiffness of the pillar structure. When you slam the door now, it sounds like they are closing against solid concrete.
We also finished capping the top of the windshield structure. It took 3 attempts until I had it the way I wanted it. Like the B pillars, it made a huge difference to the stiffness of the structure. It's hard to get a good picture of it as the differences in surface color makes it look wavy.
Here is the chassis with all the cutting and chopping completed....... for now.
I've also been working on the front suspension and adding the parts to my 3D computer model. I'm ordering the Arraut front spindles with 1 1/2" drop and the 13" brake kit. Once I have these parts in my model I'll be able to measure the exact length needed for the upper and lower control arms. Here is my 17" front wheel with the 13" brake rotor. There is just enough room for the calipers.
edit typo
[This message has been edited by Yarmouth Fiero (edited 09-22-2013).]
Yes, those lime green rotors are from the new Glade Scents Automotive collection. Apparently, under conditions such as hard braking, they give off a calming citrus scent. They are meant to replace the traditional pine tree hanging from the rear view mirror.
Work (ie: my job) has had me tied up with new contracts and projects to ramp up. With regard to actual progress on the car, its been a little slow, I'll admit. I've gotten through all the items on my list that are not dependant on having the body ready to install. After having the initial 355 body panels (that we are using as a plug for moulds) loosely fitted this summer, there are a few items that need to be done but I am hesitant to proceed past the design stage at this point. These include removing some of the front chassis structure in way of the hood and nose, raising the bottom of the door structure to clear the rocker panels and restructuring the lower windshield fascia to suit the extended windshield. While I have the preliminary design work started for all of these items, as I stated, I am reluctant to cut anything until Blooz and I have finalized the actual body panels as there are some major changes we need to finalize and complete.
On that note, I stopped by today to see Blooz's progress on his rear suspension and as you might guess, it looks even better in person. As well, we got a chance to talk about a couple other items that he has been working on that we will likely incorporate into both our cars. More on that subject later.
With regard to my front suspension, I will be purchasing my Arraut 1 1/2" lowering spindles tomorrow. Once I have them, I'll add them to my 3D model so that I can finalize the control arm measurements. I have decided to go with the Arraut 17" 13" brake system as well.
The next item on the chassis modifications that I can proceed with is to flip the chassis upside down and finalize some welding on the rocker reinforcements, refinish and install the fuel tank, fabricate new stainless steel cooling pipes and brake lines and then design and fabricate my skid plates. You may recall I purchased (on page 3) a 4ft x 8ft panel of 1/2" black UHMW sheet which I hope to fashion into Ferarri 355 style skid plates under the passenger space.
This work will be our focus throughout the winter months. As always, I'll document with drawings and pictures as we proceed. Hopefully progress will be steady enough to keep updates regular.
Edit: corrected my monster brake rotors.
[This message has been edited by Yarmouth Fiero (edited 10-06-2013).]
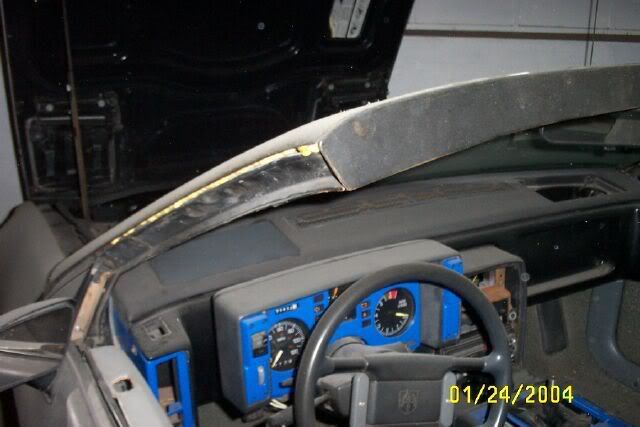
It's been a while since my last post but I have been working on a few items. One of these items involves reworking the windshield wipers to suit the extended windshield we are using. A few pages back, we documented making a template of the extended windshields we bought and the bright yellow object in my pictures is a pretty close replica of the extended glass. As can be seen from the first photo, the extended glass covers the stock wiper location, both driver side and passenger side. I laid the wipers on the template to show the stock locations.
My plan is to move the stock wiper pivots forward. The drivers side will move straight forward approximately 3 3/4" and the passenger side will be an exact mirror of the new driver side location. I then have to rework the linkages so that the wipers rotate from the center outward away from each other. My plan is to keep the stock wiper motor and location.
I'll also need slightly longer wiper arms and blades. There appears to be enough room to run the new wiper linkages through the Fiero airbox under the windshield.
Here is a picture of the stock linkage. I am hopeful that the stock wiper arm pivots can be reused as well as the stock linkage joints which are rivited to the current linkages.
I can only imagine that this task has been completed by someone before me yet I have yet to master the Search tool effectively. If some knows a link to a previous project, I'd appreciate a heads up.
[This message has been edited by Yarmouth Fiero (edited 10-20-2013).]
Flip the lever arm on the passenger side 180 degrees so it points to the front (might need to lengthen the main cross bar slightly). Then when the motor pushes the linkage to the passenger side, the passenger wiper will rotate towards the center as will the drivers side.
Great job as usual.... FWIW, I was keeping this mod stewing in the back of my head for the future, but my Aztek has a very similar wiper scheme, being on the out side. It might be worth while to see how GM did it.
Thanks for the input Fieroguru and RCR. My last 3 Grand Caravans had the same set up so I am hopeful it should be an easy modification. I'll document with photos, drawings, measurements and materials along the way.
Glad to hear yours are in excellent condition too... it's always a crap shoot when you order a used part on the internet. Do yours have the little round pads in them too... you know the ones that we hypothesized might be desiccant in mine?


 But if I close my eyes really tight I can still see my chassis covered with a body.
  I guess he didn't want me getting too attached to them yet...ha-ha-ha


 ha-ha-ha