Looking good CPU. I hope you're housing the chopper in a secured place? How many days before the paint is cured and finale buff? Does the car/paint need sunshine for curing?
The paint will harden more with time, but it's a base color with clear that is then baked to cure/harden. Because they had to do the hood a couple to three times, it's been baked for many hours and is set. Nothing else is needed, but it will get harder over time. I've got it covered in a very safe spot. When I take the cover off the clear is like liquid glass! The place where I took the shots has little light. I can remove the plates - but do want enough light so I don't have to have the flash.
Will take me a week or so to find floods - so everyone has to be patient - even myself.
I've been a little too busy to find portable lights to get better pictures of the TAZ. Everyone will need to be patient.
Car has been appraised ... ding Purchased dual round 1/2 height headlight buckets from Fiero1Fan ... ding Ordered the Hella 90mm lenses, and connectors ....ding Tried a few paint ideas on the badges - (where the heck is that paint stripper!) ... ding
I've got a fellow at work who wants to go partners on a car carrier, so that's what I'm up to this weekend. If anyone on PFF in Ontario wants to go in on a partnership (timeshare?) just give me a ping. I'm looking at a 14 or 16 foot with beaver tail - dual axle.
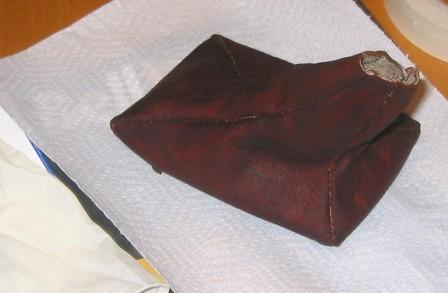
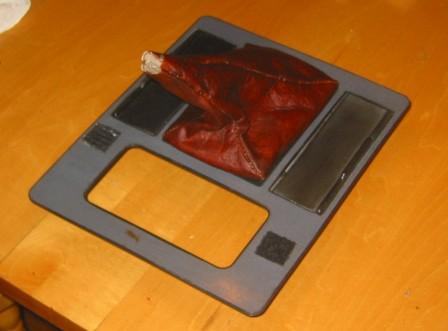
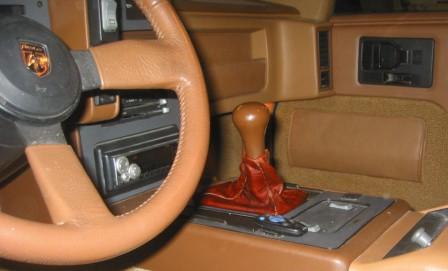
I did this last, but figured I'd post the pics. I made a leather boot for the shifter and had not dyed the leather yet. Since I've decided on my Mr. Mike's leather color I decided to dye the boot. You'll need to go back a few pages in my post to see what the original leather color was. This is the finished product.
That was an easy upgrade!
The leather is darker than I wanted - but have of lot of extra so will make up a few more and try different colors until I get one that matches the new interior...
Next post will be the headlight.
------------------
[This message has been edited by DrCPU (edited 03-23-2007).]
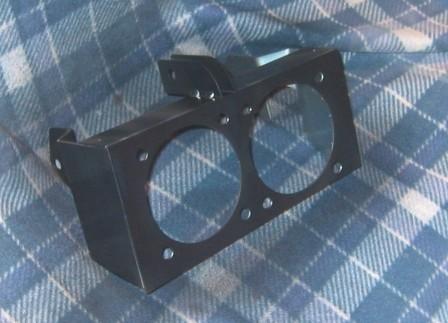
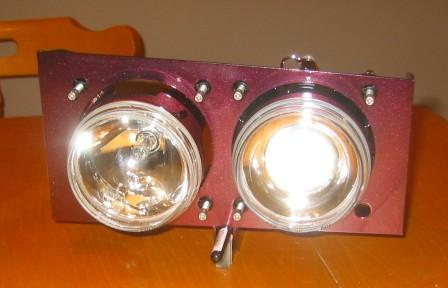
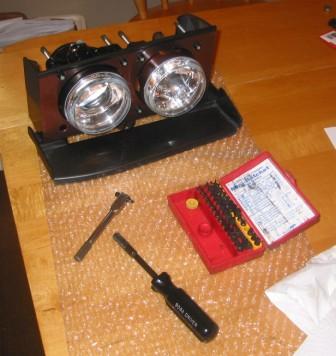
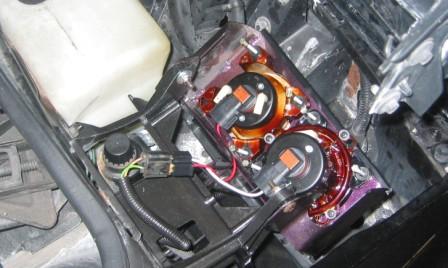
Now for the headlights. Everyone knows about Fiero1Fan's buckets - I bought a set and ordered my 90mm Hellas from Susquahanna MotorSports. It took a little more than three weeks for the buckets to get to me and about a month for the headlights to come from the US. I had to spend an extra $115 CDN to rescue the packages from the mail paying duties, handling fees and taxes.
I decided to paint the buckets a chameleon color - gold/purple. First had to but down the background black base - primer.
Next applied the color coat and then the clear coat.
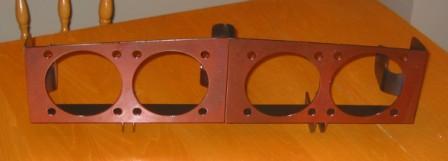
The paint is very soft and I ended up baking the paint in my regular oven for about an hour and a half at 250F. The paint will still take some time to fully cure - but it's ready for the assemble stage. Here is a pic of the rear of the Hi beam lens.
And the Low beam. The low beam is a lot deeper and heavier.
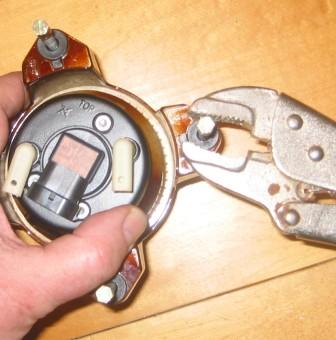
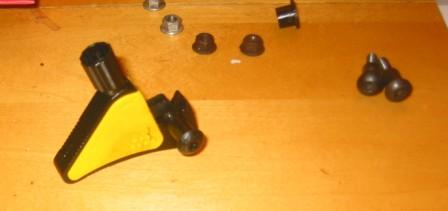
The next little head scratcher was how to get the adjusters on the lenses. Susquehanna does not send you a tool to do this. I tried a lot of things, but ended up using a set of vise grips set just tight enough to grab the plastic bit. I used the under lip of the vise grip to rest on the small tab and with direct pressure turned the adjuster screw slowly and evenly and the tabs slipped right in. The Low beams need to be done from the front. Take it slow and they go in without much difficulty.
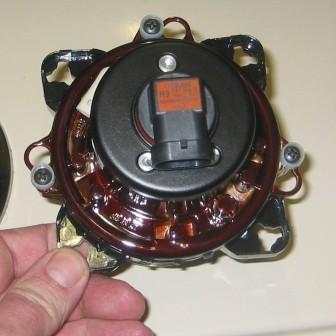
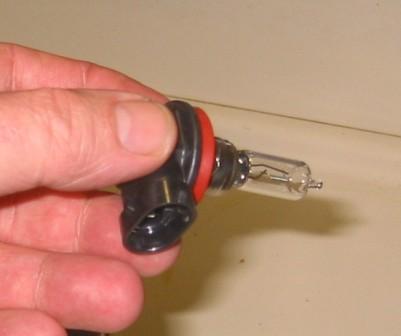
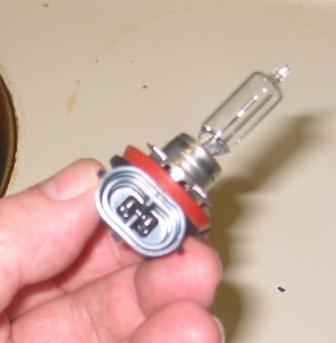
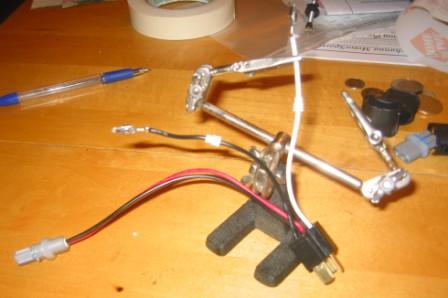
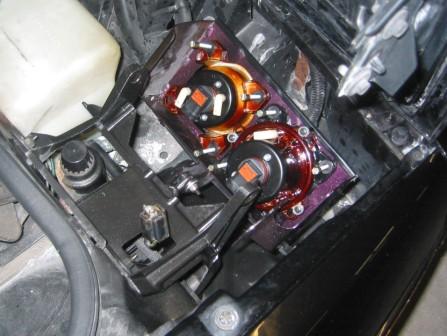
I took the bulb assembly out to get pics to Timo as I did not know if the bulbs were unidirectional - power on one side and ground on the other. As it turns out it does not matter. I still had to make a harness and wanted to do a good job.
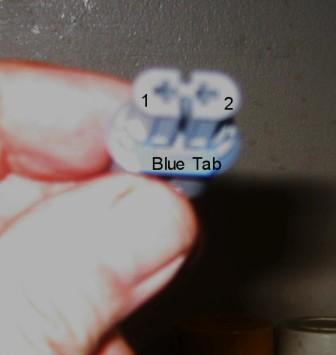
I decided to make the #1 on the H9 connector as ground for each bulb. This way each set of wires is consistent.
So next is to make up the harness. I had pre-measured the length I needed but did not take picks of this.
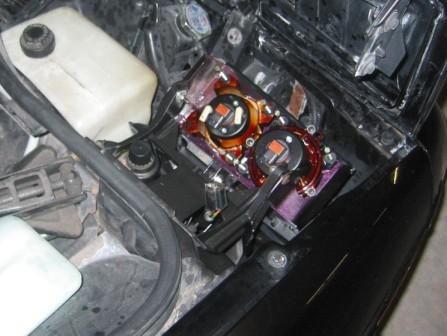
WARNING - Make sure you put the black boot on the wire BEFORE you put the wires into the H9 connectors. Don't ask me why I know this! The other option is to solder and wire up each H9 Connector then put on the boots BEFORE you solder the H4 connections. Also, if you want to have a plastic housing protector for the wires do this BEFORE you make up the H4 end.
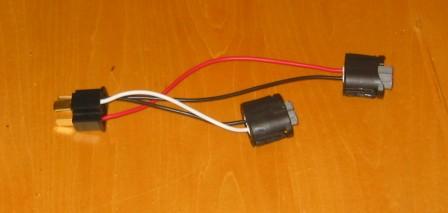
This is a pick of the finished harness. I still have to get some shrink wrap for the H4 ends - but have decided to simply wrap the wires in electrical tape to keep them as flexible as possible.
The longer side goes to the High beam. I used 16 gauge wire. I had 14 gauge - but the wires were too thick.
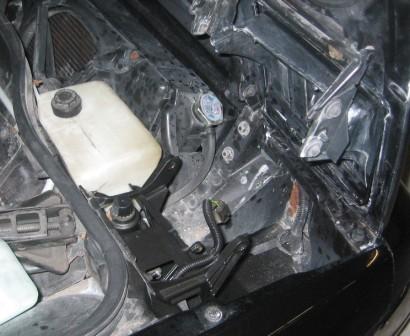
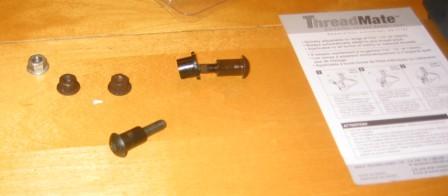
Next I needed to remove the stock headlamps. I had upgraded to a set of Bosch H4 sealed beams. Taking out the headlamps - especially from the driver side took a little bit of care. The nuts that GM uses are simple soft steel and the top nut had a lot of corrosion on it. I had to buy new nuts for this and decided to go with nylon lock washers M6 1.0mm is the size to pick. You need to keep the holding bolts and the plastic expanders - but they had some surface rust - so bought a thread clearner tool (as my tap and die set is at my cottage - Doh).
The threads cleaned up nice and with some 320 and 800 wet grit sandpaper - I cleaned up the bolts so they fit smoothly in the new buckets.
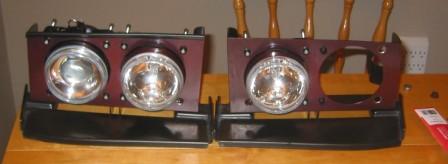
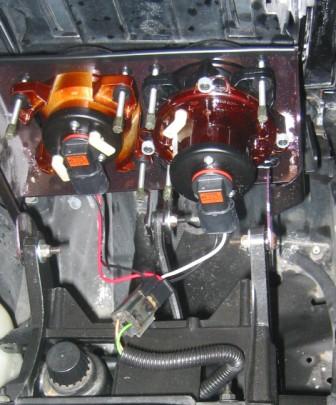
Next I needed to install the lenses in Timo's buckets. This is a shot of what the headlights look like before a complete assembly.
I made a real dumb mistake on this next step. I broke an adjuster and one plastic bucket by misunderstanding the instructions. I inserted the plastic bucket from the front of the mouting housing. DO NOT DO THIS! I then tried to push the ball end of the adjuster through the tight end of the plastic bucket part - with the help of my "hammer friend". One tap and plastic spread all over the place. I don't know why I thought this was OK to do as I should know that the engineers for these products are geniuses. I re-read the instructions for the 10th time and had a moment of clarity!
When assembling the lenses into the buckets you assemble everything from the back of Timos headlight buckets. First you put the rounded end of the plastic bucket(s) into the hole from the back and then compress the part until it pops in. I noticed that the little barbs did not engage properly and found that the front steel plate - with paint measured 85 thou. The gap on the plastic bucket between the barbs and the flutted end is 50 thou. Timo chamfers the front and I needed to drill them out more to bring the thickness of the edge of the hole down to 50 thou. If you do this headlight mode, just make sure the barbs engage once you push the plastic buckets into the mountiing face (from the rear).
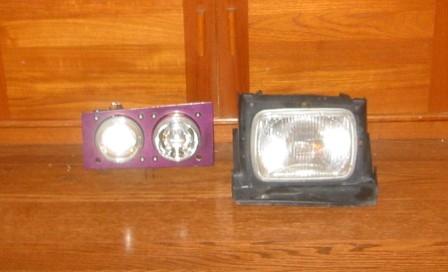
The next pic is one of the old and new assemblies - I still have to transfer the lip over. I bought new self tapping stainless screws to do this.
This is a pic of the lip - transfered - and the door edging I bought to protect the top of the new assembly when it opens the headlight cover.
I also used a tiny tool set to get the old headlights out. The bolt end is a torx end. The rusted nuts at the other side make this more difficult than it needed to be. The removal of the old headlamp from the passenger side was a smooter operation. I've only had to use this small tool set a few times, but it's saved my bacon each time. The ratchet will click in less than 5 degree increments and is no wider than a small screwdriver end bit!
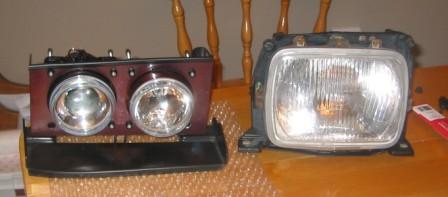
Here is pick of both assemblies - minus the one low beam lamp. I'm waiting for a new adjuster screw package and buckets to come from Susquehanna before I can finish up the second side.
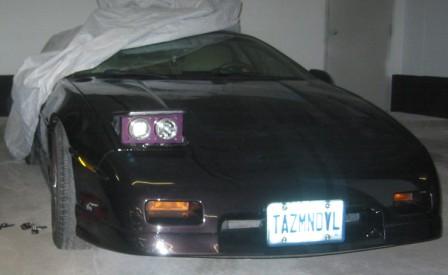
I can still finish up one side, so I installed the passenger side assembly. This work is easy - and takes just 5 minutes to accomplish.
Place the new assembly in and put the lower centre bolt and screw assembly together. Don't over-tighten!
Next is the left and right bolts and nuts...
Install the wiring harness...
Check to make sure everything operates properly. I did this by MANUALY turning the actuator motors a few times (up and down) to make sure nothing pinched or pulled.
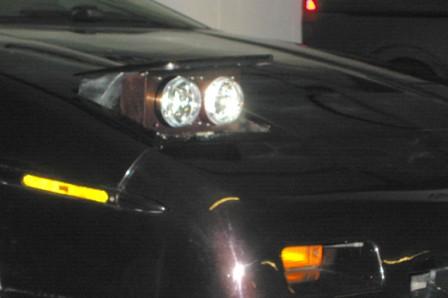
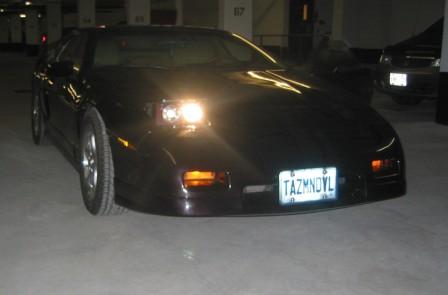
Next step was to fire up Taz and aim the headlight and make sure both Hi and Low beams worked. Here's proof.
So now I just have to wait for the adjuster and plastic bucket to come to finish the job. I still have to wrap the harnesses and zip tie down the wiring at the H4 end - but the job is basically finished. I was hoping that both Hi and Low beam would come on with the high beams - but with just one lamp don't know if this is something that will work when both are installed. As it is the lamps seem bright.
I used a product by the name of "Mystify" by Dupli-Color. It's a 3 stage paint. I bought mine at Walmart in the auto paint section. I don't know what kind of abuse it will take - or how long it will hold. Time will tell. If I had my choice (and time) I would have had them powdercoated - as that stuff is harder than any paint on the market. Less chipping from rocks etc.
I'll get some other profile shots when I get my extra part.
Looks good! Can you take some close ups off the adjuster screws and how it is assembled right. Just to be sure if I understood the instruction the right way. I don't want to waste an adjuster. Thanks!
Ok - here are two side shots of the head lights popped up. I had to lean as the car next to mine was close...
First one is a full close-up followed by a one as far away as I could get.
Next are the close-ups of the plastic bucket adjuster screw assembly process.
First push the plastic buckets, round part first, from the back (why do I feel aroused?) so they end up sitting like this. Pic is taken facing the rear of the headlight bucket.
Next you need to put in the headlamp (adjuster screws should already be installed) and use C-clamp - or if your MagillaGorilla - just push hard. Pushing hard WILL deform the front plate - so the C-clamp is a better idea - though an extra hand would help! C-Clamp should rest on end of round plastic bucket - and the brass screw end of the adjuster.
is there a way to make the low beams on even when you click the high beams so that both are shining when you are in high mode?
I don't know about keeping both on. I'm not sure if it would be legal - like driving with safari lights! I'll know better how they compare with the Bosch H4 sealed beams I used to have when I get the replacement adjuster screw from Susquahanna. I sure hope it gets here before March 16th - orthwise I'll have to install the old H4 Bosch back into the left side.
I'm sure someone from PFF could elaborate on how to mod the headlight harness to leave power on the lows when switching the highs on. I guess you could make up a crossover pigtail harness that took power from the high and directed it to the power connection on the low beam.
LOW POWER -------------- LOW beam HIGH POWER -------/----- HIGH beam (sorry for the crappy graphics)
Some kind of automatic switch would work better - but I'm no electrician or engineer!
If I have to install the old bucket into the driver side for D7 then I'll be able to get the compare pic MadCurl was asking about. Right now the driver side bucket is empty. Dang - should have known never to use a hammer!
Dave
[This message has been edited by DrCPU (edited 03-07-2007).]
It should be legal as my 02 Maxima has hid lows and halogen highs and when high is on they are both on..
I am thinking abuot getting these buckets but I'd only want it if I can get both to be on at the same time... to me just one on or the other looks goofy to me...
Either way I'll likely be happy with them. If I'm driving back from a meet late at night - and I need to go through the countryside, then I'd prefer my High beams to be so bright that they burn through a dear from a half mile away. :lmao:
I need to make a trip to the electronics shop anyway. Two more parts for the "basket".
Dave
After posting a question on this in the Tech Section (Hi and Lows on), and with lots of info from Marvin I've decided to leave the headlights as is for now. I need to remove the harnesses and finsihed them up with protective tubing. but other than that the job is done!
[This message has been edited by DrCPU (edited 03-13-2007).]
Dave you have done a really good job. Just one thing.....if you'll lengthen the wires about 6 more inched you'll be able to push the H4 connections down inside the motor bracket. They will be out of the way (less likely to be accidentally pulled apart) and you won't see the them (I think the H4 connector is kind of ugly).
Dave you have done a really good job. Just one thing.....if you'll lengthen the wires about 6 more inched you'll be able to push the H4 connections down inside the motor bracket. They will be out of the way (less likely to be accidentally pulled apart) and you won't see the them (I think the H4 connector is kind of ugly).
I did the short wires just to see how things would work out. I'll end up finishing them as you mentioned.
I have to say that I'm very surprised with all the things I've done over this winter season. The list is getting thinner by the month, but there seems to be a tendency for me to keep adding to the list. THis is how a $5k car gets turned into a $50k car then a $75K car - right?
Anyway, I just got back from Mr.Mike's in Sarasota. I need to add some text here before throwing up the pictures to give Mike kudos. So here is the story on how I went from cloth to leather!
The first time I saw MrMike's leathers in person was at the CTHC 01? - in Sept 06. I'd seen his web page and all of the feedback I'd read on PFF. Everyone seemed thrilled, and the price seemed very reasonable. (ed OK Mike you can hike your prices now!) I was set on two tone - light tan and dark tan. At Fierorama a draw prize was a $300 voucher for MrMike's leathers and I wanted that prize real bad! I even thought, momentarily, of rolling the winner if I did not get it. I was livid when I did not win that prize. Crud - now I'm going to have to pay for them! I was told that Mike had an Xmas sale - so I waited until mid-November. The sale came, and wasn't what I was expecting. I was hoping for a fire sale kinda thing - or say - 25% off. I can dream can't I? Or maybe it's just cheap drugs....
Anyway I called Mike in December and told him I was coming to Daytona (D7) for March and would decide on colors in January. I'd aksed him to send me colors samples as the light tan was no longer available. The dye method is changing and the light tan was not colored throughout the leather - just the top coat. That would not do for Mike, so rather than offer an inferior product he simply took it off the list of options. I was a little ticked at this at first, but as I have found out, Mike is straight business (an artist or top craftsman is more appropriate) and isn't interested in selling low quality products. This is a huge indication of how pleased I am with the leathers...
I waited until the end of January to place my order. It started out as just seats, then grew to seats and visors, then grew to seats, visors, door uppers and lowers and then added door map pockets. Like I said, the list has a way of growing! As it turns out, I'd almost left things too late. I wanted my order to be ready for me to install at his shop - much like how Archie let me use some of his space at CTHC. Mike told me he didn't have room to allow me to work and we then begun a conversation that lasted for about an hour about what options I had available. I pleaded my case with Mike saying I'd have a fresh install for D7 for his customers to see and that my car was an Archie conversion and chop. Well, Mike relented and we had a deal! Yahoo.
All I had to do now was 1) sell the Harley, 2) sell my enclosed trailer and 3) find someone to share the purchase of a car carrier! I took care of everything and ended up picking up my trailer on March 12th - just in time for my trip to Sarasota and Daytona.
I ended up going with dark tan and dragon for the inserts. Visor, door uppers and map pockets are in dark tan and the door lowers are in dragon. l would have never guessed how exact the dark tan was to the interior of the TAZ. So close is gives me shivers!!
Part of my deal with Mike was that I'd drop my car off at 9:00am Monday and would leave he and Tim to do their majic without me hanging around. That gave me two days to hang around Longboat Key beaches and soak up the sun. I would have loved to have helped (right Archie!), but I was very greatful for Mike doing this install. No way I was going to be a PIA and hang around. I did drop by the Tuesday morning to leave my car trailer in front of his shop. I poked my head and asked if I could attempt to fix my sunroof latch while the seats were out. He okayed this little deviation and I finaly figured out how to fix the sunrrof mechanism. It was not closing at all after I got it back from the paint shop. If anyone wants details - I'll add it to a later post.
The job was completed within the time Mike estimated, even though Mike was waiting for the dark tan leather to come in. He basically made everything from scratch on Monday morning. I did show up a few hours early on Tuesday and witnessed Mike and his craftmanship at work. I cannot overstate how gifted Mike is in this area. His movement was precise, with little wasted effort - yet relaxed and focused at the same time. I don't know if craftsman is the right word for it - but he is certainly gifted.
The quality of the entire job is the highest I've ever seen. The fit of everything is perfect. Mike and Tim took care of small things - like broken clips and other items as they found them - even if they were not part of the job. All I can say is WOW. I have a new found respect for a professional here, and maybe even someone I can call a friend. I sure hope so. He's a smaller verison of Archie! If you are new to PFF and the Fiero community I can only add that fellows like these two contribute an immense amount to the positive nature of Fiero restoration and ownership. I cannot recommend Mike any more highly.
If you ever thought you might want his products - don't wait or questions whether or not you are taking a chance. His kits are complete, with everything you need to do the job. Mike's report card score is 100% with a 20% bonus for doing such a great job!
Here are the pics... (the last one is for Curly!)
Thanks again Mike (and Tim) - and looking to take you on at the Go-Kart track!
[This message has been edited by DrCPU (edited 03-21-2007).]
Anyway, I just got back from Mr.Mike's in Sarasota. I need to add some text here before throwing up the pictures to give Mike kudos. So here is the story on how I went from cloth to leather!
That looks great. I 'm a bit jealous as I would like to have Mr. Mike personally work on my car.
Well, everyone who sees it tends to walk with their heads at about 90 degrees from normal. If there were telephone poles in the area you'd be hearing the head bonks all the way out in kalifornieh!
I'm heading down to the beaches in Daytona - should be fun!!!
My next little job requires warm weather to complete. Being that it's in the very high 20's in Florida, and that I brought materials I did this job yesterday. First thing I always notice on a fresh paint job is the stone chips you get on some critical front leading areas of the car. I picked up some 3M clear material in roll and sheet form.
First thing to do is cut a template for the leading nose of the body side moulidong on the front bumper. This area always took the worst of any chipping after the bumper itself.
Next is to do the scoops on both sides - just the leading edge - so I used the tape here.
and finally - the leading edges of the mirrors...
The material is a little tricky to use (no instructions - and I figured "How difficult can this be anyway?"). It really picks up finger prints and it works best if you apply it while peeling back the backing material. The tape can be removed at any time - so if you don't like your job - just peel it off and do it over! The material is stretchy and can be pulled to form almost any curve. I say this from someone who knows nothing about the proper application methods.
When I bought it they mentioned using a 50/50 mix of water and rubbing alcohol. I just used water - but found the bits I installed worked fine dry.
I also kept the pieces small - and the lines are hardly noticeable...
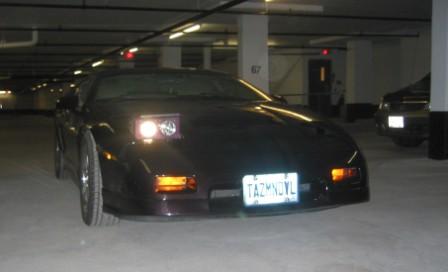
that car is my all time favorite fiero. i really like the color you chose. i was going to go yellow on mine but after seeing yours, i think i may change. not to the same color, but i'm thinking a dark grape now. can't wait to see this one in the daylight!
that car is my all time favorite fiero. i really like the color you chose. i was going to go yellow on mine but after seeing yours, i think i may change. not to the same color, but i'm thinking a dark grape now. can't wait to see this one in the daylight!
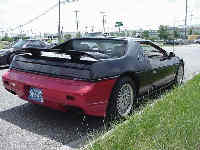
Hey, I wouldn't be upset if you chose the same thing. I have the paint numbers if you want. In the morning it looks mostly black, from about noon onwards it really starts to take on that deep cherry (black) look. In most color catalogs it's 95 Jaguar Deep Black Cherry. It's a two coat process, base color and clear. There is a lot of very fine metalic in the base color. It's almost exactly as I pictured it in my mind. If I could have had a blue tinge added to the first coat of clear it would be perfect - but then would not be a stock color. The way I've done it I can go to any painter to get work redone - or new panels painted... hmmm an IMSA back end could go good right about now! My preference would be to do some custom work and make the wheel wells much closer to a Porsche than the IMSA... there goes the list again!
Thanks for the kind words - glad you really like it.
I'd love to get a set of the VDC doors. Looks like Curly has the ticket with the fellow from Florida. I'll wait to hear from Curly and Archie as to how well they go on. I also will give eXtreme Doors some time to get sets done before I make a final decision.
I spent all my cash on the leathers - and need to do something about the steering wheel before anything else!
I'd love to get a set of the VDC doors. Looks like Curly has the ticket with the fellow from Florida. I'll wait to hear from Curly and Archie as to how well they go on. I also will give eXtreme Doors some time to get sets done before I make a final decision. Dave
Archie is brining one of the VDC hindges (rt or lt?) to D7. Be sure to check out the details of kit. I talk to one of the fellows last night about comming to D7 but, I'm not sure if they'll make since thers a Hot Import Night in Daytona. You might want to drop by the shop for continued discussion regarding the VDC door?
[This message has been edited by madcurl (edited 03-23-2007).]
Sounds like an idea! I just picked up my D7 Car Show pass. Glad I did it now - as tomorrow going to shear mania! Saw Ferrari 318(?) Bob and will hook up with the host hotel crew in an hour or so. Sorry you couldn't make it - would have enjoyed chatting with you again.
Rats - I was in that neck of the woods earlier in the week. Will have to pass on a shop tour and make do with a visual inspection of the one Archie has with him.
At least I've got the contact details now - means I've got a reason to come down to D8 if the London guys don't pan out!
After getting the leathers from Mr. Mike I had time to think about ordering the console as well. I called Mike from my truck on my trip from Sarasota to Daytona and asked him to bring the console wrap in Dark Tan.
I only took two picks - one with the console out and the second with the installer - Bill Murray himself (tee hee). I tried to do the install, but I blinked twice and Mike had it done! Sorry for loosing that hex bit of your Archie - it's at the bottom of the shifter well - never to be seen by human eyes again! It fell out of the socket I was using when I was tightening that last darned shifter cover!! I'll add a pick of the finished console later this week.
Mike is a dead ringer for Mr. Murray - with his hat, wrap around glasses and goatee. If you ever do get to meet Bill Murray - just for fun you should ask him if he's Mr. Mike!


 , what did you use to paint timo's buckets?