Since I was thinking that my front lower control arm poly were probably as soft as the uppers had gotten I started thinking about replacing those bushings. As far as I am concerned the front lower control arms are the worst designed piece of the 84 to 87 fiero suspension. The bushings not only do not line up, they are not even mounted at the same height on the car. This causes a lot of binding and a huge lack of freedom of movement. With the OEM rubber bushings the binding is not that big of an issue. Put on poly and the binding is a lot worse and it is easy for poly bushings to spin their centre metal tube causing the frame mounting holes to get sloppy and then things start moving around.
I noticed a thread by Mender about some rear control arm bushings called Lemforders. I don't know what the actual name of this type of joint is but it is basically a rod end without the threaded mounting stub but with a round housing that is pressed in to a control arm. They also are greased with rubber grease seals that will increase service life over rod ends. I figured these would solve all of the problems inherent to having poly on the front lower control arms.
I picked up a cheaper version of the bushing made by Febest MBAB-027Z on Amazon. They are only 12.00 compared to lemforders at 50.00 each. I cut and ground out some pipe to make holders for them. I made a makeshift jig to hold them in place while I welded them to the arms.
Prior to welding the jig on to the tube I cut almost all the old weld off as some of it would be covered by the jig. As I was taking the passenger side arm off I noticed that the rear mounting tabs had gotten pretty sloppy. Probably why I started noticing a slight right hand pull whenever I tapped the brakes just before putting the car away for the winter.
This is the completed passenger side lower control arm. I did not get the rear holder welded in so it would be centred in the frame tabs. Next time I will be a little fussier. The arm now moves up and down with no binding.
I used 9/16" grade 8 bolts to hold the rear of the arm in place because the holes were sloppy to the point of almost fitting that size. The Febest bushings have a 9/16 mounting hole. On the front mount I made a sleave for inside the bushing so I could use flanged 12 mm chassis bolts.
[This message has been edited by wftb (edited 11-30-2017).]
Lemforder balljoints are used heavily in BMW vehicles. I replace them on a regular basis as they are a wearable item. The next time I pull one out, I can get you some dimensions if needed. Remember, I can get these at cost if needed.
Sounds good thanks Shayne. The Febest bushings come with a note saying they will only last 60,000 KM so as they wear out I will put the better quality Lemforders on. I just didn't feel like laying out that much cash at this time. Dimensions of any similar bushing you pull out would be appreciated. There seem to be about a hundred different years and models of Mercedes that use this type of bushing as well.
[This message has been edited by wftb (edited 12-01-2017).]
Passenger side is all reassembled. I tried adding a bit more castor by shimming the lower arm forward but that caused binding of the shock mount bushings. I could correct that with the rod end mounts I have but I put it back to stock. It isn't out by much so I will correct it on the upper arm after I get the drivers side done. I will need to set the camber but I can't do that without getting the car on the ground.
On the driver side I made a new jig that I think is a bit more accurate. Also I narrowed the holder to make it easier to get the spacers in. My original idea was to make them as wide as the febest bushing to protect the rubber from debris. I have decided the extra hour or so of swearing and chasing washers all over the garage is something I can do without. On the first replacement I will narrow down the passenger side to match. The passenger side bushings are already plug welded so taking them out now would ruin them.
Ready to weld tomorrow. Too dark in our garage at night to do a good job of it.
[This message has been edited by wftb (edited 12-28-2017).]
I picked up a new sliding compound mitre saw from Canadian Tire. They are on sale for 299.00 now. What made me buy it is that it will cut mild steel up to 1/4" thick. I was skeptical but it cuts really well. It uses a new (to me anyway) kind of carbide tipped blade made in Japan. I can now cut just about anything with just this saw and not send sparks flying all over the garage. The only thing I need now is a clamp to hold small pieces securely.
Made up a bracket to weld the new bushings on the control arm. New saw made short work of cutting the bits and pieces. Cut and welded up in about an hour.
Going to cut off the old bushings and fit the new bushings to the arm tonight. The old bushings were shot, I could wiggle the end of the arm back and forth about 3/8" after the control rod and ball joint were disconnected.
Winter has hit full bore here in Bruce County. We are known as the land of horizontal snow but right now along with the snow we are getting really cold temps. We do get the odd dip down to -20C for a week or so but not till late January early February. For most of the winter we hover a few degrees off freezing give or take. All day it has been -15C and now it is -17. So working in our non heated garage has meant wearing my battery heated jacket and using a propane heater to keep my work area bearable. We can't drive anywhere so I try to stay busy on the car.
So I wanted to do some painting in the cold and I figured I could do it if I heated up the object in front of my propane heater. I have lots of red spray bombs warm in the basement so I heated up a bumpsteer bracket and sprayed it. The paint kind of boiled as it hit it. Guess 5 minutes was a little long to warm it up. Anyway it came out with a crinkle finish that looks OK to me:
I have everything in place again and spent most of the day adjusting camber and getting the upper arm angle to match the lower arm angle and getting the wheel base to match the other side. A lot of finnicky stuff that takes a lot of time. Some of my high tech tools:
I can plot wheel movement on the ground with the laser and check camber gain with the dial protractor. Looks like I gain -2 degrees from ride height to projected full compression (about 2.5" of wheel travel) and nothing noticeable as far as bumpsteer. There is about 1/8" forward movement of the wheel from full droop to full compression. I do not think that will affect anything but the only way I think I can correct that is to cut off the upper arm mounts and reposition them. Not happening unless the next track day shows I need to. I will set ride height camber at -1 degrees. I am going to drop the ride height lower than last year, I think it has crept up a bit. I have fitted better rod ends as well as high deflection washers on the chassis side of the control rod. These have a 5/8" bore but 5/8" OD stainless tube makes a perfect spacer for fitting to the 12mm flanged chassis bolt:
I have completed the driver side rear lower control arm put in a new ball joint too:
Glad to finally have all the control arms completed with their new bushings. The upper rear control arms still have their original poly but they are not that old yet and seem pretty good.
Playing around with ride heights I found that this is as far as I want the tire to go under compression because any further travel and the axle hits the transmission:
The line on the axle was just from me turning the wheel and tire as I raised it to the limit. Tomorrow I hope to get the other arm installed and then I have some cleanup and a bit of welding to do on the cradle.
[This message has been edited by wftb (edited 01-01-2018).]
If you look close you can see the access hole I had to cut in the cradle to get the longer bolt in. Using the high deflection rod end washers meant the bolts had to be 1/2" longer. Just long enough that I could not get them in without cutting a hole.
I have not found a jig yet to hold small pieces so I tacked the bushing holders to a piece of square 1"X 1" tube. If you are considering buying a saw like the Evolution one drawback is that if you are usually cutting 1/4" thick steel you will dull the blade fairly quickly. I bought this saw as an alternative to a horizontal bad saw (much cheaper) but it is really only cost effective for mild steel 1/8" or less.
My Makita chop saw did not cut straight enough when I tried to slice an eighth inch off one of the bushing holders. I also had to cut the holders with the aluminum centre in place and that caused the abrasive cutter of the chop saw to clog up. The evolution cuts aluminum like a knife through butter and worked better and stayed straight. Overall everything came out well and the new bushings lined up perfect with the frame holes.
[This message has been edited by wftb (edited 01-03-2018).]
Thanks. I have always wanted a band saw but space is limited in my garage and now that I am retired I have to watch what I spend. But the upside is I get to spend all the time I want working on my hobbies.
Today I spent 2 hours modifying the coilover upper spring perches. To get the coilovers off I have had to unbolt the knuckle from the ball joint adapter. This did not affect the alignment at all because the tolerances there are very tight. But it added time to the job so I ground away about 3/8" away from the bottom of the upper perches and cut a bit of metal away from the upper strut mount area that no longer does anything. A bit of trimming of the outside of the upper control arm mounts so they could drop down further and now the coilovers can go in and out by just taking out the mounting bolts. I did not take any pics of this because it really doesn't look any different than before.
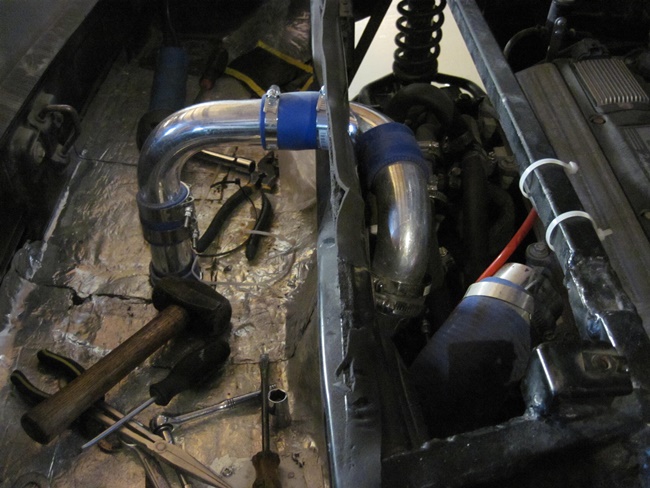
So other than a spring alignment, that is all I am doing to the suspension this winter. Next up is getting rid of this mess:
I ran the charge pipe through the trunk area so that I could adjust the rear camber on the passenger side without taking the wheel off. I have hated the look of it ever since. So I am going to route it the way I had it a while ago. This will mean relocating the turbo heat exchanger back in to the engine bay. Currently it sits where the cat converter originally was. I like that location but not all the extra piping that goes with it. The other thing that is going to happen in this area is some stainless steel hard piping and Tee fittings to clean up the ugly and prone to failure hoses and plastic fittings that are there now. The intake and air filter are getting a reroute too but I have not decided how I am going to do that yet.
I have completed the first part of my engine bay update. I was hoping to do a lot more hard piping than I did but I decided running stainless all the way to the OEM alluminum heater lines was going to be really awkward and be a lot heavier than heater hose. I got rid of all the domestic water plastic fittings and replaced them where needed with Gates plastic fittings that are designed for automotive use.Making up a couple of short metal lines got the plastic fittings away from the heat of the turbo manifold. I may change out the stainless steel one for a mild steel line like the other one in the picture because it is a lot easier to bend the mild steel without putting the kinks in the pipe that you will see in the pics. Once the charge pipe is in there it wont be seen any way so maybe not.
I think this will improve the flow of hot air off the turbo manifold and out the decklid scoop. Before the heater hoses and intake piping had that whole area mostly blocked. I also added a small rad cap style filler neck:
This item was left over from my air to water heat exchanger kit. It was not needed because i fill the system up with a coolant tank located in the front trunk. I also shortend the OEM heater pipes that ended part way up the passenger compartment bulkhead. So difficult to get in that area, now the fittings are out in the open just in front of the back of the gas tank. I used some Earls tools to put bumps in the new stubs. I haven't connected the new hoses to the stubs yet, going to have to wait till spring for that because i want to flush out the heater core and lines to get the filings out. Hope to get the intake completed tomorrow.
Over the years I have changed turbos, manifolds, heat exchangers plumbing and lots of other things. So I have a choice between these 2 HX's :
The big one will handle about 550HP and the smaller one about 350HP. Using the smaller one will save about 5 lbs of weight. So I am going to try the smaller one because I doubt if I will ever tune this engine to run at 350+ HP. I have had both on the car and they seemed to cool the charge about the same. Did a quick mock up of the charge piping:
Need to make a few brackets and use a shorter 90 coming out of the turbo to level the front tube. Should have It all done tomorrow.
It was 7C out today so I managed to get the heater hard lines cleaned out and ran all the new hoses for the heater and for the heat exchanger .Got the charge piping all clamped together and I did not need to make any brackets. Two heavy duty tie wraps secure the HX to the strut brace and one tie wrap hangs the piping near the throttle body.
Fired it up to check for leaks and make sure the air was out of everything. No leaks that I can see and the filler cap worked great. As soon as the temp guage started to move, there was warm air coming out of the defroster. The intake is not clamped together yet because I want to get a new air filter. Maybe tomorrow.
Thanks for the replies. It has been a productive winter so far, really looking forward to driving the car this year. Amazing what you can get done when you don't have to go to work any more. What I am doing now is taking out all the AC stuff that hasn't worked since I got the car. I decided not to install AC because of the cost and weight savings. It really does not get that hot around here any way and the fiero is a fairly comfortable car to drive with the windows down. The other thing is that I am going to be able to tuck all the extra hoses nicely beside the fuel tank with the AC hard lines removed.
------------------ 86 GT built 2.2 ecotec turbo rear SLA suspension QA1 coilovers on tube arms
Got 2 more things off the list: hoses and extra wires are tucked in beside the gas tank and put together a new intake with new air filter. All done with crawling under the car for this winter. I seriously considered dropping the gas tank to fix my fuel gauge but I am going to do that job in late fall when I can do it outside.More pics:
I have a big pile of silicone charge pipe bends,reducers, clamps and aluminum bends that I used to run various versions of charge piping and intake that I am going to sell in the mall. Probably some other stuff once I start sorting through all the boxes of stuff I have filling up the garage at the moment.
Decided to take a break from mechanical stuff and mount the decklid lip spoiler that I bought at the 30th show. It is a fiero warehouse product I think. After moving it around to mark the holes, I drilled them in the wrong spot. The next holes did the trick. I added some double sided tape about 1/4" in from the leading edge to prevent any vibrating.
Thanks for the reply Shayne anytime you want to come up just shoot me an email to make sure I will be here. Steve
------------------ 86 GT built 2.2 ecotec turbo rear SLA suspension QA1 coilovers on tube arms
Thanks. I was actally considering a big wing for downforce on the track but trying to pick one was proving impossible. I found this thread- https://oppositelock.kinja....-it-wrong-1665312667 on the difference between a wing and a spoiler with wind tunnel smoke patterns and charts etc and decided the spoiler would do what I wanted and save me building a front splitter. The upside to the spoiler is preventing lift and keeping the car stable at speed. Sometimes you gain a bit of downforce. Less drag with a spoiler as opposed to a wing. I have heard it said on the forum that the stock wing improves stability at high speed but I have been at high speed with and without a stock wing and never noticed any difference. Main reason to get rid of the wing is I hated how it blocked the view out the back.The spoiler blocks very little of the view out the back.
[This message has been edited by wftb (edited 02-14-2018).]
We are enjoying a warm snap up here so I decided to put the car back on the road. Spent yesterday touring around for about an hour and then I jacked the car up to check everything over. Everything looked good so today I took it to get alligned. I bought a digital protractor to set my camber and it did not work at all. Two wheels had to be adjusted in the shop and that added a bit to the bill. Next time I will use my mechanical protractor and read it with a magnifying glass. The new bushings have not added to road noise at all but the overall feel is like I added about 100 lbs to the spring rate at each corner. It just feels stiffer even though the spring rate has not changed. Probably because the old poly busings were shot and added a bit of compliance to the suspension is the only thing I can think of.I set the coilovers to 5 all the way around and found the ride a bit bouncy. Then I tried 10 and the ride was down right punishing. I then went down to a setting of 1 all around and for street driving that now feels best. Smooth ride and a better feeling of control. This time of year the roads are warming up and the frost is coming out of the ground and our roads get bumpy for a while.The stiffer settings are great for track days but not for street driving this time of year.
I also found my simonize oscilating polisher and have brought some of the paint back to life. Hope to get the rest of it done tomorrow and post some pics.
Looks like tomorrow is going to be cold and wet so back in the garage it will go. Going to drive it whenever it is dry out. Today we went to Cambridge in it and everything went well. Got the top half shined up a bit, looks better in pics than in person but not bad overall. Also gave my headlight covers the Turtle Wax restore treatment and removed one projector from each side and got the high beams to work. Before and after cover pics below:
------------------ 86 GT built 2.2 ecotec turbo rear SLA suspension QA1 coilovers on tube arms
The predicted wet weather did not arrive so I decided it was time to upgrade my tune. Since I pretty well ruined the tune chasing my tail around what was actually an exhaust piping problem I decided to start from scratch. I went through the whole tune and modded or put back to stock just about everything. It took probably about 8 hours in total work over the last couple of months. So I wrote the new tune in and took the car for a ride and was really happy with the changes. The car is smoother and feels stronger than before. I have not run a scan yet but I doubt I will have to change anything. If it is nice out tomorrow I will take it for a long ride and do a scan.
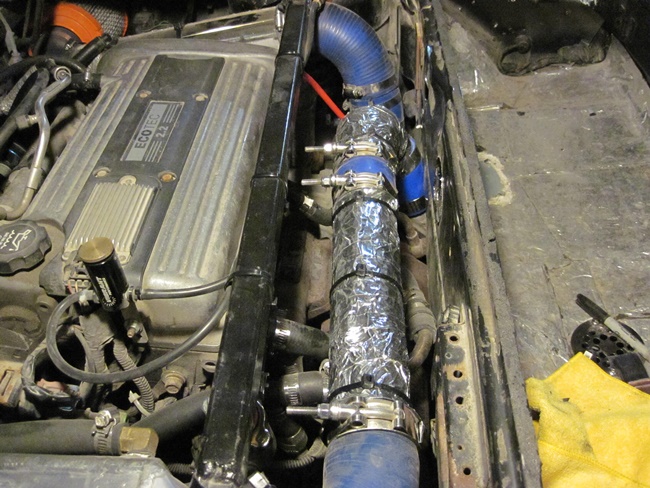
I have been driving the car a lot and everything feels good. I decided to run a scan and noticed a few things- about 9 degrees of KR in a spike around 4000 RPM in third gear with throttle wide open. And I noticed the AL piping of the charge pipe gets hot as it passes above the exhaust manifold. I was hoping the new set up would not be as warm in that area but no such luck. So I found some auto sound deadener on sale at CTC and wrapped all the AL pipe and elbow with it and then some AL foil tape and some ty wraps for good measure:
Before the wrap the max temp was 68F peak and constant no boost temp of 54F, after 61F max and 45F constant. Temperature outside today about 38F.So the insulation made a decent improvement. As for the KR spikes I really have not figured out yet. I have the water meth set to come on full at 8 PSI so I should not get any knock. Here is a screen shot of one of the spikes:
Hopefully I will straighten it out but a spike like this might have happened with the last tune. I was so happy to have 7000 RPM again I did not run a scan after. And then I took it to the track with no ill effects. The ECM computer does its job and keeps the engine in one piece in spite of all my best efforts.
------------------ 86 GT built 2.2 ecotec turbo rear SLA suspension QA1 coilovers on tube arms
I have been running lots of scans, researching info from a ways back on the HP tuners forum(circa 2006 to 2010, no one tunes these first gen 2.2's anymore) and I have made some good progress.It is hard to get the old info because most of the links and pasted on charts have gone missing from the old HP tuners threads. I did all my old tuning by just following along as other people tuned there cars. Ask a question about something and someone would reply with a bunch of screen shots of tables and would say copy these and it would work. But all that info is gone now.
I raised my PE (power enrich) commanded AFR to 12.5 from 11. I copied the low octane PE spark table onto the high octane PE table. I copied the low octane non PE spark table onto the high octane table. I changed my VE offset to 50% up from 40%.On one of my runs I found the water meth injection had a leak at the nozzle fitting so I fixed that. So I took out a lot of timing under boost and the biggest spike I see now is a KR of 8 degrees. That is down from 12.4 from before the changes. Most of the other spikes are less than 3 degrees. So still room for improvement but what has me wondering is why the water meth is not taking care of this.Funny thing is you would think that suddenly having 12 degrees of timing removed would cause me to feel the car bog a bit but it only shows up on the recording and not in the way the car runs. I am beginning to suspect false knock and the culprit may be my homemade poly motor mount. I had no problem with KR with the stock mount and I was running more timing then. I made the mount because the stock rubber mount wore out. I think I will take a trip to the wreckers tomorrow and pick one up.
[This message has been edited by wftb (edited 03-05-2018).]
I bought a cavalier upper mount on wednesday but decided not to use it. The thing weighs about 10 lbs and I should have looked closer at it because it is not in the best of shape. So I started thinking of another way to do a motor mount using the friend to engine swappers everywhere, the dodge truck engine mount. Looked one up on Summit Racing and it was 4.00 and change. Cheap. Tried CTC and they wanted 12.00 and 2 days to get it. Spike's autoparts said 3.25 each and be here the next day. I bought 2 of them for less than 8 bucks. Here is one:
The plan is to cut off the top of the present mount at the top of the Y shown here (existing mount is under the intake tubing):
But I had the sawzall at the ready but decided to wait until I do a scan of my latest tune in case the KR has gone down by a lot. Of course the weather is not cooperating(4" of snow last night) so until I can get out on the road again the sawzall can stay on the shelf.
The weather around here continues to be bad. Getting up to 4" of snow most nights and it is not forecast to melt anytime soon. So rather than wait and do another scan I decided to go ahead and make the new motor mount. I used the cast aluminum part of the original mount as the connector to the engine block. Bolted a 1"X1" square tube to the cast part and bolted the truck mount to that tube. Welded another tube to the fiero sheet metal and drilled a hole in it to run the lower mount bolt through. I had a hard time getting a decent looking weld to this sheet metal as it is 2 layers and there is seam sealer in between the two layers that kept catching fire on me. So it looks like cr&p but I did manage to get enough decent beads to secure it. There is a brace of 1/8" flatbar welded from the tube to the sheet metal for added strength. A 3/4" OD .120 wall stainless tube braces the square tube back to the strut housing. It is welded to the stub left when I cut off the old mount. I used nothing of the old mount, it was in the wrong place for the new design. So the new mount could use a lot of prettying up(ala grinding) but it is solid.
With the cold weather and the tune I am running the engine runs pretty rough for the first minute or so. With the old mount the engine did not shake, just vibrated the whole car basically. With the new mount the engine will shake back and forth during the rough warm up period, moving about 1/4" each way. So I think the old mount was pretty much a solid mount, not enough poly in it to absorb any vibration. Hopefully that is what has been causing the bulk of my KR, but I wont know for sure till the weather turns for the better.
------------------ 86 GT built 2.2 ecotec turbo rear SLA suspension QA1 coilovers on tube arms
I have had a few days of decent weather to do some more tuning and test out the new motor mount. The mount works great but only gained back maybe 2 degrees of KR so not the culprit I was hoping it was. I have been backing off the timing based on the scans I have run and had it down to the odd spike of about 6 degrees. I made some more changes and took it for another run and it showed a bit of a stumble as it came in to boost. Before the run I had increased the watermeth injection and since I have not noticed anything like that before I decided to do a 2nd run with the w/m injection dialed way back. Stumble gone and everything seemed much better. Checking the scans when I got home showed 0 degrees of KR during the run with the water meth dialed way back. So I am thinking the KR was caused by me dumping too much w/m in to the engine. I kept increasing when I should have been decreasing. And the fitting on the elbow started leaking again, turned out it was not the plastic fitting but the metal housing of the spray nozzle holder:
So I decided to redo the charge pipe from the HX to the throttle body and relocate the w/m injection nozzle to the fitting that holds the IAT sensor and the w/m boost reference line:
I used a cast iron plumbing fitting to seal the crack in the nozzle holder. The new charge pipe:
The w/m injector controller for the high spray has a confusing to me anyway selection dial. It starts low and then the last part of the dial has 4 psi and then 19 psi. So I have been guessing at where I thought 11 psi was and putting full spray at that point. What I did not realize was full spray was too much at 11psi of boost. When I did the run that showed no KR I turned the dial for for full spray at 19 and that seemed to be the right spot.
I changed the nozzle to one size smaller so hopefully I will have a finer range on the controller. Now that I have achieved 0 KR I can start tuning for more power. ------------------ 86 GT built 2.2 ecotec turbo rear SLA suspension QA1 coilovers on tube arms
[This message has been edited by wftb (edited 05-04-2018).]
The spray nozzle change made things worse. The Snow kit I bought came with 3 nozzles and I have been using the medium size one. The smallest one that I tried really can be best described as having a pin hole sized opening. So I put the old nozzle back in and did a long scan with a full throttle pull in second and third gear and got a max KR of 1.1. Not perfect but I can easily tune that out on the spark tables. I also did about a mile in 3rd gear at 3500 to 6500 rpm to replicate what I do on a road course (the tracks I have run on can be run in that gear without shifting) and that showed no KR at all. The knock sensor on this engine seems very sensitive, there are spots in the scan that show at steady speed in top gear a few random spikes of .5 KR. So probably a bump in the road can set it off.
I think you are negating the bumpsteer fix by tying that link to the frame, it has to be tied to the control arm directly like you used to have it. The way you have it currently will still cause bumpsteer as the link and the control arm will not take the same arc as the suspension moves.
Also after all these years have passed, what would you recommend for engine management? You are using the Cavi computer and have made some changes with HP Tuners correct? Limitations of this method include difficulty with using the stock Fiero gauges and it seems like you kept the Cavi sender as well for fuel level.
I am debating between ecotec and 3800 swap, I want a reduction in weight from the rear end though and the 3800 will not give me that, though it does seem like the simpler swap. But it would be nice to have ample room around the engine to work on everything, and both motors (L61 and L67) are similarly priced. I would need the transmission from the cavi also, but its under $200 so whatever I will just have to do some fab to get it to shift properly. I can live with an NA ecotec for a while until deciding to boost it. My uncertainties come from the wiring and engine management aspect of things, the 3800 seems very straightforwards compared to the Ecotec, but that is also because many people have done it, while you are one of the very few to have a running ecotec. What is your opinion on the engine management side of things? Stick with the stock computer and go HP tuners, or aftermarket engine management? Megasquirt is way more comprehensive than it was when you were first deciding what to go with.
Great work making such consistent progress for so long.
This is a link all about my bumpsteer solution. https://www.fiero.nl/forum/Forum2/HTML/134732.html . It actually works perfectly, and Mender has made his own version of it. The pivot point on the frame is the pivot point of the control arm bushings and is the mounting bolt for the control arm bushing resulting in zero measureable bumpsteer. My trip to the track showed that my tires were shot, as were all my poly joints except the rear upper control arms and springs were too light for track use. All have been changed out and I am happy with the results. I have not had time to do another track day and I am still debating about wether I really need such heavy springs. Hopefully I can fit a track day in soon.
The problems that my too small exhaust caused resulted in me making all kind of unnecesary changes to the tune. What I ended up doing to get it right after switching to a 2 1/2" exhaust was to go back to a mostly stock tune. The changes to stock tune are 50% VE offset, injector constant changed to suit 42 lb injectors, 11 PE , and PE enable at 2500 RPM and some other stuff that I can't remember now. I last played with the tune in early May and have been driving the car almost every day and there is nothing that needs changing.
I like using the stock cavi management system with HP tuners but the 2004 system I have does have its drawbacks. It is a MAP only system and only has a 1 bar MAP. When I did this swap it was all that was available. I think it works great for me but I would recommend going with something from a 2007 Cobalt. Still tuneable with HP tuners but a better system overall. Buy a whole car and take what you need and sell the rest. Cobalts are dirt cheap. If you follow member Lunatic's thread he is solving the problems of making it all work with Fiero guages. I use a cavalier guage cluster.
I decided early on that I did not want the weight of a 3800. I wanted a handling car and you need a lighter motor to do that. If you follow the Fiero LeMons/Chump car threads and watch the videos you will see all of the v6 powered cars spinning out from time to time. My car does not do that, it is completely neutral. As I hit the limit, all four tires will slide but the rear will not slide out nor does the front plow. You just end up taking a wider arc that can be easily corrected by dropping the throttle or a tap on the brakes.
By accident, my engine and transmission sit very low in the chassis. If you compare the engine bay pics of mine versus other ecotecs you can see this. I cannot lower the rear of my car any more than it is because the passenger axle will hit the transmission. I do not know if this contributes more to the chassis neutrality than the lower engine weight but it must help a lot.
As far as stand alone systems, I think they are great but I have not found one for the 500.00 price tag that I would be willing to pay. I have a Megasquirt setup designed for the ecotec by member Fosgate Cavvy but I have never tried it out.
Sorry for being so long winded but I have not posted in a while. Thanks for your post.
[This message has been edited by wftb (edited 08-04-2018).]
This post turned out way longer than I thought it would. Abridged version. 2.2 works but has quirks. Other ecotechs are easier with aftermarket computers but are a bit more rare. Aftermarket computers are easier to work with and more flexible in most cases but expensive.
One of the biggest hurdles for most people to get over doing an Ecotech is the computer. A huge part of that is that the older 2.2s that are super cheap and common have an.. interesting ignition system. Is is based off of technology Saab developed in the 80's and continued to develop through till GM bought the company. Long story short, the ignition coil/cassette in the cam cover does a bunch of science with the sparkplugs and can figure out where the cams are, and this is the important thing, without a traditional cam sensor. The drawback is that this only works with engines with fixed cam timing. The later engines with variable can not use the old system as it can only get cam timing if the cam is in a fixed phase relative to the crank, as such they have a cam sensor on each cam. BUT WAIT THERE IS MORE. There is an odd ball in the family that works different, and that is good for us.
I am unsure if the megasquirt or other computers supports this ignition system and the features is provides. Like per cylinder knock detection, misfire detection, and ignition quality data.
The odd ball I mentioned is the supercharged LSJ in the first gen SS Cobalt. It has no variable valve timing. But uses standard coil on plug. No cassette like the 2.2s before it. It is heavily based on the LK9, a turbo 2.0 and only put into the Saab 9-3. Lots of parts on the Cobalt engine even retain the Saab casting marks. The Saab, being who they are, used their own tech still that didn't need a standard cam sensor but it was in a coil igniter box in the wiring loom.
When GM replaced the Saab turbo setup on the engine for a supercharger, they removed the cam driven brake booster vacuum pump. And in it's place they made a bolt cam trigger wheel and pickup. Standard 2 small and 2 big teeth pattern they use on other engines and later Ecotech engines.
What does all of this mean? The LSJ is a much easier engine to run with aftermarket computers than the early 2.2s. Also, the Saab LK9 engines are all over in junkyards, with factory manual option, and unlike the Cobalt can be found with the F40 6speeds. And all that is needed to run that engine is to get the cam sensor and coils from an LSJ.
I am doing an LK9 swap in my car. I got lucky and found an f40 equiped 2007 Saab in a pick n' pull. $280 for the engine + trans. Ebay for the Cobalt cam sensor and some other parts (the S/C intake manifold has a built in water/air intercooler) I will be using a Haltech Elite 1500 to run the engine. Yeah. It's $1,800 for the computer and a generic wiring harness. But it will run the original dash. And the software is 100% free with no restrictions at all.