i decided to just use normal square edge weatherstripping .without actually seeing the product , it is hard to get the perfect solution .so i have wasted about 35 bucks on various size and shapes of foam , i think now i have something i like : i am going to change to slightly narrower side foam to avoid the pinching you can see .and i need to find some matching screws that i like better .at the hdwre store , different lengths meant different heads .the holes were drilled and then tapped in to the buckets .bottom foam is 1.25"W x 3/16 thick trimmed to fit and double thick along the sides running down the hood .this causes the lens to match the contour better .the side foam shown is 3/8 W x 1/4 thick .i am going to 3/16 thick for the final version , should make it easier to pop the lens on and off for aiming .next will be wiring and making a harness for high beams .
made up the headlight wiring harness for the drivers side .i want all 4 lamps on for the high beams so i soldered a 7A diode from the high beam 12 V positive wire to the lowbeam 12 V positive wire .also took a feed from the 12V high beam to the coil of a relay and to the input post of same relay .then the NO post of the relay feeds the positive wires for the high beam flappers . i assumed the negatives on the light harnesses were not switched , so then all the negatives got tied in to the low beam harness negative .so when i am on low beam just one light per side is on with the flapper closed .when high beams are selected , then all four lamps will be on with all flappers open .my only concern was how hot the diode might get with the highs on .left the lights on with the car running for 1/2 hour and the diodes got fairly warm but not really hot so they will do the job .pics: i dont have a pic of it yet but i also changed to the narrower side foam and shimmed the cover so that it now matches the hood contours almost perfectly .i have ordered the other HID kit i need and will have the lights all wrapped up by friday .
[This message has been edited by wftb (edited 11-12-2012).]
my diode backfeed idea worked great on one side , but with all 4 lights hooked up there appears to be too much voltage drop to get all 4 lights to fire from the high beam circuit .so i have to figure out a way to bring another feed in .for now , low beams are the outer lights and high beams are the inner lights .
turns out i gave up on the diode back feed idea too soon .i forgot that with a ballast setup like this the voltage is critical and when i thought it was not going to work , i forgot to try it with the engine running .so i soldered another diode in and turned the engine on and tried the lights and they work perfect .you just do not have high enough voltage to fire all four lamps without the engine running .
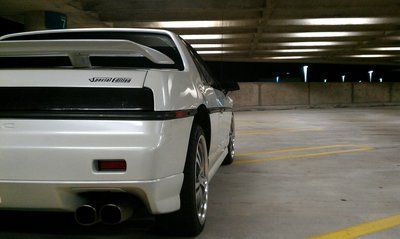
got my headlights aimed tonight .really easy to get right , these kits are really well designed .i live on a single lane straight level road and that made it simple too .i aimed the low beams to aim the way my ford focus does, and walked in the line that a car coming from the opposite direction would follow .really easy on the eyes! such an improvement over my old set up and over stock as well .i did not need to aim the high beams , i guessed pretty good in the garage and they simply light up everything in sight .real flamethrowers .any one who is having trouble with their pop ups , dont hesitate to get a set of these .lighter weight and better light to boot .i looked at my can am spyder roadster and it has the same headlights as the doublec4 kit .
got my headlights aimed tonight .really easy to get right , these kits are really well designed .i live on a single lane straight level road and that made it simple too .i aimed the low beams to aim the way my ford focus does, and walked in the line that a car coming from the opposite direction would follow .really easy on the eyes! such an improvement over my old set up and over stock as well .i did not need to aim the high beams , i guessed pretty good in the garage and they simply light up everything in sight .real flamethrowers .any one who is having trouble with their pop ups , dont hesitate to get a set of these .lighter weight and better light to boot .i looked at my can am spyder roadster and it has the same headlights as the doublec4 kit .
Thanks for the review!
Glad you got the lights together and aimed. They are definitely an improvement over stock and the light output is great. Hope to see continued progress with your car.
my goal now is to get the car painted and ship shape by may so that i can go to the 30th fiero show in indianapolis .it is running again , been driving around the cottage roads to see what is going to leak etc (car has been in the garage for over a year).so i have two leaks : the cavalier clutch master cylinder has developed a leak and the gasket at the oil drain on the turbo has a slow leak .the turbo will be easy , i have another gasket somewhere if i can find it .if not i can just make one .the clutch cylinder will be harder as it is in here somewhere : you can see the fluid resoirvoir here : the one thing i dont like about turbos : plumbing ! i am going to try to just run to the HTOB without the slave/master combo that i have now if i can .i have not had to do any work to the cavalier end of things as far as clutch hydraulics go .i want to try to maintain the self bleeding feature of the cavalier system .even though it has developed a leak , the clutch still works fine .i know some of the F23 swap threads show adapters to do this , i will have to do a bit of searching .
building a new home for the fiero .this is an old fabric shed that the fabric rotted off of .i am bracing it up and building a wooden door for it and it is sitting on a pressure treated wooden floor .it will be covered with a blue poly tarp and then a heavy duty bale tarp over that .it is 12X20 and i hope to be able to heat it .doing a shed this way is the only way to survive the wind around here :
the shed is mostly done and insulated .the fiero is in and now i can concentrate on prepping for paint .the shed is heated with 2 1500 watt heaters .i had to run a second circuit when i managed to fry my ground fault receptacle on the house by running a shop vac and one heater at the same time on that circuit .fixed that and added another heavy duty cord feed from inside the garage and i added a second heater to that circuit .so now i can shut off one heater and run tools without popping another gfci .pics: lots of room to work and i am adding more storage cabinets and work benches whenever they are on sale .and now i have lots of space in my real garage so i can park my go to work car in at night .so much nicer to not have to clean the snow and ice off at 6:45 am.
putting the new shed to good use .i bought a bunch of rustoleum spray bombs a while back.i gave up on the red that i wanted to use as it came out blotchy. the arctic grey i used on my new to me rear clip was very easy to use .so i decided to paint the upper half of the car in the grey .so i put a finish coat on the rear clip and painted the roof .working not too bad , i had 2 full cans left so i decide to get some more .go to home hardware to find out that shade is discontinued .great.i gathered all my part cans and managed to finish the whole top of the car .i now have half a can left and that has to do a second coat of the rear deck lid and some minor touch ups .the lower half of my car is gloss black .i dont mind the way they look together , but the bumpers have spider webbing .and i wanted to paint the top half of the front bumper the same as the upper car .right now it is all black , the way it was when i bought it , and it does not look right as far as i am concerned .anyway , i hope to have a passable job when i am done , with a lot of buffing and waxing maybe a 10 footer .pics slightly darker shade still available its hard to get decent pics because the shed is a little small for the camera .
[This message has been edited by wftb (edited 01-02-2013).]
there is a lot of reflections of the red tape that i taped up the seams of the styrofoam with.i have one run under the driver side mirror , one run right at the left hand front corner of the front hood and three finger prints on the other side of the front hood from when i lost my balance stepping over the nose .i am going to let the paint harden up for a month and then wet sand and hit them with rubbing compound .i found some water based tremclad paint that might work for the bottom half of the car .get to try out my new sprayer .first i need to see if the stuff even sticks to the old paint .
[This message has been edited by wftb (edited 01-03-2013).]
the gallon of water based tremclad i bought does not have good adhesion on the OEM paint .i dried it with a heater for an hour and i could still scratch it off with my fingernail .it really sticks well to the rustoleum spray paint i have been using .and there are more colours available , but i have to drive to Owen Sound Home Depot to get some .
i had the whole top of the car done in the light grey rustoleum .but i did not have enough for the second coat on the deck lid .so i had to switch to the dark grey .home depot still carries the slate grey , and is a currently available colour .everytime i wet sanded a coat, i would look at the finish and think that it looked better than the high gloss unsanded paint .it is nearly impossible to get a consistent finish with the spray bombs .some panels came out perfect , others not . so i decided to wet sand the whole car and then just wax it .so the process is, two thick coats of paint ,wet sand with 800 then 1000 grit , then polish with ultra fine synthetic steel wool .gets rid of the orange peel and all the waviness .comes out looking like a sheet of semi gloss plastic.the bumper was a pain , the spider webbing was right in the bare plastic .had to use some high build polyester primer to fill the spider webbing .finally came out pretty good , nothing has come through the top coat yet .here is what the finished car is going to look like :
more pics, you can see the difference in gloss here: fixing the bumper the whole top of the car except for the rear deck lid is now the darker grey .called universal slate gloss by rustoleum .
it is all one colour now .really am sick of paint work .about 40 hours of wetsanding and buffing to go and then i have to decide what i want to do for 1/4 panel windows and the rear grill area .pics: i wet sanded and polished the top of the back bumper, in a couple of weeks it should all look like this:
fixed my turbo oil leak with a new gasket and a new hose .fixed the clutch leak , real easy and cheap as in free .what happened was some crud got in to the cavalier master and caused the leak .took it apart , cleaned it and put it back together and no more leak .here is a bad pic of the crud around the seal :
put the insurance back on since i am very close to being done with everything .weather is still too bad to drive the car yet , we are getting a late spring .i now have the back half of the car back together : painted the fastback trim to match the car and repainted the gills in black satin got rid of my icebox, took up to much room and i never used it any way later i also removed the evap canister(AC) since it frees up some space and i dont intend to get the AC working anyway . installed earls solo bleeders and bled the brakes .i got these because i seldom have any help and i was having trouble getting the last bit of air out .these work better than any thing else i have tried and are cheap for most cars around 30 bucks for 4 .would be good for clutch lines too . my interiour is all back together , just have to set the ride height and then off for an alignment .
got the car out of the shed and in to the garage .could not get the ride height set in the shed because of the "give" in the floor .it was driving me nuts until i figured what was happening .got my lenses on my lights .decided to just lay a bed of velcro down to fill in the gaps .not perfect because i did not drill my holes in the right place and i dont have an even gap.i am going to get another set of lenses and do a better job . took a few pics,also a pic of my last allignment read out. you can see i had a few settings in the red , not too far out that it caused any problems with tire wear or handling .hopefully i will be all green after the next allignment .still cant drive it yet , we are still getting snow and the roads are covered in salt and sand .
thanks .i will PM you about another set of lenses soon .today is april 1 and i still cant drive the car because it is too cold out . and it has snowed off and on all day .my car has summer high performance tires that are not supposed to be used at around the freezing mark .took some pics .i cant finish my wet sanding and minor touch ups i want to do yet cause it is to cold and i dont want to put it back in the shed .looks good in pics though .yesterday afternoon was warm enough to go for a shakedown run .the bumpsteer kit works well , nice and stable on the bumpy road on the way to work .my new brake calipers really dont improve the braking much , but they are smoother than the old ones .i was getting some low speed pedal pulsing before that is gone now .i had the discs turned while i was still driving it and that did not fix the problem .the pedal is a bit softer now and goes further down to the floor , but not bottoming .i may put the S10 brake booster upgrade on it sometime .pics: looking at rear window options now , am thinking maybe the fiero fibreglass open panels .
i ended up buying new tinted 1/4 windows from the fiero store .they were back ordered so i waited about 2 weeks but they look nice .it has been too cold to install them though .i bought a new instrument cluster today : this one is from an 04 ecotec powered sunbird .it is compatible with my cavalier harness .i find it funny that the the guage configuration is slightly different .a lot of development money down the drain for something no one would even notice .this time the plan is to make a whole new pod for this cluster , rather than hack it up and make it fit in to the fiero cluster pod .tomorrow i am going to pick up some MDF and carve up a home for this cluster .i am hoping to make the turn signal indicators work as well as the backlighting .according to my cav/sunfire haynes manual , i can cut one wire and that will disable all the warning lights .i am going to try that on the old cluster .right now i just have them covered with some vinyl , but if you lean over you can see them (airbags, service soon etc).put about 2000 km on so far this season, i was kind of surprised at that with all the rotten weather .but the rotten weather means i cant ride the motorcycle so the fiero has become first pick .yesterday it snowed most of the day .nothing stayed , all melted .
today we finally had some sun and warmer weather , so i put on my new windows .they fit really well, but of course i got the passenger side a little to far foreward .and it stuck so well i did not attempt to take it off .its not too noticeable but annoying to me .i ended up putting my old drip rails back on .once i put the windows in ,there was space that needed covering so back on they went .i hope to find a nice set sometime .
[This message has been edited by wftb (edited 04-26-2013).]
Went to the 30th and had a great time .40 miles from home and the car started surging at 100 KM/hr every once in a while .very annoying as it has been forever since i have had a problem .i decided to gas up before crossing the border , and as long as i did not have a problem starting it i would keep going .started right up , so off i went .the surging happened off and on all the way down .ran a scan when i got to the hotel and it was not throwing any codes but i did notice my air intake temps were hitting the low 40's C .when i got home , i put my ice can back in the front trunk and changed the fuel filter .with out the reservoir of water , i think the pump was just pushing air half the time .any way , the fuel filter was full of some tar looking stuff so it seems to have solved the problem .there was a fellow at the show with wheel scales and i had the car weighed .results 819 driver rear 577 driver front 742 pass rear 653 pass front that puts the total at 2791 lbs with frt /rear at 44% frt and 56% rear .this was with a full tank of gas .i thought i would be lighter but i have a lot of turbo related stuff that easily adds up to over 100 lbs .they ran the scales friday night briefly before the monsoon hit and again sat night after the Callies speech so i dont know if a lot of cars did this .hopefully more people will post results so i can compare .thanks to all the 30 th organizers and volunteers , lots of hard work was put in to make it a great show .
Excellent build my friend! Thanks for paving the way for the people who want to do an Ecotec swap. Although the journey was long, the end result was well worth it.
I've met WFTB in person, very cool guy! I've also gone for a drive with him in this awesome little car. This car is so much fun!
sorry it has taken so long to reply and update but been really busy with work and other projects .it was great to meet a fiero enthusiast from nearby .off and on all summer i have had fuel problems .after the car acted up again , i decided to quit stalling and drop the tank and see what was going on .i expected to find a bunch of crap but it was clean .so i ordered a new AC delco OEM fuel pump .cheapest i could find was 280.00 including tax and delivery .aftermarket ones were as cheap as 80.00 but i dont want to drop the tank for a long time so i passed on those .it runs awesome again , like it did before i worked on it for a year .i tried to get my fuel gauge to work while i had the tank out .turns out that the float was hitting the plastic baffle in the tank and it could not rise .so i cut a hole in the baffle but now i have a different problem .the float seems to have gotten stuck in the 3/4 full position against the top of the baffle .so i am still using the trip odometer to decide when to fill up .i have the old pump and sender unit still , so maybe i can figure out a fix .but , not going to drop the tank again any time soon .
putting it away for the winter soon .funny but my car is still the only documented running turbo ecotec swap .planning more suspension work soon but not till the new year .
putting it away for the winter soon .funny but my car is still the only documented running turbo ecotec swap .planning more suspension work soon but not till the new year .
i wish my driveway still looked like that ... snow started here in late november and never left .unusual for around here , snow that sticks normally comes around xmas .but i thought i would post to celebrate 50000 views a while back .thanks to everybody for following along and have a great winter ....
Car has not been worked on this year .Other project has taken all my time , but I have more things I want to do to this car .Driving it this year with the bad winter is still about a month away .I noticed another ecotec swap is starting so I thought I would bump this so he does not feel so all alone.
I have done nothing to the car this year except drive it .With the new fuel pump I put on in the late summer last year ,it has been running great .I am still planning suspension work and interiour upgrades but not untill the snow flies .Right now I am sitting in Sheridan WY on holidays with my youngest son .We are off to Yellowstone tomorrow hoping to get a campsite and spend a couple of days .So far we have been to Cinncinatti (Reds game) ,St. Louis(saw the Cards) Denver(Rockies game) and have not seen a Fiero .After Yellowstone , we are going through Seattle and up to Vancouver BC .Not in the Fiero though , not enough room .Driving our 2011 Ford Focus and it has been cheap , comfortable and reliable .
So the car is now in the " work on " position in the garage .This spot was occupied by our 1991 Civic wagon while I built a new stainless steel exhaust , put in a new gas tank and rebuilt the front and rear suspensions .The plan for this winter is : 1- make and install an upper control arm /coilover suspension system 2-Utilize a stock rear knuckle and rear brakes as part of this package . The reason for this is twofold : I want the lightest suspension possible and I want a parking brake . The stock disc is very light compared to the 11" lebarron rotors on the back now .The stock rear caliper is a fairly lightweight AL unit .On my fiero , judging by the amount of wear on the rear pads vs the front pads , the rear brakes do not provide any more than maybe 30% of the total braking .And my brakes work really well on the street and on a track .I use the stock MC and booster and proportioning valve .I will probably gain some unwanted rear brake fade but I am not concerned about it . And in the looks department , stock brakes have no cool factor at all .But I am hoping the gains outweigh the losses .No pics for now , my old camera crapped out and still waiting for the new one to come in the mail .
This is the start of how I hope to make the upper arms .I had made an attempt at this a couple of years ago but gave up when I felt over my head on this project .But there have been a lot of threads and people doing similar things that I developed some ideas that I think are workable .I have all the bushings I need to make the arms but I need to hunt down the tube steel I need .I am not trying to reinvent the wheel here , the geometry shoud be very similar to stock .I am going to eliminate the need for tie rods and utilize coil overs similar to what I have on the front end .I want much lighter unsprung weight and adjustability .and if it does not work , I will be able to revert to what I have now .
[This message has been edited by wftb (edited 12-07-2014).]
I bought these delrin bushings from West Coast Fieros probably 7 years ago .Thought I could make them work with my Held Motorsport front arms but not possible at the time .But now I am going to use them for the outer bushings of my new upper control arms .So spent most of today figuring how to make the arm holders for these bushings .They are designed to fit stock 84 -87 UCA so they fit no standard pipe sizes . So I cut , bent and welded a little metal barrel to fit .It is three petals welded and filed to fit .Going to make another one tomorrow .I wanted to get our local machinest to make these but he is on holidays and the other guy is retired .So being the impatient guy that I am , I made one myself .
[This message has been edited by wftb (edited 12-12-2014).]
These are the bushings that will be on the frame side .I got our now retired machinist to turn them down and make the pipe that will be welded to the arm an exact fit .Drilling a hole for the grease fitting will make sure the AL bushing will move with the arm .I hope these bushings will last as long as I do , just have to keep them full of grease .They are very precise and very smooth .
[This message has been edited by wftb (edited 12-16-2014).]
I noticed another ecotec swap is starting so I thought I would bump this so he does not feel so all alone.
Were you thinking of me when you said this? If so, thanks.
I see that you're starting some suspension work. Let me know if I can assist with some laser cut parts. Just email me some quick sketch's with dimensions and I'll burn them for you.
PS-I'm picking up two more Ecotec engines this week. Need anything?
That is correct and then there is now another fellow doing an LE5 turbo swap .I have been following your thread love your fabricating work .Dont really need any parts right now , I am kind of planning as I build and none of the parts that I am making are all that complicated .Got some more of the frame mount done tonight , but not worth a picture yet . Thanks .