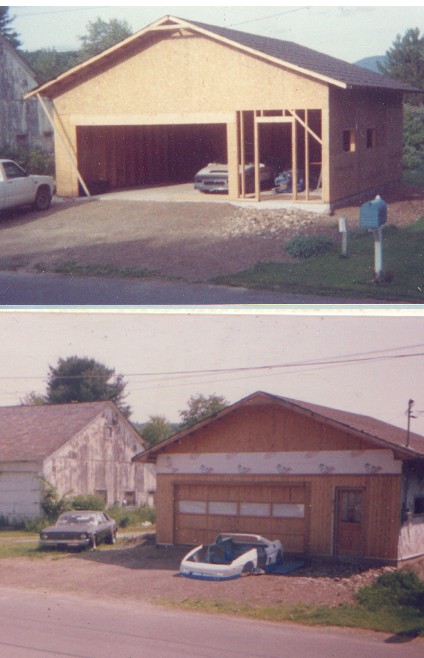
Russ I Love following along, good pictures, thanks! The hole thing brings back fond memories of my original install. I started my car back around 1990 then bought a new home and had to build a garage so I could finish the project.
One thing I did on my Original install that is not necessary for your permanent installation is the use of riv-nuts. Riv-nuts (and by other names) are large rivets that are threaded on the inside allowing the use of bolts where you can not get to the area behind for a nut, for any that do not know. I used �-20�s in the door opening and under the sail panels among other places, with button head screws in them. Neat and easily removed.
This will make it easer to get the rear clip off for other builders that may wish to. Another mod. I made to help simplify the removal of the rear clip was to the stock panel at the rear of the roof. The small stock section that you reuse has a couple of small humps for indexing, that I ground flat. Then I slotted the holes at the very front edge of this part and enlarged the hole diameter to clear washers I used to maintain the space between the roof and the dill-and-mill pads on the chassis. With these mods you can pull the rear clip strait back with the front roof panel, interior, and bumper in place.
The draw back is you can not fill the seems with any thing but silicone. You will be exchanging smoothness for serviceability and reparability a tuff call in anyone�s book I think.
As for filling and smoothing the seems I prefer a somewhat labor intensive method. I use a 3� sanding disk on a angle grinder (rite angel dia grinder) to grinder thru the gel cote and form a channel about half the thickness of the glass deep and 1 �� wide. Then fill the channel back in with glass mat and resin. Use wider strips of matt first then successively narrower strips as needed. Grind the cured glass back to just below the surface of the panels being joined then cover with gel cote or filler.
Possibly the trickiest spot on the seems to do well is were the front fender meats the facia forming a square corner for the hood, extra effort is needed there. As you should come over the edge and across the flange as well as along the front edge.
I hope this helps someone and offends no one.
And thanks again Russ
George
------------------ Sincerely George www.switch-tray.com
Originally posted by Russ544: I've had some trouble with bondo cracking at the upper B piller joint each time the rear clip is removed and replaced on the car
Speaking of panel flex (which you were, kinda)...
Would it be possible to have the front and rear fascae made in urethane instead of glass fibre? That way we wouldn't have to worry quite as much about having a rigid (and thus easily cracked) fascia at each end of the car.
Also, would Sage be willing to modify the molds to incorporate the larger wheel openings that you made? If the parts were molded with larger wheel openings, then they'd have basically the same trim strips as a stock Fiero, and the molds could be further modified to make the panels accept factory trip strips... Thoughts?
------------------ Turn the key and feel the engine shake the whole car with its lope; Plant the gas pedal and feel in your chest neither a shriek nor a wail but a bellowing roar; Lift and be pushed into the harness by compression braking that only comes from the biggest cylinders while listening to music of pops and gurgles. Know that you are driving and American V8. There are finer engines made, but none of them are this cool.
Luck, Fate and Destiny are words used by those who lack the courage to define their own future
Would it be possible to have the front and rear fascae made in urethane instead of glass fibre? That way we wouldn't have to worry quite as much about having a rigid (and thus easily cracked) fascia at each end of the car.
I don't think that would be possible (anything is possible, but I mean within reason) due to the way the fenders join the facia. Also the wider fenders wouldn't meet up very well with the OEM facia. I don't see where the rear soft facia would be a benifit actually, and the front ones always seem to be warped on top and not very attractive anyway. One area that I do have on my agenda however it to try and use the more speedbump friendly "skitime" type air dam. I haven't actually tried to fit it up yet, but I'm hoping that the stock lower facia will flex out enough to meet the wider IMSA nose piece OK. I'll be finding that out before too long and will of course pass that info along in this thread.
quote
Also, would Sage be willing to modify the molds to incorporate the larger wheel openings that you made? If the parts were molded with larger wheel openings, then they'd have basically the same trim strips as a stock Fiero, and the molds could be further modified to make the panels accept factory trip strips... Thoughts?
Perhaps Sage will answer that himself, but I've mentioned to him that the larger wheelwells would certainly be a welcome change for many potential buyers, and he did say he agreed and might be willing to make new molds for that at some point if there were enough interest. Perhaps with more input from you and others, he can be further persuaded It is pretty simple to enlarge the wheelwells as I have, but of course if you planned to use inner wheel tubs those will need to be fabricated as well, as the glass extentions supplied wouldn't work with enlarged openings (which is why I ordered my kit without them to begin with). I most likely will make/modify some for my enlarged wheelwells, but the tubs actually aren't vital to the kit anyway IMO. The trim is molded into the IMSA body panels and can't be changed.
Russ I Love following along, good pictures, thanks! The hole thing brings back fond memories of my original install. I started my car back around 1990 then bought a new home and had to build a garage so I could finish the project.
One thing I did on my Original install that is not necessary for your permanent installation is the use of riv-nuts. Riv-nuts (and by other names) are large rivets that are threaded on the inside allowing the use of bolts where you can not get to the area behind for a nut, for any that do not know. I used �-20�s in the door opening and under the sail panels among other places, with button head screws in them. Neat and easily removed.
This will make it easer to get the rear clip off for other builders that may wish to. Another mod. I made to help simplify the removal of the rear clip was to the stock panel at the rear of the roof. The small stock section that you reuse has a couple of small humps for indexing, that I ground flat. Then I slotted the holes at the very front edge of this part and enlarged the hole diameter to clear washers I used to maintain the space between the roof and the dill-and-mill pads on the chassis. With these mods you can pull the rear clip strait back with the front roof panel, interior, and bumper in place.
The draw back is you can not fill the seems with any thing but silicone. You will be exchanging smoothness for serviceability and reparability a tuff call in anyone�s book I think.
As for filling and smoothing the seems I prefer a somewhat labor intensive method. I use a 3� sanding disk on a angle grinder (rite angel dia grinder) to grinder thru the gel cote and form a channel about half the thickness of the glass deep and 1 �� wide. Then fill the channel back in with glass mat and resin. Use wider strips of matt first then successively narrower strips as needed. Grind the cured glass back to just below the surface of the panels being joined then cover with gel cote or filler.
Possibly the trickiest spot on the seems to do well is were the front fender meats the facia forming a square corner for the hood, extra effort is needed there. As you should come over the edge and across the flange as well as along the front edge.
I hope this helps someone and offends no one.
And thanks again Russ
George
Thanks for the tips George. The process of grinding out the joints and using glass is probably an especially good idea. I didn't do that, so time will tell if cracks show up in mine eventually. I did use plenty of panel adhesive in the joint as it was being bolted together however BTW George. what happened to the photo of your car in your previous post?
[This message has been edited by Russ544 (edited 09-23-2004).]
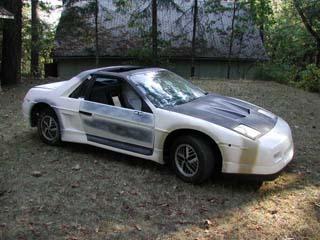
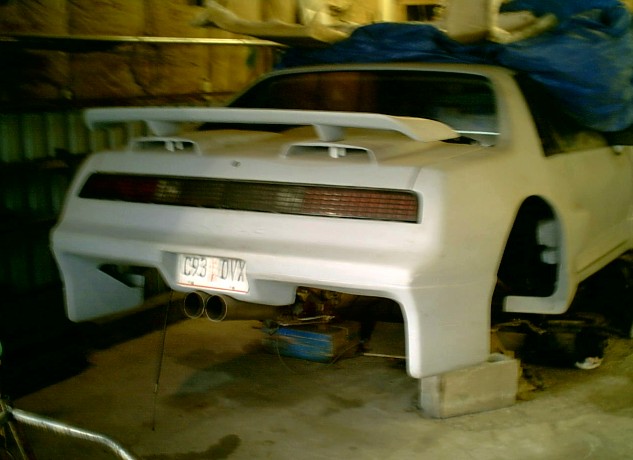
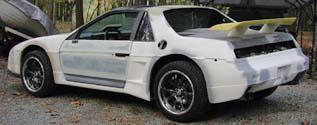
Russ, I actually posted about 9 photos to show some of the parallels to what you are doing, that is using this kit as a starting point and not the end product. However I began to think of the dial up and I also did not wish to take over your thread so I took them off. . This is the third time I have altered the car. I call it a GT/4E (4th edition) stock being the first. On 3E (white with blue) I installed the IMSA kit and made many changes to it but did not open the wheel wells. This tine around I am making a grate many more changes and the wheel wells are just one. Also included this time, it has been shaved and sectioned
Thanks George
------------------ Sincerely George www.switch-tray.com
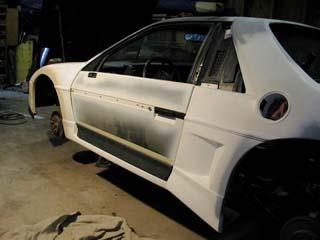
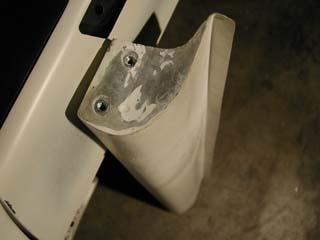
CHAPTER 8: This weekend the attention turns mostly to several "accessory" items. With the front wheel openings compleated, and with the panel adhesive curing on the front fenders/facia joints, I began work on a flexable air dam (aka Skitime). It wasn't certain that this would flex out enough to work on the widebody nose, but by the time all the "extra" material gets removed from the urathane aero nose, it becomes flexable enough to form into just about any shape you want it .In fact it becomes so flexable that it's much easier to do the final trimming after it gets mounted to the IMSA facia and becomes a little less of a wet noodle. A pop rivet every 6" or so, with large backup washer, seems about right. to secure it to the lower lip where it can easily be trimmed down to its finished size and the edges sanded smooth. You might also notice the metal strip on the upper lip of the facia below. this is the Fieros origianal top facia retaining strip which the lip of the flexable facia was screwed to. By slotting out the screw holes that attach it to the spaceframe, and riveting the strip onto the lip of the IMSA nose, a good solid system is formed to attach the IMSA nose to the chassis. With the mounting holes slotted out, a degree of adjustability becomes possible to assist in squaring up the hood opening and for adjusting for the upper door/fender gaps.
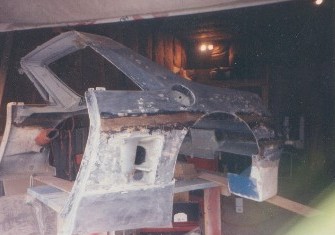
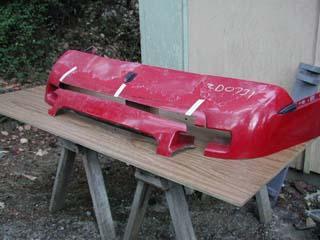
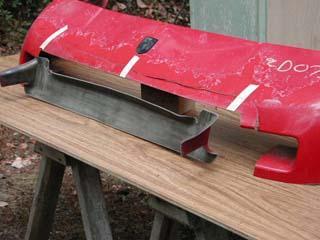
During the air dam project I began to think of ways to improve the airflow to the radiator. one thought led to another and a pretty cool project began to develop. By cutting out part of the upper section of the remains of the aero nose:
And flipping it upside down:
Then by standing on one foot and squinting with your left eye crossed, you'll begin to see it morph into the form of a lower radiator air deflector . The part that was once the sides of the turn signal opening have now become support members that just happen to be spaced the perfect distance apart to mate up to the stock Fiero rubber/plastic ductwork near the sides of the radiator (yellow arrows). A couple pop rivets and a strip of fiberglass (green arrow below) secure the cleaned and painted deflector to the lower radiator support, wile one or two aditional rivets per side tie the sides to the existing Fiero ductwork. As measured from the mounting flange this one is 3 1/4" high which seems about right for most cars. Where do I get the patent
[This message has been edited by Russ544 (edited 07-08-2009).]
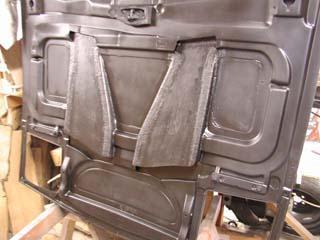
CONT: I was so happy with the results of my front vents on the sbc project that I'm building a duplicate for this car, and most likely for every non-restored car I build from here on. To me they just look like they belong on a Fiero, but maybe I'm just being paternal The bottom of the donor hood was really scratched up and dirty so after the glass work on the vents was smoothed up a bit, the whole underside got sanded and a new coat of semi flat black Krylon applied.
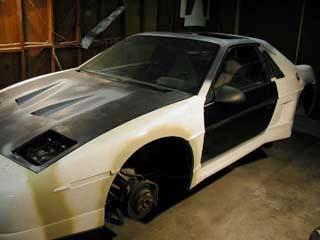
The lower Gfx are just setting in place in this photo below, as I've been doing lots of sheetmetal "adjusting" on the door sill with a ball peen hammer, as well as plenty of fiberglass grinding and cursing. I'm sure I'll have more to say about these pieces in a future chapter, as fitting these things in here has turned out to be a bit of a challenge .
<until next weekend>
[This message has been edited by Russ544 (edited 07-08-2009).]
Originally posted by Russ544: The trim is molded into the IMSA body panels and can't be changed.
I know it's molded into the panels, but if the molds are being changed to go to the larger wheel wells, how hard would it be to change them to get rid of the trim and set the panel edges up like stock as well? Then the panels could be screwed/glued together just like stock panels and the stock trim applied to them... I think that would lead to a better integrated wide body kit...
------------------ Turn the key and feel the engine shake the whole car with its lope; Plant the gas pedal and feel in your chest neither a shriek nor a wail but a bellowing roar; Lift and be pushed into the harness by compression braking that only comes from the biggest cylinders while listening to music of pops and gurgles. Know that you are driving and American V8. There are finer engines made, but none of them are this cool.
Luck, Fate and Destiny are words used by those who lack the courage to define their own future
Then by standing on one foot and squinting with your left eye crossed, you'll begin to see it morph into the form of a lower radiator air deflector . The part that was once the sides of the turn signal opening have now become support members that just happen to be spaced the perfect distance apart to mate up to the stock Fiero rubber/plastic ductwork near the sides of the radiator (yellow arrows). A couple pop rivets and a strip of fiberglass (green arrow below) secure the cleaned and painted deflector to the lower radiator support, wile one or two aditional rivets per side tie the sides to the existing Fiero ductwork. As measured from the mounting flange this one is 3 1/4" high which seems about right for most cars. Where do I get the patent http://pic2.picturetrail.com/VOL7/1543635/5114421/68029120.jpg
Genius idea on this one! I knew I kept the rest of that old fascia around for a reason!
Today I pulled off the door skin, as several tasks were easier to accomplish with it removed. One task was to repair the lower hinge. I had cleverly taken a lower hinge off a parts car several days ago and taken it to work with me so I could fabricate a new detent roller on my lathe, and replace the hinge pins. Except for the mental trauma of dealing with that dang spring, I was really proud of the way it came out, and sure that I was saving a bunch of weekend time by doing it this way.......... Do you know the saying about "the best layed plans"? Much to my disgust, I discovered today that the bolt holes on a lower hinge from an 84 don't line up with those from an 88 . One of these days I swear I'm gona' pour a can of gas on that damn 84 and burn it to the ground wile throwing rocks at it and chanting "burn baby burn" .... anyway.... I was able to remove the new pin I made from the 84 hinge and install it in the 88, so it wasn't a total loss. This car will be going from black to white, so having the skins off provided a good opportunity to sand and paint the doors edges and other hard to mask areas. The outer door handle and the little piece of trim behind it need to be installed with the skin off, so it's a good time to remove the round trim and install ribbed after painting behind those areas as well.
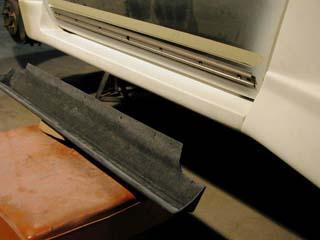
As I mentioned last weekend, I had quite a time getting the drivers side lower Gfx to fit to my satisfaction. Unfortunately I didn't take a decent photo of the problem area, but what it was, was that the ends of the lower Gfx piece didn't mate up with the corresponding areas of the front or rear fenders very well. Now this was in no way the fault of the way Sage made the parts, as he just pulls parts from the molds he has to work with. My guess is that IRM knew that these areas would need some grinding anyway, due to variations in each car, so they weren't too concerned with fit and finish on those points. Each car is a little different, and the length needs to be adjusted to get correct door/fender gaps. Unfortunately nobody told Sage or myself about this, so by the time the ends were ground down enough to get the door gaps reasonable, and the parts themselves mating up properly, it was necessary to grind almost clear through the ends in several places, which left them too weak to support the mounting hardware. I added 4 layers of glass mat to the inside of each end of mine, and I think Sage will be building future parts thicker in this area now that we know what to expect. After being built up inside, riv-nuts can be installed in each end to secure them to the fenders. Pop rivets will also be used in the flange under the car, and in the top, similar to the stock Fiero parts. Sage offered to build me new Gfx pieces at no cost to me, but I figure that these things are just part of the "guinea pig clause" in my contract for this project . That's the main reason I got the good guy deal from Doug on this kit. this is the first IMSA out of these molds in many years, so we all expected there would be some problems to solve along the way.
We didn't know about the lower Gfx issue at the onset, but we did know that something needed to be done for upper Gfx pieces. At one time IRM made these kits with full fiberglass door skins with the Gfx molded in similar to the fenders, but for some reason they decided to begin using stock door skins and add the IMSA Gfx to them. the problem is,... however they accomplished that task is apparently lost under the dust of time, as no provision for attaching them was provided to Doug or Sage with the rest of the IRM molds. Once again Sage came to the rescue with a truly excellent solution. by using the stock GT/SE Gfx trim retaining strip and adding a return on the back of the IRM trim, a simple and effective method to retain the top of the trim was created. for the bottom Sage simply added several inches of glass so it will now reach under the door skin where it's attached into the bottom of the door via pop rivets.
Now all I have to do tomorrow is just what I did today........ except on the passenger side .
[This message has been edited by Russ544 (edited 07-08-2009).]
Ver nice job. I've always loved the IMSA look. One question... since the round rib is molded into the fender and quarter panels, are you planning on molding the trim on the doors to match?
Ver nice job. I've always loved the IMSA look. One question... since the round rib is molded into the fender and quarter panels, are you planning on molding the trim on the doors to match?
Keep up the great work,
One of the first questions I ask Sage when we were discussing the door skin situation was "how will I match the look of the trim on the door to the molded-in trim on the rest of the car?" The conclusion was that there are a couple of ways to make a more perfect match if a person wants to. You could permanently attach the door trim and fill in the gap on each side of it; or scribe a groove along the sides of the molded in trim to make it look like a separate piece; or lay a pinstripe with a slight contrast on either side of the trim to simulate a gap. Now that I've actually seen the parts in person I have to agree with Sage on this one however. from 5 feet away you don't notice the difference in the real and "fake" trim anyway, so I most likely won't alter it at all. I do plan to paint all the trim black however. All the molded on trim on the IMSA is of the ribbed style btw, even on the fastback body style I believe. I personally prefer the ribbed trim anyway, but if you wanted the round it wouldn't be to hard to fill in the grooves in the ribbed IMSA molding to creat your own round trim. The beauty of fiberglass is that you can pretty much creat anything you want to with it.
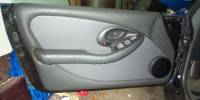
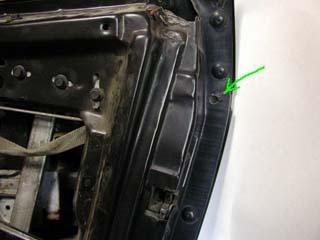
Today is a rerun of yesterday in the IMSA garage, with the exception that it's happening on the opposite side of the car, so I'll throw this in instead. The door trim is easily removed, with the exception of the little piece behind the door handle. that one piece is retained by a single screw that goes in from the back side of the door skin. To get to it you can remove the door skin........ or simply drill a small hole (note green arrow) in the door to access the phillips head screw.
[This message has been edited by Russ544 (edited 07-08-2009).]
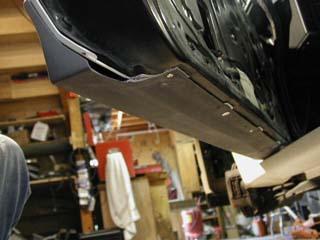
It's been a productive weekend . Both doors were gutted, sanded and edge painted, Gfx trim installed and the drivers door lower hinge repaired. As I mentioned the other day, Sage came up with a really clever solution to mounting the Gfx on the door skins, which are now installed as well. This is what it looks like from the bottom with a couple of the rivets installed. It works great Tedd. plenty of room under the door for them without hitting the lower Gfx or door sill.
Even though this is a "race inspired" car, some concessions had to be made for street legality, such as installing side marker lights, license plate mounting, and rear license plate lights. Those parts were confiscated from a parts car and holes drilled and riv-nuts installed for there future installation after the car gets painted. Holes were drilled to receive the rear reflectors as well. It was time to clean my shop and regroup by late Sunday, so wile the car was outside it received a good BonAmi water and scotch pad scrubbing to remove any remaining mold release, greasy fingerprints and other stray crud.
I still need to finalize a rear decklid, which needs a bit more air cleaner clearance and hot air extraction, but I can see a day when paint will be sprayed before too much longer . A machinist friend of mine will be making some steel wheel adaptors for me. I gave up on finding the style wheels I wanted with the correct backspacing, width, diameter, etc., so I'm converting to a more common Chev 5 x 4.75 bolt pattern. I wouldn't trust those aluminum wheel adaptors as far as I could throw one, but these steel ones will be super strong.
Now I need to go back to work so I can relax for a few days
<til next weekend>, Russ
[This message has been edited by Russ544 (edited 07-08-2009).]
That is looking fantastic Russ! Glad the door strips worked out, I DID have some doubt, not having installed any myself, but knew that if they COULD work, you WOULD make them work, nice job.
Can't tell you how gratifying it is to see this thing come together. There was never any doubt about your being able to do it in my mind, but it's still very satisfying to see it happening. Am really enjoying your installments and look forward to the next chapter as soon as I'm done viewing the last one for the 7th time! Your trials and tribulations will be of immense value in building the next kit, and hopefully avoiding some of the same pitfalls for the next builder of an IMSA wide body. Thanks for that too!
Keep up the great work and thanks for taking it easy on me for the idiosyncrasies of the kit that I really had no control over. You are doing a fantastic job, as was anticipated. Thanks for doing this thread too, I'm sure from some of the other responses, I'm not the only one getting into it.
Russ your attention to details and to the fit of the kit has inspired me to take another look at the fit of my GT/4E (modified IMSA) to see if I can use some of your tips to make it better.
I check your thread every day.
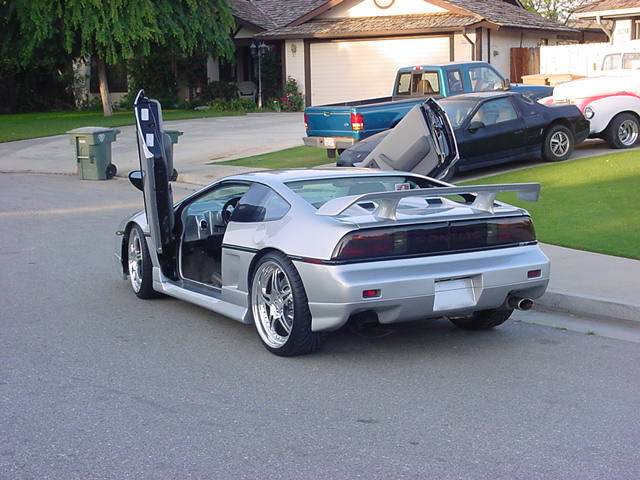
You mention that you may do something for �hot air extraction�. I refer to the �scoops� on my rear deck as air extractors. They also move the wing up and back to get it into a cleaner air stream and reduce air from the engine compartment from corrupting it. (I think)
It mite not be your �cup of tee� but check it out. .
------------------ Sincerely George www.switch-tray.com
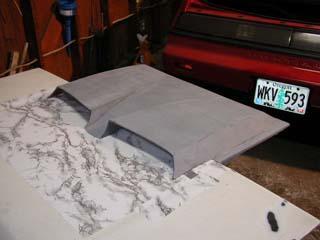
The rear decklid vents/wing stands you made are defiantly unusual. I like it ! I would have never thought of doing it that way but I imagine it works quite well by getting the vents back far enough to get back into the airflow where they can create some vacuum. I do already have a plan for mine however. In fact you may find that by the time I mention a specific portion of my project I've most likely been thinking about it for quite some time. I tend to do most of my "development work" in my head, with quite a bit of detail, before making any mention of it . About a year ago, when I was working on my sbc project, I built a plug and a mold for rear decklid "scoops" that would bolt onto an 84 style decklid in place of the vent section. My idea was to develop a system that any novice could just bolt on without any glass work involved. I was never totally satisfied with the shape, so it kind of got put on the back burner......... until now. I did pull one scoop from my mold and install it on my sbc project, but it still needs some reshaping to satisfy my vision of what it should look like. I don't have a decent photo of the finished and painted product but here's the raw part as it came out of the mold, sitting on an 84 decklid.
Part of that same sbc project involved making a fairly elaborate fan system to pump cool air into the engine compartment. It does work excellent on that car, but I'm beginning to think along the lines of not using a fan, but rather just opening up the side IMSA vents and running flexable ducts back into the engine compartment. perhaps even utilizing a sealed cool air box surrounding the carb, but that part isn't fully "developed" yet .
So was your Widebody made by IRM? What engine are you running in it?....... interesting exhaust system
Cheers, Russ
[This message has been edited by Russ544 (edited 07-08-2009).]
Boristheblade You are reveling a secret I am embarrass to have reveled. But the story includes divorce lawyers, investigators, family courts, financial devastation and nothing that belongs here, But the car was disassembled , spread around my shop and left in peaces so that I would have it when I came out the other side of it all. And I am now looking over the top of that deep hole, a few years later. I have me house, my shop, my GT/4E Fiero and my son and everything things is going back together(I hope).
Russ; Twin sons of different mothers???
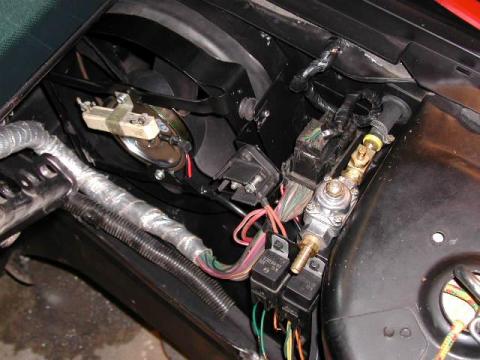
Both small holes on the bottom went to the brakes. A hose went from the top, large transition on the passenger side through the battery area to blow on the front of the motor, no fan. The left top fed the engine,
IRM? Yes. No rear spoiler, no wheel houses, made my own front spoiler, and came with little door caps. Sound familiar?
Full door skins weren�t offered until later when they altered the fender molds so the inner fender lip reached into the stock wheel houses.
Jim? The owner told me mine was not the �first kit� they soled because I only bought parts, not a kit. Who knows the truth of this? Not me.
The air extractors I did in 87.
------------------ Sincerely George www.switch-tray.com
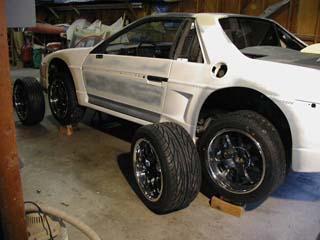
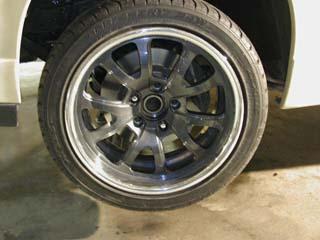
Those little girl tires were really starting to bug me, but I'd spent many frustrating hours browsing tire and wheel sites looking for the right combination of backspacing, outside diameter, wheel and tire width, and all in a package that had the look I was after. It sounds easy, but really had me pulling (what's left of) my hair out. Today I just took all my troubles to Les Schwab and was rewarded with what I think is an excellent package for this car. I should have done that a month ago. Of course having all the aforementioned criteria met and having a 5 x 100 bolt pattern would be like a free night with Brittany, so I will be making (steel) wheel adapters for the rear and redrilling the front hubs for a 5 x 4.5" bolt pattern,.. but hey....... She'll just have to learn to live without me . The hubs are off the car for machine work, and it's on jack stands.. but..... what do you think?
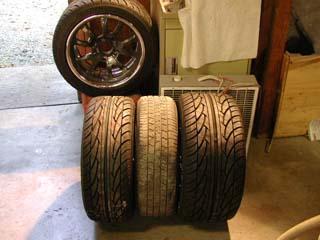
Center tire below is the stock 195-70-14 . YAaa BABY !!. I still may have to bite the bullet and pay the ridiculous price asked for the fake knockoffs however. Wheels are 17" Raceline GTs . 10" rear 8" front. XI-326 ZEXIUS tires Front 225-45-17 Rear 275-40-17
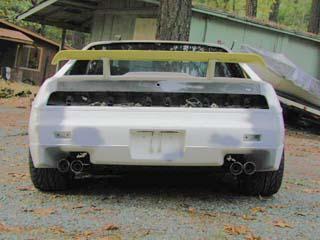
Other than acquiring rolling stock, all I got done today was mounting the wing on 5" stands, build a battery box platform in the front, and sanding sanding and more sanding. Now that the wheel problem is rolling along, I feel inspired again to move forward.
Russ
[This message has been edited by Russ544 (edited 07-08-2009).]
I know a chop top would be a ton of work, but it would sure look good :P
I do like the looks of a choptop, expecially on the fastback, but............. One of the reasons I love the Fiero is because it's one of the few "sports" cars I actually feel comfortable in at my 6' 2" height ...... Maybe a choptop with a "Gurney bubble" would be cool
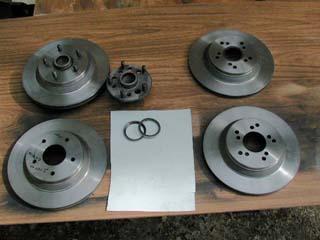
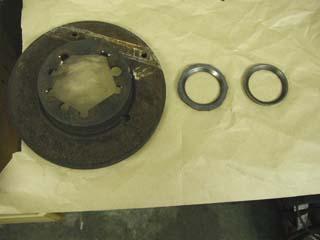
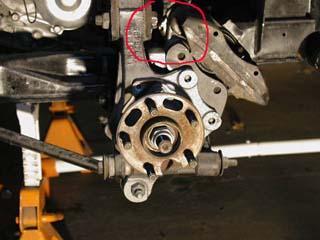
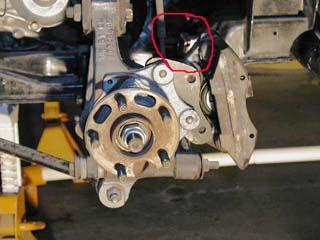
As long as I was converting to the larger bolt pattern for the new wheels anyway, I decided to go ahead and install 12" Vett brake rotors. True to my nature, I've done it a bit different than the norm so I'll share. The wheels I got are a 5 x 4.75 bolt pattern. the rears are 10" wide with a 6" backspacing. The Fiero rear wheel flange isn't large enough to re drill to the larger size, and I needed to space the wheels out another 3/4" anyway, so wheel adaptors are being made by a friend of mine who has a larger lathe than mine and an indexing fixture. The Vett rotors just needed to be re drilled to the Fiero pattern and concentric rings fabricated, so I did that myself. The front wheels are 8" wide with only 4 1/2" backspacing but fortunately the wheel flange is large enough on the front to be re-drilled to 5 x 4.75, so we're only talking about pushing the wheel out ~ 3/8" beyond stock. that amount shouldn't have a big detrimental effect on wheel bearing loading. Of course with the hubs re-drilled to 5 x 4.75 no re drilling of the rotors is needed here, so just adding the concentric rings finishes up the front.
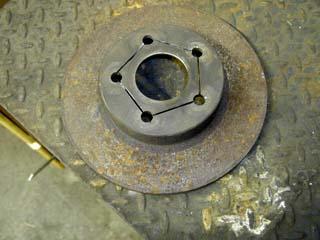
Rather than start with a hunk of steel and build concentric rings from scratch I decided to utilize some scrap early rotors I had laying around. By simply cutting out the center of the rotor with a side grinder with cutoff wheel attached
then knocking off the corners with the cuttoff wheel to create a semi-round shape, all that remained was to turn down the outer diameter to the Vett rotor ID of 2.785 wile leaving a small ( .050) flange on the ring to help retain it behind the rotor.
I've already mocked up the caliper brackets in wood, so tomorrow I'll whittle some out of some steel plate.
[This message has been edited by Russ544 (edited 07-08-2009).]
Originally posted by Russ544: The front wheels are 8" wide with only 4 1/2" backspacing but fortunately the wheel flange is large enough on the front to be re-drilled to 5 x 4.75, so we're only talking about pushing the wheel out ~ 3/8" beyond stock. that amount shouldn't have a big detrimental effect on wheel bearing loading. Of course with the hubs re-drilled to 5 x 4.75 no re drilling of the rotors is needed here, so just adding the concentric rings finished up the front.
I'd worry less about wheel bearing load and more about steering geometry. As long as the centerline of your new wheels is in the same spot as stock, you won't have any issues, but moving the wheel out may give you a perceptible change in steering kickback.
------------------ Turn the key and feel the engine shake the whole car with its lope; Plant the gas pedal and feel in your chest neither a shriek nor a wail but a bellowing roar; Lift and be pushed into the harness by compression braking that only comes from the biggest cylinders while listening to music of pops and gurgles. Know that you are driving an American V8. There are finer engines made, but none of them are this cool.
Luck, Fate and Destiny are words used by those who lack the courage to define their own future
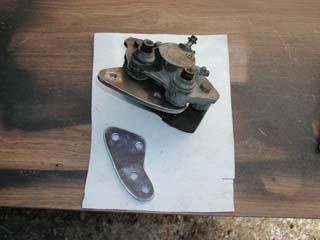
Whooo-Raaaa...... I've never worked so hard for so long to accomplish so little. Santa really needs to bring me a plasma cutter this year cause cutting out brackets this thick with an oxy torch and then spending hour upon hour in front of a 12" grinding wheel isn't my idea of a fun day......... but it' done now and they look good, so what the hey. The two caliper mounting bolt holes are tapped 12MM and did seem to torque down well, but I'm still concerned with the number of threads available in the bracket for such a stressed part as the caliper. I have an idea brewing to modify a grade 8 nut by turning down ~1/2 it's thickness in the lathe, then drilling out the bracket to accept the round portion of the nut, and tack weld it in place. Simple, strong, won't require any major changes to the brackets, and good for some peace of mind............... maybe next week .
The 17s swallow even these 12" rotors with an inch to spare
Now if I could just get my buddy to finish the adaptors for the rear...... I'm sure getting anxious to see what it looks like back on all fours again.
[This message has been edited by Russ544 (edited 07-08-2009).]
"If you're not good... at least be Lucky" will be my moto from now on. When I was mocking up the brake caliper brackets in wood last Friday I really wasn't paying much attention to the rears as I knew the mount spacing was the same and well.......... truth is, I just wasn't thinking. Saturday I made 4 bracket out of steel plate. all exactly the same. Today I went to put on the rear calipers and discovered that the E brake cable bracket hole lines up perfectly to hit the strut .
The thought of starting from scratch on those brackets was a less than pleasant experience to say the least, so after I was done throwing things in my shop, and swearing at the cat, I set the caliper on the rotor, which was mounted on the car by now, and began rotating the caliper to see where it needed to be to clear everything............. 0 ........ When I realised that the caliper needed to be below the old mounting position instead of above it, like the front calipers, I though perhaps I could reverse the bracket and use it to mock up the position of the new holes that would be needed. I was absolutly stunned when I found that everything fits perfectly with the bracket flipped "upside down". no grinding, fitting, drilling, nothing . bolt it on and go. amazing !! I'll be right back. I need to go buy a lottery ticket now. I'm feelin' lucky
[This message has been edited by Russ544 (edited 07-08-2009).]
Yup. Just a chunk of steel I had laying around. I just miked it at .344 (about 11/32"). The difference in offset between the Vett rotor and the stock Fiero is about .380 so it worked out.
Sorry I haven't had time for the IMSA project for a wile now. My dad was in the hospital for a total knee replacement and it hasn't gone well. Things seem to be improving somewhat however, so I feel I can devote more time to the car again. The wheel adaptors are done now, so I can install the 12" rotors, mount the wheels on the car, and determine how much to drop the suspension. I also built a roll bar and re-fit the rear vents into the new bodywork, so sometime this weekend I should have a progress report and some photos to share.
peace, Russ
[This message has been edited by Russ544 (edited 10-29-2004).]
Russ love the 5" wing stands,..ever think of extending the wing tips down a couple inches at an angle like on madcurl's silver chop top ?
I do love Curls car, but It's not the look I'm after on this project, which will be much more traditional/contemporary. I've never seen another car with extended tips like his.... apparantly he just glassed over some foam forms?? The main reason I like Curls work is that it's unique. gotta resprect a guy that thinks for himself. I wonder if they ever caught the guy that broke his door hinges
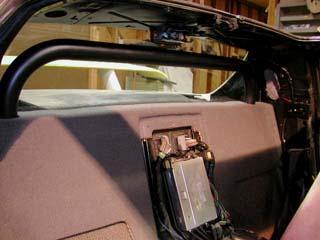
Today I had the dubious honor of scraping the cheep window tint, which was scratched and had turned purple, from the rear window. that litle chore took the better part of an hour. With that job done the mounting of the new roll bar proceded without much effort. I was happy to have recently purchased a right angle drill head however. The carpet and backing was cut to hide the flange which is welded on the base of the tubing and bolted to the rear shelf. That rear shelf is actually two layers thick btw and the layers are about an inch apart so long bolts are required. tack weld the bolts to the rollbar flange to make it easier to tighten the nuts from the engine bay.
The wheel adaptors came out really nice. about 1/4" needed to be removed from the stock wheel studs, and the nuts were releaved of about .100 from the outer face for clearance. With the addition of the 3/4" thick adaptors, that also puts my wheel spacing just about right on the money for offset/backspacing of the 10" rims with 6" backspacing. The plate to the left of the adaptor is one of the rear brake caliper adaptors btw.
A little side note for the "it's a small world" file: The guy that made the rear wheel adaptors for me was working for the machine shop in the mid 80s that did much of the Huffaker Fiero machine work. OOOooooooooooo. that's almost spooky .
[This message has been edited by Russ544 (edited 07-08-2009).]
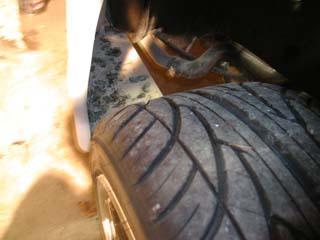
Between company and chores I didn't get much time for the IMSA today other than installing the 120 guage cluster and pod (thanks Aaron). A rather humourous side note is in order about the Zexius tires I'm using however. I drove the car out of the shop yesterday so I could reorganise it and take a couple of photos of the car. My driveway is gravel, and after just a few feet I slammed on the brakes to see what the heck all that clattering sound under the car was. it sounded hideous whatever it was. well I finally figured it out
The photo is after driving about 50 feet across my driveway. These things are a gravel magnet . Just driving 5mph across the driveway sounds like being inside a tin can in a hail storm .
Cheerio, Russ
[This message has been edited by Russ544 (edited 07-08-2009).]
A little side note for the "it's a small world" file: The guy that made the rear wheel adaptors for me was working for the machine shop in the mid 80s that did much of the Huffaker Fiero machine work. OOOooooooooooo. that's almost spooky .
The small world thing seems to happen a lot. Remember my first dealing with you was someone back East saw a part I had for sale and told you about it. I sent it to you and days later my dad walks into your shop and notices you have a Fiero and tells you about his son having one. With the size of the country, what's the chance.


 It is pretty simple to enlarge the wheelwells as I have, but of course if you planned to use inner wheel tubs those will need to be fabricated as well, as the glass extentions supplied wouldn't work with enlarged openings (which is why I ordered my kit without them to begin with). I most likely will make/modify some for my enlarged wheelwells, but the tubs actually aren't vital to the kit anyway IMO.
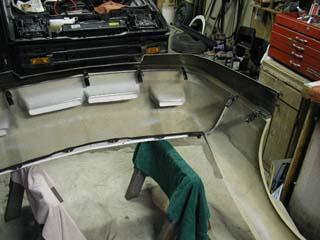
 . The part that was once the sides of the turn signal opening have now become support members that just happen to be spaced the perfect distance apart to mate up to the stock Fiero rubber/plastic ductwork near the sides of the radiator (yellow arrows).
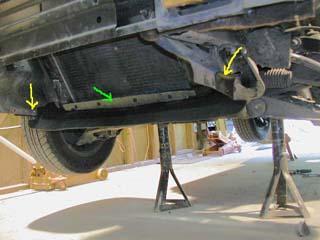


 . One of these days I swear I'm gona' pour a can of gas on that damn 84 and burn it to the ground wile throwing rocks at it and chanting "burn baby burn"
  .... anyway.... I was able to remove the new pin I made from the 84 hinge and install it in the 88, so it wasn't a total loss.