1988 GT: This evening I immediately noticed my driver side headlight was not all the way up. Since I was still in the lane to our house, I turned the headlights off. Both retracted fine. Turned on and both came up the entire way. Well, that "fix" lasted until I started up again after parking in town. Driver side did not go all the way up. Both down, Tried up again. Drivers side only 80% up. Did a couple of more cycles and just drove home with the drivers side low beam pointing about 10 feet in front of the car.
Got home, left the car running, headlights on. Lifted the front "hood" and poked/looked around. The "rod" (slightly bent by design) which pushes/rotates the hinged headlight mounting up could be pushed and pulled back and forth at least an inch on driver side. ("Rod" on passenger side was firm, no slack.) Closer examination showed the rear end of the "push rod" attaches to another moving element, shorter and inboard (at least inboard on the driver side headlight). This part has a flat top/front rectangular surface. I could pull up on the second part, the attached push rod moved forward/up, and the headlight went fully up. When I let loose the mystery part dropped back down, the push rod followed, and the headlight dropped again. This part remains immobile on the passenger side light assembly, flat rectangular portion toward the front, when the passenger side headlight is on/up.
My pdf manuals don't go into enough detail to see what's going on. Both electrical motors sound normal. It's like the mysterious part has loosened on an output shaft or something, but only loose for a short distance (a few tens of degrees).
Ideas for what to do next?
[This message has been edited by John W. Tilford (edited 12-09-2017).]
I experienced this in my 87 GT a few months ago. It has developed into an apparent stripped gear. The problem goes away until the gear is in position for the missing teeth to "not engage". It seems as though one or two teeth missing provide the result you are seeing. As more break away, it starts struggling harder to get the full height. I am still running my motors as-is, and once in a while it gets close enough that a small bump/pothole makes the headlight drop slightly, but enough to see it happen. Sucks to turn them off and back on at night when ya have cars in front of you!
https://www.fiero.nl/forum/F...HTML/139824.html#p12 If something isn't causing jamming and module to shut off... Likely dying motor. Dying motor can try work part way open w/ hood close or all open w/ hood open. Get Cardone new motor(s). I believe AZ sell Cardone under AZ store brand. Works out of the box and have a warranty.
DIY rebuild can work how long it will work depend on many issues. If you keep the car, likely a poor idea. In a nutshell... Is not as simple as replace whatever broke. Often need to clean lube adjust other parts and will cause problem if ignored or done wrong. If you or PO use harder Delrin "pins" and/or metal gear then next weak thing will break. These issues can show up next day or months later often at worse times. See https://www.fiero.nl/forum/Forum2/HTML/128600.html
------------------ Dr. Ian Malcolm: Yeah, but your scientists were so preoccupied with whether or not they could, they didn't stop to think if they should. (Jurassic Park)
Sort of doubt the failing motor cause because the headlight goes up just as fast as the other until the same (not all the way) height each time. Also because the problem was not progressively worse. Sort of doubt the gear losing teeth because of the headlight reaching the exact same height and each time. It's each time now, no exceptions.
I'll start taking things apart and looking around. Years ago I replaced the little plastic balls in the earlier style opening mechanism on my first Fiero, a 1986 notchback 2.5. Pretty simple, just followed Rodney's directions.
Is there somewhere I online I can get a "blown up" image/schematic of the headlight mechanism? Like the ones I can find for other Fiero assemblies (such as steering rack with inner & outer control arms)?
Agree this is a good time to lube everything. Suspicious the problem first occurred after the start of freezing weather, even though the car is garaged.
My 88 driver's side headlight is doing the identical thing. I haven't investigated any further than going, "Hmmm..." It also doesn't go all the way up, even with the hood open. It's as if there is some slack in the mechanism, or the geometry of the levers is whacked up, somehow.
Raydar, Please contact me via email at johntilford@comcast.net That way I'll have your email address. I'll start looking around the mechanism later today. If I find anything I'll let you know. If you find - likewise? Email is a lot easier for me than the PMs.
The driver side headlight cover had been rubbing/dragging against the front hood for some time, starting right at the point the headlight had been stopping. Some paint had worn off the hood at the rubbing location. Two of the nuts in particular were loose which hold the headlight cover. It looks like the rubber-like padding (I assume to protect the plastic fiber headlight cover from the metal) had aged, lost "spring" due to compression , and loosened the fasteners. The nuts on both sides of each headlight were not tight, but the nuts on the driver side were definitely loose. Repositioned both side headlight covers and retightened every nut. No drag on either side now during full range of motion. Lubricated pivots for headlight covers.
Naturally, I found this AFTER disassembly of the gear/worm/motor assembly. No teeth were missing or even seemed worn on the gear or worm. Which does not prove the motor may not have weakened considerably.
I'd appreciate any hints as to how to properly reassemble the worm/shaft/motor, and then (using the manual knob, I guess) position the shaft at the correct position so the liinkage is also correct for reattachment to the pivoted headlight mounting. Or am I making this harder than it is? I'd like to try the motor to see if it works well enough for a while, even though it might be weakened.
[This message has been edited by John W. Tilford (edited 12-10-2017).]
Motor doesn't care how you install gear etc. Motor will "self adjust" when link is install so all sections (3) are inline close to HL lift open/up. The link pretty much forces you to install correctly because you have to open the lift to install/remove the link nut on the motor. If needed can double check after spinning motor open/close by hand.
Many missed a lot of things causing motor problems... Lift Rubbing anything can cause jamming, more so if other parts are binding. Door and Lift must align so can't hit hood etc. Is a reason the lift mounting bolts have huge "slots" but most just stuff HL assem in and never bother to adjust. Only 2 bearing point on the lift should hit the doors bearing strips. https://www.fiero.nl/forum/F.../HTML/140521.html#p7 Wear marks anyplace else then will cause motor problems to damage to lift door and/or hood.
Note that HL bulb bottom is lower the hood opening is often a sign for poor Lift mount install. The lift rarely rest on the top 2 studs. (Assuming Hood is install right. Many are not or have hinge damage. My guess GM had a tool to mount the lifts w/o effort on the line.)
Door springs where hits metal could get a tiny bit of lube. Most others Do Not get lubed. Most will cause problems w/ plastic bearing/sliders. May work now but cause far worse problems. If plastic bearings are dirty etc. take apart, Clean plastic w/ alcohol, spray metal parts w/ Dry Teflon and reassemble. If can't take apart then clean w/ alcohol and dry and hope.
Thank you, Ogre. On way to NAPA this morning to look for replacement motor and the dry Teflon lube you mentioned.
Yes, as soon as I saw what appeared to be "shims" left behind hanging on the screws for the two lower mounting nuts after I removed the motor assembly I wondered if they were intended for alignment purposes. In my driver side configuration both plates/shims were below the motor assembly with the nut/washer above, a "nut/washer - assembly - two shims" sandwich. The headlight cover upper surface does match the hood when closed, so I'll leave these shims where I found them after checking for the "only two points of contact" you mentioned.
I also hope NAPA has or can get one of those black "pivot" bolts (T-30 round head, then pivot surface, then narrow to match 10mm nut) to replace the one which magically disappeared yesterday from where the raising linkage arm pivots with the headlight assembly. I heard it hit the sheet metal below but then it evidently passed through into a parallel universe.
mount studs in the car etc does not use shims from manufacture that I know of. (If they did should be a part listed in 22P and isn't one.) Very likely shims are adjust after a wreck. You will need carefully alignment to center the lift assem w/ door and hood. Make sure door is center in the hood too.
Note that aiming HL bulb using any type mechanical means may not work. All requires a good frame etc to work right or aim can be left or right of center of car. You should double check bulb aiming w/ optical methods. Just pointing at a wall only helps when aim is way out. You have to mark to wall correctly and have very level ground to use this method. or find a shop w/ optical aiming machine. Poor aim can make you hard to see whatever and/or blind other drivers. Every 1° to 2° off affect light performance.
[This message has been edited by theogre (edited 12-11-2017).]
I finally got around to messing with mine, a few days ago. The light is raising and locking into place as normal, but as we both surmised, there seems to be some slack in the mechanism. Looking at the mechanism doesn't reveal anything obviously broken or worn, but there may be a "field fix".
If you look at the lever that bolts to the motor shaft, you will see a "peg" (for lack of a better description) about 3/16" in diameter.
When the lights are up, this peg is shoved into a corner of another triangular lever, forcing it down which, in turn, forces the headlight arm upwards.
If there is slack in the mechanism, at the pivot point, it may not extend fully. (There is a little bit of slack in mine. Replaced it with a spare, but I'm not sure how much of a difference it made.) It occurs to me that a sleeve (made from a piece of brass tubing) could be installed around the peg, or possibly it could be built up by brazing a bump on the side that presses against the lever. This would tend to extend the arm upward, a bit more.
After I had everything back together, and came back upstairs, it occurred to me that if the motor had slipped on it's mounting points, relative to the bucket/bracket assembly, it (maybe) could also have caused the same problems. I haven't checked for that, yet. I also noticed that you discovered the addition of shims, under the bottom studs of your bracket. I arrived at that same conclusion. I added two flat washers to each stud, between the bracket and the bulkhead. It helped a little bit, but it still isn't where it needs to be.
To be continued...
[This message has been edited by Raydar (edited 01-07-2018).]
------------------ "Kilgore Trout once wrote a short story which was a dialogue between two pieces of yeast. They were discussing the possible purposes of life as they ate sugar and suffocated in their own excrement. Because of their limited intelligence, they never came close to guessing that they were making champagne." - Kurt Vonnegut
I appreciate you jumping in. That's good info, but all of my linkage seems to be tight. That's the first thing I checked.
With that said... I added two thicknesses of common brass tubing to the "peg" that I circled in my previous post. (The small tube fit perfectly over the peg. The larger tube fit perfectly over the smaller tube. I'll post the sizes later.) I also left the washers/shims over the bottom studs on the bracket. I now have plenty of height / adjustment on my lights. (Hey... it's a ghetto-fab, but it works.)
(Now I get to replace the bushings in my passenger side motor. They failed about the time I was finishing up the driver's side. )
Thanks for everyone's comments. Most appreciated.
[This message has been edited by Raydar (edited 01-15-2018).]
I finally got around to messing with mine, a few days ago. The light is raising and locking into place as normal, but as we both surmised, there seems to be some slack in the mechanism. Looking at the mechanism doesn't reveal anything obviously broken or worn, but there may be a "field fix".
If you look at the lever that bolts to the motor shaft, you will see a "peg" (for lack of a better description) about 3/16" in diameter.
CLICK FOR FULL SIZE
When the lights are up, this peg is shoved into a corner of another triangular lever, forcing it down which, in turn, forces the headlight arm upwards.
CLICK FOR FULL SIZE
If there is slack in the mechanism, at the pivot point, it may not extend fully. (There is a little bit of slack in mine. Replaced it with a spare, but I'm not sure how much of a difference it made.) It occurs to me that a sleeve (made from a piece of brass tubing) could be installed around the peg, or possibly it could be built up by brazing a bump on the side that presses against the lever. This would tend to extend the arm upward, a bit more.
CLICK FOR FULL SIZE
After I had everything back together, and came back upstairs, it occurred to me that if the motor had slipped on it's mounting points, relative to the bucket/bracket assembly, it (maybe) could also have caused the same problems. I haven't checked for that, yet. I also noticed that you discovered the addition of shims, under the bottom studs of your bracket. I arrived at that same conclusion. I added two flat washers to each stud, between the bracket and the bulkhead. It helped a little bit, but it still isn't where it needs to be.
To be continued...
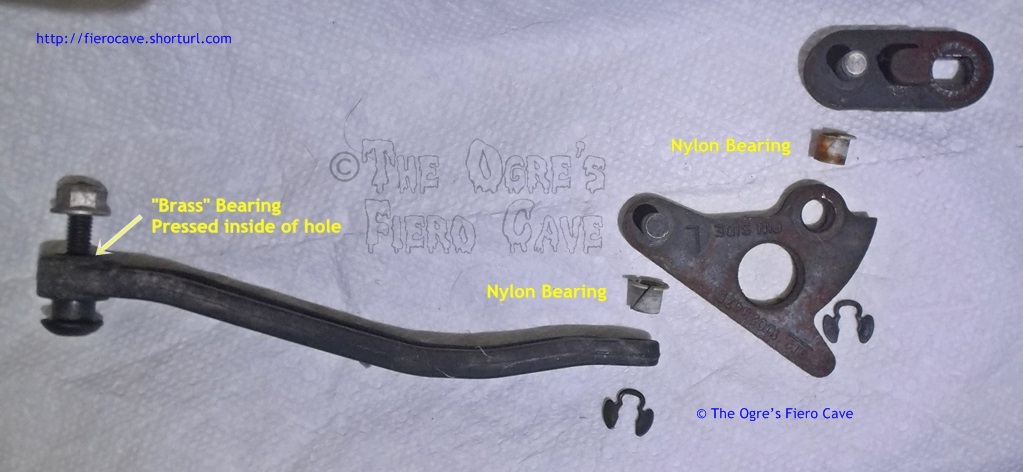
Don't know what year is using this but 86-87 I've seen uses this...
In pic I show, W/o the nylon you will have wear and binding problems. No clue where you get new ones. Can try nylon tube and washer to emulate them. (Is same bearing/bushing type used in top pedal pivots but smaller. Example @ Dorman)
If you have sloppy pivot(s) in that version above then GM didn't use the Nylon bearing or it's worn out. Any "fix" is likely to be temporally. I would find a link like my pic soon.


.JPG)
.JPG)

 )
).jpg)
.jpg)