I'm in the process of installing CompCam 1.6 roller-tip rockers in my 2.8 powered 5-spd '88 Formula. The car actually goes surprisingly well at autocross with its basically stock engine (has ported exhaust logs). I'm not expecting miracles, but I'm hoping a little more valve lift might be somewhat noticeable on the track.
I had installed rebuilt injectors a couple of months ago (which really cut down the smell of raw fuel), and I wasn't all that keen to take the fuel rail etc all apart again. I thought I'd need to though, as we often read here that the middle intake plenum needs to come off before the valve covers can be removed. I wanted to find out for myself before yanking everything all apart.
Well, I'm here now to tell you all that it can be done! And here's the proof...
The red arrow indicates where the bolt is that's a bit of a challenge to remove (one on each side), but really, with a bit of ingenuity it was actually pretty easy.
[This message has been edited by Patrick (edited 02-25-2024).]
Yup, Patricks right. I have done numerous v6 valve cover gasket replacements on both sides of the moter without even removing the upper intake. All that's needed is a good set of 1/4" drive sockets, regular and wobbly extensions, and a u-joint.
------------------ "Because in a split second, It's gone" Ayrton Senna
I have done numerous v6 valve cover gasket replacements on both sides of the moter without even removing the upper intake.
You know, I was wondering about that after I took off the upper intake plenum.
However, I wanted to take the upper intake plenum off anyway as there were a few other things I wanted to do... including re-wrapping my EGR tube as we were discussing HERE.
[This message has been edited by Patrick (edited 08-03-2015).]
Patrick, I'm surprised that it's possible to get the valve covers off without removing the middle intake. I remember trying once, but gave up and tore the whole top end down. Next time the opportunity should arise, I'll have to try again.
If you haven't done it already, Don't forget the Dawg mod to open up that tb neck restriction. It heavily compliments the 1.6 rockers, especially if you're hogging out the logs. Also, the y pipe restriction is important too. All these things together make it "feel" like an extra 15-20hp. It definitely sounds different and the power band is different than stock.
[This message has been edited by f85gtron (edited 08-03-2015).]
I tried that once, after a freshly rebuilt 2.8 V6 was broken in and needed to have the valve lash adjusted. Unfortunately, I wasn't able to get the valve covers off without damaging something. So I loosened the middle intake bolts a little bit, and rocked the middle/upper intake to one side to make room. It worked.
I'm not sure why I couldn't remove the valve covers like you did. Maybe it's because after having the block decked, heads shaved, and lower intake shaved to match, there was less space between the intake and valve covers.
I have done it before too. It has been years. IIRC there was something about getting the back valves/rocker-arms in just the right position to rotate the covers out.
My goal is to someday try adding a secondary (small) TB onto the passenger side of the stock upper plenum that would start to open only when the primary TB is around 3/4 open (and both would be completely open at full throttle). The secondary TB could be operated with direct linkages, or perhaps (and I like this idea better) with a vacuum control of some sort. IMO, this would bypass the problem with the restrictive stock intake neck and still retain crisp throttle response at lower RPMs.
Haven't done that yet as I've been leery of cutting the pipe apart and re-welding it. However, it's relatively easy to remove the Y-pipe if and when I decide to tackle it.
quote
Originally posted by olejoedad:
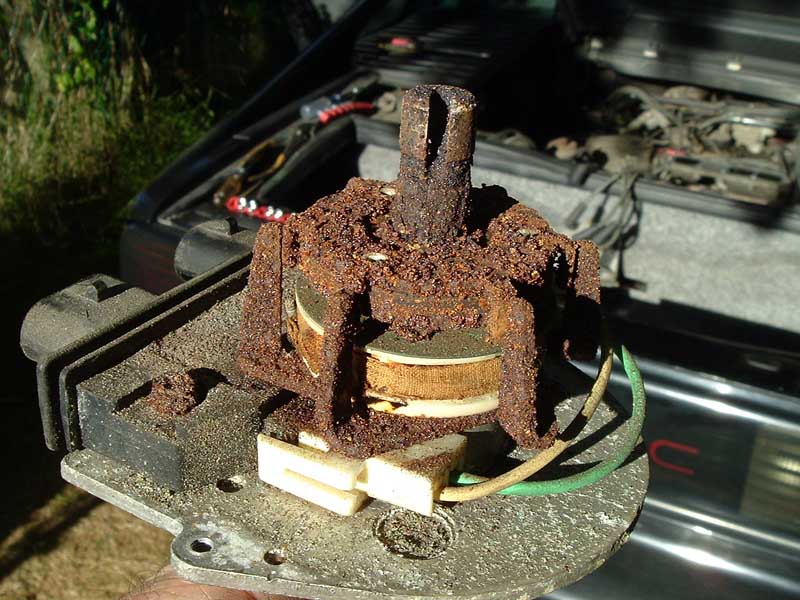
And a new design distributor wouldn't hurt either! Ewww! Rust!
That's nothing. Here's how that same distributor looked a few years ago.
I've swapped this distributor from Fiero to Fiero as I've installed a large heatsink on the bottom which appears to work well. (Same ICM for a lot of years now.)
quote
Originally posted by Blacktree:
I'm not sure why I couldn't remove the valve covers like you did. Maybe it's because after having the block decked, heads shaved, and lower intake shaved to match, there was less space between the intake and valve covers.
Hard to say, but yeah, there wasn't a whole lot of extra room to wiggle the valve covers out of there.
quote
Originally posted by sardonyx247:
IIRC there was something about getting the back valves/rocker-arms in just the right position to rotate the covers out.
I had read that as well, and I was expecting to have to mess around with rotating the crank to find the "sweet" spot. However, I found with the distributor rotor pointing towards the tranny (as in my earlier picture), I didn't need to move the crank/cam/rockers at all. Maybe I was just lucky.
... the Y-pipe sold by the Fiero Store doesn't have that restriction in it.
I'm too cheap to buy That. Plus with me being in Canada, that adds to the price as well... especially with the dollar exchange rate going the way it is.
I've got a question though. If this procedure is done to the '88 Y-pipe, can the factory insulation be removed without destroying it... so as to reuse it?
[This message has been edited by Patrick (edited 08-03-2015).]
Originally posted by Patrick: I've got a question though. If this procedure is done to the '88 Y-pipe, can the factory insulation be removed without destroying it... so as to reuse it?
Originally posted by Patrick: I've got a question though. If this procedure is done to the '88 Y-pipe, can the factory insulation be removed without destroying it... so as to reuse it?
Been there. It's kind of "rolled and crimped". Getting it off is a pain in the posterior. The better idea might be to have it thermal coated, and ditch the insulation completely. Make sure there are no cracks before you send it off.
Since you're "buying a service" and not an item, you might be able to get around the brokerage fees.
Patrick, with the difficult maneuvering to get the covers off, when you put them back on, did you have any trouble with keeping the new gaskets in place?
Been there. It's kind of "rolled and crimped". Getting it off is a pain in the posterior. The better idea might be to have it thermal coated, and ditch the insulation completely. Make sure there are no cracks before you send it off.
Raydar, I appreciate the suggestion of the thermal coating, but shipping the Y-pipe off to the States sounds like more of a pain than dealing with the insulation jacket. I think if I decide to deal with the Y-pipe restriction, I'll try and convince my buddy to cut and weld it up for me. He's great at this kind of stuff, and has a nice shop/garage... but he's always so busy!
quote
Originally posted by Notorio:
Patrick, with the difficult maneuvering to get the covers off, when you put them back on, did you have any trouble with keeping the new gaskets in place?
Excellent question... and I might have an answer for you tomorrow. Haven't put the valve covers back on yet!
Never having done this to a 2.8 before (with these weird rubbery gaskets), I suspect I'll need to lay the gasket in place on the heads and then place the valve covers on top. It should be obvious if the gasket isn't positioned in the valve cover "grooves" properly... I would think.
And I mustn't forget about the small blobs of goop to put under the gasket where the heads meet the lower intake plenum.
[This message has been edited by Patrick (edited 08-04-2015).]
I think it will be easier to stick the gaskets in the valve covers. At least with mine, the gaskets stayed in there after I pressed them in. (the rubber gaskets that fit in the channels in the valve covers)
I think it will be easier to stick the gaskets in the valve covers. At least with mine, the gaskets stayed in there after I pressed them in.
If the intake plenum wasn't in the way, that's the method I'd use as well (and I still might). However, I'm just a little concerned that manipulating the covers into position will dislodge the gaskets.
I'll do several dry runs to determine the easiest way to get the valve covers in place, and then decide how best to deal with the gaskets. Hopefully I'll have a full report tonight.
Another question: did you also replace the valve stem seals while you were doing the rocker arms? I'm contemplating doing that as well w/plenums on, using the compressed air routine to hold an individual valve in place while releasing the spring tension. Guess I'm wondering if you can get the spring compressor in there with the plenums in place ...
Another question: did you also replace the valve stem seals while you were doing the rocker arms?
Another good question from you. Stop that.
I didn't replace the valve guide seals as this engine doesn't burn a drop of oil (and I don't have an air compressor etc), however... If you look at the picture in my first post you'll see evidence of a lot of sludge. The inside of the engine is absolutely coated with this crap. (I suspect the previous owner never changed the oil, ever! But the motor runs fantastic.) The inside of the valve covers was the worst mess I've ever seen. They're so bad I'm putting different valve covers back on! Anyway, the point I wanted to make was I'm a little concerned that the crud which is everywhere is also on the valve stems. With the valves now being pushed open more, I'm hoping the crud stuck to the valve stems doesn't damage the valve guide seals. I've set the valve lash (1 1/2 turns from zero lash) and have already turned the engine over and over by hand many times. If the seals are going to be wrecked, they already are! We'll see what happens at start-up.
[This message has been edited by Patrick (edited 08-05-2015).]
For what its worth, here is what I do. I use a thin film of RTV sealer on the gasket side that goes into the valve cover, then install it into the cover. I use flat 1 inch thick pieces of wood about the size of the valve cover on the bottom ( motor side of the gasket) and one on the top outside of the valve cover, then lightly c-clamp together, let dry for couple hours or overnight.
Next I use a thin film of RTV Sealer on the valve cover gasket (motor side) then gently maneuver into place. The key is to make sure the installation and surrounding area are supper clean to keep debris form getting into the motor.
As mentioned above, do test fits so you know how you need to maneuver the cover into place. Hope the above is helpful, good luck.
...do test fits so you know how you need to maneuver the cover into place.
Oh, I did a lot of test fits.
Okay, here's what I did. Yes, I listened to what was being suggested ... and I used Permatex Aviation Form-A-Gasket (I bought my second bottle today after using the first one for 40 years!) to sparingly tack the gasket to the valve covers. I just let the covers sit on a flat surface for a couple hours after sticking the gaskets on there.
First thing I did was bang the engine lift thing (on the trunk side) to the left with a hammer. Just about a quarter inch. I then made a "guide" out of a cereal box to prevent my "practice" valve covers from catching on the underside of the middle intake plenum.
After manipulating the valve covers into position a few times, I realized I didn't need the cardboard guide any longer. I put blobs of black RTV on the four places it was required on the heads... and then it was time to work some magic.
I grabbed the valve covers with the now stuck on gaskets... and slid them both right in without the slightest effort.
They're all buttoned down now. Tomorrow all the rest gets put back together... and perhaps I'll start it!
[This message has been edited by Patrick (edited 08-05-2015).]
My project is on hold at the moment as it's raining and I work on the car out in the open in the backyard.
I wanted to take this opportunity to discuss the methodology of adjusting valve lash. The last time I adjusted valve lash was back in 1977 after I swapped a lumpy camshaft with solid lifters into my big-block 396ci Chevy.
This is the first time I've ever adjusted the valve lash on a 2.8 engine. I've read all the numerous posts about which rockers to adjust when, and "spinning" the push rods while tightening the rocker nuts until the push rods start to bind. Then there's the debate about how many turns of the nut after finding zero lash. I gotta be honest... I didn't feel a lot of those posted methods were very convincing. Here's how I did it....
First, for each cylinder I determined when it was at TDC of the compression stroke. This was done by rotating the crank using a wrench on the front pulley (with the spark plugs out it's easy) and seeing when the exhaust valve is closing and the intake valve is opening. That's TDC, but on the exhaust stroke. Turn the crank 360° (watch the timing marks go by... stop on the third one), and this is TDC on the compression stroke.
With the rocker nut loose, grab the rocker at the valve end tip and lift it. You'll notice the play. You don't even have to see it, you can feel it. Slowly start to turn the socket wrench on the rocker nut and you can feel the play becoming less and less. And now I've got something critical to add...
Do not get fooled by a lack of play due to your socket wrench putting pressure on the rocker ball.
Lucky for me, I noticed this very quickly, but I can certainly see how an inexperienced mechanic could get completely fooled by this! It is very important that the socket wrench is taken right off the rocker nut when lifting the end of the rocker to check for play. (A deep socket rests on the rocker ball, and the wall of the socket can also push against the inside of the rocker, both of which can prevent the rocker from easily moving.) Otherwise it's way too easy to come to the conclusion that you've reached zero lash when in reality you could still be way off. Using this method I was able to determine zero lash to perfection.
And now the lifter pre-load. I gave each rocker nut exactly 1-1/2 turns after finding zero lash. I suspect why some people suggest less pre-load is because the "spinning" push rod method to find zero lash is so imprecise that many people would probably have already gone beyond zero lash. Therefore, adding another 1-1/2 turns would be exceeding the recommended lifter pre-load for this application (if the rocker nut had been tightened too much while setting zero lash).
Before I removed the original rockers, I checked to see what the pre-load was. It was all over the place, but it seemed like 1/2 turn past zero lash was the usual. That's not enough.
With the higher lift rockers, and more pre-load than before, I'm certainly hoping the valve train will now allow the engine to breathe a little easier. It remains to be seen whether this will translate into a noticeable increase in power.
Now if it just stops raining, I'll get back to work.
[This message has been edited by Patrick (edited 09-30-2025).]
It wouldn't stop raining long enough for me to get anything done today... but nevertheless I have another report.
The 1.6 roller-tip CompCam rockers were bought used from a forum member. He asked me if I wanted the push rods. Well, why not? So he sends me the rockers and the push rods. The rockers look fine, the push rods... not so much. Several of them were bent. Thanks a bunch! Anyway, not a big deal as the price on the rockers was okay... but why bother messing around sending me bent push rods? Weird.
So I ordered some new CompCam push rods # 7816. When I was installing them the other day, I noticed there was one odd ball.
A closer look...
Although it had 7816 stamped on it elsewhere, as you see it also had 21-3207 marked on it which is a Clevite number for the same push rod application. Makes you wonder who actually manufactures everything we buy these days. Maybe it ALL comes from the same huge mega-plant in China.
[This message has been edited by Patrick (edited 06-27-2018).]
Okay, today the sun's out and the birds are singing. Today I will start this engine. I'll shoot some video to prove it.
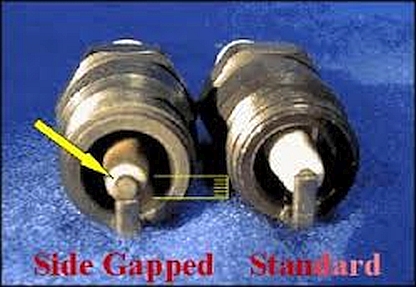
One thing I did do yesterday was to modify a set of spark plugs. I figured it was a good time to install a new set, and I had some extra new plugs sitting around here for a duke. Basically the same plugs as the ones for the 2.8, but with slightly longer ground electrodes and a wider gap. I side-gapped them. I've never done this before, may never do it again... but I was just curious about it. The following images were found on the 'net.
...
The theory is that it unshrouds the spark for a better burn. I cut the ground strap back to just past the middle of the center electrode, and set the gap to the factory .045" (although it's sometimes suggested to reduce the gap when using this mod by .010"). More info and images can be seen HERE.
[This message has been edited by Patrick (edited 02-25-2024).]
The exhaust system is made up of ported factory exhaust manifolds, un-modified Y-pipe, original cat (probably hollow) and original muffler. I have a new cat and Corvette tips to be installed.
I drove the car tonight. As soon as I pulled out of the driveway, it felt different, even at low revs. It felt "eager" to go. Was it the 1.6 rockers, or the side-gapped plugs? Who knows, but I like what I'm feeling.
I did not put my foot into it. I'd like the new push rods to get to know the original lifters and the 1.6 rockers for a little while before I goose the throttle. I have two autocrosses coming up in a week, so I'll certainly know by then how well the engine has responded to these changes.
I agree, the engine sounds pretty good. It sounds "healthy", so to speak.
I'm about to do something similar with my 3.4 V6, but with full-roller 1.6 rockers. The engine already has a performance cam. So valve lift is gonna be interesting... approximately 0.475" intake / 0.495" exhaust with the new rocker arms.
[This message has been edited by Blacktree (edited 08-27-2015).]
I'm about to do something similar with my 3.4 V6, but with full-roller 1.6 rockers. The engine already has a performance cam. So valve lift is gonna be interesting... approximately 0.495" intake / 0.475" exhaust with the new rocker arms.
I was thinking of buying those full-roller 1.6 rockers when they were first being offered months ago, but figured they were overkill for my basically stock 2.8 and bought the roller-tip 1.6 rockers instead. I'll be interested in hearing how they work out for you with your 3.4 and its performance cam. Are you concerned about valve/piston clearance at all?
I can't wait until this coming weekend... two autocrosses to attend. I'll definitely be finding out then what the engine sounds like at full throttle. And oh yeah, I'm anticipating it'll have a bit more jump as well.
Originally posted by Patrick: it's difficult to hear anything over the dreaded Getrag rattle!
Can you elaborate on the "Getrag rattle"? My Formula rattles in neutral with the clutch out; it's quiet with the clutch in. I thought it was a throw-out bearing issue...
Can you elaborate on the "Getrag rattle"? My Formula rattles in neutral with the clutch out; it's quiet with the clutch in. I thought it was a throw-out bearing issue...
I can't say (without actually hearing/driving your car) that what you've got isn't a "throw-out bearing issue", but it's very common for the 5-spd Getrag in Fieros to develop an internal rattling sound (with the symptoms you've described) that is loud and annoying... but is apparently not an indication that the tranny is about to fail.*
Interestingly enough, mine didn't exhibit this problem until someone else at autocross drove my car for the first time and tried to launch (by mistake) in third gear a couple of times. From that point onward, my Formula has had the notorious Getrag rattle. Someone who knows more about trannys could probably explain it, but nevertheless, it's been discussed here many times over the years.
*The "Getrag rattle" is not to be confused with the Getrag input bearing sleeve breaking off, which Rodney Dickman has addressed HERE.
[This message has been edited by Patrick (edited 08-22-2015).]
The "Getrag rattle" is pretty common. Even my freshly rebuilt transmission with a new clutch (and Synchromesh oil) had it. And BTW, our Getrags aren't the only manual transmissions that do that. For example, the GM F23 and F40 transmissions do it, too. Even my Saturn does it.
[This message has been edited by Blacktree (edited 08-11-2015).]
The "Getrag (and other assorted transmissions) rattle" could probably be remedied with a 10 cent shim... if only it was known where to put it.
It's such an annoying sound. Sitting at a light and people in the next lane beside the car can hear this clacking and rattling going on from the engine bay. I feel like yelling out... "The engine's fine, it's the damn tranny!!!"
Originally posted by David Hambleton: Can you elaborate on the "Getrag rattle"? My Formula rattles in neutral with the clutch out; it's quiet with the clutch in. I thought it was a throw-out bearing issue...
Mine too. I just hold the clutch down. I know a very knowledgable Fiero guy who replaced his throwout bearing and the same sound persisted. I will wait until there is some other reason to take it apart, like a clutch replacement.
I describe the sound as a muffled version of the sound when you are going up the hill at the beginning of a roller coaster, like a big chain sound. Sometimes when cold it doesnt do it, sometimes doesnt until I move the car.
[This message has been edited by 2.5 (edited 08-11-2015).]


 However, it's relatively easy to remove the Y-pipe if and when I decide to tackle it.


 and I work on the car out in the open in the backyard.
 Thanks a bunch! Anyway, not a big deal as the price on the rockers was okay... but why bother messing around sending me bent push rods? Weird.


 ...
...