Originally posted by Archie: Are glassing these joints from the inside also?
Archie
Yup, Plus I am adding additional structure inside the c pillar as well and double layering the inside panel that the outer skin is bonded to. Over all it will have 6 to 8 different layers when done. Right now with the outer skin glassed from the outside and inside I can stand on it but I am still adding more just to be safe. the thickness at the bonds right now is about triple the thickness of the stock fiberglass that way I can fine tune the shape sanding if I have to later on. I think I may add 2 more layers of glass again to the inside too just in case I change things a bit.
I have a idea to do one more tweak to the sail area and I will need to beef up the inside a bit to have the thickness to form with. when I am done the sail windows will be held in by tabs at the bottom and back that fir into grooves like I did the ones on my chop but, with this one I am adding more tabs as well so I only need to use very little 3m tape to hold them in. That way, If the lexan ever gets dull or scratched John can pop them out easy and trace them onto a new piece and replace them within a few hours.
I started to fit the gas door guts tonight too and as I suspected they will need to be deepened No biggie just a bit of cutting and filling in the gap. Tomorrow night I will be buttoning up the inside structure of the rear part of the c pillar and then I will be working on the gas door a bit more and then modifying the top section of the b pillar to accept my style sail windows. After all that the clip will be ready to put back on the car and final glass work done.
[This message has been edited by jetsnvettes2000 (edited 10-07-2013).]
Good to hear. I had thought that you were doing both the inside & outside, but you didn't mention that you were.
IF you were only doing the outside & IF I hadn't spoken up & asked the question, then I would have felt bad when things failed later on.
It's all good now.
Thanks
Archie
quote
Originally posted by jetsnvettes2000:
Yup, Plus I am adding additional structure inside the c pillar as well and double layering the inside panel that the outer skin is bonded too. Over all it will have 6 to 8 different layers when done. Right now with the outer skin glassed from the outside and inside I can stand on it but I am still adding more just to be safe. the thickness at the bonds right now is about triple the thickness of the stock fiberglass that way I can fine tune the shape sanding if I have to later on. I think I may add 2 more layers of glass again to the inside too just in case I change things a bit.
I have a idea to do one more tweak to the sail area and I will need to beef up the inside a bit to have the thickness to form with. when I am done the sail windows will be held in by tabs at the bottom and back that fir into grooves like I did the ones on my chop but, with this one I am adding more tabs as well so I only need to use very little 3m tape to hold them in. That way, If the lexan ever gets dull or scratched John can pop them out easy and trace them onto a new piece and replace them within a few hours.
I started to fit the gas door guts tonight too and as I suspected they will need to be deepened No biggie just a bit of cutting and filling in the gap. Tomorrow night I will be buttoning up the inside structure of the rear part of the c pillar and then I will be working on the gas door a bit more and then modifying the top section of the b pillar to accept my style sail windows. After all that the clip will be ready to put back on the car and final glass work done.
Good to hear. I had thought that you were doing both the inside & outside, but you didn't mention that you were.
IF you were only doing the outside & IF I hadn't spoken up & asked the question, then I would have felt bad when things failed later on.
It's all good now.
Thanks
Archie
I was wondering about this also and was going to ask Archie, but he answered my question. I am planning to move my rear pillars inward toward the edge of the decklid for more hip, is the reason for my curiousity.
Good to hear. I had thought that you were doing both the inside & outside, but you didn't mention that you were.
IF you were only doing the outside & IF I hadn't spoken up & asked the question, then I would have felt bad when things failed later on.
It's all good now.
Thanks, Ya I guess I should have said that I was but I figured that would have been obvious to have done it from both sides. I Forget people that have not done this are watching to get tips so I will be more detailed in the future. When I get working I focus more on getting the work done some times and forget to document the steps I take.
[This message has been edited by jetsnvettes2000 (edited 10-07-2013).]
I was wondering about this also and was going to ask Archie, but he answered my question. I am planning to move my rear pillars inward toward the edge of the decklid for more hip, is the reason for my curiosity.
I was thinking about your idea when I read your pm and was curious, won't the decklid hit the c pillars? when I was mocking up this one for sh-ts and giggles I laid them up there like your thinking and it looked like the decklid would have a clearance issue. how did Madcurl fix that? did he cut the corner off the decklid and bond it to the sail window trim panel?
I was thinking about your idea when I read your pm and was curious, won't the decklid hit the c pillars? when I was mocking up this one for sh-ts and giggles I laid them up there like your thinking and it looked like the decklid would have a clearance issue. how did Madcurl fix that? did he cut the corner off the decklid and bond it to the sail window trim panel?
An example done by the guys over at Outlaw customs,
** EDIT **
Scratch that idea. Both this and madcurl's car sport the Archie rear Hatch. That is how they got around the decklid clearence issue. Jet's i am glad one of us is paying attention (and it wasn't me).
[This message has been edited by exoticse (edited 10-08-2013).]
I was thinking about your idea when I read your pm and was curious, won't the decklid hit the c pillars? when I was mocking up this one for sh-ts and giggles I laid them up there like your thinking and it looked like the decklid would have a clearance issue. how did Madcurl fix that? did he cut the corner off the decklid and bond it to the sail window trim panel?
I think I remember reading a post from Curly that stated he was planning to do exactly that. Trim the hood to fit. I'm thinking it's on his latest build....
Bob
Great build, BTW...
[This message has been edited by RCR (edited 10-08-2013).]
when one moves the "hips" in, one would need to trim the front part of the decklid. If you are going to do it, I would suggest you only trim a little bit at at time, from the frt part that would be hitting, until you can open the deck lid. ( it's easier to cut a little more than try to add )
I am very glad that Archie asked about glassing the inside part of the rear clip also. I know that some people said before that it "would be fine".....without glassing the inside.
Is the blue car chopped? I think that makes a difference in the total look comparing the two.... I think the hips will look wider on a chopped car than on a stock car.
I was over at Rob's place last night helping slightly with the rottinchop, the rear clip is gorgeous and rock solid. You could stand on it without worry of it cracking. It's glassed and bonded from the outside and inside with many overlapping layers. The next project is figuring out incorporating the gas door into the hips. Looking great!
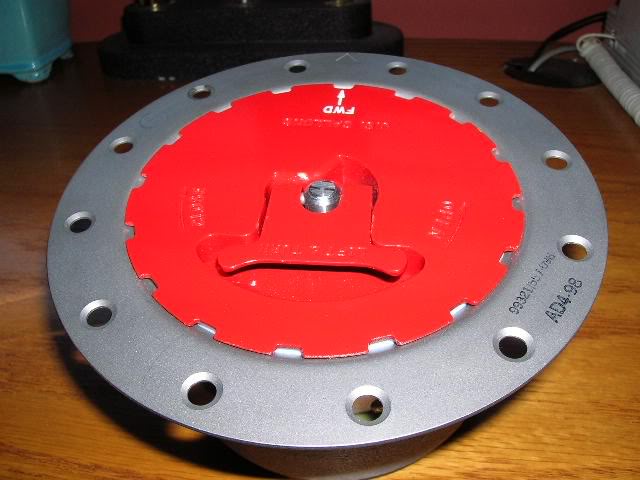
One of our club members has a Fiero Factory body kit and uses this for his fuel door. Has a key where it can be locked and you just push a button and it pops open. This is a crop from a picture of his whole car. I will see if I can get him to take an up close picture of it for me.
The current base I am at has only large aircraft with single point refueling receptacles. The fuel comes through a pressurized fire hose and that attaches to the aircraft. No such luck here at Scott!
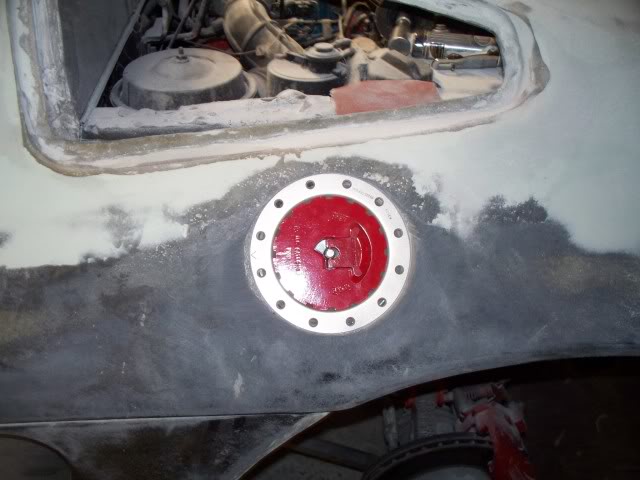
Here is a fuel door from an F-16 Fighter. I do not remember who's car it was, sorry....
I believe that was Whodeanie's old choptop.
Rob, would the standard cable release for the fuel door still work with the Chevy replacement you noted directly above?
Dr. W. ------------------ Is your Fastback GT's trunk seal shot? My Gen IV replacement GT trunk seals with miter double bonded corners are now in production. $95 + $15 flat rate shipping to the US (contact me for international shipping rates) or buy two and pay only a single shipping rate! More info can be found here GT Trunk Seal Project
[This message has been edited by infinitewill (edited 10-12-2013).]
Well, Today I got working on stuff again between the rain drops and decided to work on the door skin parts for the tops of the hips. After thinking about how I was going to do this for a week or so I decided to change things up a bit from how we discussed how bonding them would go. Originally we had decided that the lower door skin would sit over the new wider top within the door molding channel. But, After mocking things up I found a problem with doing that and that is the effective lip at the front of the door for the molding channel is too shallow and would look awful with the door trim on.
Solution: put the lower skin on the bottom. Second issue is the new wide body hips for the doors do not have the two mounts for those pain in the ass holder screw thingys so I added them too. After playing with it all day I have it were I like it and things look good. Tomorrow I will finish up getting ready the other door skin and then bond the two halves together and fiberglass the back side for added strength. Here are some pics of whats going on. Now at this stage it is just rough and that's ok everything gets filled in with bonding agents and fiberglass and then sanded.
Ok here is the back mount screw tab I added
The back side needs to be prepped and sanded also the tabs need to be cut out to fit the door. some fiddling will be needed later on as well.
here is the front tab mount added to new hip.
I had to cut out htis whole area for the door handle to do it the way I wanted it to fit, plus doing it this way makes life simpler when mounting the door handle now I have stock holes to work with.
Here is the hip and you can see how cutting out the door handle area makes sense.
Here you can see the door trim in place and now how it sits down into the hip channel I am glad I decided o do it this way so much easier.
Here on the lower skin you can see I had to do a few modifications to the channel area as well as thinning it a bit so I can achieve the depth I wanted with the trim so it matches the rest of the trim.
Tomorrow I will finish fitting it up a final time and then bonding time!!
Rob, would the standard cable release for the fuel door still work with the Chevy replacement you noted directly above?
Dr. W.
The chevy door does not use a cable, it just has a pop lock on the back side. I was looking at them today at Autozone, and the see ma bit large. The Dodge one is a bit smaller but still huge and the Ford one well they must be compensating for something cause that dang door is big enough to put a foot ball threw. I would like to see one for a jeep wrangler in the same style, I think it will be the right size.
To move your C pillars in to create the hip effect you simply cut a section off each side of the deck lid and rebond it to the body of the car. That makes the deck lid narrower and allows it to pass the pillar while maintaining the same body gaps. Bozzie covered it pretty decently in his build.
Is one of the extra mods I plan to do while I'm going widebody.
[This message has been edited by EvilSqueezles (edited 10-13-2013).]
Geoff from Champion Radiator sent me a reply, they are going to send out a replacement orifice tube for the radiator! Cool! now I do not have to make one!!
Oh and the size of the orifice tube on this radiator is 5/16 24 threads not 1/8th npt, I took the remains to work and had the machinist identify it for me since I no longer own a calipers.
Well, I wanted to replace the orifice on my Champion radiator and the threads are BSPT (British Standard) 1/16-28. I measured it several times with a caliper and the major diameter is exactly 0.3045". I checked the pitch with a pitch gauge and 28TPI fits perfectly whereas 24TPI is not even close. Then I tried mating it up with a 5/16-24 nut and no success. Oh, and the threads are definitely tapered.
Since these radiators are made in China, perhaps Champion doesn't specify what the threads should be, and the manufacturer just uses whatever is available. So you end up with 5/16-24 straight and I end up with 1/16-28 British Taper.
That could very well be the case, I was looking at another club members car that has one of these radiators and I noticed around the area of the trani cooler fittings in the tank his had a lot more meat to work with as well.
OK, with a ton of fiddling and a big hammer I got the left hip on fitted and looking good enough to bond the skin halves. The door frame will need tweaking with these hips to fit right I have discovered. This may not be the case for those without lambo hinges but in this case I had to bend the screw lip on the front in and on the back of the door that lip has to be bent out at the top.
I am happy with how it turned out, it all looks stock now and is held down with the factory plastic screw thingys like a stock skin. so here are some pics of the drivers door tomorrow I will be final fiting the passenger side then they are ready to bond together. For now they are riveted together and really I could leave it at that as the way I cut the top skin after the door handle and trim is on the cut areas totally are covered up but, I will be bonding the skins together anyway just because.
Top view from the front:
Down the side view you can see how the door hip aligns with the rear hip now
Looks kinda cool from behind!
[This message has been edited by jetsnvettes2000 (edited 10-13-2013).]
The chevy door does not use a cable, it just has a pop lock on the back side. I was looking at them today at Autozone, and the see ma bit large. The Dodge one is a bit smaller but still huge and the Ford one well they must be compensating for something cause that dang door is big enough to put a foot ball threw. I would like to see one for a jeep wrangler in the same style, I think it will be the right size.
That style you've gravitated towards looks like the stock fuel door on my motorcycle. Most modern sportbikes use a similar cap, and they aren't the size of your head. Maybe you can find one without a key and have the lock cylinder redone to match the ignition key for the car?
Edit: the keys are dimensionally similar as well, only the Fiero keys aren't cut on both sides
[This message has been edited by skuzzbomer (edited 10-14-2013).]
Do the hips cause the lower panels to angle out a bit ie slight wide body, and do you need to remove the whole rear clip to put these on just curious the rotten chop is looking great and its a nice subtle look still fiero but yet not quite stock.
So, last night a little 8 wheel package was dropped off in my driveway for the build!! FInally we have the missing parts!!!!!!! so today I started doing a little work getting the stuff off I need. Also I started figuring out a few other nagging issues we are running into.
8 Wheels get it lol ok so maybe not funny but helpful!! Here are what the seats look like John, the middle is suede the bolsters shiny leather and then the sides cloth. the drivers side has a small split in the bolster can be seen in next pic. Otherthan that the dash is awesome and so is the rest of the onside guts. with a little cleaning it will look nice. If you trade steve those seats for his I think it would look even better still since they have speakers in them for the radio.


 Topic Closed


 )
)