Pennock's Fiero Forum
  General Fiero Chat
  85 GT Ecotec turbo project "Fierion" (Page 3)

Post New Topic  Post A Reply
Email This Page to Someone! | Printable Version

This topic is 5 pages long:  1   2   3   4   5 
Previous Page | Next Page
next newest topic | next oldest topic
85 GT Ecotec turbo project "Fierion" by coppertop_01
Started on: 09-28-2010 10:53 AM
Replies: 166 (7660 views)
Last post by: Bridgetown on 10-04-2014 08:27 PM
La fiera
Member
Posts: 2194
From: Mooresville, NC
Registered: Jun 2008


Feedback score:    (7)
Leave feedback

Rate this member

Report this Post02-03-2011 09:02 PM Click Here to See the Profile for La fieraSend a Private Message to La fieraEdit/Delete MessageReply w/QuoteDirect Link to This Post
That is awesome! Keep it up buddy!
IP: Logged
ccfiero350
Member
Posts: 826
From: Houston, Texas
Registered: Feb 2003


Feedback score: (2)
Leave feedback

Rate this member

Report this Post02-04-2011 09:11 AM Click Here to See the Profile for ccfiero350Send a Private Message to ccfiero350Edit/Delete MessageReply w/QuoteDirect Link to This Post
Hey those look real good!

------------------
yellow 88 GT, not stock
white 88 notchie, 4 banger

IP: Logged
coppertop_01
Member
Posts: 162
From: Brampton, ON, Canada
Registered: Apr 2009


Feedback score: N/A
Leave feedback

Rate this member

Report this Post02-06-2011 01:06 AM Click Here to See the Profile for coppertop_01Click Here to visit coppertop_01's HomePageSend a Private Message to coppertop_01Edit/Delete MessageReply w/QuoteDirect Link to This Post
Another quick update, will probably be another one tomorrow with even more update photo's.

Jer
IP: Logged
doublec4
Member
Posts: 8289
From: Oakville, Ontario, Canada
Registered: Jun 2003


Feedback score:    (20)
Leave feedback


Total ratings: 150
Rate this member

Report this Post02-06-2011 01:52 AM Click Here to See the Profile for doublec4Send a Private Message to doublec4Edit/Delete MessageReply w/QuoteDirect Link to This Post
Jer,

its looking awesome. I can't wait to see this thing when its done.

Are you going with a notchback or fastback? I've wanted to do the engine compartment venting from between the taillights for the longest time (very Ferrari like), but I have that pesky trunk in the way. Keep it up!
IP: Logged
coppertop_01
Member
Posts: 162
From: Brampton, ON, Canada
Registered: Apr 2009


Feedback score: N/A
Leave feedback

Rate this member

Report this Post02-06-2011 07:50 AM Click Here to See the Profile for coppertop_01Click Here to visit coppertop_01's HomePageSend a Private Message to coppertop_01Edit/Delete MessageReply w/QuoteDirect Link to This Post
Its going to be both, I have the fastback sails (rest of the back was damaged) that I will be glassing to the stock notchie back that the car came with.

I've been thinking the same thing about the tail lights, I could also cut some holes in the bumper as well........but that just screams hey I'm 19, got my first civic, look what I can do with a jigsaw. haha

Jer

[This message has been edited by coppertop_01 (edited 02-06-2011).]

IP: Logged
doublec4
Member
Posts: 8289
From: Oakville, Ontario, Canada
Registered: Jun 2003


Feedback score:    (20)
Leave feedback


Total ratings: 150
Rate this member

Report this Post02-06-2011 12:49 PM Click Here to See the Profile for doublec4Send a Private Message to doublec4Edit/Delete MessageReply w/QuoteDirect Link to This Post
I wouldn't do the bumper, looks juvenile like you said.

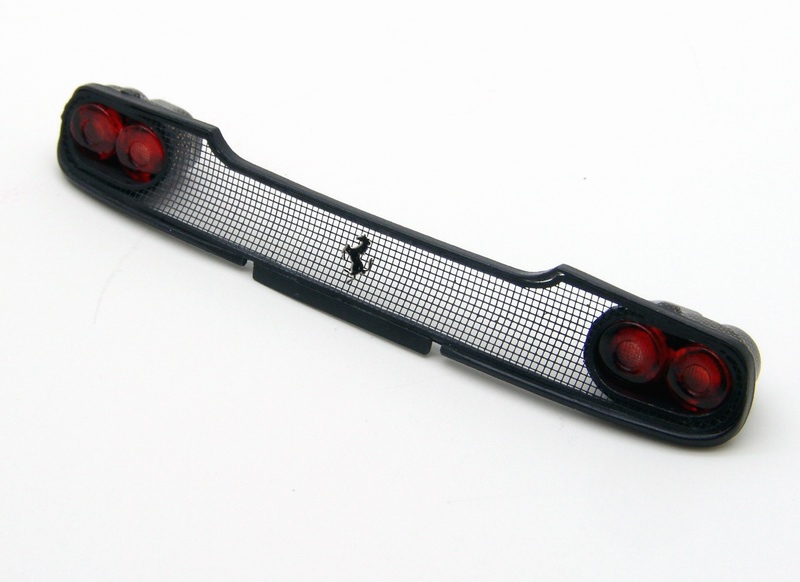
The vent between the tail lights is definitely nice:


Either that, or you could go with something like the Ferrari 599xx and do two circular vents that look like tail lights but are actual vents (in addition to two actual tail lights, obviously needs to be road legal lol)

IP: Logged
coppertop_01
Member
Posts: 162
From: Brampton, ON, Canada
Registered: Apr 2009


Feedback score: N/A
Leave feedback

Rate this member

Report this Post02-06-2011 07:29 PM Click Here to See the Profile for coppertop_01Click Here to visit coppertop_01's HomePageSend a Private Message to coppertop_01Edit/Delete MessageReply w/QuoteDirect Link to This Post
today's welding has been uploaded and updated.

Jer
IP: Logged
unboundmo
Member
Posts: 2242
From: California
Registered: Sep 2006


Feedback score: N/A
Leave feedback

Rate this member

Report this Post02-07-2011 04:38 PM Click Here to See the Profile for unboundmoSend a Private Message to unboundmoEdit/Delete MessageReply w/QuoteDirect Link to This Post
All I want to say is -- wow. What a cool project. I just checked out your blogspot and all seems to be well thought out. I'm curious on what the decklid is going to look like with the intercooler. Is it going to be exposed or ... What are your plans? I was always interested in the 85 prototype turbo and how gm inserted it in the wing.

Great job though. What's your idea on horse power with the engine.. Oh, I love the dump out for the exhaust and the two pipes sticking out.

Again-- wow

------------------

[This message has been edited by unboundmo (edited 02-07-2011).]

IP: Logged
coppertop_01
Member
Posts: 162
From: Brampton, ON, Canada
Registered: Apr 2009


Feedback score: N/A
Leave feedback

Rate this member

Report this Post02-07-2011 05:09 PM Click Here to See the Profile for coppertop_01Click Here to visit coppertop_01's HomePageSend a Private Message to coppertop_01Edit/Delete MessageReply w/QuoteDirect Link to This Post
Thanks, currently the plan for the intercooler is to have a bird catcher (similar to a F16 jet inlet under the pilot cabin) coming over the roof, curving down 90 degrees right into the intercooler.

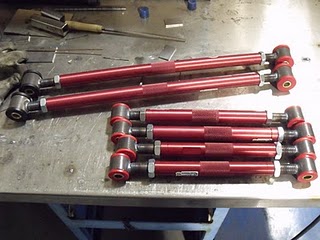
BTW my pipe bender is finally here, as well my poly insert bushings for the custom rear control arms came in today. Finally have the pieces so I can start the front and rear suspension fabrication, just gotta buy some piping to start.......

Jer
IP: Logged
coppertop_01
Member
Posts: 162
From: Brampton, ON, Canada
Registered: Apr 2009


Feedback score: N/A
Leave feedback

Rate this member

Report this Post02-08-2011 09:28 PM Click Here to See the Profile for coppertop_01Click Here to visit coppertop_01's HomePageSend a Private Message to coppertop_01Edit/Delete MessageReply w/QuoteDirect Link to This Post
Engine test fit part 2 into subframe ver 2.0 happened today, seems to be sitting ok, engine might be sitting a inch higher, need to check on clearance but it should be ok. Jig seems to be working out quite well as well.

Jer
IP: Logged
coppertop_01
Member
Posts: 162
From: Brampton, ON, Canada
Registered: Apr 2009


Feedback score: N/A
Leave feedback

Rate this member

Report this Post02-10-2011 06:18 PM Click Here to See the Profile for coppertop_01Click Here to visit coppertop_01's HomePageSend a Private Message to coppertop_01Edit/Delete MessageReply w/QuoteDirect Link to This Post
Lasered the final pieces of the engine cradle today, formed and welded them as well.....currently dry fit onto the frame, needs a little trimming to make it fit 100% but came out really good.

Unfortunately I won't be welding it this weekend, maybe sometime next week.

Jer
IP: Logged
PFF
System Bot
coppertop_01
Member
Posts: 162
From: Brampton, ON, Canada
Registered: Apr 2009


Feedback score: N/A
Leave feedback

Rate this member

Report this Post02-19-2011 05:41 PM Click Here to See the Profile for coppertop_01Click Here to visit coppertop_01's HomePageSend a Private Message to coppertop_01Edit/Delete MessageReply w/QuoteDirect Link to This Post
Big update on the blog today, big push to have the engine re-mounted, engine cradle, rear suspension and front suspension mocked up by spring.........an added benefit would be the brakes, but I ain't pushing my luck.

Jer
IP: Logged
coppertop_01
Member
Posts: 162
From: Brampton, ON, Canada
Registered: Apr 2009


Feedback score: N/A
Leave feedback

Rate this member

Report this Post02-22-2011 01:14 PM Click Here to See the Profile for coppertop_01Click Here to visit coppertop_01's HomePageSend a Private Message to coppertop_01Edit/Delete MessageReply w/QuoteDirect Link to This Post
The new 88 style engine cradle and engine have been test fit on the chassis, everything seems to fit well, very cool to see everything coming together well.

If all goes well this week and this weekend, I hope to have the entire 88 engine cradle, engine, exhaust, control arms and custom rear knuckles mounted......it won't be 100% welded, everything is going to be tack welded to ensure it works before I take the time to weld everything permanent.

Here's a teaser pic, check out the blog to see the rest.


Click this link to see the full size pic

This images is larger than 153600 bytes. Click to view.

Jer

[This message has been edited by coppertop_01 (edited 02-22-2011).]

IP: Logged
coppertop_01
Member
Posts: 162
From: Brampton, ON, Canada
Registered: Apr 2009


Feedback score: N/A
Leave feedback

Rate this member

Report this Post02-24-2011 05:51 PM Click Here to See the Profile for coppertop_01Click Here to visit coppertop_01's HomePageSend a Private Message to coppertop_01Edit/Delete MessageReply w/QuoteDirect Link to This Post
So I got the 88 style rear knuckles formed up, CCFiero did the design, which came out really well.

Here's a couple small pics, if you want to see the bigger detailed pics check out the blog.


Jer
IP: Logged
wftb
Member
Posts: 3692
From: kincardine,ontario,canada
Registered: Jun 2005


Feedback score: (4)
Leave feedback

Rate this member

Report this Post02-26-2011 03:26 PM Click Here to See the Profile for wftbSend a Private Message to wftbEdit/Delete MessageReply w/QuoteDirect Link to This Post
i assume you are using the cobalt ss axles .how do they look strength wise compared to the fiero axles ? this is awesome work , way beyond me but gives me lots of ideas for future stuff for my car .thanks for keeping us posted .
IP: Logged
coppertop_01
Member
Posts: 162
From: Brampton, ON, Canada
Registered: Apr 2009


Feedback score: N/A
Leave feedback

Rate this member

Report this Post02-26-2011 04:03 PM Click Here to See the Profile for coppertop_01Click Here to visit coppertop_01's HomePageSend a Private Message to coppertop_01Edit/Delete MessageReply w/QuoteDirect Link to This Post
Yeah I am using the ION/Cobalt axles, I haven't compared them to the Fiero axles though.......

Big update later tonight with lots of sexy pictures, I had some big progress today.

Jer
IP: Logged
doublec4
Member
Posts: 8289
From: Oakville, Ontario, Canada
Registered: Jun 2003


Feedback score:    (20)
Leave feedback


Total ratings: 150
Rate this member

Report this Post02-26-2011 04:42 PM Click Here to See the Profile for doublec4Send a Private Message to doublec4Edit/Delete MessageReply w/QuoteDirect Link to This Post
Can't wait to see the big update!
IP: Logged
coppertop_01
Member
Posts: 162
From: Brampton, ON, Canada
Registered: Apr 2009


Feedback score: N/A
Leave feedback

Rate this member

Report this Post02-26-2011 08:17 PM Click Here to See the Profile for coppertop_01Click Here to visit coppertop_01's HomePageSend a Private Message to coppertop_01Edit/Delete MessageReply w/QuoteDirect Link to This Post
deleted

[This message has been edited by coppertop_01 (edited 02-26-2011).]

IP: Logged
coppertop_01
Member
Posts: 162
From: Brampton, ON, Canada
Registered: Apr 2009


Feedback score: N/A
Leave feedback

Rate this member

Report this Post02-26-2011 08:22 PM Click Here to See the Profile for coppertop_01Click Here to visit coppertop_01's HomePageSend a Private Message to coppertop_01Edit/Delete MessageReply w/QuoteDirect Link to This Post

coppertop_01

162 posts
Member since Apr 2009
Update has been done to the blog.........I wanted to post a teaser picture, but for some reason the blog isn't allowing me to link the picture here.

Jer

------------------
86 GT daily driver w/mods
85 GT project car "Fierion"

Follow the buildup blog at http://coppertopautosports.blogspot.com

IP: Logged
RULOOKIN
Member
Posts: 1157
From: Mississauga, Ontario, Canada
Registered: Jan 2010


Feedback score:    (10)
Leave feedback

Rate this member

Report this Post02-26-2011 09:34 PM Click Here to See the Profile for RULOOKINClick Here to visit RULOOKIN's HomePageSend a Private Message to RULOOKINEdit/Delete MessageReply w/QuoteDirect Link to This Post
PM me please if you are interested in selling these as a package,
IP: Logged
coppertop_01
Member
Posts: 162
From: Brampton, ON, Canada
Registered: Apr 2009


Feedback score: N/A
Leave feedback

Rate this member

Report this Post02-27-2011 04:36 PM Click Here to See the Profile for coppertop_01Click Here to visit coppertop_01's HomePageSend a Private Message to coppertop_01Edit/Delete MessageReply w/QuoteDirect Link to This Post
Got some more work done today, the second knuckle and hub are installed, also got the coilover struts modified for the Fiero and installed. My TIG welder really really can't handle 1/4" thick alum, so I did what I could to get it holding enough to send them out to get welded this week, updates and pictures are all loaded on the blog.

Jer

------------------
86 GT daily driver w/mods
85 GT project car "Fierion"

Follow the buildup blog at http://coppertopautosports.blogspot.com

IP: Logged
PFF
System Bot
pHoOl
Member
Posts: 2496
From: Novi, MI
Registered: Jun 2000


Feedback score: N/A
Leave feedback

Rate this member

Report this Post02-27-2011 04:57 PM Click Here to See the Profile for pHoOlClick Here to visit pHoOl's HomePageSend a Private Message to pHoOlEdit/Delete MessageReply w/QuoteDirect Link to This Post
What are you thinking power wise when you're done? Keep it at the 240 or whatever you were near, or are you thinking of building it up even more?
IP: Logged
coppertop_01
Member
Posts: 162
From: Brampton, ON, Canada
Registered: Apr 2009


Feedback score: N/A
Leave feedback

Rate this member

Report this Post02-27-2011 06:09 PM Click Here to See the Profile for coppertop_01Click Here to visit coppertop_01's HomePageSend a Private Message to coppertop_01Edit/Delete MessageReply w/QuoteDirect Link to This Post
when this engine was in the ION and supercharged it was making near 275hp, with the turbo and an good tune I should be able to make in the neighborhood of 300-330, the turbo is a stock LNF unit as maxes out on the LNF motor at around 330, keep in mind this is a LSJ without the direct injection, so I might loose a couple HP when compared to the LNF.

At this point, I'll be happy when the car is running again..........lol

Jer
IP: Logged
pHoOl
Member
Posts: 2496
From: Novi, MI
Registered: Jun 2000


Feedback score: N/A
Leave feedback

Rate this member

Report this Post02-27-2011 07:49 PM Click Here to See the Profile for pHoOlClick Here to visit pHoOl's HomePageSend a Private Message to pHoOlEdit/Delete MessageReply w/QuoteDirect Link to This Post
Haha, I hear ya. I've been drooling over the thought of an LSJ swap ever since I bought my redline. I'll be curious too to see what your weight balance is... Just from my guestimating, I'd think if the battery was up front, it'd be close to 50/50. I'm excited to see what your final weight is as well... but with 300+ hp, it'll definitely be an awesome swap.
IP: Logged
coppertop_01
Member
Posts: 162
From: Brampton, ON, Canada
Registered: Apr 2009


Feedback score: N/A
Leave feedback

Rate this member

Report this Post03-05-2011 07:12 PM Click Here to See the Profile for coppertop_01Click Here to visit coppertop_01's HomePageSend a Private Message to coppertop_01Edit/Delete MessageReply w/QuoteDirect Link to This Post
small update today, started playing around with the front suspension components.

Jer
IP: Logged
coppertop_01
Member
Posts: 162
From: Brampton, ON, Canada
Registered: Apr 2009


Feedback score: N/A
Leave feedback

Rate this member

Report this Post03-20-2011 08:35 PM Click Here to See the Profile for coppertop_01Click Here to visit coppertop_01's HomePageSend a Private Message to coppertop_01Edit/Delete MessageReply w/QuoteDirect Link to This Post
Mounted some rotors this weekend, but the main posting is pictures of CCFiero's new rear knuckle, he's modified several things to aid in his build (I will let him explain what he's done to the design)

http://coppertopautosports....on-and-mounting.html

Jer

[This message has been edited by coppertop_01 (edited 03-20-2011).]

IP: Logged
coppertop_01
Member
Posts: 162
From: Brampton, ON, Canada
Registered: Apr 2009


Feedback score: N/A
Leave feedback

Rate this member

Report this Post03-28-2011 08:39 PM Click Here to See the Profile for coppertop_01Click Here to visit coppertop_01's HomePageSend a Private Message to coppertop_01Edit/Delete MessageReply w/QuoteDirect Link to This Post
Today my rear strut housings came back from alum welding, installed the bilstien inserts and got to mounting everything all back together..........its all coming together nicely, I have a few things that I will have to clean up before I can bolt it all together.

Jer

------------------
86 GT daily driver w/mods
85 GT project car "Fierion"

Follow the buildup blog at http://coppertopautosports.blogspot.com

IP: Logged
doublec4
Member
Posts: 8289
From: Oakville, Ontario, Canada
Registered: Jun 2003


Feedback score:    (20)
Leave feedback


Total ratings: 150
Rate this member

Report this Post03-28-2011 11:37 PM Click Here to See the Profile for doublec4Send a Private Message to doublec4Edit/Delete MessageReply w/QuoteDirect Link to This Post
Nice work Jer, always looking forward to updates on this build.

Do you think it will be on the street this summer?
IP: Logged
coppertop_01
Member
Posts: 162
From: Brampton, ON, Canada
Registered: Apr 2009


Feedback score: N/A
Leave feedback

Rate this member

Report this Post04-03-2011 07:11 PM Click Here to See the Profile for coppertop_01Click Here to visit coppertop_01's HomePageSend a Private Message to coppertop_01Edit/Delete MessageReply w/QuoteDirect Link to This Post
double, its going to be another couple years before the car is on the road, the plan is to have the project complete in another 3 years.........

But today is the first time in almost 2 years my project car has some rims on it, rear suspension is looking good and looks like everything is going to work well.

Check the blog for pics of the progress

Jer
IP: Logged
coppertop_01
Member
Posts: 162
From: Brampton, ON, Canada
Registered: Apr 2009


Feedback score: N/A
Leave feedback

Rate this member

Report this Post04-13-2011 09:49 PM Click Here to See the Profile for coppertop_01Click Here to visit coppertop_01's HomePageSend a Private Message to coppertop_01Edit/Delete MessageReply w/QuoteDirect Link to This Post
First real bit of progress with the front suspension was done today, nothing more than a quick test fit but progress none the less. Right now everything is really rough fitting and not completed but I did find a couple issues but nothing too major, still waiting on a couple pieces to complete the suspension projects but I should have them in a week or two.

Jer
IP: Logged
coppertop_01
Member
Posts: 162
From: Brampton, ON, Canada
Registered: Apr 2009


Feedback score: N/A
Leave feedback

Rate this member

Report this Post04-25-2011 07:53 PM Click Here to See the Profile for coppertop_01Click Here to visit coppertop_01's HomePageSend a Private Message to coppertop_01Edit/Delete MessageReply w/QuoteDirect Link to This Post
There is a fair bit of progress with the front suspension over the last two weeks, still waiting on a few parts but it really is getting closer to completion.

Jer
IP: Logged
PFF
System Bot
coppertop_01
Member
Posts: 162
From: Brampton, ON, Canada
Registered: Apr 2009


Feedback score: N/A
Leave feedback

Rate this member

Report this Post05-09-2011 10:50 PM Click Here to See the Profile for coppertop_01Click Here to visit coppertop_01's HomePageSend a Private Message to coppertop_01Edit/Delete MessageReply w/QuoteDirect Link to This Post
Not that anybody actually posts in this thread, but the project finally got one side of the front suspension complete enough to mount a tire to it, looks really good......like with any project there is a couple things that came up during the install that will need to have some time spent to look at and figure out a solution, but it is showing some good progress tonight.

Jer
IP: Logged
doublec4
Member
Posts: 8289
From: Oakville, Ontario, Canada
Registered: Jun 2003


Feedback score:    (20)
Leave feedback


Total ratings: 150
Rate this member

Report this Post05-10-2011 12:39 AM Click Here to See the Profile for doublec4Send a Private Message to doublec4Edit/Delete MessageReply w/QuoteDirect Link to This Post
 
quote
Originally posted by coppertop_01:

Not that anybody actually posts in this thread, but the project finally got one side of the front suspension complete enough to mount a tire to it, looks really good......like with any project there is a couple things that came up during the install that will need to have some time spent to look at and figure out a solution, but it is showing some good progress tonight.

Jer


We're still watching
IP: Logged
coppertop_01
Member
Posts: 162
From: Brampton, ON, Canada
Registered: Apr 2009


Feedback score: N/A
Leave feedback

Rate this member

Report this Post05-10-2011 06:37 AM Click Here to See the Profile for coppertop_01Click Here to visit coppertop_01's HomePageSend a Private Message to coppertop_01Edit/Delete MessageReply w/QuoteDirect Link to This Post
I realize that people watch, I check how many hits the blog gets and from where, I was only saying that this thread doesn't see much action/discussion.

Jer
IP: Logged
Will
Member
Posts: 14219
From: Where you least expect me
Registered: Jun 2000


Feedback score: (1)
Leave feedback


Total ratings: 237
Rate this member

Report this Post05-10-2011 08:08 AM Click Here to See the Profile for WillSend a Private Message to WillEdit/Delete MessageReply w/QuoteDirect Link to This Post
What sort of analysis did you use to design the front suspension?

Have you measured camber and toe curves through the full range of motion?

[This message has been edited by Will (edited 05-10-2011).]

IP: Logged
coppertop_01
Member
Posts: 162
From: Brampton, ON, Canada
Registered: Apr 2009


Feedback score: N/A
Leave feedback

Rate this member

Report this Post05-10-2011 08:22 AM Click Here to See the Profile for coppertop_01Click Here to visit coppertop_01's HomePageSend a Private Message to coppertop_01Edit/Delete MessageReply w/QuoteDirect Link to This Post
I've tried to keep all the control arms to the stock 84-87 geometry, the only thing I had to modify was the location of the upper control arm on the frame for two reasons, one there wasn't enough room to mount the larger cross shaft and the other is that the cobalt/ION knuckle was an inch taller than the stock 84-87 steering knuckle. I haven't done any analysis yet, I need to take some dimensions and send them CCfiero's way, but nothing has been written in stone yet as well, I have only tack welded everything together and with the full adjustable upper control arm I should be able to control the full range of motions. I've also kept the steering rack open to change, not just the rack but the location so I can get the proper tie rod length and mounting location.

Jer
IP: Logged
coppertop_01
Member
Posts: 162
From: Brampton, ON, Canada
Registered: Apr 2009


Feedback score: N/A
Leave feedback

Rate this member

Report this Post05-14-2011 02:49 PM Click Here to See the Profile for coppertop_01Click Here to visit coppertop_01's HomePageSend a Private Message to coppertop_01Edit/Delete MessageReply w/QuoteDirect Link to This Post
Well I got all four wheels on today, also after 2 years its finally sitting on the ground again........close to the ground, at the lowest setting I have 4.25" ground clearance, and thats before everything else is installed, yes I realize that I will have to raise it, just looks really good sitting low.

Jer
IP: Logged
doublec4
Member
Posts: 8289
From: Oakville, Ontario, Canada
Registered: Jun 2003


Feedback score:    (20)
Leave feedback


Total ratings: 150
Rate this member

Report this Post05-14-2011 04:52 PM Click Here to See the Profile for doublec4Send a Private Message to doublec4Edit/Delete MessageReply w/QuoteDirect Link to This Post
Just curious... did the stock 84-87 front upper control arm also angle "down" towards the outside of the car as well (when the suspension is supporting the vehicle?

Won't this create positive camber during compression?

IP: Logged
coppertop_01
Member
Posts: 162
From: Brampton, ON, Canada
Registered: Apr 2009


Feedback score: N/A
Leave feedback

Rate this member

Report this Post05-14-2011 08:09 PM Click Here to See the Profile for coppertop_01Click Here to visit coppertop_01's HomePageSend a Private Message to coppertop_01Edit/Delete MessageReply w/QuoteDirect Link to This Post
I will check my daily driver tomorrow, but I am pretty sure the angle in similar manor. If there is a problem I already know what I can do to adjust the angle of the upper control arm while sitting in the regular ride height.

Jer

------------------
86 GT daily driver w/mods
85 GT project car "Fierion"

Follow the buildup blog at http://coppertopautosports.blogspot.com

IP: Logged
Will
Member
Posts: 14219
From: Where you least expect me
Registered: Jun 2000


Feedback score: (1)
Leave feedback


Total ratings: 237
Rate this member

Report this Post05-15-2011 08:39 PM Click Here to See the Profile for WillSend a Private Message to WillEdit/Delete MessageReply w/QuoteDirect Link to This Post
 
quote
Originally posted by coppertop_01:

I will check my daily driver tomorrow, but I am pretty sure the angle in similar manor. If there is a problem I already know what I can do to adjust the angle of the upper control arm while sitting in the regular ride height.

Jer


I assume you raised the inner pivot the same amount as the difference in height between the original knuckle and your new knuckles?

Suspension geometry must be considered wholistically... Simply moving one point, then moving another the same amount is not likely to give desirable results.

How do the kingpin inclination and scrub radius of your new knuckles compare to stock?
IP: Logged
Previous Page | Next Page

This topic is 5 pages long:  1   2   3   4   5 
next newest topic | next oldest topic

All times are ET (US)

Post New Topic  Post A Reply
Hop to:

Contact Us | Back To Main Page

Advertizing on PFF | Fiero Parts Vendors
PFF Merchandise | Fiero Gallery | Ogre's Cave
Real-Time Chat | Fiero Related Auctions on eBay


Copyright (c) 1999, C. Pennock