Hi Again, After EGR replacement - one valve did not move at all, I went back toe the Referee for another inspection. Still failed with extremely high NOX at 15 MPH. I was beginning to think that my custom Y pipe was not allowing enough exhaust gas into the intake manifold, so today I disassembled the parts and tested for any restrictions. I found the EGR tube allows lots of exhaust to pass thru it, the EGR valves actuate properly and the EGR base plate is not obstructed. Next I started the car to check for vacuum at the EGR port and was amazed to NO vacuum at all. Now I know what is wrong, the upper intake manifold is clogged. Not sure how to clean this out yet but I suppose I will have to remove it and soak it in cleaner. Perhaps a long flexible brush will assist in cleaning.
Is it common for the EGR port on the upper intake to clog? thanks for listening,
Larry
Hey Larry.
I cut an UIM from a 1991 apart to have a look around once. The EGR passage was completely blocked with crap. I remember thinking this would be a real pain to get cleared out. Yeah, soak and poke at it, or find one that isn't blocked.
Speedstreet, Thanks for the info about it not being too uncommon to clog. I have the intake off and have found most of the clog to be about 2 inches behind the butterfly and seems to be less than inch thick. I have it partially cleared at the moment, soaking in cleaner and looking for a flexible bottle/tube brush to run thru it. That sure is a convoluted passage to reach a vacuum source.
Hi Again, I got the blockage out of the Upper Intake Manifold. Soaked it several days, poked at it with a bent brazing rod and a long bottle brush and feel it is almost as clean as new. Went back to the Smog Referee today and I am now smog legal in California. Thanks to you all for your assistance.
Surprisingly the referee was not too interested in the aesthetics of my install. Just wanted to make sure all needed items wer there and working. Although I did try to make it look as neat and semi factory like as possible. I have a stock Fiero V6 air cleaner connected to the upper intake with a Iron Duke plastic air intake tube cut to the proper length. I had to make my own Air Injection tubes into the exhaust maniflods, I used stainless tubes and connected them with 1/8" pipe thread fittings. He did not comment on any of this. I feel very lucky compared to others who have had to jump thru lots of hoops. He also did not ask for the VIN that I got the engine or ECM from. Just wanted to know the year and model of car, so I picked 1991 Chev Lumina.
I hope to drive it to the Coast Run this year - assuming I can go at all. Larry
Having mine look like a factory install was my game plan as well, but the referee wouldn't pass it with the stock Fiero air cleaner. I had to find a stock Lumina part, put it on with zip ties (had to leave the deck lid off for clearance) and go back for a final check. A small hoop to jump through, tho.
I too had very little trouble with the ref. I failed first time due to bad cat. (off of another build) Fixed that and passed. ~40k since the sticker went on and have passed each time the Reg requires it. Only problem I have had is the check valves for the air injector system. They go bad quickly and burn the rubber hose from the pump off causing a bad exhaust leak in the engine bay. First time it happened was at the Autobahn Country Club in Joliet, IL after the 25th show (http://www.autobahncc.com) Burnt the hose off and the exhaust melted some of my convoluted covering on my harness as well as melted my cruise control box disabling it. That made for a long ride home to California. I have tried several dif valves since then and they all fail. I ended up welding them shut and have never had a problem at the smog shop. It all looks normal to them because the system is all there and the pump stills comes on. Have not damaged a cat yet after the fix.
------------------ Red 1988 GT 5 speed Poly all around, Koni's & Lowered LQ1 powered
[This message has been edited by CC Rider (edited 09-28-2012).]
Carl, I know they fail as one started blowing exhaust on me while I was putting the system together. I currently have AC Delco ones on it now and so far is ok. I know the air pump only runs for a few seconds at start up to prime the CAT into starting to work quicker. When they fail I will look at your solution. I also am considering removing the air pump except for inspections as it is not mounted too well. Was the last part I added and I was running out of space for it. I used a pump from a Chev Pick-Up. Glad to know the engine is still running fine. I saw your car at the 25th show - is a very nice car!
After 3 failing with the last 2 ac delcos I was done. The damage was not fun and either was getting at the valves to change them. Thanks for the comments. When they fail on a long drive it can be a real pita. Last summer we started at the bottom of the Rockies in Utah and went up past Yellowstone. Got home after 5k miles on the trip with no issues to the modified valves. Look me up at the 30th
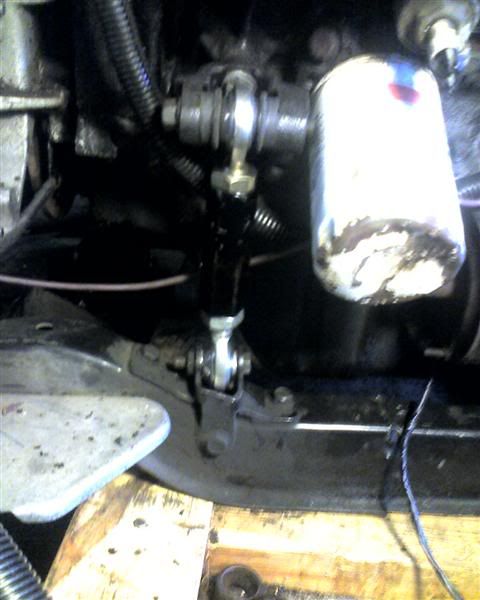
The stock v6 mounts for that year fiero is all you need. Poly mounts on the motor and trans. (I got mine from Rodney Dickaman) If you have a 84-87, You can do as I did and replace the engine damper unit with two spherical rod-ends on a radius rod tubing cut to length and rethreaded.
I have read this post a few times. Seems to be a few different ways to bolt the motor to the cradle. (I have an 85).
Is anyone making a kit for the motor-transmission mounts?
Marc-Alan
if using a manual trans, mount the trans side first using poly mounts from Rodney Dickman. They are direct replacement. Then get the motor mount side properly aligned (left/right, up/down) and figure out if you can use a modified stock mount or not. I was lucky, I mounted my 96 motor to my 88 cradle using a stock 88 mount, and it fit perfect. No mods at all, it was a real "bolt up" swap. had the motor/trans mounted on the cradle in 20 minutes. Then it took me 5 years to get the rest of the swap done. ............. long story.
Thanks for your replies. From what I read folks were not using the stock mounts due to the engine sitting too high. Is it that the stock mounts make it sit high, but is still workable?
Also, thanks for info on the shock-dampner replacement. Did you put the dog bone on in the stock location too?
Thanks for your replies. From what I read folks were not using the stock mounts due to the engine sitting too high. Is it that the stock mounts make it sit high, but is still workable?
Also, thanks for info on the shock-dampner replacement. Did you put the dog bone on in the stock location too?
Thanks so much for your time.
M-A
Mine is on all stock 1988 mounts and there are no clearance issues. That said, it's a very top heavy motor and lowering it as much as possible wouldn't hurt the handling of the car.
Most swaps reqiure the passenger side decklid mount be trimmed. The lower stud is removed. I used no upper dogbone. The solid rod ends do not let the motor pivot enough to need one. I was only able to use two of the three bolt holes for the mount with the DOHC block however. Im not worried, since the car will never see hard launch's. Just track days, plus I have an 88 Cradle now, those old mounts are now gone. I have seen a lot of pictures here of broken timing covers, All evidence points to the dog bone mounting to the timing cover.
There are some pics in my photobucket (link below) that Show how I did my deck lid brackets. I also sale 1" lowering tranny mounts in the mall. The LQ 1 is one of the easier swaps to do all around. Plenty of info on here to help with the details.
I used stock (Rodny Dickman) poly mounts on my swap. Used stock trans and motor mount, motor did not sit to high. Yes, I did have to make a small notch in the decklid for the dogbone mount, but nothing else touched. It is a W-I-D-E motor, but I only had to make room for the bone. If I had used a second motor mount (like pic above) and not used a d-bone, I would not have needed to do the notch, but honestly, don't let that small notch be an issue. I'd think the redesign of "lower" mounts would be more of a hassle than the notch. But thats just me. If I was doing another DOHC swap, i'd use the RD poly, stock mounts and design a 4th (and 5th) engine mount with no d-bone.
This is how I did my dog bone mounted to the cradle you can also see the front motor mount using the stock bracket and a Chevy tail shaft poly bushing. Many track days with no failures. I did not have to cut my deck lid
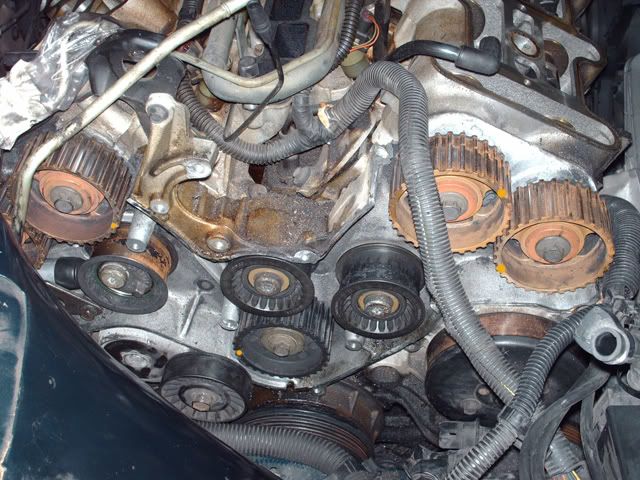
Just dropped the LQ1 out of the fiero to give it a freshing up and some diagnostics to pinpoint some rough idling, oil leak, etc..
While looking through the w-body and lq1 shop manuals I noticed that my harmonic balancer is different than the one specified in the repair manuals etc.. I know that the early manual LQ1's had smaller/lighter balancer than the automatics, however you can only buy a single type from GMparts direct here
Which has 3 spokes and looks like this
and this (credit to steven snyder)
However, my harmonic balancer appears to be like this one:
Just dropped the LQ1 out of the fiero to give it a freshing up and some diagnostics to pinpoint some rough idling, oil leak, etc..
While looking through the w-body and lq1 shop manuals I noticed that my harmonic balancer is different than the one specified in the repair manuals etc.. I know that the early manual LQ1's had smaller/lighter balancer than the automatics, however you can only buy a single type from GMparts direct.
Which has 3 spokes and looks like this (credit to steven snyder)
However, my harmonic balancer appears to be like this one:
Anyone know why the difference?
thanks...
Pretty sure that yours is the one that has a reluctor wheel (24X resolution) for 94-97, and the other square edged balancer has no reluctor wheel for the 91-93 engines. So the 94-97 ones are backwards compatible, and the older ones cannot be used on the SFI and OBD2 engines. That's probably why there is only one part listed, it superseded the older design.
Yep its a 96 with a 97 monte carlo ECU. Ok, that eliminates that variable..
This is procarnut's old car, she's been sitting in storage for almost 3 years. I realized the engine had a rough idle and some ticking/rattling at idle that seemed valve train related so I buttoned her up until I had time to open the DOHC, swap in an 88 cradle and see what's up..
I performed compression test and leak down tests this weekend.
The first compression tests varied from 160 - 205.
I noticed that the timing was not factory and was set to what looked like both intake and exhaust were both retarded either 6 or 13 deg.
I reset factory timing and then retested. All numbers came to right about 180 with one cylinder spiking to 190..
I then performed a leak down test... NOTE: do not trouble yourself with the tester from Harbor Freight or NAPA... both are same, NAPA looks pretty, instructions are flat wrong, they do work...kinda... you can build yourself a better one. The problem is that both guages are after the regulator, and the colored indicated one can only go to 15psi, so you really cannot perform a true percentage comparison even after replacing the 15psi only gauge.
So after replacing the 15psi gauge with a 160 psi Kobalt from lowes, converting my chi com Harbor Freight tester to effectively a single gauge tester, I measured between 5-6 psi loss at 50 psi on the regulator which then equates to a 10-12% loss. Quite acceptable I think.
I was totally completely expecting to find some bent valves, general head / valve train issues, with all the timing belts that procarnut shredded (left bank 180 deg out of timing), broken timing chain, and the rough idle. Other than the timing being tuned intake and exhaust 6-13 deg equally, all looks well...except for the littany of texas dust coating the engine...sheesh, its like caked sheet rock dust, how do you guys put up with it...
So I'm running out of options, which is a good thing, as to why the idle was so rough... could have been a coil, wires, or plugs all along..
While turning the crank manually, I am getting an interesting short noise at the same point in the crank rotation. Similar to an unlubed poly bushing groaning but a bit more metallic. With the timing change having been broken, I'm sure the chain guide, tensioner, or even the intermediate shaft may still be buggered. Maybe even the IM shaft and oil pump mating area.
Thoughts anyone?
[This message has been edited by msweldon (edited 05-06-2013).]
Yes I know all about the 13deg timing mod way back from 2000, I was chatting with Micheal Smith over email only a month or so after he made this mods..
[This message has been edited by msweldon (edited 05-06-2013).]
Had my garage assistant, wife, listen around the engine with a mechanic stethiscope (hose) to see if she could pinpoint the "grunch" location every 360 deg of crank rotation turned by hand. We tracked it down to the oil pan / oil pump area with both sound and slight vibration felt through the pan. You could feel the oil pump start to catch / hitch etc.. before the "grunch" occurs..
Never torn into a DOHC oil pump before, anything particular or touchy about the unit. Documentation and posts seem to state that the oil pump for this engine is quite large and can drain the oil pan and starve the block if the engine revs long enough, but have read nothing about durability.
I'll post a video for peeps to listen.. I was planning on checking out the rod and journal bearings soon anyway so I'll definately be removing the oil pump..
I am looking for an modded oil pan or way to make dip stick work. Also looking for the timing tool
I used 3/8" brake line tubing for mine and bent it up over the front cam cover, pointing towards the rear of the car. I used a duke dipstick handle an currently have a piece of copper wire with the end flattened for the stick. I plan to get a van dipstick to replace it with. I removed the tab from the factory dipstick tube and welded it on to the new tube so I could bolt it to the block.
I'll have to see if I can find a pic...
------------------ 1986 SE Aero coupe.
3.4 DOHC swap is complete and running, now just have to finish the rest of the car...
Yes I know all about the 13deg timing mod way back from 2000, I was chatting with Micheal Smith over email only a month or so after he made this mods..
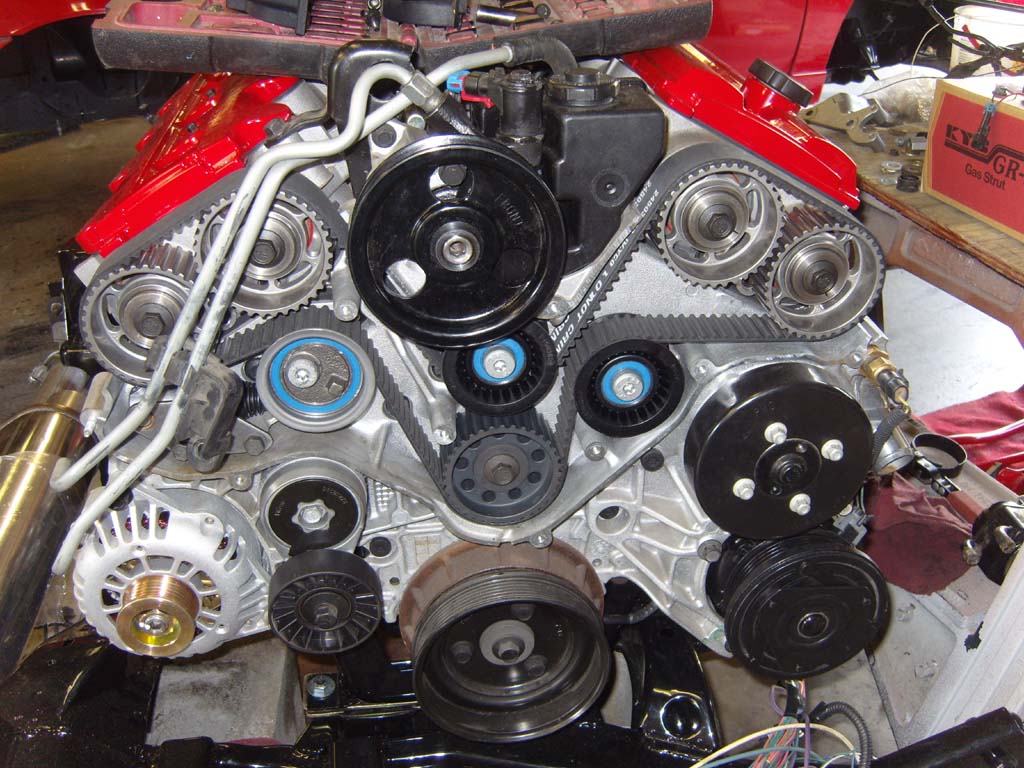
I Hope after my restoration, my engine will look this good! WOW!
Also, the link to the intake swap is dead, anyone have a working one?
Thanks....but it doesn't look like that now. That pic was 6 years ago. I daily drive it during the summer so it's seen some wear and tear. Still runs great though and lots of fun to drive.
Originally posted by msweldon: Never torn into a DOHC oil pump before, anything particular or touchy about the unit.
Just replace it with a new one from GM.
Make sure you disassemble and clean out the new one when you get it. There will be some metal chunks in it from the machining process.
Absolutely make sure you tack weld the pickup tube to the pump.
quote
Documentation and posts seem to state that the oil pump for this engine is quite large and can drain the oil pan and starve the block if the engine revs long enough, but have read nothing about durability.
I've never seen any conclusive evidence that this happens. Maybe someone didn't have as much oil in their motor as they thought they did.
I'm running my 3.4 DOHC at 4.5k to 7k RPM for 20 minutes at a time on the track with a stock oiling system filled half a quarter over. No problems. I did grind the casting flash off the block when I had it apart, which could slightly improve drainback but I doubt it's significant.
[This message has been edited by Steven Snyder (edited 08-08-2013).]
Thank you for the information, but are you sure it's the same bolt used for the intermediate shaft belt sprocket as the cam sprocket? When I measured the hole it was about 90mm deep and this bolt is 64mm long right?
Finally got my DOHC Formula on the road after letting it sit since I got it. I have to say the DOHC on a 5 speed is a hell of alot of fun to drive. Winding thru the gears with it pulling harder the higher the RPMs get just makes it a blast to drive.
Finally got my DOHC Formula on the road after letting it sit since I got it. I have to say the DOHC on a 5 speed is a hell of alot of fun to drive. Winding thru the gears with it pulling harder the higher the RPMs get just makes it a blast to drive.
Alright first question..Car has thrown a car twice but both times went away after a restart. My question is how do u pull codes on DOHC swap? Same as the 2.8?
Alright first question..Car has thrown a car twice but both times went away after a restart. My question is how do u pull codes on DOHC swap? Same as the 2.8?
What year engine? More importantly, what year ECU?
91-93 engines (OBD1) should be same as the ole 2.8. 94-95 engines (OBD1.5) I believe need an ALDL scanner. (Can anyone else confirm this?) 96-97 engines (OBD2) will need an OBD2 scanner/code reader.
[This message has been edited by Silicoan86 (edited 09-26-2013).]
What year engine? More importantly, what year ECU?
91-93 engines (OBD1) should be same as the ole 2.8. 94-95 engines (OBD1.5) I believe need an ALDL scanner. (Can anyone else confirm this?) 96-97 engines (OBD2) will need an OBD2 scanner/code reader.
Next question..... How to tell what year...I know its not 96-97 but how do I tell the difference between the other years? I didnt build this car and dont know alo about the DOHC.
94-95 motors have a crank sensor behind the harmonic balancer and a cam sensor in the top of one of the heads. That being said, it is possible to run these motors with the 91-93 (OBD1) ECM and simply not use those sensors. You will have to verify whether or not they are in use.
I am running a 91-93 crate motor with the 91-93 ECM, but have all of the upper intake and accessory stuff from a 94 motor. It's easy to end up with a mutt on these motors, as several parts from all years will mix and match.
------------------ 1986 SE Aero coupe.
3.4 DOHC swap is complete and running, now just have to finish the rest of the car...