Glad this hasn't been archived yet. Time for an update.
I've since obtained my clutch, installed the motor on the cradle, installed accessories and wiring, and put it in the car. I still have to wire the motor harness pieces to the ECM, C500, etc. so I'm not nearly done with wiring. I've also obtained the pieces I've chosen to do my exhaust with: A (brace yourself) Flowmaster 80 Camaro muffler and a Catco 12" long cat.
*Commence muffler fight* - why a Flowmaster? I've heard what glasspacks and glasspack type mufflers sound like on the V6. They're very smooth and they don't rasp or snarl, but IMHO they don't at all provide the throaty sort of sound I'm looking for. I obviously can't explain in words what I'm looking to achieve. The aftermarket chambered muffler on my old 2.8 produced a sound I really liked, and I'm looking to sort of recapture that tone with a new twist. I also happen to have a Magnaflow downstairs that I borrowed - I don't think I could cram that thing into the space I'm trying to fit stuff in. It's too thick.
Anyways, I have to complete wiring, get my gooseneck filler added and drivers side coolant pipe, complete the dogbone, and fabricate my exhaust. I also need to relocate my battery still. We're getting there - it may actually come together someday. Here's some pictures from progress along the way:
After beadblasting my intake plenum/manifold, there were beads stuck everywhere, including the throttle shaft bearings. So I pulled them out and replaced them. One is a common "6000" type bearing, while the other is a "R6" type bearing. I ordered an NSK 6000 and R6 and ended up with GBC parts, but whatever. Www.motionindustries.com has em. Oh, one more funny thing? The 6000 is a METRIC bearing, while the R6 is a ENGLISH bearing! I know the R6 goes over the part machined for threads, but still... WTF GM? http://img.photobucket.com/albums/v249/pyromaniacal/TDC%20Swap%20Project/ Final%20Assembly/Bearing.jpg
You need a tool to punch out the old bearings, even after grinding/breaking the tabs holding them in. It has to be hard steel, be a couple thousandths smaller than the shaft bore in the casting, but a couple thousandths too big to go through the bearing. I looked around for an hour before I found that a cut off headbolt works perfectly as a punch. http://img.photobucket.com/albums/v249/pyromaniacal/TDC%20Swap%20Project/Fin al%20Assembly/Tool.jpg
Here's my replacement clutch. It still doesn't look like Stevens disc. Must be a later generation or something. Notice that the only difference at all is that the splined hub is installed the right way around. I also just noticed that the incorrect hub on my bad disc has been lathe turned in an attempt to cut down the protruding hub! So they must know about the problem, and send out the "massaged" disc anyways... http://img.photobucket.com/albums/v249/pyromaniacal/TDC%20Swap%20P roject/Final%20Assembly/Clutch_Compare.jpg
Contrary to my previous beliefs, the 80 will indeed fit up between the cradle and the trunk heatshield with 1/2" of room to spare between the cradle and muffler in one spot. It doesn't need notching, and in fact probably wouldn't make any real fitment difference. Call me insane, but this is how I plan to route this stupid thing: Coming right out the rear manifold through a donut bend toward passenger side, through the cat, U bend to the inlet on the 80 (inlet up top, outlets on the bottom). I thiiiink I just might be able to shoehorn all of it in there if I can get the bends right. Any suggestions or info on where I can get good bends and donuts for a good price? http://img.photobucket.com/albums/v249/pyromaniacal/TDC%20Swap%20Project/ Exhaust/Exhaust_Mockup12.jpg
Downpipe, for comparison and mockup purposes. I'm thinking of trying to put a flare directly on my 1/4 donut elbow, cutting the retaining collar off the downpipe, and transferring it to the elbow. Weld cat directly onto the end of the elbow, weld a U bend onto the other side and into the muffler, install hangers, take it to the shop to install tips. I'll be amazed if I can make it work. http://img.photobucket.com/albums/v249/pyromaniacal/TDC%20Swap%20Project/ Exhaust/Exhaust_Mockup14.jpg
That's all for now, more soon.
[Edit]: Pg 7 = 0wned by me.
[This message has been edited by Blue Shift (edited 10-03-2005).]
Looking good blue! That disk looks just like my replacement and it works fine. I have just passed 100 miles on it. Still doesnt look like Stevens either.
Just an Idea, I used the stock Fiero thermostat housing and filler. Cut off the extra "nipples" and weld shut. It bolts right on and is easy to fill and change thermostat.
I was looking at my other Fiero's 4 banger thermostat housing has more of a bend, just a thought.
Keep it up you will have fun driving it! (some motivation)
Travis
IP: Logged
10:23 PM
Oct 4th, 2005
SKIDMARK Member
Posts: 1350 From: Chardon, Ohio, USA Registered: Sep 2001
Like I said on the first page, this thread stands out in the detail department.
I just got my DOHC to fit in the engine bay of my 88 GT (Getrag 5spd) and decided to use a front exhaust manifold in the rear ($25 at the juk yard). I ported it to closely match the head ports to minimize restrictions and designed a Y pipe using the front half of the crossover. The Y connects over the back of the trans and bends 120 degrees into the cat and then directly into the muffler. The cat and muffler inlet are on the driver's side instead of the passenger like most others I've seen. It would work even better without the converter but I want the car to meet Ohio emissions. I haven't measured it yet but the Camaro muffler might be a little too long for my application. I like the idea of it being quiet but throaty though. Just want to hear it when I get on it a little.
Keep posting....your build looks great. Can't wait to see the final results.
Don
------------------
[This message has been edited by SKIDMARK (edited 10-17-2006).]
I got the 80 series crossflow like you do. It fits in there pretty well, although it isnt by any means quite. It has a very VERY pleasent tone though, and is indeed more throaty than the glasspack exhaust is. I think that you could throw a mc donalds straw on one of these engines for exhaust and have it sound good though. I didnt attempt to put a cat on my car and I still ended up running my exhaust not through the stock rear manifold. I'm not saying that it wont work to do what your planning, but i dont know if it will work because i didnt try it. I wanted something better flowing anyhow, so now I got a crazy whacked out exhaust, but i think that it flows and works good!
I'm running a short magnoflow + cat on mine with a 2 1/4 inch exhaust pipe and it was waay too loud. Had to install one of theose CC inserts into the pipe between cat + mufler to get it to be aceptable. now it has a nice growl unde acceleration but is reasonably quiet for general driving.
I'm running a short magnoflow + cat on mine with a 2 1/4 inch exhaust pipe and it was waay too loud. Had to install one of theose CC inserts into the pipe between cat + mufler to get it to be aceptable. now it has a nice growl unde acceleration but is reasonably quiet for general driving.
Those things really work huh? How restrictive are they?
IP: Logged
03:15 AM
ltlfrari Member
Posts: 5356 From: Wake Forest,NC,USA Registered: Jan 2002
Don't know since I have now way of measuring before/after flow and it never ran right in the before state anyway so can;t even use seat of pants performance meter !! Certainly made a big difference to the noise level though although since I used 2 1/4 inch pipe throughout I guess that did not help the noise level (smaller tube = more gas velocity = more noise). Anyway it is not so much a cop magnet now unless I hit the gas then it has a nice roar but otherwise it just has a nice rumble.
Hey, what happened to Blue Shift and this great build? It's been a couple months since he posted.
I just saw him today.. He's been really busy with work and other stuff. He's getting a little bit done at a time. I think he plans on doing the exhaust in a week or two. Stay tuned!
Thank you Steven and everybody else for keeping this thread alive! I thought it'd be long gone by now.
Well, the car is still alive and in progress, but I've been so backed up with work for the last few months that I've made very little progress. As it is, the engine and cradle are back out - I had to install the new 94-95 cam cogs, and retime with a 13 degree retard. I also did stuff like install a newer style timing belt cover set and a brand NEW Delphi A/C compressor for R-134a which I bolted on as well. I found the compressor on a car at the yard with it's instruction booklet still taped to it for 30 bucks.
As it stands I have to complete these things:
1.) Exhaust. I'm going to try to shoehorn a Flowmaster 80 and a cat into the space between the motor and the trunk. I think it can be done, and if so will be just about the most compact full muffler exhaust ever. Wish me luck on that one.
2.) Plumbing. Gotta finish the driver side coolant hose, should be easy to do. I also gotta finalize all my vacuum hoses and things as well.
3.) Wiring. I had it almost done once, but I'm starting over with this one. Hopefully it won't be so difficult.
4.) Interior and instrumentation. I have to put my interior together, order the custom Speedhut gauges I want (Aaron of all people found out that you can order gauges from speedhut with the 160 MPH speedo, and 8K Tach - you'll have to calibrate the speedo, which I have a way I'll cover in detail later). I also have to install my Autometer Cobalt AFR gauge too on my A pillar pod.
5.) Break in and testing. Go out there and break it in!
When I get moving, I'll pick it back up. Sorry to keep you guys waiting!
IP: Logged
05:38 AM
Jan 9th, 2006
SKIDMARK Member
Posts: 1350 From: Chardon, Ohio, USA Registered: Sep 2001
Hope to see you back at it soon. I was afraid I would catch up with you and not have a reference guide to do my 88 GT but there's little chance of that. I too am working on the wiring and exhaust. It sounds like we may have similar ideas for routing the exhaust system.
IP: Logged
10:07 AM
AaronZ34 Member
Posts: 2322 From: Colorado Springs, CO Registered: Oct 2004
Originally posted by Blue Shift: (Aaron of all people found out that you can order gauges from speedhut with the 160 MPH speedo, and 8K Tach
Damn straight!
Dang tritum, from the looks of it, I may have my swap done and running before your's!
------------------ "all pushrod motor are better than the dohc because it has less rotational mass" -rick17, MyMonte member, owner of a 3100 Monte Carlo LS
IP: Logged
11:05 AM
fieromadman Member
Posts: 2217 From: Oconomowoc WI, USA Registered: Jan 2003
I'm gonna be changing my oil later and will snap some pics of my exhaust setup for you blue shift.. I dont think that you will be able to fit the 80 series and the cat in that space, and if you can I will bow down to you! Are oyu using two front manifold or going with the stock manifolds? Using two front ones and a custom crossover would be the best thing to do IMHO.
Later, Jeff
IP: Logged
03:45 PM
Steven Snyder Member
Posts: 3326 From: Los Angeles, CA Registered: Mar 2004
I'm gonna be changing my oil later and will snap some pics of my exhaust setup for you blue shift.. I dont think that you will be able to fit the 80 series and the cat in that space, and if you can I will bow down to you! Are oyu using two front manifold or going with the stock manifolds? Using two front ones and a custom crossover would be the best thing to do IMHO.
Later, Jeff
He's using the stock manifolds and crossover. We / he mocked it up a few times and it looks like it all will fit using the tightest 90 degree bends available (2.5" donut cut into 90 degrees).
IP: Logged
05:07 PM
Fastback 86 Member
Posts: 7849 From: Los Angeles, CA Registered: Sep 2003
He's using the stock manifolds and crossover. We / he mocked it up a few times and it looks like it all will fit using the tightest 90 degree bends available (2.5" donut cut into 90 degrees).
Just FYI, IIRC, the WCF Spintech muffler is smaller dimensionally (lengthwise, I believe) than the Flowmaster 80 Series, and its already designed to be a cross flow muffler. I think its also cheaper. Might be worth looking into.
IP: Logged
05:32 PM
PFF
System Bot
Steven Snyder Member
Posts: 3326 From: Los Angeles, CA Registered: Mar 2004
Just FYI, IIRC, the WCF Spintech muffler is smaller dimensionally (lengthwise, I believe) than the Flowmaster 80 Series, and its already designed to be a cross flow muffler. I think its also cheaper. Might be worth looking into.
Blue Shift likes to do things the hard way so he never gets them done. Plus he says he wants the "rumble" of the Flowmaster.
I'm going with the Spintech myself for my "quiet" exhaust setup. Sounds great on your 3.4 OHV... should be monstrous (but quieter than what I have right now!) on the DOHC.
IP: Logged
08:54 PM
Jan 10th, 2006
fieromadman Member
Posts: 2217 From: Oconomowoc WI, USA Registered: Jan 2003
The flowmaster has an AWESOME sound on the 3.4 DOHC, it rumps at idle and low rpms and then howls at high rpms much like the sound of a ferrari when you're in the car.
Glad to hear that you guys got it mocked up and think its going to work. I had allready snapped some pictures earlier today of the exhaust on my car though, so i'll show them to you anyhow. Its a bit tight!
as you can see I used the stock manifolds, but two front ones and created a custom y-pipe.
In this pic you can kinda see after the pipes merge it goes into a 90* and then into the top of the muffler
As you can see, the muffler doesnt stick down below the frame, its above it in all places.
Heres the 90* that goes into the muffler, as you can see it barely clear the tie rod mount on the earlier cradle. We cut a few reliefs into it and re-welded it to get a little bit better clearance too.
The passenger side outlet (without using any bends to avoid) hits the frame with 2.5" diameter exhuast unless you mount the muffler lower, but that looks silly. I had to cut a small section of the cradle to avoid that problem.
and lastly, it is tight up against the trunk, the trunk will get hot, I am going to see what I can do about mounting it away from the trunk more because you wouldnt want a fire incident. Seriously, try and give it some space so it doesnt heat it up like mine does.
I still like the way that my exhaust came together though and I think that it flows fairly well. It's all mandrel bends witht eh exception of the y-pipe that changes the two 2.25's into the single 2.5."
I am running a spintek and a cat, and it is still pretty loud. I have had many noise complaints...mostly because I leave to go to work at 5 am. The sound was really raspy in the higher rpms, and sudden throttle closings when I just used the muffler with no cat. SInce the cat, it has mellowed out alot. People say a turbo will also make it way quiter....LIES...my car sounds exactly the same.
Hopefully this Sunday, I will be getting a big ole' magniflow thrown in there, I will tell you how that differs in sound.
Originally posted by XzotikGT: People say a turbo will also make it way quiter....LIES...my car sounds exactly the same.
Hopefully this Sunday, I will be getting a big ole' magniflow thrown in there, I will tell you how that differs in sound.
turbo only quiets it down when you start building boost due to the increased backpressure.. the 2.8 turbo fiero i sold my dad rumbles real nice but when you get on it it actually gets quieter - then when you let off it gets loud again
IP: Logged
08:02 AM
Steven Snyder Member
Posts: 3326 From: Los Angeles, CA Registered: Mar 2004
I am running a spintek and a cat, and it is still pretty loud. I have had many noise complaints...mostly because I leave to go to work at 5 am. The sound was really raspy in the higher rpms, and sudden throttle closings when I just used the muffler with no cat. SInce the cat, it has mellowed out alot. People say a turbo will also make it way quiter....LIES...my car sounds exactly the same.
Hopefully this Sunday, I will be getting a big ole' magniflow thrown in there, I will tell you how that differs in sound.
Will you be selling the Spintek after you switch to the magnaflow?
IP: Logged
11:53 AM
Feb 1st, 2006
SKIDMARK Member
Posts: 1350 From: Chardon, Ohio, USA Registered: Sep 2001
Today I cut 3" out of my Flowmaster 80 to make more room for the converter. What I plan on doing is similar to Jeff (fieromadman) except that I'll have a converter and my crossover will be a little less complicated. I found stainless tubing cheaper than most places at WWW.PERFORMANCE-CURVE.COM and should be able to complete the whole exhaust tips and all for a lot less than a stock Fiero exhaust system. I'll post pictures as things progress.
Don't mean to hijack your thread....just sharing my idea and keeping your thread alive. Again, I hope to see you get back into it soon....need inscentive.
Don
IP: Logged
12:48 AM
fieromadman Member
Posts: 2217 From: Oconomowoc WI, USA Registered: Jan 2003
If by less complicated you mean worse flowing then I think that I understand j/k Good luck to you, I on the other hand dont have to deal with emissions so I'll gain the power and pollute. (dont tell the green party guys)
You know, I thought this thread would have been archived by now. Many thanks to everybody who's kept it alive long enough to come back to it. I've been a combination of busy and lethargic for the last few months, which as you know makes for no progress at all. I've finally got back to doing some work. I may very well meet or even break Ltlfrari's record for time to completion! But anyways, back to work (slowly).
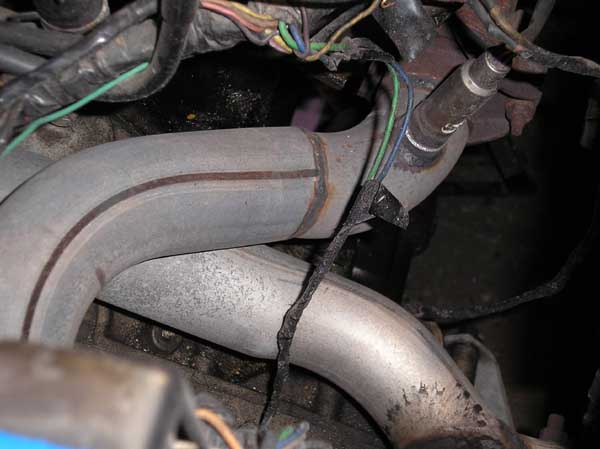
I finally got started on fabbing my exhaust today. I'm going to have a 1/4 donut bend going straight from the manifold, and over toward the passenger side of the car, through a sawed off cat (nipples sawn down to the housing to save length), into a donut U bend, into the muffler inlet, possibly with the inlet nipple sawn down to save length as well. I'll have an exhaust shop install and align some Z28 style slot shaped tips, which fit into the GT rear fascia like they were made for them. The donut came from Chassis Shop (which oddly was the only place I could find which had donuts), I had an exhaust shop in Gilroy put a flare on a leftover piece of 2.5" pipe, which I then cut off with a lathe for precision. A local exhaust shop had the universal style manifold flange on hand. I welded the flare into the flange, and then welded the 1/4 donut into the other side of the flange to make up the first and most difficult part of the system. More details as I complete more of it.
The mockup. Notice I only have a spring on the left side for now just to mock things up. I have a couple of ideas on hand. One, I shorten one of the springs by grinding it down carefully and try to fit it in with a shorter bolt as well to clear the radius of the bend. Two, Ieave it as is - let it pivot freely on one bolt while tension is applied by the spring bolt on the opposite side. It could work. On the mockup, it looks like the U bend that I was worried about will JUST clear all the critical stuff, like the inboard rear ball joint (poor 87) and my new poly rear cradle mount. It may end up with about an inch of clearance or so, which would be nice. If it looks like it's going to cook the mount, I may wrap the U bend in header tape, since it will be directly downstream of the cat, and really hot. Notice that at least on my 87, it looks like the Flowmaster 80 snugs into a space just short of hitting the cradle. I don't think cradle notching is nessicary on pre 88's, though I could be proven wrong as I get this thing put together. Also, the lowest point on the cradle is obviously sitting on the dolly - and so is the muffler, so it looks like it's not only going to fit, but not hang down. Sweet. All and all it looks like it'll work so far.
If my welding was that 'bad' I'd be more than happy, mine still looks like pigon doo doo but it is improving. My actual build time was only about one year, the other 18 months was spent finding I had two wires the wrong way around ...Duh... It's looking good, nice work.
are you sure that the strut tower is not going to be in the way with that exhaust setup? looks like its going to be an awefully close clearance! Also with the cat and the muffler in that area and if you plan on retaining the trunk make sure tyhat it is well insulated. I know of someone that had a slight fire problem when the trunk was loaded with just the 80 series muffler too close to the trunk wall .
IP: Logged
02:05 PM
PFF
System Bot
Steven Snyder Member
Posts: 3326 From: Los Angeles, CA Registered: Mar 2004
are you sure that the strut tower is not going to be in the way with that exhaust setup? looks like its going to be an awefully close clearance! Also with the cat and the muffler in that area and if you plan on retaining the trunk make sure tyhat it is well insulated. I know of someone that had a slight fire problem when the trunk was loaded with just the 80 series muffler too close to the trunk wall .
I don't think Chris plans on driving it below 90 mph. There should be adequate airflow for cooling.
IP: Logged
02:08 PM
Feb 28th, 2006
fieromadman Member
Posts: 2217 From: Oconomowoc WI, USA Registered: Jan 2003
Well, it's been awhile. I've been pretty busy lately until now, so I'm back at work.
So I've completed my ultra short chambered exhaust setup - it CAN be done, which is a surprise, even to me. No, I didn't cut the trunk. I've finally mocked it up on the car, tack welded it, adjusted, then welded it together. I've also come up with a hanger system to take some of the load off and suspend some of the weight so it doesn't come apart under the stress of expansion, vibration, and fatigue. There's not too much more to it, so here's the pics:
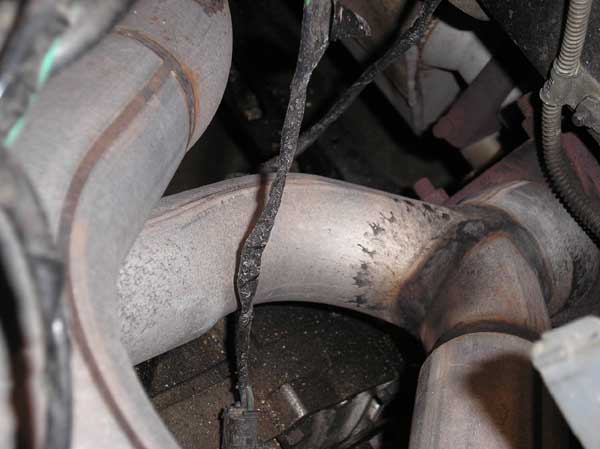
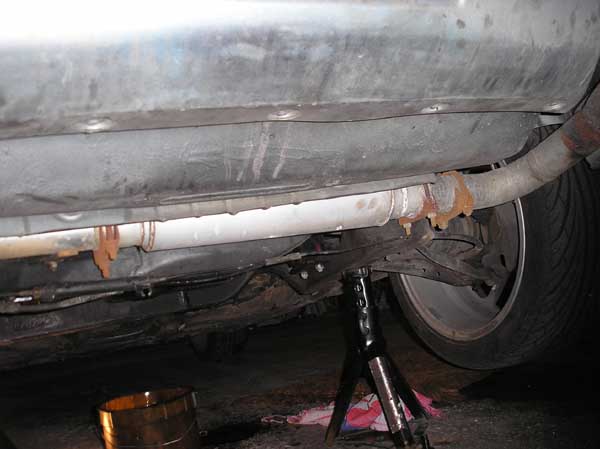
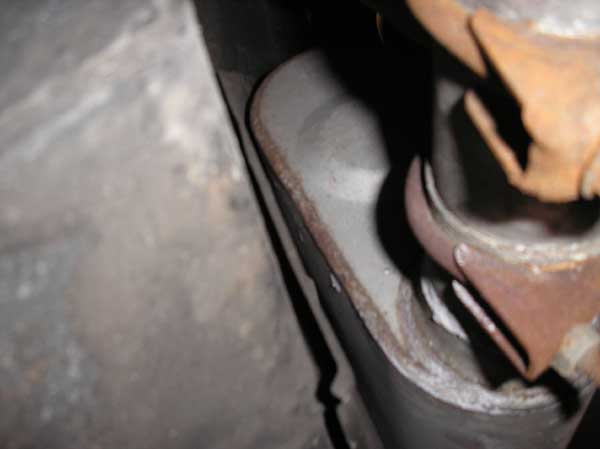
This is the whole thing in place. The muffler is lightly brushing the stocker heatshield. I figure I'll remove it and it'll give me almost 3/4" of combined air gap. I also ordered some aluminized glass fiber heat shield from Summit Racing - part number THE-13575. It's not very thick, self adhesive, and it's good for 2000 degrees. It should keep the trunk from becoming a portable car-b-que. I hope. I also ordered some aluminized header wrap - I'm going to wrap up the U pipe after spraying it down with VHT header coating to insulate it. VHT should keep out water that leads to rot. The U pipe is going to get nice and toasty when the cat lights up, which could possibly melt the rear poly cradle mount a few inches away. I also got some aluminized glass tape to cover up stuff like the rear inner tie rod balljoint which the cat passes right over, it already has a heatshield but more would be nice here. Hopefully with the insulation, nothing will get too hot. Somehow in there, I managed to actually cram the muffler in there high enough to not hang below the cradle as well - you can see the picture where I lay a piece of steel across the cradle low points and the muffler is about 1/4" higher. Sweet. And the last picture, the bolt up. I'm not exactly sure what to do with the second bolt since you can't fit a spring bolt in there, or a spring. I'm considering using a socket head cap bolt, with a washer, a lockwasher, maybe another washer then another lockwasher and then bolt it down so it's not hard mounted. As it is, it can move and flex alright, but when I have time, I'll come up with a better solution.
That's pretty much all of it for now. All I have left is wiring, relocating the battery, plumbing the drivers side coolant hose, and the dogbone. Then all the little things like routing vacuum hoses and such. Not much longer now!
More pictures of the exhaust. I took the whole thing down to the carb shop my friend owns and beadblasted it, the trunk heatshield, the front compartment heatshield (in case I use it), and some other stuff. Then I gave the exhaust a spray of VHT paint - but this time I used the "Header Paint" instead of the "Flameproof" coating. Perhaps it's reformulated just for that sort of use? Instead of a pearlescent white/silver, it's an aluminum color. Hope it stays put. Anyways, here's the pics:
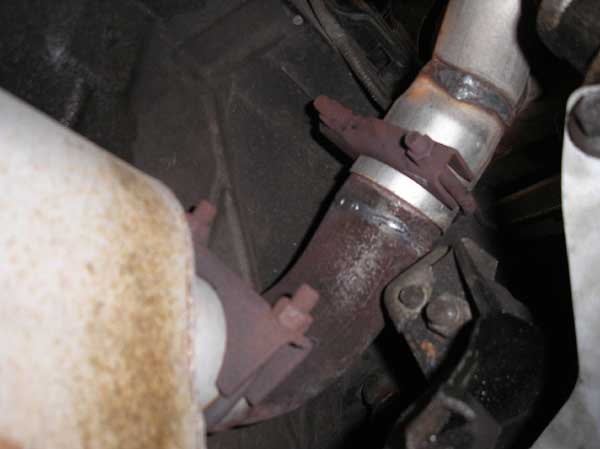
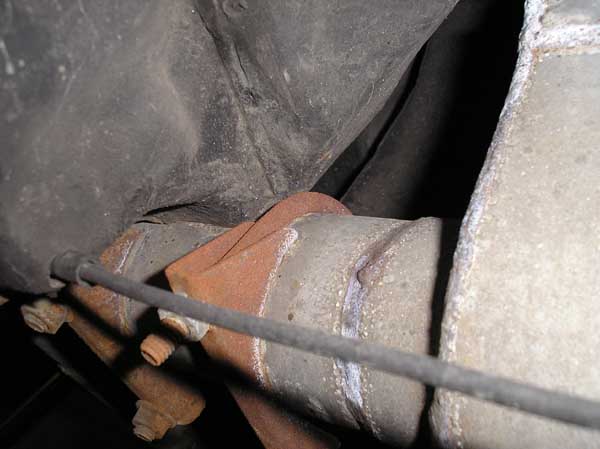
And the last heat sensitive part, the rear poly cradle mount. The only thing poly isn't good at, is not melting. You can see that the U pipe (which is right after the cat and is sure to get nice and hot) sorta comes near it. I'm going to put header wrap on the U pipe, soak it down with VHT header coating, then bake it. Hopefully the paint will keep water out so it doesn't rot out. http://img.photobucket.com/albums/v249/pyromaniacal/TDC%20Swap%20Project/Exhaust/Cradle_Mount.jpg
Alright, this is the last series of pix in the whole exhaust topic. Promise.
I decided to beef up the heatshield a little. On the front, I have Thermo-Tec "heat blanket" type material. It's about 1/16th of an inch thick woven fiberglass cloth, with an aluminized surface. The adhesive decided to protest being baked in the barbecue, so I also attatched it with some stainless steel screws so it can't ever go anywhere. That should take care of the radiant heat. Then on the backside, I laid some fiberglass mat I had laying around, trimmed it to fit, pressed it into all the curves, then soaked it in VHT header paint, and further pressed it into the depressions on the backside of the heatshield. No adhesives to fail, no moisture to get in. And it'll be held in place once the shield is screwed back in place. Speaking of being held in place, for the mounting bolt on the inside of the bend going to the cat, I decided to use a normal bolt, with a stack of stainless steel washers, and spring washers. It just clears, it'll give some spring tension, but won't be a hard mount. Works great as far as I can tell. Anyways, on to the pictures:
Not much room in there for an exhaust system. Just keepin' this thread alive and waiting patiently for an update!
I made some progress on my DOHC conversion....finished the crossover and welded it. I would post some pictures but I suck at welding so I think I'll wait until I'm done grinding and polishing. I also power washed the cradle and trans and I'll be cleaning, polishing, and painting everything in the engine compartment for the next week or two.
IP: Logged
01:07 AM
ltlfrari Member
Posts: 5356 From: Wake Forest,NC,USA Registered: Jan 2002
You want to watch the grinding. I (still) suck at welding. When I did my exhaust I ground the welds down. Looked nice but didn't last long and soon cracked and leaked. Now I have Mr Blobby welds on there, don;t looks as nice but they do the job. I figured it was better to keep the fire INSIDE the exhaust pipe !!


 j/k
j/k  Good luck to you, I on the other hand dont have to deal with emissions so I'll gain the power and pollute. (dont tell the green party guys)


