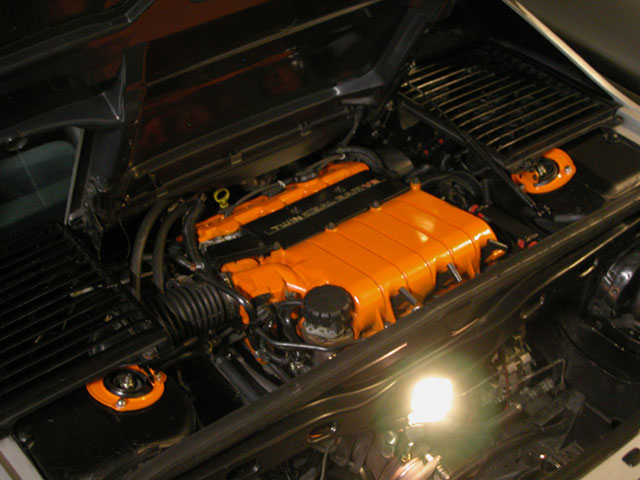
Edited on Jan 17, 2006 to add the current semi-finished swap pic:
. . . .
And now back in time... build thread begins here, 12-02-2004:
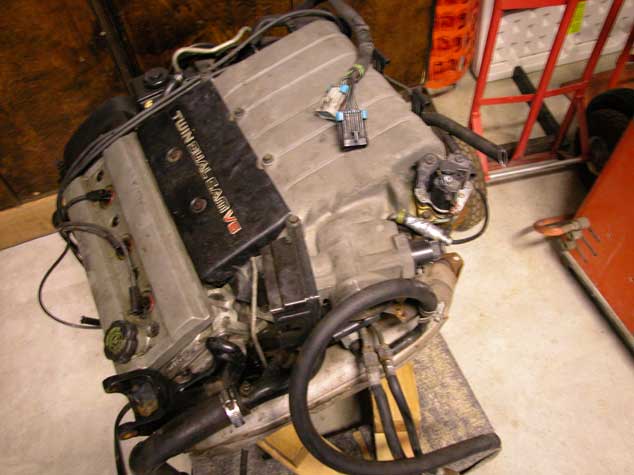
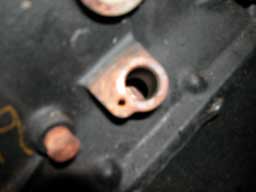
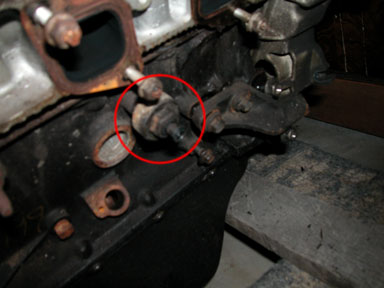
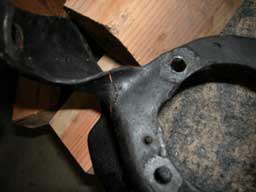
After waiting almost a month after the end of the ebay auction, my engine has FINALLY arrived. All seems to be in order except for a few things. For one, there are yellow numbers on the engine, indicating that it is from a slvage yard. The seller did not inform me of this. Also, it appears that something that was sealing the crankcase has been removed; I'm not sure what. Crank sensor maybe? The seller did mention that he had removed the crank sensor and wasn't sure if he put it back on, so he would check if he still had it and send it over. I haven't heard from him about that yet but intend on calling him tomorrow morning. Here's the hole in the block where it was: What concerns me most is that it looks like I can see part of the crank or something through the hole, and there is surface rust on it. Is this a definite indication that the bottom end is screwed? Or will this surface rust go away with no problems once the engine is turned over? Also, I'm not quite sure what this piece is above it. It looks like something would be attached here? Oh yes, the sender shipped the engine in such a way that this bracket was stressed and cracked. I haven't seen this bracket before in pictures from other buildup threads for this swap. What mounts here? Just thought I'd throw these questions out while I make a run to Watsonville to get a compression tester and some other stuff. My plans will be outlined when I get a chance to write them up and then the build-up begins!
-Steven
------------------
[This message has been edited by Steven Snyder (edited 01-17-2006).]
IP: Logged
07:46 PM
PFF
System Bot
cptsnoopy Member
Posts: 2587 From: phoenix, AZ, USA Registered: Jul 2003
you may get lucky in that the surface rust may only be on the crank itself and not in the bearings from the oil sitting in there. if it is in the bearings your hosed. I am more concerned about the cylinder walls. if the crank was able to rust, the cylinder walls may have had enough oil run off to rust too. not quite as bad as the bearings but still a problem. the part your asking about just above the hole in the block looks like a sensor of some sort and the end of it is where a wire connector would plug in. (I bet DarthFiero would know) I hope that is not rust you see in there. good luck!
[This message has been edited by cptsnoopy (edited 12-02-2004).]
IP: Logged
07:56 PM
ltlfrari Member
Posts: 5356 From: Wake Forest,NC,USA Registered: Jan 2002
The hold is for the crank pos sensor. Connector above it is knock sensor. Twisted bracket is part of orig cars stuff, went over orig axles I think, you don't need it.
Looks like you are going to have to strip the engine to check it out. good look and keep us posted with lots of pics of course..
The circled item is a knock sensor. ESSENTIAL for the 3.4L TDCs fuel management system. It has a small, single wire connector that plugs in over the end of it, it just pushes onto it. I would highly reccomend changing this, becuz if its bad, the car will take forever to start, and will hamper the car's running performance. In my Z34, I got beat by a stock 2.8L CARBED Firebird automatic when mine broke. Got a new one, and I was back to beating the LT1s.
That is the crank sensor...
As for the rust, I'd advise flipping it over and removing the oil pan and checking on this, especially if its a boner motor that had an open access area to the internals(crank sensor hole).
------------------ 1992 Lumina Z34 5-speed For Sale 14.78 @ 92.68 1992 Lumina Z34 5-speed For Sale Offered to donated its organs to Fiero
IP: Logged
09:51 PM
Dec 3rd, 2004
Steven Snyder Member
Posts: 3326 From: Los Angeles, CA Registered: Mar 2004
I pulled a few spark plugs and turned the engine over with a socket wrench on the crank pully. Its easier than I thought, but not like I could do it without a wrench. I've never turned over an engine before so maybe this is how its supposed to be. I kept looking at the crank and there doesn't seem to be any rust on it, I think that one spot was just a little bit dry of oil and maybe had some oil residue caked on it. However, the engine really does appear to be cut out of a car from a junkyard; coolant hoses cut and whatnot. The seller listed it as "well kept and pulled when ran" and told me that he had the car for a year and drove it around. Sounds fishy. I tried to do a compression test on one cylinder but was having trouble with the gauge.. I pulled the hose out and the adapter is still in the spark plug hole! How the heck do I reach down there to get it out? Aiee. Also, tons of water the rear bank of plugs. Any tips on getting this out? I put some oil down the plug holes and turned it over now I'm letting it sit with a bit more in there. I'll do a compression test on more cylinders in a few hours if I can get the hose adapter out.
-Steven
IP: Logged
12:09 AM
Fastback 86 Member
Posts: 7849 From: Los Angeles, CA Registered: Sep 2003
Glad you're getting started Steven! I didn't know you had everything together already! If you need any help over the winter break here, let me know and I'll do my best to help! Did you find what you wanted at those yards in San Jose? And did you ever find the engine I was talking about in Moss Landing? You might be able to get some stuff off of that one if its still there.
IP: Logged
12:58 AM
Steven Snyder Member
Posts: 3326 From: Los Angeles, CA Registered: Mar 2004
Originally posted by Fastback 86: Glad you're getting started Steven! I didn't know you had everything together already! If you need any help over the winter break here, let me know and I'll do my best to help! Did you find what you wanted at those yards in San Jose? And did you ever find the engine I was talking about in Moss Landing? You might be able to get some stuff off of that one if its still there.
Thanks for the offer to help, Scott! Hopefully this engine is actually good like the seller claimed so the swap can actually get done over winter break. I could certainly use some help. I actually ran out of time last weekend so I didn't get to go the San Jose yards to look for another front manifold and whatever else I needed (I can't remember!). I looked all over the Moss Landing yard for that car/engine and probably walked up and down the mid-size GM row with the Grand Prixs and whatnot about three or four times. The dang thing just wasn't there anymore. Maybe someone just bought the whole car? I guess I'll have to stick with the AC compressor I have for now. I was hoping to have one already set up for R134a.. but oh well. I'd rather just have the engine running first. It's winter so I wont need AC for awhile. I've been trying to get a compression reading on the front-left cylinder (is that #1?) but its very inconsistent. I didn't get any oil down in that cylinder yet so I think its just because the cylinder is dry so nothing is sealing right. Also could be my compression tester fittings leaking. Because of the ridiculous deepness of the spark plug holes, I can't tighten the fittings except by twisting the hose. Also, the adapter I had on the hose is stuck in the spark plug threads for that cylinder! I twisted the hose out and the adapter got left behind. Oops! I have no idea how I'm going to get it out. Its too wide to get a socket around it... until I get it out I wont be able to test the compression of the other cylinders or get any oil down in that cylinder. Also have to find out how to get the water out of the rear spark plug holes. I'm afraid I might just take a plunge and take the cam carriers off. I'd really hate to tear that far down into the engine if I don't have to though. I took a valve cover off and there's nice oil all over the camshafts. Whew. They also move properly when I turn the crank ;-) At least -something- is looking okay here!
-Steven
IP: Logged
02:12 AM
aaronrus Member
Posts: 870 From: bradenton, FL USA Registered: Nov 2003
I pulled a few spark plugs and turned the engine over with a socket wrench on the crank pully. Its easier than I thought, but not like I could do it without a wrench. I've never turned over an engine before so maybe this is how its supposed to be. I kept looking at the crank and there doesn't seem to be any rust on it, I think that one spot was just a little bit dry of oil and maybe had some oil residue caked on it. However, the engine really does appear to be cut out of a car from a junkyard; coolant hoses cut and whatnot. The seller listed it as "well kept and pulled when ran" and told me that he had the car for a year and drove it around. Sounds fishy. I tried to do a compression test on one cylinder but was having trouble with the gauge.. I pulled the hose out and the adapter is still in the spark plug hole! How the heck do I reach down there to get it out? Aiee. Also, tons of water the rear bank of plugs. Any tips on getting this out? I put some oil down the plug holes and turned it over now I'm letting it sit with a bit more in there. I'll do a compression test on more cylinders in a few hours if I can get the hose adapter out.
-Steven
yeah.. take the valve cover off
IP: Logged
02:55 AM
Steven Snyder Member
Posts: 3326 From: Los Angeles, CA Registered: Mar 2004
The valve cover is already off; it isn't even a half-inch thick. It's more like a cap. The spark plug hole extends another 4 or 5 inches at least, as it has to pass through the rest of the cam carrier.
-Steven
IP: Logged
03:53 AM
ltlfrari Member
Posts: 5356 From: Wake Forest,NC,USA Registered: Jan 2002
So far as I can figure out, left and right on this engine are when looking at it from the flywheel end. With all the doubts you have about the engine it sounds to me like you'd be better off stripping it from the getgo and refurbishing everything so you know it is all ok. I tried the same shortcut methof when I did mine (try it first and fix things as needed). So far I have pulled it about half a dozen times and taken a little more apart each time. In the end it would have been a lot quicker and easier to simply strip it up front, at least to do the known trouble items like plenum gaskets, valve timeing, injectors etc.
As for turning it over. mine is pretty stiff, even with the plugs out and the only way I could do a realistic compression test was to hook up the starter to turn it over fast enough.
as for getting that water out, maybe put the engine on an engine stand and turn it upside down or point a hair dryer down the hole and evaporate the water although I guess that would take a while.
If you have a compressor, blow the spark plug holes out, but turn your head, it will be messy and water will spray everywhere. But the rest will evaporate. If you have an engine stand, I reccomend you drain your oil (and probably alittle bit of water) and pull the oil pan, it will give you a better idea of what you have to do. You might opt to change the bearings while your in there. But then again, you might not have to touch it at all. Either way, an oil pan gasket is a small price to pay for reassurance.
IP: Logged
05:31 PM
Dec 5th, 2004
Steven Snyder Member
Posts: 3326 From: Los Angeles, CA Registered: Mar 2004
Originally posted by Patrick: Wouldn't a wet/dry shopvac work? I imagine you'd be able to suck all the water and crap out of there easy enough.
Worked great! I sprayed some WD40 down there to help loosen up the dirt and sucked everything up through a straw with the shopvac. The spark plugs are all out now. My engine lift started leaking fluid pretty bad, so I'm going to have to get that fixed before I can lift up the engine to take off the oil pan and look at the bearings. I picked up a flywheel for a 91 Cavalier Z24 from Kragen's today so I could get that hooked up and spin the engine with the starter for a comp test. Alas, nobody has the flywheel bolts in stock, and the dealership parts centers are closed for the weekend. I also realized I don't know where the bolts are that hold the starter to the block. I think the seller left them out when he removed the starter to set the engine on the shipping pallet. I hope to be in contact with him by Monday to get all the details..
I can just use the 93 Lumina flywheel bolts even though I'm using a flywheel from a 91 Cavalier, right? All the 60-degree V6 flywheel bolts are the same I imagine... if not, anyone have a part number for the bolts I need? I'm placing an order with gmpartsdirect.com tomorrow for a whole bunch of stuff for the swap.
-Steven
IP: Logged
04:03 AM
ltlfrari Member
Posts: 5356 From: Wake Forest,NC,USA Registered: Jan 2002
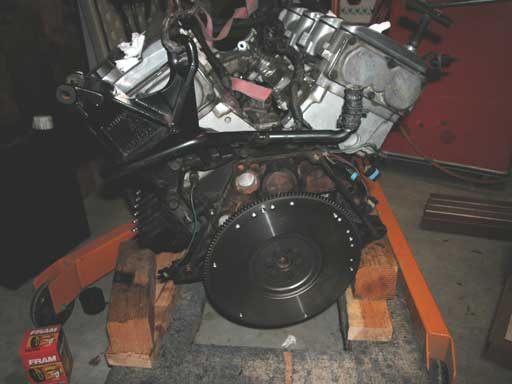
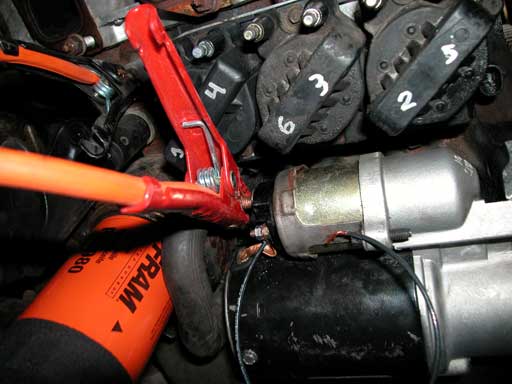
Thanks for the part number, Dave. I was going to go by Napa to pick some up but it turned out I had to wait longer because the engine provider forgot the starter bolts so I couldn't hook it all up for a compression test anyway. I ended up ordering the OEM bolts, part # 476576 from gmpartsdirect.com. My order from GPD came in yesterday along with a conversion gasket set I ordered from pickproparts.com. The gasket set was cheaper than the oil pan gasket alone at Autozone and it contains that exact same gasket from the same manufacturer along with a ton of other goodies. I may as well replace whatever gaskets I have while the engine is out. Today was a fun day; I would finally find out whether this engine was what it is supposed to be... well, from a compression point of view, at least. First, I had to fix the fluid leak on my hoist. Whenever the screw to let down the hoist arm was loosened, hydraulic fluid leaked out around it. I put an o-ring over the threads in front of the rubber "plug" that was supposed to seal it and it hasn't leaked... yet. Next, I lifted the engine and attached the flywheel. The starter was then bolted up and a crude wiring system was set up like so: Jumper cables from battery to starter motor terminal (+) and mounting bolt (-). Small wire from starter solenoid to be touched against starter motor terminal when it is to be run. Good connections and a good battery are crucial. I pulled the battery from the lawnmower out of the barn and tried a compression check but I ended up getting values of under 100 on all cylinders. Ouch. Then I tried the battery in my dad's van and got some readings over 100. However, they were still quite disappointing. Not one to give up easily, I checked my connections, cleaned them, put things back together, and tried again. 105, 135, 150, 160, 120, 159... hmm, not so good! It then occured to me that even 150 psi is quite a lot of pressure for a dry o-ring to seal against, especially on a hand-tightened connection. I put some fresh motor oil around the o-ring on my compression tester and tried again... The result: Exactly 180 psi on every cylinder except #2 which was between 165 and 170. Not bad; that's less than 10% from the rest. I double checked just to be sure. The top end of the motor gets an A from me! My plastigauge should be arriving here any day now. I'll drop the oil pan when it arrives to check bearing clearances and inspect the crank before I put decide whether or not I'm going to tear it down anymore before it goes in. So far it seems like its going to be alright.
-Steven
IP: Logged
02:53 AM
turbo86se Member
Posts: 2098 From: Carroll Valley, PA Registered: Oct 1999
Originally posted by turbo86se: This is a good read!! Good luck with the swap, hope it all works out for ya! I'm gonna go grab some popcorn. ~joel
Thanks Joel!
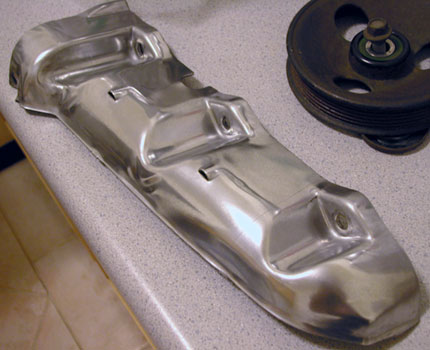
Today I went to the Moss Landing Pick-N-Pull to get some of the stuff for the power steering idler pully setup. My helper and I searched for an hour for the mystery bracket that qwikgta is using but couldn't find it. We carefully inspected every FWD GM car in the lot, and then some more. I also searched for the S-10 AC delete pully which is part of the idler setup. I looked at all the S-10s in the yard and couldn't find one without AC. On the way out of the yard I tripped over a duke sitting near the pickup trucks and looked down to find the pully sitting right there waiting for me. Yeehaw! ;-) I also lucked out at the San Jose yards the other day. I found a 94 or 95 3.4 DOHC in a 92 Lumina that was essentially complete. I snatched the front manifold and heat shield to use for the rear on mine, as I plan on making an exhaust like most of the others have done: an imitation of the V6 Fiero exhaust routing. This requires the use of a front manifold flipped over in the rear. I don't know if the heat shield can be seen the way the engine sits in a Fiero engine bay but I polished it up all nice anyway ;-). Clean, polished aluminum is so darn pretty! I plan on polishing the valve covers and intake to look the same, but I may end up painting them.. I haven't really decided yet.
-Steven
IP: Logged
04:06 AM
AaronZ34 Member
Posts: 2322 From: Colorado Springs, CO Registered: Oct 2004
Sorry to see you waste your time, but that heat shield sits below the manifold to protect the ignition, so you can't see it from the top. Looks good though! FYI the rear 3.4L TDC manifold's heat shield can be seen from the top, but you probably won't be using this.
------------------ 1992 Lumina Z34 5-speed For Sale 14.78 @ 92.68 1992 Lumina Z34 5-speed For Sale Offered to donated its organs to Fiero
IP: Logged
12:07 PM
Steven Snyder Member
Posts: 3326 From: Los Angeles, CA Registered: Mar 2004
Originally posted by AaronZ34: Sorry to see you waste your time, but that heat shield sits below the manifold to protect the ignition, so you can't see it from the top. Looks good though! FYI the rear 3.4L TDC manifold's heat shield can be seen from the top, but you probably won't be using this.
I didn't polish the one that'll be facing down. I am using the heat shield I polished to cover the top side of the front manifold I'm flipping over to use in the rear. I just wasn't sure if the intake stuck out far enough on the back side of the engine to prevent this from being seen. I found some pics of the same setup I'm using and this shield will indeed be visible. I don't know that it'll be functional considering that there isn't anything that needs to be shielded from heat running near it I can think of, but it'll look better than a rusty cast iron manifold.
-Steven
[This message has been edited by Steven Snyder (edited 12-23-2004).]
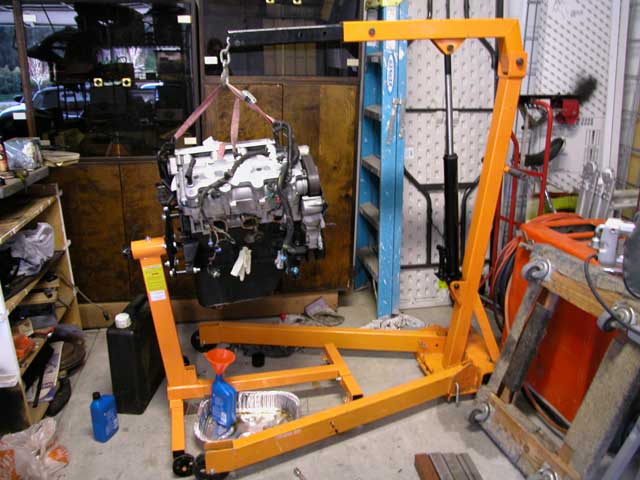
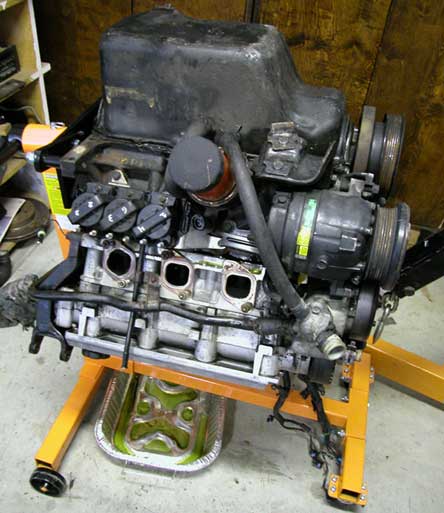
I picked up an engine stand from Harbor Freight yesterday, and today I got some bolts to mount my engine to it: two 12x1.75x80mm, and two 12x1.75x100mm, and a bunch of washers and nuts. I also fixed the release/bleeder screw on my hoist so I could get the engine up on the stand without leaking hydraulic fluid all over the garage floor again. Here it is being attached to the stand: Working on the engine should be a lot easier with it like this; especially the bottom end. Just flip it over like so... ...and the oil pan comes off without dripping any oil in your eyes! I also noticed that the last person who put the exhaust manifolds on put one of the gaskets on sideways/backward. Look at the left-most cylinder in the second pic. The gasket actually enters the path of the exhaust gases when put on like this. Tsk tsk... Everything looks okay in crankcase so far, but I haven't removed any bearing caps yet. I forgot to get assembly lube today so I'm not going to Plastigage and reinstall the bearings until tomorrow or the next day. I also need to pick up a star socket to get the connecting rod bolts out, as well as a new torque wrench. In the meantime, I'll be working on my notchback taillight mod. I picked up some parts today to experiment with and I'll post pics if it works out.
-Steven
IP: Logged
10:04 PM
Dec 30th, 2004
jsmorter1 Member
Posts: 674 From: Creston, Ohio Registered: Jun 2004
Originally posted by jsmorter1: those look to be 12 point nuts on the rod bolts so u want a 12 point socket- not a star socket
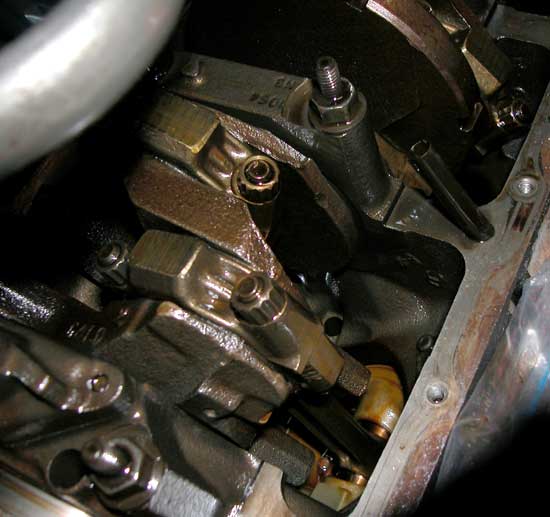
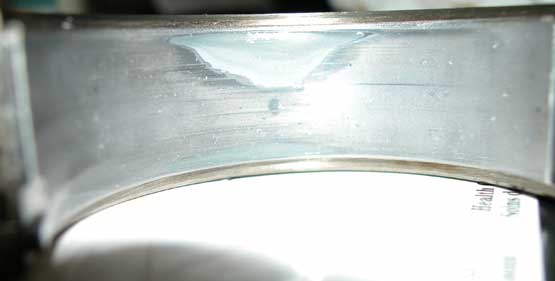
Ah, ok, I didn't realize there was a difference. Thanks. Good thing I picked up the right socket today anyway! I also got some other stuff: a new clicking torque wrench, some assembly lube, and some fuel hose to replace my crumbling PCV plumbing. Autozone had no idea what engine assembly lube was, but they had a torque wrench. Parts + Plus had assembly lube but no 12pt socket in the right size. Kragen's had the socket. I had a long day. I checked three of the rod bearings so far with Plastigage. They all come up within spec, but I don' t know what to look for on the bearings themselves to determine whether they should be replaced. The #6 rod bearing has a shallow scratch going across it with a matching one on the crankshaft. Is the scratch something to worry about now or just if I'm putting new bearings in? Its deep enough that I can feel it with my fingernail, but its not a huge gouge. The wear marks on the bearing aren't deep, the Plastigage "squished" evenly over the marks and the prettier portion. Here's a pic of that bearing: And the #5: Are those marks normal for an engine with 89,000 miles on it? Even across all the worn-looking portions the clearance is within spec. Other than the scratch in #6, the crankshaft looks perfectly smoothed and polished on all portions I've been able to see by removing rod bearing caps so far.
-Steven
IP: Logged
10:23 PM
Fastback 86 Member
Posts: 7849 From: Los Angeles, CA Registered: Sep 2003
He's right. I can't tell you if they are bad or not, but my bad ones looked worse, a lot worse. And since the bearings are a problem on the 3.4L, it is stupid not to replace them.
I'd go and just buy an entire, 100-300 piece Craftsmen tool set. Cheaper in bulk, I've always had the right tool, guarenteed forever with no receipt, and there are Sear's all over the country.
IP: Logged
12:25 AM
Steven Snyder Member
Posts: 3326 From: Los Angeles, CA Registered: Mar 2004
Originally posted by Fastback 86: If you've got em out, replace em. Theres no reason not to. Cheap insurance.
I'll pick up new rod bearings when I go back to work on Saturday. Autozone has 'em for like $3 each. I can just buy a new set of rod bearings and slap 'em in there, aye? I don't have to worry about that one groove in the crank on the #6 journal? Also, I haven't looked at the main bearings yet. The torque specs for the main bearing bolts specify 37 ft-lbs + 75 degrees, which I thought means that the bolts have to be replaced if removed since they are torque-to-yield... but the service manual mentions no such thing. Am I gonna need new bolts if I take the main caps out?
Steven if you can get a pic of the 'groove' in your crank that might be worth posting to get some opinions on it. Is there an edge that protrudes? ie does anything stick out or is it a groove INto the crank if you know what I mean. If it is reallysmall and it does NOT stick OUT (so that it would gouge the new bearing) AND you can do a polish, then MAYBE you can get away with it; but it will depend on the size, shape, orientation .......AND your driving style once done.
37 ft lbs doesn't sound like much; for mains that CAN"T be 'torque to yield' - it is way too low unless the bolts are 1/8" or something LOL...... is that the right torque? I haven't got that info but it seems...VERY low. If that is right then I am sure you can reuse those bolts; they are a long way from being stretched. Be good to get a few more opinions here too.
IP: Logged
11:22 AM
crzyone Member
Posts: 3571 From: Alberta, Canada Registered: Dec 2000
Steven if you can get a pic of the 'groove' in your crank that might be worth posting to get some opinions on it. Is there an edge that protrudes? ie does anything stick out or is it a groove INto the crank if you know what I mean. If it is reallysmall and it does NOT stick OUT (so that it would gouge the new bearing) AND you can do a polish, then MAYBE you can get away with it; but it will depend on the size, shape, orientation .......AND your driving style once done.
I'll take a good close-up pic of it tomorrow or the next day when I get back to work on the engine.
quote
Originally posted by fiero308: 37 ft lbs doesn't sound like much; for mains that CAN"T be 'torque to yield' - it is way too low unless the bolts are 1/8" or something LOL...... is that the right torque? I haven't got that info but it seems...VERY low. If that is right then I am sure you can reuse those bolts; they are a long way from being stretched. Be good to get a few more opinions here too.
It's 37 ft-lbs + 75 degrees. This is listed in my Chilton's manual as well as the site that Crzyone posted above. Since the manual doesn't even mention replacing them when putting it back together, I'll just reuse them if I even decide to take the main caps off, unless someone has some additional info to share.
Thanks for the link!! Looks like those specs are for a 96+ engine, though. The bearing clearances and some of the torque specs are different. Still will be useful for stuff I don't have specs for in my Chilton's though.
-Steven
[This message has been edited by Steven Snyder (edited 01-02-2005).]
IP: Logged
01:01 AM
Jan 3rd, 2005
Steven Snyder Member
Posts: 3326 From: Los Angeles, CA Registered: Mar 2004
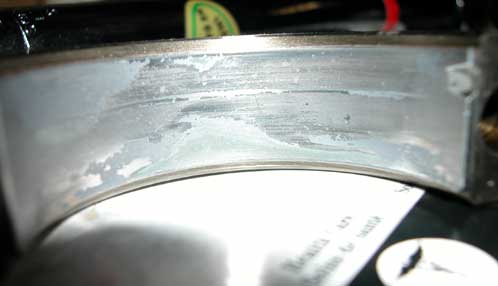
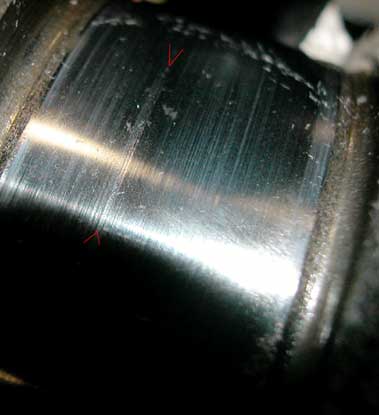
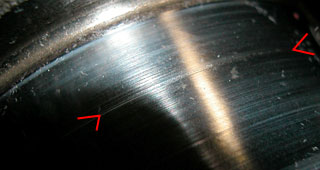
The macro ability of the digital camera I'm using is better than I thought! Below are some extreme closeups of the portion of the crank in question. I put some red marks to indicate where the groove is. It extends completely around the crank. I pushed the rod down to check the other side. Note that the rod is NOT scored all over as it may seem to be in the picture. Those other lines going along with the groove are not even visible to the naked eye! Without the camera the crank looks perfectly smooth and polished except for the groove marked. This groove is the only one I can feel with my fingernail. I can't tell if the edges protrude but it doesn't feel like it. I doubt that the edges would gouge a new bearing, and if it did, I can't see how it would be a problem considering that the bearing wasn't even spun when the groove was created. Here's the pics. As much detail as there is, the gouge is so small there really isn't anything to see..
Should I polish it just to clean up rough edges if any? What do I use if I should? I got new bearings at Autozone yesterday, hopefully I'll get 'em on tomorrow.
-Steven
IP: Logged
02:25 AM
PFF
System Bot
cptsnoopy Member
Posts: 2587 From: phoenix, AZ, USA Registered: Jul 2003
Originally posted by cptsnoopy: if it were mine i would say it's time for all new bearings (rod and main) and a polished crank, that journal looks bad.
I'll consider it, but it honestly doesn't look nearly that bad in person. In fact if I saw that pic without knowing I took it I wouldn't think it was my crank. The thing is as shiny as chrome, the only visible mark or line being the groove I marked with the red lines in the pic. I even compared it to pics elsewhere on the 'net of "good" cranks that look identical. Obviously those lines in the pics are there but they can't even be felt nor does the journal look dull as it does in the pic. Basically what I mean is... if I can't see any irregularities without optical enhancement, are existing irregularities significant enough to limit the ability for the oil film to properly form? In case I do need to get it polished, how much should I expect to pay for a crank polishing job? Anyone have recommendations for a machine shop in the Bay Area or around Santa Cruz?
-Steven
EDIT: Here's a link to one pic of a crank journal I used to compare... http://www.blairlee.com/m3files/bearings/003_crank1.jpg The journal in the pic has some noticeable discoloration and lines going around the diameter, which I don't see on my journals. That image also looks duller, but it could be the pic. Otherwise looks the same as what I can see without taking those 1-inch away macro shots I posted above. Does the appearance of that indicate a need for polishing?
[This message has been edited by Steven Snyder (edited 01-03-2005).]
IP: Logged
04:25 AM
cptsnoopy Member
Posts: 2587 From: phoenix, AZ, USA Registered: Jul 2003
I would agree that these digital cameras bring out every little imperfection that we normally would not see. I think that there may be some room to work with but I can't put together an engine that I want to last 100K miles wondering if the bearings and crank are ok. You may be able to get many good miles out of it but since there is a groove in the crank already that says something is wrong. I can't get technical because I am not knowledgeable enough to know how much that one groove will affect strength or cause the bearing to wear more than the rest of the bearings. I hope other folks here will give you their opinion and with a lot of input you can make a decision that you feel comfortable with. I have never worked on this particular engine but I understand that it is designed to turn fast. I would imagine that puts more strain on the bottom end than most other engines. I am excited about your project and wish you the best of luck.
IP: Logged
05:21 AM
Fastback 86 Member
Posts: 7849 From: Los Angeles, CA Registered: Sep 2003
The 3.4 DOHC spins FAST when you rev it up high, and being a 60* engine, it puts a lot of stress on the crank and main bearnings. I wouldn't rebuild an engine and reuse damaged parts, especially bearings.
IP: Logged
02:43 PM
AaronZ34 Member
Posts: 2322 From: Colorado Springs, CO Registered: Oct 2004
The 3.4 DOHC spins FAST when you rev it up high, and being a 60* engine, it puts a lot of stress on the crank and main bearnings. I wouldn't rebuild an engine and reuse damaged parts, especially bearings.
I agree 100%, especially after having a bearing failure on a synthetically lubricated 127k mile engine.
------------------ 1992 Lumina Z34 5-speed For Sale, modified(high 13s), or stock 14.78 @ 92.68 1992 Lumina Z34 5-speed Stock, takes my butt to work...Sometimes... 3.4L TDC V6, getting built to about 430hp at 8000rpm for a 88GT
IP: Logged
03:19 PM
Steven Snyder Member
Posts: 3326 From: Los Angeles, CA Registered: Mar 2004
I'll take the crankshaft out sometime this week to take it to a machine shop for a grind and polish. Anyone have experience with shops around my area? I'm between Santa Cruz, Gilroy, and Salinas, but I'm also in the Bay Area a lot (mostly San Jose). How much should I expect to pay if the crank needs to be turned and polished? Anything specific I need to ask for? I've never had to use a machine shop before.
-Steven
[This message has been edited by Steven Snyder (edited 01-03-2005).]
IP: Logged
03:44 PM
Jan 15th, 2005
Steven Snyder Member
Posts: 3326 From: Los Angeles, CA Registered: Mar 2004
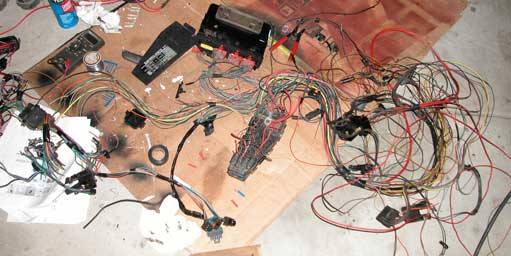
I found a place in Gilroy that will regrind and polish the crank AND hook me up with new main and rod bearings for just over $100. Sweet. Well, once I get the crank out, that is. See the current issue here: https://www.fiero.nl/forum/Forum2/HTML/058931.html. I have the wiring harness pretty much done. I just need to get the engine bottom end done so I can reassemble it and make sure everything reaches right. Also, the AC clutch and knock sensor connectors had been cut from the harness, so I have to locate these at a yard. Finally, I don't know what to do with the D22 "clutch switch" wire. I imagine its supposed to be grounded? Can't tell from the diagrams I have. I'm using an auto harness with an ECM that was programmed by Darth Fiero with the manual tranny program. I'll figure this out evenutally ;-) Here's what the harness looked like on day 1: 3 days later (today) it looks like this... Err, can't find the pic!!! I'll take some more next time the harness is laying out in the open. Trust me, it looks a lot cleaner and neater. ;-) It's reaaaaallly nice. I'm going to get back to polishing and cleaning things while I wait for the crank to get done. I'm also currently trying to decide how to do the exhaust system. I really want to do it the way Rick did his 3.5 S*, but I don't know if the stock rear manifold on the 3.4 dumps at the right angle. Sadly, I don't have one to test fit. I guess I'll have to buy one unless someone can tell me if it does or does not work. I realize that there are clearance issues with the Isuzu transmission and the stock crossover but it is my understanding that it is just interference with the heat shield so I should be able to cut out or dent a portion to make it fit right. I'm also concerned about noise level. Somehow Rick's 3.5 is unearthly quiet for having just a cat and resonated tips (no muffler!). I guess I could get a rear manifold and just mock up an exhaust with some resonated tips and simply reuse them with the other exhaust style if it doesn't work out. It's a simple enough system that I could get it done cheap or do it myself. Yeah.. I think I'll do that.
Looks like rebuild time. No engine should have water in any cylinder. Turning the engine over with rust in a cylinder could break a ring. An accurate compression check requires that all plugs be removed and you are able to spin the engine with the starter.
IP: Logged
01:16 AM
Steven Snyder Member
Posts: 3326 From: Los Angeles, CA Registered: Mar 2004
Originally posted by Jim Krause: Looks like rebuild time. No engine should have water in any cylinder. Turning the engine over with rust in a cylinder could break a ring. An accurate compression check requires that all plugs be removed and you are able to spin the engine with the starter.
Hi Jim, I think you replied to the wrong thread ;-). Never any water in cylinders in this thread.