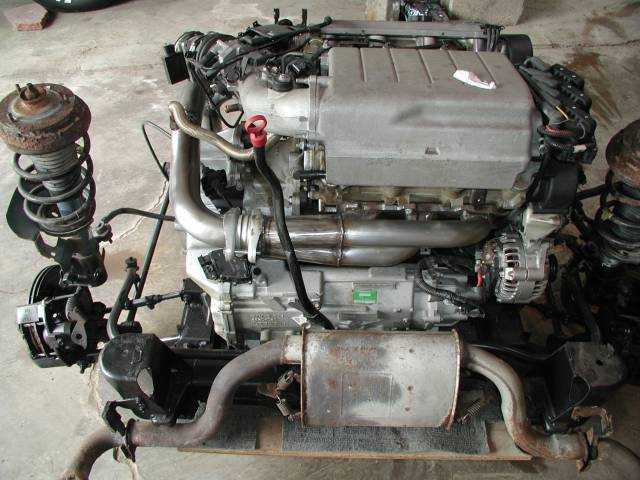
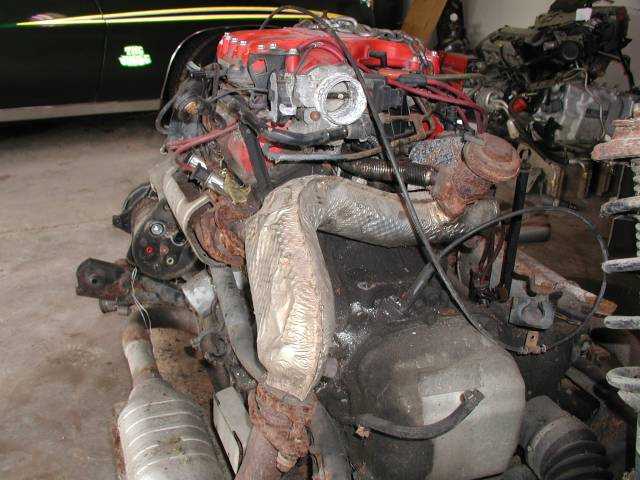
i am in the process of swaping in a 1996 3.4 dohc engine with the factory 4t60e tranny out of a monte z34 into my 88 gt. i plan on using the stock obd2 electronics with the factory air compressor and cruise control. i am starting this thread to document my swap with the problems and solutions for this swap. before we get started i just wanted to show a pic of the stock 2.8 to show the stock exhaust routing to compare with the dohc swap
[This message has been edited by mike kaas (edited 02-02-2004).]
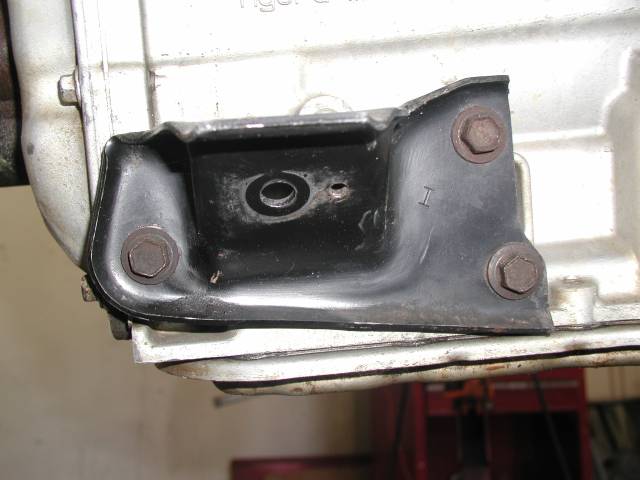
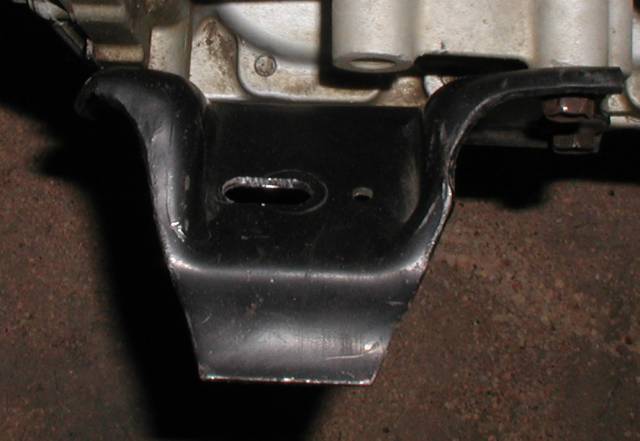
here is a couple of pics of the tranny mount brackets that i got out of the junk yard. i just used some pics that i got from the web and used these when searching for the mounts. i was looking for a tranny already pulled out because it is so much work to get to these mounts when in the car. i think the tranny was a late 80's 4t60 that they came from. the pic with a mount in my hand is the stock mount from the fiero th125 they almost look identical and i think it might fit the 4t60 case
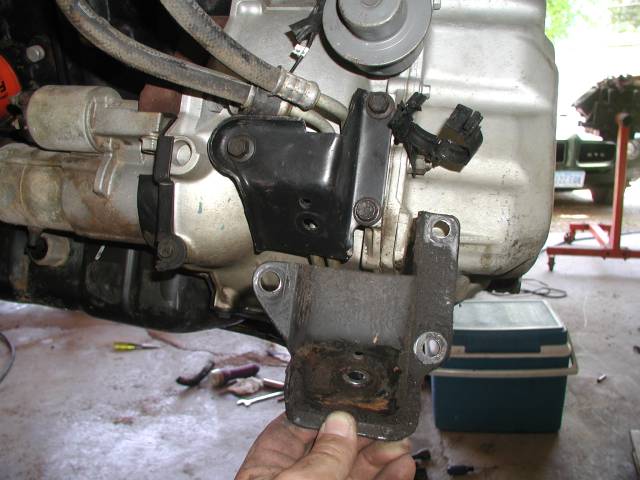
the next one is a pic of the stock front fiero 2.8 engine mount this fits the dohc engine like it was made for it. the original dohc mount had a bracket going to the end of the tranny to support it from flex from hard acceleration, i just cut and then welded it to the fiero mount
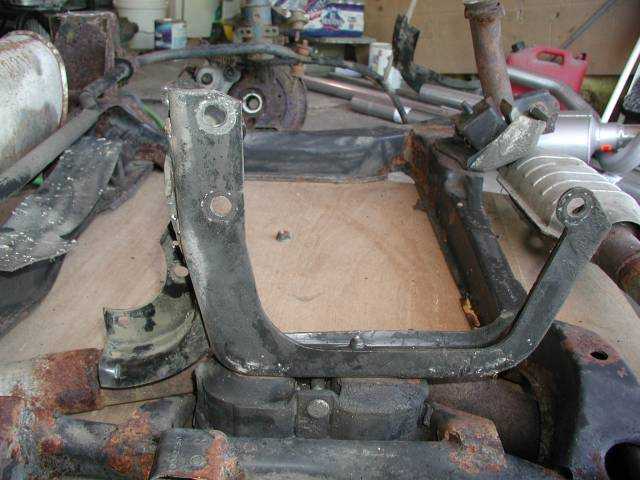
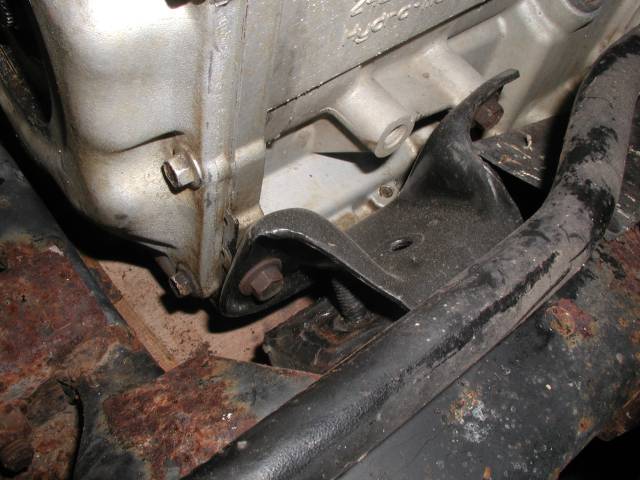
while testing the fit of the mounts in the cradle the engine went in and lined up but the rear tranny mount did not line up the hole was off by an inch
i pulled the engine out and noticed the cradle had a slot for the rubber mount and that i could move it over in the right direction a 1/2 inch. i was still off a half inch so i cut a 1/2" slot in the tranny mount and when the engine was set back in everything lined up perfectly. the engine was in the cradle!!
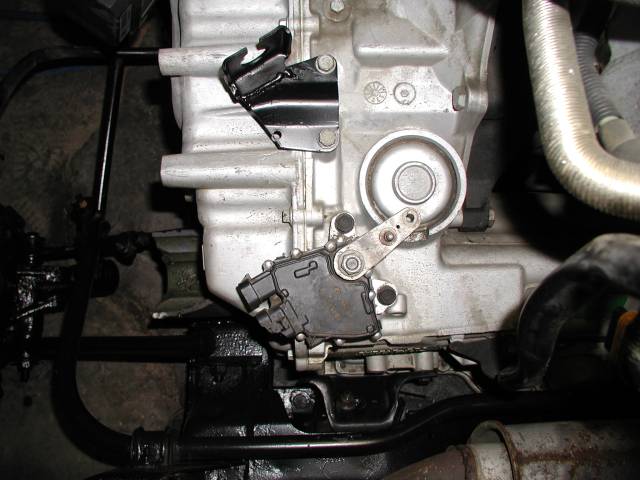
next i worked on the shifter cable. i took the th125 shift arm and installed it on the 4t60 but did not like the angle of the arm when installed, so i ended up using the 4t60 arm. the stock th125 fiero shifter arm is 1 5/8" from the center of the stud to the ball link. on the 4t60 when i went through the gear detents and at this distance the ball moved 3/8" between the gears. when i checked the distance the shift cable moved between gears with the shifter the cable moved 1/4". i then checked the shift detents on the th125 tranny and the ball also moved 1/4" between gears. i had to find where to put the ball on the 4t60 arm to get the 1/4" ball movement between gears.this distance ended up being 1 7/16" from the stud center to the ball. i put the tranny into neutral gear and started working on the the shift cable bracket. i wanted the bracket to be at a 90 degree angle to the arm in neutral gear. i ended up using part of the th125 and part of the 4t60 bracked welded together to make my new bracket
[This message has been edited by mike kaas (edited 02-02-2004).]
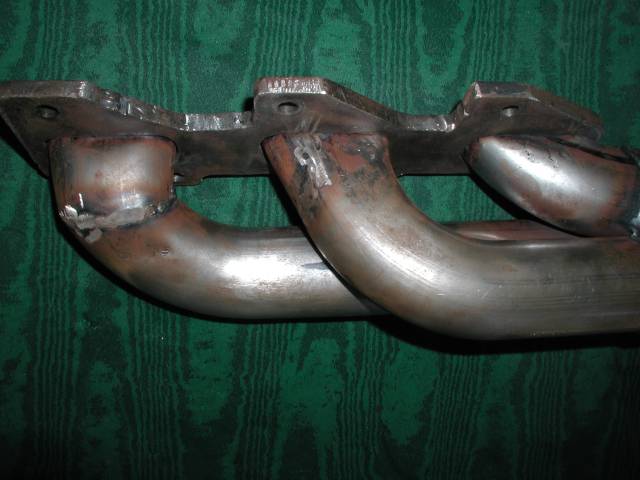
for the exhaust i wanted to run the stock syle with a cat in the stock fiero position. this means i could not use the dohc manifolds. i decided to make my own headers. my biggest problem were the flanges, i tried to locate a pair of the laser cut flanges but found out by the source that they were all gone. so i had to make my own. i took a piece of 3/8" plate steel and cut it out with a acetylene torch then cleaned it up with a carbide burr in a die grinder. due to the limited space to work with i decided to go with a shorty style header. the primary tubes are 2" going into a 3" collector. i used a 2" primary because this size matched about the same area as the port of the heads and any smaller pipe would be a nightmare to try to mate to the flanges. the collector is 6" long and will work best for performance but i am wondering if this length might be getting to tight in the engine bay. on the end i welded a flowmaster collector ball set to connect to the y pipe.
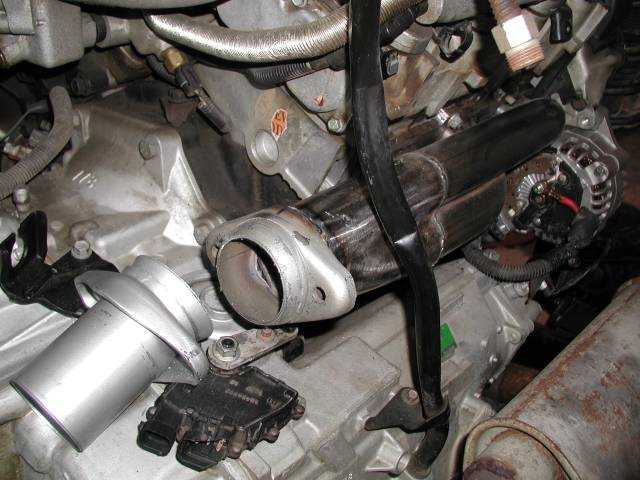
here is a pic of the end of the header. due to the way the ports lined up this put the collector very close to the gear selector. i lifted the collector as much as i could before welding and this put the collector 1/2" above the shift arm ball. the end of the shift cable has a plastic connector and because of the heat i will have to change this to metal and put a heat shield over the transaxle switch
IP: Logged
12:22 PM
Patrick Member
Posts: 39487 From: Vancouver, British Columbia, Canada Registered: Apr 99
Even though I have no interest in doing this type of swap myself, I still find this thread to be very informative. I admire anyone who when they can't find the proper parts, just makes 'em! Thanks for going through the extra trouble of posting these pictures along with your thorough explanations. Great stuff!
IP: Logged
04:43 PM
PFF
System Bot
qwikgta Member
Posts: 4671 From: Virginia Beach, VA Registered: Jan 2001
Mike, Not sure if you have seen any of my posts. I too am doing a 96 3.4 from a monte ss into my 88 coupe. First off, I love the headers. Is there any way you can produce another set, I am looking for a set myself. I dont have any welding background and i love the look. It looks easy but im sure it is not. You mention that you would like to use the stock 96 ECM and acc. I have wanted to do the same but have been told it is not easy because of the OBDII. Do you have this worked out. I have picked up a 92 ECM and was planning to use it, and mating it to the 96 harness. It is not the best, but again, it has been done before. Starting off with the V6 you should not have any probs with the fuel lines and heater hoses, they are a ***** starting with the 2.5 like i did. Are you upgrading your fuel pump, if so, which one. I really can't wait to see what you do with the harness and ECM/PCM. I look forward to reading about it all when i return to the USA after my "future" deployment. Good luck
Rob
------------------ 88 TTop coupe, soon to be fitted with a DOHC 3.4/5spd
IP: Logged
06:16 PM
bHooper Member
Posts: 4157 From: greensboro, nc Registered: May 99
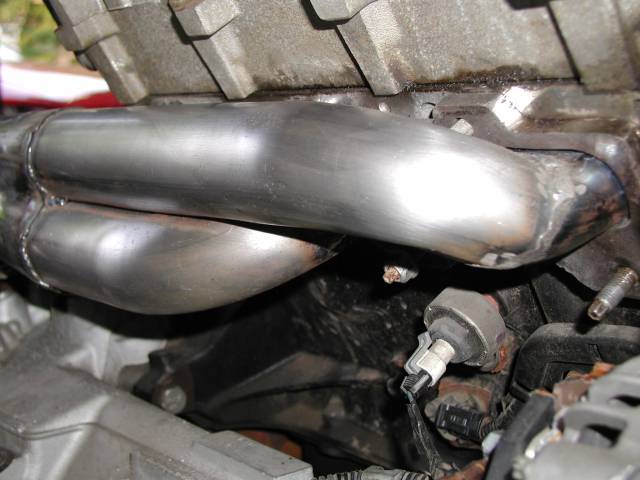
quikgta- at this time i don't know if i can do anymore headers. the main problem is that i have had to build the whole thing from scratch. this has taken over 6 hours to make each header. i have been doing some research into the electrical for some time, and not saying that i will run into no problems, i think the obd2 system can be used. the main thing about this system is in the doner car almost all of the obd2 system is under the hood. the heart of the electrical system is the u/h#1 (underhood electrical system #1). this contains almost all of the fuses and relays for the engine electrical system. for a quick description the only wires used from the fiero are mainly the wires from c500 & c203 connector going to the dash area. i have maped out all of the electrical on paper and would like to share it when i find a program to put it into the computer. on the fuel pump i have'nt pulled the gas tank yet but i want to use the fuel pump from the dohc car. i have not worked out a problem with the fuel lines yet, i seems the fuel lines on the dohc engine come out of the opposite end of the engine compared to the 2.8 engine. for anybody interested in how i did the headers here is a closeup of the long tube, it was the hardest to make.
IP: Logged
12:48 AM
fierodustin_86 Member
Posts: 970 From: Joplin, Missouri Registered: Aug 2002
Mike, If you want some extra cash, let me know, i still want some headers. More cash than skill. As for the PCM. I had mine layed out on the garage floor today. I was trying to figure out all the wires, and what they are for. I have the Under hood electrical box #1, and noticed that like you said, most major fuzes and wires are leading to/from it. I noticed the large red lines providing power to it also. I don't know what the large bundle of wires that is at the end of the harness goes to, its the bundle that seams to lead into a huge rectangle plug that looks like it may have lead into the firewall. It has over 20 wires leading to it, and the wires are all part of the bundle leading from/to the PCM. Are you planning to use all the stock engine acc's, because i cant see why we cant use them all the way they are. Anyway the point of this reply is to ask, do you think that you will be able to bypass the OBDII part of the PCM that continues to kick everyones ass. THere are several of us that have 96+ engines in the car, but have to go with the OBDI PCM.
Nice Goat, i had a 70 in H.S., and i loved it.
Rob
------------------ 88 TTop coupe, soon to be fitted with a DOHC 3.4/5spd (on hold again for Uncle Sam)
IP: Logged
10:15 PM
DreXteR Member
Posts: 1763 From: Orlando, FL Registered: Aug 2000
quikgta- at this time i don't know if i can do anymore headers. the main problem is that i have had to build the whole thing from scratch. this has taken over 6 hours to make each header. i have been doing some research into the electrical for some time, and not saying that i will run into no problems, i think the obd2 system can be used. the main thing about this system is in the doner car almost all of the obd2 system is under the hood. the heart of the electrical system is the u/h#1 (underhood electrical system #1). this contains almost all of the fuses and relays for the engine electrical system. for a quick description the only wires used from the fiero are mainly the wires from c500 & c203 connector going to the dash area. i have maped out all of the electrical on paper and would like to share it when i find a program to put it into the computer. on the fuel pump i have'nt pulled the gas tank yet but i want to use the fuel pump from the dohc car. i have not worked out a problem with the fuel lines yet, i seems the fuel lines on the dohc engine come out of the opposite end of the engine compared to the 2.8 engine. for anybody interested in how i did the headers here is a closeup of the long tube, it was the hardest to make.
Nice headers, they look exactly as the ones I try to make. What you did to match the oval shape to the header pipe? The local guy who try to make the headers did a horrible work. I had to take them from his hands and they arent finished. Now I have to find someone that can fix whe he did wrong and finish the headers.
gta first, are you planning to use a manual tranny? if you are the obd2 system will have a problem with this. they never offered a manual tranny in 96. as for the two red wires they connect to the power post on the starter, the same post the large battery cable goes on. one red wire goes to uh/1 the other goes to the alternator. the rectangle connector you are looking at is the c100 connector, this is the connector that goes through the firewall. this is where you will be splicing the wires to the fiero wires. like most people i think this would be a kick ass engine beheind a manual tranny, but my car is originally a auto car so i decided to take the complete drivetrain from the doner car and keep the obd2 system together with all the emission eqipment. one other thing do you have the pass key theft module that was above the glove box in the monte? the computer will be looking for this to run.
drexter i added to your thread a while back and was wondering how you're project was coming along. on the long pipe this was the hardest to make because of the compound curves right by the port. to make matters worse the port has a unusual shape. what i did was to take about a 3" piece of a curved pipe and slice it down the middle (lengthwise) fit it in the flange then hand form the shape to the port and also the shape of header tube. when this was done i had to graft a piece in at the top of the port. by chance do have a picture of what you have done so far? i would like to see how you did you're design. tomorrow i will have more pic,s i just about have the exhaust finished up
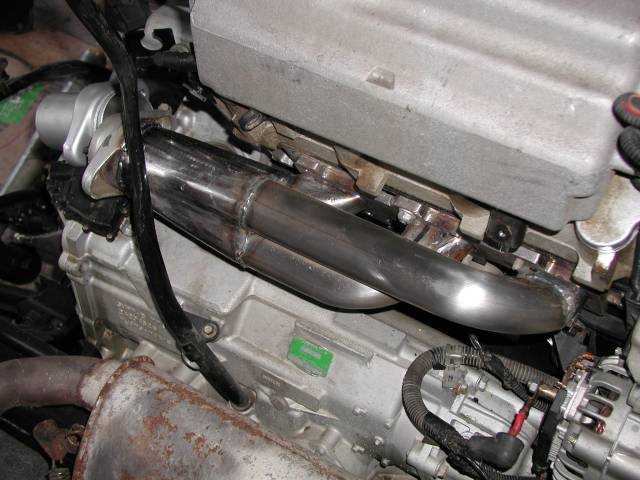
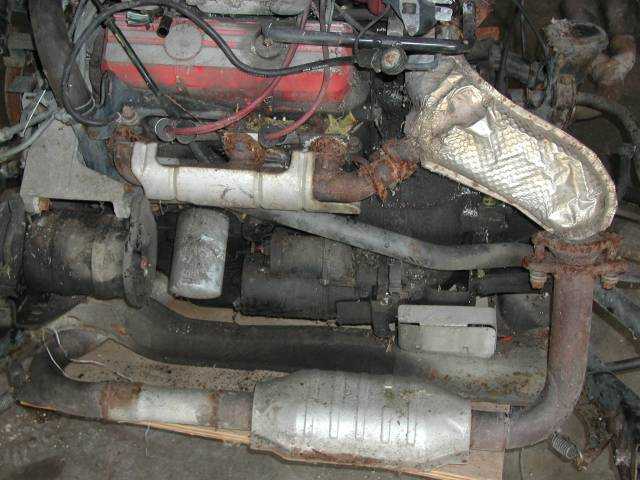
here is a picture of the exhaust system. i am just about finished. i have to weld a bung for the o2 sensor and one for the egr tube. the headers are connected to a 2 1/2" y pipe into the stock cat converter. at this time the remainder of the exhaust is the factory 2.8 system until get any bugs out of the computer. i plan on replacing the cat with a 2 1/2" in & out, and 2 1/2" tubing out to a flowmaster 80 series muffler in the stock location then out to the stock exit points. one note about the exhaust, it has 2 o2 sensors for the obd2 computer
Mike, I have been working my exhaust options for a few weeks and i am flat out pissed, pissed because that header and y pipe is about the most awsome thing i have seen in a while and i cant have one. I noticed that the way the headers exit that i could not use that set up anyway. The shift bracket and cables would get in the way, so i will have to go with my back up plan. I had to "modify" my crossover pipe, cause it was hitting my shift linkage arm so in doing so, i think i have the answer. I have to cut it in half to put in a small pipe that is bent like a lazy V so that it go's around the linkage, and i realize that if i have to go that far, i may as well just create a new "Y" pipe, cap the original port on the rear mani, and have a set up very similar to yours except no headers. It will look similar and someday i may get some headers. And yes, my setup is a five speed, with no pass key thing... Im sure im going to have to go with the 91-93 harness/ecm. I will be leaving the country soon, so i will not be able to do much more to my swap, I look forward to catching up with you when i return and seeing the finished project. Thanks for the pics, please continue to document your swap and maybe pass the info to DOHCFiero web site.
gta i have a solution for you and maybee anybody else that is having a hard time with the exhaust. while welding up the headers i thought, on the 91-95 engine you can take the front manifold and put it on the rear head and get rid of the manifold with the main exit port. now with the 96 motor the front manifold fits the rear head but the ports don't line up. so my idea is to take a piece of 3/8" plate steel and make a flange like i did for my headers, but pull the studs out of the heads and countersink the holes in the plate then put countersink screws to hold the plate on the head. then drill new holes and tap for threads into the plate for the manifold to bolt on where the ports line up. i have looked at this and i think it will work. then you make a new ypipe to complete the exhaust system. i would advise against caping off the large manifold it was not designed to flow through the y pipe in reverse flow, i think it would choke. with the interest you had in the headers i thought about maybee making another one but i have run into the problem with the collectors. i bought mine used off ebay and they worked out well, but the only other ones i can find new are 10" long which is way too long to use on a fiero so this on hold at this time. when i finish my swap i would be glad to pass my info to the dohcfiero web site, my intensions are to help anybody out trying to do this 96 dohc swap
IP: Logged
12:51 AM
qwikgta Member
Posts: 4671 From: Virginia Beach, VA Registered: Jan 2001
Mike, In theory it works, i even have a second front mani because i was going to do the swap, it wasn't until after i bought the mani that i found out it woundn't work. It looks like it bolts up, but your right, the ports are off. What would you do for the EGR and O2 sensor, just weld a bung on the down stream "Y" pipe, i guess the only issue then would be getting a long enough EGR tube. I may have to look into this when i get back. Thanks, another idea to ponder every day for the next few months, wishing i was back in the states working on my project.
Rob
IP: Logged
03:20 PM
DreXteR Member
Posts: 1763 From: Orlando, FL Registered: Aug 2000
Mike, here are some pics. I have been delayed so much that the pipes are rusted. Also one of them is built some upward direction. That guy holds me for a 1.5 months for this **** . I take them from his hands after saw what he did.
If you can see the piece of metal that pass the gasket, they guy that was building them do a crap work. I so pissed. Now I have to find a way to fix it.
DreX
[This message has been edited by DreXteR (edited 07-10-2003).]
gta think about what i was describing. i think it is possible to use the front manifold with some modifications. as for the egr tube it's not to important were it goes. on mine it reaches the y-pipe so i this is were i will put it. (look for the metal tube going to the y-pipe in the picture). as for the o2 sensor i think i am putting it in the down tube going to the cat converter. if you are leaving soon i wish you a safe return
drexter if i see what you are describing in the picture, i can understand why you are upset. the port by you're hand looks like it might be able to be cleaned up with a grinder, but the other one looks like you're welder just smashed the tube flat stuck it into the hole then built the weld up to get to the pipe. this one does look like a mess. on mine i had to cut and add a section of tubing to the end of the pipe on 2 of the 3 tubes on each header to make the end big enough to fill the hole completely. on your's you might be able to cut the weld out on the one side of the port then weld a section of pipe in that area. here is a pic of the flange on mine
IP: Logged
01:42 AM
bHooper Member
Posts: 4157 From: greensboro, nc Registered: May 99
Mike, that long black tube in the front of your engine... is that the dip stick? Nice!
I wish I had the skill, much less the tools to bend and weld exhaust. It's costing me around $350, just to build a new crossover for this thing! I get to reuse the Borla, but had to buy a new cat.
Hopefully, it will be done and inspected this afternoon!
hoop
IP: Logged
06:57 AM
DreXteR Member
Posts: 1763 From: Orlando, FL Registered: Aug 2000
Mike, I went yesterday to talk to other guy and he told me that the headers needs to be started all over again. I will go this sat to help, supervise the work. He ask me to do that. It makes me feel that this time all will go right.
On aside note, I bought a set of custom collerctors form Ed. They are 2" to 2.5". I will take pics later.
bhooper sorry, i meant to ask you where you got you're solid engine mount from. by looking at the front of my engine i need to put a dog bone somewere and i like where the coil packs are at but i think they will have to be moved to make room for a dog bone. are you using a dog bone with a solid mount? i have been wanting to ask somebody who has one of these things in there car if they can get to the engine oil dipstick which is at the edge of the cam cover, can you get it in & out in the stock position that close to the deck lid?
drexter i took a pic of the bottom of the header for you. if it helps print out some of my pics and show you're welder and see if he can follow the way i built mine i am happy with the way mine turned out, they fit close to the block so i don't think i will have any clearence problems in the engine bay
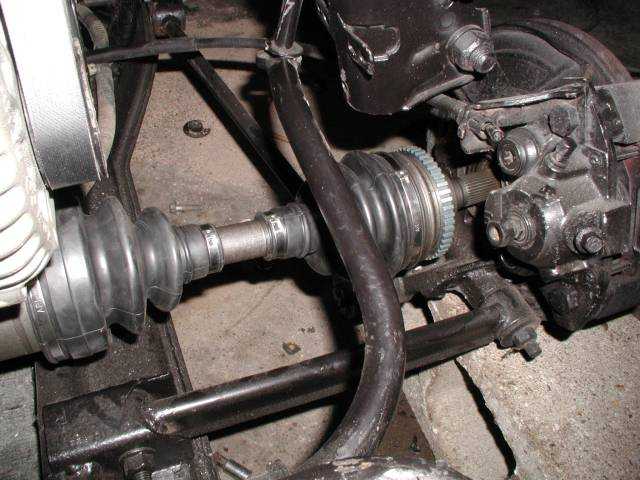
i have been progressing on my swap so i thought i would update this thread. when i got to the problem with the axles i saw that people had been using different combinations but i noticed it was mentioned that the passenger side axle were different for the 4t60e compared to the 4t60. i found that a few people were saying that axles on both sides of a 94 beretta w/v6 would be a direct fit for my transmission so i went to a carquest store and bought a set of rebuilt baretta axles. when i installed the axles i ran into some problems. the drivers side was a good fit, but when i installed the passenger side both ends of the axle assembly were correct but it was too short. the tripod bearing accually pulled out of the housing when i tried to install the axle nut. after a little investigation it appears the passenger side was about 2" too short. (see picture) the first thing that i looked at was the boots small end fits into a grove in the axle, so you can roughly tell how long the axle is by measuring the distance between the boots. on the beretta passenger side axle it was 1.5" so if i add 2" to that length i am looking for a axle with about a distance of 3.5". now i don't have the resources to go through rebuilt axles to find the one i need. so what i ended up doing was i still had the axles from the monte doner car and there was a distance of 3" on the drivers side and 4.5" on the passenger side between the boots, and the axles had the same diameter of axle shafts as the baretta's. i decided the axle with the 3" distance might work so i dissasembled it to remove the shaft. now when i dissasembled the baretta shaft i compared it's length to the monte's and the monte's was exactly 2" longer. this turned out to be just what i needed, so i put the ends of the baretta axle assembly onto the monte axle shaft then this was a perfect fit into the fiero.
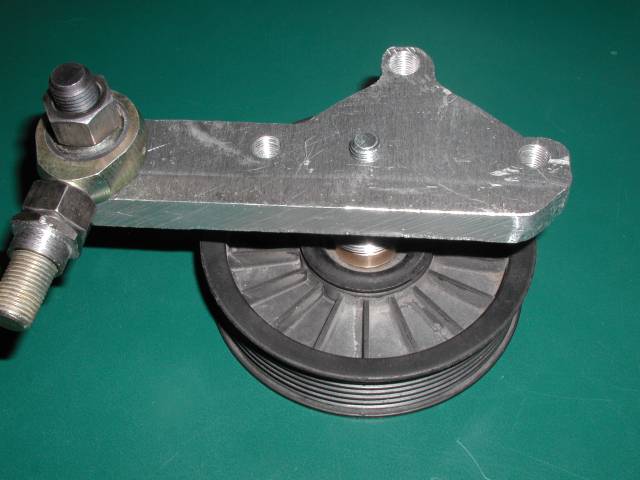
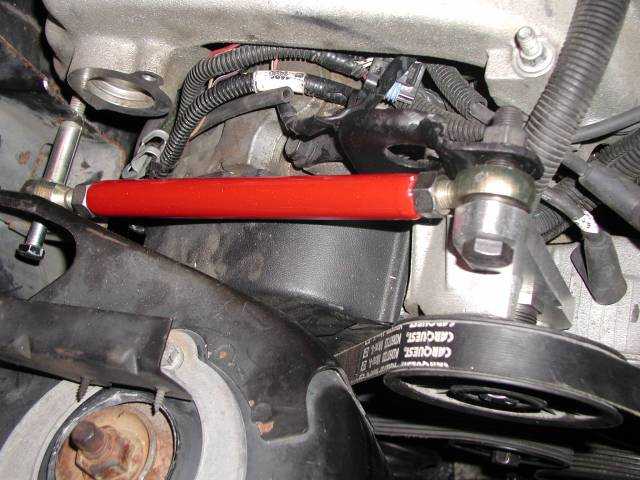
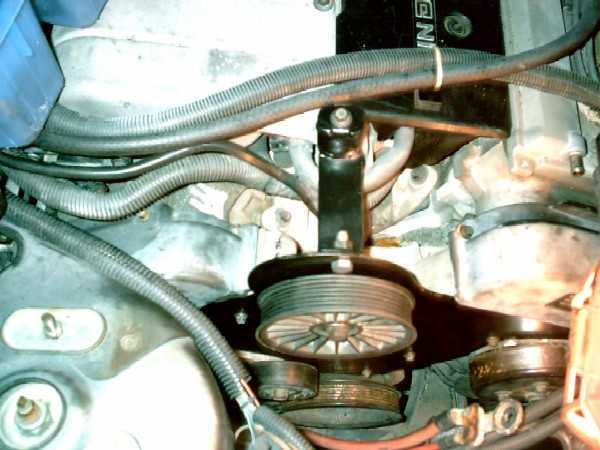
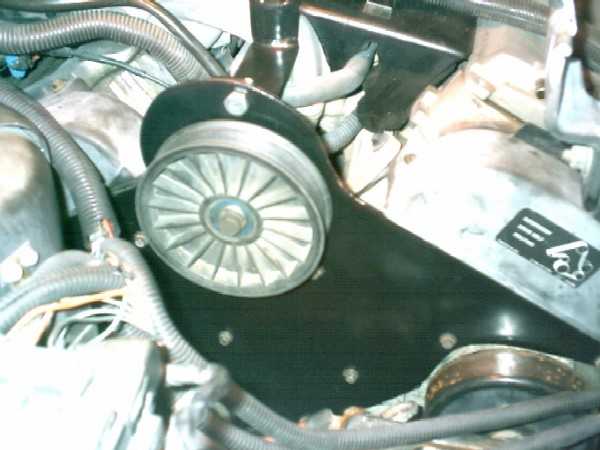
now the dohc engine has a power steering pump and this not needed for the fiero so this has to be replaced with a idler pulley. i had a idler assembly laying around that replaces the air cond. compresser on a chevy s-10 and it was about the same diameter as the ps pulley so i used this. now i made a mount out of aluminum that bolts onto the original the ps mount and then used spacers to align the position the pulley to be aligned with the belt. now the idler pulley was 20mm smaller than the ps pulley so you can see in the pic that i raised the center hole 10mm to put the new pulley about the same height as the old pulley so the belt was about the same fit as it was originally. you might also notice the arm on the bracket, this is for the dog bone coming up next.
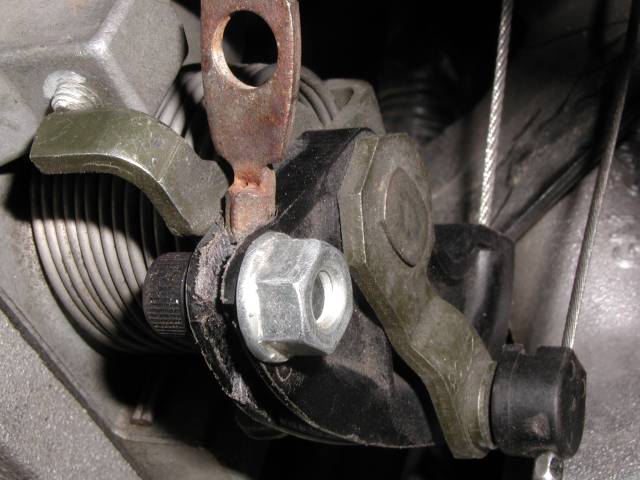
the dohc engine has a single front engine mount so a dogbone is needed to hold the front of the engine steady. i liked where the coil packs were located on the engine originally but there is not enough room in the fiero because of the shock tower so it had to be moved. with it gone this left me room to put a dog bone in the stock fiero dogbone mount. this is a simple setup and looks like it will work well. i used 1/2" radius rod ends threaded into a steel tube. on one side i used the stock fiero mount and on the other side i made a mount for the idler pulley & dogbone. you can see in the picture that i also welded a piece of metal to the engine lift bracket to make this end stronger.
IP: Logged
12:37 PM
ltlfrari Member
Posts: 5356 From: Wake Forest,NC,USA Registered: Jan 2002
That dogbone mount looks sweet. Do you have a drawing with dimensions. It looks to be exactly like what I was planning to do for mine. Nice work by the way. Those who can, do, the rest of use play at it!!
ps how did you mount the pully. I have a 70 mm idler but am stumped at what to use to mount it. Seems like there's a whole world of info I need on interferance fits, bearing yada yada. gotta be simpler than that!
That looks great. The dogbone is what worries me most about my swap. I can see mine ripping apart the lift bracket or front cover. Where do you get the materials for the dogbone anyway?
------------------ Alan Frazier '86 GT-'92 3.4 TDC under construction '84 2m4 daily driver '88 Silver coupe, auto For Sale
IP: Logged
05:18 PM
BV MotorSports Member
Posts: 4821 From: Oak Hill, WV Registered: May 2001
Mike nice work. I do have to point out one thing about your dog bone mount. It has been in my experince that mounting a dog bone like that will cause the mounts on the head to break. The metal has not been cast well and has all kinds of holes within the casting. Garths dog bone was EXACTLY like yours. Now he was racing and using R1 compound tires but it broke. Here is what we did:
bv motorsports- i really like how you solved the problem with the dogbone & pulley. i have given this dogbone problem a lot of thought. the original dohc dogbone mount is huge and bolted to the head but the problem is that it is on the wrong end of the engine and the front of the engine does not have any good places to securly mount a dogbone. i am running a auto tranny so i don't know if it will have as much stress as a manual but i like you're idea and i think i will look into adding something simular to what you have done. by the way where is the dogbone on this engine? thanks for the pictures, it's nice to see what somebody else has done that has been there.
dave- i think i will post some more info about this mount as soon as i have the design finished. on you're pulley you need to decide what size of bolt you will be using. if the hole is larger than the bolt you need to install a sleave the same thickness as the bearing. i went to a hardware store looking for something to use for a spacer, i needed something that was about 1" tall. i ended up using a pipe adapter that had a hole about the size that i needed and was big enough around to support the pulley. my pulley is 110mm diameter but yours might have to be raised up to the top mounting bolt to fit with the stock belt.
alan- i used some aluminum that i had around. the dogbone is a tuff problem because there is just no good place to put it.
now the accerator cable was one of the easier problems for me to solve. i used the stock 88 gt cable. i cut a groove into the plastic arm with 2 hacksaw blades doubled up. just cut a groove as deep as the cable is thick. i also had to drill a hole about 1/16" deep on the end of the plastic because the cable was a little tight. i put a 1/4" bolt and locknut in the hole to hold the cable in place. after this picture was taken i cut off the eyehole on the cable end, just wanted to show what the stock cable end looked like.


 86 Fiero SE


 Now I have to find a way to fix it.