Pennock's Fiero Forum
  FAQs & HowTos
  84-87 Rear Caliper rebuild

Post New Topic  Post A Reply
Email This Page to Someone! | Printable Version


next newest topic | next oldest topic
84-87 Rear Caliper rebuild by Dodgerunner
Started on: 12-15-2006 10:05 PM
Replies: 20 (3564 views)
Last post by: glwalker04 on 05-05-2022 09:38 AM
Dodgerunner
Member
Posts: 9686
From: Lincoln, Nebraska
Registered: Sep 2004


Feedback score:    (61)
Leave feedback


Total ratings: 323
Rate this member

Report this Post12-15-2006 10:05 PM Click Here to See the Profile for DodgerunnerClick Here to visit Dodgerunner's HomePageSend a Private Message to DodgerunnerEdit/Delete MessageReply w/QuoteDirect Link to This Post
Ok to continue from the Front brake post: https://www.fiero.nl/forum/Forum9/HTML/000036.html

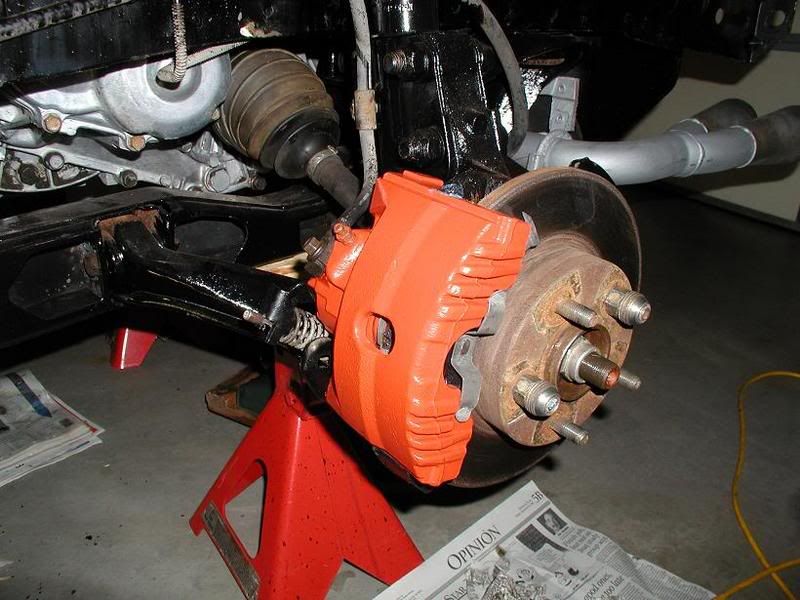
Have completed the Rear's and am ready to fill and purge and check and see if the rebuilds work.

But first a little info for you all.

I will not go into the pins and pin guides since they are the same as the front post. But I'll say again, if your putting in new pads, clean and lude the pin bores with lots of brake grease.

First the rear caliper break down.
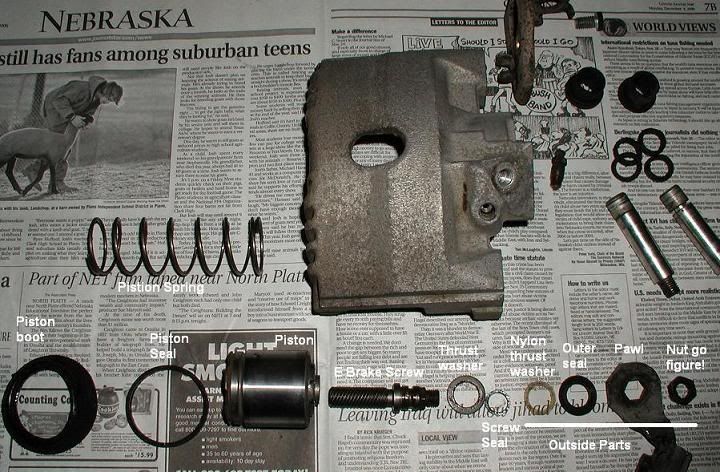


The large spring goes inside the pistion and assist the ebrake funtion.

The pistion is the interesting part and is the key to the ebrake.
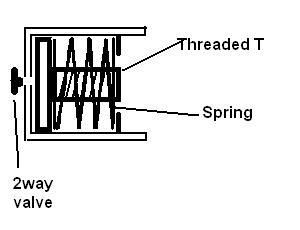
The inside of the piston contains a top hat shaped threaded section for the screw which is spring loaded. This acts like a slip clutch so that the screw will adjust as the pads wear. When you use the brakes the ebrake screw does not move but the pistion will. As it moves out it would want to turn on the screw but can't since the pistion is locked into the pad by the two pins. (That's why it's important to have the pistion turned for the pad pins fit the pistion holes) Instead the threaded T in the piston is pulled away for for the inside face of the piston compressing the spring (NOT the large piston spring in the pic above) that tries to keep it pressed against the piston face. This reduces the friction holding it in place and allows it to turn on the screw as it returns to it's place against the piston face. So if all works right your ebrake should stay in adjustment.


Here are the parts that come in the rebuild kits.
Note: The screw seal is just setting inside the thrust washer.


Since the pistion is metal and (in my case good shape) I did not have to do anything to the pistion. I did polish the bore a little as it was not machined as nice as the fronts where.

There are three key places that caliper will leak from.
The first of course is the pistion seal.
The second is the screw shaft seal.
The third is the two way valve in the face of the pistion. More on this later.

When I looked at the hole where the screw passes thru the rear of the caliper I notice the hole was not very smooth except in the very inside edge.
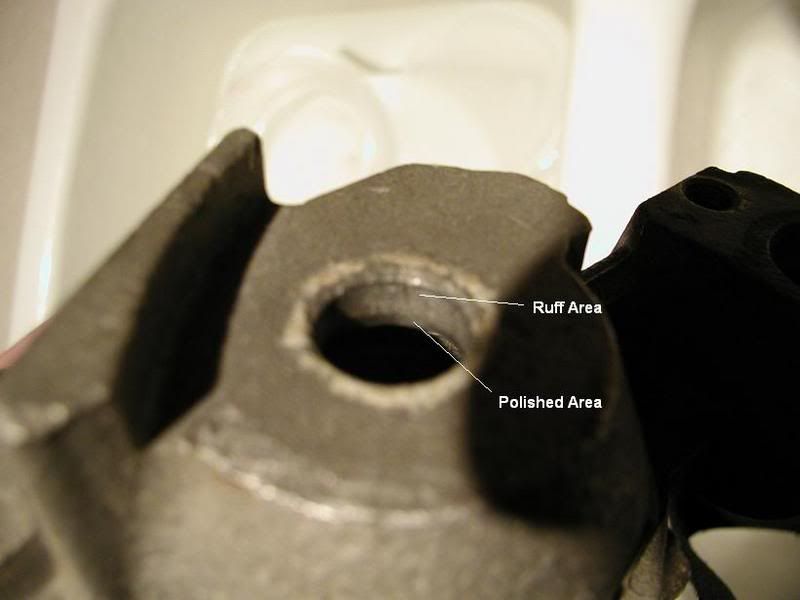


Found it interesting that when you put the screw into the hole the seal does not ride in the polish area but about in the middle of the ruffer area. I polished the hole more and hopfully will allow the seal to work better. (or make it leak more will see)

Now the two way valve.
In the face of the pistion behind the pad is a very soft small botton that presses into a hole in the pistion. Took me a bit to figure out what this might be for. Here is my idea, maybe someone will correct me if I'm wrong.
As I described above the threaded T part inside the piston has to move in and out a small amount as it adjust. when it does it has to pull away from the inside face of the piston. Since the pistion is full of brake fluid as it pulls away there would be a suction formed that would fight the pistion moving out. the small button would allow the suction to be broke as it flexes in. A small amount of brake fluid would then be between the face and the T. The button would flex outward a little as the fluid works it's way around the T back into cyl. On one of the calipers this button had become rock hard and most of it was broke off. Fluid had been leaking from the hole for sometime. You can see the yellow botton in the parts bag.

The process is basically take it apart, clean it up and put it back together with the new parts. Getting the pistion back in is a little more of a trick due to the large spring that goes inside the piston. I installed the piston by hand far enough to get a small piece of wood between the piston and the outside edge of the caliper. Then used a bar clamp to press the piston back in. You place a socket over the hole the screw has to come out as you press it in. After I had the piston started I ended up putting the pawl onto the screw and working back and forth between pressing the piston in and working the screw in.

Total cost $3.50ea.

Well there you have it. Hope it all works.
IP: Logged
PFF
System Bot
Hudini
Member
Posts: 9029
From: Tennessee
Registered: Feb 2006


Feedback score: N/A
Leave feedback


Total ratings: 165
Rate this member

Report this Post12-15-2006 10:51 PM Click Here to See the Profile for HudiniSend a Private Message to HudiniEdit/Delete MessageReply w/QuoteDirect Link to This Post

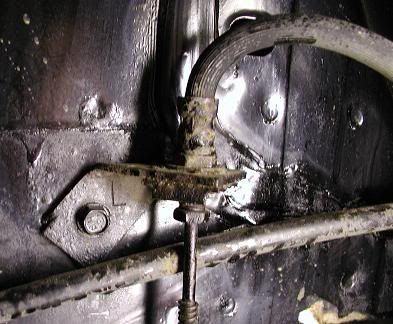
Could you post a pic of the hard metal line where it connects to the rubber brake line? It is just above the last pic you posted. The bracket on mine is missing so I just want an idea of what I need to fabricate to work.
IP: Logged
Dodgerunner
Member
Posts: 9686
From: Lincoln, Nebraska
Registered: Sep 2004


Feedback score:    (61)
Leave feedback


Total ratings: 323
Rate this member

Report this Post12-15-2006 11:09 PM Click Here to See the Profile for DodgerunnerClick Here to visit Dodgerunner's HomePageSend a Private Message to DodgerunnerEdit/Delete MessageReply w/QuoteDirect Link to This Post
An snap of the fingers and a flick of the wrist presto chango.
It's just a straight piece bend at a cross angle. Simple.
There is a little cut to the left of the bolt so that it can be bent to fit a hole so the bracket will not rotote.

[This message has been edited by Dodgerunner (edited 12-15-2006).]

IP: Logged
Hudini
Member
Posts: 9029
From: Tennessee
Registered: Feb 2006


Feedback score: N/A
Leave feedback


Total ratings: 165
Rate this member

Report this Post12-15-2006 11:23 PM Click Here to See the Profile for HudiniSend a Private Message to HudiniEdit/Delete MessageReply w/QuoteDirect Link to This Post
Ahh, thanks. I'm doing the beretta upgrade now so I'll take care of it while I'm in there.

You test those brakes yet?

+ for you.

[This message has been edited by Hudini (edited 12-15-2006).]

IP: Logged
Dodgerunner
Member
Posts: 9686
From: Lincoln, Nebraska
Registered: Sep 2004


Feedback score:    (61)
Leave feedback


Total ratings: 323
Rate this member

Report this Post12-15-2006 11:29 PM Click Here to See the Profile for DodgerunnerClick Here to visit Dodgerunner's HomePageSend a Private Message to DodgerunnerEdit/Delete MessageReply w/QuoteDirect Link to This Post
Will fill and purge tomorrow.
Won't be able to road test for a bit yet. Have to put a rebuild kit in the clutch slave and build an adaptor for the shift cables.
(didn't want to use the 4cyl. izzy cables)
Hope one more week will do it. Then it will probably dump snow.
IP: Logged
Dodgerunner
Member
Posts: 9686
From: Lincoln, Nebraska
Registered: Sep 2004


Feedback score:    (61)
Leave feedback


Total ratings: 323
Rate this member

Report this Post12-16-2006 06:09 PM Click Here to See the Profile for DodgerunnerClick Here to visit Dodgerunner's HomePageSend a Private Message to DodgerunnerEdit/Delete MessageReply w/QuoteDirect Link to This Post
The brake system is completed.
Filled with new brake fluid bled all four corners and have a full peddle.
No leaks anywhere. Sat and held the brakes on for 5 min. with no leaks.

Not bad for less than $10 and several hours, but that included painting.

IP: Logged
02SOMFormula
Member
Posts: 120
From: Carmichael, CA USA
Registered: Apr 2006


Feedback score: N/A
Leave feedback

Rate this member

Report this Post12-16-2006 08:21 PM Click Here to See the Profile for 02SOMFormulaClick Here to visit 02SOMFormula's HomePageSend a Private Message to 02SOMFormulaEdit/Delete MessageReply w/QuoteDirect Link to This Post
 
quote
Originally posted by Dodgerunner:

The brake system is completed.
Filled with new brake fluid bled all four corners and have a full peddle.
No leaks anywhere. Sat and held the brakes on for 5 min. with no leaks.

Not bad for less than $10 and several hours, but that included painting.


How do they feel? I'm curious to see if the stock brakes are better after a rebuild!

IP: Logged
mgbringo
Member
Posts: 198
From: Fargo, ND 58104
Registered: Dec 2000


Feedback score: N/A
Leave feedback

Rate this member

Report this Post12-16-2006 09:45 PM Click Here to See the Profile for mgbringoSend a Private Message to mgbringoEdit/Delete MessageReply w/QuoteDirect Link to This Post
I recently bought rebuilt calipers and put in new pads in the rear. I am going to put in new pads in the front next.

The brakes stop the car much better now after just doing the rears. I had to step pretty hard on them before. Now it is just normal pressure that is needed. My pads were still OK but needed to be replaced. I assume it will be even better stopping power when I replace the front pads.
IP: Logged
racer37
Member
Posts: 423
From: Dawsonville, GA
Registered: Sep 2002


Feedback score: (1)
Leave feedback

Rate this member

Report this Post08-20-2007 06:20 AM Click Here to See the Profile for racer37Send a Private Message to racer37Edit/Delete MessageReply w/QuoteDirect Link to This Post
Great write up. I am trying to do this right now, but I have some questions. My rear pistons do not have a hole in them for the little yellow plug. I did notice a bleeder hole in the side of the pistin. (84 model). Was there a change in the design after 84? And how does the dust boot fit on the piston? Does it go in the outermost groove or closer to the smooth part of the piston? Thanks for everyone's help, Scott
IP: Logged
Dodgerunner
Member
Posts: 9686
From: Lincoln, Nebraska
Registered: Sep 2004


Feedback score:    (61)
Leave feedback


Total ratings: 323
Rate this member

Report this Post08-20-2007 08:36 AM Click Here to See the Profile for DodgerunnerClick Here to visit Dodgerunner's HomePageSend a Private Message to DodgerunnerEdit/Delete MessageReply w/QuoteDirect Link to This Post
Have not seen 84 calipers so can't answer that question, but guess it would work to bleed the inside of the piston with a small hole like that.

On the seal, yes it goes in the outermost groove. The inner one is for the piston seal.


Oh and by the way... 6K on the brake rebuild and still working great nary a leak......

[This message has been edited by Dodgerunner (edited 08-20-2007).]

IP: Logged
rodmcneill
Member
Posts: 1616
From: Indiana USA
Registered: Oct 2000


Feedback score: N/A
Leave feedback

Rate this member

Report this Post08-20-2007 12:16 PM Click Here to See the Profile for rodmcneillSend a Private Message to rodmcneillEdit/Delete MessageReply w/QuoteDirect Link to This Post
Where did you buy the rebuild kits? The Fiero Store gets $12.00 each for the rear and $6.50 each for the front.
IP: Logged
PFF
System Bot
Dodgerunner
Member
Posts: 9686
From: Lincoln, Nebraska
Registered: Sep 2004


Feedback score:    (61)
Leave feedback


Total ratings: 323
Rate this member

Report this Post08-20-2007 12:21 PM Click Here to See the Profile for DodgerunnerClick Here to visit Dodgerunner's HomePageSend a Private Message to DodgerunnerEdit/Delete MessageReply w/QuoteDirect Link to This Post
Oreilly's, but my son was working there at the time I wrote this so I got a good discount. The price you quoted it about right....

Sure wish he was still there.... saved me hundreds of $ on my rebuild... Also goes to show the markup on auto parts...

[This message has been edited by Dodgerunner (edited 08-20-2007).]

IP: Logged
racer37
Member
Posts: 423
From: Dawsonville, GA
Registered: Sep 2002


Feedback score: (1)
Leave feedback

Rate this member

Report this Post08-25-2007 09:15 AM Click Here to See the Profile for racer37Send a Private Message to racer37Edit/Delete MessageReply w/QuoteDirect Link to This Post
I see now.... I just had a revilation. I didn't understand where the little check valve button was. (You had me confused when you said it was behind the pad) How does the piston come apart so that I can get to the button. Thanks, Scott
IP: Logged
racer37
Member
Posts: 423
From: Dawsonville, GA
Registered: Sep 2002


Feedback score: (1)
Leave feedback

Rate this member

Report this Post08-25-2007 03:10 PM Click Here to See the Profile for racer37Send a Private Message to racer37Edit/Delete MessageReply w/QuoteDirect Link to This Post

racer37

423 posts
Member since Sep 2002
After doing some more research, it appears that I have recalled pistons that do not have the 2 way valve behind the pads. That is what the little bleeder hole is for. I just hope that the piston doesn't leak. If I have to get new pistons, I might as well get the rebuilt calipers, and I will have all of this time trying to rebuild them. This sucks, but now I know. Scott
IP: Logged
sjmaye
Member
Posts: 2468
From: Hendersonville, TN USA
Registered: Jun 2003


Feedback score:    (13)
Leave feedback

Rate this member

Report this Post05-29-2008 05:05 AM Click Here to See the Profile for sjmayeSend a Private Message to sjmayeEdit/Delete MessageReply w/QuoteDirect Link to This Post
Dodgerunner- Great writeup...as usual. Has anyone done the same for 1988 rear calipers?
IP: Logged
Fierology
Member
Posts: 1195
From: Eastern Tennessee
Registered: Dec 2006


Feedback score: (3)
Leave feedback

Rate this member

Report this Post11-07-2008 11:04 PM Click Here to See the Profile for FierologySend a Private Message to FierologyEdit/Delete MessageReply w/QuoteDirect Link to This Post
Thanks Dodgerunner. Great threads! (front & back)

How easy is it to mess this job up?
What do I look for to determine whether my pistons/bores are in rebuildable condition?

-Michael

------------------
"A guy know's he's in love when he loses interest in his car for a few days." -Tim Allen

He who dies with the most toys... still dies.


Check out my restoration!

IP: Logged
Dodgerunner
Member
Posts: 9686
From: Lincoln, Nebraska
Registered: Sep 2004


Feedback score:    (61)
Leave feedback


Total ratings: 323
Rate this member

Report this Post11-07-2008 11:44 PM Click Here to See the Profile for DodgerunnerClick Here to visit Dodgerunner's HomePageSend a Private Message to DodgerunnerEdit/Delete MessageReply w/QuoteDirect Link to This Post
The hardest are the rears due to the e-brake screw. Getting the piston back in takes some care.
As far as the pistons and bore you don't want score marks on the piston sides indicating they where running with side loading very much.otherwise they will leak if it's where the seal runs.
On the bores you don't want to see scoring or pitting from water in the walls.
IP: Logged
Fierology
Member
Posts: 1195
From: Eastern Tennessee
Registered: Dec 2006


Feedback score: (3)
Leave feedback

Rate this member

Report this Post11-08-2008 09:39 PM Click Here to See the Profile for FierologySend a Private Message to FierologyEdit/Delete MessageReply w/QuoteDirect Link to This Post
thanks
IP: Logged
theogre
Member
Posts: 32520
From: USA
Registered: Mar 99


Feedback score: N/A
Leave feedback


Total ratings: 572
Rate this member

Report this Post11-08-2008 09:56 PM Click Here to See the Profile for theogreClick Here to visit theogre's HomePageSend a Private Message to theogreEdit/Delete MessageReply w/QuoteDirect Link to This Post
The rear caliper is covered in my cave. I didn't bother with rebuilding info for a few reasons.

Understand that:
1. If there is fluid in the piston, it is leaking internally and cannot be repaired. Don't bother with new caliper seals if the piston is leaking out the weep hole. (Later pistons have a weep hole on the side instead of the piston face.)
2. Even if the piston isn't leaking, it's probably bad and the Ebrake and self adjustment are unlikely to be fixed by this.

The piston is a crappy design in either version. 88 uses the same piston system BTW.

------------------
Dr. Ian Malcolm: Yeah, but your scientists were so preoccupied with whether or not they could, they didn't stop to think if they should.
(Jurassic Park)


The Ogre's Fiero Cave (It's also at the top of every forum page...)

IP: Logged
glwalker04
Member
Posts: 17
From: New York
Registered: Apr 2022


Feedback score: N/A
Leave feedback

Rate this member

Report this Post05-03-2022 09:40 AM Click Here to See the Profile for glwalker04Send a Private Message to glwalker04Edit/Delete MessageReply w/QuoteDirect Link to This Post
Hi, reviving this dead thread. It seems I am a bit late to the party since not many people are working on fiero's as much as the 2010's lol.

I'm working on a set of rear calipers after the E-Brake seized the calipers when I pulled it. (Who knows how long it's been since it was last pulled). Had usual rust issues, but the biggest issue with my calipers was tons of dirt (not metal) in both cylinders. One has a good boot but bad rear seal, both pistons and screws are good. The passenger side was a different story however. It had white milky crap all over the spring and walls, as well as a glob of what can only be described as a loogie in the cylinder (It was almost like bearing grease). The dirt problem was only worse on this side since the dust seal was ripped from the ring. Unfortunately there is a small nick in the outside of the cylinder bore that I think will cause me to have to get a new caliper. I want to replace the dust seals ideally, but I cant figure out how they are attached to the caliper. There seems to be a hard rubber ring that seats into a groove, but no amount of pulling will help it come out. I tried using a tool to take out this ring and its like its fused with the metal.. I can only scape off tiny uneven chunks, leaving behind some in the groove. Is there an easy method to pulling out these dust seals?
IP: Logged
glwalker04
Member
Posts: 17
From: New York
Registered: Apr 2022


Feedback score: N/A
Leave feedback

Rate this member

Report this Post05-05-2022 09:38 AM Click Here to See the Profile for glwalker04Send a Private Message to glwalker04Edit/Delete MessageReply w/QuoteDirect Link to This Post
Update: I figured out how they attach to the caliper. First time working on brakes so I didn't realize the dust seal comes out with a screwdriver. I didn't think there was a metal ring inside the seal that helps seat it in place. Got my LH caliper cleaned up and ready for rebuild and i'm ordering a replacement RH caliper.
IP: Logged
PFF
System Bot

next newest topic | next oldest topic

All times are ET (US)

Post New Topic  Post A Reply
Hop to:

Contact Us | Back To Main Page

Advertizing on PFF | Fiero Parts Vendors
PFF Merchandise | Fiero Gallery
Real-Time Chat | Fiero Related Auctions on eBay


Copyright (c) 1999, C. Pennock