OK, kick me for reading the directions, but I just read the sticker on my car for setting the timing and it said to put the car in "drive". WTF??? I DON"T think I'll do it that way and I bet it will be just fine.......... What were those engineers thinking??
Yes they do say put it in drive... It slows the engine idle speed down lower...but I don't do it that way. It's too dangerous. Do it in park or neutral
If you are connected to the coil wire won't it be firing and blinking for all 6 plugs firing? How would you know which one it is firing for? I thought I was pretty sure about this, but I am beginning to wonder
Yes, it will flash for all 6 cyl's. Thing is, for the cyls that fire away from the painted timing mark, all you will see is the side of the balancer. The cyls where the line is will flash on the line, making the line visible. Hope this makes sense.
Guess I am kicking myself for not taking pictures as I rebuilt this distributor
Before I do any sort of writeup, I am going to send the distributor to my father so he can use it in his car, mostly to verify that this mod does what I think it will do, or for that matter work at all. One thing I can say, is the plastic housed pickup coil itself, from the S10/Blazer, is of far better quality then the one from the Fiero. The Fiero one was wrapped up in paper and fell apart when I was removing it.
Did this ever work out?
------------------ If you ever have a questions about the sincerity of the circle of Fiero owners on this site, take a look at: "In Memoriam: Fiero Members"
I recently replaced the lifters and push rods in my stock 2.8. In the process, I removed the distributor and put it back in. In order to find TDC, I turned the crank until cylinder #1 was neither going up or down with the screw driver test. I found the plug wire #1 and used a diagram i found on this site to figure out where it goes.
The engine runs, but badly, it sounds like a four cylinder.
Could I be 180 or 360 degrees off with my TDC?
Will the engine run if I am off a tooth on the distributor or not?
What would a broken cam do?
Thanks! I am SO SO close to finally having a drivable Fiero for the first time.
------------------ If you ever have a questions about the sincerity of the circle of Fiero owners on this site, take a look at: "In Memoriam: Fiero Members"
If the engine is running you're very close, 180* off and it would only backfire. You can be off several teeth, that's why you can rotate the distributor housing. If you're running but badly, double check your wiring sequence as you may have a couple of plug wires crossed or cracked a spark plug upon installation.
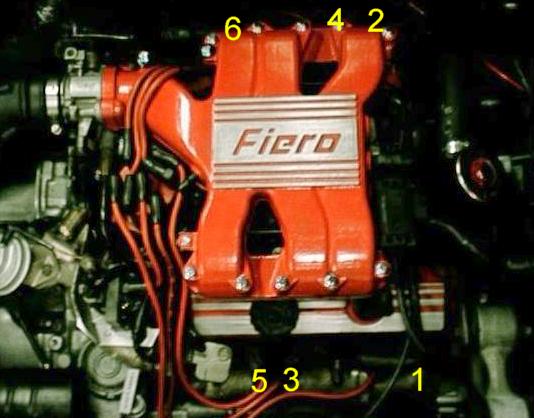
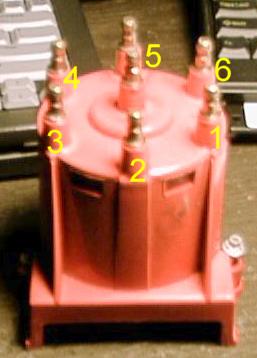
I thought that I would repost a couple of nice diagrams of plug wire routing.
Great write up. One thing I have learned is that in your picture of the two distributors, you will notice that the wires from the PU coil to the module in the remanufactured distributor are longer than stock. Be carefull when you put the cap back on so as not to pinch those wires.........Paul
Um yeah, I just crimped mine Happens really easily.
If you have a good induction timing light, hook it up to your coil wire and you will be timing for both your #1 cylinder and your #4 cylinder at the same time. I just tried it myself and it worked like a charm. For years I've taken the difference between #1 and #4 as I set the timing, this is so much simpler.
I wish that I could remember the forum member that had suggested this idea, I really wanted to give credit where credit is due for this teriffic idea.
Under normal circumstances, after setting the timing for #1 cylinder, you would double check against your #4 cylinder. If you had a difference of more than one degree or so then you would split the difference so that the average of those two would be 10* BTDC.
Now that I've been thinking, hooking up to the coil wire would give you the average of all cylinders, you would see the timing for every cylinder firing. Due to wear and other factors, the strobe light won't sit perfectly still on the harmonic ballancer, it'll dance around a bit, you adjust your timing so the average is at 10* BTDC.
Sometimes I'm not too good at explaining stuff, anyone is more than welcome to chime in here for you.
Talking about the blaer build up options. I have installed it into 2 owners and they both have said that reponsiveness of the engine has improved a little along with getting the car to idle at a more regular tone. I have 2 more rebuild and ready to install if anyone is interested.
I was amazed at how many problems I ran into / caused into with my distributor along the way.
Here goes: 1. Broken/hidden 2 wire connection to module (this was really hard to diagnose) 2. White wire from coil got crimped in and shorted between cap and base of dist (can't see back there) 3. Somehow the old rotor went back on the new dist. (wobbled on shaft, made engine miss) 4. Cleaned first rusted distributor with PB Blaster DOH! (it's magnetic !) 5. Blue screws at new cap base were too long, hit intake stud, making it seem like the dist endpoint (I think this may trip up a lot of us)
This thread helped my straighten a lot of mistakes that I made : )
If the engine is running you're very close, 180* off and it would only backfire. You can be off several teeth, that's why you can rotate the distributor housing. If you're running but badly, double check your wiring sequence as you may have a couple of plug wires crossed or cracked a spark plug upon installation.
I thought that I would repost a couple of nice diagrams of plug wire routing.
Pictures worth a thousand words,,,,
OK My 88 Fiero GT is different than this in regards to the distributor cap diagram you have there. When my cap is on the distributor, the flat edge is located at about 7:30 o'clock if you are looking at it from back of the trunk and my #3 plug is where you have #2. This is how my car has always been. Has it been wrong all this time or is the location of where the cap is determine where #1 would start??? With my distributor cap in the location it is now, (flat edge at 7:30 o'clock) the #2 plug is located at 6 o'clock when looking at the cap from behind the trunk.
[This message has been edited by mgiusto (edited 04-24-2009).]
Generally speaking, you like to install the distributor so the rotor is pointing at your #1 post on the distributor cap and work from there. Sometimes mechanics don't get that right when they're re-installing the distributor so they "correct" by moving the plug wires one post forward or back to compensate for where the rotor is pointing at top dead center. This usually causes confusion later when someone like you or me tries to install a new distributor.
Get to top dead center on #1 cylinder, fat groove on harmonic ballancer, install distributor so rotor will be facing the #1 post on the cap, go from there.
Originally posted by jetman: Get to top dead center on #1 cylinder, fat groove on harmonic ballancer, install distributor so rotor will be facing the #1 post on the cap, go from there.
just a reminder that the fat groove lines up with the pointer when #1 AND #4 are at TDC. that is all
just a reminder that the fat groove lines up with the pointer when #1 AND #4 are at TDC. that is all
Line fat groove up with 10 * on the pointer? Can I do it this way blind without having to take the #1 plug out and check for compression? I am just one person doing this job and I am rotating the crankshaft from below the car.
Buddy great video! I was at aloss on how to paint the big groove and the 10 * marker from up abvove though. I found it so much easier doing this from below the car. with the right-rear tire off.
While waiting for a reply to my previous message, I went ahead and lined up the fat groove on the crankshaft pulley with the 10 degree mark on the pointer, then I removed my distributor cap and took a pic to show where the rotor is.
Notice that the rotor is located at the #4 location if the distributor cap were on. Do I now lift the distributor out and turn and put back in so it lines up with where position #1 would be as shown in my pic? When I took out the old distributor, the rotor was facing between #4 and #5 location.
Notice that the rotor is located at the #4 location if the distributor cap were on. Do I now lift the distributor out and turn and put back in so it lines up with where position #1 would be as shown in my pic?
Only if piston #1 is actually at TDC. You won't know until you follow the instructions for finding TDC of #1.Yes, you've got the timing marks lined up, but at that position it could be for either cylinder #1 or #4.
I found the easiest way to rotate the crankshaft was to remove the passenger side rear wheel, unhook and drop the flexible side-skirt a bit, and then put a socket on the end of the crankshaft with a long extension. In doing so, I was able to stand beside the car and observe the timing mark on the balancer while I reached around and turned the crankshaft with a ratchet.
[This message has been edited by Patrick (edited 04-25-2009).]
Hey, I know this is a bad thing, but what if you did'ent marking the place of the old distributor and just put the new one in ? lol sorry. Can anyone help me ? All my friends are calling me an idiot. lol
Totally blind installation with distributor already out of engine.
Rotate the crankshaft so the fat timing mark on harmonic balancer is on the timing tab like shown.
Note where the #1 plug wire post is on the cap and mark with white-out on the body of the distributor exactly where that is. Remove the cap.
Install distributor with the rotor pointing at your white-out mark indicating #1 post and put the distributor cap back on. (note that the rotor is point exactly where the #1 plug wire post will be when we put the cap back on.)
Insure that your plug wires are in the correct order per the pictures.
Here is another diagram of the plug location.
Try starting the car. If it doesn’t catch fire then you may be 180* off on the base timing so get the fat timing mark on the timing tab like before. Remove the distributor and crank the harmonic balancer around exactly one full turn (360*), and then re-install the distributor with the rotor pointing at the #1 mark on the distributor. Put the cap back on and start the car.
Warm up the car then shut off, ground your ADL and restart.
Set timing with an induction timing light.
Remember that your crankshaft makes two revolutions for every revolution of the distributor, that’s why you may be at Top Dead Center (TDC) for either #1 or #4 cylinder with the fat mark lined up on the timing tab. Some folks will pull the #1 plug out, put their finger over the hole and when it blows off, you’re at TDC for #1 cylinder.
Some folks will rock the car in 2nd gear to rotate the engine on manual shift trans to get the harmonic balancer fat mark to line up on the timing tab. I’ve done that myself, beware of getting your skull slammed by the deck lid, ask me how many stars you’ll see. I have also used a long wrench and or a socket on the main bolt on the balancer. Whatever works for you.
I think that’s it for a blind installation of a distributor.
------------------ jetman Silver 86 SE 2M6 4-speed, with "check wallet light" Now fortified with 8 essential slices of bacon goodness
[This message has been edited by jetman (edited 04-25-2009).]
Totally blind installation with distributor already out of engine.
Rotate the crankshaft so the fat timing mark on harmonic balancer is on the timing tab.
Note where the #1 plug wire post is on the cap and mark with white-out on the body of the distributor exactly where that is. Remove the cap.
Install distributor with the rotor pointing at your white-out mark indicating #1 post and put the distributor cap back on. (note that the rotor is point exactly where the #1 plug wire post will be when we put the cap back on.)
The engine runs without stalling or anything but it sounds really different. It's a lower pitch rumble now.
Try starting the car. If it doesn’t catch fire then you may be 180* off on the base timing so get the fat timing mark on the timing tab like before. Remove the distributor and crank the harmonic balancer around exactly one full turn (360*), and then re-install the distributor with the rotor pointing at the #1 mark on the distributor. Put the cap back on and start the car.
Warm up the car then shut off, ground your ADL and restart.
Set timing with an induction timing light.
Remember that your crankshaft makes two revolutions for every revolution of the distributor, that’s why you may be at Top Dead Center (TDC) for either #1 or #4 cylinder with the fat mark lined up on the timing tab. Some folks will pull the #1 plug out, put their finger over the hole and when it blows off, you’re at TDC for #1 cylinder.
Some folks will rock the car in 2nd gear to rotate the engine on manual shift trans to get the harmonic balancer fat mark to line up on the timing tab. I’ve done that myself, beware of getting your skull slammed by the deck lid, ask me how many stars you’ll see. I have also used a long wrench and or a socket on the main bolt on the balancer. Whatever works for you.
I think that’s it for a blind installation of a distributor.
EDIT: All is fine. I had a few complaints about the engine sound but it wound up being because I had the ADL jumper in on the first start. I removed it and the car sounded fine. I'm hopeful that after getting a timing light all will be perfect with this new distributor. Thanks to everyone for the help!!! Especially Jettman, whose post above help me tremendously with a step by step guide on starting from nothing...
[This message has been edited by mgiusto (edited 04-26-2009).]
I love you guys. ya'll are so awesome. You guys are defanently the shapest mechanics I have ever come acrossed on the internet. That post that you replied to me with is going to solve so many of my problems. i finally know why the car has never ran right. the firing order has never been correct. You guys are seriously awesome.
Thanks for this post used the info in my own install which I undertook past weekend and ended up with this;
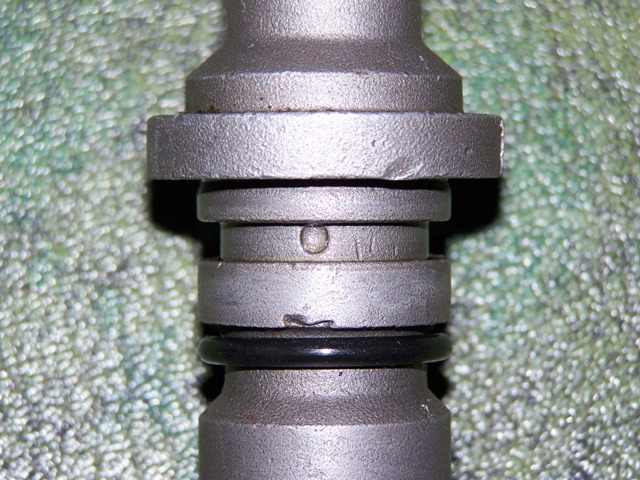
(O-ring moved to show groove) Leaked like you would not believe till I found out why, took the o-ring off to change it thinking it might be cut and found this dimple in the o-ring groove. Oil was pushing behind o-ring and up this dimple and out.
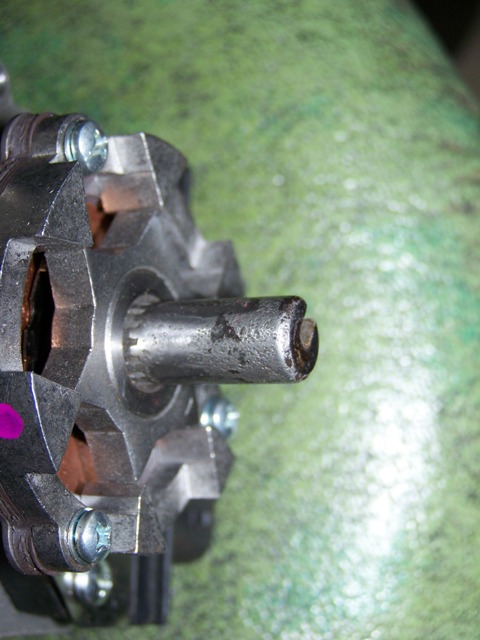
My original distributor had end play so while I had it out I compared to this "new" remanufactured one and found my trigger wheel had moved up the spline after 97000 miles so I tapped it back down to tighten up the end play.
I had also noticed when I installed my rotor on the "new" distributor that it felt loose so I measures the shaft and it was undersized from the old one, you can see the grind marks in the pics;
Installed my old one after checking everything out and installing new o-ring and took the "new" one back to NAPA today for a refund! NAPA guy didn't even question it, must not be the first time?
Needless to say I'm now an expert on distributor removal/install after doing it 5-6 times. (had the timing off a tooth one way or the other so had to pull it a time or two extra and the other times were to find the leak)
Anyone want to guess how many times I had to pickup the clamp and bolt off the floor??
This thread is vey helpful in the rebuilding of my motor but i have one question. I have bumped the cylinders a few times since i removed my distributer. What should i do about replacing it and retiming it?
This thread is vey helpful in the rebuilding of my motor but i have one question. I have bumped the cylinders a few times since i removed my distributer. What should i do about replacing it and retiming it?
You need to find Top Dead Center (TDC) for # 1 piston. Rotate the harmonic ballancer so the fat timing mark is aligned up on the timing tab, then set your distributor. You will be at either # 1 or #4 TDC, go from there. If you have your intake off and can see the lifters, TDC #1 is where the both valves are closed when the fat mark is on the timing tab. A little more detail here....
I think it might help clarify that the coil trick works because you don't see cylinders 2,3,5,6 firing because they are doing so at 1/3 increments around the balancer. So if you are standing above it holding the timing light, the lower 1/3 marks would pretty much be out of your vision and you will only see 1 & 4 firing around the 10 degree mark (hopefully). Someone correct me if I'm worng, but I beleive that's right.
Here is an excellent question that I was asked by one of our forum members.
quote
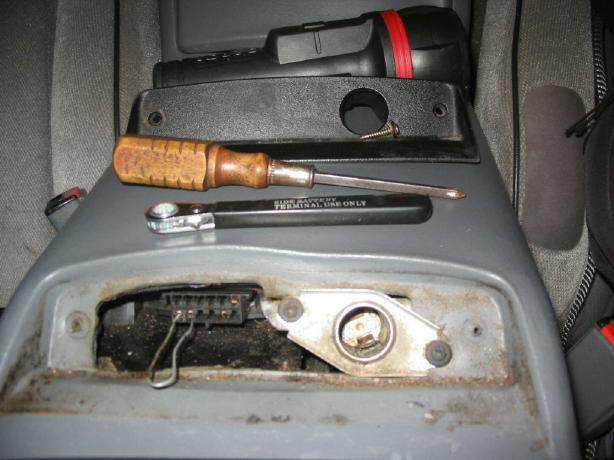
Your post on distributor replacement is awesome! After reading through it a couple of times, I had some questions. What is the purpose of grounding out the ADL with a paper clip? What is ADL? Is this required every time the timing is checked? Thanks again!
Thanks for the compliment.
Yes, you must ground out the ADL to set the engine distributor base timing.
The ADL is the computer diagnostic connector that lives behind the ciggy butt cover. Grounding out the ADL puts the computer into "service" mode so that the computer does not adjust the timing on it's own. With the engine off, the paperclip is inserted into the ADL, then start the car and adjust the distributor base timing which is 10* before top dead center. It's as simple as that.
If you didn't ground out the ADL which puts the computer into service mode, you'll never be able to set the distributor base timing as the computer will be constantly making adjustments on it's own.
You also ground out the ADL whenever you check the engine codes but in that case, you don't start the engine, rather just turn the key to the engine on position and watch the "service engine soon" light (check wallet light) flash the codes at you.
Back in the old days, we didn't have engine management computers, setting the distributor timing was all we had to do. Now a days, the computer makes adjustments constantly so grounding the ADL temporarily stops the computer from making adjustments allowing you to set the distributor base timing properly.
Thanks for the excellent question, this is what makes the forum so great. As you can tell by my ratings bar, I "positively" help out in any way I can for the benefit of all my fellow Fiero forum members as they have for me in the past.
[This message has been edited by jetman (edited 09-09-2012).]
... then start the car and adjust the distributor base timing which is 10* before top dead center. It's as simple as that.
And be sure to tighten down that bolt that holds the distributor holddown clamp - don't do like I did and restart the engine a couple of times with it loose! The motion of cranking the engine and the turning of the cam against the distributor gear was enough to bump it back out of time, by quite a bit. Funny to look back and laugh, but I was really puzzled there for awhile why the car ran so awful when I'd just timed it! LOL
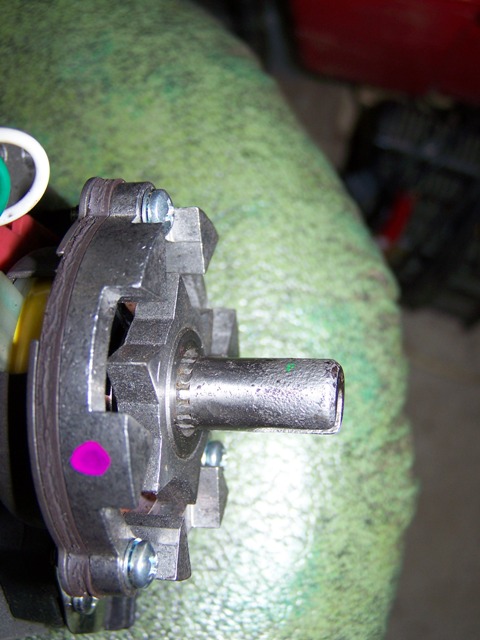
One thing I never liked about the Fiero's distributor, is the style of the pickup coil. The rusted/bent steel fingers on the pickup coil and on the magnet do not promote any kind of consistancy on the firing across all 6 cylenders. I was always a big fan of the star shaped pointed pickup and magnet. I just got finished rebuilding a 2.8 distributor using parts from a used 4.3 (blazer/S10) distributor. Far superior parts, much like the ones you installed. I'm hoping that this will eliminate some of the roughness that the Fiero has always had at an idle. You can REALLY feel the pointers when they line up now.
Any news about this mod? How the engine performs with the new pick-up coil?
Can you please give use some details about your dizzy pick-up coil upgrade: - Which parts you have used from the Blazer S10 distributor (only pickup coil, rotor, stator or also the ICM)? - Is the Fiero ICM also compatible with the newer style pickup coil? - Can you recall part numbers?
Thanks, Moar
[This message has been edited by Moar (edited 11-14-2015).]
Totally blind installation with distributor already out of engine.
Rotate the crankshaft so the fat timing mark on harmonic balancer is on the timing tab like shown.
Note where the #1 plug wire post is on the cap and mark with white-out on the body of the distributor exactly where that is. Remove the cap.
Install distributor with the rotor pointing at your white-out mark indicating #1 post and put the distributor cap back on. (note that the rotor is point exactly where the #1 plug wire post will be when we put the cap back on.)
Insure that your plug wires are in the correct order per the pictures.
Here is another diagram of the plug location.
Try starting the car. If it doesn’t catch fire then you may be 180* off on the base timing so get the fat timing mark on the timing tab like before. Remove the distributor and crank the harmonic balancer around exactly one full turn (360*), and then re-install the distributor with the rotor pointing at the #1 mark on the distributor. Put the cap back on and start the car.
Warm up the car then shut off, ground your ADL and restart.
Set timing with an induction timing light.
Remember that your crankshaft makes two revolutions for every revolution of the distributor, that’s why you may be at Top Dead Center (TDC) for either #1 or #4 cylinder with the fat mark lined up on the timing tab. Some folks will pull the #1 plug out, put their finger over the hole and when it blows off, you’re at TDC for #1 cylinder.
Some folks will rock the car in 2nd gear to rotate the engine on manual shift trans to get the harmonic balancer fat mark to line up on the timing tab. I’ve done that myself, beware of getting your skull slammed by the deck lid, ask me how many stars you’ll see. I have also used a long wrench and or a socket on the main bolt on the balancer. Whatever works for you.
I think that’s it for a blind installation of a distributor.
Instead of turning the engine around 360 degrees, why not just turn the distributer shaft around 180 degrees? Seems easier to turn the distributor than the whole motor... Right?
Instead of turning the engine around 360 degrees, why not just turn the distributer shaft around 180 degrees? Seems easier to turn the distributor than the whole motor... Right?
Some people find ignition timing/ distributor placement confusing enough without now suggesting that the rotor be pointed at cylinder #4 on the cap.
This tread is so helpful,, How my 88GT is even running right now is FM{freak-in magic) wish i knew how to post video, ya'll would not believe my firing order and i get a good idle ,, but no POWER,, will start over on my day off
Started over and followed Patricks lead here,,, Found TDC on the compression stroke, Pointed the rotor at No,1, installed the cap, Plug wires 1,2,3,4,5,6 and BAM!!! Runs Great,, Thank You again for the thread
Over the years here, I've seen so much confusion relating to setting the static timing.
First of all, the cap position can be anywhere you wish to orient it... as long as the rotor is pointing to the terminal used for #1... and the piston is at the top of the compression stroke for cylinder #1.
The only thing restricting where the distributor can actually be positioned is the wiring harness. Obviously the connection for the ICM can't be pointed away from the coil if you expect to connect the harness etc.
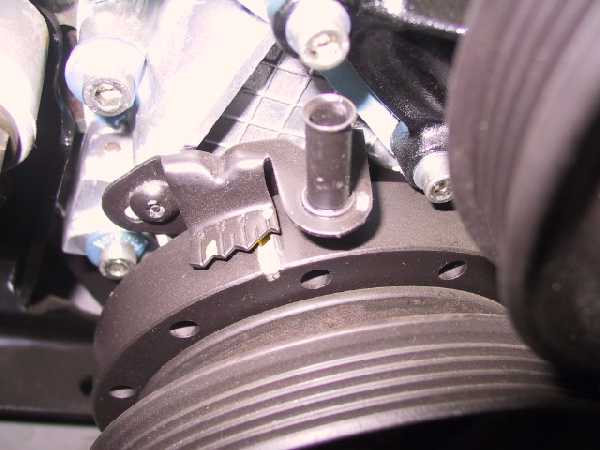
Below is the 2.8 in my Formula. To do the initial static timing, I have the timing mark for cylinders #1 and #4 (the wider mark on a known good harmonic balancer) set to 0° with #1 piston on the compression stroke. If I'm installing the distributor, I drop it down so that when fully seated, the rotor is pointing at the indicated bolt on the upper intake. I then rotate the outer distributor so that the terminal I'm using as #1 (as it could be any which one you want) is lined up with the rotor. The terminal I've selected seems to work best in regards to orienting the distributor towards the coil. The engine is now timed well enough to start, and dynamic timing can now be set with a timing light (or for the old guys like me, by ear). Nothing to it.
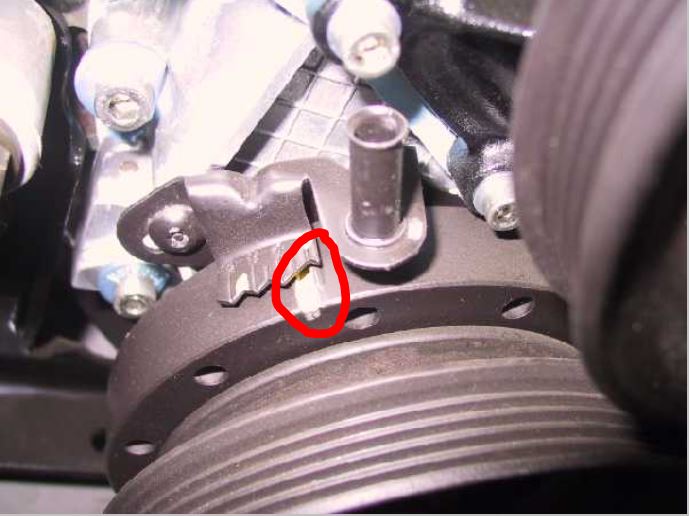
I've timed a million cars, that's no issue, but I can't find the timing mark on the actual crank balancer (it's painted in the pictures here). Anyone have a pic of what the mark looks like? I've spun over the motor and just don't see it.
Sorry for reviving an ancient thread!!!!
[This message has been edited by Brivander (edited 12-06-2021).]
I found another that works but was so long ago i am trying to remember what car i got it from but off memory a Ford Japanese car. eg: Ford telstar same as mazda 626 late 80s.


 Happens really easily.