OK, I finally found some time (and clear weather) to pull the engine out and replace the clutch.
Yep, it's munched!
fortunately the flywheel wasn't gouged and just needed to be resurfaced.
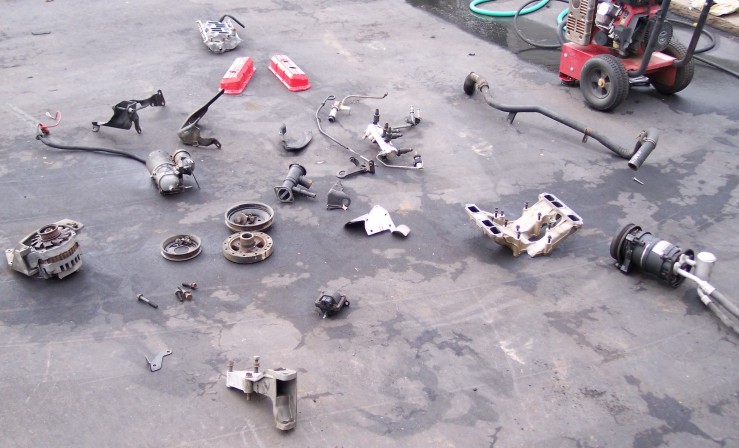
BUT...as is always the case, there was more to see with the engine out. Like:
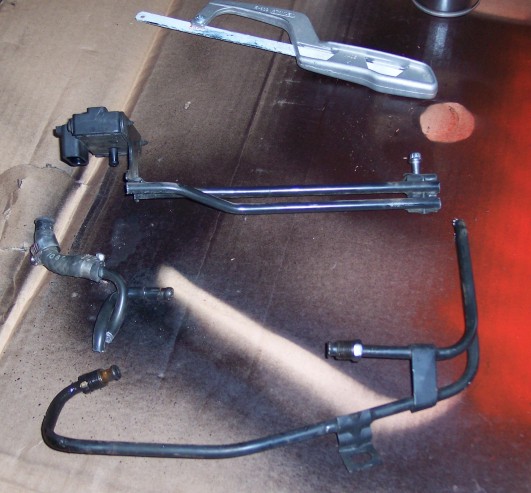
Cracked exhaust manifold. All the way around the weld.
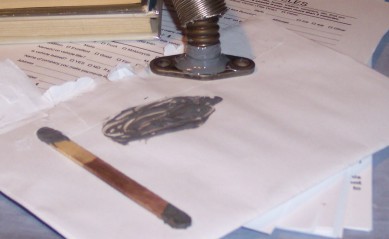
Broken EGR tube:
Smashed-in oil pan where someone decided to use a floor jack because the K-frame clearly didn't look strong enough to support the car's weight.
And finding FREE TOOLS!
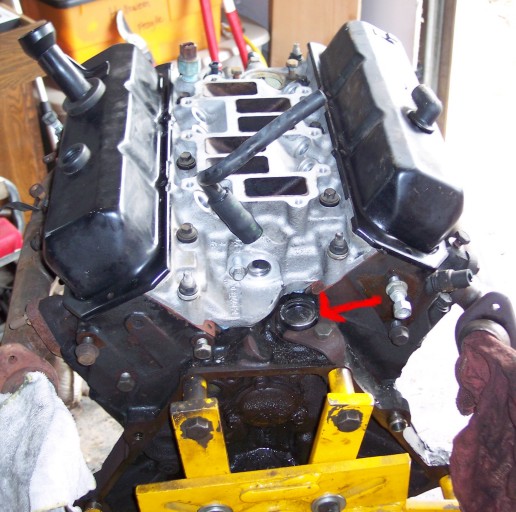
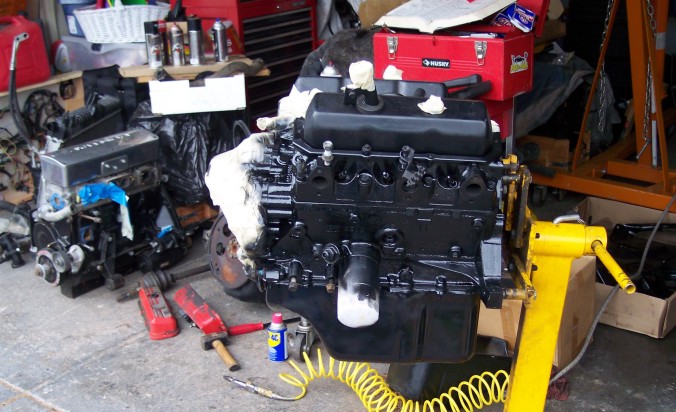
Thhe first step was to pull the engine off the cradle and put it on a stand. then I pulled the oil pan for repair. With a wooden clothes bar and a post hammer I managed to bend it back into nearly original shape. I was able to clean a goodly amount of sludge out too.
While I was in there, I checked tolerances and the rods and bearings all look pretty darned good! I was surprised since the oil pick-up had been pushed-up by the pan cave-in and I was worried about dry oiling. Just for the hell of it, I installed a new High Volume oil pump.
Next, I am going to replace the timing gear (as long as I am in there anyway).
I'm curious to see how the jbweld holds up to flexing on the car....If that works, i have a few tears to fix in my front facia.....
I have always considered this a temporary solution even thought I have minor tears that I repaired with JBWeld that have been holding up for 10 years. Eventually I will replace the fascia when I repaint the car. But that is a down-the-road project and I wanted the car to not look like a beater until then. I like JB for 3 reasons, CHEAP, strong, and easy to work with.
I have always considered this a temporary solution even thought I have minor tears that I repaired with JBWeld that have been holding up for 10 years. Eventually I will replace the fascia when I repaint the car. But that is a down-the-road project and I wanted the car to not look like a beater until then. I like JB for 3 reasons, CHEAP, strong, and easy to work with.
Haha! Reading this reminded me I have a perfect condition front end in my garage. I just have to paint it and the rest of my car. Lol. I need more sleep.
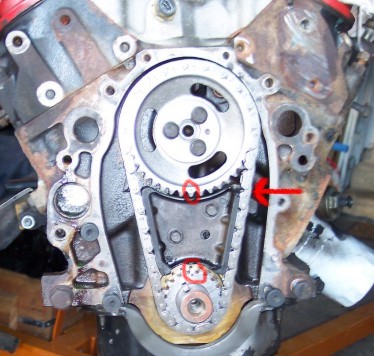
NEW timing gears and chain. Ahhhhh, no more play in the chain.
Notice the chip in the original chain guide (arrow). Conventional wisdom says to replace the chain guide but if you do, it will simply happen again. And if it does, that chunk of plastic will fly around the inside of your engine as this one did. No thanks. I'll keep the original which is doing a fine job.
BTW, I found the plastic piece in the oil pan, chewed and mangled by the chain before it came to rest.
The lower gear is pressed on using the original center bolt and a collar. The timing gear sprocket is screwed on to 20 ft lbs and the dots top and bottom must line-up (see circles).
You may ask why I replaced the timing gear on an engine with just 102,000 miles. The original gear had some play but not a dangerous amount. But as long as I had to repair the oil pan it just made sense. When you get this far into an engine it is silly not to replace the basics. And in the end, a new timing set was only $35 at O'Reilly's and barely took 20 minutes to replace. This engine will have a nice long life now before it needs serious rebuilding.
[This message has been edited by Toddster (edited 11-13-2020).]
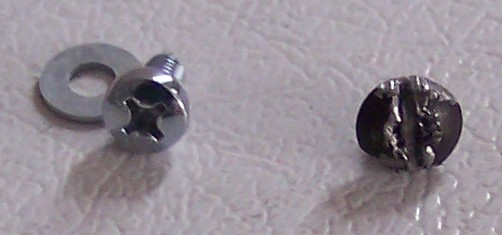
Getting there a little at a time. Today I spent a good portion of forever removing the ST-27 security screws from the timing mark plate. These bastards were designed by Satan. They are round head design for one thing, they are a rare screwball size for another. And if you happen to have a ST-27 bit (which I did) you will likely break it in half (which I did) trying to remove these damn things. SOoooooo, I used a hack saw to cut a groove into the head and removed them with a large screw driver and Vise-grip pliers. I'm using simple M6x100 screws with a Philips head to replace them.
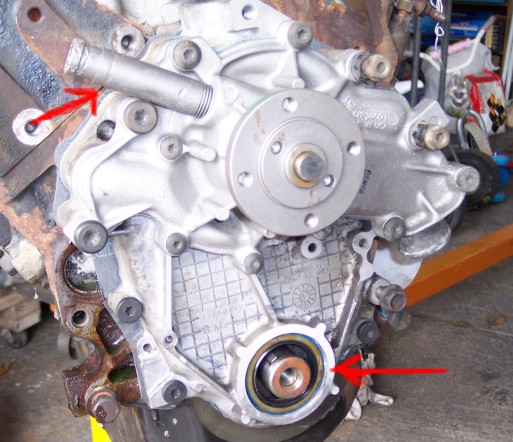
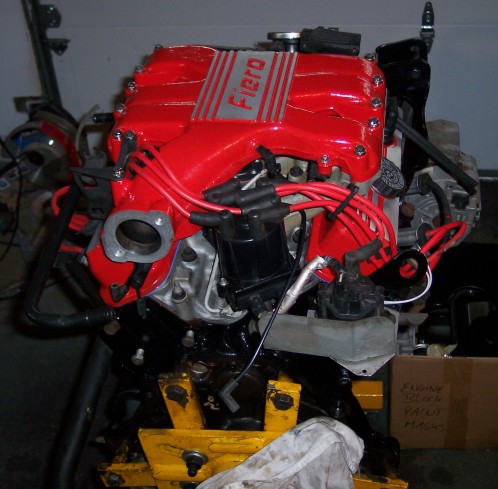
OK, moving along I cleaned-up the timing cover (sans the timing guide plate) and installed it with a new gasket and some RTV. Then I added a remanufactured water pump ($16 at O'Reilly's). The price is great but you have one problem, the '88 didn't have the water outlet on that was used in earlier L44 motors. So you have to use a pipe wrench to get it off and you will trash the threads when you do it. So I had to tap the hole and use plenty of pipe thread tape on the cap, but it works. I also added a new front main seal.
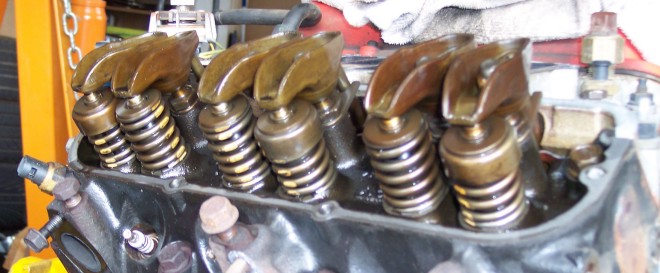
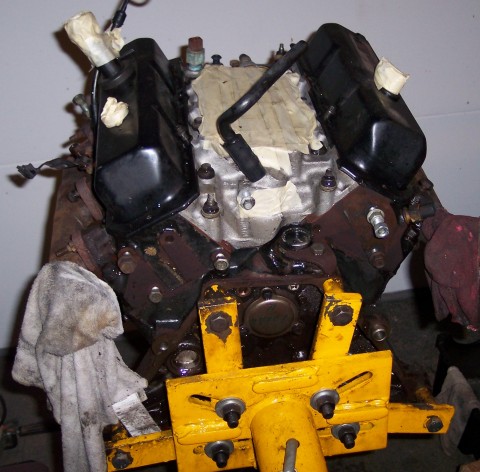
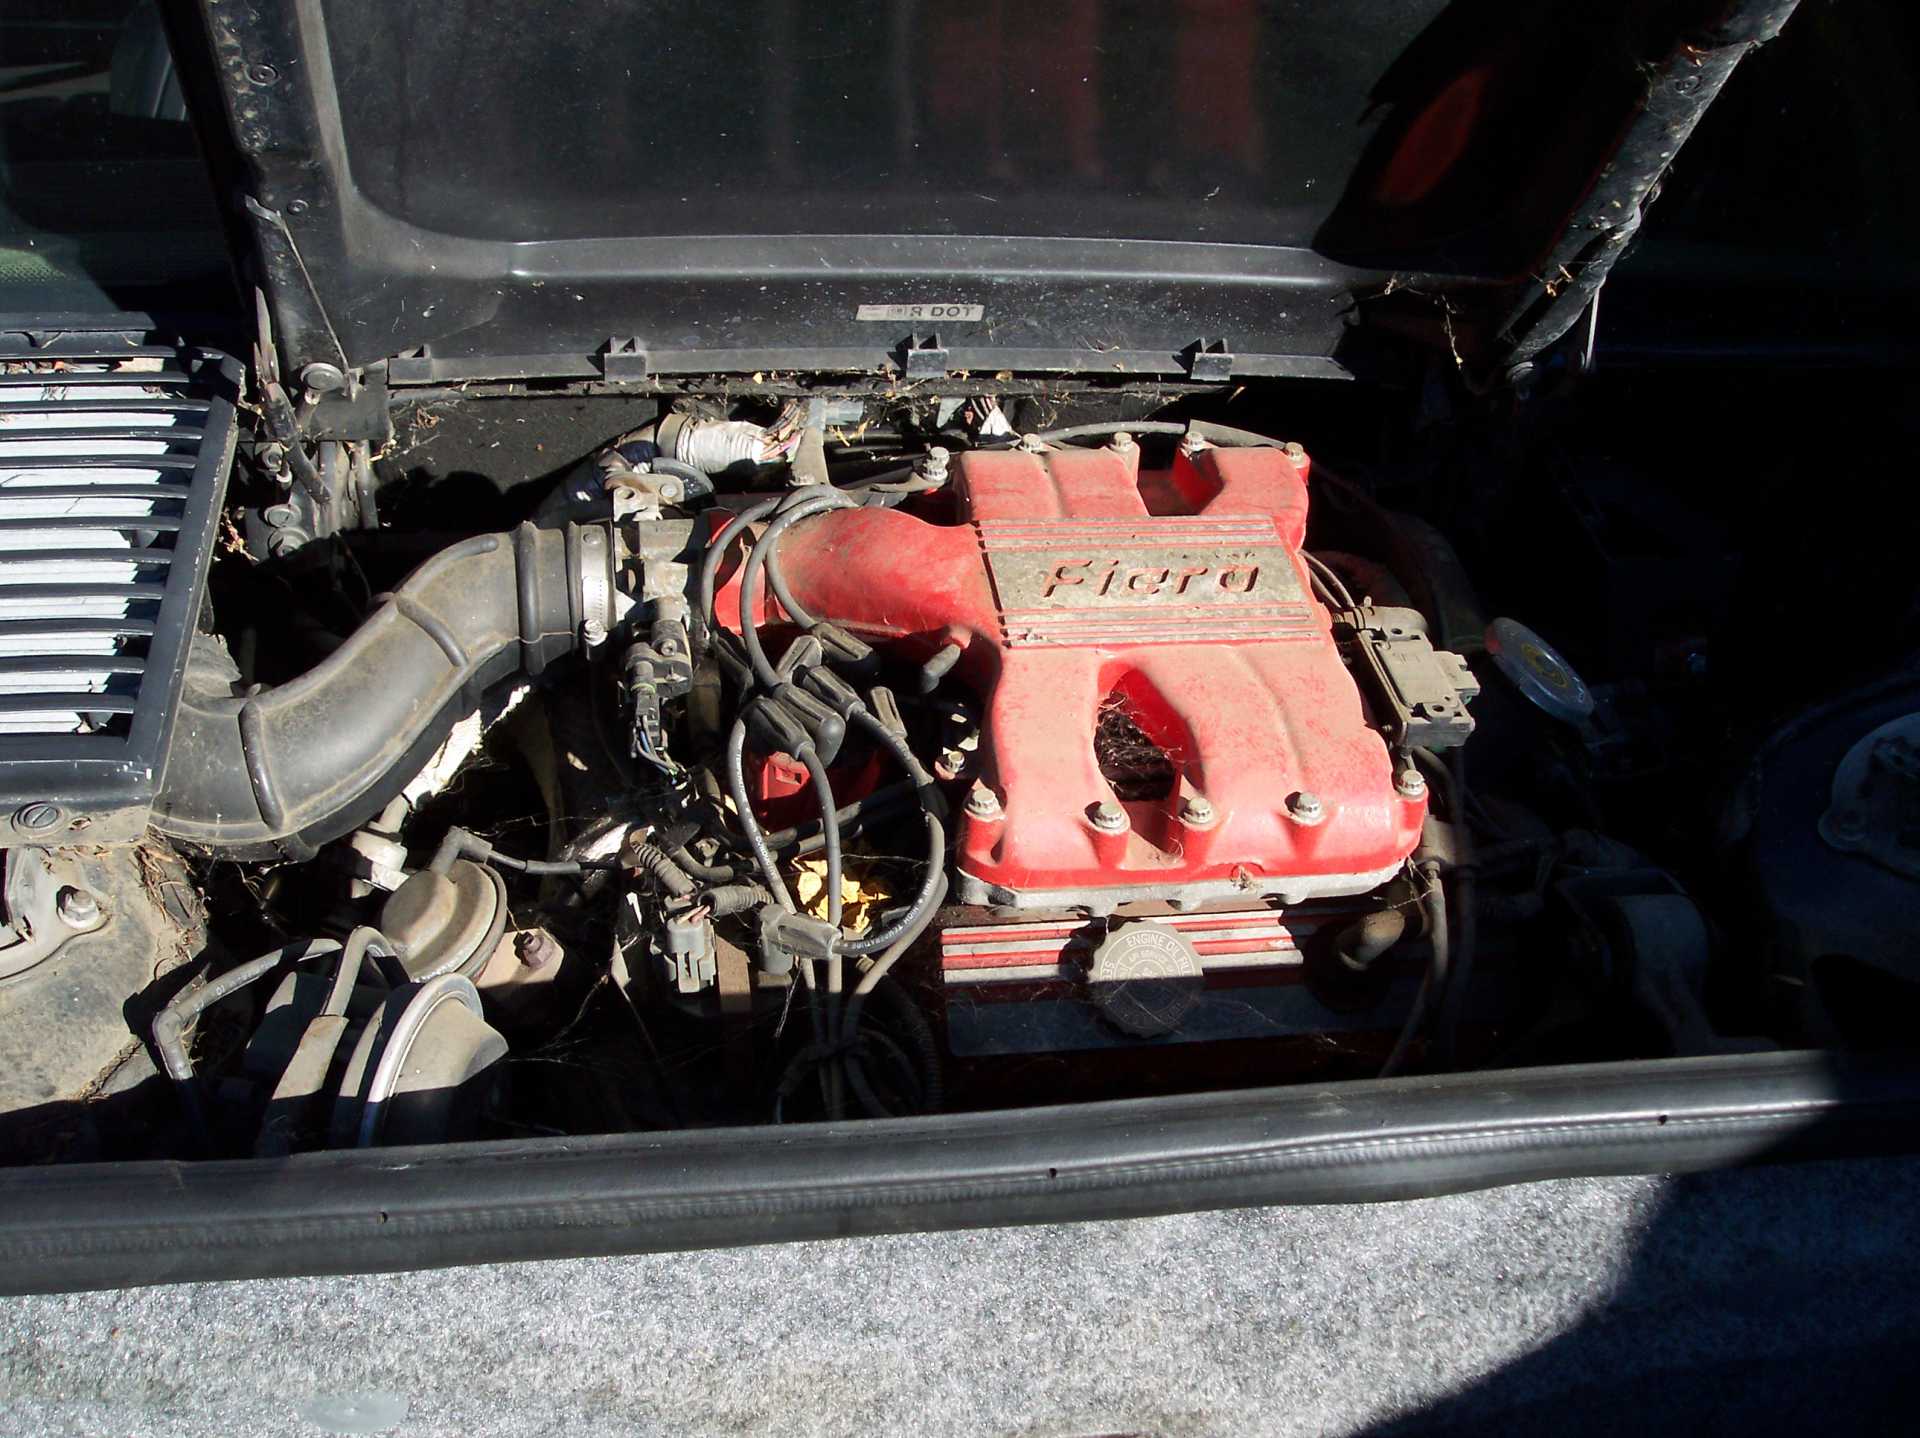
Next I removed the lower intake and valve covers. I pressure washed the intake to get the grit off. And I was happy to see the valves were in great condition. Even the factory paint marks were still totally visible. The keepers, valve guides, rockers, etc. are all in great shape.
I rallied all the accessory parts and blasted them clean.
Finally, I took some old parts I had from my last 3.4 swap and put them on the engine. I use them as cleaning and painting masks; oil pan, valve covers, timing cover, disty plug, oil filter, various bolts and rubber plugs. I even have a set of crappy old spark plugs that have about 5 layers of paint on them by now.
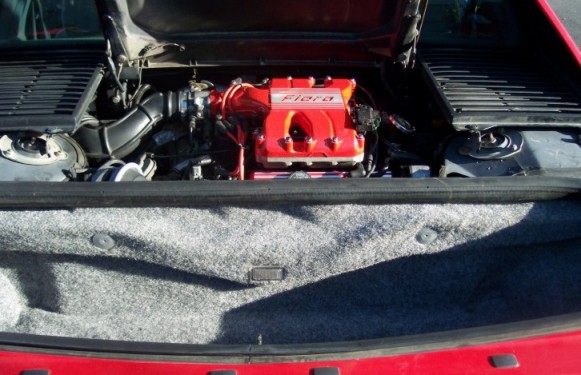
I blasted the whole thing clean. Tomorrow I will shoot some engine paint on it and start assembling the outer engine again. This is NOT a full on resto. I am not sand blasting everything and grinding of flashing. I will do that when I completely rebuild it. I just want it to look reasonable for a 100K mile engine.
[This message has been edited by Toddster (edited 11-14-2020).]
Not only does it look better but it will be easier to maintain, reduce rust, and all for the cost of one can of 500 degree engine paint.
No brianer.
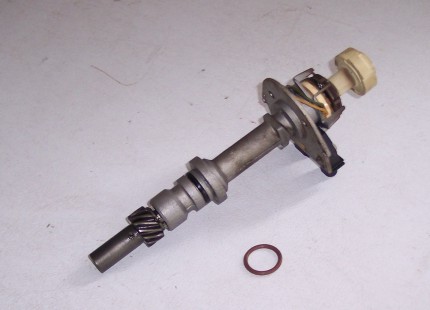
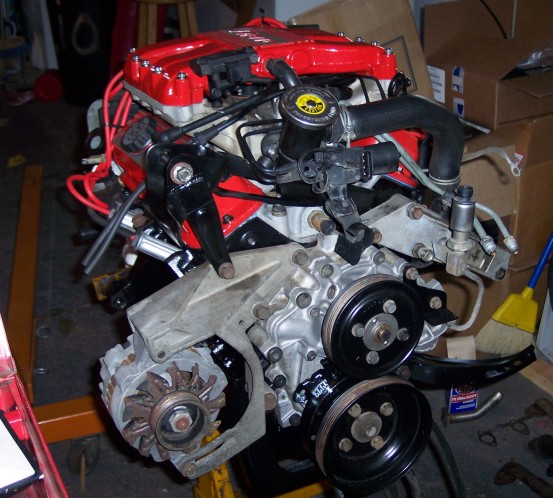
The next step is to put the distributor back in so I can replace the balancer and timing marker. The distributor was obviously replaced not long before I got the car because it had a "remanufacture" sticker on it and it was clean and turned freely. The only thing disappointing was the o-ring which looked "square" and brittle. So I swapped in a new one.
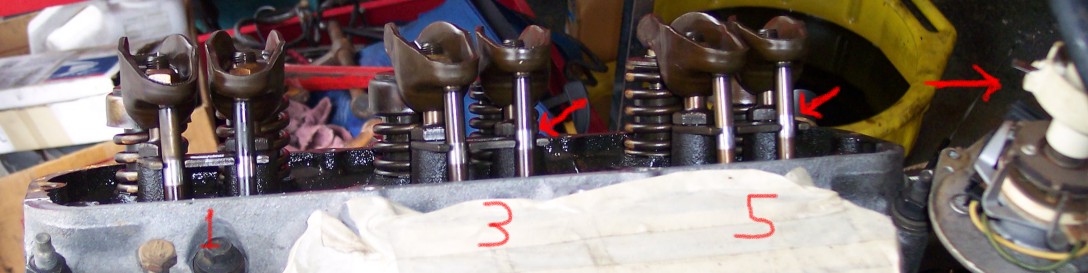
Now comes one of the most common ****-ups in auto mechanics, avoiding putting in the disty in 180* out of synch. We marked our new timing gear with the dots lined-up so we know we should be at TDC. But to make sure we take a look at the valves. Looking at the cylinders 1,3, & 5 we should see that the E and I valves for cyl #1 should be both closed. The intake for cyl #3 should be open, and the exhaust for cyl #5 should be open. As you can see in the picture below, they are. Hence, we are at TDC and not BDC. Now we install the distributor with the rotor pointing roughly towards cyl #1.
Now we can press on the balancer. First, just press it on by hand. Then set the timing mark in place and line up the mark on the balancer with Zero on the mark and use some thread locker to put the new 6mx100 screws in to hold it in place. We do this AFTER the disty goes in to avoid getting out of synch as we WILL end up turning the crank when we torque the center bolt of the crank shaft down to press on the balancer. Now torque down the bolt and press the balancer all the way on. BTW, a light coating of oil on the shaft will make it slide past the new seal easily.
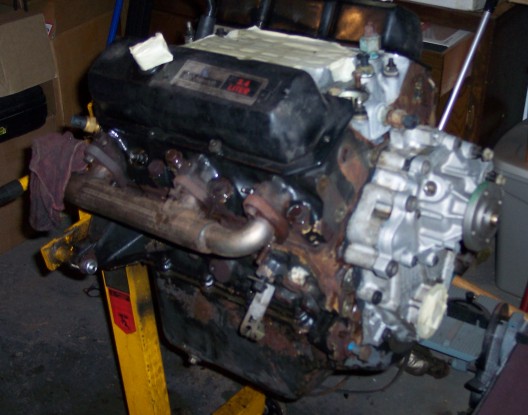
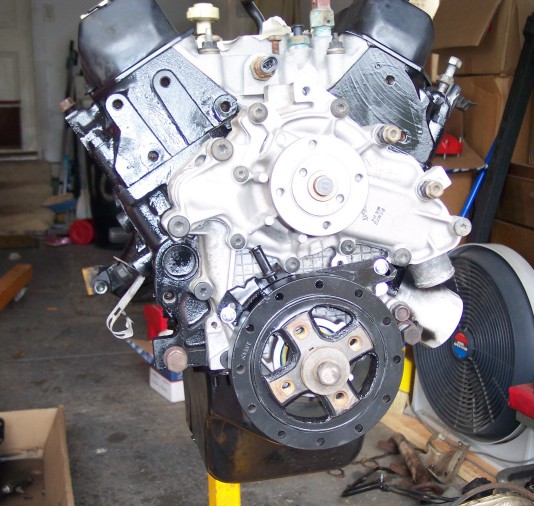
I painted the intake and valve covers and while letting them dry moved on to instaling some of the lower brackets and modifying a few things on the engine. Such as cutting off the ends of the TBI coolant line. This is a totally useless gimic that is in the way more than it does anything useful. I leave the center section so it will bolt back on and hold the MAP sensor in it's stock location.
Tomorrow I can finish the intake and valve covers and install them along with the rest of the engine components.
[This message has been edited by Toddster (edited 11-14-2020).]
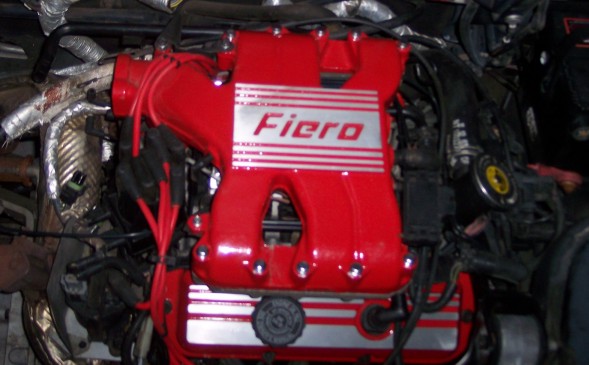
One can of red paint and a belt sander later and this looks much nicer. I used a spare front side exhaust manifold I had and I still have to grind out the flashing before I can install them. This is one of those MUST do's when you pull an engine. Putting a stock exhaust manifold back in is just asking for trouble. It will eventually crack just as the one I replaced did.
One of the other repairs necessary is the EGR Tube. Now the proper solution is to replace it. But the Fiero Store unit (a very nice product) is $100!...for a tube!
JB Weld is rated to 600* F sooooooooo, OK it will do. Now a couple fo things to remember are that if you have the break at the base, you're screwed. But if you still have a rung or two you are in good shape. The JB Weld will wrap around the grooves and give GREAT adhesion. Also, make sure you leave room for the mounting screws and trim the shield back about 1/2 inch to let heat dissipate around the repair. This is not a permenent repair but it will last long enough until I completely rebuild or replace the engine.
[This message has been edited by Toddster (edited 11-14-2020).]
Thanks for the write-up with pictures! I'm going to be doing the same thing to a 100k mile block here in about 2 weeks so it really helps to get a preview of what I have to look forward to. Do you think there is any merit to pulling the heads to replace the head gaskets or does the cost of replacing the one-use head bolts not merit the bit of preventative maintenance?
I'd give you a plus but I have to be a member here for 30 days first
Pulling the heads depends on what you find when you pull the valve covers. If you have bent push rods, broken springs, keepers, guides, etc. Then yes you need to pull the heads and fix them. But if they are in good shape and you still have good compression then you won't need to.
My philosophy is that if you need to pull the heads then you need to rebuild the entire engine. That is why I am just doing a minor rebuild. The long block is still good on this engine so I will get another 100K miles out of this one easily.
Ok, thanks for the info. Looks like I'll skip the head gaskets then....the donor motor has around 100k and ran well (as I'm told) before it was pulled for a 3.4 swap. Every other gasket will be new as well as wear parts (timing set, WP, alt, etc) so I should be able to pull another 100k out of it.
I doubt I'll get mine as pretty as yours though
I bought a complete gasket set since it was cheaper than buying the individual gaskets so it comes with head gaskets. I don't really want to toss perfectly good gaskets so I'll probably end up hanging them on a wall with the rest of my random car stuff (extra Buick grills, an Olds hubcap, a license plate, etc).
[This message has been edited by Alibi (edited 03-04-2009).]
OK. Today we had great weather so I decided it was time to get bizzay!
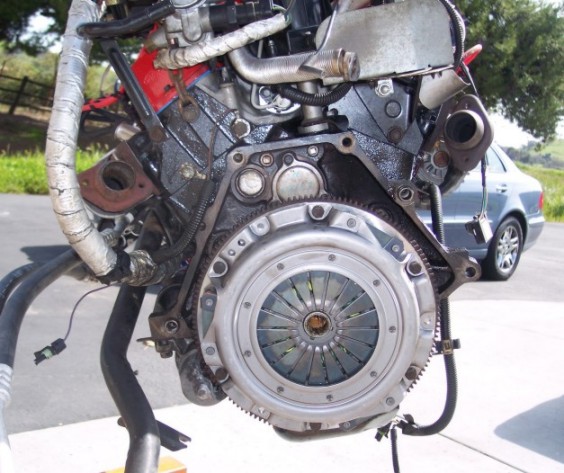
First, I took the engine off the stand and replaced the rear main seal (as long as I had the chance), then bolted on the resurfaced flywheel with red thread locker and 55 Lbs of torque. Next, the new clutch and pressure plate are installed. Again red locker and 25 lb torque. Not shown is the alignment tool. I put some grease on the splines and it is ready to hook-up.
I finished the small details like cleaning and installing the wiring harness, a few heat shields, and the timing belt. Note that unlike the AC belt, which is new, the Alt belt wasn't in stock at the parts store. Screw it! I can replace it later, I wasn't going to let a belt hold-up an install.
Next I had to install the throw-out bearing and hold the clutch arm with some wire during installation. Matching a tranny and an engine requires some heaving and some grunting so strapping the clutch arm back is essential.
Before installing the engine I took the opportunity to paint the battery tray with some rustoleum, replace a few dried and cracked hoses, and tidy up the engine bay in general.
Then, using my removal procedure in reverse (see procedure here: https://www.fiero.nl/forum/Forum2/HTML/088599.html ) I put it all back in. Just a few hook-ups still to do but otherwise it is pretty close to being done!
Yep, it's been a FULL day!
[This message has been edited by Toddster (edited 11-14-2020).]
Very nice. Great job, wish i had the space and time to do that. BTW, whats up with that red steering wheel?
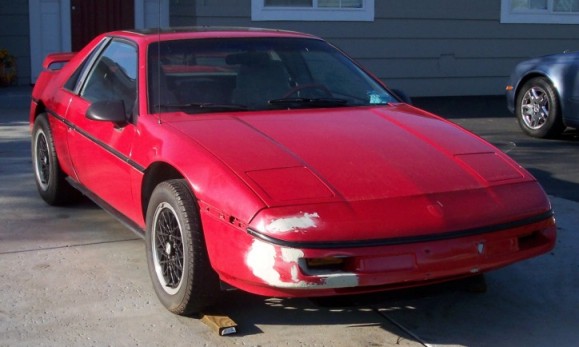
The guy I bought it from wanted a steering wheel with more grip (like the GT wheel) so he decided to wrap the stock Formula wheel in leather. I'll replace this with a nice clean GT wheel eventually but for now it is low priority to just getting it road worthy again.
I have a few other interiror and "comfort" mods to make. But for the time being I'll be roughing-it with crank windows, no trunk release, and a red steering wheel.
I love this kind of grass roots restore/rebuild. Makes a change from all the high tech high power restos we see in this forum (because totally impossible budget, time and regulations in France !)
The price you paid for the car makes me a bit green, but hey, everyone has to have à good deal sometime!
Regards, Rafe
PS I paid 1700 euros for my '87 GT 5 speed in about the same condition as your's was: clutch trashed, seats ripped, body OK except cracked door panel, engine and gearbox good, chassis rust free....etc. I was happy with the buy.
I like all kinds of build threads but you are right, we need more threads about getting the most out of your Fiero for the least amount of green possible...especially in times like these!.
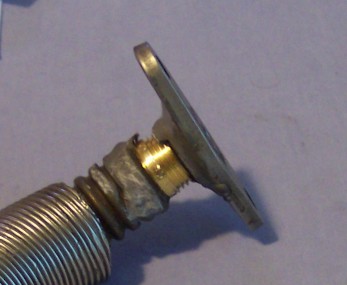
My brilliant little patch job for the EGR tube cost $1.91 at Home Depot.
A 3/8th Brass coupler is a perfect fit and won't contribute to electrolysis or succumb to the heat. It screws right in and is rock solid even without any adhesive. Still, I used a liberal amount of JB weld to seal it from vacuum leaks and the extra length will help relieve stress on the tube so it should last a good long time.
[This message has been edited by Toddster (edited 11-14-2020).]
I actually TIG welded mine with a bit of copper tube inside to support the weld while molten. However, not everyone can weld metal that thin - it takes a steady hand !
I actually TIG welded mine with a bit of copper tube inside to support the weld while molten. However, not everyone can weld metal that thin - it takes a steady hand !
True. I have a Mig welder and I tried it before. Not much luck despite my care. This solution works great and after cleaning the trunk carpet with a pressure washer and finishing the details we're done with the engine and tranny.
BEFORE AFTER
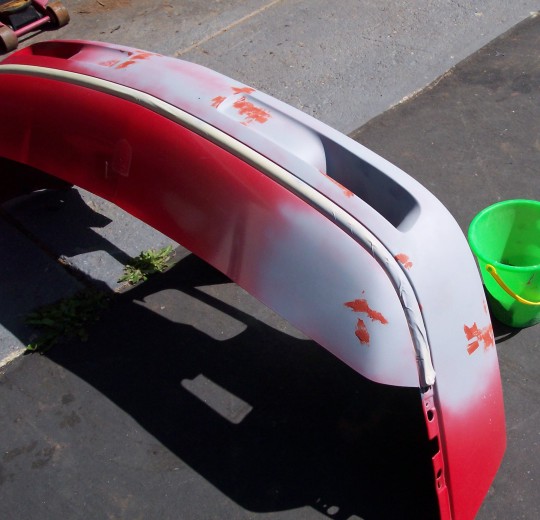
So I moved back to the fascia. I did a trial mounting to make sure everything connected well and that there was no binding. I added a thin coat of filler which still needs to be wet sanded, but it will be easier to do on the car since the subframe will hold the form.
[This message has been edited by Toddster (edited 11-14-2020).]
OK, I started the car up today. I needed to put a 15 minute charge on the weak battery. After that I turned the key to the "on" position 3 times. This allows the fuel pump to fully pressurize the fuel system. Then I disconnected the coil wire and cranked the engine for a good 20 seconds or so. This allows the oil pump to cycle oil through the engine. Then I reconnected the coil wire.
With the A & B terminals of the ALDL shorted with a paperclip I hooked up my timing light and cranked it over. Started right up, first time. Timing was dead on 0. And the nice thing about new timing gear is that there is no walking! The timing was motionless. I set the timing at 10* then unpluged the paperclip and she was running like a champ.
I did notice one funny noise which turned out to be the distributor. The whole thing was cavetating! It runs OK but I suspect the center shaft is warped. Fortunately I have plenty of distributor spares so tomorrow the new one goes in.
Then I will bleed the clutch system and the brakes and test all other systems before finishing the body work.
Well I got home from work early today and put in a couple hours. I got the sanding done on the fascia. I need to apply some primer and do some more fine wert sanding but I started with 100, then 220 and lastly 400 grit. With the primer I will use 600 and 1200 grit before masking and painting.
Mechanically the car is pretty good but I did need to bleed the clutch and take care of one little thing. Can you guess what it was.
I had a spare light. Took about 20 minutes.
All other systems are working perfectly. The only other thing I noticed was the fan wasn't kicking on. It switched on so the problem is probably the fan switch. I can swap that out easily enough. I also need to recharge the AC and deal with a few more details.
[This message has been edited by Toddster (edited 11-14-2020).]
This is about to become my regular driver. I sold Judge Red last October and have to get ready for Westfest so I need a running Fiero! I have 6 and this is the only one running as of now.
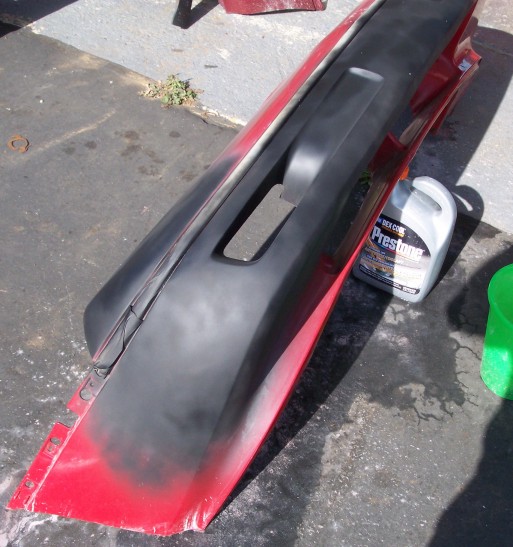
Alternating gray and black primer with a dab of spot putty, I got the smooth look I wanted. It is not 100%. The start and end point of the tear is bumped-up a little. I took it down as much as possible but there is only so much I can do with what I have. I'm OK with that. I will repaint the car one day and when I do I will replace the fascia anyway. This is a low buck repair that will look good until that repaint day comes. My cost to repair this fascia comes down to one pack of JB WELD, two cans of primer, one tube of spot putty, and one can of factory red. Total cost, around $35.
Last coat of primer
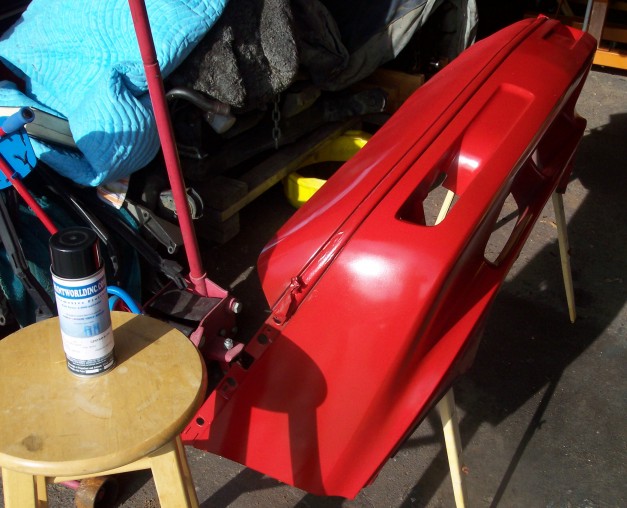
And finally a rattle can of the factory original paint. I will let it dry over night and then I will hit it with some clear before the final wet sanding and buffing.
[This message has been edited by Toddster (edited 11-14-2020).]
Well, since you have so many projects and so little time, maybe you could.....give one to me?
Let's see some cash.
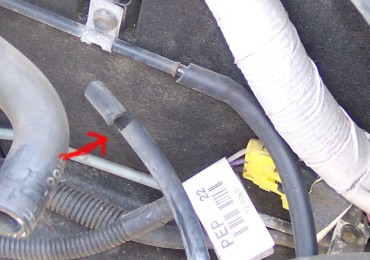
OK, took it for it's first test drive today. And with the exception of a Code 22 and a quick replacement of the TPS it was perfect. It's running like a new car now!
There are still some things I want to personalize, replace, or upgrade, but the car is a great daily driver again.
here is the tally:
Car $250 + $30 transportation Clutch $135 Timing Gear $36 Water Pump $16 Oil Pump $48 Seats $40 Coolant, Belts, Oil, Filters, Paint, Primer, JB Weld, Thermostat $85 Miscellany from my parts cars $0 Labor $0 + 2 bruised knuckles
Total out of pocket = $640 for a virtually new running Fiero.
Yeah, I'm good with that.
[This message has been edited by Toddster (edited 11-14-2020).]
todd next time i come buy i will get you a new egr tube and a egr cap cause your just a nice guy every time i see you. or when you come south to slo let me know and you can pick them up.
You da man! Hey, I may take you up on that SLO trip. I need to take the car out for a long drive and I might take a weekend off soon. Bewteen now and then however, I will be doing some upgrades!
OK, finished the test drives. I got a Code 22 and 13 so I replaced the TPS and O2 seonsor which fixed those problems and I swapped out the VSS because the speedo was reading inaccurately.
But I had to spend another $26 bringing the total cost to $666
Hmmm, red color, 666, torn-up fender...... I think I have my new name for this car,
You mean to tell me that out of all of those cars you didn't have one to drive?
When I saw this thread pop up again, I thought you found another "barn" car.
Tragic huh? But I sold off most of my Fieros and all I have left are non-running parts cars and fixers. So the Formula was first since it was the easiest to get operational again.


 :
: