Some have said the only differences between the 275HP VIN-Y (LD8 engine) and the 300HP VIN-9 (L37 engine) are the camshafts and the valve springs. I posted a photo earlier that shows the physical difference between the camshafts. Just for kicks, I compared the valve springs today. The VIN-Y springs are wound from 0.125" diameter wire, and have six-and-a-half 360-degree coils. The VIN-9 springs are made from 0.130" diameter wire, and have only six 360-degree coils.
Torsion increases with the 4th exponential to radius, and 6 turns makes for more torsion per displacement, which makes a higher spring constant.
Great build thread.
[This message has been edited by AP2k (edited 05-31-2007).]
Originally posted by AP2k: Torsion increases with the 4th exponential to radius, and 6 turns makes for more torsion per displacement, which makes a higher spring constant.
True. Some folks cannot understand that having fewer coils ... also as in suspension coil springs ... makes for a higher "spring rate."
quote
Originally posted by AP2k: Great build thread.
Thanks! For a while there, I was starting to think nobody was looking at this.
Picked up my heads & valves today from Dunkum's Machine Shop. I'm now ready to start smoothing the surfaces inside my intake & exhaust ports. But before I do that, I need to pull the 2.8 V6 & transaxle out of the kit car, and have it ready for another Pennock's poster to come get it. I may not be posting many photos within the next week ... maybe just before & after shots.
[This message has been edited by WAWUZAT (edited 05-31-2007).]
Originally posted by WAWUZAT: Thanks! For a while there, I was starting to think nobody was looking at this.
Rest assured that you've got an audience, most of us (myself included) just don't want to interrupt your flow of good documentation with our own chit chat.
Hey Will the lower case halve has NO bolt hole for the front mount. What year is that thing?
Haha, is this a quiz?
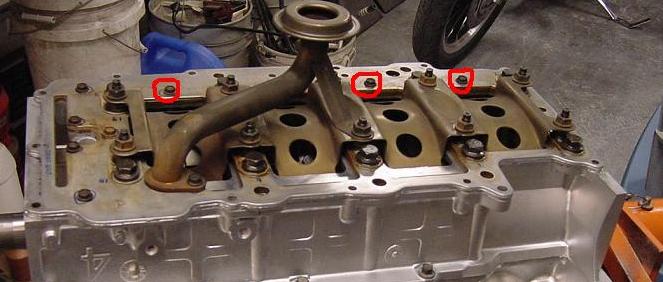
Not sure when but at some point they added a bunch of short bolts between the "oil manifold" and lower crank case to help seal the main bearing oil channel better.
Originally posted by Will:Not sure when but at some point they added a bunch of short bolts between the "oil manifold" and lower crank case to help seal the main bearing oil channel better.
Will - Are you talking about the row of bolts circled below?
Originally posted by Nashco: Rest assured that you've got an audience, most of us (myself included) just don't want to interrupt your flow of good documentation with our own chit chat. Bryce 88 GT
Thanks, Bryce !
Yesterday's weather was a lot better than today's forecast (remnants of tropical storm Barry blowing through today), so I spent a good part of yesterday outdoors. I accomplished nothing on the N* because I need to yank the 2.8L V6 out of the GT40. Got 'er up on stands, drained fluids, and started unhooking items from the engine ...
Today, I installed new primary timing gears, chain, guide block, tensioner, and a new Melling oil pump. In another post last year, I mentioned how I won an eBay auction for $1,100 worth of N* rebuild parts ... bearings, rings, gasket sets, timing gears, chains, guides, tensioners and oil pump. Though I was the high bidder, I had not met the seller's reserve price. I was totally shocked (and PLEASED) when the seller sent me a 2nd-chance offer the next day, and sold me all those parts for less than what the FelPro gaskets sets alone would've cost me.
EDIT TO ADD ... A little prevention can go a long way. I failed to mention above that there are a few small openings that could allow unwanted parts to drop down inside the bottom-end. This is not a good thing unless you actually enjoy fishing parts out of the Twilight Zone, or re-assembling parts over and over again gives you a thrill. A stuffed rag, or some tape as shown below, can prevent major aggravation
[This message has been edited by WAWUZAT (edited 06-09-2007).]
I picked up my N* valve covers today after having them sandblasted, but other than that, there's been no progress on that engine. Spent several evenings this past week disconnecting plumbing and electrical systems on the 2.8L, and got it yanked out this afternoon.
As I've always done with this V6, I pulled it out from the top.
It's now hanging on the hook in the garage, waiting to be picked up.
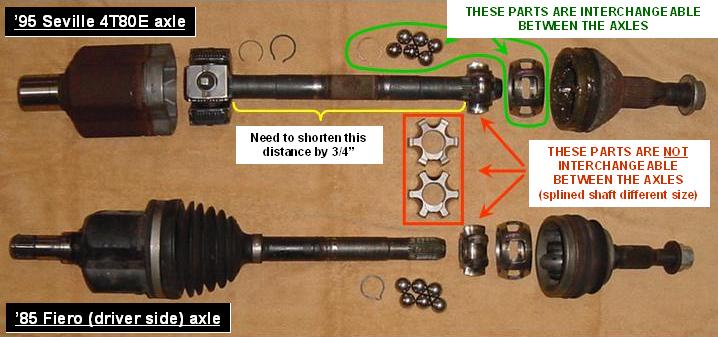
I haven't posted in awhile due to some other activities requiring my attention. The old V6 engine has been hauled away thanks to another member here. I need to get started on my cylinder heads, but got sidetracked to another portion of this swap ... axle shafts. I previously found info that said, "4t80e tripots, 4t80e axles shortened 3/4", fiero outers. Take the stock axles, move the snap ring grooves on each end 3/8" towards the center (away from the end) on a lathe, and lop off 3/8" off each end." Well, that's not entirely accurate.
I will use the 4T80E tripots and axle shafts with the Fiero outer CV joints, but moving the grooves 3/8" at each end will not work. There are two snap rings at the tripot end of the shaft, and you must move the exposed ring further onto the shaft first, then slide the 3-pointed spider further ONTO the shaft to gain access to remove a small wire retainer ring on the end of the shaft. Once the wire ring is removed, you can then slide the spider off the shaft. The problem is that you can really only move the tripot end grooves about 1/4" further onto the shaft so you'll have enough spline left over to move the spider and get to that wire ring. This is not a problem because the CV joint end of the shaft has enough spline that its ring groove can be moved 1/2" further onto the shaft.
After I disassembled the CV joints on both axles (Seville & Fiero), I found that the internals were interchangeable between them with one exception. The Fiero CV spider race will not fit the 4T80E axle shaft. So, I must use the spider race from the Seville's CV joint. Again, this is no problem. I wish the entire engine swap was as simple as this portion. All I need to do is visit my machinist buddy to have him turn the shafts to relocate the grooves, and shorten the ends.
The image below shows the two CJ joint spider races. The Seville is on top, and you may be able to see that its splined hole is a tad larger than the Fiero's.
[This message has been edited by WAWUZAT (edited 06-30-2007).]
I used 2 Beretta shafts ( I think the left side ), Fiero outer CV joints, 2 inner Tripods ( needle roller bearing type ) from a 4.5 or 4.9L caddy (that is the same size shaft as the Fiero), and two Tulips from a 4T80E with roller type bearings.
Originally posted by WAWUZAT: I previously found info that said, "4t80e tripots, 4t80e axles shortened 3/4", fiero outers. Take the stock axles, move the snap ring grooves on each end 3/8" towards the center (away from the end) on a lathe, and lop off 3/8" off each end." Well, that's not entirely accurate.
I will use the 4T80E tripots and axle shafts with the Fiero outer CV joints, but moving the grooves 3/8" at each end will not work. There are two snap rings at the tripot end of the shaft, and you must move the exposed ring further onto the shaft first, then slide the 3-pointed spider further ONTO the shaft to gain access to remove a small wire retainer ring on the end of the shaft. Once the wire ring is removed, you can then slide the spider off the shaft. The problem is that you can really only move the tripot end grooves about 1/4" further onto the shaft so you'll have enough spline left over to move the spider and get to that wire ring. This is not a problem because the CV joint end of the shaft has enough spline that its ring groove can be moved 1/2" further onto the shaft.
The first set of axles I had machined were supposed to be .75" shorter, but they ended up moving the snap ring grooves 0.300" in, and shortening the axles by 0.600". (I don't know how 3/8 became 3/10) They assembled just fine with no problems. After talking to Tim (Fiero STS), I decided not to chance it and have another set machined to the correct measurements. As I recall, Darrell Morse did the second set in trade for some parts. So if anyone knows the measurements exactly, it would be him.
Thanks for the update, Ryan. Methinks I'll wait until the first rough-fit of the drivetrain in the car before calculating how much to shorten them. At that time I can then pre-fit the axles, remove the coil springs, and cycle the suspension up and down and mark the axle shaft to indicate shortest/longest condition. With that info, I can then determine where to best position the rectangular roller bearings inside the tripots ... preferably midway in.
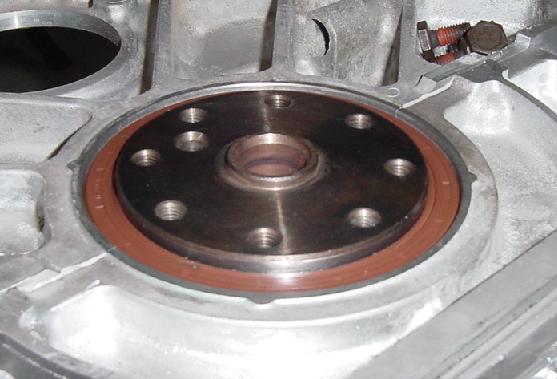
This latest task went too smoothly. Normally, I'd use a block of wood and a mallet to seat a shaft seal. While I did seat the front shaft seal using wood blocks, the blocks were used to prop up the timing cover, and I pressed the seal home using my drill press as an arbor press. To seat the rear shaft seal, I needed something that would allow the seal to be recessed below the surrounding surfaces. The seal is conveniently sized so a short length of 4" NPS PVC pipe (4-1/2" O.D.) fits perfect. I drilled a scrap piece of 3/8" x 3" steel, bought some bolts and washers at the local Ace Hardware, and installed the seal very easily. See photos below. And yes, I do realize one bolt is shorter than the others ... was all they had on hand in 8mm x 1.25mm pitch. And no, those 2" wide pieces of scrap steel would not fit between the bolts ... I could've made 'em fit, but didn't need to. I also double-checked the bolt lengths and stack height to ensure the bolts did not protrude through the crankshaft flange too far and damage the aluminum block.
And here's a shot of the new Felpro seal after being installed ...
------------------ "For those who understand, no explanation is necessary. For those who do not, no explanation is possible."
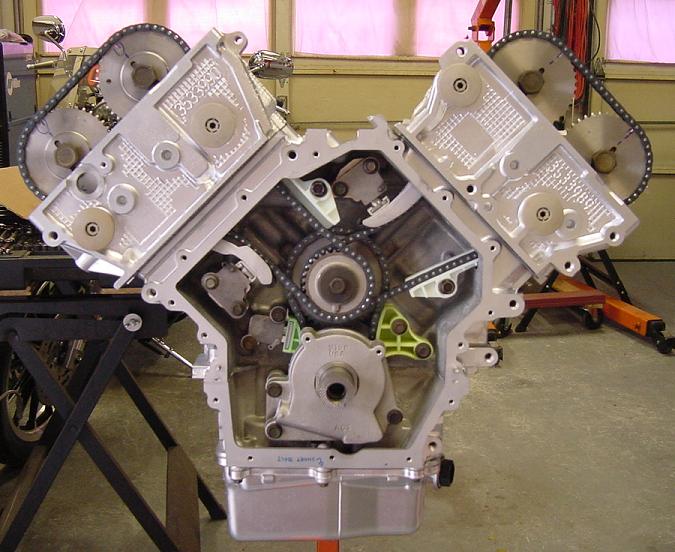
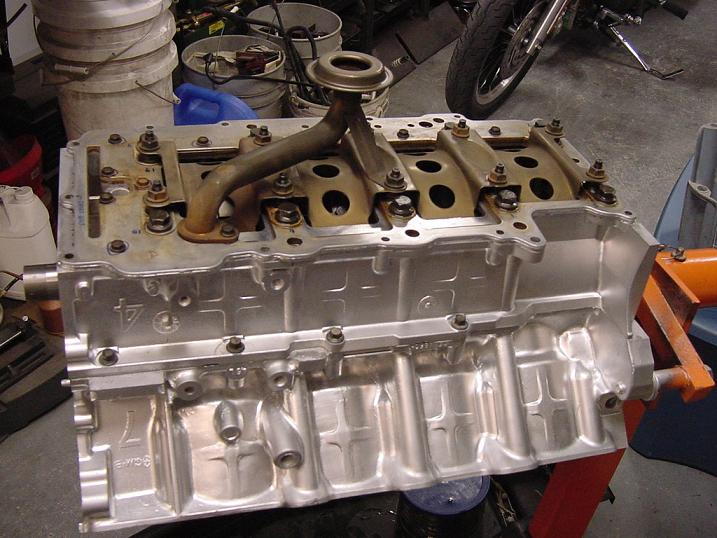
Spent 6 hours today going over the ports in ONE cylinder head. Other than putting a knife-edge on the bulkhead between each pair of intake runners, and getting the exhaust ports into a D-shape to match the CHRFab exhaust flange, my only goal was to remove casting flash. Intake port ...
------------------ "For those who understand, no explanation is necessary. For those who do not, no explanation is possible."
[This message has been edited by WAWUZAT (edited 07-08-2007).]
I've been sidetracked again. Since my last post, all I've accomplished is to final clean the heads, paint them, and install the valve seals. I used a Q-Tip to smear a small amount of grease on their insides, then drove them home by hand using a 12-point 17mm socket on a 1/2"-drive extension. I positioned them with square-end needle-nose pliers, then gently pushed them into place. I should have the valves, springs, retainers and keepers installed this weekend.
What got me sidetracked? I decided to sell my '06 Harley, and spent a few days removing all of the accessories I had on it. I'm glad I saved all of the OEM parts to put back on. Accessories don't add a penny to resale value, but I estimate (conservatively) that I can sell those parts for $1,500 to $2,000 on eBay after the bike is gone. I left the electrical accessories on the bike (auxiliary headlights, extra horn, and an electronic module that lights up the rear signals with the brake light) because their resale value doesn't seem to bring in much $$$. http://your3forfree.oodle.com/view/553358762/
------------------ "For those who understand, no explanation is necessary. For those who do not, no explanation is possible."
[This message has been edited by WAWUZAT (edited 07-18-2007).]
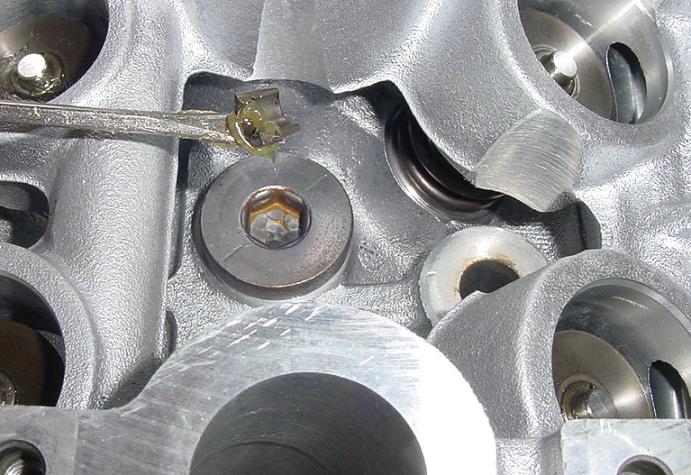
Beautiful weather today. Opened up the garage doors, let the light in, and the gentle wind blow through. Got lots done, too. First, I reinstalled all freshly ground intake and exhaust valves.
In order to position the little keepers AND have them stay in place on the valve stems, I employed a bit of grease. A small dab on the inside of each keeper allows it to "stick" to the valve stem, and another dab on a small screwdriver so I could position each one down in the holes where the retainers are located. Slowly ease off the spring compressor, and everything stays put.
Finished the valve installation early, so I continued with installing the heads on the block. I did buy one of those torque-degree indicator tools that AJ recommended on the first page of this thread, and it performed wonderfully. Hmmm ... that didn't take long either. So I went ahead with pre-lubing the followers and camshafts, and installed them, too.
Next step is to install the secondary timing chains, gears, guides and tensioners. Then I can button-up the front of the engine, and install the valve covers. ------------------ "For those who understand, no explanation is necessary. For those who do not, no explanation is possible."
[This message has been edited by WAWUZAT (edited 07-21-2007).]
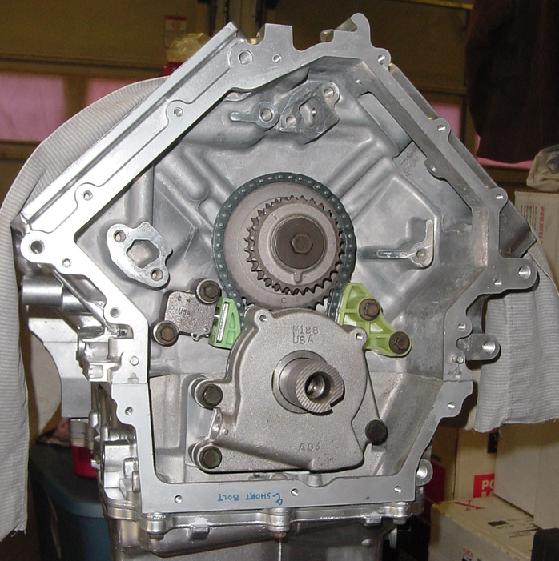
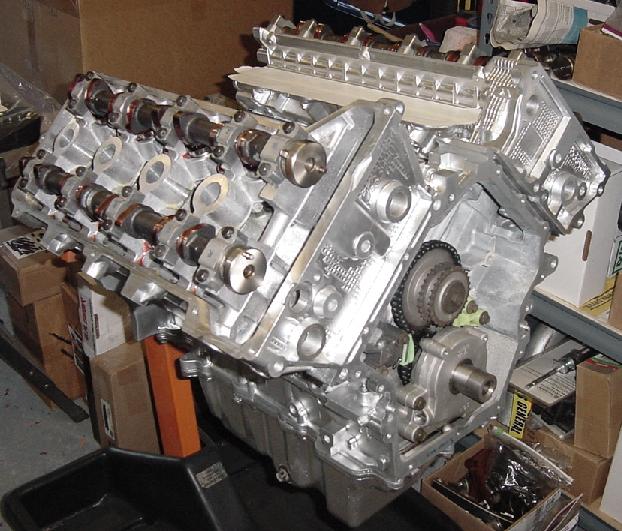
Another great day for getting work done. Warm, but not hot n' humid. Today, I installed all new secondary timing chains, sprockets, guides and tensioners. I'm glad I snapped a photo of the engine when I tore it down because one of the new sprockets was not marked exactly right. I pulled up the old photo and counted the links between TDC of each pair of sprockets. With that information, I was able to correct an "almost-mistake" ... I had the left exhaust cam out of synch by one tooth.
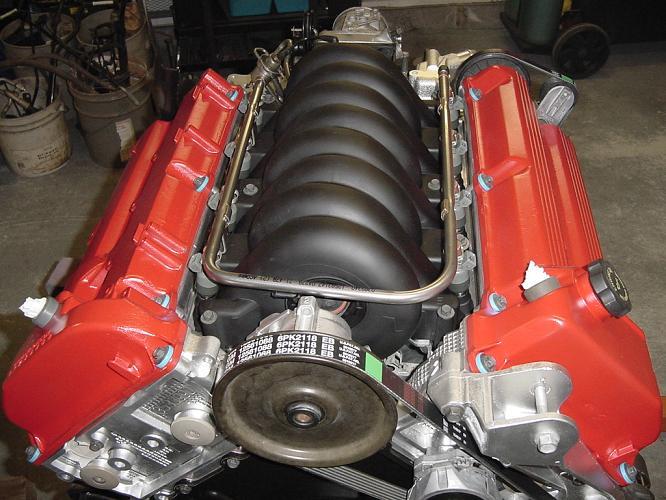
Then I installed the timing and valve covers using new seals and gaskets from a Fel-Pro kit.
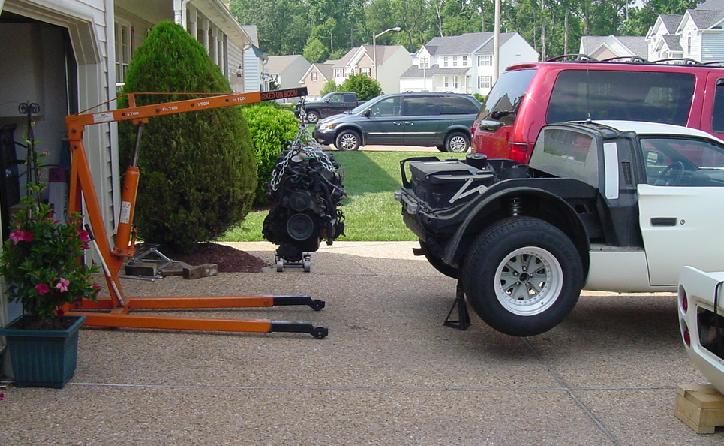
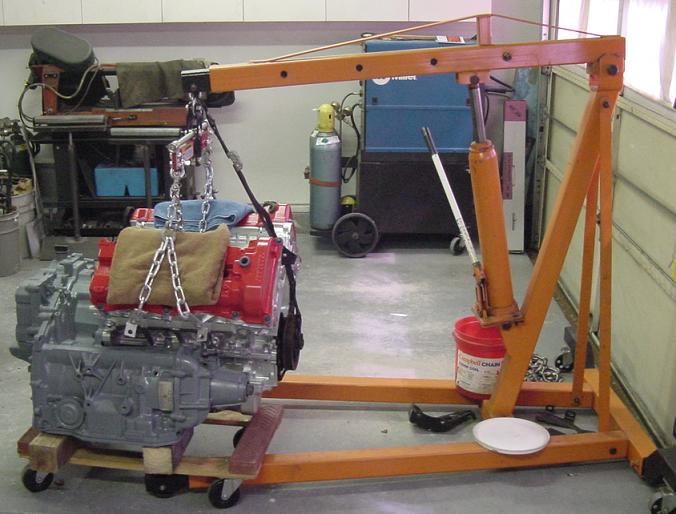
On Thursday, I picked up my 4T80E transaxle after it had been overhauled. I told the shop I was planning on painting it, but I guess their signals got crossed, and they painted it for me. It's not the color I would've used, but I like it anyway ... looks "industrial." I've got vacation time I need to burn, so I took off Friday so I could "work" (?) on my project. Here it sits on the dolly with a GM-rebuilt torque converter sitting in it waiting for making a reacquaintance with the Northstar.
And here's the Northstar getting ready to leave the engine stand for the last time (I hope) ...
Together again ...
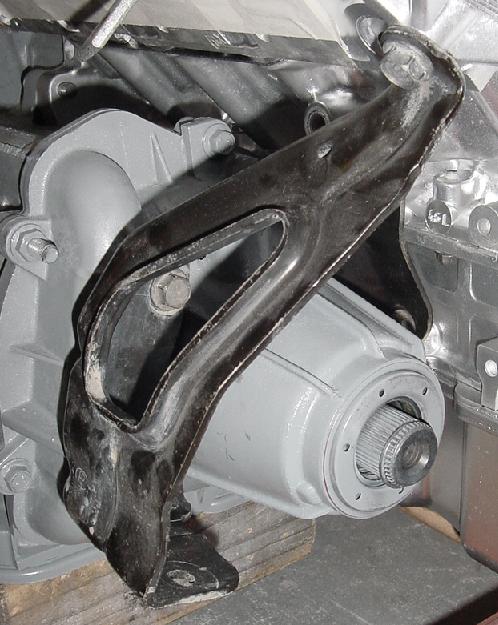
After tightening the bellhousing bolts, the first of two engine-to-tranny brackets is installed ...
And the second one is installed ... this one hasn't been cleaned up because I anticipate modifying it when it comes time to fabricate motor mounts.
The next step was to position the assembly high enough, and safely, in order to do a little work from beneath. These little sawhorses are rated at 750lbs each, and provide enough room for me to bolt the torque converter to the flexplate. I also installed the sheet metal shield and another engine-to-tranny bracket from underneath.
[This message has been edited by WAWUZAT (edited 08-19-2007).]
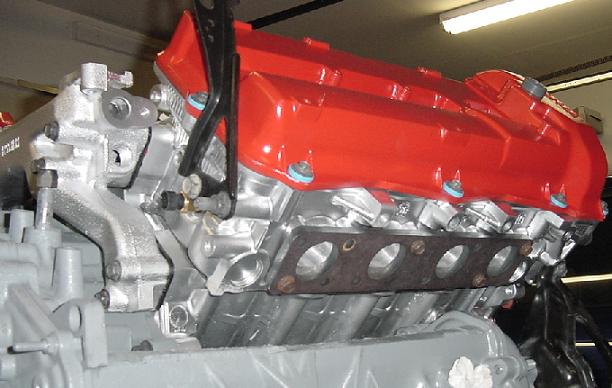
Today, I installed some external items. Many new parts installed such as the water pump, water pump belt tensioner, water pump belt, thermostat, water temperature sensor, and all new gaskets and seals. Also installed new main belt idler and tensioner pulleys. The "main belt" is located at the front of the engine (passenger side), and the "water pump belt" is located on the driver-side end of the intake camshaft on the front-head.
Here's a shot showing a CHRFab header flange I'll use to make my exhaust manifolds. I could've made these flanges, but for the price CHRFab charges, it was worth buying them versus making them.
Originally posted by ryan.hess:Tell me you are not using a 4t80e in the fiero with a stock converter.
Yeah. Why shouldn't I? I gave some thought to a higher stall TC, but decided against it. I'm not looking for any more performance than was available from the stock combination. Besides, the GM-rebuilt TC was only $100 plus $60 shipping via eBay.
quote
Originally posted by ryan.hess:How much were the flanges?
I think they were around $90 for the pair. NC laser-cut 3/8" thick steel. I could've made 'em, but by the time I layed out the holes and drilled them, the $90 looked like a bargain ... and I would've drilled both flanges at the same time.
EDIT: Sorry ... not NC laser-cut, but NC plasma-arc cut
[This message has been edited by WAWUZAT (edited 07-29-2007).]
I wish I had installed a higher stall converter when it was all apart.... The yank 3000 gives you practically the same feel as stock supposedly. Right now I've got a stock VIN y converter, and 255's in the rear, and there's no chance of tire slip on all but the iciest road.
Originally posted by Will:How are you planning on handling the front bank exhaust.
I intend to run the exhaust similar to the 2.8L V6 engine. Both manifolds will exit to the driver-side ... front bank will have a 180* turn & the rear bank will crossover to the forward side ... then both will dump into a two-in/two-out catalytic converter ... the cat will be positioned close to where the V6 cat was ... then it gets interesting. Since I raised the engine cradle higher in the chassis a few years back, I have 2-1/2" ground clearance beneath it that the rest of the car doesn't have. I plan on fabricating some rectangular exhaust tubes (like you see on Cup cars) to get from the cat to the muffler, and the fun part will be making the transitions from round to square.
I looked at the Spintech website, but could not find any oval or rectangular tubing. I't just as well since I'll have to fabricate my own anyway because I'll need to have the rectangular tube make a turn/bend.
All I've gotten done this week is to get the intake manifold, fuel rail, and throttle body installed. I did not like the Fel-Pro intake gaskets too much, and used "clip-on" GM gaskets. I also used a GM "seal kit" to rebuild the fuel rail ... included all the O-rings, the little metal retainer clips, parts to rebuild the pressure regulator, and the short vacuum tube with rubber ends. If those of you that are familiar with the Northstar will look close at my intake manifold, you may be able to figure out why this took me an entire week.
[This message has been edited by WAWUZAT (edited 08-05-2007).]
For oval tubing go to www.spintechmufflers.com then click on accessories and then select oval tubing from the pull down menu. If you go into the products directory instead of the accessories then click on street performance and then click on the oval sportsman street type muffler for the oval muffler selection. They have pictures as well.
That looks like a 95 throttle body. Won't work with the Holley 950.
By the way, nice work on the manifold. I still have those stupid clips. I had a practice manifold to try to remove them, and decided it would be too much work after getting 1 done. It looks good though. Did you spray paint it to remove the traces of white fiberglass?
[This message has been edited by ryan.hess (edited 08-05-2007).]
Zac -- Thanks! I found it that time. Their tubing doesn't get as "flat" as I will need. Also, their transition pieces look like all they did was flatten one end of a round elbow. The flattened end will not flow as much as the round end ... a round and an oval sharing the same perimiter will have different areas, which means different volumes passing through it.
Ryan -- What? I don't recall reading that anywhere. Of course, I could've gleaned right past it. Which throttle body should I have? I have not yet tried connecting any of the CHRFab 950 harness to my engine. I have checked some connections, particularly at the coil pack, but I have not checked them all to see if they fit. And yes, it took me about 10 hours to cut, grind, and sand all those clips off. I thought I was going to burn up my Dremel tool. I did spray paint it ... tried some of that Krylon Fusion in flat black paint for plastics.
[This message has been edited by WAWUZAT (edited 08-05-2007).]
Originally posted by WAWUZAT: Ryan -- What? I don't recall reading that anywhere. Of course, I could've gleaned right past it. Which throttle body should I have? I have not yet tried connecting any of the CHRFab 950 harness to my engine. I have checked some connections, particularly at the coil pack, but I have not checked them all to see if they fit. And yes, it took me about 10 hours to cut, grind, and sand all those clips off. I thought I was going to burn up my Dremel tool. I did spray paint it ... tried some of that Krylon Fusion in flat black paint for plastics.
Yeah, the 95 has a throttle kicker motor instead of an IAC. You want a 96-99 that looks like this:
Note it doesn't have a lip for an intake attachment. The MAF bolts to the throttle body, and that's what the intake tubing attaches to. You can use a gutted out MAF or build a flange/pipe piece that bolts to the TB.
I also didn't realize the Holley setup needed the later throttle body, I got a Holley 950 setup used. I guess I'll have to swing by the junkyard and pick one up when I get to that point; I noticed they didn't have the typical GM stepper motor on the '95 SLS engine I got, which will actually work out a bit easier when I go to Megasquirt.
What are you planning on using to control the trans? I see that you're using the 4T80E and want to use a Holley setup...???
Bryce
[This message has been edited by Nashco (edited 08-06-2007).]
Originally posted by ryan.hess: Yeah, the 95 has a throttle kicker motor instead of an IAC. You want a 96-99 that ...
Ryan -- Sure enough! My CHRFab 950 Commander wiring harness will not fit the "kicker motor" connection. I went back through my literature, and I could not find any text that says I must use a '96 - '99 throttle body. Even CHRFab's website says, "The tuning power of the Holley Commander 950 has just jumped to the next level. The PRO software is available now. This is our most popular engine management system with over 260 units currently installed on Northstar engines ('93-'99)." ... without any mention of needing to run a later-model TB. I found and purchased one on eBay, and it should be here early next week. Now I'll have two '95 throttle bodies to get rid of later on, plus a NIB GM "kicker motor" ... plus an extra set of heads, VIN-Y camshafts, an intake manifold, fuel injectors, and a few other parts I'm sitting on until after the engine is running.
Nashco -- Thanks for the link, but again, the tubing they offer isn't quite flat enough for my needs. I'll make my own from 16ga. sheet metal which will probably be only 1-1/2" high by about 4" wide.
[This message has been edited by WAWUZAT (edited 08-08-2007).]