Pennock's Fiero Forum
  The Construction Zone
  Northstar swap, Grin Reaper style (56k warning (Page 4)

Post New Topic  Post A Reply
Email This Page to Someone! | Printable Version

This topic is 4 pages long:  1   2   3   4 
Previous Page | Next Page
next newest topic | next oldest topic
Northstar swap, Grin Reaper style (56k warning by motoracer838
Started on: 02-13-2007 11:03 PM
Replies: 152 (13503 views)
Last post by: motoracer838 on 05-29-2018 07:54 PM
motoracer838
Member
Posts: 3751
From: Edgewater Co. USofA
Registered: Jan 2006


Feedback score: (2)
Leave feedback


Total ratings: 83
Rate this member

Report this Post02-28-2014 12:27 PM Click Here to See the Profile for motoracer838Send a Private Message to motoracer838Edit/Delete MessageReply w/QuoteDirect Link to This Post
 
quote
Originally posted by Diamond Dave:

Oops. Sorry Joe didn't mean to step on your toes. I see now your back on the build. I have just found your build and read through it twice. I am eager to hear great news about your build as this what I would like to do with my Enterra. Again sorry I spoke out of turn. Just excited to finally see aa build and what's ahead for me with mine.


No problem, it will still be a bit before I really get back to it, between upcoming surgery for a torn rotator cuff and another project sitting in the shop, it has to wait it's turn.

When I do get back to it, the project has changed a bit, lucky me, I stopped working on it at the perfect spot to acomodate the upcoming mods. look here to see where this is going.
//www.fiero.nl/forum/F...1/HTML/091128-6.html

Joe
IP: Logged
Diamond Dave
Member
Posts: 81
From:
Registered: Feb 2014


Feedback score: N/A
Leave feedback

User Banned

Report this Post03-03-2014 12:39 PM Click Here to See the Profile for Diamond DaveSend a Private Message to Diamond DaveEdit/Delete MessageReply w/QuoteDirect Link to This Post
Oops. Sorry Joe didn't mean to step on your toes. I see now your back on the build. I have just found your build and read through it twice. I am eager to hear great news about your build as this what I would like to do with my Enterra. Again sorry I spoke out of turn. Just excited to finally see aa build and what's ahead for me with mine.

------------------
Diamond Dave

84 Enterra the only one
88 Formula

IP: Logged
motoracer838
Member
Posts: 3751
From: Edgewater Co. USofA
Registered: Jan 2006


Feedback score: (2)
Leave feedback


Total ratings: 83
Rate this member

Report this Post02-20-2016 12:43 PM Click Here to See the Profile for motoracer838Send a Private Message to motoracer838Edit/Delete MessageReply w/QuoteDirect Link to This Post
Back from the dead... I'm having a hard time realizing it's been nearly 9 years since I stopped working on this , it was soo bad that I stopped bumping the thread until I had real news on the project. That time is now...

Pulled the car into the shop a couple of days ago, and promptly started looking for "lost" parts, have done better than I thought I would in finding stuff. (lesson learned, keep everything grouped together, labeled and documented ) Still missing a few minor parts, nothing that would be a "show stopper".

The next headache is figuring out what I was doing when I stopped and what I want to change. I had thought about using this car as the base for my 288 GTO project //www.fiero.nl/forum/Forum1/HTML/096417.html, but decided that I would be undoing a lot of work I've already done. About the only real change I see at this point is the operating system for the engine, I currently have one of Ryan Hess's chips for the 7730 ecm, from what I've seen over the years, I think now is the time to step up to the LS1 pcm with a modified Shelby series 1 file, since wiring is one of the big things left on the project.

Also using the car to test fit some of my concepts for the Fauxrrari build, first up is the dash, a couple of months I purchased a C6 Corvette dash, the width is on the money as well as the steering column placement, did a test fit last night, there will be a lot of trimming on the front edge, but it looks like it will go.

Cheers Beers n Gearz, Joe

IP: Logged
motoracer838
Member
Posts: 3751
From: Edgewater Co. USofA
Registered: Jan 2006


Feedback score: (2)
Leave feedback


Total ratings: 83
Rate this member

Report this Post04-09-2016 11:21 AM Click Here to See the Profile for motoracer838Send a Private Message to motoracer838Edit/Delete MessageReply w/QuoteDirect Link to This Post
Ugh, just ordered over a $1,000 in parts and now working massive overtime, at least when the rush is over I'll be able to get back to it... (Once I'm rested from the OT.)

Joe
IP: Logged
motoracer838
Member
Posts: 3751
From: Edgewater Co. USofA
Registered: Jan 2006


Feedback score: (2)
Leave feedback


Total ratings: 83
Rate this member

Report this Post04-22-2016 11:23 AM Click Here to See the Profile for motoracer838Send a Private Message to motoracer838Edit/Delete MessageReply w/QuoteDirect Link to This Post
Score, just picked up a low mile F23 for $150... I had been debating what to do about the 282 that came out of my '87 GT, it had lots of miles and needed syncro's. Even with the time off to pick it up, it cost less than having the 282 rebuilt and it's an upgrade.

Cheers Beers n Gearz. Joe
IP: Logged
motoracer838
Member
Posts: 3751
From: Edgewater Co. USofA
Registered: Jan 2006


Feedback score: (2)
Leave feedback


Total ratings: 83
Rate this member

Report this Post04-22-2016 10:24 PM Click Here to See the Profile for motoracer838Send a Private Message to motoracer838Edit/Delete MessageReply w/QuoteDirect Link to This Post

motoracer838

3751 posts
Member since Jan 2006
 
quote
Originally posted by motoracer838:

Score, just picked up a low mile F23 for $150... I had been debating what to do about the 282 that came out of my '87 GT, it had lots of miles and needed syncro's. Even with the time off to pick it up, it cost less than having the 282 rebuilt and it's an upgrade.

Cheers Beers n Gearz. Joe


Ugh, there might be a possibility that the passenger side tripot will interfere with a spot on the engine block / oil pan, wont know until I have a chance to try to mock up the parts.

Not a happy camper. Joe
IP: Logged
motoracer838
Member
Posts: 3751
From: Edgewater Co. USofA
Registered: Jan 2006


Feedback score: (2)
Leave feedback


Total ratings: 83
Rate this member

Report this Post04-23-2016 08:21 AM Click Here to See the Profile for motoracer838Send a Private Message to motoracer838Edit/Delete MessageReply w/QuoteDirect Link to This Post
Question, are there any applications of the F23 that run an intermediate shaft on the passenger side?

Joe
IP: Logged
Lunatic
Member
Posts: 313
From: Canada, Where the maple syrup is.
Registered: Sep 2013


Feedback score: N/A
Leave feedback

Rate this member

Report this Post04-24-2016 04:31 AM Click Here to See the Profile for LunaticSend a Private Message to LunaticEdit/Delete MessageReply w/QuoteDirect Link to This Post
 
quote
Originally posted by motoracer838:

Question, are there any applications of the F23 that run an intermediate shaft on the passenger side?

Joe


Hey Joe.

I know a guy that has the Northstar/F23 combo in his car. He doesn't use a jack shaft but rather the stock Fiero axles on both sides. He did mention that there is a little boss/casting on the engine block that had to get shaved a little. He also used a silicone-type CV boot that was thinner then the original.
FYI, most of the 3.1L cars with the 282 Getrag had intermediate shafts. So with some work, you could adapt one of those.

Shayne
IP: Logged
motoracer838
Member
Posts: 3751
From: Edgewater Co. USofA
Registered: Jan 2006


Feedback score: (2)
Leave feedback


Total ratings: 83
Rate this member

Report this Post04-24-2016 10:33 AM Click Here to See the Profile for motoracer838Send a Private Message to motoracer838Edit/Delete MessageReply w/QuoteDirect Link to This Post
 
quote
Originally posted by Lunatic:
Hey Joe.

I know a guy that has the Northstar/F23 combo in his car. He doesn't use a jack shaft but rather the stock Fiero axles on both sides. He did mention that there is a little boss/casting on the engine block that had to get shaved a little. He also used a silicone-type CV boot that was thinner then the original.
FYI, most of the 3.1L cars with the 282 Getrag had intermediate shafts. So with some work, you could adapt one of those.

Shayne


Shayne, thanks for the info, I was starting to wonder if anybody else had tried to do a Northstar F23 swap. That boss you mentioned is definantly in the way, I think it can be trimmed, even trimmed, I doubt the rubber cv boot will clear. Do you know more about the silicone boot? Also how does the guy with the Northstar like the F23?

I may still go with an intermediate shaft, with the axle being that much closer to the block, mods will be needed to the "rear" engine mount. I can see incorporating the shaft support and engine mount in one piece, I've never liked how that mount turned out anyway, and I like the idea of a short driveshaft for the passenger side.

I see what you did to save the pics on the F23 tutorial thread, you get a + from me.

Joe
IP: Logged
RCR
Member
Posts: 4397
From: Shelby Twp Mi
Registered: Sep 2002


Feedback score:    (7)
Leave feedback


Total ratings: 102
Rate this member

Report this Post04-24-2016 03:27 PM Click Here to See the Profile for RCRSend a Private Message to RCREdit/Delete MessageReply w/QuoteDirect Link to This Post
F23 and N* is a combination I was considering. WAY in the future, but still considering.

Bob
IP: Logged
motoracer838
Member
Posts: 3751
From: Edgewater Co. USofA
Registered: Jan 2006


Feedback score: (2)
Leave feedback


Total ratings: 83
Rate this member

Report this Post04-24-2016 06:12 PM Click Here to See the Profile for motoracer838Send a Private Message to motoracer838Edit/Delete MessageReply w/QuoteDirect Link to This Post
 
quote
Originally posted by RCR:

F23 and N* is a combination I was considering. WAY in the future, but still considering.

Bob


The last couple of days have been "interesting"... (one moment up for scoring the trans soo cheap, then down when I saw there was a problem ) following Shayne's info I went to the local Pick your part yard, didn't find anything with a 3.1 and 5 speed. Did find a bunch of Saturn's with a 5 speed I'm not familiar with, that had an intermediate shaft, and latter ones with the F23 and a long axle.

I took the time to take the long axle from one so I could test fit the intermediate shaft from another, (yeah, that was a bunch of work) the results were a success, I have an intermediate shaft that fit's the F23 and has a smaller diameter tripot joint, still need to see where I wind up with the cv shaft, but that's easy.

Now that work is returning to "normal" for a while, I expect to get back to making progress on this one with an eye towards getting it up and running by mid summer, hopefully I can get started on the Fauxrrari this fall.

Cheers beers n gearz. Joe

[This message has been edited by motoracer838 (edited 04-24-2016).]

IP: Logged
PFF
System Bot
motoracer838
Member
Posts: 3751
From: Edgewater Co. USofA
Registered: Jan 2006


Feedback score: (2)
Leave feedback


Total ratings: 83
Rate this member

Report this Post04-24-2016 07:38 PM Click Here to See the Profile for motoracer838Send a Private Message to motoracer838Edit/Delete MessageReply w/QuoteDirect Link to This Post

motoracer838

3751 posts
Member since Jan 2006
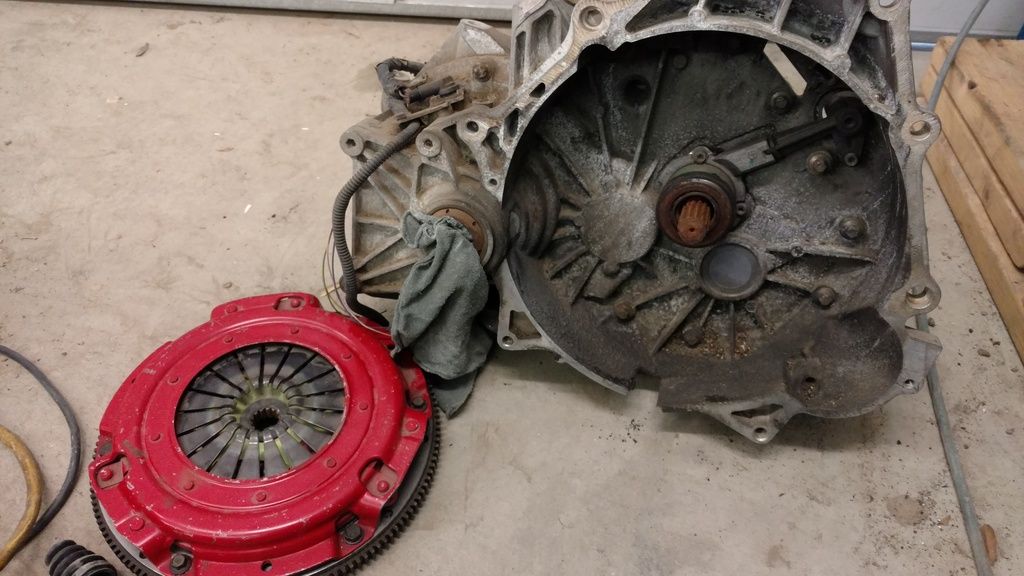
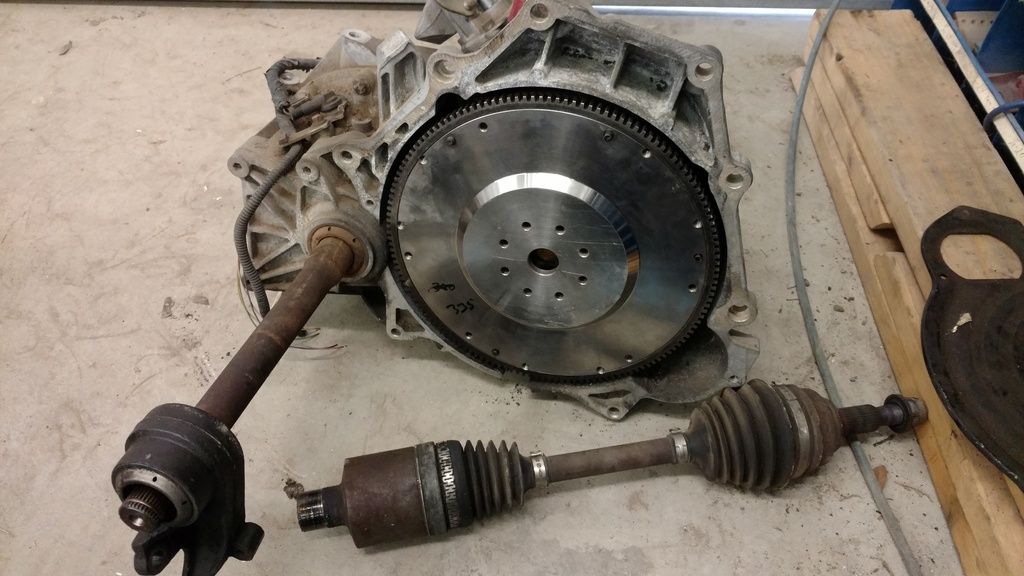
Ok, what everybody's waiting for, pics...


The F23 and the flywheel/clutch assembly from Cadillac Hot Rod Fabricators


With flywheel/clutch and intermediate shaft in place. The CHRF flywheel/clutch package was meant for rwd applications and is about .200 thou too tall, I was going to make a .250 thick spacer plate to go between the 282 and the Northstar. the pressure plate from CHRF is soo big it interferes with the bulge in the F23 case where the diferential sits, soo I have to pull the clutch out a bit.

The spacer plate will wind up being .500 thick and then I can space the htob out to get proper engagement, the spacer will also help me fix the difference in the lower "rear" bolt hole. (the Northstar uses a modified metric pattern, the lower rear is not in the same place.)

Joe
IP: Logged
Lunatic
Member
Posts: 313
From: Canada, Where the maple syrup is.
Registered: Sep 2013


Feedback score: N/A
Leave feedback

Rate this member

Report this Post04-25-2016 06:00 AM Click Here to See the Profile for LunaticSend a Private Message to LunaticEdit/Delete MessageReply w/QuoteDirect Link to This Post
 
quote
Originally posted by motoracer838:


Shayne, thanks for the info, I was starting to wonder if anybody else had tried to do a Northstar F23 swap. That boss you mentioned is definantly in the way, I think it can be trimmed, even trimmed, I doubt the rubber cv boot will clear. Do you know more about the silicone boot? Also how does the guy with the Northstar like the F23?

I may still go with an intermediate shaft, with the axle being that much closer to the block, mods will be needed to the "rear" engine mount. I can see incorporating the shaft support and engine mount in one piece, I've never liked how that mount turned out anyway, and I like the idea of a short driveshaft for the passenger side.

I see what you did to save the pics on the F23 tutorial thread, you get a + from me.

Joe


Hey Joe.

I'm glad you're working on the car again! As for the silicone CV boot, I just emailed him asking for specifics, part number, etc. Lets see if he kept detailed notes. I will post back after I hear from him as this is good information for all Northstar/F23 owners.
He loves the F23 as it shifts so much nicer then the stock Fiero unit. He didn't like the 3.94 final drive gearing as he found it made the Northstar rev higher than he'd like. This was made better by finding an F23 from 2009/2010 Cobalt as it had the slightly better 3.63 gearing, factory option FY1. Just swap the bellhousing, it's that easy.

Shayne
IP: Logged
Lunatic
Member
Posts: 313
From: Canada, Where the maple syrup is.
Registered: Sep 2013


Feedback score: N/A
Leave feedback

Rate this member

Report this Post04-25-2016 06:02 AM Click Here to See the Profile for LunaticSend a Private Message to LunaticEdit/Delete MessageReply w/QuoteDirect Link to This Post

Lunatic

313 posts
Member since Sep 2013
 
quote
Originally posted by RCR:

F23 and N* is a combination I was considering. WAY in the future, but still considering.

Bob


Hello Bob.

I have a spare Northstar/F23 combo sitting here. You're not too far away from me....
IP: Logged
Lunatic
Member
Posts: 313
From: Canada, Where the maple syrup is.
Registered: Sep 2013


Feedback score: N/A
Leave feedback

Rate this member

Report this Post04-25-2016 06:08 AM Click Here to See the Profile for LunaticSend a Private Message to LunaticEdit/Delete MessageReply w/QuoteDirect Link to This Post

Lunatic

313 posts
Member since Sep 2013
Hello again Joe.

I'm going to dump some information in this reply as it's Northstar/F23 related. If you think it's too much, let me know and I'll remove it.

I've decided to add some information to those interested in mating the Northstar to a F23 transaxle.

Notes;
1a) The Northstar has one mounting flange hole (on the bellhousing) offset to clear the 4T80-E transaxle. Therefore we will need to clearance the block for a bracket.
1b) The Getrag F23 will physically bolt to the Northstar. Although the F23 is secured to the block with six bolts while attached to the 2200 SFI or 3800 engines, on the Northstar we will use four for sure. There is a possibility to use the 5th hole and I'll show this later on.
2) Stock Fiero axles fit right in, no modifications are necessary.
3) The Northstar is neutrally balanced. Therefore we need a flywheel that is also neutrally balanced. With some minor machining, you can use the one that came from the 2000-02 Sunfire or Cavalier. The part number for this flywheel is: 14018712. If you Google that number, you'll see it was used in many applications.
4) Fiero clutch and pressure plate can be used.
5) Transaxle mounts. You'll have to fab up some mounts as the F23 doesn't really line up with anything on the Fiero cradle. I'm working on something.
6) Flywheel bolts. The Northstar flexplate bolts are too short to use on the manual flywheel. You'll need to find something suitable. Whatever you end up using, use Loctite and torque to the manufacture's specification. FYI: Make sure the bolts used aren't too long or they'll hit the rear bearing and either damage it, or cause the crank not to turn. The maximum length they should protrude from the flywheel is .530" The holes in the crankshaft flange are M8x1.25
7) Despite what others think, you can use the stock Fiero clutch master cylinder. But there is a catch; you'll have to make sure to measure the travel and see if you need a spacer or not.

I'll be using a Gen 1 (93-99) Northstar block and F23 from a 2000-02 Cavalier or Sunfire with the 2200 SFI engine for my tutorial.

Here's the dirty F23 and Northstar somewhat bolted together.


In this photo, we can use the bottom left and top left bolt holes. The middle one is not tapped and there isn't enough material to do so safely. We'll leave it alone. You can also see there is ample clearance on the left side for the water log.


On the right side, this is the hole that doesn't line up. We'll take care of that later on.


That bolt hole isn't used, although it can be. I'll show that later on as well. You can see the F23 has a casting that interferes with the water log and must get removed.


Using a hack saw, remove the offending area. It only takes a minute.


Then I chose to use a sanding disk and clean up the area a little.


The water log on the right now clears.


Now we have the filler cap to deal with. It hits the water log! This means you'll have to remove the water log to fill the trans, or fill the trans then install it onto the engine. This is nowhere near ideal.


Two simple 45° elbows (not shown) will remedy this by offsetting the filler away from the water log.


Another tight spot is the right tulip. The boss on the block is in close proximity to the axle. While it does turn, I don't have the CV boot on. The boot may foul if in place. Grinding the boss looks like it'll have enough room to clear the boot. Doing it this way should work and avoid having to use a jack shaft.


Starter clearance: As we know, the Northstar has its starter in the "V" under the intake manifold. We must clearance the inside of the F23 for the starter. Using my technique with a grinder and used (therefore smaller diameter) abrasive wheel, one can make a nice looking cut.


You'll need to go in at least 1 5/8".


Your cut should like this.


The camera gives the illusion that the left side of my cut isn't enough; it is.


If your cut looked like mine, then your starter will fit.


Now the flywheel, which needs some machining. This is the one from the 2200. It has the right ring gear diameter to work with the Northstar starter. The seven holes will need to be plugged. Either machine some pins and press them in or tap and thread in some set screws. Use high strength Locktite if tapping. After the holes are filled, one must drill new holes to match the flange of the Northstar. The pattern is 8 on 78mm. The holes should clear the 8mm bolts and be around 8.2mm; a 21/64" drill bit should be good. After that, machine off the rear flange of the flywheel. It's around 0.060" thick and needs to be removed. This is because the Northstar crankshaft is larger in diameter and needs a larger base. After the material has been removed, use the spacer that came on top of the Northstar flexplate and place it between the flywheel and crankshaft. This plate is around the same thickness as the material that has been removed. Now we need a bushing made to center the flywheel onto the crankshaft. Make it a press fit into the flywheel and the inner diameter should match that of the Northstar crank.


Here's the bushing that's needed to center the flywheel onto the Northstar crank.
Note: I say "my application" below. Measure "your" Northstar crank lip and flywheel ID to get the proper measurements.
Dimensions:
The inner diameter (in my application) was: 1.102"
The outer diameter (in my application) was: 1.263"
The overall length (in my application) was: .356"


Here's a metric layout of the bolt circle, for the flywheel, that's needed when using a mill with a DRO (digital read out).


If one had access to CNC equipment, making a flywheel would be easy. Here's a few quick drawings of what it would look like.


Oh yeah, the ring gear!


If designing your own flywheel, you can pick up an aftermarket ring gear as seen below. Using the flywheel shown, it'll work with your existing starter. These are fairly inexpensive at around $40.
This ring gear is installed as a "shrink fit". Meaning one will heat the ring gear to expand it, then quickly install it onto the flywheel. As it cools, it shrinks into place. If I was going this route, I'd machine the mating surface on the flywheel around .020" bigger than the inner diameter of the ring gear. I'd say 0.002" per every 1 inch of ring gear would be an interference fit. Therefore a 10" ring gear should have 0.020" of interference. Steel expands when heated. So, for every 100° in temperature rise, you gain 0.006" of ring gear expansion. Therefore at 400°, you should be around 0.024" of expansion. I'd also place the flywheel in the freezer for a day too.
Some specs:
-Pioneer part number: FRG 142W
-Outer diameter: 11.910"
-Inner diameter: 11.088"
-Pitch 12
-Width: .453"


Addressing the mount that doesn't line up.
As seen in this photo, one can see the mount that doesn't line up.
Note: The centerline of these bolt holes is 1.0625" apart or 1 1/16".


That's okay, this is an easy fix. I used a piece of 1" round stock. Coincidentally, it had the perfect inner diameter of 1/2", which is what we need.
Note: The length of my tube was .970" (thickness of the flange) + .240" (thickness of the material) = 1.210" long.


I chose to slip a bolt through the tube that I just cut and used that to scribe a line.


As seen here, this is what you need to remove from the block.


Take your time here with the die grinder and you can make it look factory.


I also added a fillet to clear the weld.


Checking the fitment.Looks nice and like it belongs.


Oh yeah, here's the mounting lug adapter that we're making.


Here's the piece that was laser cut out of 1/4" mild steel.


Here's what it'll look like after I attach it to the tube that I cut earlier.


After TIG welding the two components, I now have this mounting lug assembly.


And lets install it.


Now for the fastener lengths. These are M12 x 1.75
Hole A = 45 mm
Hole B = Not used
Hole C = 45 mm
Hole D = 45 mm
Hole E = Not used
Hole F Upper = 30 mm
Hole F Lower = 55 mm

[This message has been edited by Lunatic (edited 02-07-2017).]

IP: Logged
motoracer838
Member
Posts: 3751
From: Edgewater Co. USofA
Registered: Jan 2006


Feedback score: (2)
Leave feedback


Total ratings: 83
Rate this member

Report this Post04-25-2016 02:31 PM Click Here to See the Profile for motoracer838Send a Private Message to motoracer838Edit/Delete MessageReply w/QuoteDirect Link to This Post
Shane, excellent write up, some of the best Northstar swap info, I've seen, should be a great help to anybody else that might want to go this route. Probably should drop this in the F23 tutorial thread as well.

For me, if I were to start a swap today, I would go LS, the big reason I'm not on this one is that I'm too deep in parts to back up now. The Fauxrrari project on the other hand is getting a longitudinal LS1 with a Porsche Boxster s 6 speed transaxle.

Joe

[This message has been edited by motoracer838 (edited 05-01-2016).]

IP: Logged
motoracer838
Member
Posts: 3751
From: Edgewater Co. USofA
Registered: Jan 2006


Feedback score: (2)
Leave feedback


Total ratings: 83
Rate this member

Report this Post07-04-2016 10:06 PM Click Here to See the Profile for motoracer838Send a Private Message to motoracer838Edit/Delete MessageReply w/QuoteDirect Link to This Post
Figuers, I finally get this car back into the workshop and my work got crazy , I swear this car will run again. (it's the only way it leaves the shop...)

Joe
IP: Logged
motoracer838
Member
Posts: 3751
From: Edgewater Co. USofA
Registered: Jan 2006


Feedback score: (2)
Leave feedback


Total ratings: 83
Rate this member

Report this Post02-26-2018 06:46 PM Click Here to See the Profile for motoracer838Send a Private Message to motoracer838Edit/Delete MessageReply w/QuoteDirect Link to This Post
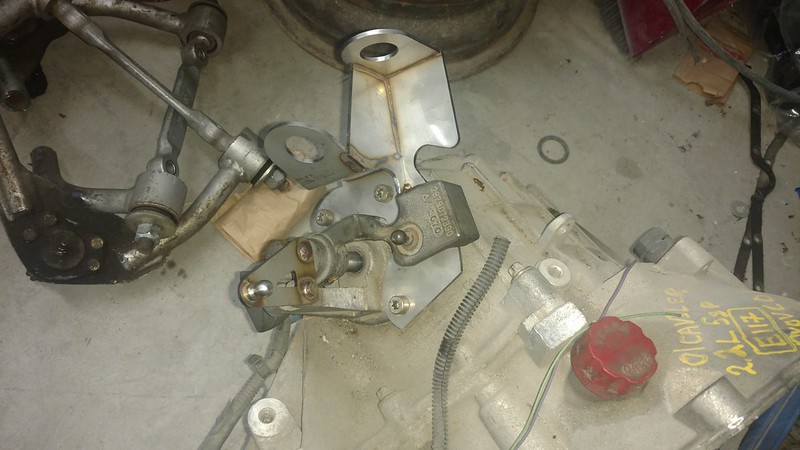
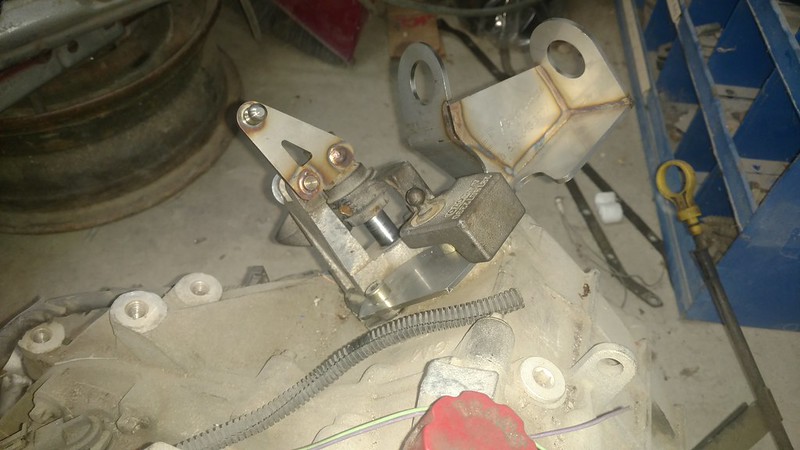
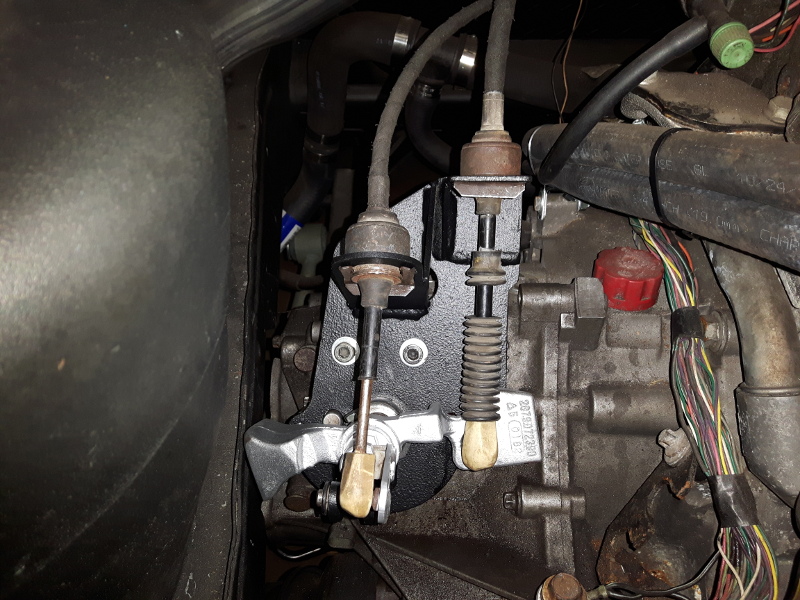
Picked up the F23 shift cable bracket kit from BVMotorsports, Install took about 20 min, parts look good and work fine, one of these days I'll get it in the car
IMG_20180226_144419664 by Joseph Martin, on Flickr
IMG_20180226_144446911 by Joseph Martin, on Flickr

Cheers Beers n Gearz, Joe
IP: Logged
motoracer838
Member
Posts: 3751
From: Edgewater Co. USofA
Registered: Jan 2006


Feedback score: (2)
Leave feedback


Total ratings: 83
Rate this member

Report this Post05-14-2018 06:13 PM Click Here to See the Profile for motoracer838Send a Private Message to motoracer838Edit/Delete MessageReply w/QuoteDirect Link to This Post
It would seem that Hell has froze over... (I was starting to think that's what it would take, I mean it's only been 11 years since I've done much of anything with this car, bad enough that it took more than 2 years to get to it after moving it into the shop... ) Oddly enough it's a problem with the Indy Hauler that's got me going on this. (need the room...)
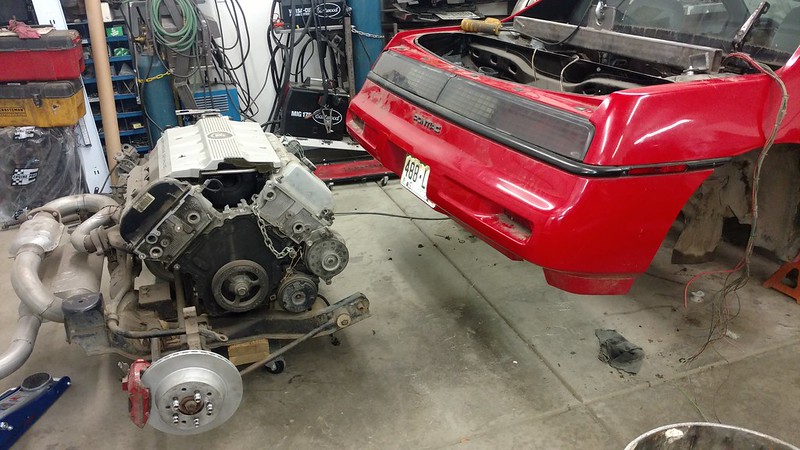
IMG_20180514_144342735 by Joseph Martin, on Flickr
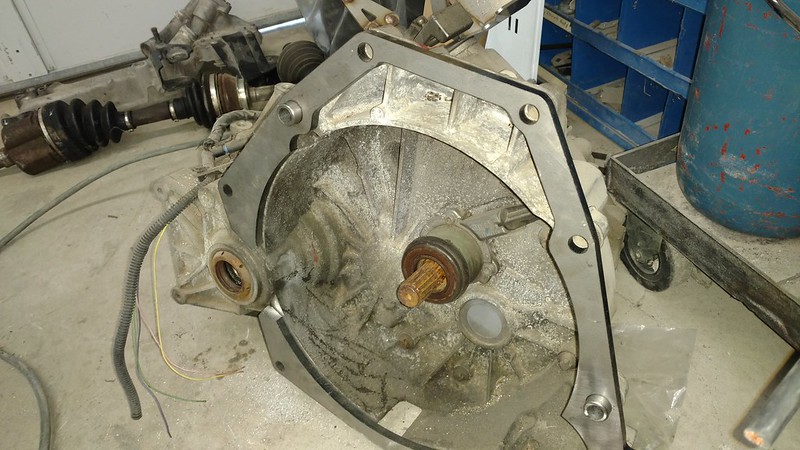
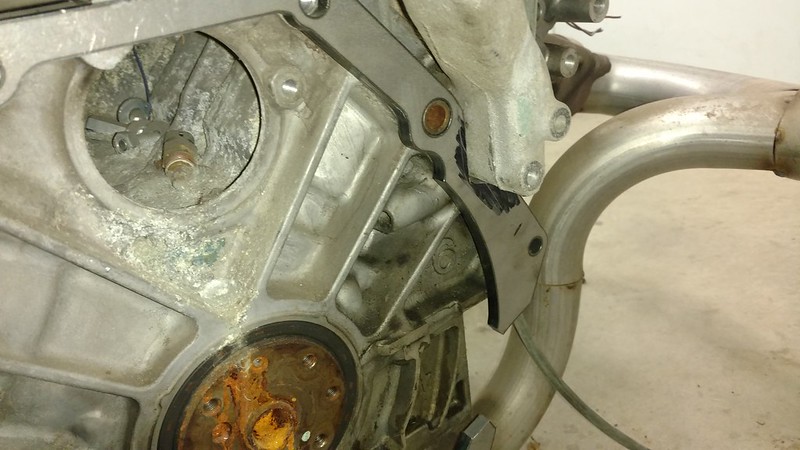
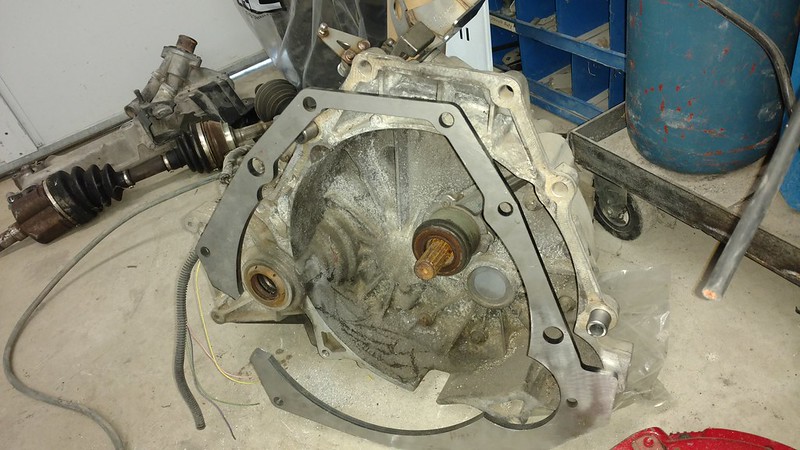
To accommodate the flywheel/clutch package i'm using, I was going to make a spacer plate when I came across paulsobj's thread, he's doing an F23/3800 swap, //www.fiero.nl/forum/Forum1/HTML/096715.html I got his "bad" plate and will tweak as needed, also made some longer dowels for engine/trans alignment to allow for the thickness of the plate. (3/8')
IMG_20180514_153208224 by Joseph Martin, on Flickr
IMG_20180514_153246453 by Joseph Martin, on Flickr
Now to pull the 282 and fit the F23 and start making new mounts, 3 out of 4 will get scraped (1 engine and both trans mounts.) and I never even drove it...

Cheers Beers n Gearz, Joe

[This message has been edited by motoracer838 (edited 05-14-2018).]

IP: Logged
Bob2112
Member
Posts: 126
From: Middle Tennessee
Registered: Nov 2015


Feedback score: N/A
Leave feedback

Rate this member

Report this Post05-15-2018 01:24 AM Click Here to See the Profile for Bob2112Send a Private Message to Bob2112Edit/Delete MessageReply w/QuoteDirect Link to This Post
Better late than never! I say that as one who often takes years to finish my projects....

------------------
New Moon Rising - 1988 Black Formula
My Blue Heaven - 1965 Mustang Coupe

IP: Logged
RCR
Member
Posts: 4397
From: Shelby Twp Mi
Registered: Sep 2002


Feedback score:    (7)
Leave feedback


Total ratings: 102
Rate this member

Report this Post05-15-2018 07:28 PM Click Here to See the Profile for RCRSend a Private Message to RCREdit/Delete MessageReply w/QuoteDirect Link to This Post
Well, you know my story, Joe. Good to see you at it. Get it done and start that 308 project.

Bob
IP: Logged
PFF
System Bot
motoracer838
Member
Posts: 3751
From: Edgewater Co. USofA
Registered: Jan 2006


Feedback score: (2)
Leave feedback


Total ratings: 83
Rate this member

Report this Post05-19-2018 09:35 AM Click Here to See the Profile for motoracer838Send a Private Message to motoracer838Edit/Delete MessageReply w/QuoteDirect Link to This Post
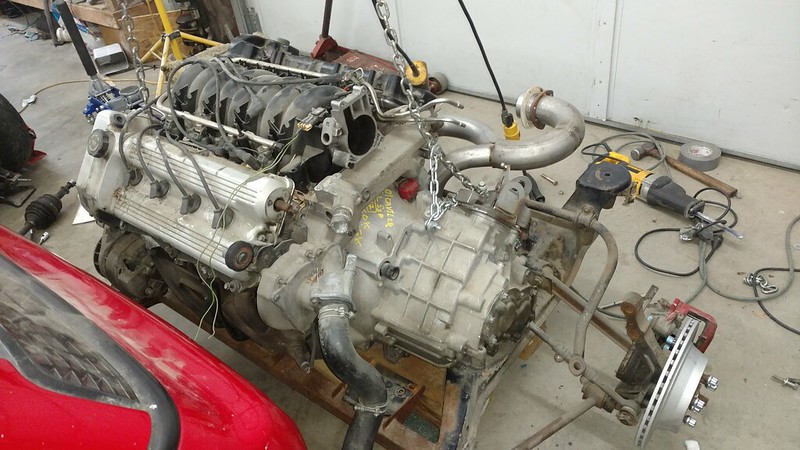
After a tough week at work, I got some time last night to work on the Grin Reaper, got the mock up engine and 282 off the cradle and pulled the 282 off the mock up engine, clearanced the the spacer plate to clear the water manifold. I can now use the spacer to mark where I need to clearance the transaxle, I should have the f23 mated up to the mock up and fit back in the cradle latter today. Then I can start working on new mounts, once the transaxle mounts are done I can rework the rear engine mount to accommodate the intermediate shaft, I expect that I will be scrapping that mount and starting over, there were things about that mount that I never really liked, but couldn't seem to find a better answer for. It's not breaking my heart, I just hate wasting my time going backwards...
IMG_20180518_200515232 by Joseph Martin, on Flickr

Joe

[This message has been edited by motoracer838 (edited 05-19-2018).]

IP: Logged
motoracer838
Member
Posts: 3751
From: Edgewater Co. USofA
Registered: Jan 2006


Feedback score: (2)
Leave feedback


Total ratings: 83
Rate this member

Report this Post05-19-2018 06:53 PM Click Here to See the Profile for motoracer838Send a Private Message to motoracer838Edit/Delete MessageReply w/QuoteDirect Link to This Post

motoracer838

3751 posts
Member since Jan 2006
A good afternoon in the shop...
IMG_20180519_160230064 by Joseph Martin, on Flickr
IMG_20180519_160217801 by Joseph Martin, on Flickr
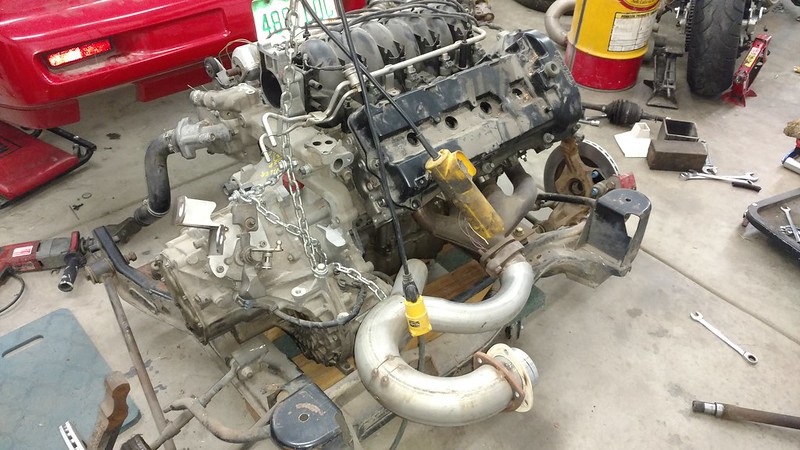
F23 is mounted up to the mock up engine and back on the cradle and I'm starting to make templates for the new trans mounts...

Joe
IP: Logged
Lunatic
Member
Posts: 313
From: Canada, Where the maple syrup is.
Registered: Sep 2013


Feedback score: N/A
Leave feedback

Rate this member

Report this Post05-20-2018 11:19 AM Click Here to See the Profile for LunaticSend a Private Message to LunaticEdit/Delete MessageReply w/QuoteDirect Link to This Post
Hey Joe.

I'm glad to see that you're finally working on this swap again. In time, I too would like to do a Northstar/F23 swap and I think this thread will be my inspiration.

I see that you had purchased an F23 shifter kit from eBay. I take it you need to run longer shift and select cables?

I designed a shift bracket that allowed the use of stock '84 four speed cables. It was also clocked so that the cables would have a straighter alignment into the shifter.
It looks like my design will also work with the Northstar setup and clear the waterlog. Cool.

[This message has been edited by Lunatic (edited 05-20-2018).]

IP: Logged
motoracer838
Member
Posts: 3751
From: Edgewater Co. USofA
Registered: Jan 2006


Feedback score: (2)
Leave feedback


Total ratings: 83
Rate this member

Report this Post05-20-2018 09:11 PM Click Here to See the Profile for motoracer838Send a Private Message to motoracer838Edit/Delete MessageReply w/QuoteDirect Link to This Post
"Put it together, put it together, no, no ,no, take it apart, take it apart"... Ran into a small problem last night While trying to fit bolts, the pipe from the front bank runs like I'd designed it to obscure the holes I want to use...
IMG_20180520_160858792 by Joseph Martin, on Flickr
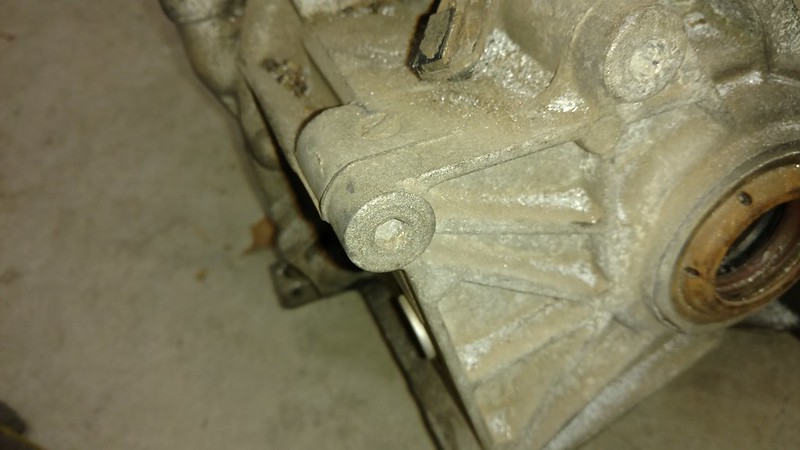
I get the trans back off and find there's no threads... I know other people have used these points, is mine an oddball or have others had to drill and tap???
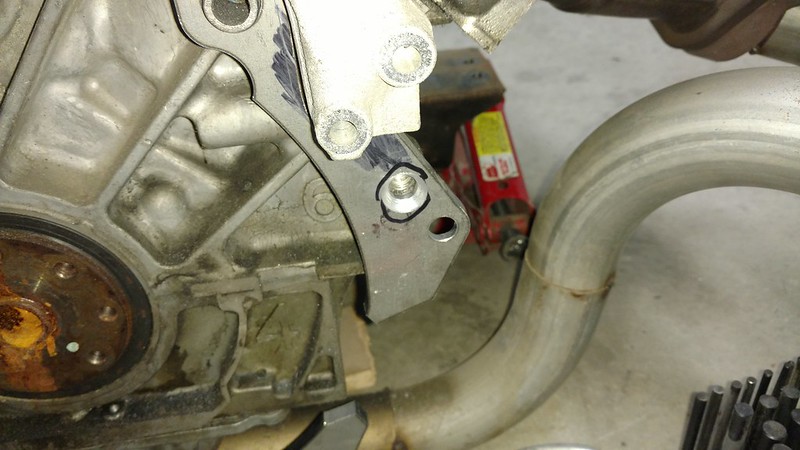
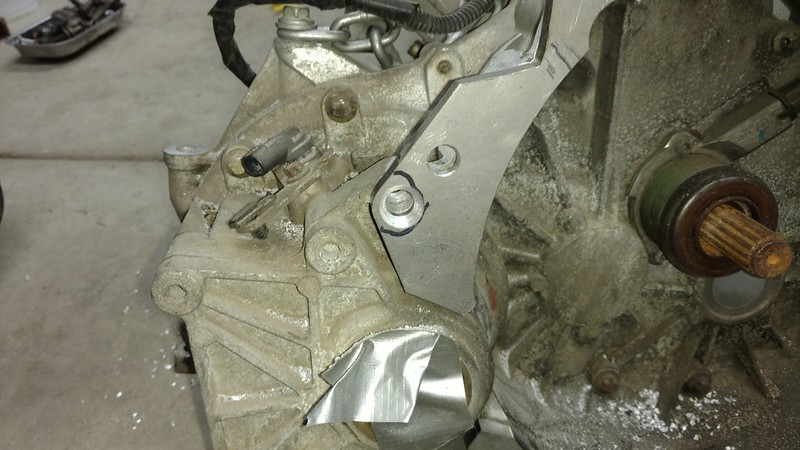
Moving on.
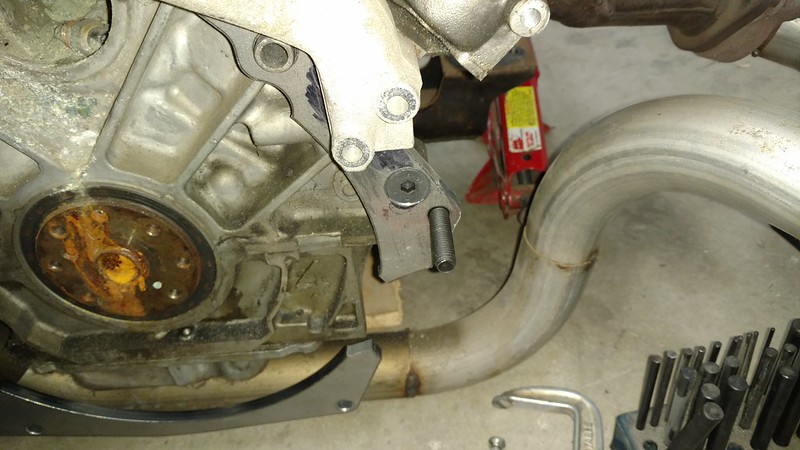
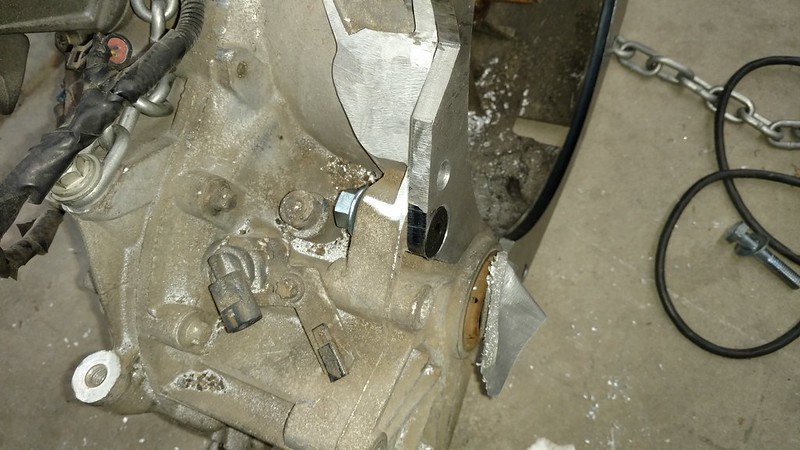
The spacer plate I got from Brad,(thanks again) paulsobj here on Pennock's had plenty of material to allow an easy fix for the one odd hole in the bolt pattern.
IMG_20180520_170842874 by Joseph Martin, on Flickr
IMG_20180520_170903552 by Joseph Martin, on Flickr
The lower hole gets a countersunk allen fit before the plate goes on the engine, the upper gets another when the plate goes on. Then the transaxle goes on. The threaded mounting hole on the transaxle was drilled out so the bolt will slide thru then get a nut...

Joe
IP: Logged
motoracer838
Member
Posts: 3751
From: Edgewater Co. USofA
Registered: Jan 2006


Feedback score: (2)
Leave feedback


Total ratings: 83
Rate this member

Report this Post05-20-2018 09:22 PM Click Here to See the Profile for motoracer838Send a Private Message to motoracer838Edit/Delete MessageReply w/QuoteDirect Link to This Post

motoracer838

3751 posts
Member since Jan 2006
 
quote
Originally posted by Lunatic:

Hey Joe.

I'm glad to see that you're finally working on this swap again. In time, I too would like to do a Northstar/F23 swap and I think this thread will be my inspiration.

I see that you had purchased an F23 shifter kit from eBay. I take it you need to run longer shift and select cables?

I designed a shift bracket that allowed the use of stock '84 four speed cables. It was also clocked so that the cables would have a straighter alignment into the shifter.
It looks like my design will also work with the Northstar setup and clear the waterlog. Cool.


I don't mind buying new cables to replace my 30 year old Getrag cables, The kit is very nicely built, and stands a good chance of being the nicest parts in the engine compartment. I liked being able to buy something to make the swap go just a little easier, I have enough to do as it is...

I'd like to drive this thing before summer is over, I have a particular event in mind but not saying anything unless I think I'm far enough along to make it happen...

Your setup looks like it allow the cables to clear the water manifold.

Joe
IP: Logged
motoracer838
Member
Posts: 3751
From: Edgewater Co. USofA
Registered: Jan 2006


Feedback score: (2)
Leave feedback


Total ratings: 83
Rate this member

Report this Post05-21-2018 11:34 PM Click Here to See the Profile for motoracer838Send a Private Message to motoracer838Edit/Delete MessageReply w/QuoteDirect Link to This Post
I love when a plan comes together...
IMG_20180521_102040424 by Joseph Martin, on Flickr
IMG_20180521_101847723 by Joseph Martin, on Flickr
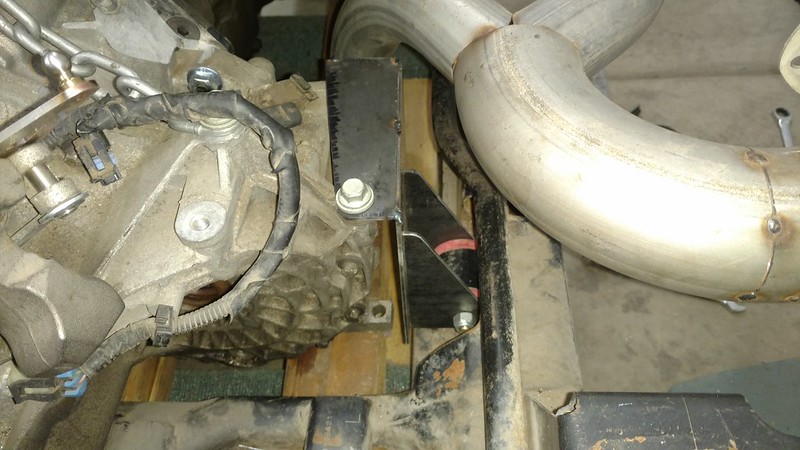
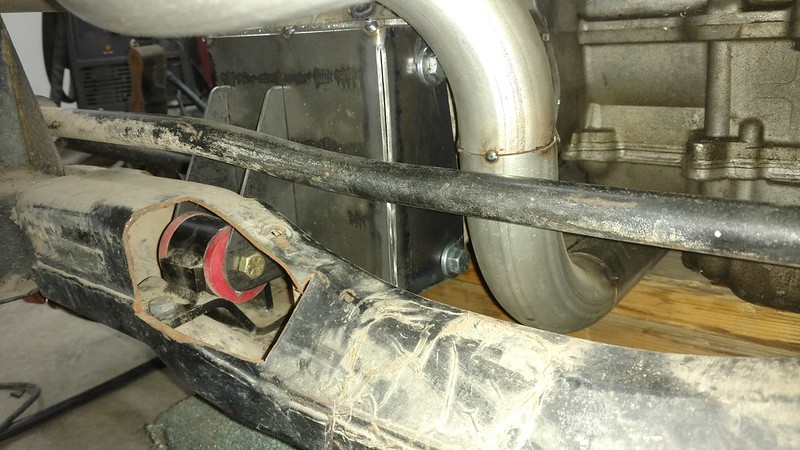
On to the transaxle mounts.
IMG_20180521_190601376 by Joseph Martin, on Flickr
IMG_20180521_190611847 by Joseph Martin, on Flickr
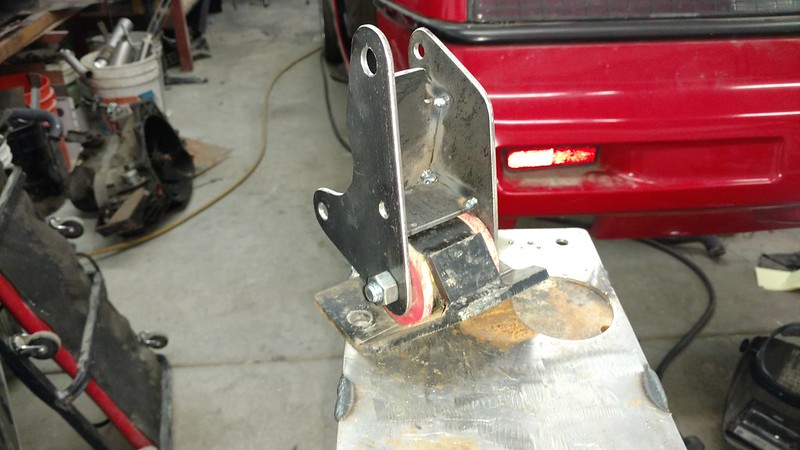
It was a good day in the shop, the Mad Scientist was making sparks... They're not done yet, needs more boxing and another mount tab... I wasn't kidding when I said the pipe does a good job of obscuring those bolts, keep in mind I fit the Y pipe 11 years ago... The notch in the crossmember is for muffler clearance and will get boxed in.

That's all for tonight... Joe
IP: Logged
RCR
Member
Posts: 4397
From: Shelby Twp Mi
Registered: Sep 2002


Feedback score:    (7)
Leave feedback


Total ratings: 102
Rate this member

Report this Post05-22-2018 12:05 PM Click Here to See the Profile for RCRSend a Private Message to RCREdit/Delete MessageReply w/QuoteDirect Link to This Post
Hi Joe,

You mentioned clearancing for the muffler. Are you trying to keep the trunk stock, or did you modify the floor?

I went with a flat floor. Plenty of room for the exhaust.

Keep it up. Looks good.

Bob
IP: Logged
motoracer838
Member
Posts: 3751
From: Edgewater Co. USofA
Registered: Jan 2006


Feedback score: (2)
Leave feedback


Total ratings: 83
Rate this member

Report this Post05-22-2018 12:24 PM Click Here to See the Profile for motoracer838Send a Private Message to motoracer838Edit/Delete MessageReply w/QuoteDirect Link to This Post
 
quote
Originally posted by RCR:

Hi Joe,

You mentioned clearancing for the muffler. Are you trying to keep the trunk stock, or did you modify the floor?

I went with a flat floor. Plenty of room for the exhaust.

Keep it up. Looks good.

Bob


I cut the trunk and still needed room for the way I routed the exhaust...

Joe
IP: Logged
motoracer838
Member
Posts: 3751
From: Edgewater Co. USofA
Registered: Jan 2006


Feedback score: (2)
Leave feedback


Total ratings: 83
Rate this member

Report this Post05-23-2018 08:15 PM Click Here to See the Profile for motoracer838Send a Private Message to motoracer838Edit/Delete MessageReply w/QuoteDirect Link to This Post
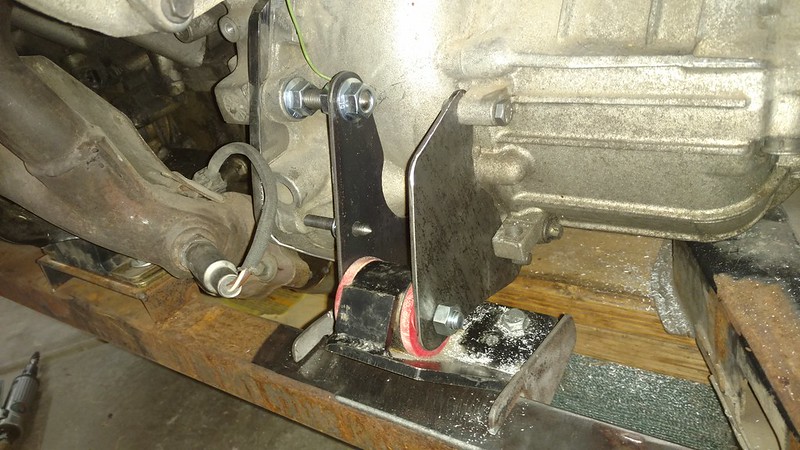
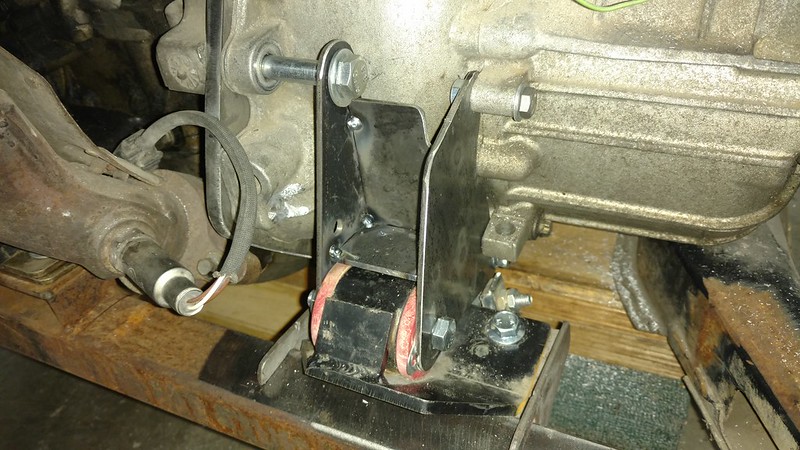
More good progress today.
IMG_20180523_144327740 by Joseph Martin, on Flickr
IMG_20180523_164539668 by Joseph Martin, on Flickr
IMG_20180523_170936385 by Joseph Martin, on Flickr
Front transaxle mount, still needs spacers, weldout and paint...

Joe
IP: Logged
motoracer838
Member
Posts: 3751
From: Edgewater Co. USofA
Registered: Jan 2006


Feedback score: (2)
Leave feedback


Total ratings: 83
Rate this member

Report this Post05-26-2018 07:31 PM Click Here to See the Profile for motoracer838Send a Private Message to motoracer838Edit/Delete MessageReply w/QuoteDirect Link to This Post
Oh hell, that didn't quite land where I hoped...
IMG_20180526_134751923 by Joseph Martin, on Flickr
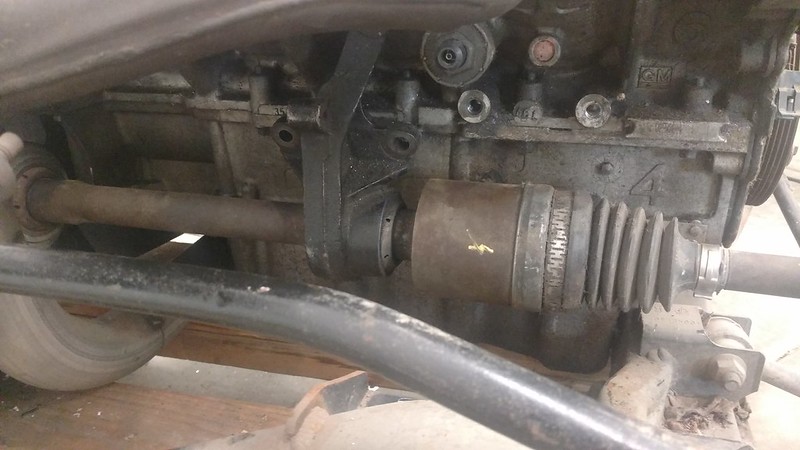
The intermediate shaft needs to be a good 5" longer to get the tripot out of the way...

"For me, if I were to start a swap today, I would go LS, the big reason I'm not on this one is that I'm too deep in parts to back up now."

I said this in a post 2 years ago when I got the F23, the thing is, I've never been thrilled with this swap and have been second guessing myself for quite some time now. (might have a little something to do with how long the car has sat...) There are a couple of LS-4s' in my area for about $500 each, (Hell, that's less than I'm going to spend on Nstar head studs...Nevermind how much work.) I know, I'll spend more but in the end have a better swap... (coming soon, Nstar stuff in the mall...) Let's hear your input...

Joe

IP: Logged
PFF
System Bot
RCR
Member
Posts: 4397
From: Shelby Twp Mi
Registered: Sep 2002


Feedback score:    (7)
Leave feedback


Total ratings: 102
Rate this member

Report this Post05-29-2018 06:30 PM Click Here to See the Profile for RCRSend a Private Message to RCREdit/Delete MessageReply w/QuoteDirect Link to This Post
Other than the "novelty" of having a DOHC V8, I can't think of any logical reason to have a N* over an LS.

Bob
IP: Logged
motoracer838
Member
Posts: 3751
From: Edgewater Co. USofA
Registered: Jan 2006


Feedback score: (2)
Leave feedback


Total ratings: 83
Rate this member

Report this Post05-29-2018 07:54 PM Click Here to See the Profile for motoracer838Send a Private Message to motoracer838Edit/Delete MessageReply w/QuoteDirect Link to This Post
 
quote
Originally posted by RCR:

Other than the "novelty" of having a DOHC V8, I can't think of any logical reason to have a N* over an LS.

Bob


When I started this swap more than 11 years ago, it made more sense, not much but more... The first Nstar happened almost by accident, by the time I discovered that it "cacked" a rod bearing I had already spent a bunch of money on the flywheel, clutch and other assorted stuff, I had "no choice" but to get another engine... first mistake but it works now. I just never really "connected" with this package...

I've more to say about all this but it'll go in a new thread I'll start in General latter tonight, thanks for watching...
Joe
IP: Logged
Previous Page | Next Page

This topic is 4 pages long:  1   2   3   4 
next newest topic | next oldest topic

All times are ET (US)

Post New Topic  Post A Reply
Hop to:

Contact Us | Back To Main Page

Advertizing on PFF | Fiero Parts Vendors
PFF Merchandise | Fiero Gallery | Ogre's Cave
Real-Time Chat | Fiero Related Auctions on eBay


Copyright (c) 1999, C. Pennock