It's been many moons since I've posted on here...lack of an internet connection and just busy catching life's curve balls are just some of the main reasons.
About 3 weekends ago Rhythm's "mighty" V6 with an accumulated 934km since the car was completed was pulled. Over the course of about 2 months of Saturdays, adapter plates and mounts were created and the engine/trans was painted. This past weekend(which felt like I ran a marathon with all the work done) most of the finishing touches were applied to the new and improved power plant. Now, I'm sure I'm gonna hear some flak about this choice...but here it goes anyway.
To maintain with the theme of Rhythm...late 60's factory concept... I picked up a hot rodded Chevy 350 and mated her to a Caddy '83 Seville TH325-4L trans(4spd). Added weight and a shift in weight bias in the car was a large concern. So with specific component upgrades, mounting the engine in a reverse rotation manner (pullies facing the rear), and pushing the engine to the front as far as possible without compromising the CV angles we were able to fit the powerplant in quite nicely. With any project, as I'm sure many know there is always a tweak here and there. In this case, brake lines...timing and the carb need to be set up yet. As well the ride height needs to be raised 3/8" in the rear (that's all she dropped with the 350) we should be ready to roll this weekend.
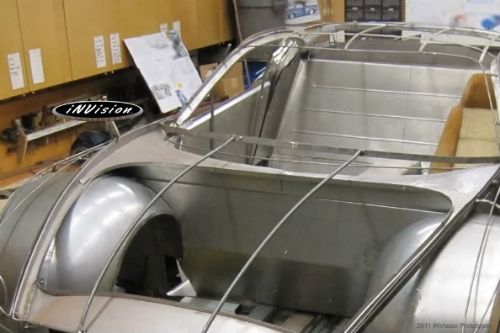
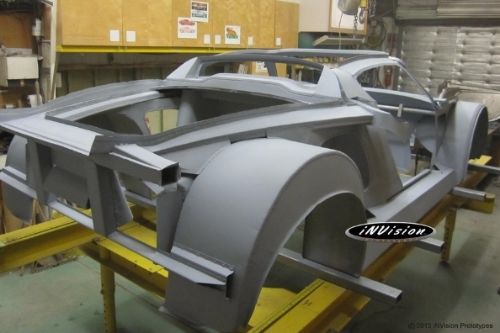
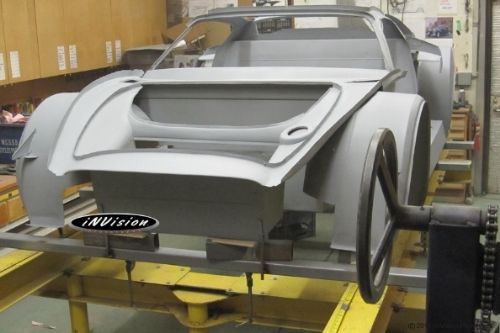
Here are some of the initial pics of the mock up. My initial course of action was to build up a chevy 350, unfortunately the 350 I had had a cracked cylinder wall. So, the decision was made to save time and pick up a 350 all ready to go. Came out of a '74 Vette which had a fuel tank fire...not a pretty site - the Vette that is. The guy just finished it...
In this shot you'll all recognize the subframe :P....it came out of the black '85 Fiero I had some time ago...didn't have the heart to scrap it. As it turned out...it helped in referencing the approximate location of the king pins.
After the rear BOP plate was created ... I needed a set of heads.
The adapter plate thicknesses played a crucial role in centering the drive axle between the crank journals...definitely followed the "measure 3 times...cut once" rule here.
All together and bolted. Unfortunately not a runner yet...
Kinda feel bad if this post came out to be a bit of a teaser...BUT more pictures are on the way... When I'm in the thick of things I don't remember to take progress pictures. I'm trying to work on changing that.
[This message has been edited by iNVisionPROTOTYPES (edited 05-30-2011).]
Trans with the diff = 250lbs...without diff - trans weighs 187lbs...
Just about every old part was weighed going out and almost every new part was weighed going in. Attempted to make the difference as small as possible. She is a heavy beast, hence the reason I turned the package around 180* for a reverse rotation setup. And compared to the stock auto...will handle a lot of torque without grenading...when I feel like putting Rhythm thru her paces. Having a rear sway bar does wonders for eliminating ... as some ppl refer to .. a 'tuna boat' feel.
N.
[This message has been edited by iNVisionPROTOTYPES (edited 06-19-2009).]
I picked up a hot rodded Chevy 350 and mated her to a Caddy '83 Seville trans(4spd).
Cool, I saw this car for the first time in a McMaster magazine... the first thing I noticed in the article was that it had a V6! The look of this car just calls for a V8 imo.
Thanks for posting about the build on here, I wanted more details and didn't even realize there was this thread here!
Thanks very much Brad! Yeah...the 6 was temp...something I guess they neglected to include in the feature article.
My goal was to complete the enormous task of building the body/interior while in the meantime looking/ finding an appropriate V8 for this project. She's all done now...completed the alignment last saturday morning and had her on the road in the afternoon. She stops people in their tracks...first, they hear something rumbling...glance over ...then come to a complete stop and give her a jaw dropping stare. The car is a lot of fun...and thru her...meeting new people who have a passion for cars like I do puts the cherry on the cake!
Well, it was quite the weekend with a Father's day celebration and everything...but Rhythm's transplant has been successfully completed. Carb was set up, brakes bled, ride height adjusted and alignment done...pretty much took up the morning on Sat. Was raining anyway so we weren't in any hurry to get out for her first road test. However, in the afternoon we took her out first down the street and back...rechecked everything...then into town to get some gas. What a difference - no comparison to the 2.8 - with respect to off the line acceleration the car is like a bat out of hell!
Here are a few pictures. Need to install the trunk and get the engine compartment washed - construction dust is all over.
Some math to get the centre of mass correct...
In about an hour everything was stripped out and clearanced for the new engine.
Trimming out the old mounts...
Finally installed. Front of the car is to the right. After cramming several work weeks into 3 weekends Rhythm's heart transplant has been completed. Final package is a Chevy 350, with a 1/4 race cam, Holley 650 carb, and custom headers designed for such a short exhaust system. Had her out yesterday and man it's like night and day!
------------------
[This message has been edited by iNVisionPROTOTYPES (edited 05-30-2011).]
Hey buddy! I hope all is well. Thanks for the thumbs up. Ahh.. I get the feeling you didn't think I'd ever get'er done :P... just kidding! I took my time preparing for the transplant then when I had all my cards lined up ... boom it was an all out thrash. Really missed driving her...but now, it's time to make up for that. Guess thats the reason why most guys tackle such a project during the winter.
I hope to see you around at the local cruise nights around the area. Working in TO makes it a bit of a challenge to get out...but, i try to make it to the Friday nite ones.
I need to know more about the drivetrain. What did you do to seal the adapter plate on the differential? I was under the impression that the axle stubs in the th425 where hard mounted, and one stuck out farther to accommodate getting past the oil pan, as you can see on the right of this picture the left axle stub is long.
Cant that be removed and flipped around? Did you have any problems with how high the axle line was through the oil pan? Do you have pictures of the oil pan?
I have always wanted to do this, but getting custom gears made was a far fetched idea for the reverse rotation.
Chris
Hey Chris,
Ok, well I'm no expert on this topic and suggest that you do as much research as your can...i'm sure you are. Especially when my application didn't exactly involve a Fiero.
I will try to explain some of the items I needed to address to make this transplant work for me. I've answered your questions within my explanation. The first thing that you should consider before starting this is how much power you want to put thru to the wheels and what your plans for the car are (- street or strip or.. in between?). The transmission shop that I deal with as well as other forum posts claim this trans can hold out to about 400HP...rebuilt of course. The second is what engine you plan to use as the heartbeat. Simply going with a Chevy 350 will solve the problem of putting the drive shaft thru the crank. However, a BOP plate will have to be bought or created since the block doesn't match the bell housing bolt pattern. Even with the 350, spacing to centre the shaft between the journals is critical - obviously. I ran with a 1/4"+ plate for the engine to trans adapter plate and 3/8" plate to flip the diff. This gave about 1/4" spacing on either side of the shaft and between the journals. Flipping the diff to run the engine in reverse rotation raised the drive shaft 1.375"....which creates the crank clearance issues, BUT, lowers the powerplant package said amount.
In regards to sealing the diff...it's not a major issue...just pay particular attention to how the adapter plate is cut out and use gaskets on either side( I made my own by tapping them out over the plate hole configuration). As for the axles, the stubby one snaps in...similar to how the Fiero's do into the trans...the long one slides out. You may need a pry bar to assist in pushing the stubby one out. When flipping the diff the axles needed to be switched from side to side...and this goes for the spring clip inside for the stubby axle...a long and sharp awl can work if you're patient...otherwise the diff will need to be blown apart(something you may want to do anyway for cleaning)
The oil pan was a pretty simple mod. Measurements were taken as to where the axle would come thru into the pan. I didn't want to create a 2 part pan and have to install another plug as some have done in the past...so I inserted a tube...which was marginally larger in diameter than the drive axle leaving the bottom of the pan intact. For this part of the baffle inside was deep sixed. I can post a picture of the pan next time I've got the car in the air...should be next weekend...as I'm out of town till next week.
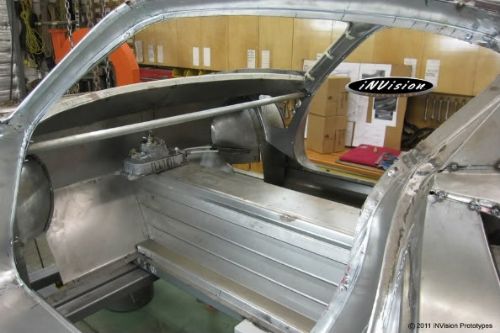
Something to take note of: Somewhere I read that the reverse rotation installation will work in a Fiero without cutting into the cab if the engine is centred over the axles. You will need to modify the front of the cradle tho. This is a hell of a lot better than running it with the pulleys facing forward. If you do want to move the engine ahead anymore forward the fuel tank and rear wall cross brace may get in your way...I don't remember exactly - but you can see roughly from my first pic on this page what may be involved for bracing. In my case I have the engine pushed ahead to the point where I've got 3 cylinders ahead of the axles without compromising the angle of the drive axles too much. Initial construction of the cab allowed for this. I did use a Fiero fuel tank, but it was mounted much further ahead for better weight distribution.
I hope this helps.
Nick
------------------
[This message has been edited by iNVisionPROTOTYPES (edited 04-15-2015).]
Wow, thank you, that does explain alot, but of course it brings up more questions.
You have to put the axle on after you put the oil pan on? not a horrible idea and save the need for special oil pump and oil drain system, small price to pay.
It is good to know that the axles are switchable, and that the axle line isn't moved to far up, I am wanting to put a twin screw supercharged big block in mine, so i am probably going to go with the th425 instead, and wanting even more to manage to fit it in the engine bay and not really have to cut any trunk out, I have to put my ttops somewhere
I look forward to more pictures, but I am in no rush, I don't want to seam like I am pressuring you.
How close did the axle end up being to the bearing cap?
Thanks again for answering stuff, I hope to be able to have a car with this set up some day.
Yeah, with that much power I'd definitely run with the 425...those are basically bullet proof. I'm sure it'll be the axles that will be the fusible link. I wanted a compromise between semi decent gas mileage and grunt...tho I do have another 325 and 325-4L as "spares".
The axle going thru the oil pan isn't that big of a deal...simplifies a lot of things...tho if u want to pull the pan, you'll need to drop the D/S axle first...then that stub shaft which I have mounted to engine via 2 bolts holding up the carrier bearing.
You had mentioned that you want to keep as much of the trunk as possible...it's gonna be a challenge...but I'm sure if you plan out your course of action you may just be able to squeeze things into that space.
When you get around to dropping that package into your fiero please post some pics...even of the build for that matter to inspire others.
Congratulations on building a great replica of a 1950's concept car. You really captured the old fashoned look and the craftsmanship looks superb.
------------------ " THE BLACK PARALYZER" -87GT 3800SC Series III engine, 3.4" Pulley, N* TB, LS1 MAF, Flotech Exhaust Autolite 104's Custom CAI 4T65eHD w. custom axles, HP Tuners VCM Suite. "THE COLUSSUS" 87GT - ALL OUT 3.4L Turbocharged engine, Garrett Hybrid Turbo, MSD ign., modified TH125H " ON THE LOOSE WITHOUT THE JUICE "
You really captured the old fashoned look and the craftsmanship looks superb.
Thanks very much Sir.
I've always loved classics and muscle cars. However, failing to find something decent for a reasonable amount to play with, the decision was made to try and create something on my own. Since I was a kid I've had a thing for biting off more than I can chew at times...haa haa haa So after I got my father involved in this project(who's a talented fabricator) influences were also drawn from his love for fighter jets.
We shall be starting 'the next one' soon as we catch up with a lot of things that kind of took the side note during the 8 year build...which shouldn't take half as long...should be a fun journey yet again. In the mean time we hope to inspire others to tackle something they've been wanting to do with their rides and also enjoy cruising around in this one.
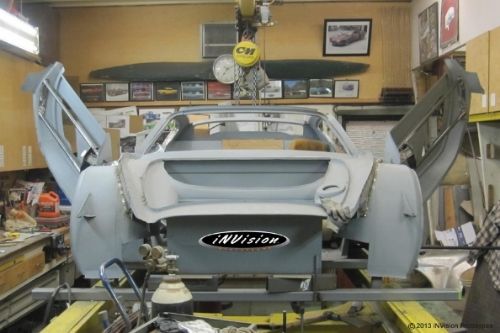
It's been quite a while since I've posted anything new on Rhythm ... last thing really being about the V8 powerplant upgrade - something we've been enjoying immensely. After looking over my posts it seems that some of the the photos disappeared into cyberspace...strange...
Anyway, just wanted to bring you guys up to date with a few things. Firstly, I've gone back over my construction picture posts and did a major re-organization throughout the pages and uploading new photos. The build process flows much better. For those who are interested in a non-fiero concept car build I invite you guys to take a look when you get a moment.
Here are a few recent photos of the car while cruising around...
Runs like a clock and a blast going into those tight curves
The other thing was that we've started 'the next one'...actually started a while ago.
Your comments, suggestions and criticisms were taken into account while redesigning the new ride.
Simply called R2(at least for now)...this is a fresh sheet of paper design, LS6 powered, 500+HP mid-engine sports car metal crafted from flat sheet metal and loosely resembles Rhythm. However, the major difference comes in the overall tightness of the proportions resulting in a more mainstream appearance(if that means anything). Rolling on 275/35/R18s in the front & 315/30/R19s at the rear(tho 19F/20R will fit as well) R2 is 28” shorter, 6” narrower, and a little over 900lbs lighter.
Thanks for looking!
------------------ Nick M.
A journey in design and fabrication begins with a vision, a single pen stroke ... and in some cases the blow of a hammer.
Even though the car is done...as many of you know with your own projects...you're never really done @_@
A little while ago, she coughed through the cab...just a fluke...while I was starting it and the thought of that foam filter catching fire came to mind right away. Later that same day, I got a out a sheet of steel, the tucking forks, and slapper and started shaping a cold air induction housing to replace the aftermarket mesh air breather...
The part is still drying, but I took some photos during the fabrication and initial install of the cold air induction housing.
Did a little tuck shrinking to create the housing's shape.
Shaping and scribing the duct attachments.
Mocked up in the vehicle...now its time for some primer and paint.
When the top turbo fans are switched on, the engine loves it... all that extra cool air. Not only does the SCB run cooler...it's more punchy when passing on the HWY.
------------------ Nick M.
A journey in design and fabrication begins with a vision, a single pen stroke ... and in some cases the blow of a hammer.
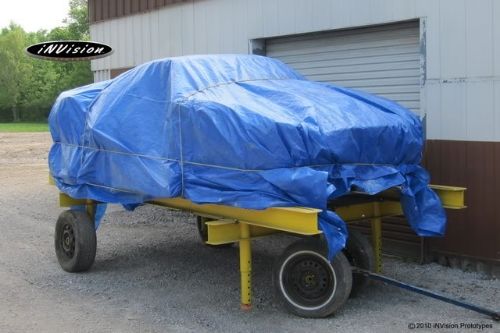
A while ago I mentioned that we were well underway with the next mid-engine sports car...built entirely from scratch from sheet metal.
Those of you who enjoy fabricating...I guess most of you otherwise you wouldn't be in this section of the forum .... feel free to have a look see by following the facebook link. The completely fresh re-design means that aside from the DOT approved windscreen, side glass and lights...no other production body panels can or have been used. All the exterior body panels and substructures have been created ... now we're in the process of fitting them together. By December the plan is to start the interior plugs. Molds will then be created from these plugs for the fiberglass parts.
Here's a photo of the wire frame wrapped up outside to make room for another project. Kinda gives you an idea of the overall shape. The buck was created for measuring, forming and clamping the panels to as they are being developed.
Back in the shop without the tarp ... things are a bit confusing.
Regards,
------------------ Nick M.
A journey in design and fabrication begins with a vision, a single pen stroke ... and in some cases the blow of a hammer.
That's what a buddy thought/said till he came by and saw the actual car in the shop ... not resembling an Enzo at all.
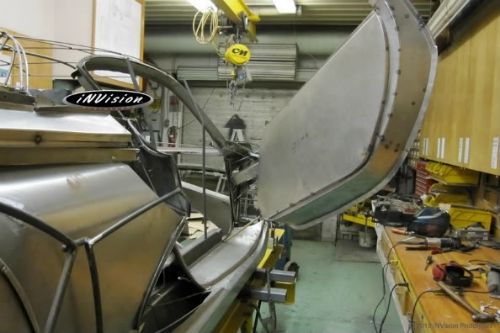
Fast forwarding a few weeks...here are one of the doors. We are going with butterfly doors working off a single pivot hinge. Gas cylinders still need to be added to make them weightless.
Looks really trick when you look from the front with the doors opened.
Thanks for looking.
------------------ Nick M.
A journey in design and fabrication begins with a vision, a single pen stroke ... and in some cases the blow of a hammer.
The next time you're in my neck of the woods feel free to stop by the shop and see the real deal.
PM sent.
Next time I am in Niagara (probably summer 2012, ...we go there every year for our anniversary), I want to stop by your shop. I have to see this creation in person!
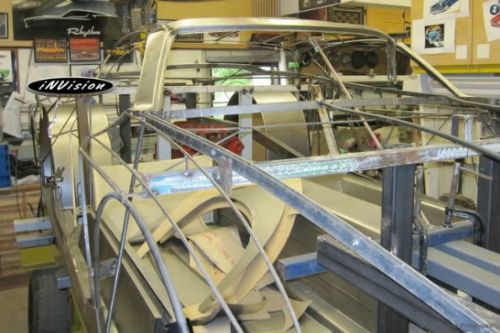
Here's another perspective of R2...with the front inner structure and firewall taking shape. This photo goes back a ways - I didn't like the appearance of the moisture trough after it was done ... so the hood seal area was redesigned and fabricated again.
And yeah...that's one of the left over Fiero seats in the car that I'm not too worried if grinding/welding sparks hit since it won't be used.
Cheers!
------------------ Nick M.
A journey in design and fabrication begins with a vision, a single pen stroke ... and in some cases the blow of a hammer.
So as more exterior panels are taking shape and coming closer to completion the interior work has started.
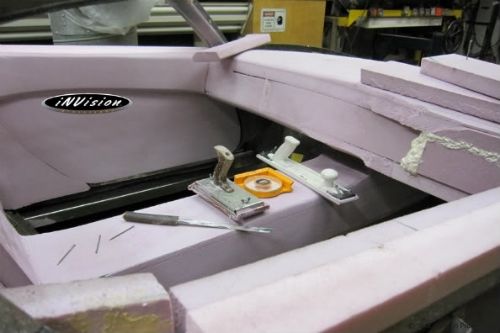
Starting as a blank canvas with the medium changing from forming sheet metal to shaping foam. The process will involve creating a basis for molds from foam, bondo and clay. It’s gonna be fun!
The floor pans have been pulled to gain access from the underside once the door shells are on.
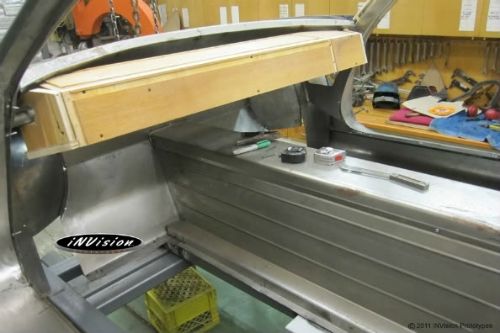
Wood grain finish on the new dash.... Actually it's the beginnings of the plug for the dash created by up-cycling some remnants of plywood left over from another project. Foam will be glued to it...then shaped to the final profile.
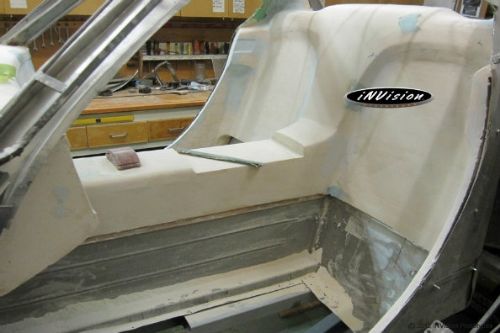
After looking like an interior out of Lego Land for a few days, the driver’s side area just about done. A few things to fine tune…but only after the passenger side has been completed.
It'll be a few more hours before the final shaping is done, but composite panel fabrication is right around the corner.
Thanks for following along guys!
------------------ Nick M.
A journey in design and fabrication begins with a vision, a single pen stroke ... and in some cases the blow of a hammer.
Yeah, I always have a thing for biting off more than I can chew .. hehe... Coming up with the ideas is the easy part, making them work is the challenge. "Normal" doors just wouldn't do for this vehicle...R2 called for Butterflyish style so it's been ahh ...fun ...spending the hours designing and getting them to work nice nice. Unfortunately, this system can't be transferred to a Fiero due to the latch and window opening approach - unless some serious surgery takes place on the jams.
------------------ Nick M.
A journey in design and fabrication begins with a vision, a single pen stroke ... and in some cases the blow of a hammer.
Do you use stock windows from an existing vehicle or are they custom?
Sorry for the late reply to your question Gokart.
Windscreen and side glass is DOT approved glass from an existing vehicle... rear window is custom cut laminated automotive glass. Can't beat the appearance and feel of real glass...
------------------ Nick M.
A journey in design and fabrication begins with a vision, a single pen stroke ... and in some cases the blow of a hammer.
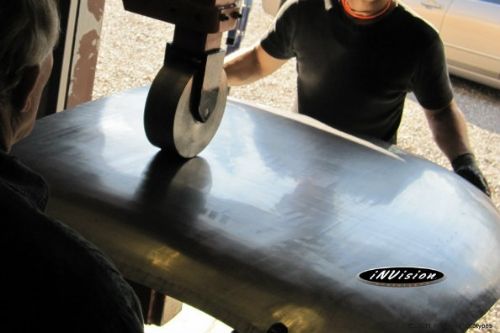
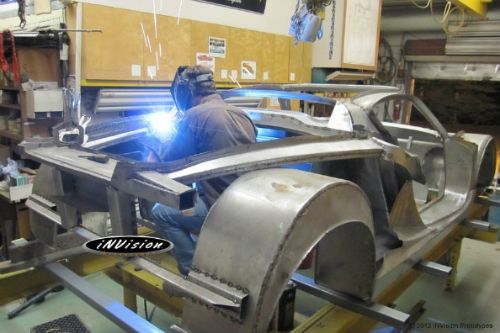
Bringing up the centre section of the roof by wheeling it 1/2" at a time. It's getting close...and shiny. The upper wheel and lower anvil are transferring their mirror smooth surfaces onto the material being rolled.
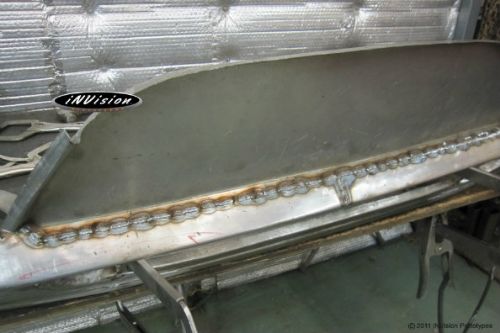
Part of the rear fascia welded up. Getting ready to grind the proud(bump) off the weld, then the HAZ area needs to be hammered and dollied to stretch the material again and remove any distortion. During the welding process things shrink and distort the panel to some degree.
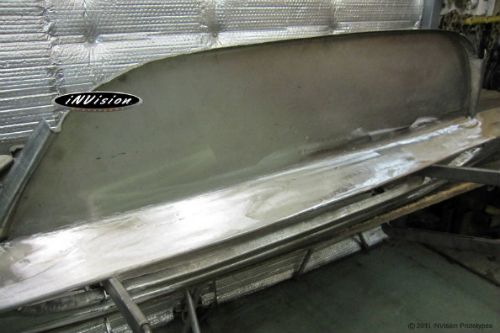
Almost done... It looks smooth, but after the panel is installed a few areas need to be touched up until the welded is completely invisible.
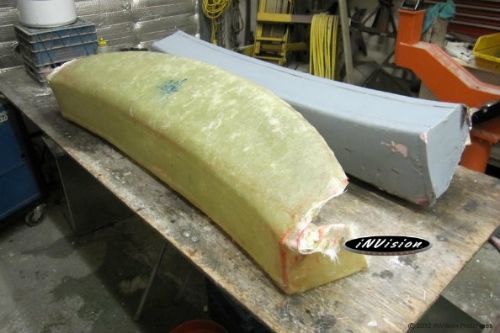
Initial plan was to create plaster molds of the interior which meant less work if we were to simply cover the panels with leather. However, taking the surface finish one step further using polyester fillers will allow for a really trick optional finish.
After a few minutes of 'playing' the mold successfully popped off the plug! Now to clean and prep the mold for the actual components.
We're playing the reassembly game now that the wire frame buck has been removed from the frame table. ... install and locate specific panels, identify where the plug holes will go, remove panels, drill holes, reinstall, square to the frame table, weld....and repeat the process. Although it's very time consuming the process is a lot of fun!
Thanks for looking!
------------------ Nick M.
A journey in design and fabrication begins with a vision, a single pen stroke ... and in some cases the blow of a hammer.
This is truly amazing. Something I can only dream of doing. I have got to come by sometime (if you accept visitors) considering I'm so close. I'm following this thread for sure.
[This message has been edited by Ry86GT (edited 11-23-2012).]
This is truly amazing. Something I can only dream of doing. I have got to come by sometime (if you accept visitors) considering I'm so close. I'm following this thread for sure.
I really appreciate the kind words Ry86GT. We're having a lot of fun with this one.
Check your PM.
Nick
------------------ Nick M.
A journey in design and fabrication begins with a vision, a single pen stroke ... and in some cases the blow of a hammer.
I hope the new year is treating everyone well so far. Thought I'd bring you guys up to date a little with the R2 build.
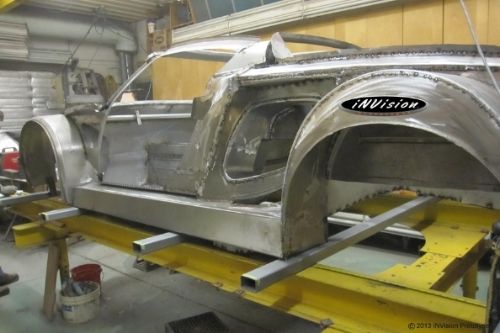
Last time, I was assembling the body structure. For the most part it's finally done and really starting to take shape. It'll be a shame to cover all this fabrication up with the exterior panels.
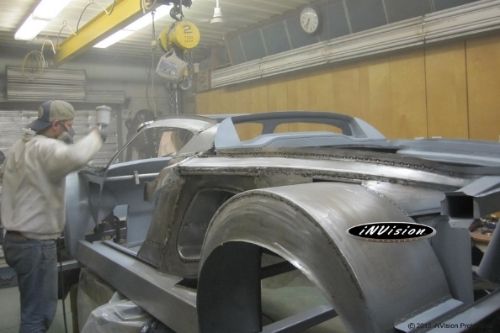
Shooting the first coat of 2k primer starting from the inside areas and working out. Soon all the bare metal will be sealed up.
A few coats of primer later, R2’s structure looks quite different.
Now the work begins on finishing up the butterfly door hinges and roll cage before the exterior skin starts going on.
Thanks for checking out the build.
------------------ Nick M.
A journey in design and fabrication begins with a vision, a single pen stroke ... and in some cases the blow of a hammer.
Absolutely fascinating build, Nick. You're a true artist and metal fabricator. Can't wait to see where this is all going...
Thanks very much buddy! I have also say that I'm really impressed with the dynamic kinematic analysis you're performing on the not so stock Fiero suspension. Very Cool!
------------------ Nick M.
A journey in design and fabrication begins with a vision, a single pen stroke ... and in some cases the blow of a hammer.
Hi guys! Some of you had asked me what the doors looked like when opened and closed. So, once we finished installing the brackets, cylinders and mounted the doors...I created a video of them in action. Unfortunately, can't quite figure out how to post the thing here on the site.
Here's a link to the vid. R2 Door Video Hope this is ok?


 So after I got my father involved in this project(who's a talented fabricator) influences were also drawn from his love for fighter jets.


 I have also say that I'm really impressed with the dynamic kinematic analysis you're performing on the not so stock Fiero suspension. Very Cool!