The General Motors 10045862 manual transaxle starter safety interlock switch for the Pontiac Fiero and Lemans was discontinued nearly two decades ago.
This post is a friendly reminder for safety advocates who want to service the integral feature to mitigate the risks from the hazard, or to restore a vehicle which the faulty interlock switch was been bypassed.
IF you’re a skeptic; please don’t comment on eliminating the circuit, we know your preference…My interlock switch was still functioning, though my GT has 136k miles on it, so the part was on my rejuvenate list.
These great PFF threads below have the majority of information you need, making it straightforward to replace the switch with a substitute part and adapt it on your Fiero:
Clutch Pedal Safety Switch - Replacement solution NOT BYPASSING by Camel
https://www.fiero.nl/forum/Forum2/HTML/133653.htmlFiero Clutch Safety Switch Discontinued... Testing A Possible Alternative by Shho13
https://www.fiero.nl/forum/Forum2/HTML/135049.htmlRevisiting Using 1983-88 Chevy S10 Clutch Starter Safety Switch in a Fiero by Wudman
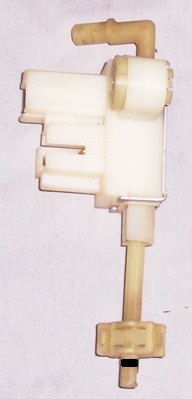
https://www.fiero.nl/forum/Forum2/HTML/146361.htmlAs a result, I brought a new/old stock GM 15569768 replacement switch, which was been discontinued as well, though it was still available on eBay for $13.
You can also easily buy the ‘Standard Ignition’ brand part in your local auto store which is number NS-88.
If you
really need/want the original GM 10045862 part; I saw two eBay listings at exorbitant prices…
'How-To' Service the Part IntactThis post was born from a few not answered questions I had while reading these threads, mainly about taking the switch out from the car in one piece:
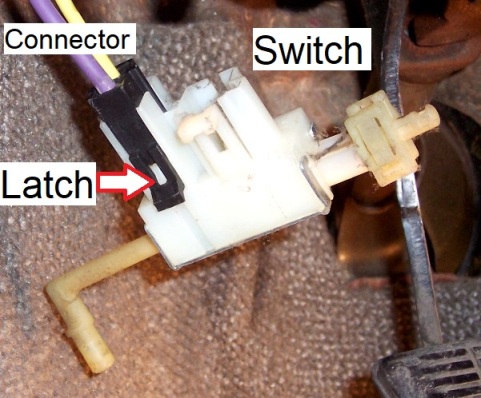
“How is the best manner to get the cotter pin out or in; how to reach and turn the mounting screw, and where is the @#$% plastic wire connector latch on the switch?”
Obviously, you can crawl under the dash and barely see the switch. In my brain, I didn’t distinguish the ‘full picture’ as these areas blocked the relevant aspects of the removal.
Luckily to me, I stumbled on the ‘perfect window’ which answered two of my questions though the left speaker cavity...
Since my stereo speakers were out from the dash; underneath was my work light shining through the speaker opening and behold! I saw the cotter pin in the switch rod, plus a clear view of the mounting screw which was holding the switch. Excellent…
 ‘How-To’ Take It Out
 {My Method Part A}
Word of Warning: My battery was already disconnected, and I recommend that you do the same…
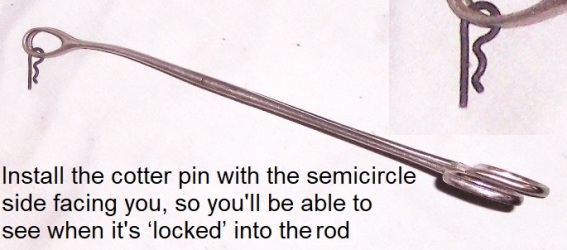
I tilted the steering wheel back and thru the speaker opening, I reached-in with 8-inch-long needle-nose pliers to pull the cotter pin from the switch rod. One down, two to go.
However, I need more workspace under the dash to remove the mounting screw.
My plastic ‘belly’ panel under the steering column was previously removed; you might want to remove it too. {4 screws}
I removed the hood release panel {3 screws} and the fuse-block {2 screws} and then push these parts to the side.
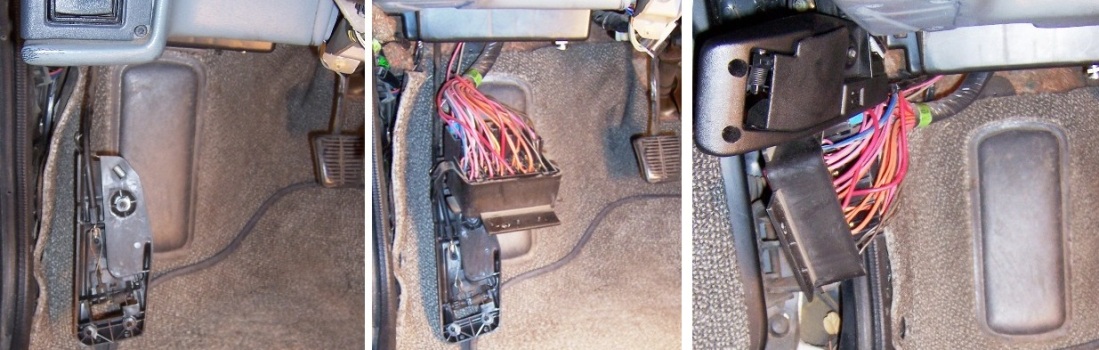
At the point, I removed my cruise control connector from the clutch switch and then push it out of my way.
While looking though the speaker opening, I was able to guide the ¼-inch ratchet and deep 7mm socket under the dash as I removed the mounting screw. Two down and only one to go.
With the screw removed, I crawled under the dash and carefully took out the rod from the clutch pedal hole, and then untangled the switch, which fell and was dangled on the wires.
At last, I was able to locate the plastic connector latch! I carefully opened the clip to separate the wires from the switch housing, and the crowd roared; I won!

 ‘How-To’ Repair It
 {On the Bench}
A Tip: The best and easiest way to replace the part is to keep the metal covers on, as the links above merely removed the metal covers to show you the inside of the switch.
With the new part on the bench; pull the cotter pin in the rod, and then slide the Chevy rod out from the switch housing. The new part is ready to install the Pontiac rod.
With the old part on the bench; make a reference mark on the Pontiac rod at the end of the two-piece adjuster, which shows the adjustment and the mark will be used later to reinstall the adjuster.

Next is to carefully pry the two latches of the adjuster and remove it from the rod. Don’t worry if you break the adjuster as you can use the new two-piece adjuster,
but don’t break your Fiero rod!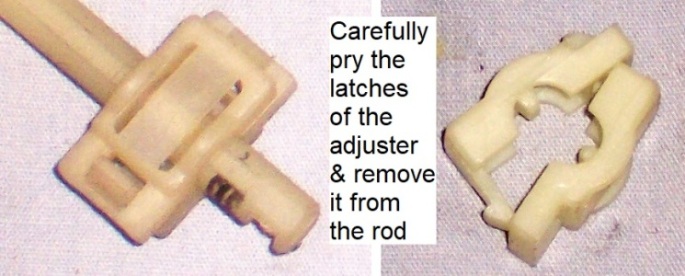
With the two-piece adjuster removed, slide the original rod from the old switch housing, paying attention at what end of the housing the rod exits.
Now simply slide the Pontiac rod into the new switch housing and then clamp the two-piece adjuster on the end of the rod at your reference mark.
The new part has now been adapted to the Fiero and is now ready for installation.
Special Note:
If you don’t have the Pontiac rod, you can use the Chevy rod; however, the main difference between them is the adjuster ‘teeth’ or ribs on the rods. The Pontiac teeth/ribs are on the straight end of the rod, while they’re at the elbow end on the Chevy rod.
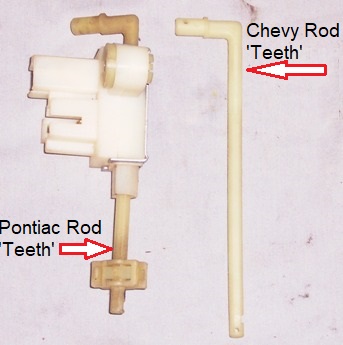
By removing the two-piece adjuster from the Chevy rod first, simply slide the rod back into the new switch housing. On the straight end, you’ll need to make a ‘moveable stopper’ as an adjuster; please read in the middle of *this* link below:
Clutch Safety Switch Adjustment Procedurehttps://www.fiero.nl/forum/Forum2/HTML/123269.html‘How-To’ Install It {My Method Part B}
My installation procedure is
almost the reversal of removal…
From below, carefully position and reinstall the switch rod into the clutch pedal hole.
From above, I reached-in with 9-inch hemostat and push the cotter pin into the switch rod. Make sure that the cotter pin ‘clips’ into the rod! I installed the cotter pin with the semicircle side facing me, so I was able to see that it was ‘locked’ into the rod.
From below and by hand, align and start the mounting screw into the support bracket using a 7mm socket. Make sure that the screw is threading in
BY HAND; don’t cross-thread it!
From above, guide the ¼-inch ratchet and deep 7mm socket under the dash and tighten the mounting screw.
From Below
Reconnect the clutch starter interlock connector to the switch
Reconnect the cruise control connector to the switch {if removed}
Reinstall the fuse-block and the hood release panel
Reconnect the battery
Test the new switch to verify that it is functioning properlyReinstall plastic ‘belly’ panel under the steering column
Reinstall the left speaker and the grill {if removed}
Call it a day...

------------------
Original Owner of a Silver '88 GT
Under 'Production Refurbishment' @ 136k Miles
[This message has been edited by Vintage-Nut (edited 11-09-2025).]


