Pennock's Fiero Forum
  Technical Discussion & Questions
  84 glass sail panel removal

Post New Topic  Post A Reply
Email This Page to Someone! | Printable Version


next newest topic | next oldest topic
84 glass sail panel removal by Kitskaboodle
Started on: 04-26-2025 10:02 PM
Replies: 4 (50 views)
Last post by: fierosound on 04-27-2025 09:15 AM
Kitskaboodle
Member
Posts: 3144
From: San Jose, Ca.
Registered: Nov 2004


Feedback score:    (8)
Leave feedback

Rate this member

Report this Post04-26-2025 10:02 PM Click Here to See the Profile for KitskaboodleSend a Private Message to KitskaboodleEdit/Delete MessageReply w/QuoteDirect Link to This Post
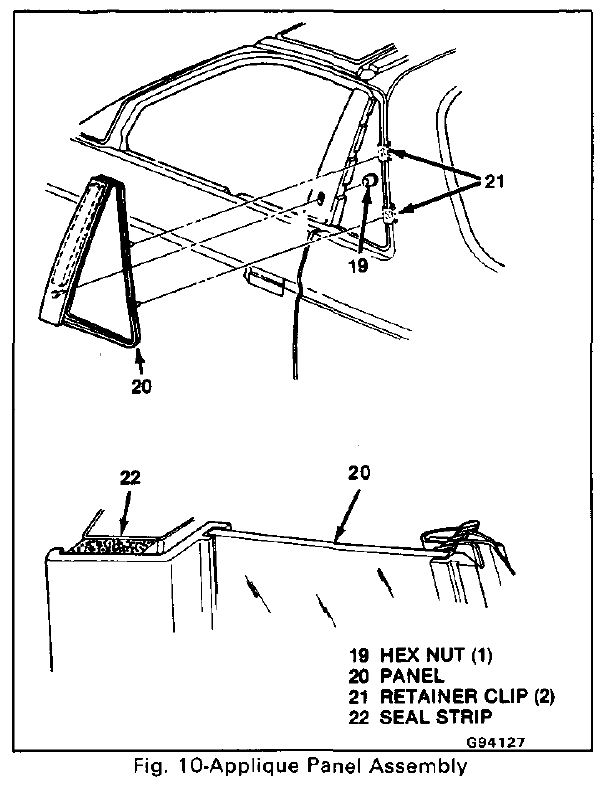
Can someone refresh me on 84 glass sail panel removal? It’s been years since I pulled a set and as I recall, getting to the clips on the back was a little tricky. Where exactly are all the clips & fasteners located?
Thanks, Kit

[This message has been edited by Kitskaboodle (edited 04-26-2025).]

IP: Logged
PFF
System Bot
Vintage-Nut
Member
Posts: 1495
From: California
Registered: Apr 2020


Feedback score: N/A
Leave feedback

Rate this member

Report this Post04-26-2025 10:34 PM Click Here to See the Profile for Vintage-NutSend a Private Message to Vintage-NutEdit/Delete MessageReply w/QuoteDirect Link to This Post
Real Glass Panels

 
quote
Synthesis:
To remove the sail panel in its entirety, you need to remove the B Pillar trim inside the vehicle and remove the 11MM nut on the backside of the sail panel.

Glass Sail Panels from 1984.

Remove the Phillips screw located on the front side of the B-Pillar trim where the end of the door sits. Lift the plastic cover over the top seat belt mounting bolt and use a T-50 Torx Tip to remove the bolt. Carefully grab the top outer edge of the B-Pillar trim and pull it towards the front of the car and in towards the center. This will remove the Push Fastener and allow you to slide the panel out of the way. Located at the front inside edge of the B-Pillar are two round holes near the bottom of the sail panel. The larger opening is above the smaller opening. Using a 6" or longer extension and an 11MM socket, remove the 11MM nut carefully from the backside of the Sail Panel. As you unscrew the nut, gently pry the bottom forward edge of the sail panel out and away from the vehicle. Do NOT exceed more than 2" of distance. This will allow you to remove the nut from inside the frame without dropping it. Then, using a long flat head screwdriver, slide the blade under the sail panel from the front, and gently twist the blade between the rear stud and the metal clip located on the rear notchback clip.. There are two clips on the back edge. (Repeat for the second clip on the back edge).

Installation is just a snap. Gently align sail panel rear studs with clips and press into place making sure top lip of sail panel is underneath the roof panel. The rest of the installation is revers of removal.

------------------
Original Owner of a Silver '88 GT
Under 'Production Refurbishment' @ 136k Miles

IP: Logged
Kitskaboodle
Member
Posts: 3144
From: San Jose, Ca.
Registered: Nov 2004


Feedback score:    (8)
Leave feedback

Rate this member

Report this Post04-26-2025 11:52 PM Click Here to See the Profile for KitskaboodleSend a Private Message to KitskaboodleEdit/Delete MessageReply w/QuoteDirect Link to This Post
Thanks Bruce! πŸ˜€
11mm socket and 6” or more extension/ check
T50 socket & socket wrench / check
Long flat screwdriver / check
Philips screwdriver (medium)
Small flashlight / check
Plastic pry bar set / check
Small baggie for misc. clips
Kit

[This message has been edited by Kitskaboodle (edited 04-26-2025).]

IP: Logged
Kitskaboodle
Member
Posts: 3144
From: San Jose, Ca.
Registered: Nov 2004


Feedback score:    (8)
Leave feedback

Rate this member

Report this Post04-26-2025 11:55 PM Click Here to See the Profile for KitskaboodleSend a Private Message to KitskaboodleEdit/Delete MessageReply w/QuoteDirect Link to This Post

Kitskaboodle

3144 posts
Member since Nov 2004
Thanks Bruce! πŸ˜€
11mm socket and extension/ check
T50 socket & socket wrench / check
Long flat screwdriver / check
Small flashlight / check
Plastic pry bar set / check
Small baggie for misc. clips
Kit
IP: Logged
fierosound
Member
Posts: 15217
From: Calgary, Canada
Registered: Nov 1999


Feedback score: N/A
Leave feedback


Total ratings: 287
Rate this member

Report this Post04-27-2025 09:15 AM Click Here to See the Profile for fierosoundClick Here to visit fierosound's HomePageSend a Private Message to fierosoundEdit/Delete MessageReply w/QuoteDirect Link to This Post

------------------
My World of Wheels Winners (Click on links below)

3.4L Supercharged 87 GT and Super Duty 4 Indy #163

IP: Logged

next newest topic | next oldest topic

All times are ET (US)

Post New Topic  Post A Reply
Hop to:

Contact Us | Back To Main Page

Advertizing on PFF | Fiero Parts Vendors
PFF Merchandise | Fiero Gallery
Real-Time Chat | Fiero Related Auctions on eBay


Copyright (c) 1999, C. Pennock