So first my radiator was leaking until it failed. I replaced the radiator and two weeks later, my heater core failed. Replaced that, had no problems for two weeks and now I have a large leak around the thermostat housing. I'm not sure if it's actually the housing, but I suspect it is. How difficult is it to replace it? And after I have done so, what will the next weakest link be? I've replaced the water pump two years ago so I think that's still in good condition.
So first my radiator was leaking until it failed. I replaced the radiator and two weeks later, my heater core failed. Replaced that, had no problems for two weeks and now I have a large leak around the thermostat housing. I'm not sure if it's actually the housing, but I suspect it is. How difficult is it to replace it? And after I have done so, what will the next weakest link be? I've replaced the water pump two years ago so I think that's still in good condition.
Unfortunately, that's the way these things go.
Heater core (in my opinion) has always been the first one to go, and then the radiator. But I'll spare you the... this car is 500 years old and blah blah.
But basically, with a new radiator, and a new heater core... OTHER THAN HOSES, there's only three locations left where it might fail...
1 - The filler neck (either it's rusted out, or the gasket has failed) 2 - The water pump... yeah... 3 - The heater core cooling tubes that run along the center of the car.
#1 is super easy to fix. If you can find a replacement, just replace it. But more than likely all you need is a new gasket and some finger-applied RTV... just have to check.
#2 is obviously... you have to replace the water pump. You'll see it leaking through the weep hole, which means the bearing seal (and soon, the bearing) is going out.
#3 is more... well... problematic. To be clear, this isn't the stainless tubes that run along the underside of the car's thresholds on either side, but in fact the insulated tubes that run through the inside of the fuel tank tunnel. Reposting this picture from an old Fiero I unfortunately cut up, but as someone else mentioned... it gives a really good look at how these tubes are run...
The top (drivers side) one that is insulated is ONE of the cooling tubes that goes TO the heater core, which is incidentally right next to the A/C pressure line, which is hot (and ideally should be cool... which is why it's not insulated).
The bottom (passenger side) one that is NOT insulated, is the cooling tube RETURN line from the heater core, which is not insulated because the goal is for it to cool off before it reconnects to the drivers side return threshold cooling tube just before it goes back to the engine. This sits right next to the low-side A/C compressor line which is insulated because it's supposed to be cold.
... with that, these lines can eventually corrode and fail. I've never actually seem them fail, to be honest, but I've heard of people having issues with them in high road-salt states. And also... yeah, the car is 30+ years old at this point and these are going to fail if your car has been on the road forever.
Now, all of that aside, there are several hoses that can fail... and the Fiero has like literally, twice as many hoses.
- FRONT - Radiator to return cooling pipe - FRONT - outlet cooling pipe to radiator - REAR - return cooling pipe to engine - REAR - outlet cooling pipe to engine
.. and then also,
- FRONT - Heater Core to feed line - FRONT - return line to Heater Core - REAR - heater core feed line conduit to water pump - REAR - drivers cooling pipe to heater core return line (which is usually a crimp line)
... and then also, small lines connecting the throttle body (heater) to the cooling system. These are the two stainless tubes coming off the throttle body, but after the pass under the plenum, they turn to small rubber lines which can wear out and leak (and this may actually be your problem, they connect to the filler neck, etc.).
... and then depending on whether it's a 4cyl of a V6, there may be an additional cooling line that goes around the firewall to the rear side of the engine bay to warm up the intake (on the 4cyl), etc...
... and as Mike says, any one of the coolant sensors (either for temperature readings, or switch). And worst of all... a head gasket leak.
[This message has been edited by 82-T/A [At Work] (edited 11-04-2023).]
It's leaking somewhere near the thermostat housing - I just can't seem to pinpoint where. If I look at the "wet spots" it seems it's leaking from the top of the thermostat housing - possibly even something a simple as a faulty thermostat cap.
But...The problem is intermittent. For instance, this morning I had to drive my son to a soccer game. All the way on the journey forth, I saw smoke coming from the passenger side engine grill and the belt was squeaking like crazy. On the way home - no such thing. No squeaking. No white smoke. And when I checked the thermostat housing - no wet spots.
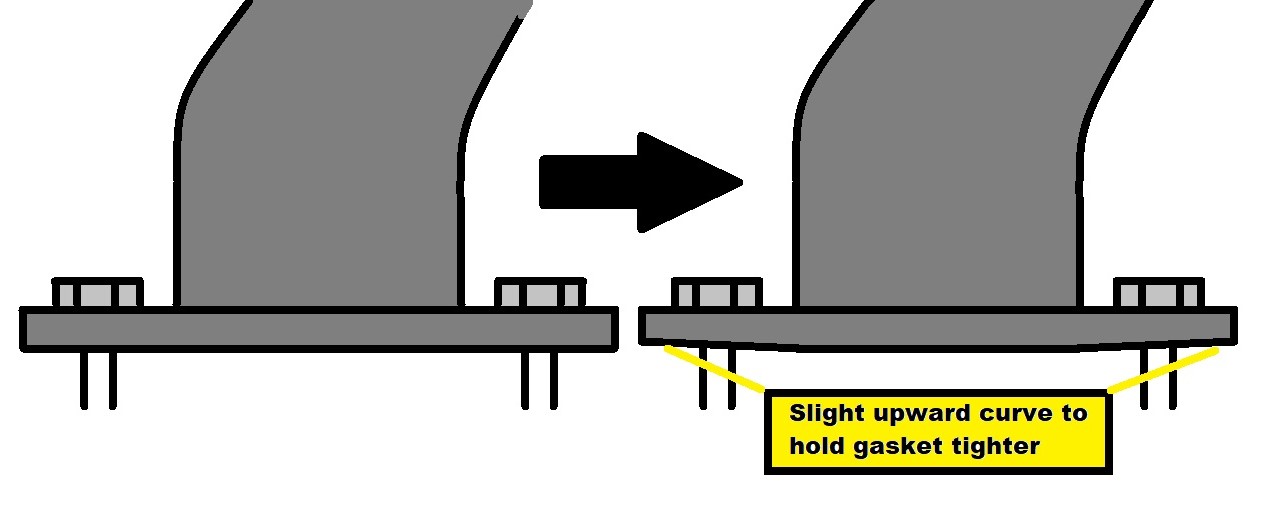
Cliff- on my thermo-housing I never could get the gasket to seal properly....after a while I tried sanding the ends of the flange slightly where the bolts go in, which puts more pressure on the gasket- worked well (You don't need much- my drawing is exaggerated)
[This message has been edited by cvxjet (edited 11-04-2023).]
Hi Cliff; I had similar problem and i finally bought a new cap. It fit much tighter and cured the Problem. I inspected the old cap and found the gasket permanently deformed and it actually had a small crack in the rubber but looked ok at first glance. Now you have repaired the other leaks your old cap probably cannot handle the pressure the system can make now. sleek
It might very well be the cap. I had replaced it some time ago and one thing I immediately noticed about this cap was that it hardly took any effort to close it. My old cap took considerable effort to close.
It might very well be the cap. I had replaced it some time ago and one thing I immediately noticed about this cap was that it hardly took any effort to close it. My old cap took considerable effort to close.
I use oil filter plyers to take off the cap. I don't remember ever being able to take one off with my bare hands.
NEXT QUESTION Do you have access to an air compressor?
Drain the pressure off until it is about 16-17-ish PSI. Fill your cooling system full of liquid. Use the air to pressurize the system by putting it in the over flow tank nozzle on the radiator. Now you can look for leaks while everything is cold.
[This message has been edited by buddycraigg (edited 11-04-2023).]
It might very well be the cap. I had replaced it some time ago and one thing I immediately noticed about this cap was that it hardly took any effort to close it. My old cap took considerable effort to close.
That might've been because some of the older caps had rubber seals that had to turn with the cap... whereas with the newer style, the cap can rotate independently of the rubber seal. That makes a huge difference with the amount of torque required to turn the cap when it's tight.
Doesn't matter how good the cap's rubber seal is if the sealing edge of the metal thermostat housing is corroded/pitted. You need to use a flat sanding block to sand that metal sealing edge so that a nice shiny continuous circle appears at the top of the housing.
[This message has been edited by Patrick (edited 11-06-2023).]
I was able to check it a bit better and it's definitely leaking from the cap. I have another cap laying around somewhere, so I'll check if that makes a difference. If not, I'll sand down the sealing edge.
Hi Cliff; Sanding the sealing surface is not advised as you will remove the rust preventive plating which would allow corrosion to start. Certainly check lip for damage and precede accordingly . Mine got some damage where the rad hose clamped on probably from prying the hose off at one time and eventually corroded through. sleek
Sanding the sealing surface is not advised as you will remove the rust preventive plating which would allow corrosion to start.
If the top of the thermostat housing has been even slightly bent or misshapen (due to manhandling the cap to get it on or off), then it's not going to seal properly.
By using a flat sanding block (not just a loose piece of fine-grit sandpaper), it can quickly and easily be determined if the sealing edge of the thermostat housing is both flat and non-pitted.
In regards to any "rust preventive plating" being removed, keep in mind that any metal removed by a flat sanding block is going to be protected by the rubber seal of the cap when it's installed. Coolant won't be able to access the polished lip.
[This message has been edited by Patrick (edited 11-05-2023).]
I found my old cap and I wasn't even able to put it on. I couldn't get enough downwards force on it for the lips to catch the lips on the housing. Compare that to the new cap which closes without any effort whatsoever. So I compared the two caps and the new cap is much higher than the old (original) cap. This tells me the new cap simply doesn't seal properly.
Now the thermostat itself doesn't "click" in place. It just "floats" and is held down by the cap. This might also be the reason why I can't get the original cap to close since the thermostat might not be far enough down the housing.
I've you've not changed it in a while, it can't hurt to swap out the thermostat with a new one. It's isolated by a rubber O-RING that can sometimes slip off. But it should be a snug fit. Is it possible that the thermostat is not the right one?
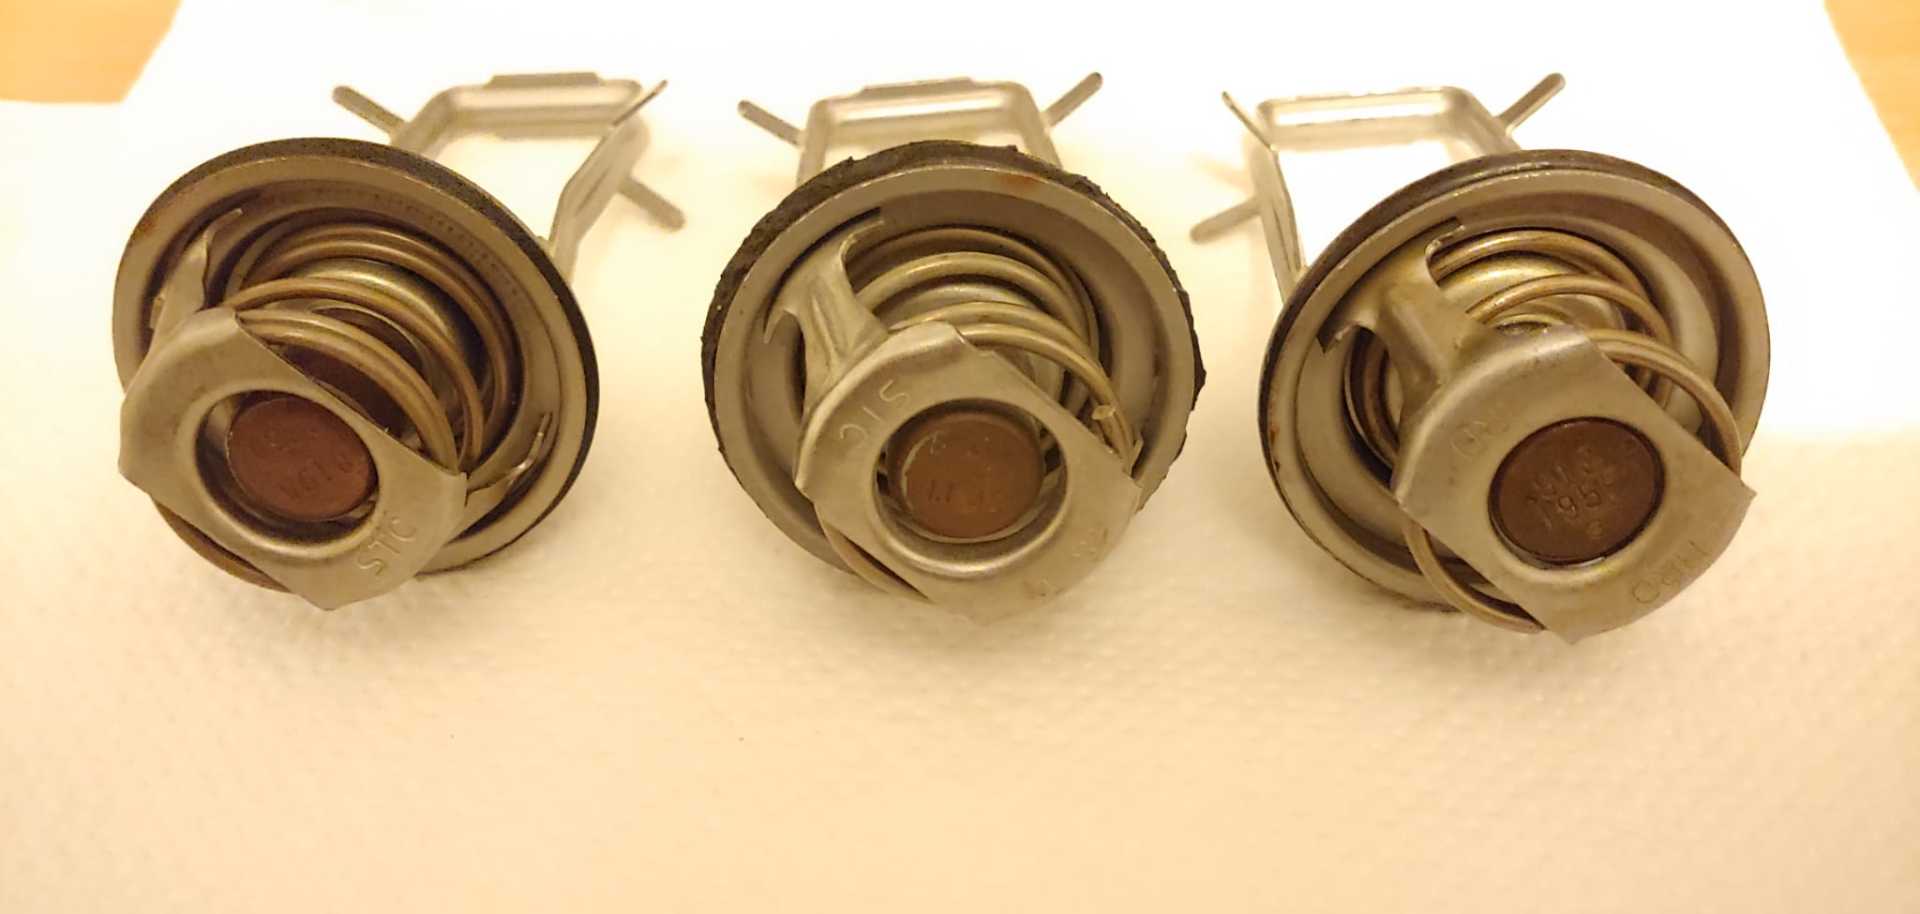
I have three thermostats here. Two 195*, and one 180*. I can't remember which one is the original but I will try a different thermostat (as soon as the engine has cooled off - had to run some errands).
I have three thermostats here. Two 195*, and one 180*. I can't remember which one is the original but I will try a different thermostat (as soon as the engine has cooled off - had to run some errands).
I put in the "old" 195* thermostat and I still wasn't able to close the housing with the old cap. Also, I think this thermostat is stuck open since it took a really, really long time for the car to reach operating temperature (almost 10 miles). I think I'll order a new cap and thermostat.
Originally posted by Cliff Pennock: It might very well be the cap. I had replaced it some time ago and one thing I immediately noticed about this cap was that it hardly took any effort to close it. My old cap took considerable effort to close.
Take T-stat cap off. Look @ bottom Does rubber fill the whole metal shell. If true was MotoRad Cap maybe w/ another brand name & doesn't fit right or not @ all depending on T-stat house.
I removed the cap and thermostat just so I could make a comparison.
Just to clarify: The "new" cap takes no effort whatsoever to close, while the "original" cap apparently takes more elbow grease than I can supply without modding something.
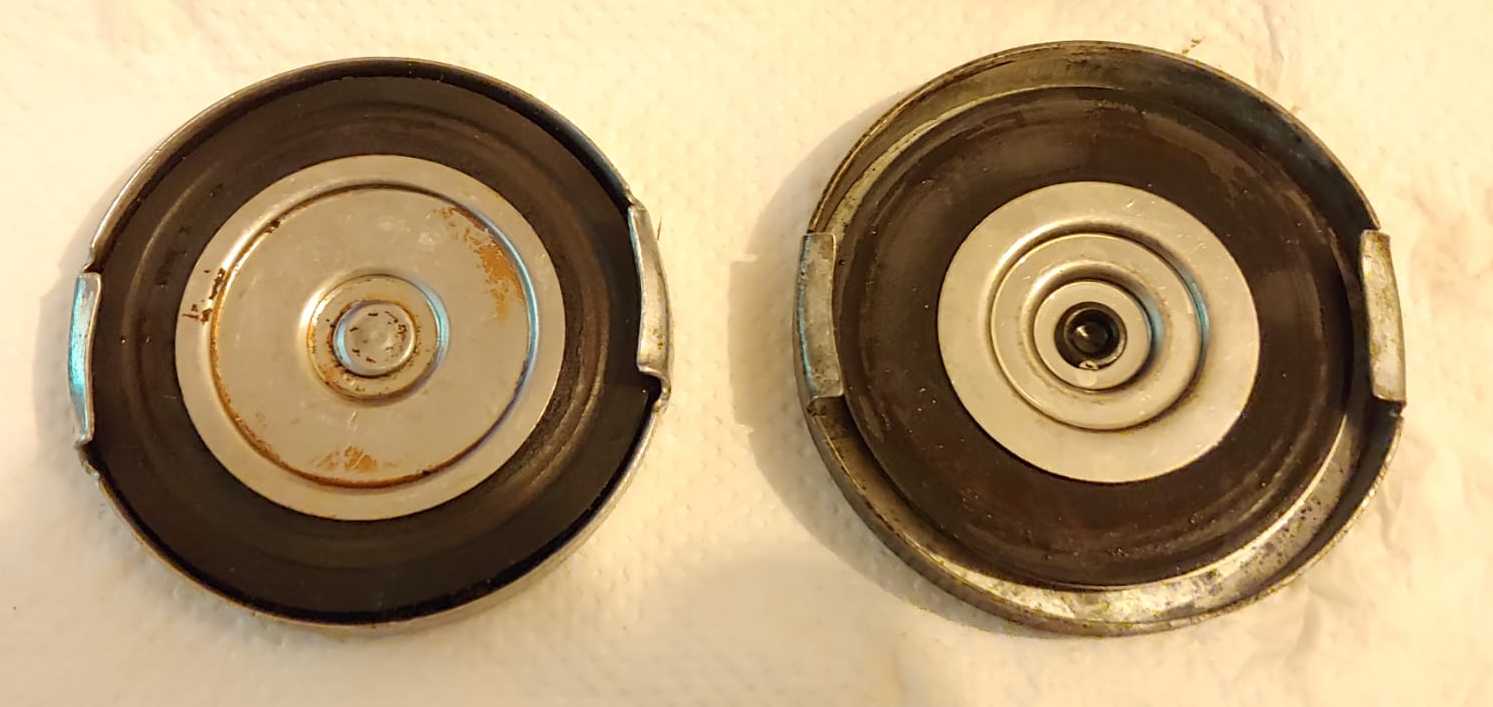
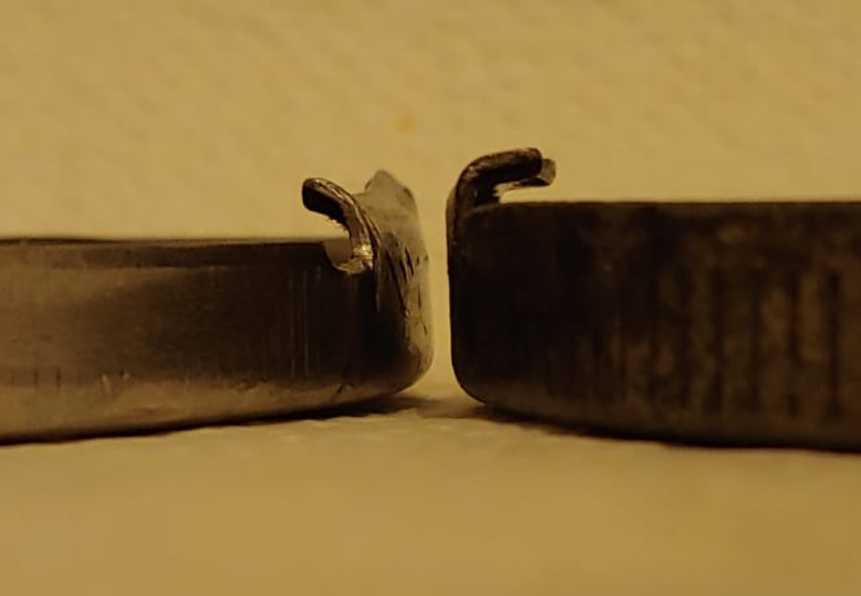
Here are the two caps I have. The one on the right is the "new" cap and it leaks a lot of coolant. I bought it recently from RockAuto. The one on the left is the cap that was on it when I bought the car (27 years ago) and which I, for some reason, can't get to close anymore.
You can clearly see that the "original" has the rubber go all the way to the edge while the new one has a smaller rubber seal.
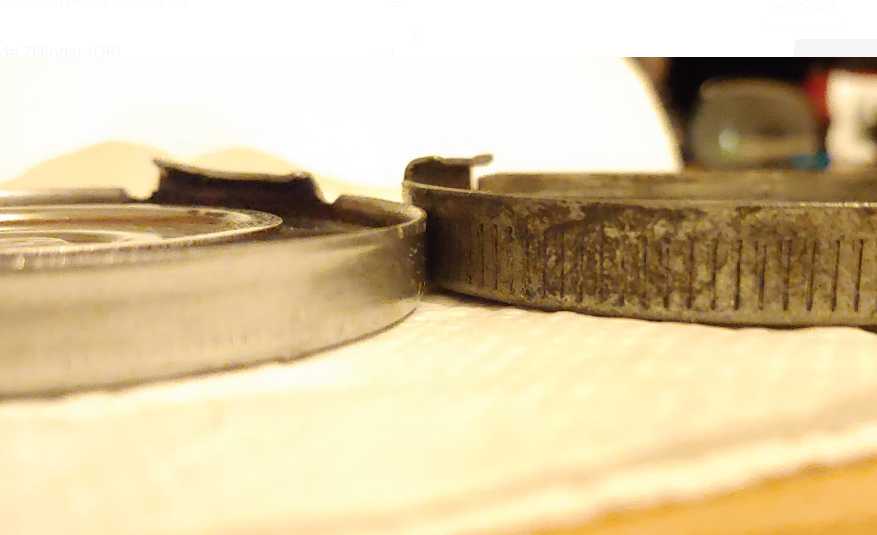
The new cap is also considerably higher than the original cap:
You can see there is much more space between the rubber seal and the locking lips on the new cap than on the original cap (although it's a bit exaggerated by the smaller diameter of the seal, but the differense is still considerable):
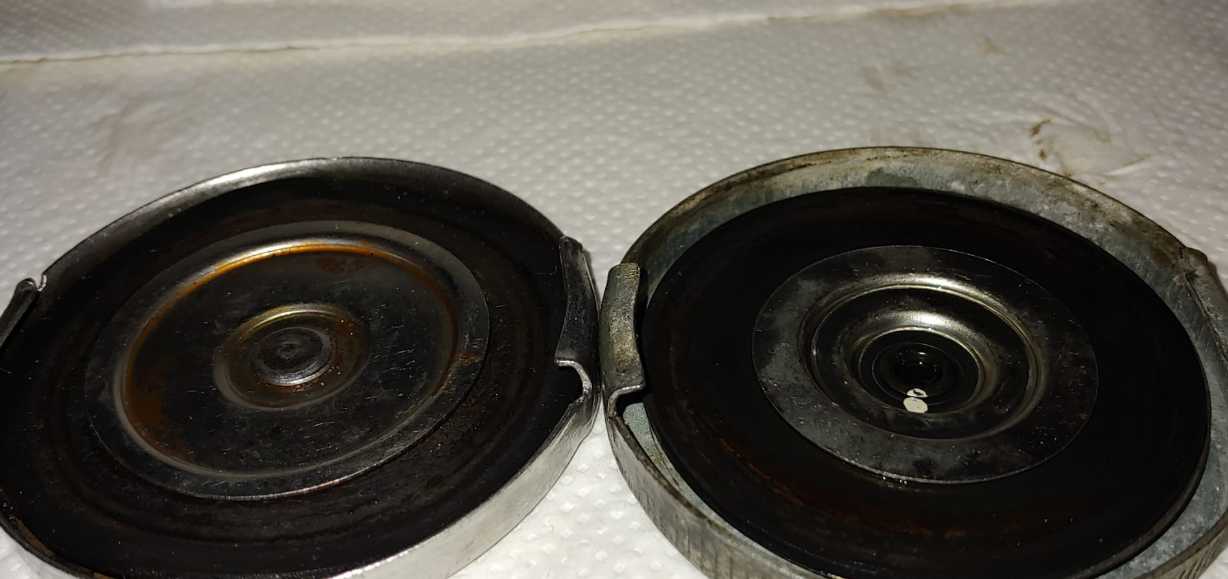
You can also clearly see why it hardly takes any effort to close the new cap:
As for the thermostats, the one on the right is the one I have in the car now. I suspect it is stuck open - it certainly looks different than the other two:
(Yes, I know the sealing ring of the one in the middle is kaput)
Hi Cliff; Have you tried your caps on with the t-stat removed. The caps normally are quite tight to install. I use my water pump pliers to remove and install mine. I got mine at Rock auto and they had several different brands and prices. The really cheap stuff is from China. I think I got Gates or AC Delco and it seals fine and the rubber gasket should go all the way to the outside. sleek
Hi Cliff; As the ogre says Stant is gone but there are options . I went to the Gates site and this cap is available part # 31313. Any parts store that deals with gates should be able to get this for you. Hope this helps. sleek
They are still available from ACDelco Part # 12R16. The original GM part number is 19114590. They Used the same caps on other vehicle such as chev citation. It is the same cap for all model Year whether 2.5 or 2.8. sleek
With the newer style thermostat housing caps (the ones where the cap is able to rotate independently of the rubber seal), pliers of any sort should not be required to loosen or tighten the cap. (Using pliers can possibly deform the cap and/or the top of the housing.) I just use a wet rag to help get a good grip.
hey Patrick when we get older and arthritic it is way easier to use pliers. And the cap I have is the new design from gates. My point is that it's unlikely that the thermostat stem would stop the cap from going into the lock position. sleek
Now the thermostat itself doesn't "click" in place. It just "floats" and is held down by the cap. This might also be the reason why I can't get the original cap to close since the thermostat might not be far enough down the housing.
I had a thermostat which wouldn't click into place, in fact it was sort of sitting there on the little ledge it was supposed to click into. Consequently, it sat too high in the thermostat housing and made the cap not seal correctly and small amounts of coolant would leak around the cap once the car got good and hot.
Ogre recommends a small amount of silicone brake grease to lube up the O ring on the thermostat. I tried that on mine, and with a little wiggling it suddenly clicked into place like it had never done before. And no more leaks! I suspect there are a lot of manufacturing tolerances between old AC Delco, new AC Delco, Gates, Stant, Motorad, etc and whomever else makes thermostats and caps for our cars.
Originally posted by Cliff Pennock: I removed the cap and thermostat just so I could make a comparison.
Just to clarify: The "new" cap takes no effort whatsoever to close, while the "original" cap apparently takes more elbow grease than I can supply without modding something.
New is MotoRad, Old is "Real" GM/Stant. (Stant made a lot of caps for Big 3 & relabel for them.)
The old cap Rivet in center doesn't allow the seal part to rotate freely. Either was made that way or likely has enough rust to block this. Forcing it On like that makes the rubber to "twist" & simply may not seal or rip it and never seal.
New cap may not seal because T-stat house edge is f'd & letting coolant out. If true can try scraping etc to get rust & other crap off the sealing face. May need a new cap even then. After cleaning, Coat that w/ Permatex Green label Brake Grease to prevent more rust w/o "eating" the rubber. Silicon oil/grease if can't get that brake grease.
"height" different may not matter for some T-stat houses. Has to do w/ actual design all parts & Tolerance Stacking.
Ogre recommends a small amount of silicone brake grease to lube up the O ring on the thermostat.
That actually did the trick. 👍
I used a little bit of bearing grease and the thermostat went in quite easily. Now both caps closed easily as where before, I couldn't get the old cap to close now matter how hard I tried.
But with the old cap, it still leaked. It doesn't (seem to) leak with the new cap however. I've only driven it a few block so the engine isn't at temperature yet so I will check if this has solved the leak next time I need to run some errands.
Originally posted by Cliff Pennock: That actually did the trick. 👍
I used a little bit of bearing grease and the thermostat went in quite easily. Now both caps closed easily as where before, I couldn't get the old cap to close now matter how hard I tried.
But with the old cap, it still leaked. It doesn't (seem to) leak with the new cap however. I've only driven it a few block so the engine isn't at temperature yet so I will check if this has solved the leak next time I need to run some errands.
Wrong Grease. Get a new cap before opening weeks to months later.
Any "Normal" & Syn oils/greases has chemical to prevent hard seals but those "eat" brake & coolant rubber parts.
Once they get on those rubber parts, washing won't help even if you wash right now.
I used a little bit of bearing grease and the thermostat went in quite easily. Now both caps closed easily as where before, I couldn't get the old cap to close now matter how hard I tried.
Putting a lubricant on there was the right idea, but...
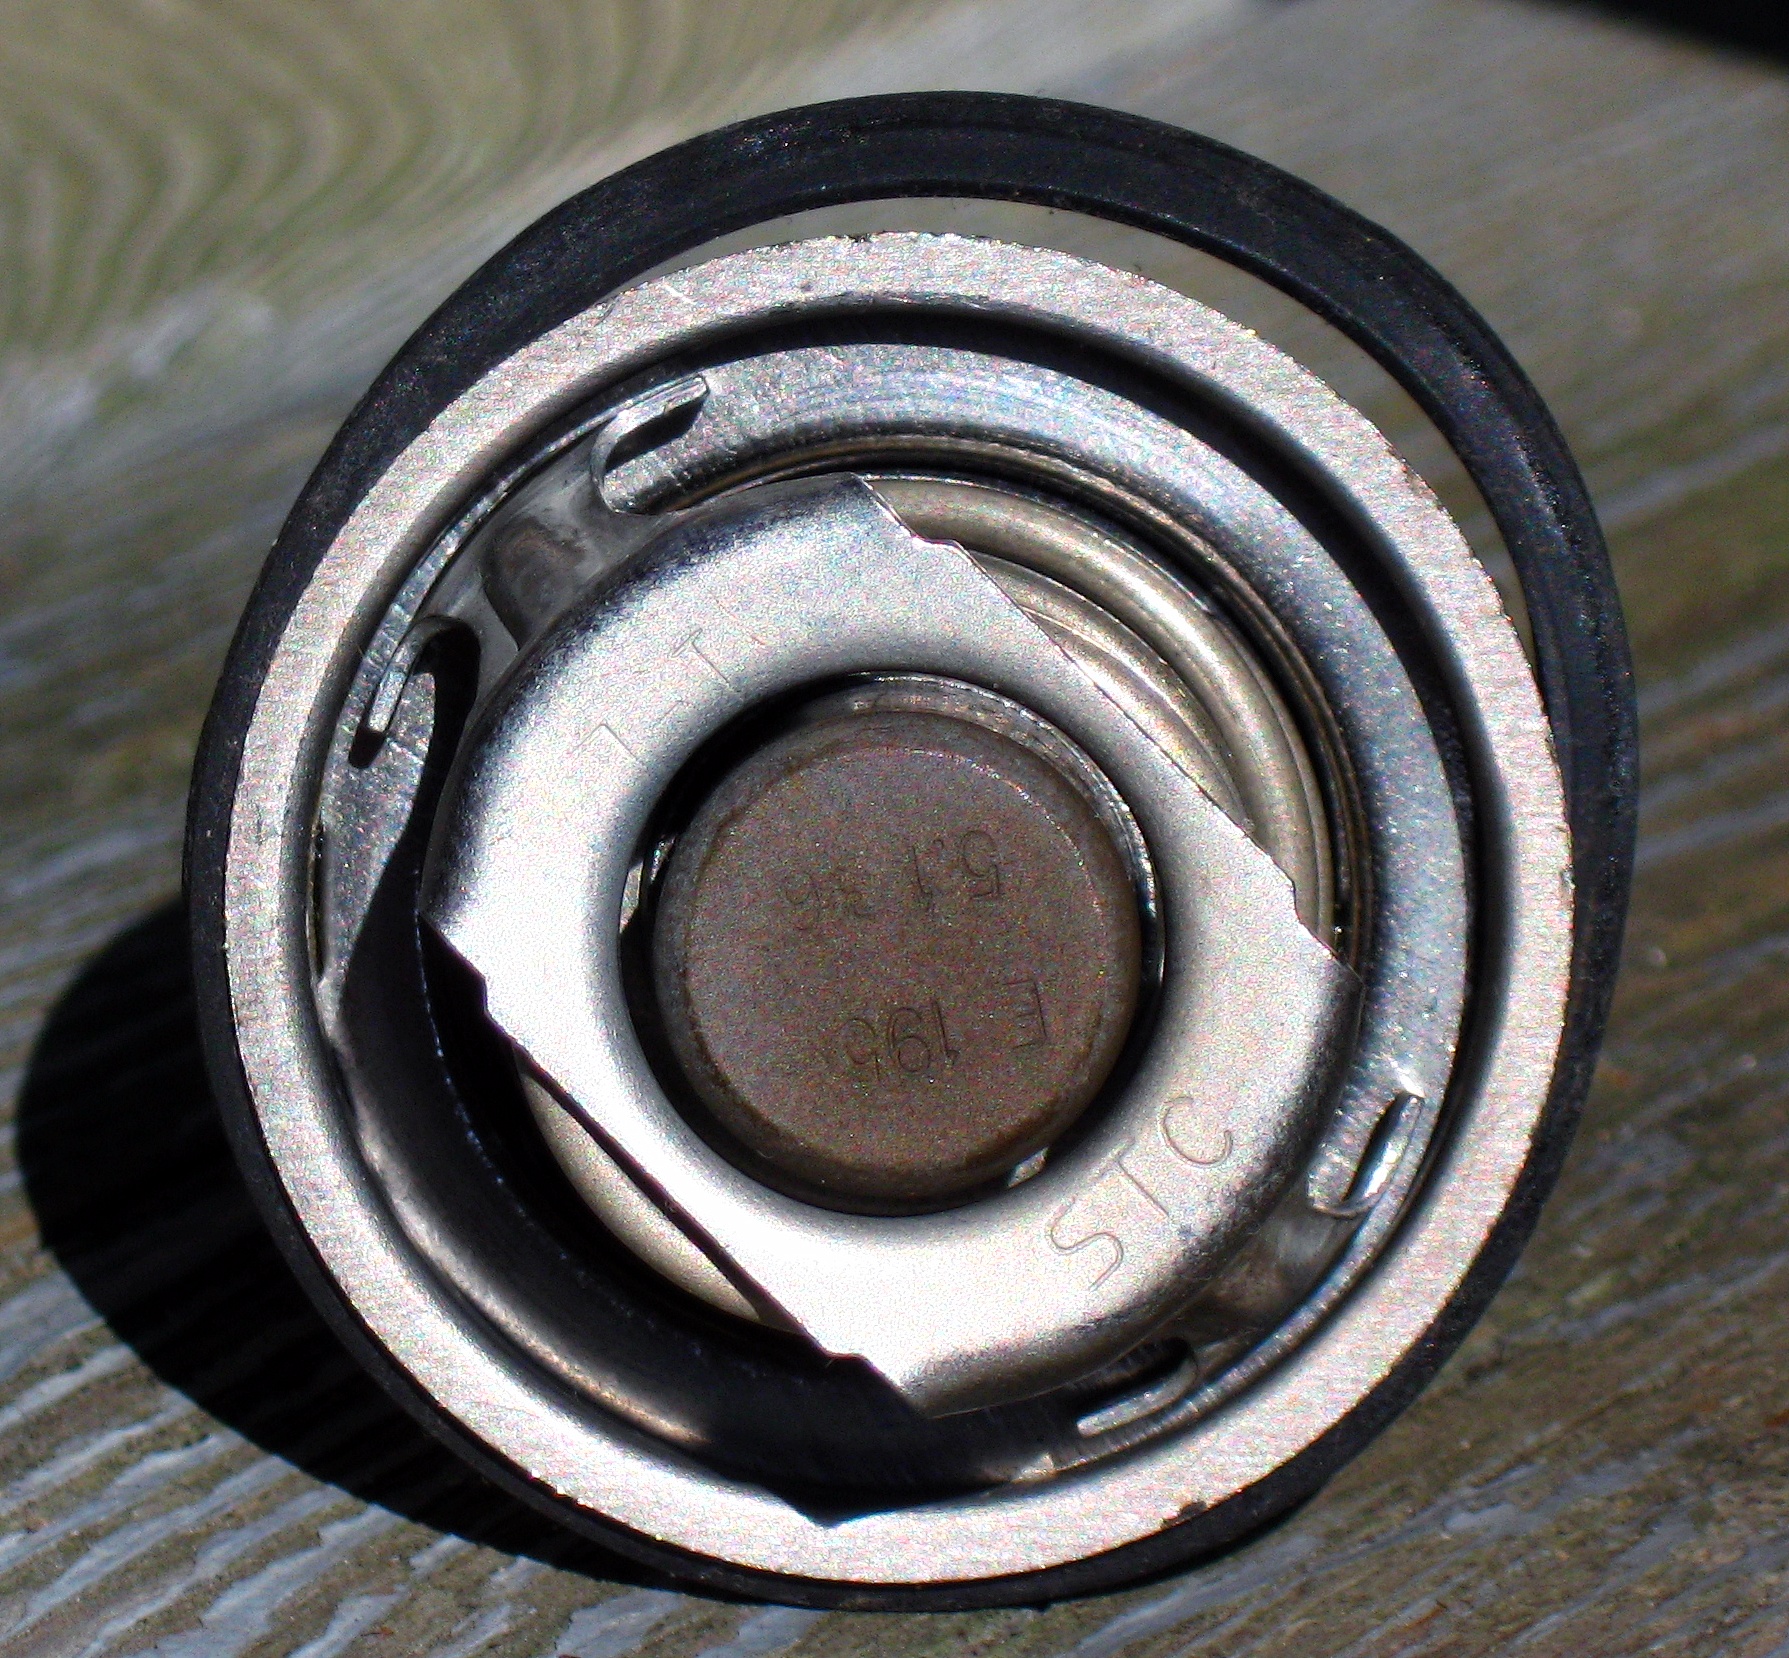
I had the thermostat removed for a few days... and when I went to reinstall it, this is what I saw. Anyone care to guess what's going on here? I do know what happened... I'm just testing your knowledge.
quote
Originally posted by Patrick:
I've been putting grease on the Fiero's thermostat O-ring for decades (for easier installation into the housing), and never had a problem. Even when I pulled this thermostat out last week, the O-ring appeared to be fine. It wasn't until I left the thermostat out of the engine for several days that the O-ring had an opportunity to swell up. Lesson learned!
When installed w/ wrong grease... Cap or o-ring will try to swell etc but pressure keeps them in shape.
When the part is open/removed after, the pressure is gone & swell/warp then. Depending on oil/grease used, Can be just minutes to a few hours before you see the problem & have new part handy or can't drive until cap is replace.