Pennock's Fiero Forum
  Technical Discussion & Questions
  Fuel, Engine Temp or Oil Pressure gauges have problems?

Post New Topic  Post A Reply
Email This Page to Someone! | Printable Version


next newest topic | next oldest topic
Fuel, Engine Temp or Oil Pressure gauges have problems? by theogre
Started on: 04-14-2023 02:37 AM
Replies: 13 (371 views)
Last post by: theogre on 11-10-2023 11:35 AM
theogre
Member
Posts: 32271
From: USA
Registered: Mar 99


Feedback score: N/A
Leave feedback


Total ratings: 568
Rate this member

Report this Post04-14-2023 02:37 AM Click Here to See the Profile for theogreClick Here to visit theogre's HomePageSend a Private Message to theogreEdit/Delete MessageReply w/QuoteDirect Link to This Post
Most think gauge(s) reading wrong or don't work mean is a "dead" senders...
Maybe true, more with older oil sender that loves to leak oil...

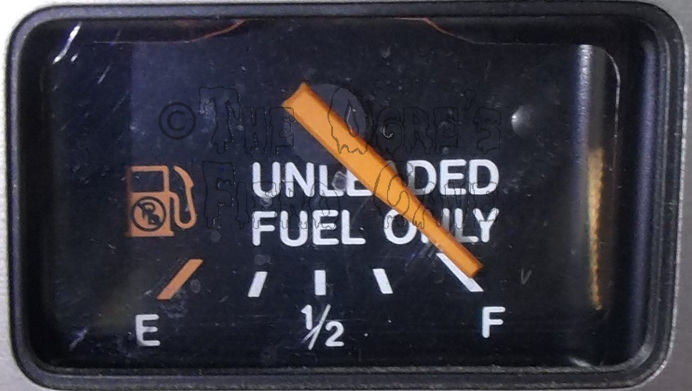
But all three gauges are just relabeled Ω meters. Worse for Fuel and OP because only made to handle 0-90Ω and 2 to 5Ω Error is a Big Deal. Example: Fuel Sender is @ 2Ω because the Tank is near Empty but Fuel Gauge see 7Ω or more because of iffy "wiring" so "lies" saying 1/4 or higher.

And 5+ Ω error is easy because all are in the dash on most cars and have a lot of connections there. Yes, OP is in the "Pod" for GT but can have same problem I'll list here.

Again, Gauge and Dash have many connections just in the Dash besides the large plugs to connect to main harness.
● Each gauge have Power, Ground and "Signal"/Sender. Even if you have good levels to the dash...
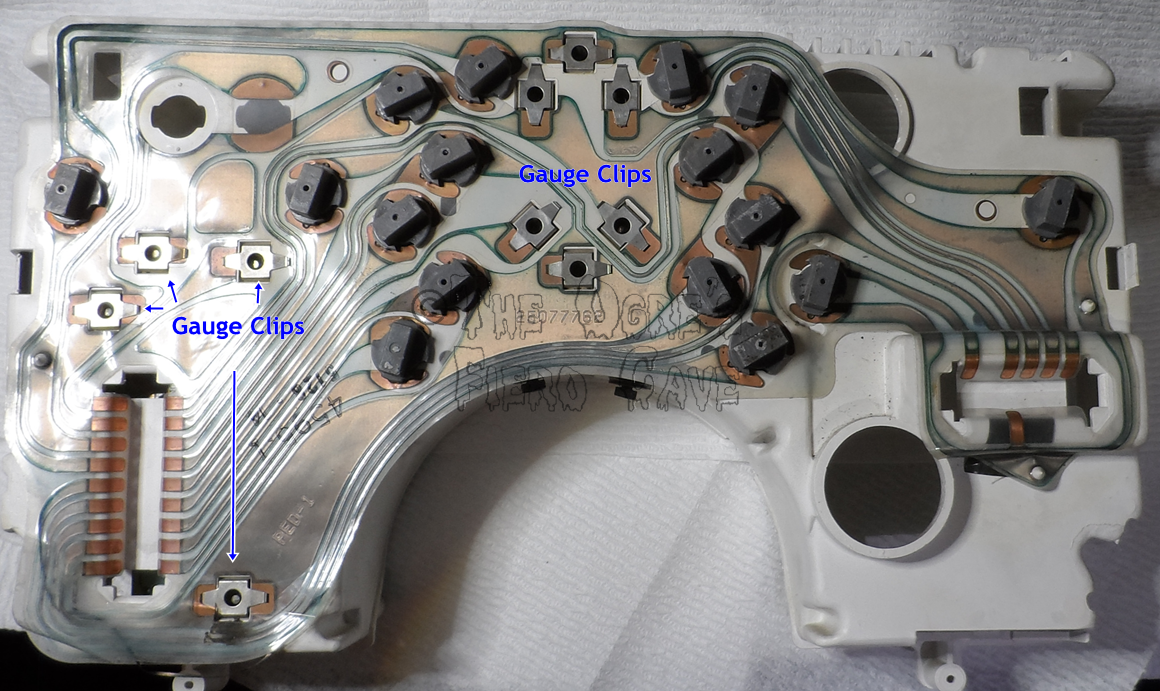
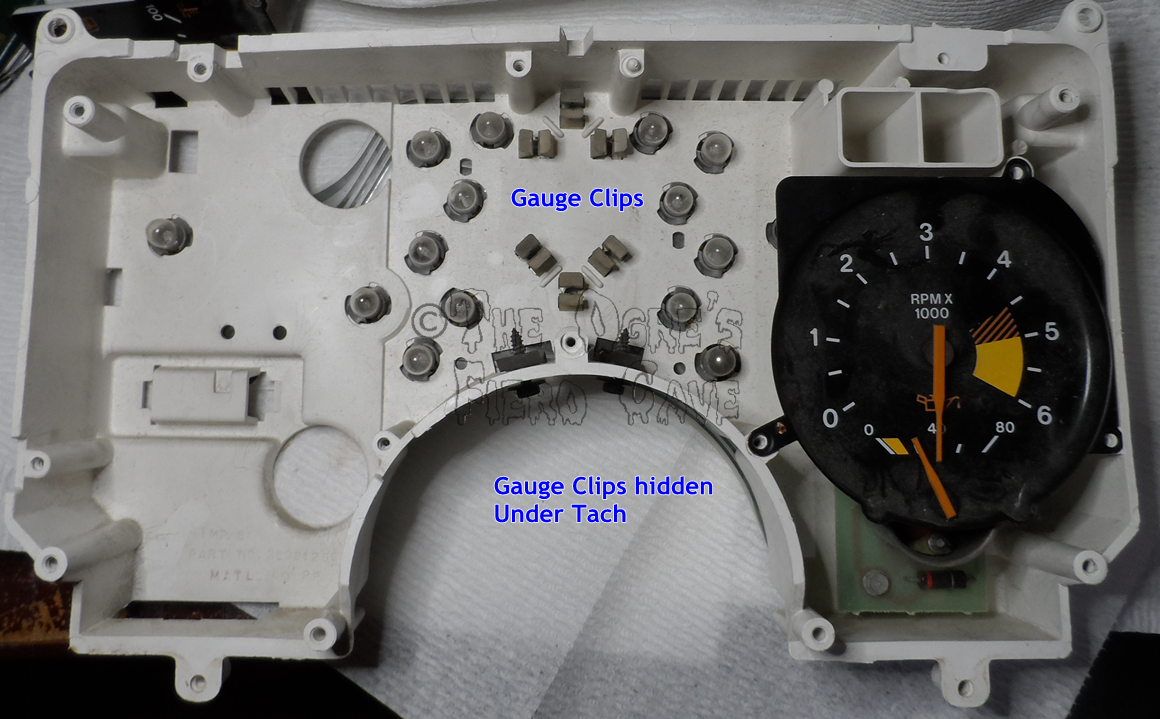
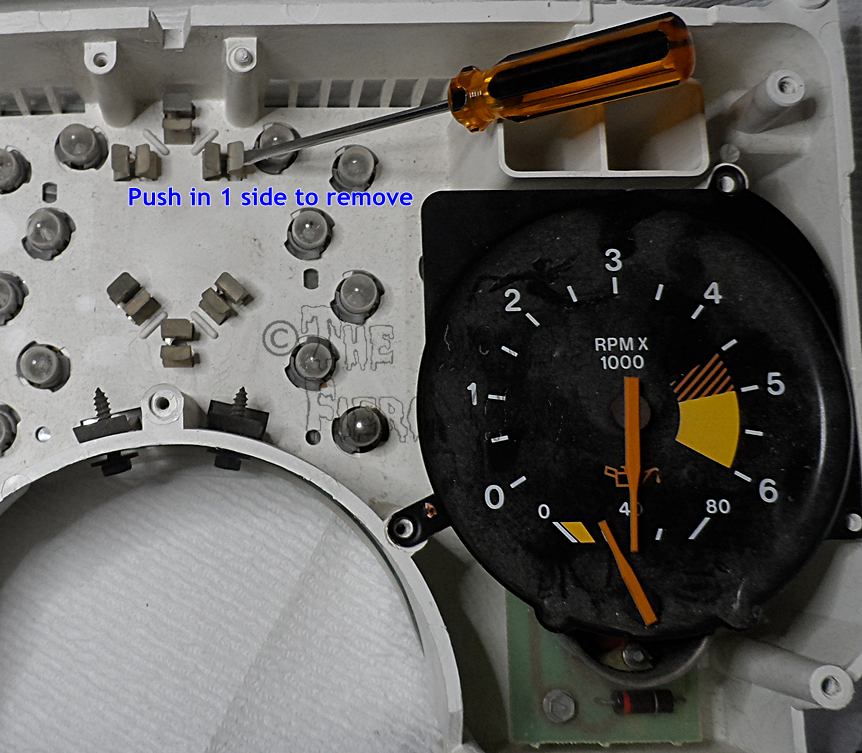
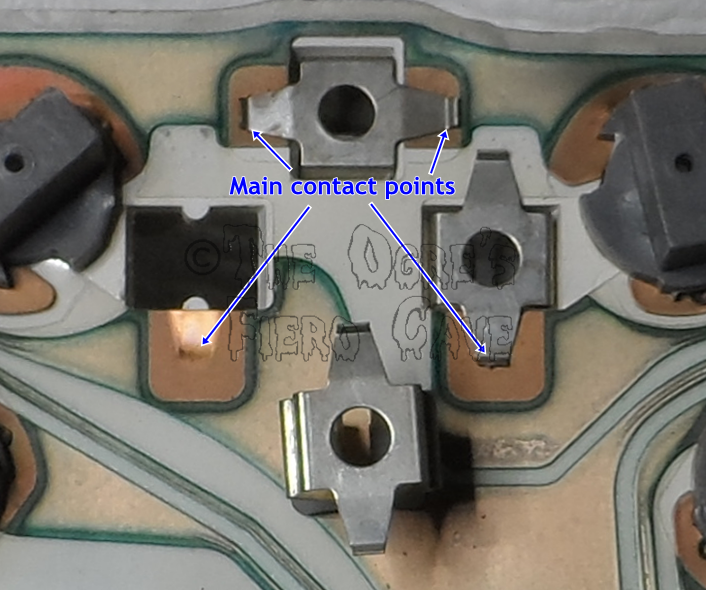
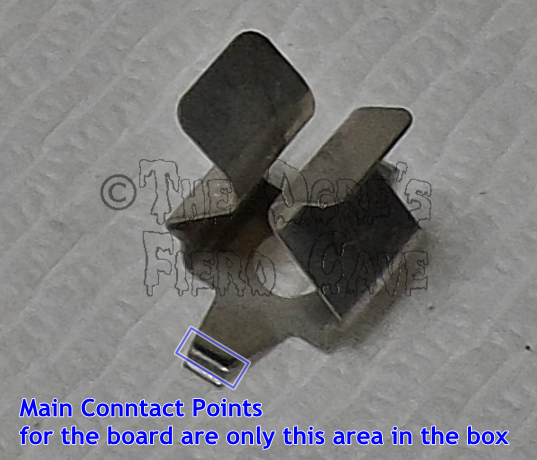
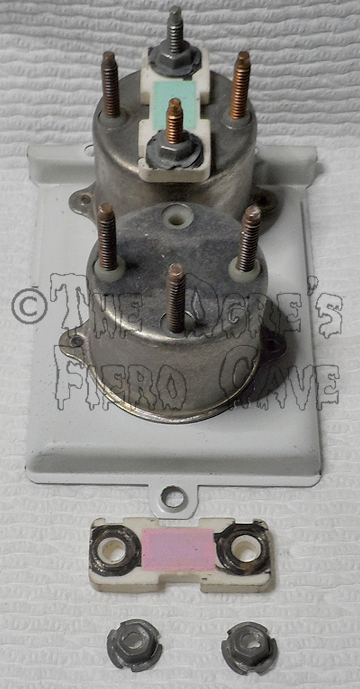
● Each uses a Small stamped metal Clip between Dash Back "board" and stud on the gauge.
● Even then the Gauge have a Resistor and 2 nuts making contact w/ that plus holding the gauge guts to back shell.
● Any to All can "rust" enough so the gauge lies or won't work at all.

So very often you need to clean the contacts shown below.
The Clips and how to remove them... (Picture are of a spare dash with bad board.)


I used Dremel Purple Fiber buffs at minimum speed (Must use variable speed tool or use Scotch Bright by hand) to Carefully scrub the copper on the board and 2 small ears on the Clips. Use CRC Contact Cleaner/lube/protector must say safe for platsic, silicone or Brake grease to stop more "rust." (Again, spare dash and not clean so see where the clip hits.)

You don't need to clean the clips where hits the studs. Studs w/ cleaner/lube on them will do that for you later.

Then put a drop of contact cleaner on the gauge studs and remove the nuts. cleaner can work on threads when removing and reinstalling the nuts.
Wipe the bottom of the nuts and ends of the resistors w/ same cleaner.

⚠️ Warning: 
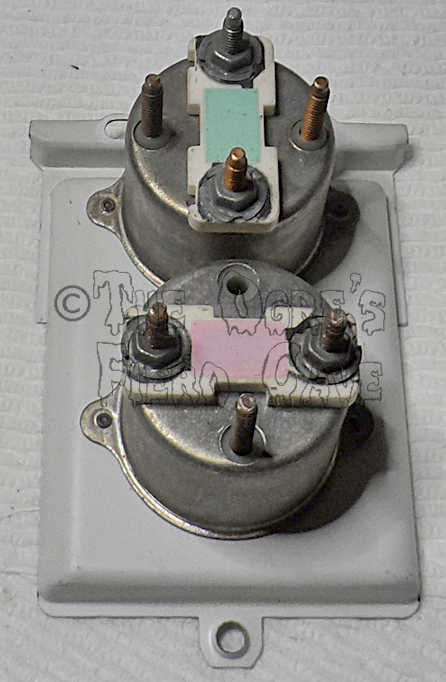
Do Not rotate the Resistor on the Temp Gauge. Must be installed as shown or will short and die. Hopefully only wreck the resistor and gauge. Resistors can have different colors and values. Your resistors may be same colors as above or Not. Do Not switch resistors even if gauges are same to you. Gauge are made in batches at a factory and resistors help "fine tune" a gauge to the job.

Note: If the OP gauge is in/on the Tach module... to the same to all of clips there. Maybe take apart the tach to clean all studs/bolts But this may "piss off" the Tach that have iffy parts causing tach reading wrong.

4Ref:
Dash cluster can be removed w/o taking the whole dash out.
1. Remove Trim under S-column and front of Cluster.
2. Remove 4 7mm hex screws. 2 on bottom you see easy. 2 on top can only see looking thru windshield.
3. Remove 4 10mm "bolts." 2 below the cluster, 2 on top can only see looking thru windshield.
4. Unclip the wires and remove 2 plug on back.
5. Unplug the Speed at bottom.
Then carefully lift and rotate the cluster out.

Is possible to pull the cluster apart w/o that but easier to break parts. Advantage is can do this w/o unplugging the dash and risk of copper on board fails there.

1 small screw holding speed has "blackout" finish to hide it. Make sure same screw goes in after. That and 4 screws holding the clear cover are SAE not Metric.

If doing this inside or out car, you may remove some light bulbs to clear the Dremel.
Dremel Buffs work w/ EZ Lock (EZ402) and Screw (402) mandrel/arbors. So don't buy EZ402 unless you need them for other things. If you need EZ402, often come w/ other things like cutoff wheels cheaper then buying that alone.

------------------
Dr. Ian Malcolm: Yeah, but your scientists were so preoccupied with whether or not they could, they didn't stop to think if they should.
(Jurassic Park)


The Ogre's Fiero Cave

IP: Logged
PFF
System Bot
montegut
Member
Posts: 91
From: Montegut
Registered: May 2007


Feedback score: (3)
Leave feedback

Rate this member

Report this Post04-14-2023 07:23 AM Click Here to See the Profile for montegutSend a Private Message to montegutEdit/Delete MessageReply w/QuoteDirect Link to This Post
Great info. I have to change the tach board on my 87 GT and will do this at the same time. Thanks,
IP: Logged
montegut
Member
Posts: 91
From: Montegut
Registered: May 2007


Feedback score: (3)
Leave feedback

Rate this member

Report this Post04-14-2023 07:28 AM Click Here to See the Profile for montegutSend a Private Message to montegutEdit/Delete MessageReply w/QuoteDirect Link to This Post

montegut

91 posts
Member since May 2007
Great info. I have to change the tach board on my 87 GT and will do this at the same time. Thanks,
IP: Logged
fierofool
Member
Posts: 12820
From: Auburn, Georgia USA
Registered: Jan 2002


Feedback score:    (13)
Leave feedback


Total ratings: 154
Rate this member

Report this Post04-14-2023 04:44 PM Click Here to See the Profile for fierofoolClick Here to visit fierofool's HomePageSend a Private Message to fierofoolEdit/Delete MessageReply w/QuoteDirect Link to This Post
Tim, if your tach is inaccurate, send it up to Jack Gunsett for recalibration. I sent mine and it's now reading correctly. I can PM his address if interested.
IP: Logged
fierosound
Member
Posts: 15147
From: Calgary, Canada
Registered: Nov 1999


Feedback score: N/A
Leave feedback


Total ratings: 286
Rate this member

Report this Post04-15-2023 11:55 AM Click Here to See the Profile for fierosoundClick Here to visit fierosound's HomePageSend a Private Message to fierosoundEdit/Delete MessageReply w/QuoteDirect Link to This Post
DeoxIT products would work well cleaning up electrical contacts in the gauge pod.
https://caig.com/deoxit-d-series/#

I had "sticky buttons" with intermittent contacts in a remote control.
I dismantled it and cleaned up all contact surfaces with DeoxIT G5 to get working like new.

------------------
My World of Wheels Winners (Click on links below)

3.4L Supercharged 87 GT and Super Duty 4 Indy #163

IP: Logged
PhatMax
Member
Posts: 545
From: Peotone, IL. USA
Registered: Apr 2006


Feedback score: N/A
Leave feedback

Rate this member

Report this Post04-15-2023 05:02 PM Click Here to See the Profile for PhatMaxSend a Private Message to PhatMaxEdit/Delete MessageReply w/QuoteDirect Link to This Post
De-oxit is awesome stuff but doesn’t remove enough of the tarnish. Having worked on electronics for 20 years this is how I’ve cleaned all sorts of contacts….even high voltage connections.
Tarnix on a Q-tip, followed by denatured alcohol then Deoxit. Works every time . Don’t use a lot of Tarnix….just enough on a q tip, you don’t have to press hard, just keeping wiping unit the tarnish is gone.

[This message has been edited by PhatMax (edited 04-15-2023).]

IP: Logged
theogre
Member
Posts: 32271
From: USA
Registered: Mar 99


Feedback score: N/A
Leave feedback


Total ratings: 568
Rate this member

Report this Post04-15-2023 08:05 PM Click Here to See the Profile for theogreClick Here to visit theogre's HomePageSend a Private Message to theogreEdit/Delete MessageReply w/QuoteDirect Link to This Post
Can use De-oxit and other cleaners but still need to remove the clips during the job.

De-oxit is expensive and many can't justify for "1 time" use or rarely use before product is lost for whatever reason.
Like Many have open "cans" of many glues sealers etc. and ruined or evap before next use. Even most New aerosol cans can go bad in storage for months or years. Open the valve 1 time then can be bad in days to a few months depending on product. How many have used canned foam insulation and valve is sealed tight or propellant gone next day and can't use rest of product?

Many already have:
Some type of Scott Bright and clone that work. Can use Used Scott Bright many times too like old pieces from kitchen sink. (But Avoid using harder/heavier "Scott Bright" marketed as sand paper or other commercial uses.)
IPA liquid or pads if doesn't have CRC or other contact cleaner.
Silicone oil/grease or Permatex Brake Grease. Just barely coat the connection is enough to protect for many years.

Note: Silicone oil/grease is often sold under different names. Example: Paper Shredder Oil. Look at label or MSDS online.

I get a lot of Dremel stuff at flea markets etc very cheap including buffs used above. But for this say have the tool but need to buy Just Dremel purple buff... 2 per pack costing $4 to $6. This job won't wear the buff so can use again.
New and used Buffs and Scott Bright won't go bad unless maybe sitting in sun light for months or strong solvents. I have Dremel Buffs and other "tips" in storage in & out of OE package for 10+ years in several places. Many sander drum and related are way older then 20+ years as came w/ old Dremel kits.

Just don't use Sand Paper and other things that can wreck the parts here.
Even Dremel Tan and Black Buffs can likely quickly dig a hole in the copper. I won't use Steel or Brass brushes either. Maybe Dremel felt or cloth wheel w/ buffer compound that many people have but never/rarely used could work but again only at lower to lowest speed.

⚠️ Warning: Don't use Single Speed tools, more so run on 120/240 power in whatever country, with most cleaning sanding and polishing "tips." Wire wheels and most other "tips" just wear out very fast and shoot a lot of crap out in all directions at higher speeds.
(Some Battery power single speed tools don't deliver high speed or torque and maybe fine w/ these tips.)

Most tips run better at lower speeds including Flex shaft and 90° attachments.
IP: Logged
PhatMax
Member
Posts: 545
From: Peotone, IL. USA
Registered: Apr 2006


Feedback score: N/A
Leave feedback

Rate this member

Report this Post04-15-2023 10:13 PM Click Here to See the Profile for PhatMaxSend a Private Message to PhatMaxEdit/Delete MessageReply w/QuoteDirect Link to This Post
Sorry Ogre but I would never use any abrasive on any circuit trace…..when you scratch it up….it WILL tarnish faster. Leave it alone and use tarnix, alcohol, deoxit. Also, I have had a can of Deoxit for prob 4 years and have no problem. If you are working on your own cars you will find more uses for it around the home……put some on an Qtip and put it on any battery terminals….remote, smoke detectors, flashlights…etc. if you think it’s expensive, it you prob shouldn’t have bought a Fiero.
IP: Logged
theogre
Member
Posts: 32271
From: USA
Registered: Mar 99


Feedback score: N/A
Leave feedback


Total ratings: 568
Rate this member

Report this Post04-16-2023 03:24 PM Click Here to See the Profile for theogreClick Here to visit theogre's HomePageSend a Private Message to theogreEdit/Delete MessageReply w/QuoteDirect Link to This Post
Do whatever...

Purple buffs are "320 grit."
Most home real Scott Bright are less abrasives and won't damage most things in a kitchen etc. Often only some soft plastic.

Other then maybe the copper on any board, None of them had good surfaces to start. Many parts are intentional design to scratch the parts during install to get thru surface oxides and worse including Weatherpack, Metripack and Other GM ends. Those Clips and Bulb Sockets will scratch the copper because are not machine smooth and often have sharp edges left from stamping to make them.

Any silicone oil/grease or Permatex Brake Grease get into any scratches.
More important, they fill any micro gaps where the clip hits the copper to keep out dirt and other crap.
Unlike Sil oil/grease, PBG will not run out/off of any surface until maybe reach 300+°F. Car Cabin can easily reach 150-200°F when parked.

This isn't a moving part to lube but a lot of dirt with get at the back of the dash, worse as most are missing the thin foam layer on the back cover/trim. Need something other then Deoxit and others that don't leave enough protection in many cars. But you don't need the parts obvious "wet" w/ grease either.

I been using same cleaning method w/ Engine Grounds and more for many years and does not fail.
But in the case of Engine Ground, I do use Wire Brushes and other things before using PBG on them.
Hardware and wire ends have too many and too big gaps to start and need heaver work to remove. Then only grease to fill "lock washer" wire ends stops crap getting in the joint. Unless you aim a Pressure Washer directly at a joint w/ PBG in/on it, "water" won't get in that joint.
IP: Logged
zkhennings
Member
Posts: 1922
From: Massachusetts, USA
Registered: Oct 2010


Feedback score: (3)
Leave feedback

Rate this member

Report this Post04-17-2023 04:46 PM Click Here to See the Profile for zkhenningsSend a Private Message to zkhenningsEdit/Delete MessageReply w/QuoteDirect Link to This Post
Thanks for the tip, I will definitely be doing this
IP: Logged
theogre
Member
Posts: 32271
From: USA
Registered: Mar 99


Feedback score: N/A
Leave feedback


Total ratings: 568
Rate this member

Report this Post04-18-2023 05:05 PM Click Here to See the Profile for theogreClick Here to visit theogre's HomePageSend a Private Message to theogreEdit/Delete MessageReply w/QuoteDirect Link to This Post
If people want buffs cheap... Likely wears out fast or faster but so does Dremel buffs for many jobs...
Amazon and likely others sell sets cheap.
Example: https://www.amazon.com/Roca...Dremel/dp/B075C72PGK
40 in 4 "grits" ~ $12 but different "colors code" then Dremel buffs...
Says "Brown 120Grit, Green 180Grit, Red 320Grit, Black 400Grit "
400 grit if true is less abrasive then Dremel Purple 320 Grit and safer for the copper.

was buying other Dremel stuff came up in list at bottom.

4Ref: When copying amazon links, cut off all after name/dp/pn Example: Polishing-Dremel/dp/B075C72PGK/ref=xxxxxxxxxxxxx cut off starting at /ref=
Even PFF autolink can/will edit what displayed but work right in the link code.
IP: Logged
PFF
System Bot
theogre
Member
Posts: 32271
From: USA
Registered: Mar 99


Feedback score: N/A
Leave feedback


Total ratings: 568
Rate this member

Report this Post10-04-2023 01:00 PM Click Here to See the Profile for theogreClick Here to visit theogre's HomePageSend a Private Message to theogreEdit/Delete MessageReply w/QuoteDirect Link to This Post
Update to add testing data...

How to "test" fuel/oil gauge w/ Resistor...
Fuel: Test @ C502 on "Firewall" that often hinds under other wires goes thru the wall. Unplug & Test between Pink & Black wires. Make sure the plug is push down again after testing so exhaust doesn't burn it.
Oil: Pull sender plug @ test Tan wire to engine.

Short = Empty/0psi
45Ω = Half Scale
90Ω = Full Scale

Note: Gauges can see a bit Higher resistance from the sender even when working 100% & why Fuel gauge reads "over full" many times. "over full" mean just a little off of scale. Not Pegged when sender is unplugged/dead.

Standard Resistors can get close to above, like 42 or 48Ω, & "good enough" to point where a problem is.
Many don't have loose resistors & many things are make of "surface mount" parts now but often have access to old toasters, hair driers etc that can cut a piece of resistance wire to make these low Ω resistors.

How to "test" Temp gauge w/ Resistor...
Warning: Temp Gauge Sender is NTC resistor type but Is Not same resistor curve used by ECM in MAT/IAC or ECT. Do not trust nearly all charts posted here or elsewhere.

Unplug the sender, test wire to engine. Color of Wire varies per year/engine. Short the plug to ground to see light turn On or Gauge > max temp.

Sender/Test Resistance:
1365Ω @ 100°F 38°C
55Ω @ 260°F 127°C

Maybe make these out of "Volume" controls of old radios etc. But I think many max out @ 10,000Ω so need to add fix resistors.

Can test on the back of the dash or in other places but have to unplug the oil or fuel sender same as above. Not covering the details here.
If tested on the Dash, make sure isn't "12v" or can heat up or burn the resistors. Look carefully @ the clips on the back, if a clip shares copper w/ other clips etc then that clip is either "12v" or Ground. Test w/ Volt meter to car frame to make sure.

[This message has been edited by theogre (edited 11-08-2023).]

IP: Logged
theogre
Member
Posts: 32271
From: USA
Registered: Mar 99


Feedback score: N/A
Leave feedback


Total ratings: 568
Rate this member

Report this Post11-08-2023 12:00 PM Click Here to See the Profile for theogreClick Here to visit theogre's HomePageSend a Private Message to theogreEdit/Delete MessageReply w/QuoteDirect Link to This Post
Example of Fuel gauge "reading" over full...

This is what I get nearly every time I fill the tank now after above fix w/ Engine Running because Sender is "pegged" @ End of Travel limit & reads ~ 91-92Ω @ C502.
Before you ask... & that's stopped filling @ first time the nozzle trips Off @ most stations. If you "stuff" the tank then you can "poison" the EVAP can or worse leaking liquid fuel out of iffy vents etc.

Note: Even GM used several Senders over just Fiero years. Then add TFS & other senders to replace bad senders.
So actual full Ω can vary over 90 to 93Ω when the sender is @ EoT

Engine Running vs Not means System Volts = output from the Alt vs Battery Volts & change gauge reading a little to be on Full mark more w/ engine Off.
IP: Logged
theogre
Member
Posts: 32271
From: USA
Registered: Mar 99


Feedback score: N/A
Leave feedback


Total ratings: 568
Rate this member

Report this Post11-10-2023 11:35 AM Click Here to See the Profile for theogreClick Here to visit theogre's HomePageSend a Private Message to theogreEdit/Delete MessageReply w/QuoteDirect Link to This Post
Bigger pic from an older thread to test gauges etc.
This images is larger than 153600 bytes. Click to view.
Example: you test Fuel sender @ C502 get 90Ω then pull C3 or the Gauge & read different then wiring have problems.
Can be the sender wire or iffy ground/power to the gauge make gauge reading off.

[This message has been edited by theogre (edited 11-10-2023).]

IP: Logged

next newest topic | next oldest topic

All times are ET (US)

Post New Topic  Post A Reply
Hop to:

Contact Us | Back To Main Page

Advertizing on PFF | Fiero Parts Vendors
PFF Merchandise | Fiero Gallery | Ogre's Cave
Real-Time Chat | Fiero Related Auctions on eBay


Copyright (c) 1999, C. Pennock