Pennock's Fiero Forum
  Technical Discussion & Questions
  86 V6 4-Speed Slave Removal

Post New Topic  Post A Reply
Email This Page to Someone! | Printable Version


next newest topic | next oldest topic
86 V6 4-Speed Slave Removal by Skybax
Started on: 07-27-2021 09:31 PM
Replies: 12 (313 views)
Last post by: Skybax on 08-03-2021 10:18 PM
Skybax
Member
Posts: 2384
From: PA
Registered: Jun 2003


Feedback score: N/A
Leave feedback


Total ratings: 78
Rate this member

Report this Post07-27-2021 09:31 PM Click Here to See the Profile for SkybaxSend a Private Message to SkybaxEdit/Delete MessageReply w/QuoteDirect Link to This Post
I replaced the slave cylinder on my 88 GT about 15 years ago with no problem, but I'm looking for some guidance on replacing the slave cylinder on my 86 GT, because I'm staring at this thing and can't remember/figure out how it unbolts! How do you get to the closer nut under the heat shield, or how do you get the heat shield off?

Sigh, is this what happens as you get older, because after working on cars for 36 years and replacing one of these slave cylinders 15 years ago, I shouldn't be scratching my head on this, lol.

[This message has been edited by Skybax (edited 07-27-2021).]

IP: Logged
PFF
System Bot
fierofool
Member
Posts: 12811
From: Auburn, Georgia USA
Registered: Jan 2002


Feedback score:    (13)
Leave feedback


Total ratings: 154
Rate this member

Report this Post07-27-2021 10:07 PM Click Here to See the Profile for fierofoolClick Here to visit fierofool's HomePageSend a Private Message to fierofoolEdit/Delete MessageReply w/QuoteDirect Link to This Post
That shield does present a problem on the 4-speed. Try to get the forward nut loose. From the front side, you can usually get to it with a wrench. That part of the shield is usually slotted. The one nearest in the photo will require a deepwell socket and maybe a flex head ratchet.
IP: Logged
fierofool
Member
Posts: 12811
From: Auburn, Georgia USA
Registered: Jan 2002


Feedback score:    (13)
Leave feedback


Total ratings: 154
Rate this member

Report this Post07-27-2021 10:08 PM Click Here to See the Profile for fierofoolClick Here to visit fierofool's HomePageSend a Private Message to fierofoolEdit/Delete MessageReply w/QuoteDirect Link to This Post

fierofool

12811 posts
Member since Jan 2002
Something you might want to consider once you have the slave off is to purchase Rodney Dickman's 4-speed slave bracket. The factory aluminum is prone to breaking. And while you're at it, order Rodney's slave, too.
IP: Logged
Skybax
Member
Posts: 2384
From: PA
Registered: Jun 2003


Feedback score: N/A
Leave feedback


Total ratings: 78
Rate this member

Report this Post07-27-2021 10:57 PM Click Here to See the Profile for SkybaxSend a Private Message to SkybaxEdit/Delete MessageReply w/QuoteDirect Link to This Post
Thanks, I already ordered Rodney's, but I didn't know he had a upgraded better bracket or I would have ordered that also, dang.

[This message has been edited by Skybax (edited 07-27-2021).]

IP: Logged
PK
Member
Posts: 1249
From: Oxford, England
Registered: Sep 2001


Feedback score: (2)
Leave feedback

Rate this member

Report this Post07-28-2021 06:45 AM Click Here to See the Profile for PKSend a Private Message to PKEdit/Delete MessageReply w/QuoteDirect Link to This Post
I was wondering why I didn't have a problem when doing my slave cyl years ago. 86 V6)..ahh I didn't know there was supposed to be a heat shield there. ¯\_ʘ‿ʘ_/¯

Guess that's another part I need to find somewhere.

Good luck with yours Skybax.
IP: Logged
Skybax
Member
Posts: 2384
From: PA
Registered: Jun 2003


Feedback score: N/A
Leave feedback


Total ratings: 78
Rate this member

Report this Post07-28-2021 10:59 AM Click Here to See the Profile for SkybaxSend a Private Message to SkybaxEdit/Delete MessageReply w/QuoteDirect Link to This Post
I ordered Rodney's master and slave, and I'm familiar with all the different bleeding techniques over the decades, so below is my plan of action and have a few questions...

- remove both master and slave
- spray brake cleaner thru line and blow out with air
- bench bleed master and install (bench bleed on bench or on the car?)
- install banjo facing up onto a non-bent pedal and adjust any slack if needed
- install line on slave with Rodney's one-way speed bleeder but don't bolt it to trans
- (before I start to bleed line/slave should the master be relaxed or compressed?)
- compress slave rod downward, drawing fluid thru system, with bleeder facing upward
- do this twice, refill master, again and again until its all fluid coming out
- remove one-way speed bleeder, compress slave rod and hold, while installing/tighten permanent bleeder
- bolt the slave onto the trans
- hopefully happy shifting!

[This message has been edited by Skybax (edited 07-28-2021).]

IP: Logged
pmbrunelle
Member
Posts: 4376
From: Grand-Mère, Québec
Registered: Sep 2008


Feedback score: N/A
Leave feedback


Total ratings: 62
Rate this member

Report this Post07-28-2021 12:48 PM Click Here to See the Profile for pmbrunelleSend a Private Message to pmbrunelleEdit/Delete MessageReply w/QuoteDirect Link to This Post
Rodney's slave has threaded holes for the studs, and the studs are kept from turning with threadlocker.

I suggest unscrewing the studs, and using long-ish bolts inserted through the bracket, threaded into the slave cylinder to fix it into place.

Then, slip the heat shield onto the excess bolt length that sticks out beyond the slave cylinder.

Secure the heat shield using nuts.


I have a different heat shield as I have a modified exhaust, but I think the same idea would work with a stock heat shield. It would solve the apparent assembly issue.
IP: Logged
fierofool
Member
Posts: 12811
From: Auburn, Georgia USA
Registered: Jan 2002


Feedback score:    (13)
Leave feedback


Total ratings: 154
Rate this member

Report this Post07-28-2021 07:46 PM Click Here to See the Profile for fierofoolClick Here to visit fierofool's HomePageSend a Private Message to fierofoolEdit/Delete MessageReply w/QuoteDirect Link to This Post
That looks like a Getrag slave. Is it? The 4-speed Rodney mount I have looks nothing like that. For the heat shield, I simply clip the flange so that rather than having a hole, it becomes a slot that can be slipped down over the studs just before doing the final tightening.

[This message has been edited by fierofool (edited 07-28-2021).]

IP: Logged
pmbrunelle
Member
Posts: 4376
From: Grand-Mère, Québec
Registered: Sep 2008


Feedback score: N/A
Leave feedback


Total ratings: 62
Rate this member

Report this Post07-28-2021 08:03 PM Click Here to See the Profile for pmbrunelleSend a Private Message to pmbrunelleEdit/Delete MessageReply w/QuoteDirect Link to This Post
That's a cast iron Rockauto slave cylinder for the Muncie 4-speed. I did wise up and buy a Rodney Dickman slave afterwards, which is made of aluminium.

The mounting bracket is the stock aluminium bracket that comes on Muncie 4-speed Fieros. Rodney Dickman makes his mounting bracket from pieces of steel welded together.
IP: Logged
Skybax
Member
Posts: 2384
From: PA
Registered: Jun 2003


Feedback score: N/A
Leave feedback


Total ratings: 78
Rate this member

Report this Post07-28-2021 08:14 PM Click Here to See the Profile for SkybaxSend a Private Message to SkybaxEdit/Delete MessageReply w/QuoteDirect Link to This Post
Two question that I'm not sure about...

- bench bleed master on the bench or bolted on the car? (or not at all)
- when I draw fluid thru line to slave should the master be relaxed or compressed?
IP: Logged
Skybax
Member
Posts: 2384
From: PA
Registered: Jun 2003


Feedback score: N/A
Leave feedback


Total ratings: 78
Rate this member

Report this Post07-30-2021 10:23 PM Click Here to See the Profile for SkybaxSend a Private Message to SkybaxEdit/Delete MessageReply w/QuoteDirect Link to This Post
Welp, rough afternoon today...

- bench bled master
- installed master
- removed pedal to inspect, not bent
- installed new pedal bushings and new grease
- adjusted banjo
- installed new slave cylinder and bled (that heat shield sucks)
- everything hooked up and ready to go for test drive
- pushed pedal in to test and... "SNAP" ...the aluminum slave bracket broke

No car show for me tomorrow, totally bummed.

Removed bracket and under closer inspection it was already cracked 50% at the top bolt location.

What really sucks is I would have ordered the replacement steel bracket when I ordered the master/slave if I had known it existed cause I had it all apart.

Have to wait till next week when steel bracket arrives and try again.
IP: Logged
PFF
System Bot
fierofool
Member
Posts: 12811
From: Auburn, Georgia USA
Registered: Jan 2002


Feedback score:    (13)
Leave feedback


Total ratings: 154
Rate this member

Report this Post07-30-2021 10:56 PM Click Here to See the Profile for fierofoolClick Here to visit fierofool's HomePageSend a Private Message to fierofoolEdit/Delete MessageReply w/QuoteDirect Link to This Post
Sorry I jinxed your slave bracket.
IP: Logged
Skybax
Member
Posts: 2384
From: PA
Registered: Jun 2003


Feedback score: N/A
Leave feedback


Total ratings: 78
Rate this member

Report this Post08-03-2021 10:18 PM Click Here to See the Profile for SkybaxSend a Private Message to SkybaxEdit/Delete MessageReply w/QuoteDirect Link to This Post
Good news, surgery on the Fiero went well today, have to admit it was a little unsettling, short summary for future members that run across this...

- Replaced the master and slave using Rodney's quality replacements.

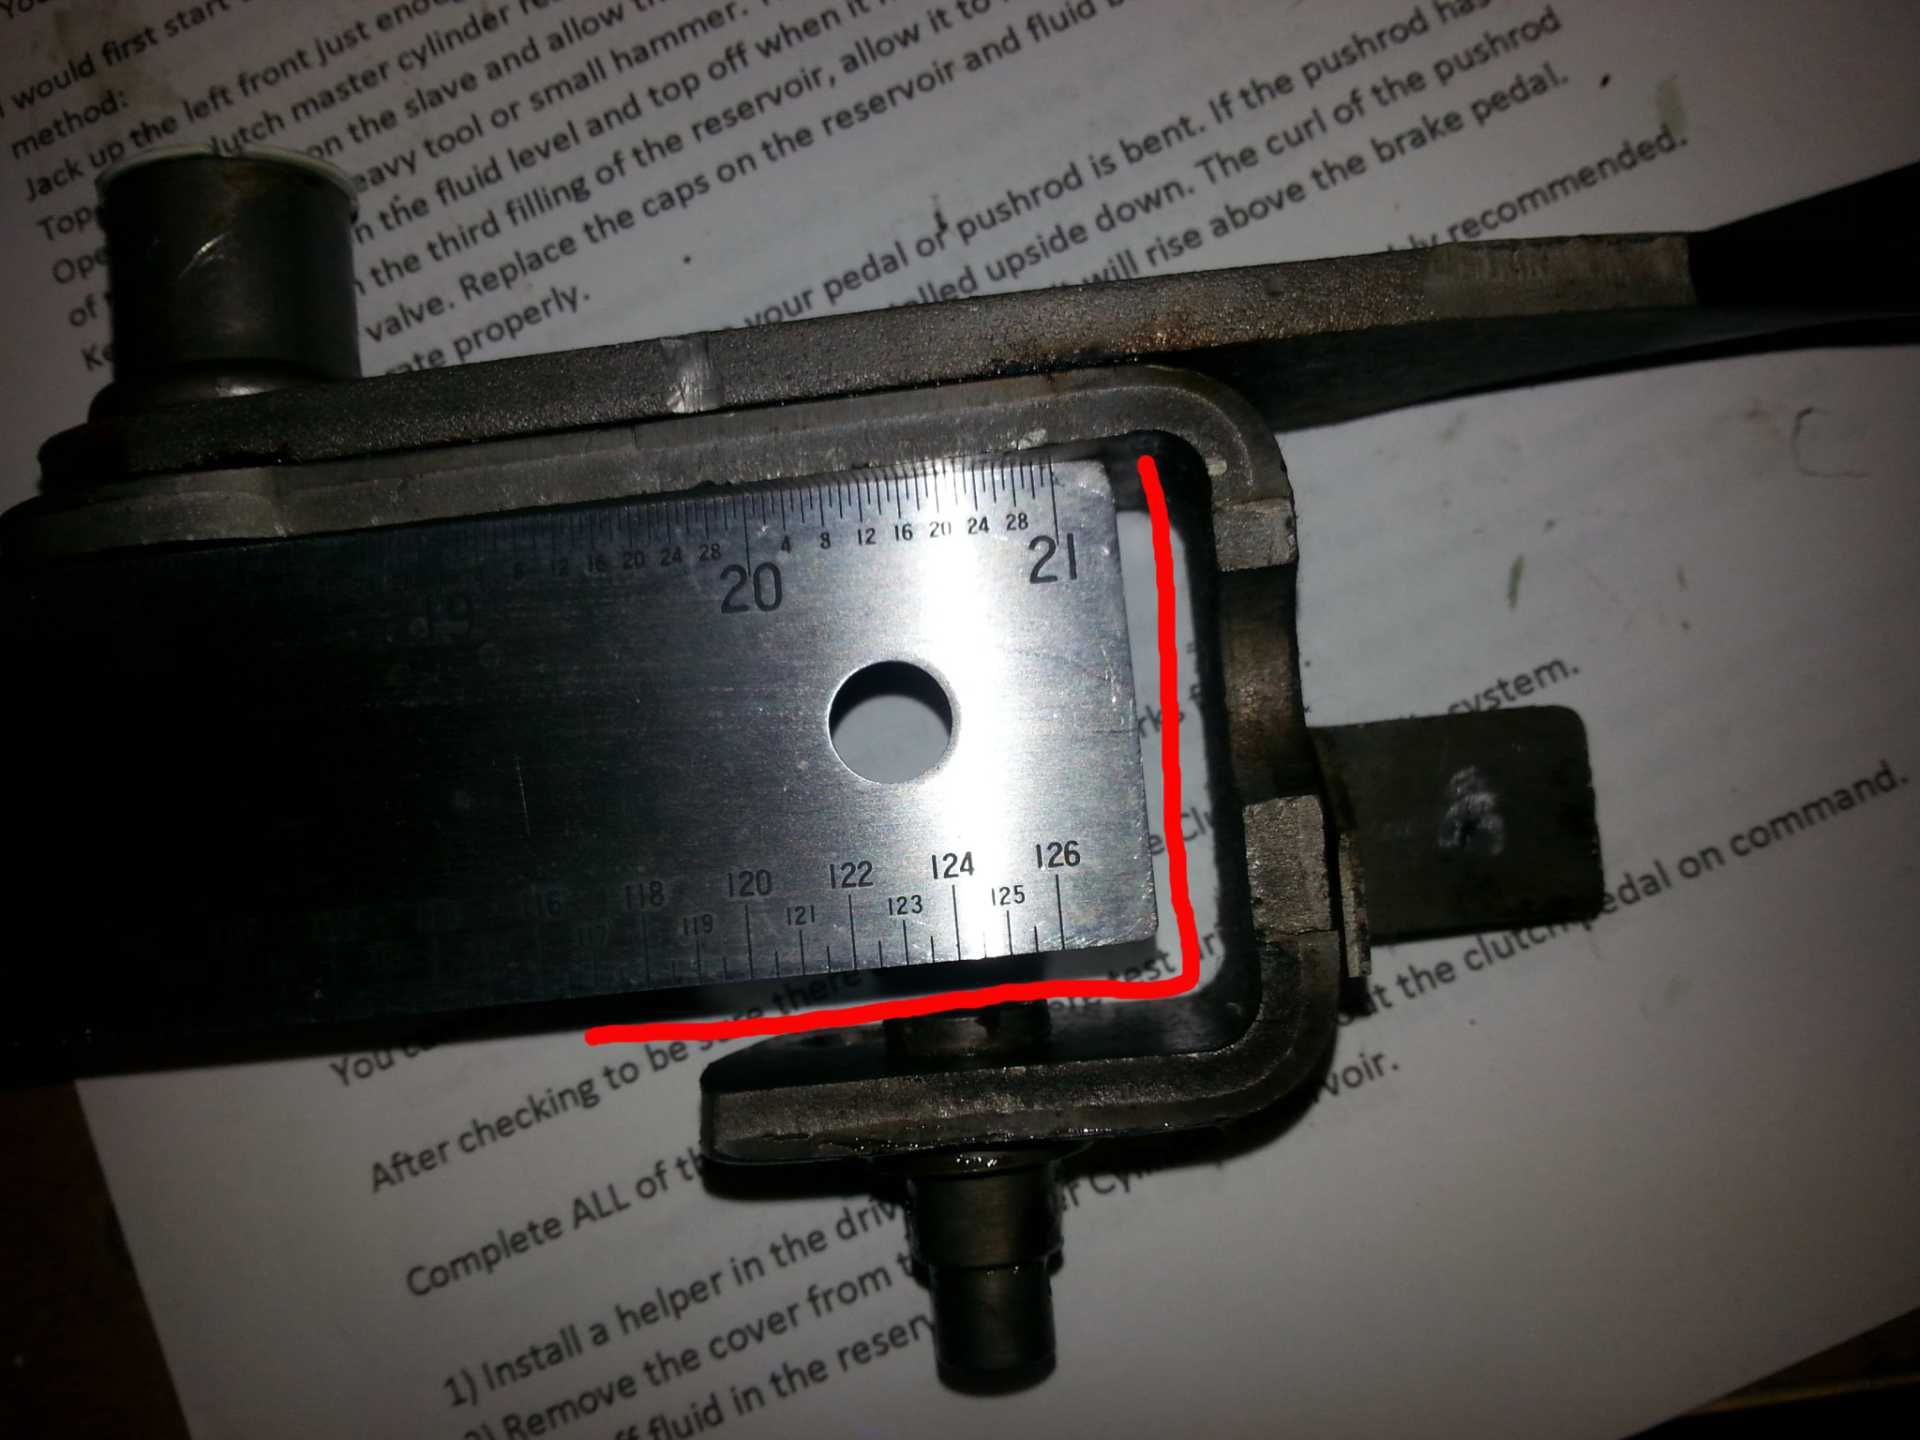
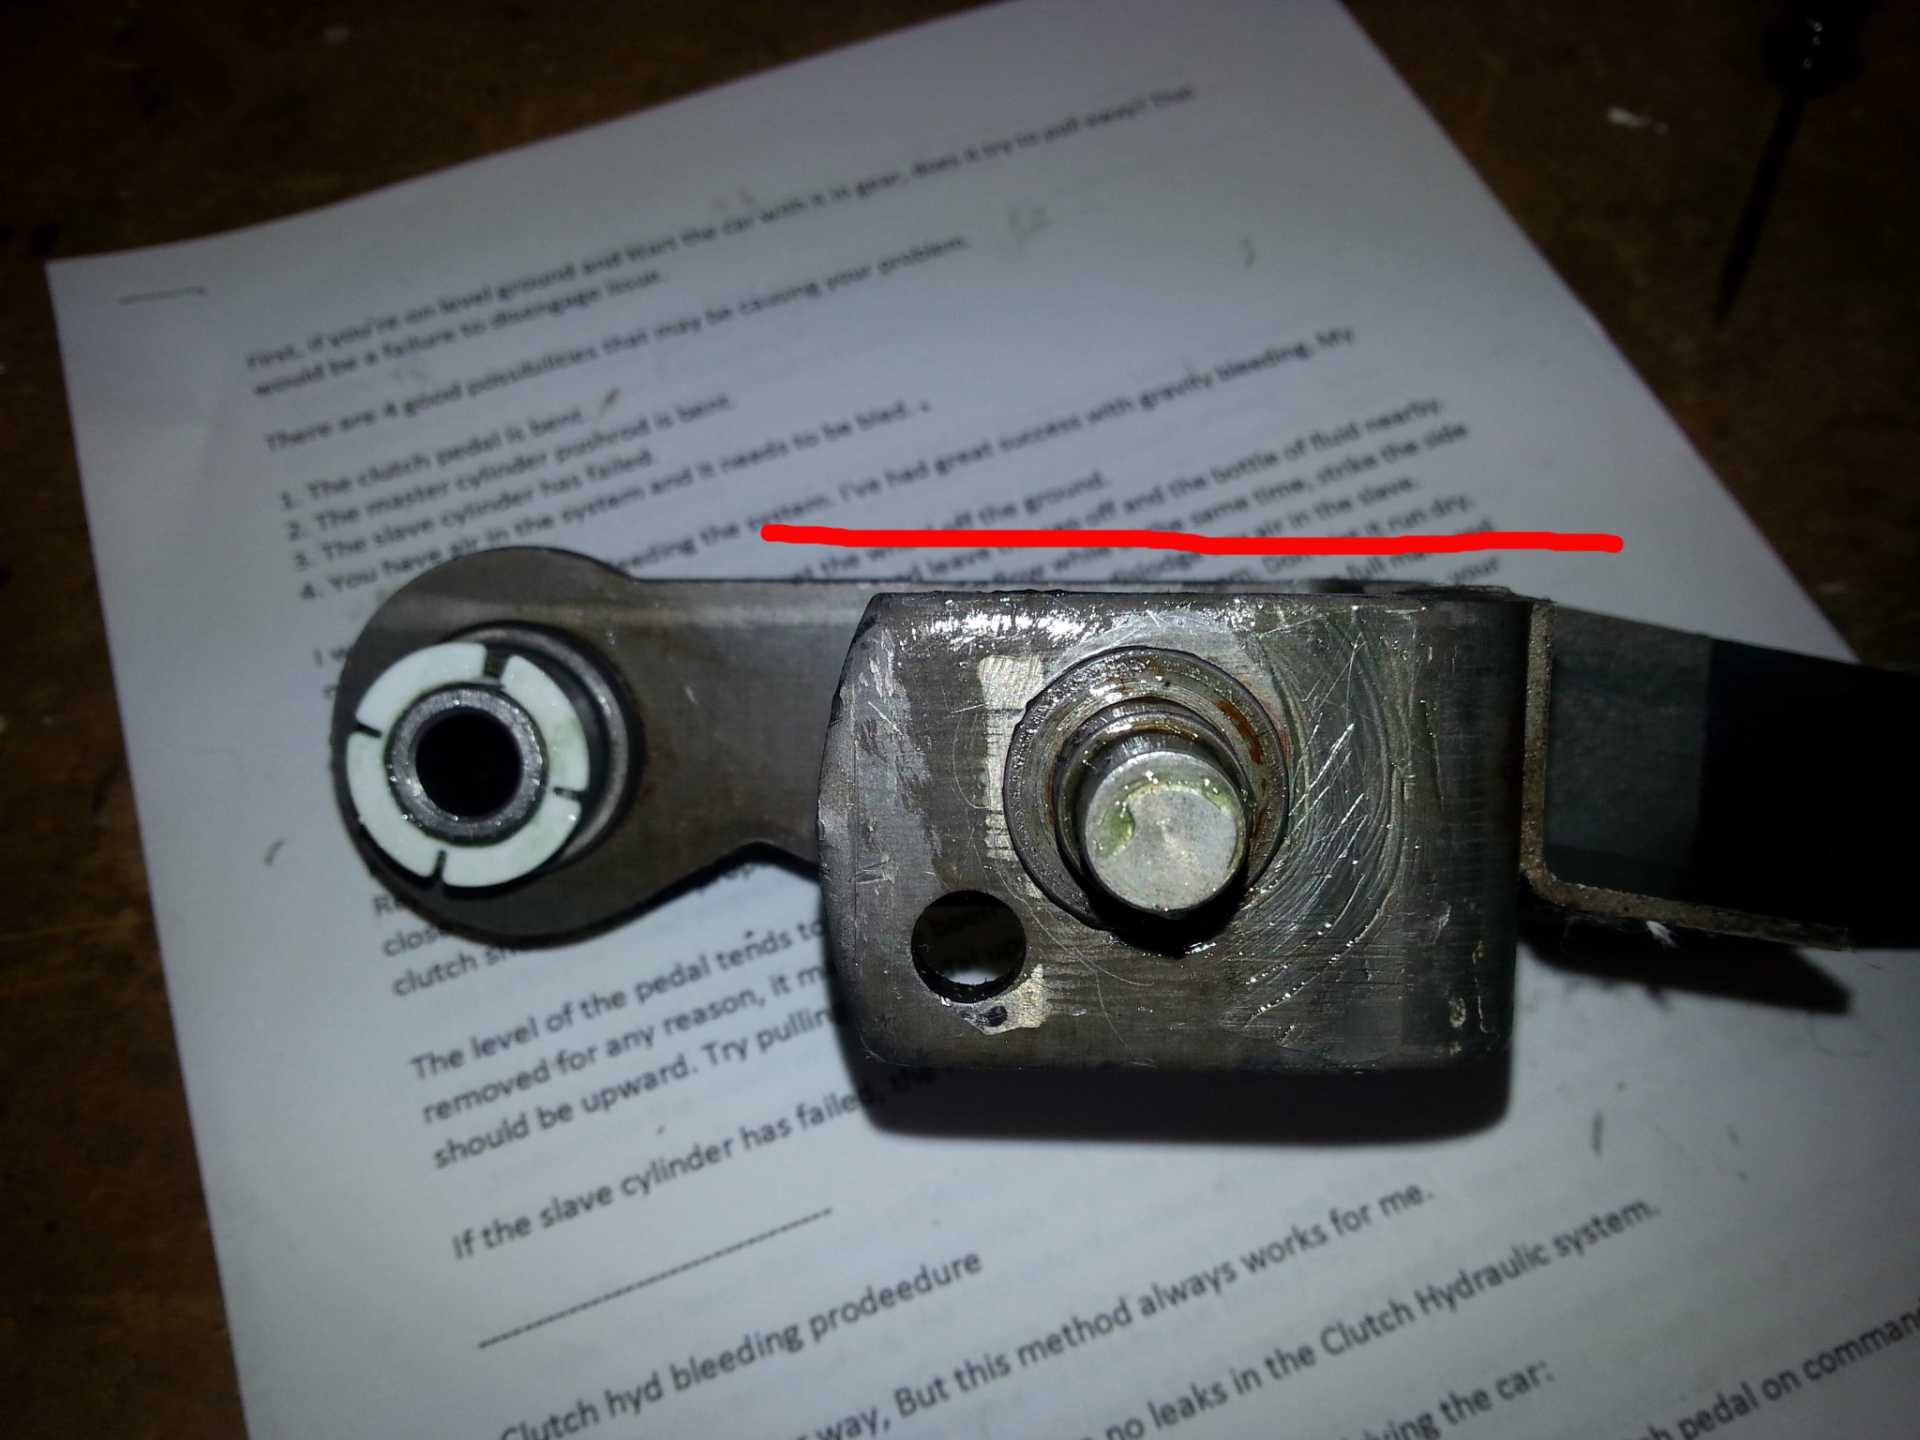
- Installed new pedal bushings and new grease when I removed pedal to verify it wasn't bent. Adjusted banjo so pedal is freely at the top of the stroke, but not maxed out, you want about 1/16" to 1/8" of play at the initial onset of the pedal throw.

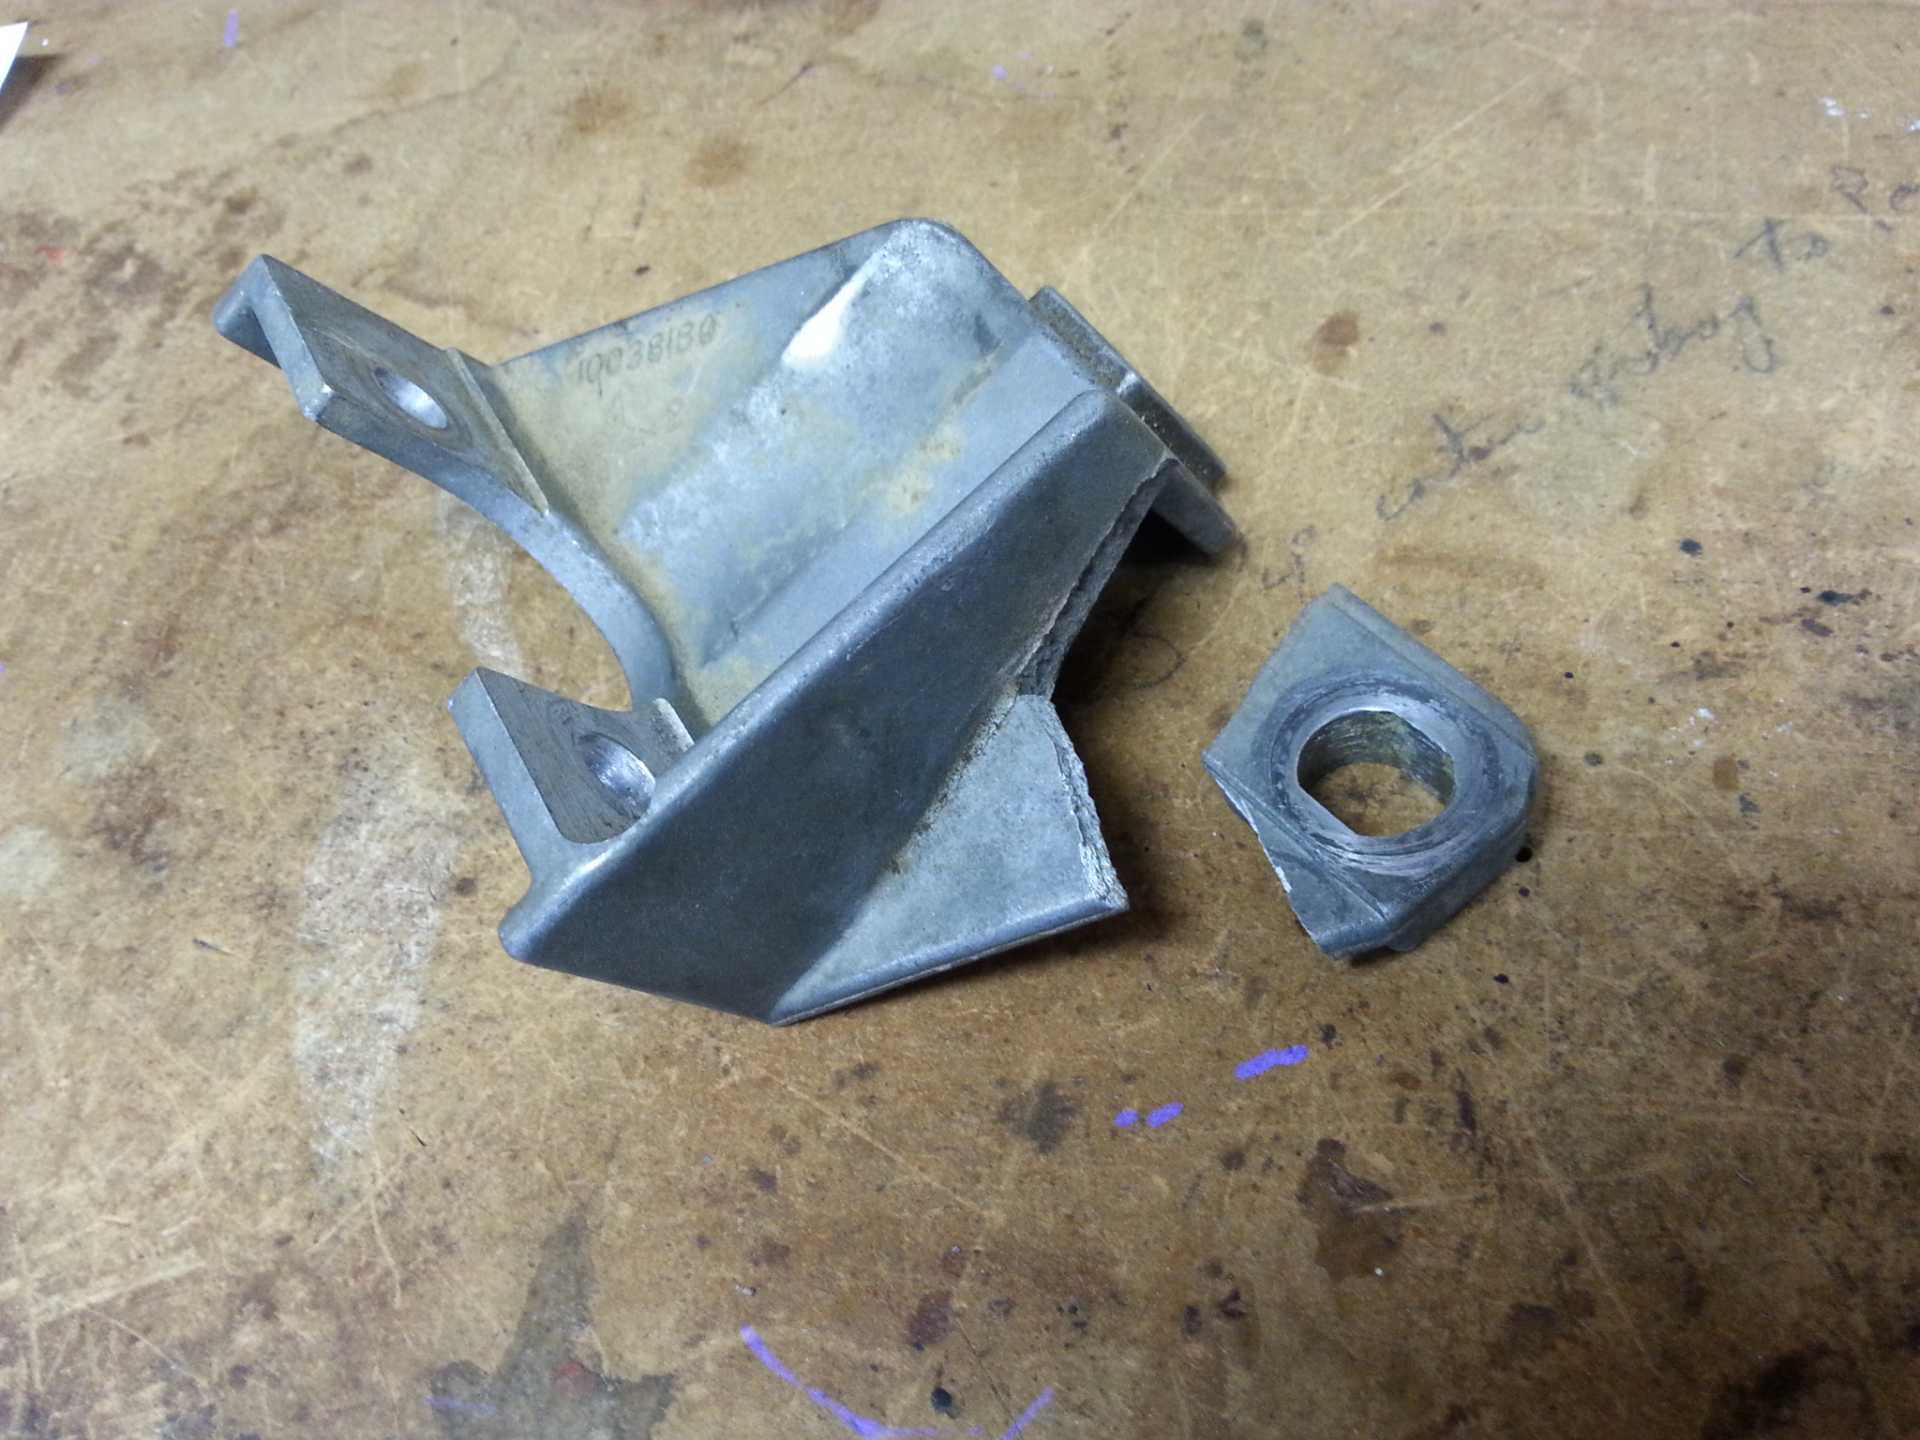
- After installing everything the aluminum slave bracket on this 1986 V6 broke off. I just learned in this thread that is common and Rodney offers a steel replacement bracket, once again thanks Rodney!

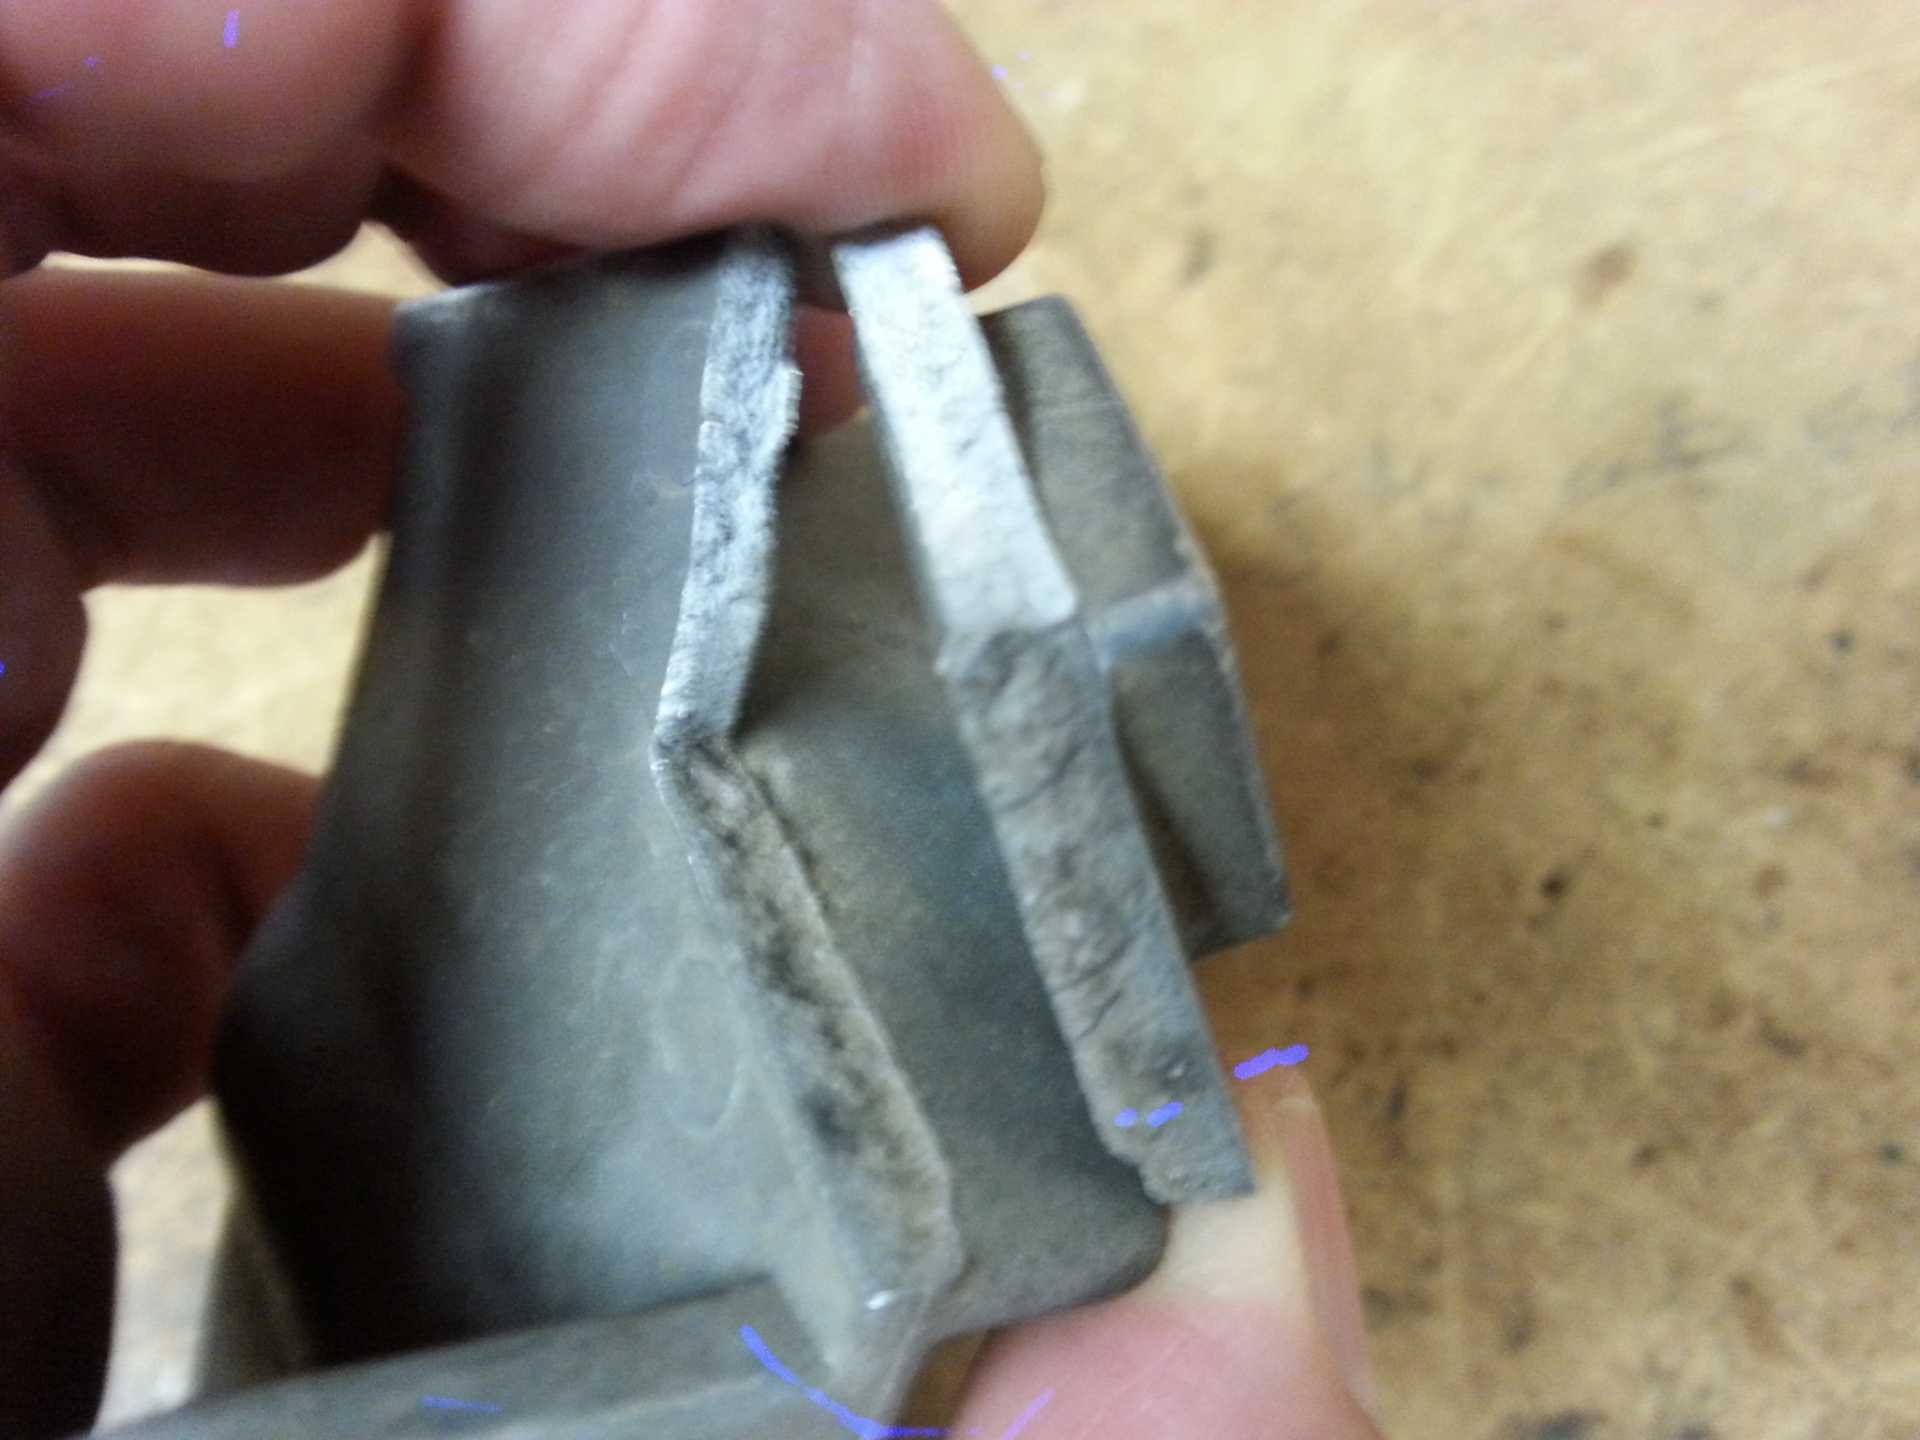
- Upon removing original bracket again I discovered 2 things... The bracket was already cracked/broken 50% at the top bolt because you can see the recent clean break, and also see the other crack was dirty, so it was cracked years ago and flexing all this time. Secondly, the hole for the lower bolt (in aluminum trans case) that holds the bracket on had boogered threads. I wasn't comfortable with that considering all the pressure/stress put onto the bracket in that direction when operating the clutch, so I decided a drill & tap was the best solution.

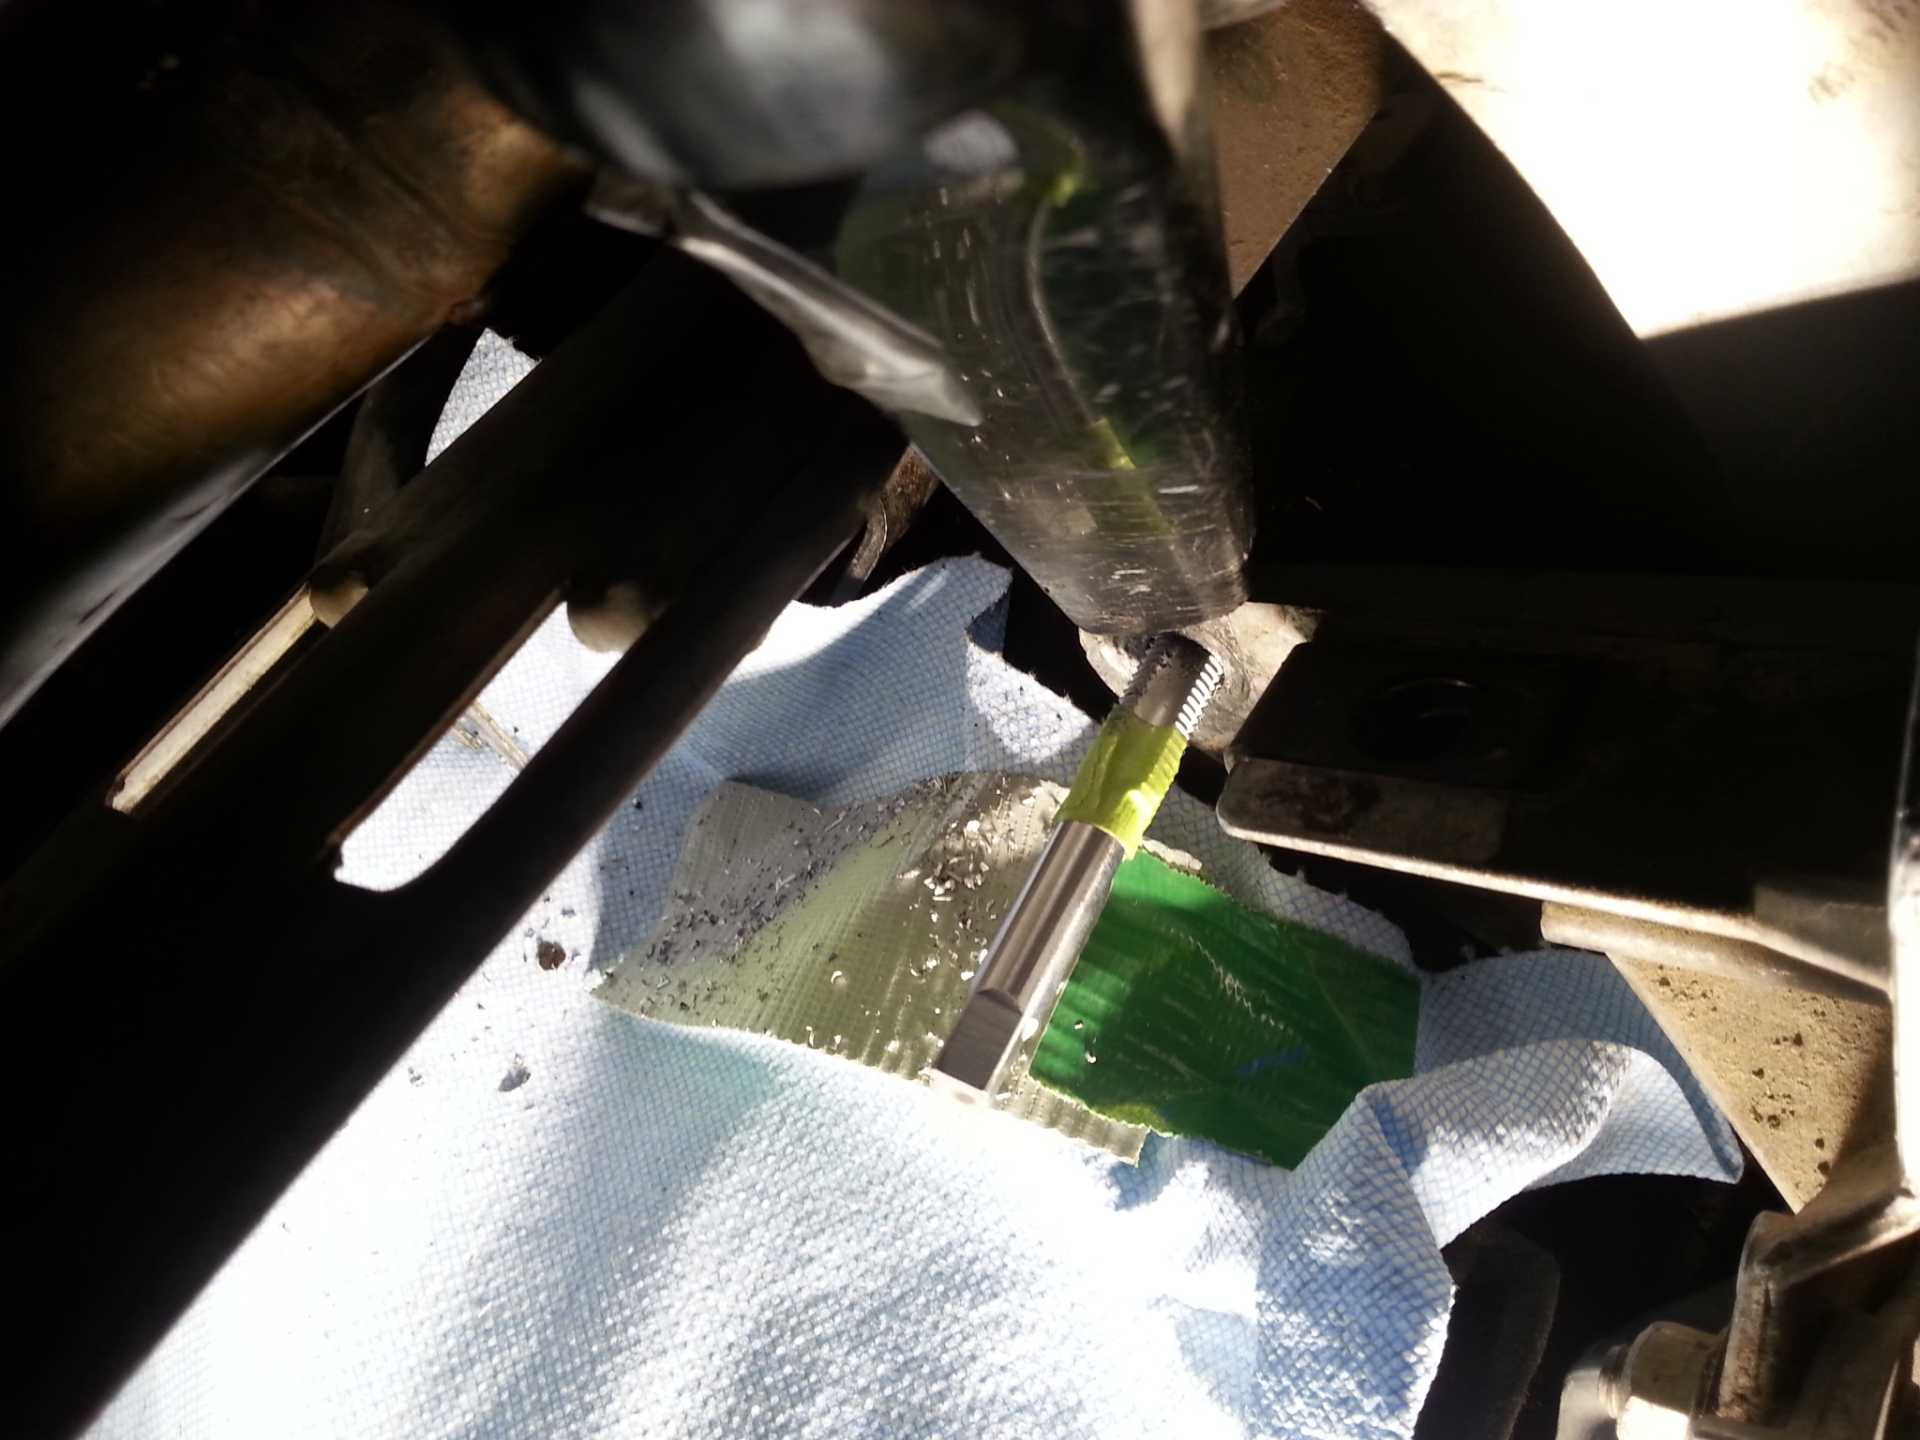
- Had to use a right-angle drill because you can't fit a regular drill down in that area.The original bolt was 10x1.5x25 so I went with a 12x1.5x30 to utilize all of the 1" thread depth in the hole. I placed a vacuum cleaner nossle next to the hole with paper towel and reversed duck tape to simulate a dental assistant while I was drilling and tapping.

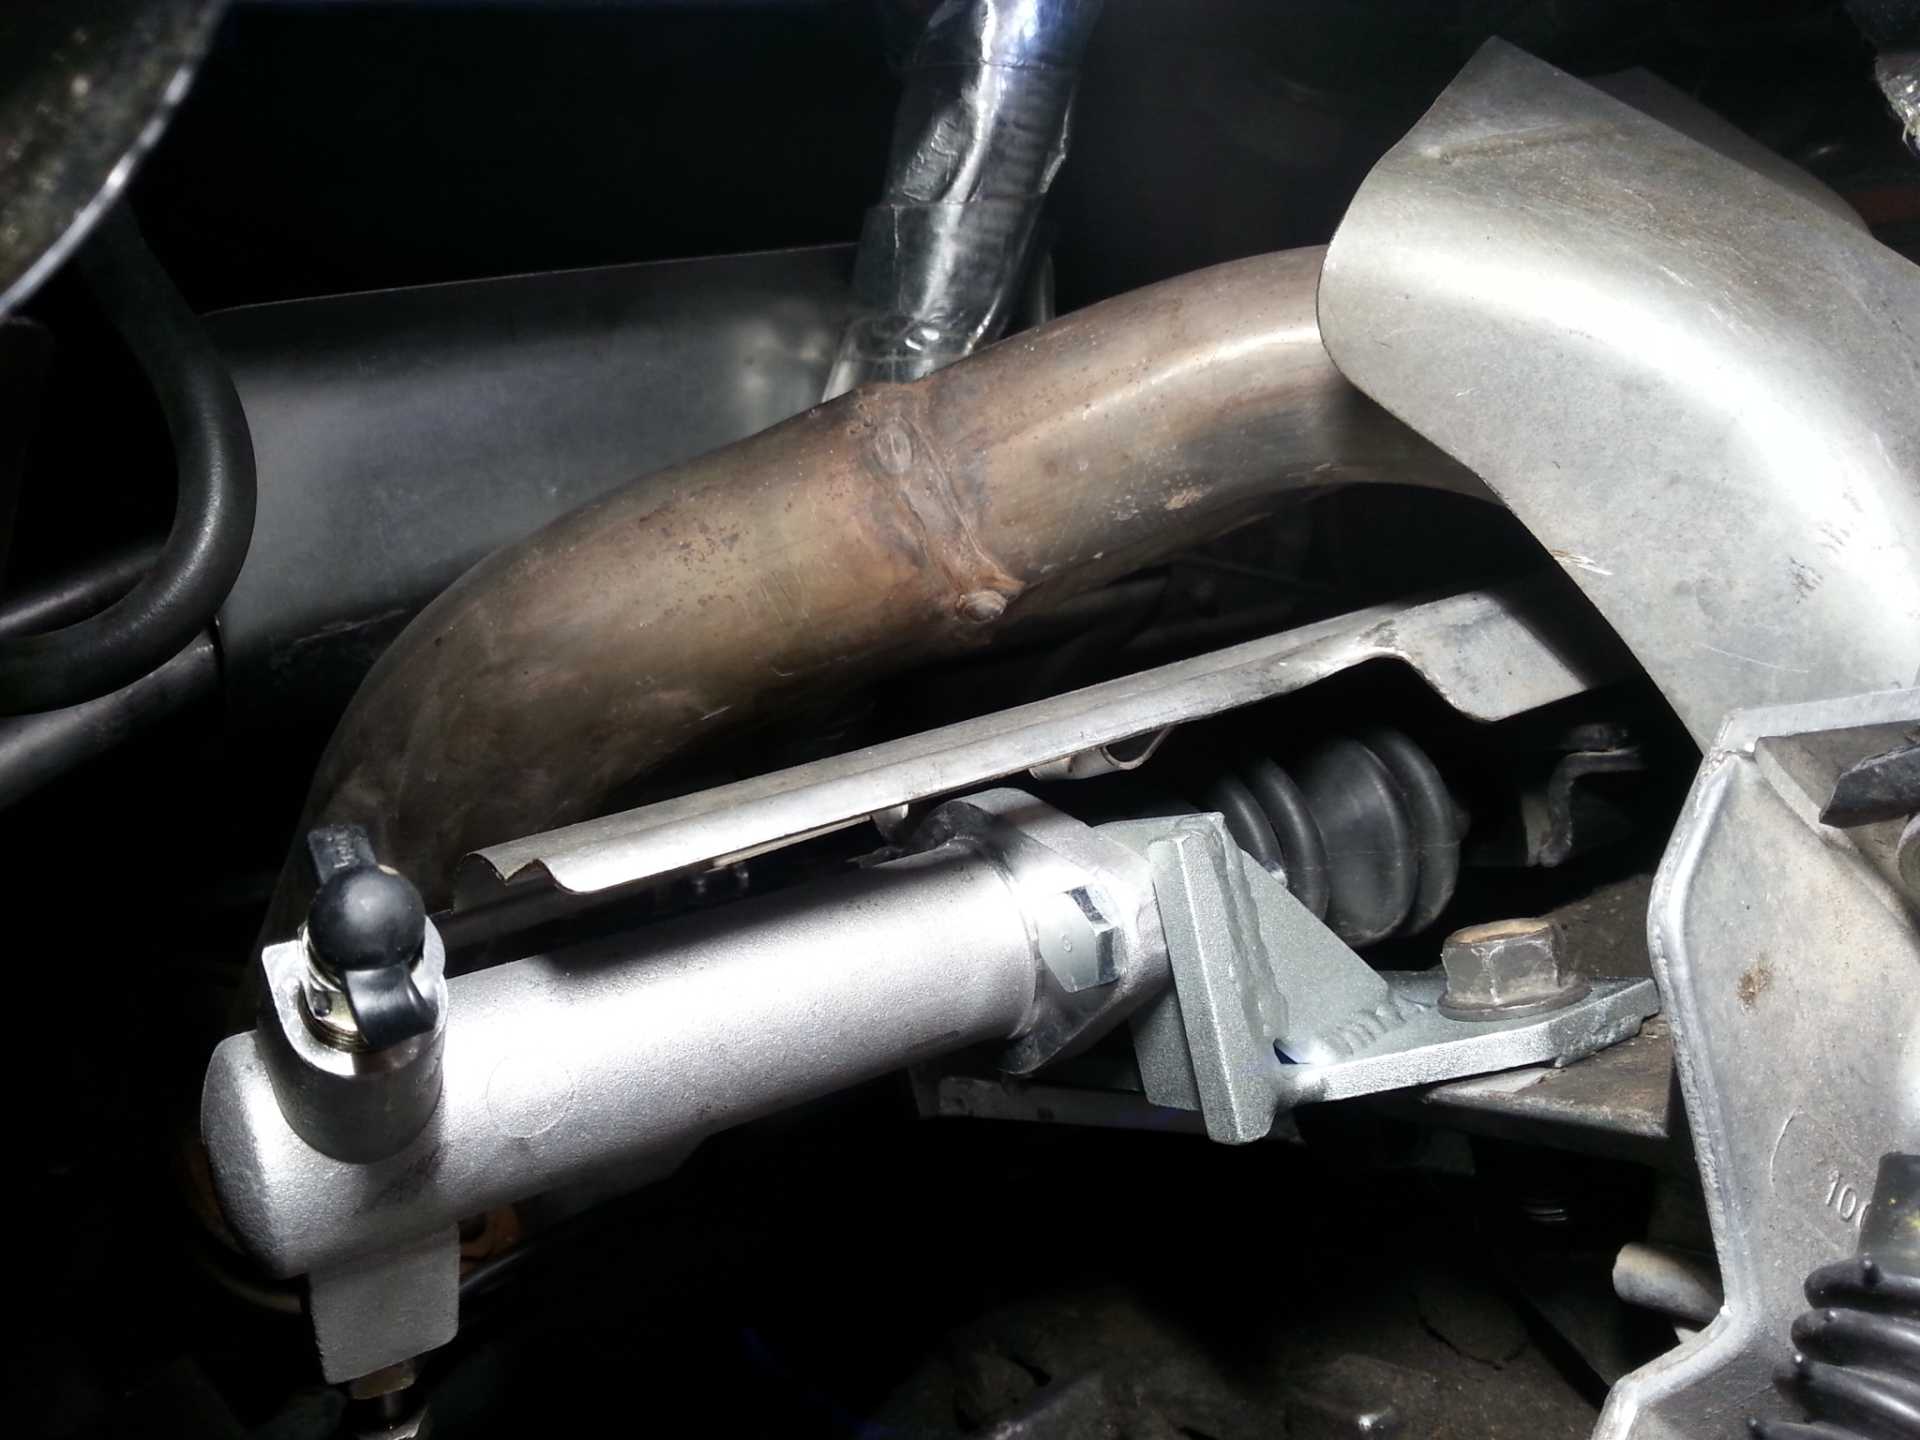
- I also had to slightly enlarge the sides of the lower square hole in the new Rodney steel bracket so the new larger 12mm bolt fit through and had wiggle room.

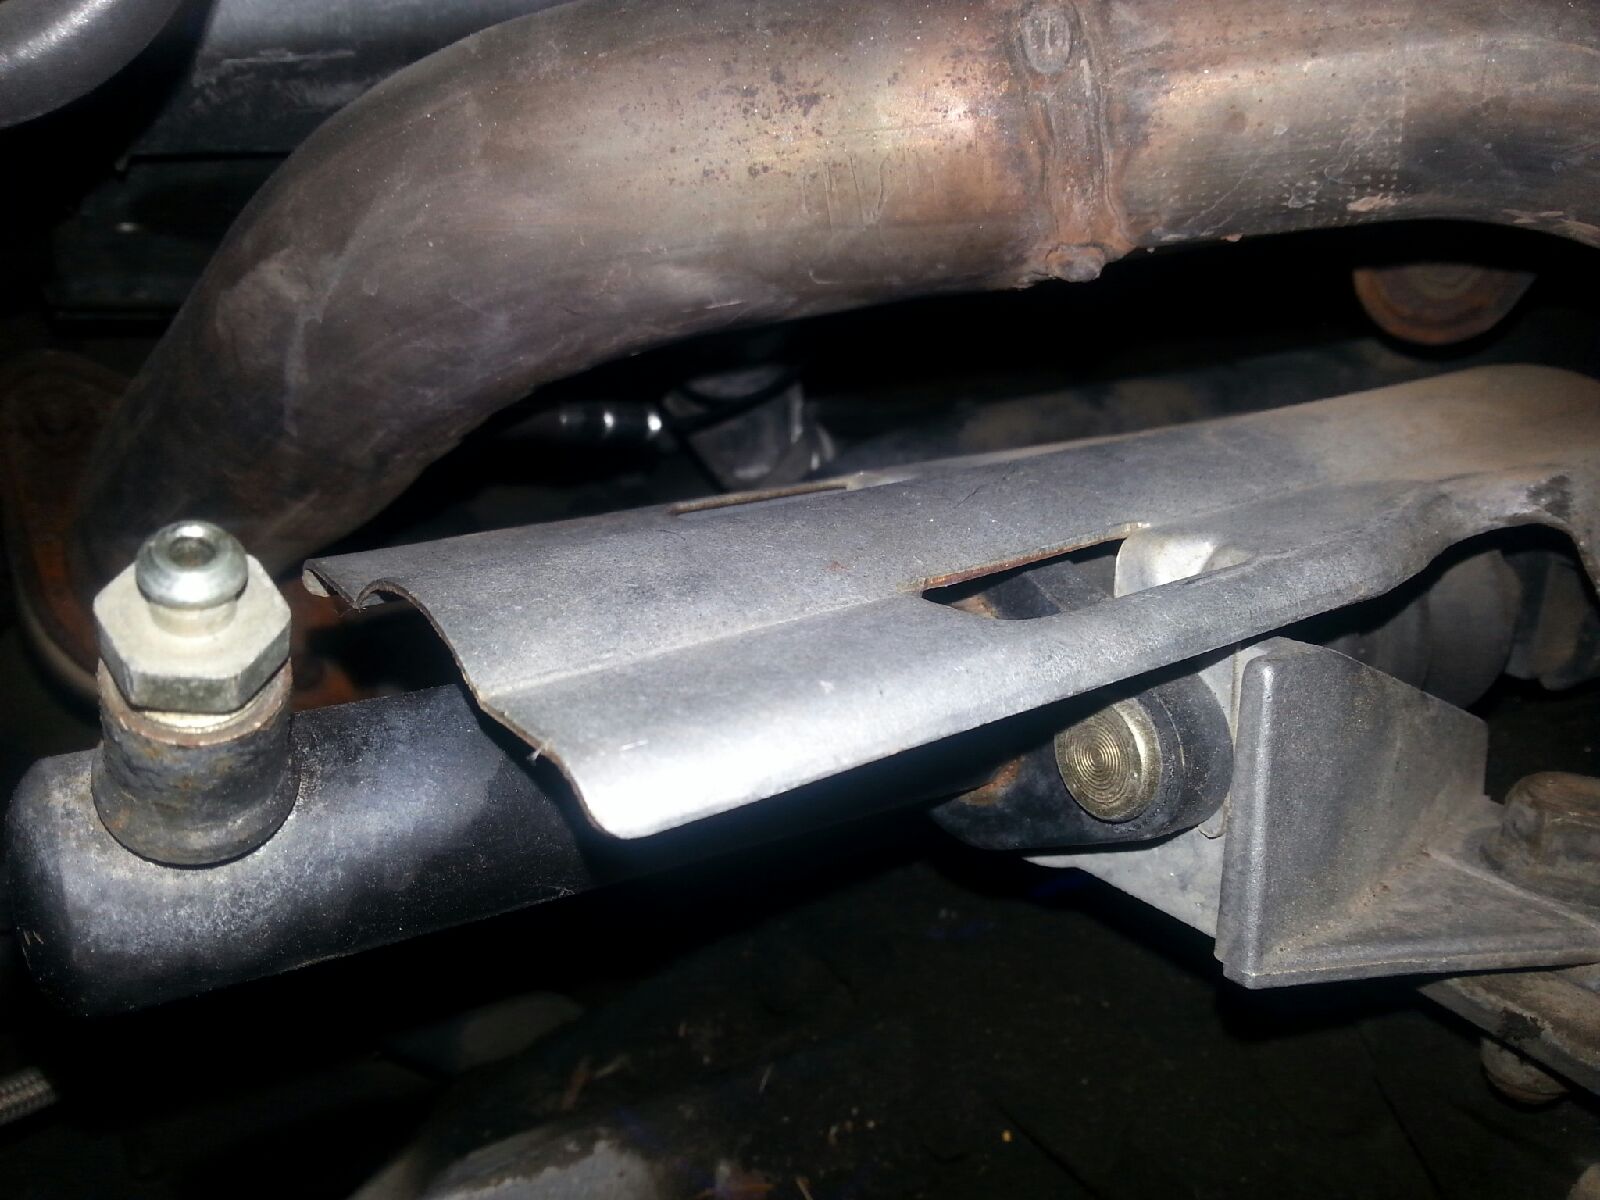
- Decided to leave that one tab on the heat shield disconnected and bent the tab up (the one toward the rear of the car), this allows you to bolt the slave to the bracket, then bolt the bracket to the car, then lower the heat shield, and last attach the other slave bolt with heat shield tab inserted. The heat shield is still plenty secure connected with the one tab and bolted on the engine (you can leave that engine bolt connected the entire time and just move the heat shield out of your way). As mentioned by somebody above, you want to install the heat shield tab on the back side of the bracket where the nut goes onto the stud, not in-between the slave and bracket.

- Bolted everything up and visually verified everything operated smoothly before going for test drive, looked like I'm getting over 1" of throw. The test drive was perfect, but the pedal felt like a completely different car, but I guess that is no surprise because everything IS different so it SHOULD feel different. (hydraulics, banjo, non-flexing bracket, etc) It will probabbly take me a day to get used to the revised clutch operation stiffness and release point.

I'm ready for the weekend...


[This message has been edited by Skybax (edited 08-04-2021).]

IP: Logged

next newest topic | next oldest topic

All times are ET (US)

Post New Topic  Post A Reply
Hop to:

Contact Us | Back To Main Page

Advertizing on PFF | Fiero Parts Vendors
PFF Merchandise | Fiero Gallery | Ogre's Cave
Real-Time Chat | Fiero Related Auctions on eBay


Copyright (c) 1999, C. Pennock