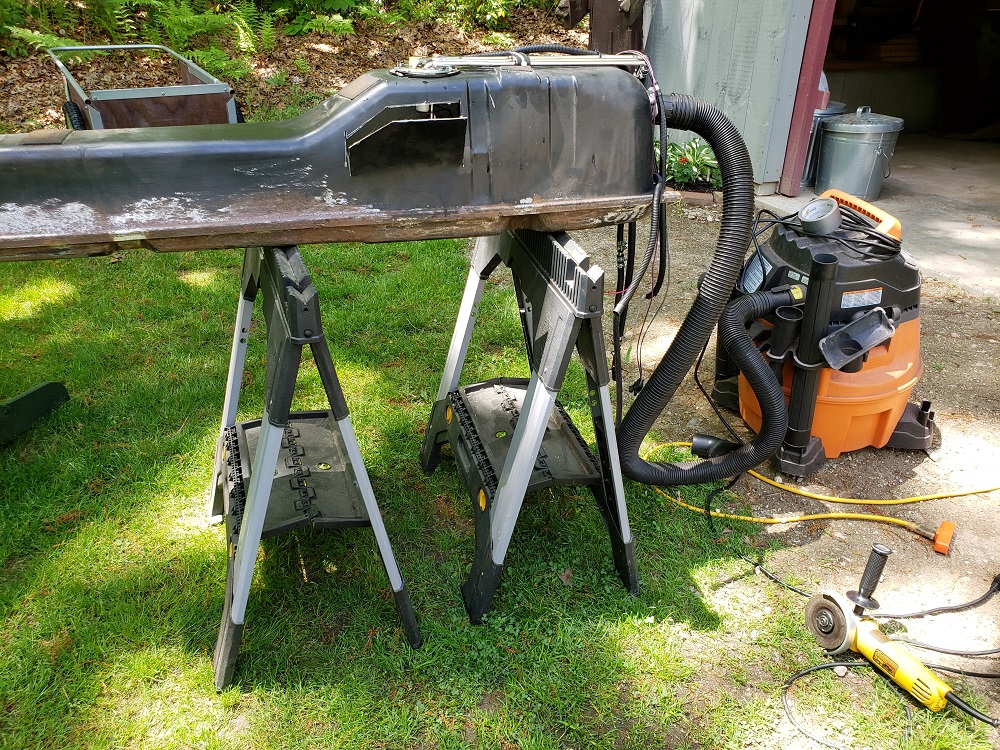
Like others, I bought a new sending unit and spent a great deal of time putting it back in the car, only to discover the gauge didn't work. It always read EMPTY and did not respond to a full tank. Finally, I took out the tank and here's what I found and how I fixed it.
The unit came from the Fiero Store and they were all helpful. Their customer service to me has always been excellent but this sender problem was one that just couldn’t be solved easily.
Like others who pulled the tank out, I put a meter on the unit and it read around 0.7 ohms at the bottom of the stroke and 92-93 ohms at the top. It worked perfectly on the bench. I think I read every forum post on this about 1) stuck on empty, 2) finally went to full, wouldn't return to empty, 3) try it with a fishing line, etc. Apparently, there were instructions in the box about potential binding but I must have missed that. No one could tell me which way to bend the rod and by how much. I'd bend the rod a little this way and that way and put it back in tank with no results.
SEAL PROBLEM - Every time I turned the tank upside down the residual fuel leaked out. The round cross section seal that comes with the kit is difficult to keep in position without leaking. Don't use it. The correct part with the three alignment tabs is ACDELCO G10. If you have a repair shop replace the sender, make sure they test the installed unit in the tank by turning it upside down to check the ohms, and more importantly, checking for leaks.
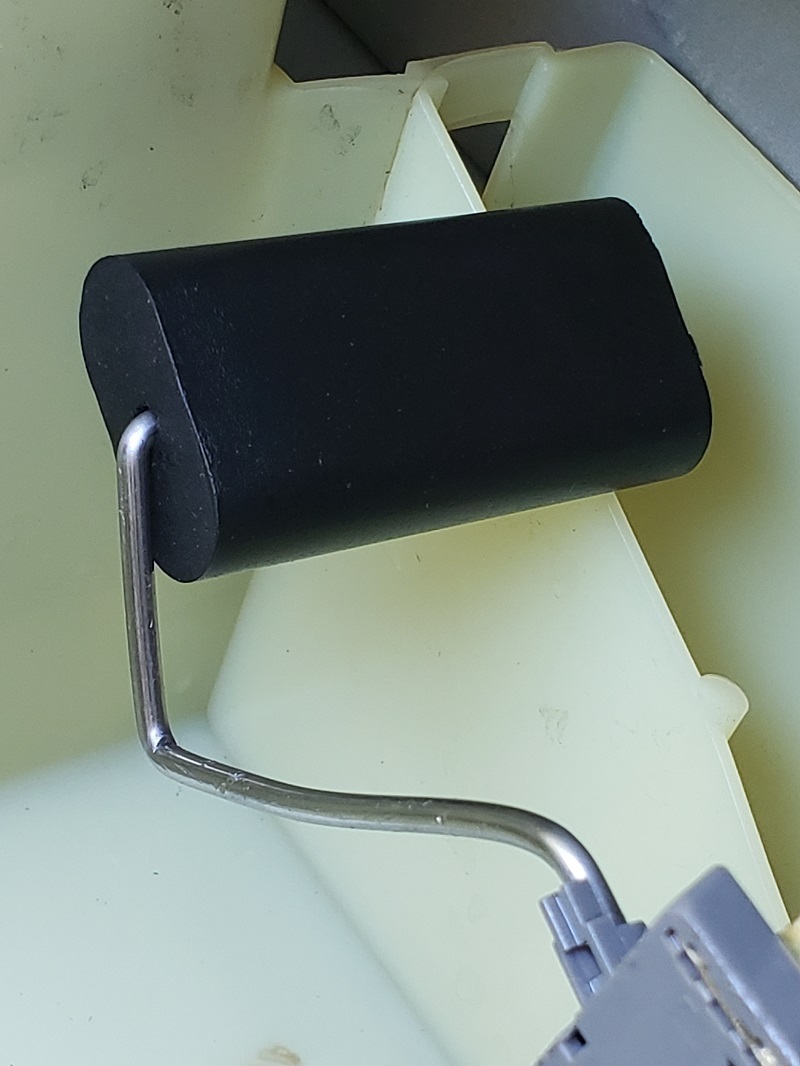
PUSH WASHER PROBLEM - The little push washer was on too far and wouldn't allow the float to spin. At first, I thought that was the root cause of the binding problem.
FISHING LINE TRICK - Someone on the forum posted this as a way to check it. You simply tie some line on the float and assemble it without the seal. Right away I found some binding and bent the rod, reinstalled it, checked again. After several attempts and bending the rod little by little, the fishing line thing worked. So I put it all back together with seal, turned the tank upside down, and the ohm meter said it was still stuck on empty. That’s because the sender was not exactly in the same position with the seal compressed and the locking ring secured. The only way to know for certain is to drill a hole in the top plate and run the finishing line through, install with correct ACDELCO seal, and check it. I decided against that.
NO FLOAT - Next, I removed the float entirely and attached a small weight. Again still stuck on empty.
Finally, after all this bending of the rod with no results, I was concerned that I might damage the potentiometer and plastic clips so I removed the rod, tried more bends, and carefully reinserted it back into the clips every time.
I’d already spent too much time on this by searching the forum and trying everything I could think of, including just giving up. I’d run out of patience and ideas on this and kept looking at my angle grinder and spare 88 tank.
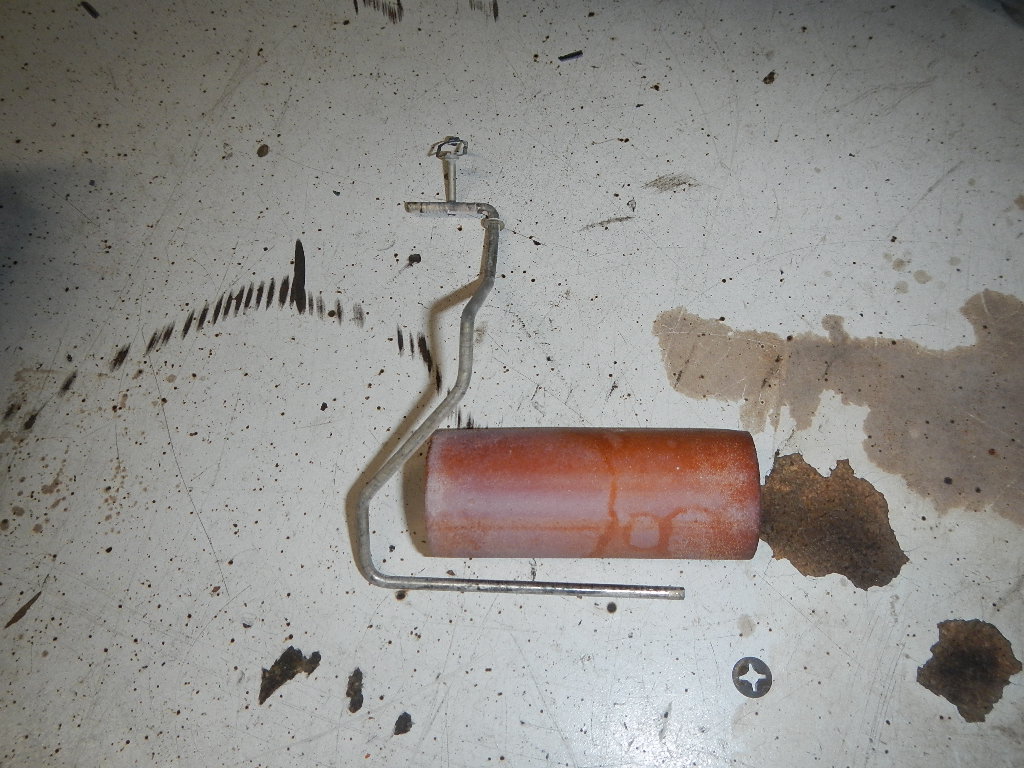
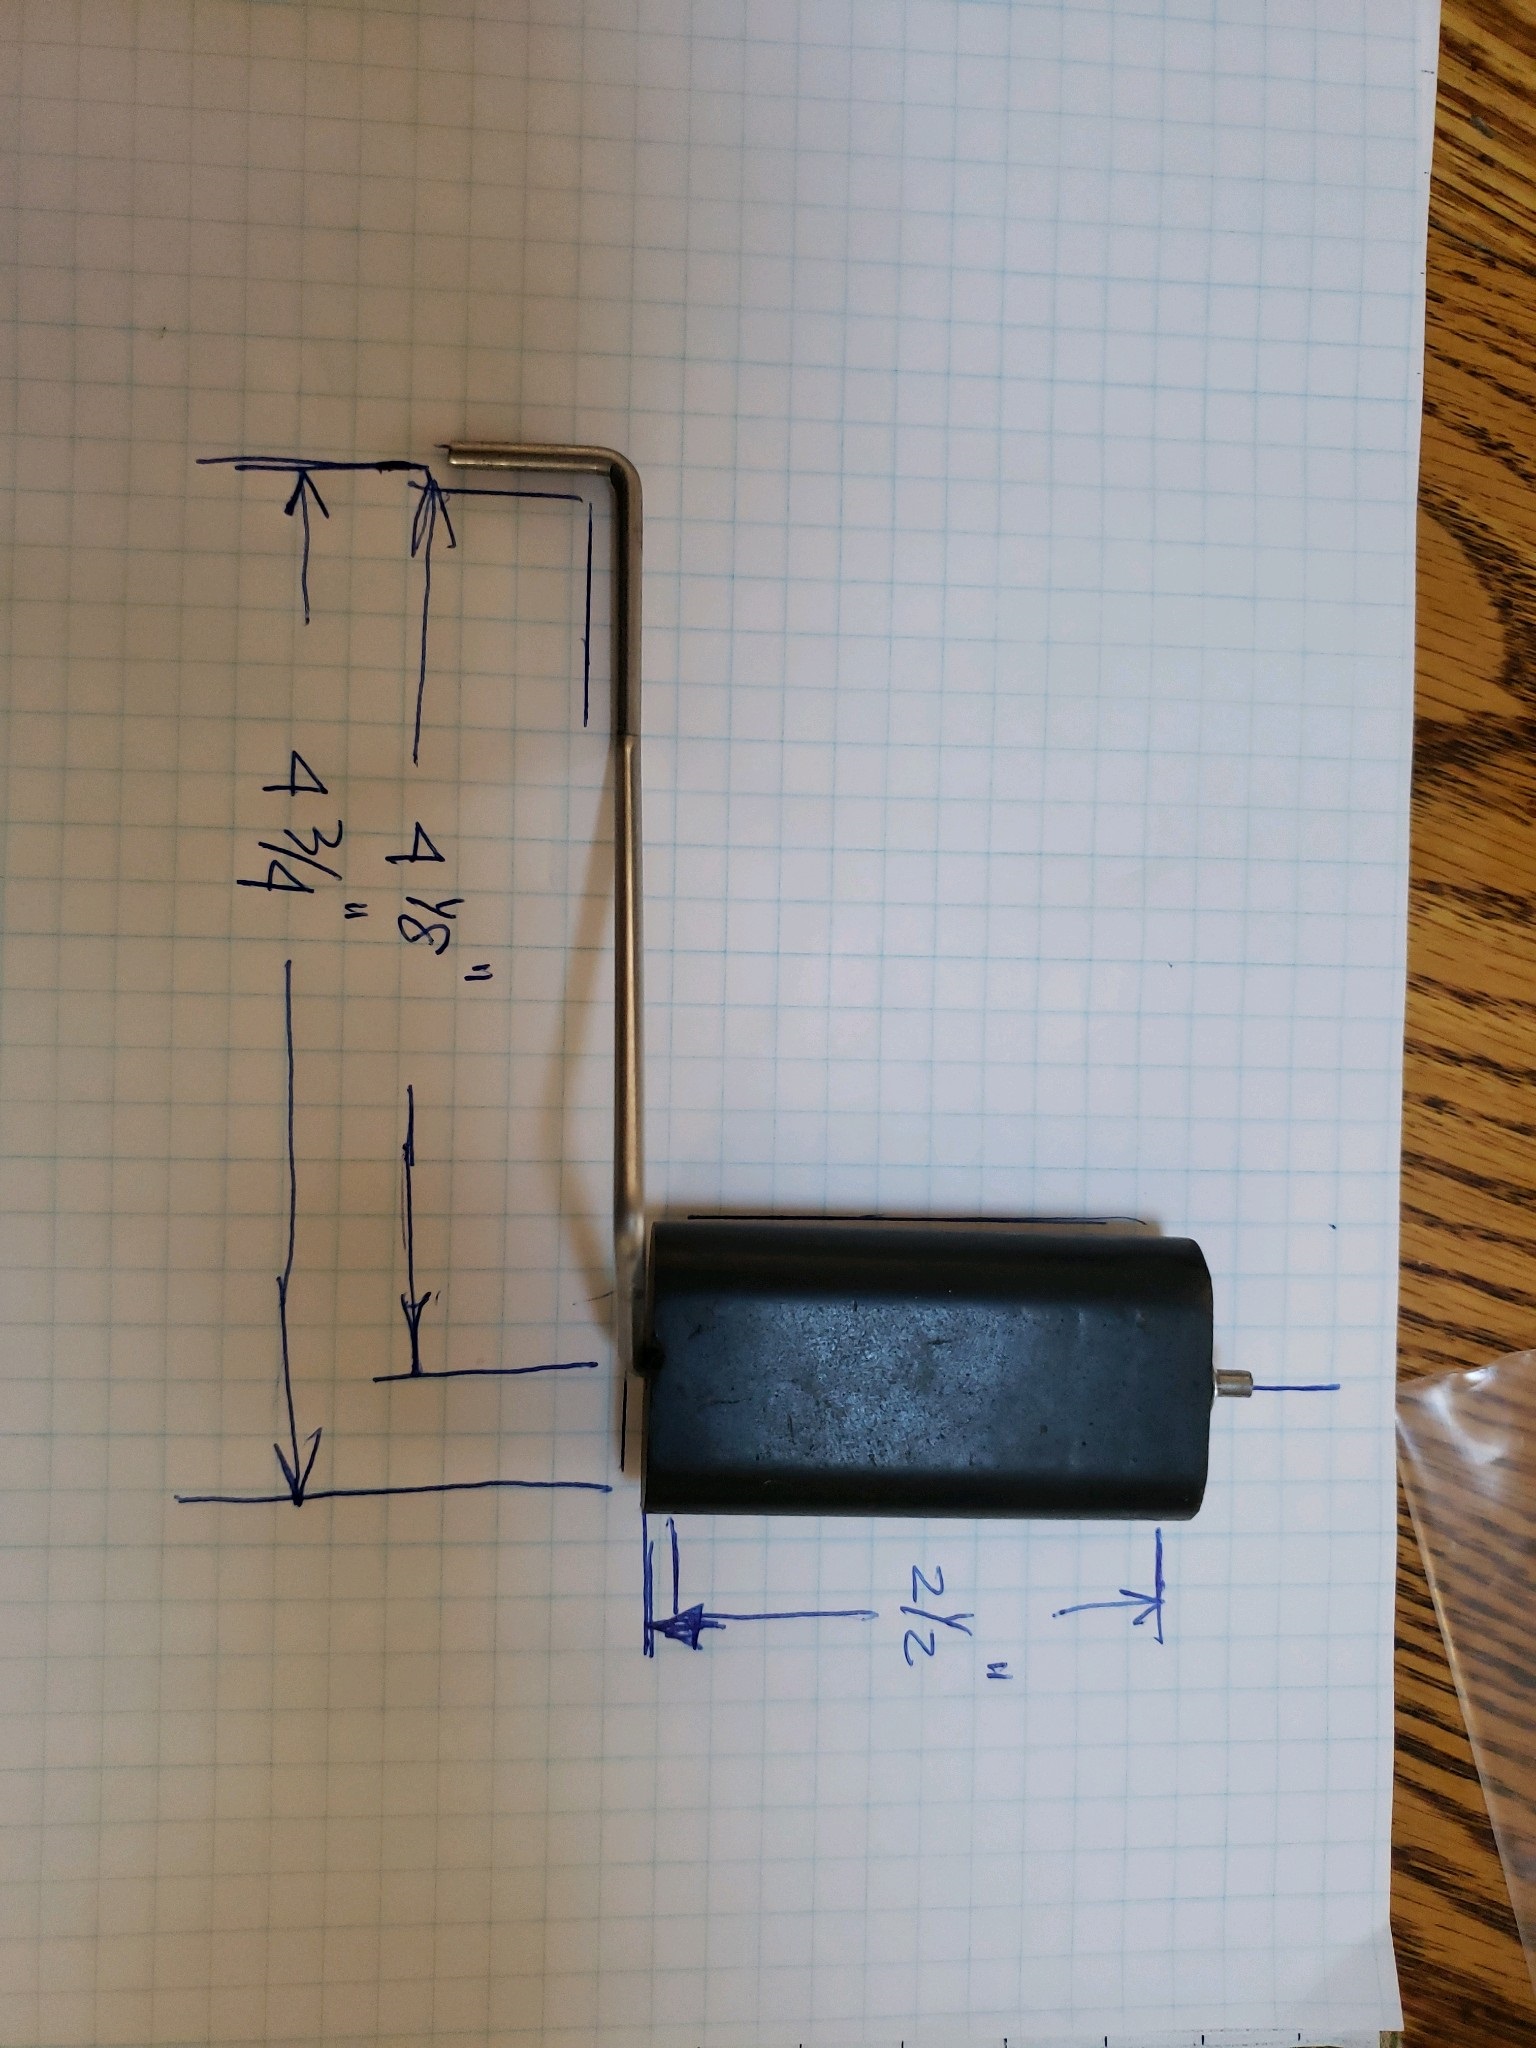
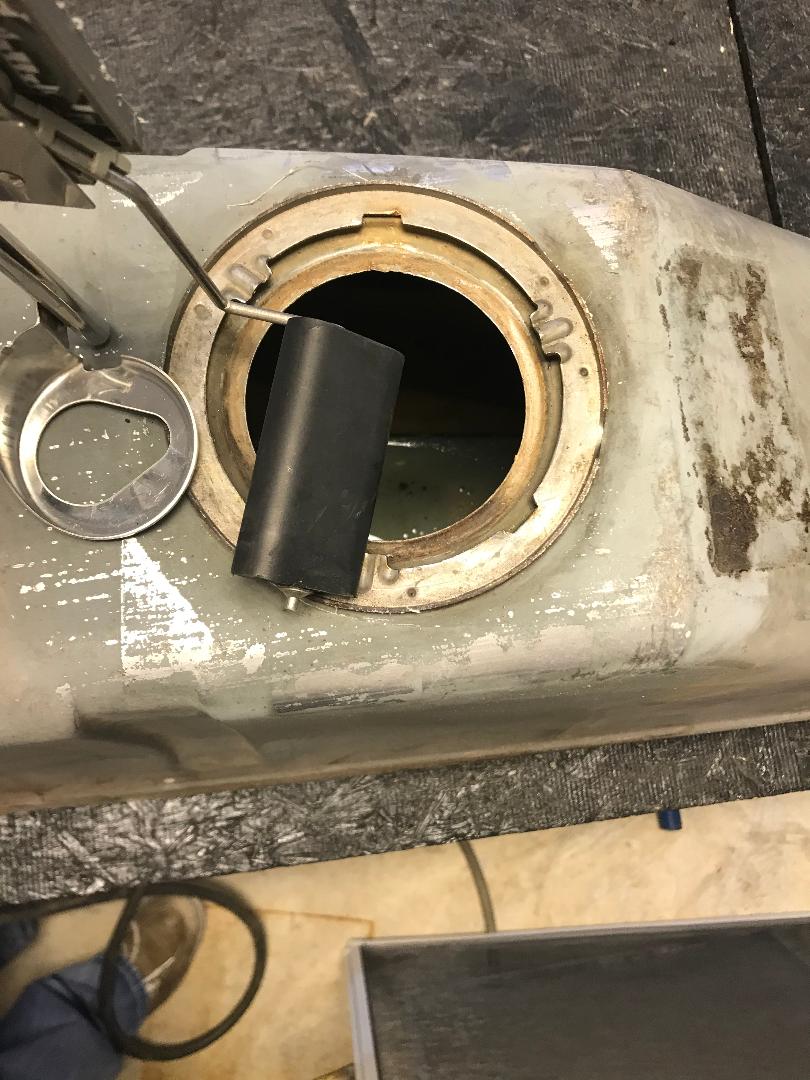
I cut a window in the side of the tank and here’s what I found. The tip of the rod where it exits the float was rubbing on the side baffle. In fact, the interference was so much that if the float moved upward enough toward full, it could never return all the way because it overhung the top of the baffle. In my case I would have had to move the entire float and rod away from that baffle by at least 3/8 - 1/2”. It was too far to bend the rod while still maintaining any form of alignment and being plumb.
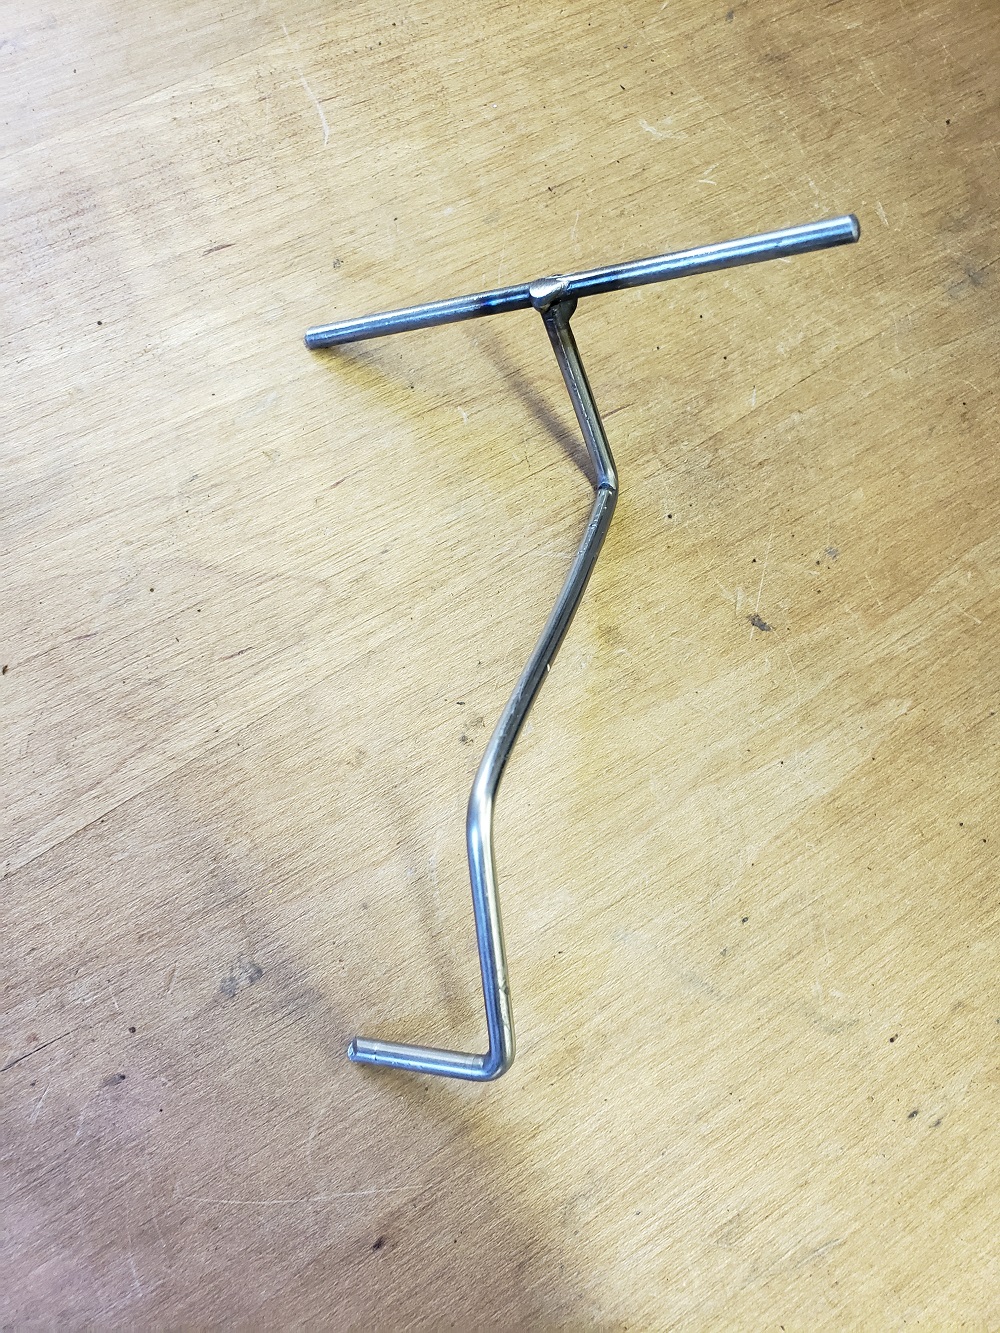
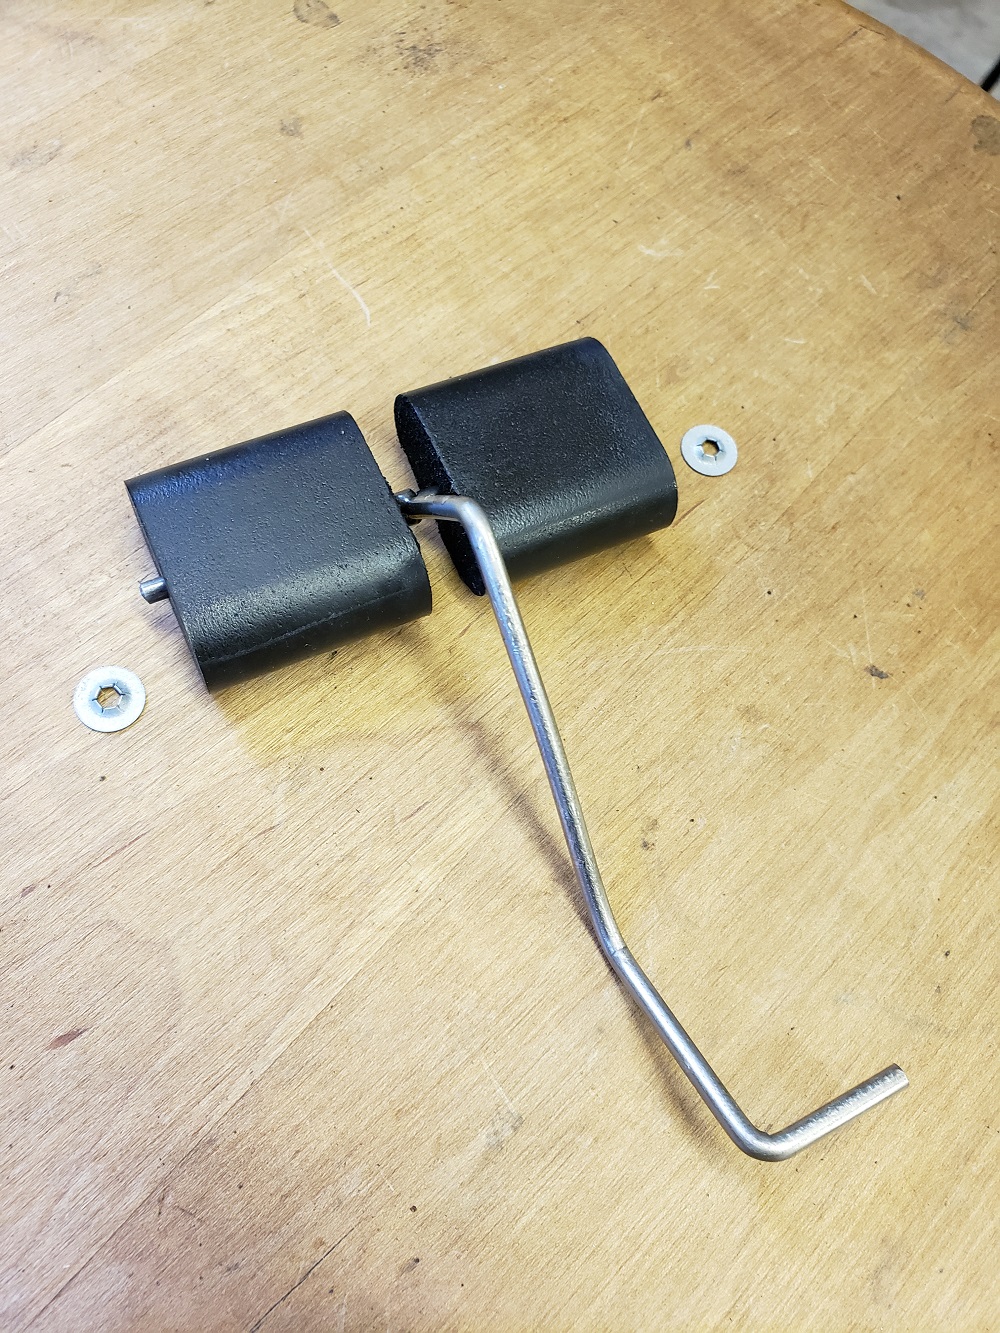
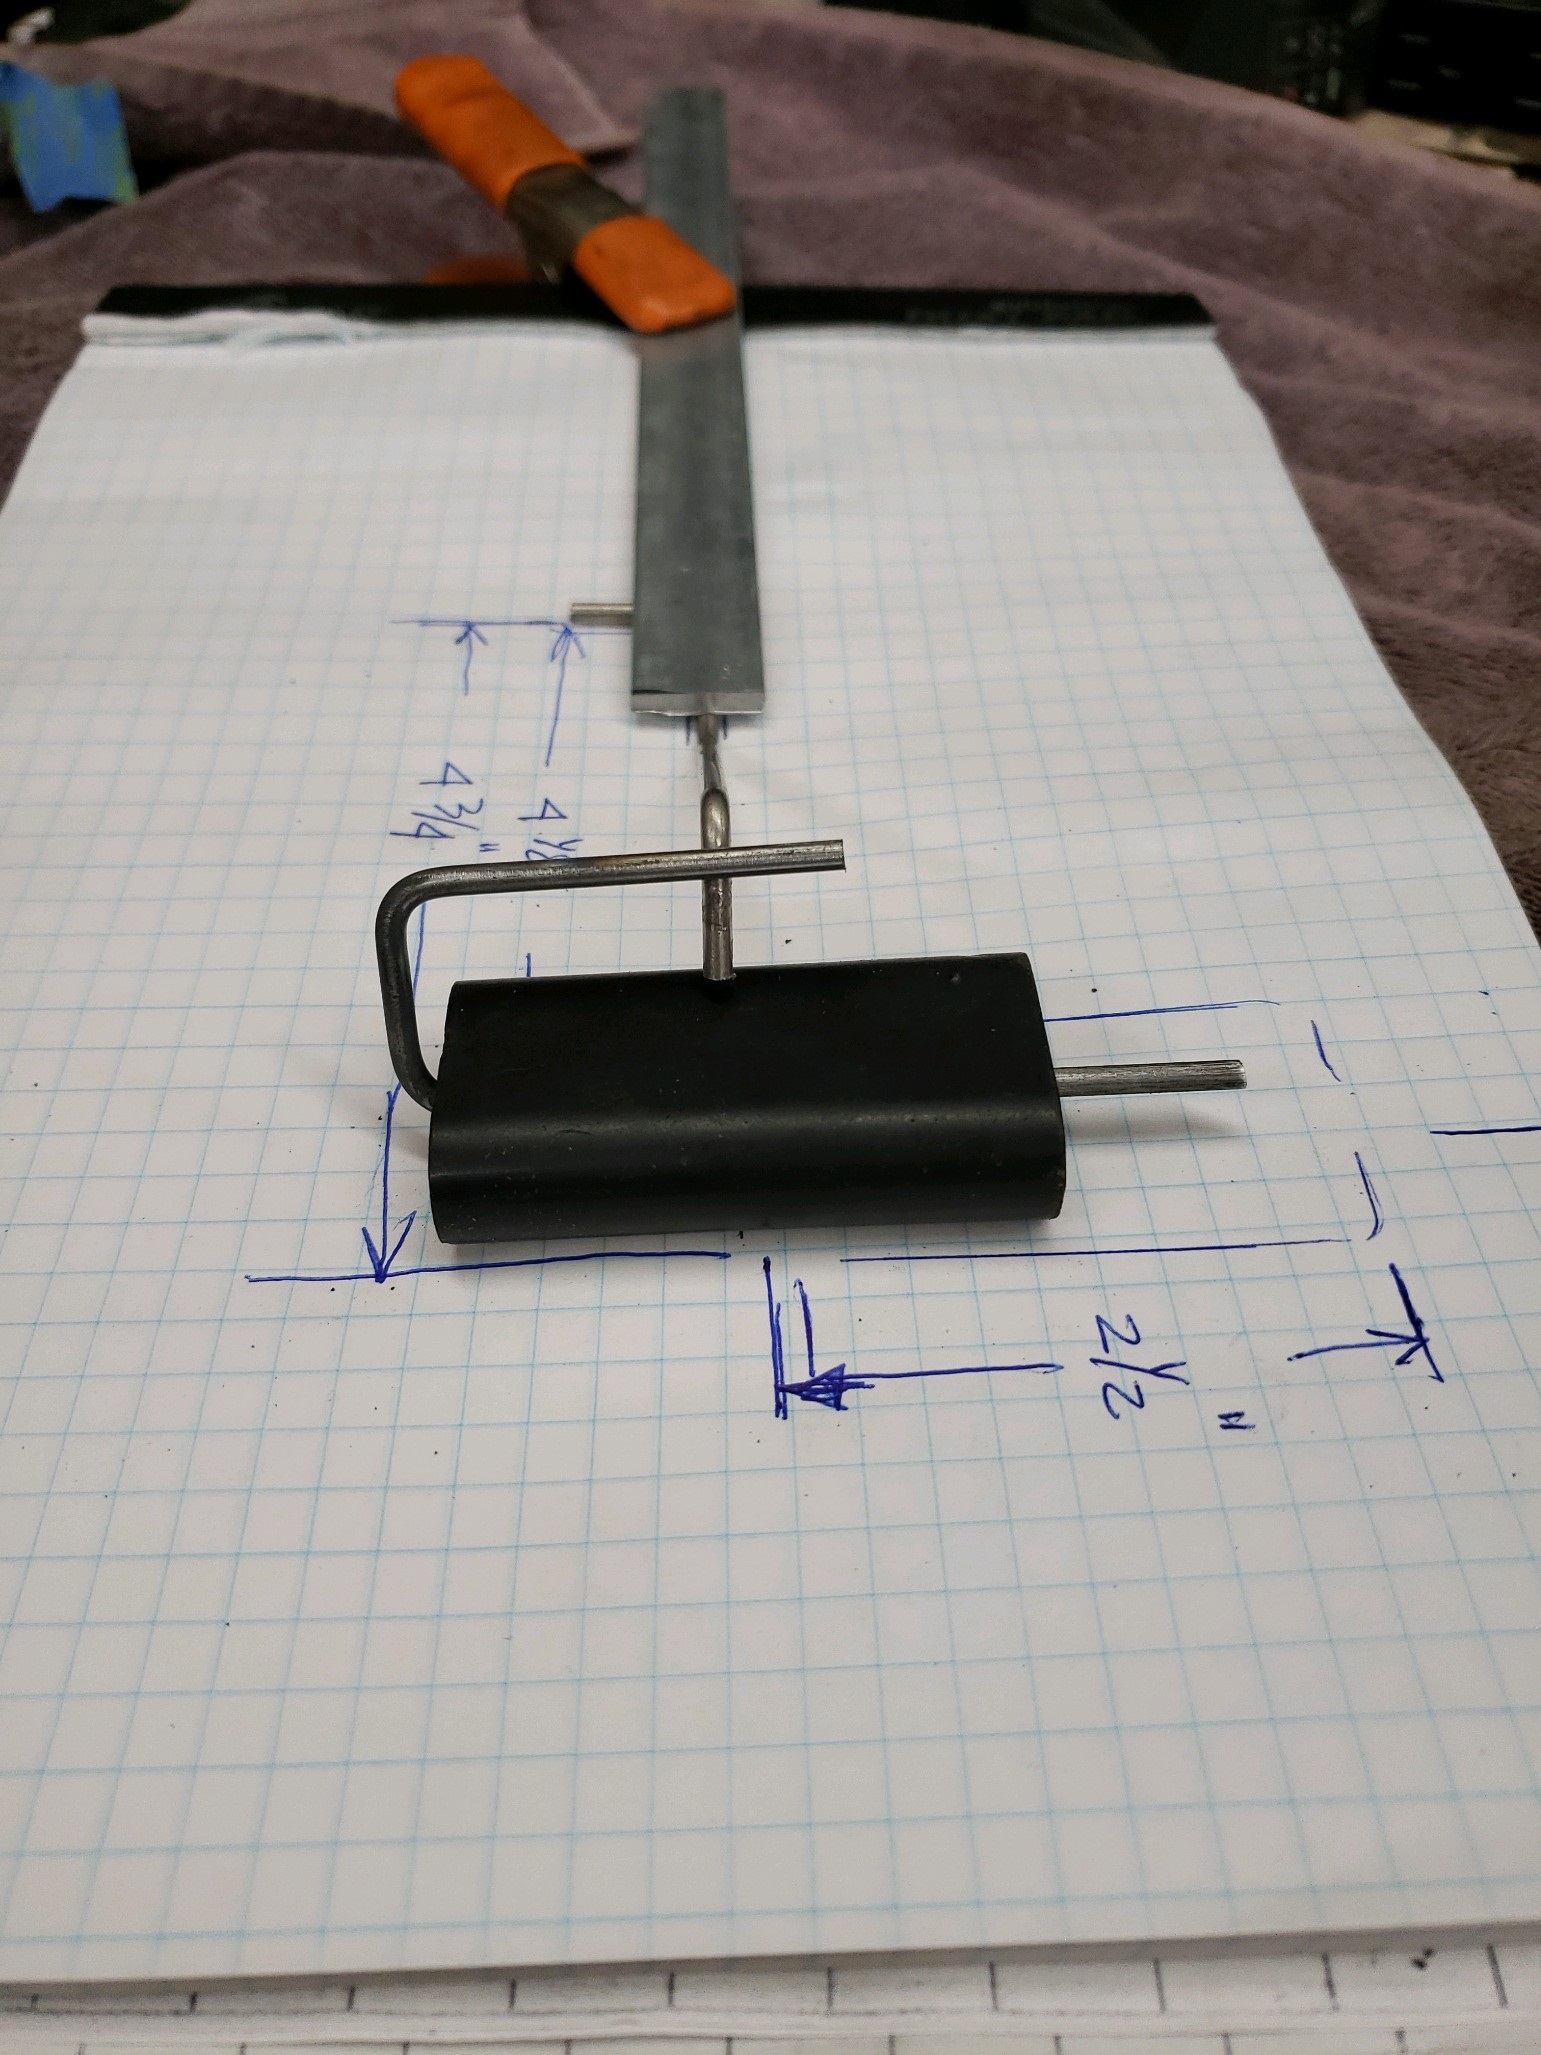
The next step was to remove the float and cut off the rod just at the bend that enters the float. I bought a piece of 1/8” steel rod and two push washers. Then I cut the float in half with a sharp box cutter blade and made two identical halves. Finally, I welded a piece of the rod on the end of the original rod to make a T and to accept both halves of the float.
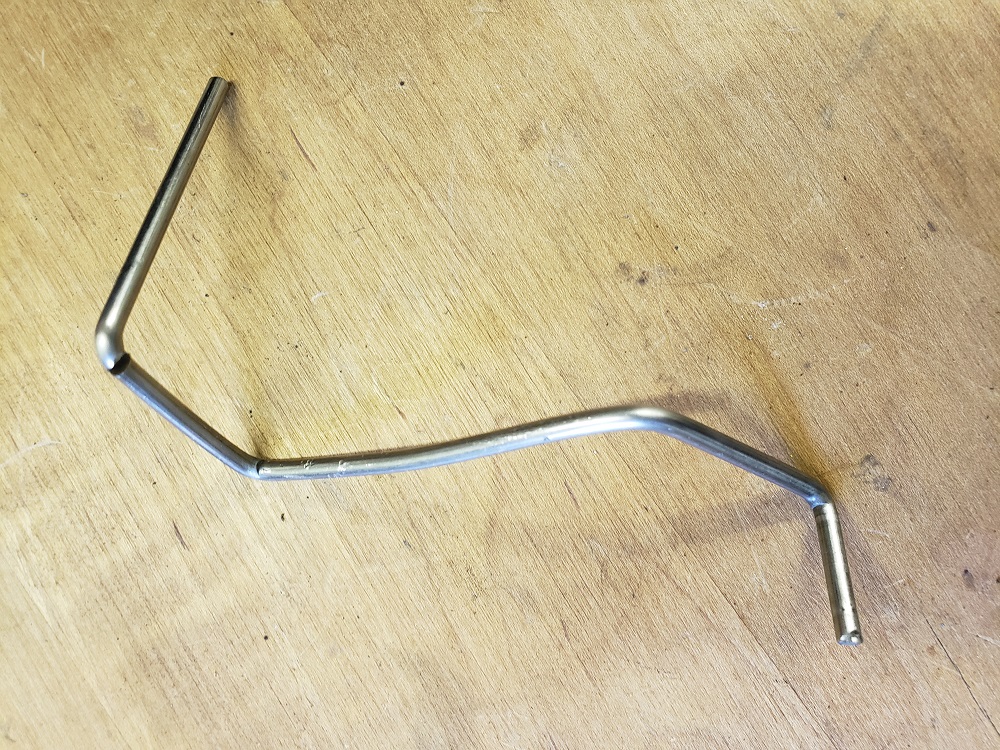
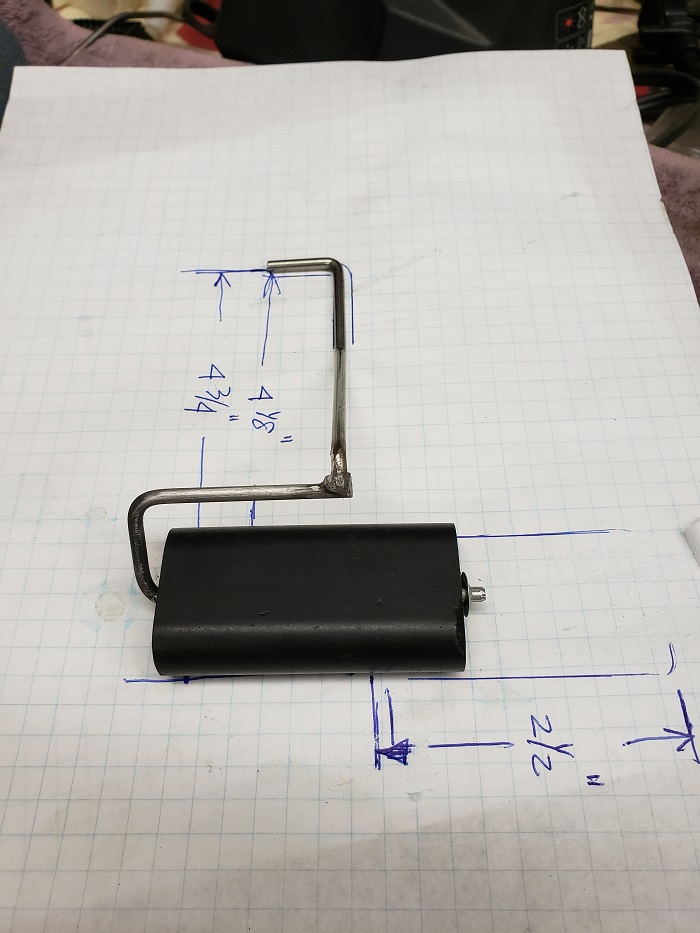
Here's the original rod versus the modified one:
Fully Assembled New Rod:
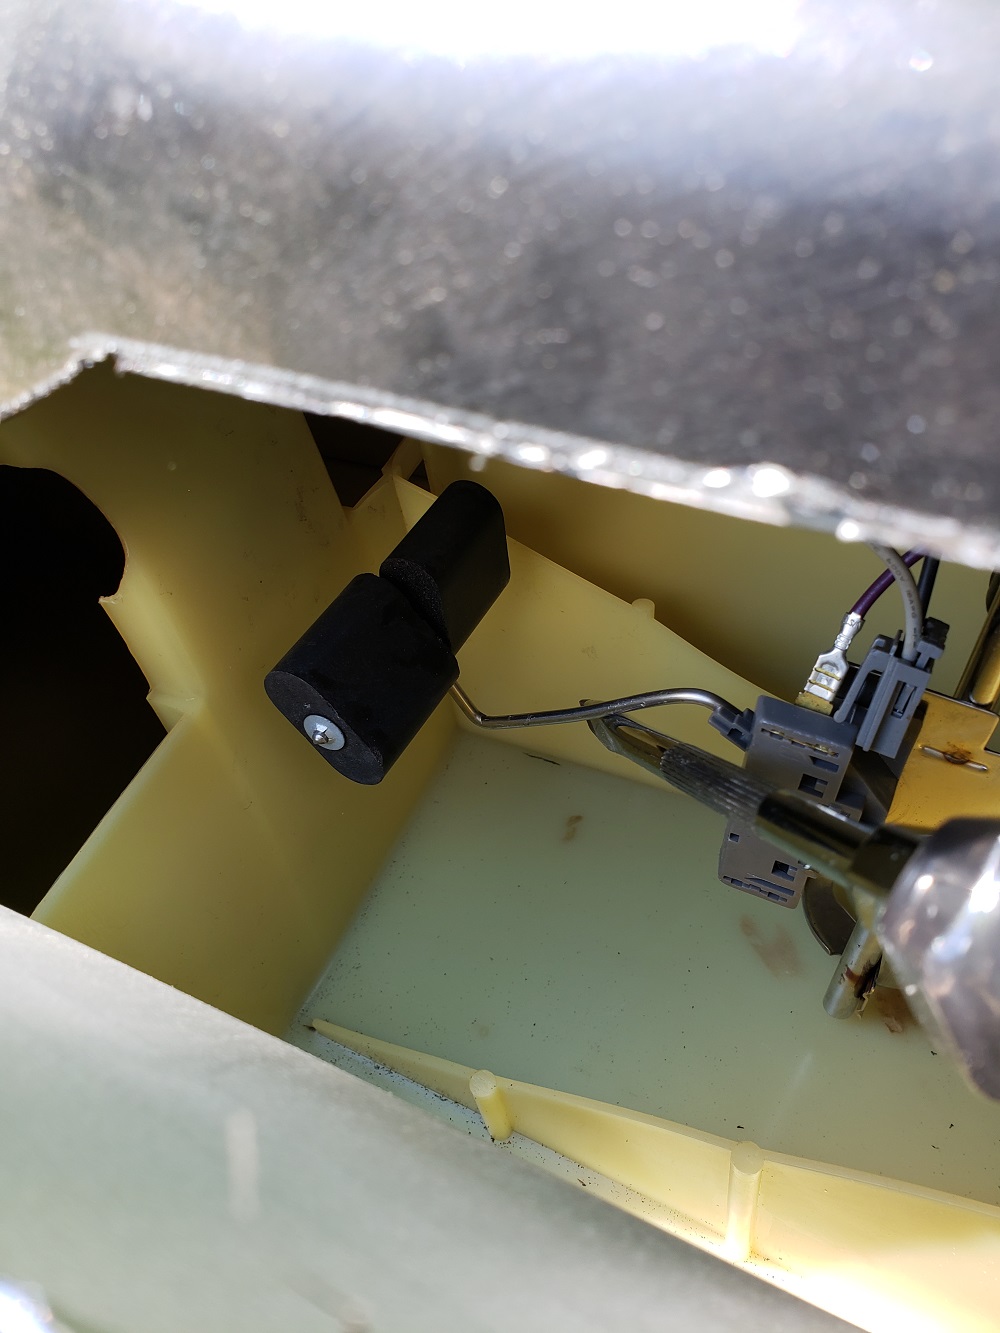
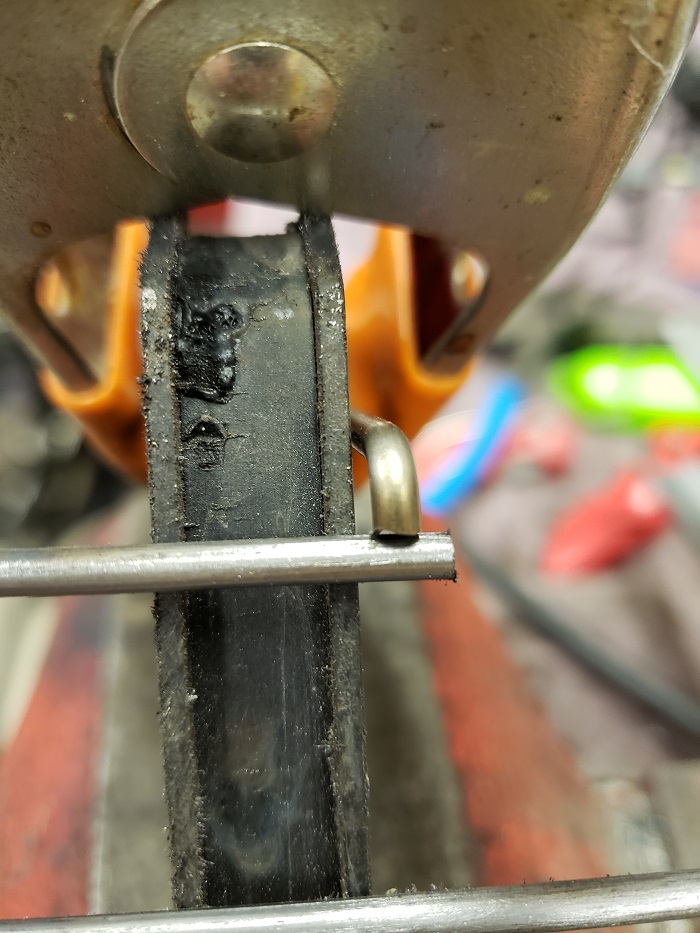
Showing new rod in empty and nearly full position with plenty of clearance in all directions:
Finally, I put it all back together with the correct ACDELCO seal, flipped the tank over and watched the ohms go from .7 to around 92. No leaks.
Forgot to mention, I also checked out the sender alone under the car with no tank. The gauge responded the way it should.
Hope this thread helps others to save a lot of time by using this simple modification. The tank is now back in the car. The spare tank will be repaired and go back to being a spare. ------------------ 88GT 355 CI Sequential Holley Multiport , AFR milled 180, Dyno'd at 427 HP, 320 WHP anderson@gdsconsulting.com
[This message has been edited by V8Steve (edited 06-02-2020).]
Very good solution to a problem so may have had. You need to provide this service. TFS could dropship all orders to you for modification, then you could ship to the buyer. If that's not doable, maybe TFS could have that modification made by their vendor. Patent the design and collect royalties.
It's a real simple solution but I couldn't find any post or website where someone actually cut open a tank to find out what's really going on. The tackwelded position of the potentiometer on the mounting tube is critical. Any angular variation of that position relative to the alignment tangs on the upper plate can make the difference between binding and not binding. A small angle here makes a big difference in float position when the arm is extended outward. That may be the reason why some people have problems and others do not. The design is marginal at best.
There are epoxy compounds that are claimed to be suitable for full immersion in gasoline. A hacksaw, a piece of 1/8" rod, one or two large droplets of epoxy, and two new push washers would be all that's needed to fix this in ten minutes for less than $10, including the epoxy. I tried using scrap 1/8" wire and 6d nails with no luck. The DIY rod has to be straight in order for the float halves to spin freely. If it were me, I'd make a test piece with epoxy and soak it for at least a week. Otherwise, weld it.
The float is shiny on the exterior but the exposed razor cut surface is rough. Just be sure there was no potential for absorbing fuel, I weighed the two halves on a food scale at .2 oz. Then I immersed them in gas and put a weight on them for 24 hours and weighed them the next day. There was no change so I was satisfied the foam was non permeable.
Nice fix !!!! Thank you for all your time spent! I don't need the fix yet, but I'll get there one day.
fierofool : "TFS could have that modification made by their vendor."
Sounds like the best solution. My guess though is the fuel sender the FS supplies is probably used in many other car models. Vender may be reluctant to the fix for us. Certainly worth the try!
I have a manufacturing business and gave thought to producing kits consisting of a new stainless steel arm and instructions. The market is too small and it's simple to DIY.
If the market were larger, it would be a perfect Rodney Dickman offering. Everything I ever bought from Rodney was high quality with good instructions and worked perfectly.
[This message has been edited by V8Steve (edited 06-02-2020).]
Interesting thread and helpful. If the new rod on the Fiero Store sending unit is made incorrectly so it binds, the simple solution might be to replace it with the rod on the unit that you took out. Its hard to imagine that the Fiero Store would reproduce a part that is exactly not like the original.
------------------ " THE BLACK PARALYZER" -87GT 3800SC Series III engine, custom ZZP /Frozen Boost Intercooler setup, 3.4" Pulley, Northstar TB, LS1 MAF, 3" Spintech/Hedman Exhaust, P-log Manifold, Autolite 104's, MSD wires, Custom CAI, 4T65eHD w. custom axles, Champion Radiator, S10 Brake Booster, HP Tuners VCM Suite. "THE COLUSSUS" 87GT - ALL OUT 3.4L Turbocharged engine, Garrett Hybrid Turbo, MSD ign., modified TH125H " ON THE LOOSE WITHOUT THE JUICE "
Many have a problem with the sending units doing this. It is interesting this has not been addressed on the manufacturing side. Thank you for taking the time and showing us what you did to fix it.
It was not possible to replace the rod from the old unit because the units were swapped sometime in 2016. It took until late 2019 to get the rebuild back together again and actually start the car. By that time, the old unit was long gone. Since I've owned the car since around 1998 I'm pretty sure the old unit was original.
------------------ 88GT 355 CI Sequential Holley Multiport , AFR milled 180, Dyno'd at 427 HP, 320 WHP anderson@gdsconsulting.com
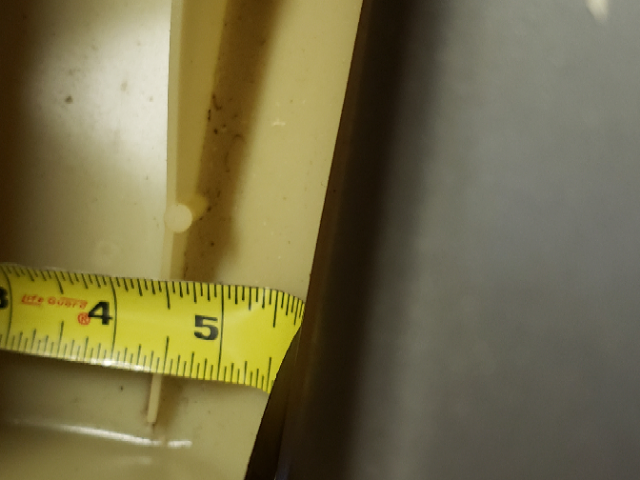
Found one on the Forum posted by Sardonyx247 in 2015, but unfortunately without a reference scale, etc. It's a shame that there are so many old threads where the pictures have disappeared ...
Great Job Steve! I have one of these new sending units for my 88, but haven't got around to doing anything with it yet. Thanks for saving me some time!
Guru, the only downside on this is one of matching materials. The FS rod is stainless steel. I didn't have any stainless rod around and my mig wire is steel. So, unless I sent it out, there was no way I could weld stainless to stainless with a stainless weld.
I think the risk is small for corrosion on the steel float shaft.
Steve, I weld stainless all the time, so that won't be any issue. Thanks for doing all the hard work figuring out what the issue was and how to easily resolve it.
It's not the weld that concerns me, but rather the steel shaft that the floats ride on. The unplated steel, hopefully will not interfere with freedom of float movement.
I cut a window in the side of the tank and here’s what I found. The tip of the rod where it exits the float was rubbing on the side baffle.
Full props to you for sacrificing a tank to see for sure what the heck was going on.
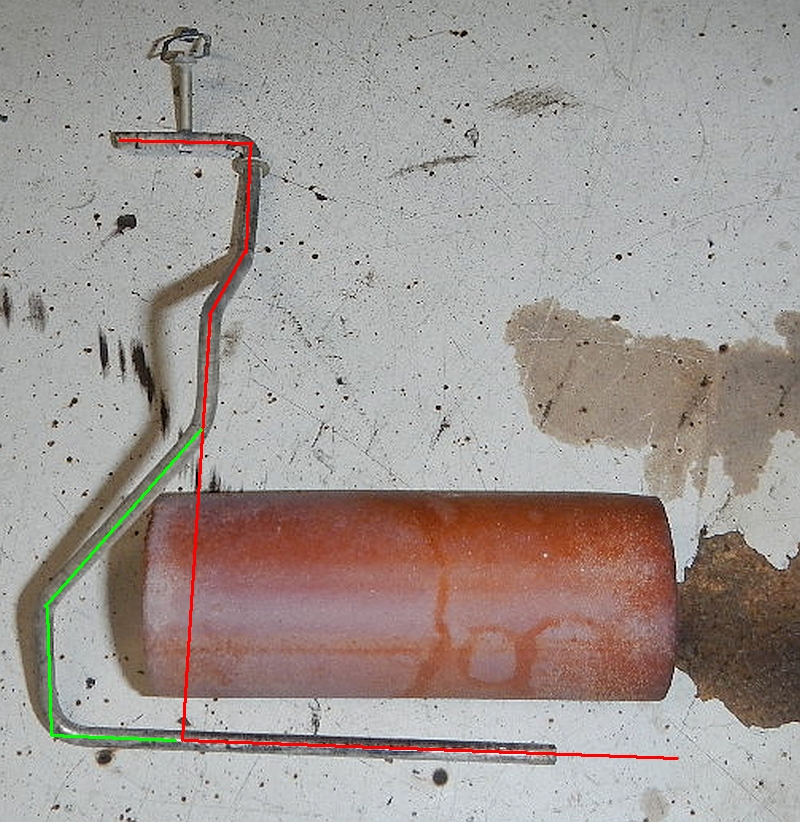
With your photo showing how close the end of the float arm was coming to one side of the tank (and hitting/being hung up on the baffle), it's no wonder the new float arm wouldn't work. In my image below, the red line shows the shape of the new arm superimposed on top of the original arm. The green line shows the missing bends which are critical in order to center the float and avoid rubbing the baffles.
It's unfortunate all this messing about is required to overcome such a "simple" problem.
[This message has been edited by Patrick (edited 06-02-2020).]
Patrick, You're absolutely right. Actually, from what I recall, the FS arm was a straight line, in a top view only, from the sensor to the elbow where it enters the float. There was at least one bend from sensor to elbow in another plane. One would have to bend the FS store arm to be like the one in the photo, just like a paint roller. After all that bending, it would be almost impossible to have the float rest on empty due to all the rod length taken up make it like a paint roller. Along the way, there is the risk that the plastic clips on the potentiometer would break off from all the messing around with it.
Once I discovered that, I knew it would be difficult to make a new rod. Another consideration was the length/weight of rod versus buoyancy of the float. That's why I made a T shape and the net weight adder was one push washer and one tiny weld.
After all this effort, I was glad to discover my own tank top leaking with the round seal. I would not want to be driving around with a leaking tank top or even worse, in the event of a rollover, fuel leaking out of the tank top.
[This message has been edited by V8Steve (edited 06-02-2020).]
One would have to bend the FS store arm to be like the one in the photo, just like a paint roller.
A paint roller, exactly! That's a perfect example of the type of bends required to center the float on the "handle" so that it's in the middle of the tank. For the float to go 100% off towards one side on the FS float assembly, that's an inexcusably poor design.
The fix for Archie's float is almost done. The float remains as a one piece instead of the above two piece. There are pros and cons for both fixes. Stay tuned for pictures.
------------------ 88GT 355 CI Sequential Holley Multiport , AFR milled 180, Dyno'd at 427 HP, 320 WHP anderson@gdsconsulting.com
The fix for Archie's float is almost done. The float remains as a one piece instead of the above two piece. There are pros and cons for both fixes. Stay tuned for pictures.
Let me know how you fixed it. I'm waiting on new pump for my 1988 and need to fix the float as it never shows below 3/4 of tank. Previous owner replaced pump, not sure what they did, but I'm installing a better pump to ensure the V8 gets proper fuel pressure.
I hope to finish the "fix" today or tomorrow. I've been trying to come come up with a solution requiring no welding, by using a new piece of steel or stainless 1/8" diameter rod. For me, it's not possible because of the tight inside radius of the 90 degree bend where the rod enters the wiper. I now have a long length of steel and stainless steel to finish up. Both will have a paint roller design, allowing the float to remain as one piece.
If you want some assistance with the V8 fuel pump, I went through a lot of that last summer. Email me if you want.
------------------ 88GT 355 CI Sequential Holley HP Multiport EFI, AFR milled 180, Dyno'd at 427 HP, 320 WHP, F40 6-Spd anderson@gdsconsulting.com
[This message has been edited by V8Steve (edited 01-16-2021).]
I gave up on a one piece design because the rod needs a really tight inside radius where it fits into the wiper. I had to cut the rod nearly all the way through, bend 90 degrees, and then back fill with weld. It's a delicate weld and it took me some time to master it. After that, it takes too much effort to heat and bend the new rod to conform to the original.
Archie's Fiero Store float assembly was binding just like mine when I started this thread.
The first step is to make an outline that later serves as a template. I used simple graph paper, traced around the offset float, and wrote down some measurements.
The goal is to move the float to be roughly centered on the rod. Then I weighed the pros and cons of just cutting the float like the beginning of this thread or making a paint roller. I chose the paint roller in order to avoid cutting the float.
The U-shaped rod is made from .125" stock from Tractor Supply. It's pretty easy to bend with a Bernzomatic and a bottle of MAP gas. I'd already cut off the end of the original rod so there was no turning back. This is where the template helps out. By clamping the rod on to the template, all the original geometry is preserved. I positioned the float and then noted where the U-shaped rod intersects the original rod. This is where you get only one shot at it. If you keep messing up the weld, the entire geometry and float location changes.
By cutting the original rod with a Dremel and cutoff wheel, the new U-shaped piece and original rod will match up. Now is the hard part because you have to weld them without losing the geometry. After making plenty of practice welds on leftover stock and making a holding fixture I was able to weld it. The mig welder made just 2-3 pulses (not trigger pulses) to just fuse them together. After careful inspection, I added 2-3 more welds and then cleaned them up.
Here's the weld fixture:
Finished
Retaining Washer - They're called a push on retaining washer or push washer and you can buy them at a hardware store.
So what's the best way to do it? Since I've made two of them now, the simplest way is the split float because you don't have to worry about retaining geometry or making a touchy weld. Just buy the .125" rod, cut off the original, and weld on a piece.
First of all, i want to thank V8Steve and everyone else for going to all this trouble and partially sacrificing an 88 tank to get to the bottom of this issue.
I'm wondering if I might have the same problem in my 88 Iron Duke. I got the car in May and the owner said that the fuel gauge didn't work 100%. It seems to work okay from Full to about 1/2 Full, but the needle stops at that point. Right now I'm just using the trip-meter to tell me when to fill up (conservatively I fill up every 200 miles, the car gets 29-31 mpg).
So, what's the least invasive way of checking the resistance? If my resistance is right from full to half full, there's a good chance I have a similar, mechanical problem.
------------------ Geoff Gibbons 1988 4cyl Manual
[This message has been edited by gjgpff (edited 01-17-2021).]
It's hard to know. If the float assembly is original, one can assume your problem is not the same. If anyone, including the previous owner, changed out the float assembly, there's a chance it could be the same problem.
I'd run the car to nearly empty and then check the ohms. Then I'd add 5 gal and check again and so on. If the resistance checks out OK, near empty, half full, and full, then the problem is likely your dash gauge.
Checking Resistance - I did most of my checking either under the car or while the tank was on saw horses. You could also check it by removing the gauge cluster or finding the pin in a connector plug. This forum has plenty of information on fuel gage problems.
Replacement of Assembly - Chances are pretty good if you or your mechanic buys a new assembly with an offset float you'll end up with the same problem. I gave thought to reworking these for PFF members at a small fee but the split float can be done really cheap. McMaster Carr sold me a stainless .125" rod, next day delivery for $3.41. Even if you don't have a welder, any weld shop can tack on the crosswise float "axle" for short $. It turns out to be an under $20 fix. Lastly, DO NOT USE THE ROUND TANK SEAL THAT COMES WITH THE ASSEMBLY. I could never get it to seal when turning the tank upside down to check the ohms. On two different tanks, it would not seal. USE THE GM DELCO SEAL with the three locating tabs.
------------------ 88GT 355 CI Sequential Holley HP Multiport EFI, AFR milled 180, Dyno'd at 427 HP, 320 WHP, F40 6-Spd anderson@gdsconsulting.com
[This message has been edited by V8Steve (edited 01-17-2021).]
My 85 tank with the new Fiero Store unit hasn't worked since the day I had it installed. I would love to get this problem solved but it is outside of my comfortzone. I think The Fiero Store should find a way to make good on this so that people can have the issue corrected.
Great info in this post and excellent solutions. I am surprised that the Fiero Store hasn't corrected the problem. Just came up with an idea that may or may not work. Suppose we cut off about 1/4" from the new float and shortened the rod. That might provide the needed clearance but its difficult to tell if the buoyancy change (if any) of a slightly shorter float will affect performance.
------------------ " THE BLACK PARALYZER" -87GT 3800SC Series III engine, custom ZZP /Frozen Boost Intercooler setup, 3.4" Pulley, Northstar TB, LS1 MAF, 3" Spintech/Hedman Exhaust, P-log Manifold, Autolite 104's, MSD wires, Custom CAI, 4T65eHD w. custom axles, Champion Radiator, S10 Brake Booster, HP Tuners VCM Suite. "THE COLUSSUS" 87GT - ALL OUT 3.4L Turbocharged engine, Garrett Hybrid Turbo, MSD ign., modified TH125H " ON THE LOOSE WITHOUT THE JUICE "
Given the amount of labor messing around with solving any kind of fuel tank problem, maybe the split float is a safe choice. You can buy replacement floats online so, if the size was right, that might be another solution as well.
I remember doing a lot of bending to solve it and I seem to remember I bent it at least a 1/4" away from that side baffle with no improvement. ------------------ 88GT 355 CI Sequential Holley HP Multiport EFI, AFR milled 180, Dyno'd at 427 HP, 320 WHP, F40 6-Spd anderson@gdsconsulting.com
[This message has been edited by V8Steve (edited 01-19-2021).]
Given the amount of labor messing around with solving any kind of fuel tank problem, maybe the split float is a safe choice. You can buy replacement floats online so, if the size was right, that might be another solution as well.
I remember doing a lot of bending to solve it and I seem to remember I bent it at least a 1/4" away from that side baffle with no improvement.
Good info but you are saying that shortening the float 1/4" may not work. I'd have to believe a 1/2" cut would probably do it but it may not. All you need is to have enough buoyancy to float the rod at the top of the gasoline level. I guess that I'll do the cut and weld of the split float and play it safe. It just pains me to think that I'd have to do this on a brand new part.
------------------ " THE BLACK PARALYZER" -87GT 3800SC Series III engine, custom ZZP /Frozen Boost Intercooler setup, 3.4" Pulley, Northstar TB, LS1 MAF, 3" Spintech/Hedman Exhaust, P-log Manifold, Autolite 104's, MSD wires, Custom CAI, 4T65eHD w. custom axles, Champion Radiator, S10 Brake Booster, HP Tuners VCM Suite. "THE COLUSSUS" 87GT - ALL OUT 3.4L Turbocharged engine, Garrett Hybrid Turbo, MSD ign., modified TH125H " ON THE LOOSE WITHOUT THE JUICE "
I put one in my 88 Mera several years ago. I had the same problem with the float hitting the baffle. I called The Fiero Store and they were aware of the problem and told me to bend the sheet metal mounting plate where it is spot welded to the metal fuel line. I was concerned that bending it would break the welds, they assured me that it wouldn't. I don't remember exactly what method I used to bend the plate but the welds held and it works great. I have had it out to change the fuel pump and all is still good. On that thought I will only use a genuine Walbro pump bought directly from Walbro in the future, you won't get a knockoff from them. They are a bit noisier but are very reliable fuel pumps.
[This message has been edited by Larryinkc (edited 01-19-2021).]
UPDATE My modification to Archie's float ended up with a problem. The Fiero Store unit was binding on the passenger side of the tank. When I made up the paint roller modification for Archie, it didn't quite come out on the center of the rod and the binding moved to the driver side. For reasons beyond this thread, Archie was able to remedy this and keep moving.
My own split float worked immediately but there is a word of caution here. Today I took out my cutaway tank again and measured the inside dimension between the two baffles at the EMPTY position. It's around 4-3/8". The Fiero Store float plus an allowance at each end for the rod makes the overall length around 2-7/8" - 3", resulting in a total clearance of 1-3/8". I seems like a lot but the clearance at EMPTY is critical and depends on where the rod is. The position of the rod depends on the location of the wiper as welded to the return tube. So, in Archie's case we ended up with binding right wehre the tape measure shows the 4-3/8". Above that, the same driver side baffle practically disappears and opens up a huge space. This would result in a float that moves freely when full but won't freely descend to EMPTY.
So, this tells me there is a chance the equally split float might still have issues that might vary from one assembly to another. The way to solve that would be to attach the cross piece and make it around 3-1/4" long and centered on the rod. Weld it in place. DO NOT CUT THE FLOAT YET. Then put it back in the tank with the correct Delco seal and check the ohms at empty and upside down full. (If you take the easy way and assemble without the seal, the results may be inaccurate). If the ohms are too high on empty, trim the float axle back until the EMPTY ohms are OK. If it's binding on returning from FULL, you know the opposite side needs trimming. Eventually, the float rod will go up and down freely.
Once you reach that point, it's time to carefully note if the float axle is centered or if you removed more material from one side than the other. Then make sure each side is long enough to hold a portion of the float along with the locking push on washer. Cut the float to fit the respective dimensions on the axle and assemble. Check one last time before installing in the car. I connect the harness to the chassis harness before actually installing the tank just be sure the dash gauge is working. Put a gallon of gas in the tank first for the final check.
Great writeup, Steve. Gave you a plus.. Figures my tank is full, but this might explain why my gage stopped working.
quote
Originally posted by Archie: I'll be installing this as soon as it gets back here. Hopefully by then I'll figure out how to get PIP working for me again. Thanks Archie
Archie... You don't need PIP. There is an image upload button now....
Does anyone else have a wire tapped into Purple sending unit wire? Found it when I dropped my tank (no plug to disconnect of course) and it goes somewhere up towards the engine.
Its a very thin wire, will try to trace it thinking its for low fuel warning in Caddy since its N* motor?
So I discovered the previous owner purchased the Fiero store tank line assembly. Of course they used the regular fuel line hose in the tank, so when I poked it with a screw driver it was soft and only a matter of time before it let go. I too had fuel sender issues; read full down to 66%, float hanging up on passenger side baffle.
So after reading this thread, I took needle nose pliers and bent the plate holding the sending unit and float to move it more center of the tank. You can see in the pictures the float is right of center, so I moved it left of center. Tried it 2 different times and gives the full and empty readings on the ohm meter.
Waiting on submersible hose to connect new pump. Then install, check gasket for leaks and double check float operation. Hope this helps others.
Dr Xtreme [img]https://images.fiero.nl/userimages/DrXtreme/Float%20mod%20 2.jpg[/img]


 [img]https://images.fiero.nl/userimages/DrXtreme/Float%20mod%20 2.jpg[/img]


