NOTE: On Feb 5th I added what amounts to a second line of questioning, namely, has this harness been hacked (as warned of by Ogre.) So new pictures appear in a reply from Feb 5th where I removed the heat tape and conduit and found a surprise (but also an answer about the wire I had just melted).
---------------------------------
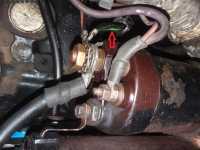
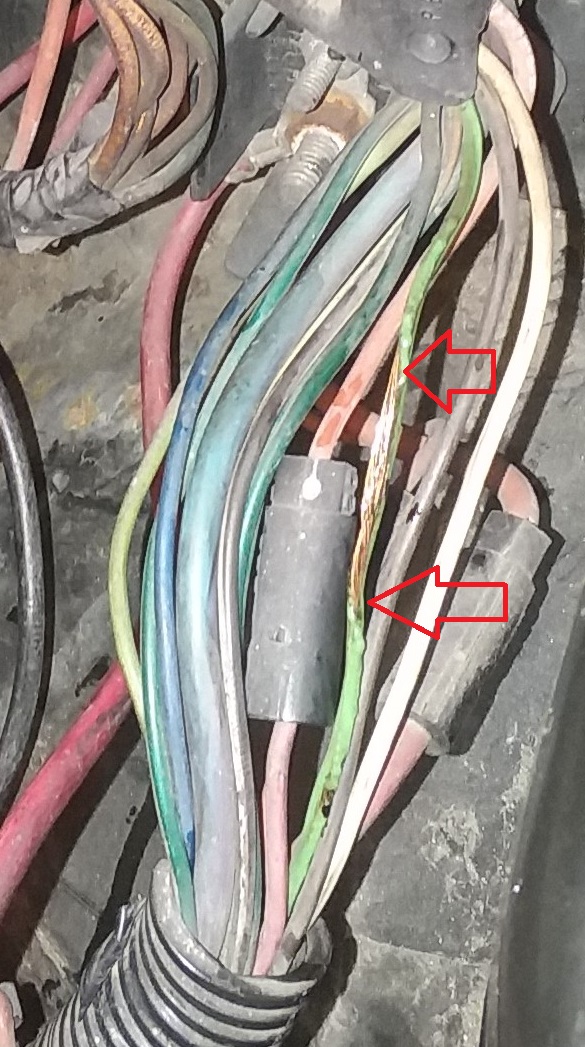
Just got my 88 v6 5spd back together after 18 months. I ran the oil pump with a drill then got the final connections together for the long-awaited attempt to start up. While tightening the positive battery terminal the green wire indicated in the pictures started to melt away its insulation. With all due alacrity I got the battery disconnected while thanking my lucky stars that I didn't torch my baby (and garage, etc.) It looks like I have an appointment with the manual to discover where this green wire goes ... perhaps I somehow shorted it to ground? Any thoughts?
Close-up ...
[This message has been edited by Notorio (edited 02-05-2020).]
Looking at my 88 manual wiring diagram, green from the C500 connector could be A) Air conditioning compressor, B) Coolant fan, C) Backup lights, or D) Cruise control...
You may want to pull fuses for your A/C, Cruise and Coolant fan, then connect the battery and see if you are still getting an voltage on that wire...Then install one fuse after another until it shows up....That would get you to which system is shorting.....
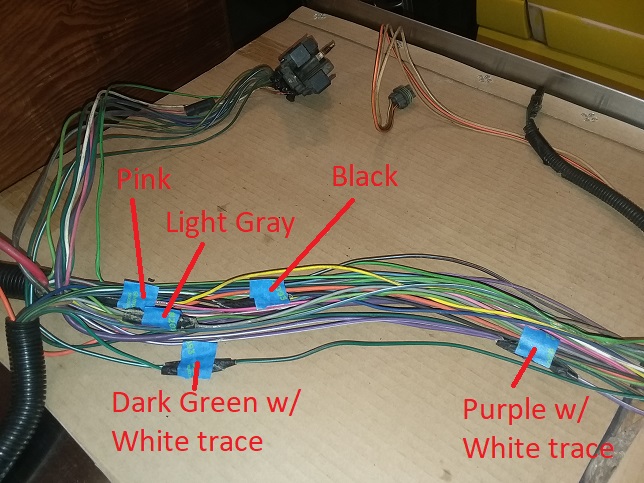
Is the wire just green, (Dark or light) or does it have a strip? (White or yellow)
My money is on the backup lights - they are battery powered, not key on.
All AC functions go through the 203 connection and all cruise functions go through the C500, but are not in the engine side of the harness - they go around the back in the taillight portion of the harness.
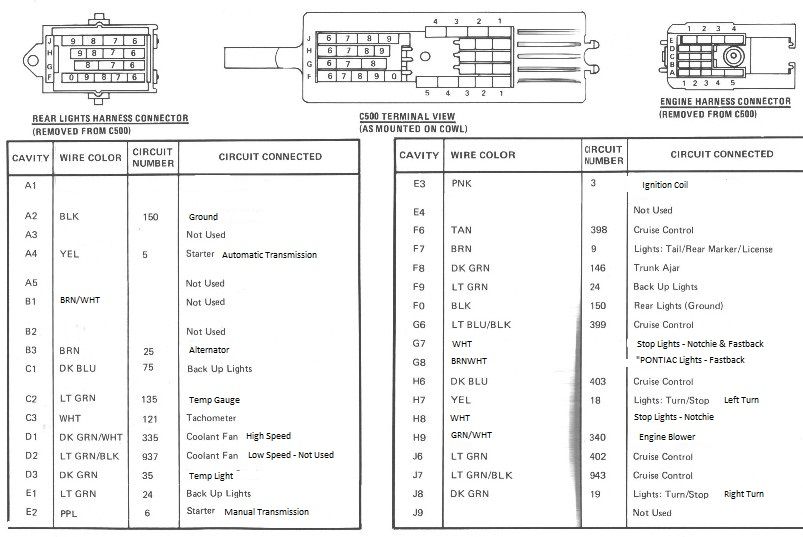
Here is a modified copy of the C500 connection that has more detail than most.
Guys, thanks for the expert help!! I'll try what you suggested in the morning. As far as I can tell the melted wire is a light green, no trace. There are a couple darker green but it looks like they may have traces. I'm going to have to clean the grime off of these so I can get a better look.
Another clue ... this car does not have cruise control but did have A/C, which suffered the black death a few years ago. During this rebuild I left the compressor off and zip-tied the two A/C harnesses together off to the side so I could use them at some future time, if any, to get the air operational again. And I was hooking the battery up with the key off and out of the ignition.
[This message has been edited by Notorio (edited 01-29-2020).]
I want to state here; Long ago, my father helped me install an aftermarket cruise control....We went in for lunch and when we came out an hour later, I happened to notice the plastic over the backup lights was bent in......We had left the key on and the shifter was in reverse....So those lights were on for an hour and MELTED the taillight backup lenses!
Never park the shifter in reverse....
(I just checked and my backup lights come on with the shifter in reverse- but the key OFF! Is that right? (I would think it would be "Key power")
Originally posted by cvxjet: Never park the shifter in reverse....
What a bummer but great advice.
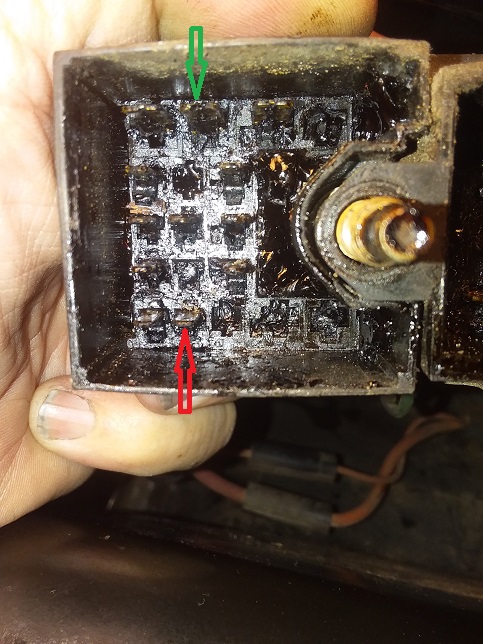
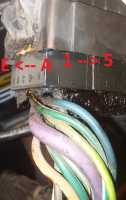
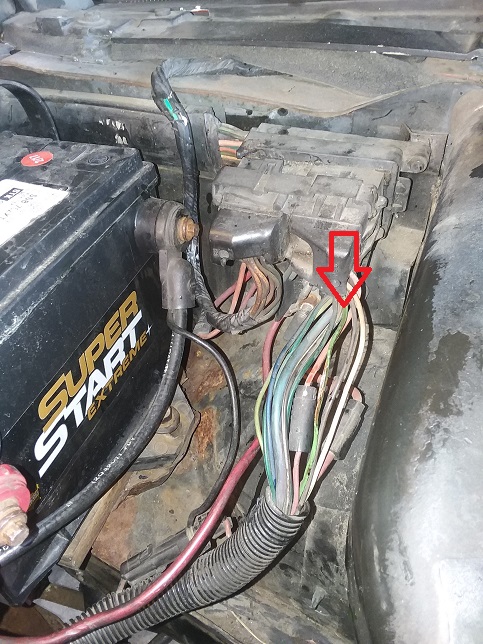
So here is the connector taken off. It is filled with a reflective, tar-like substance (?) so it is hard to see what is going on in the picture. On the front side of this male connector I have one side of my multimeter hooked to the bare copper wire where the insulation was melted away. On the bottom row, on the second small pin from the left in the picture at the tip of the red arrow, touching my other lead locks in the continuity buzzer and shows a resistance < 0.1 ohms. On the top row, on the second pin (large pin in this case) at the tip of the green arrow, touching my other lead beeps the continuity buzzer for just a moment and the resistance rapidly goes off scale.
Next step is to try to correlate the pins with assignments in the detailed diagram ...
Looks like the 'red arrow' with the direct connection to my melted wire is F9 = backup lights!! I'm going to ignore the 'green arrow' top pin for now. So, this means I've shorted the back-up wire somehow??
Mark pins are on Engine side of C500. C500 Light side is other side of bolt. Remove pins. See my Cave, Terminal Access
Assuming Wiring is OE, not hacked doing engine swap etc...
Cooked Lt Grn in Engine side is likely BU light on C500 E1 (Think is One Left of Green Arrow) Side Note: Fat black joint w/ "orange" weird wire at E3 next to cook wire is a Fusible Link for HEI. Do Not Cut/Damage this wire.
LT Grn wire Is Not connected to battery. Another wire and BU switch gets power first. They maybe have damage too.
if only cooked wire has Likely a short on body side of C500 or rest of BU lights are cooked but you haven't looked.
Look at body side etc for more cooked LtGrn wire. Likely need to unwrap engine harness to find/fix known damage.
CLICK FOR FULL SIZE
C500 above isn't 88. This is...
CLICK FOR FULL SIZE
Both from 88 Fiero FSM. Sim to 84 but not as bad... 88 has wiring changes vs earlier years and many things are different. Note: C500 F10 wire colors maybe correct and GM authors of 88 Fiero FSM didn't update color on every other page. They make errors copy/past/edit pages many times in many FSM. Often didn't have data at time of change or simply cut cost making new FSM's every year. Can use Circuit ID to follow most circuits. See my Cave, Wire Reading
[This message has been edited by theogre (edited 01-30-2020).]
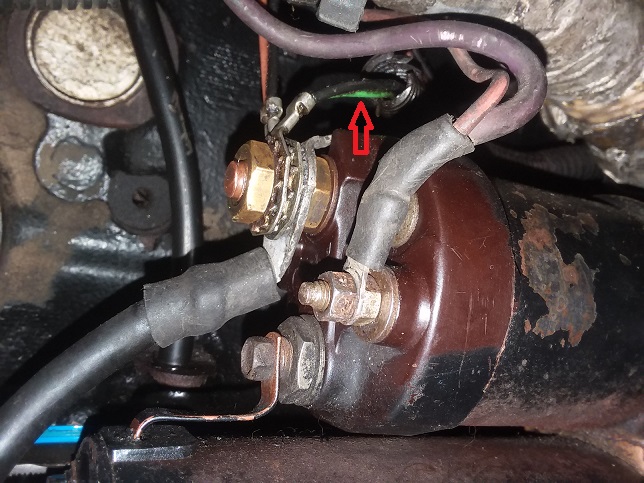
Ogre, I didn't see your reply until after I tried something. I did misread the figure Olejoedad pointed out and immediately found a huge mistake on my part: the direct short of power to ground. Definitely a Doh! moment.
Above you can see I've got the green & black wire stake on connected to the positive terminal of the starter (!!!) So I removed that and attached it to the grounding lug towards the right side of the picture. This brought the resistance of the green-melted wire to < 1 ohm.
I decided to attempt a crank over with the coil plug pulled. When I climbed into the cabin I noticed the AJAR, and the BRAKES, VOLTS, and the OIL warning lights already on (at about half strength.) Turning the key to ON (but not CRANK) those lights brightened up to normal and several other lights came on. A brief crank shows the Starter and Tach are working. One additional issue: the fuel pump did not go on. I rechecked that and sure enough it was silent.
Status: Perhaps I've blown the Fuel Pump fuse but I can't account for the lights that are ON when the key is OFF.
[This message has been edited by Notorio (edited 01-30-2020).]
Ogre, I didn't see your reply until after I tried something. I did misread the figure Olejoedad pointed out and immediately found a huge mistake on my part: the direct short of power to ground. Definitely a Doh! moment.
CLICK FOR FULL SIZE
Above you can see I've got the green & black wire stake on connected to the positive terminal of the starter (!!!) So I removed that and attached it to the grounding lug towards the right side of the picture. This brought the resistance of the green-melted wire to < 1 ohm.
I decided to attempt a crank over with the coil plug pulled. When I climbed into the cabin I noticed the AJAR, the OIL, and the TEMP warning lights already on (at about half strength.) Turning the key to ON (but not CRANK) those lights brightened up to normal and several other lights came on. A brief crank shows the Starter and Tach are working. One additional issue: the fuel pump did not go on. I rechecked that and sure enough it was silent.
Status: Perhaps I've blown the Fuel Pump fuse but I can't account for the lights that are ON when the key is OFF.
black and tan are all grounds. Not sure what what has green ground. Not digging thru entire 88 FSM to find more. tan is O2 sensor "ground" tied to ECM. Is a "Fake" ground like an ECM "Ground" to HEI. See my Cave, Ground "Myth" notes
May have wreck ECM or other things using those ground lugs. They are supposed to use stud top trans bell bolt or equiv near the starter. ECM and FP relay should have turn on the FP then shut off if you don't start the engine. connect light/meter betwwen aldl G to frame then turn key on
OK, I'm going back into the connector to trace the other wire on the 'fat' pin before looking for more melted light green wire. Here is an updated status (i.e. I had the lights incorrect above and corrected them there and now here):
quote
I decided to attempt a crank over with the coil plug pulled. When I climbed into the cabin I noticed the AJAR, and the BRAKES, VOLTS, and the OIL warning lights already on (at about half strength.) Turning the key to ON (but not CRANK) those lights brightened up to normal and several other lights came on. A brief crank shows the Starter and Tach are working. One additional issue: the fuel pump did not go on. I rechecked that and sure enough it was silent.
Status: Perhaps I've blown the Fuel Pump fuse but I can't account for the lights that are ON when the key is OFF.
Status: With the key OFF the back up lights do not light.
The cap is now off the C500 connector which has allowed me to confirm the pin assignment:
E2 - purple wire (with battery disconnected, reads <1 ohm to ground) A2 - melted, light green wire (with battery disconnected, reads <1 ohm to ground)
As per above the Purple wire goes to the Starter Solenoid. That should NOT be at ground, right? So that would mean the Light Green and the Purple wire have melted together 'somewhere' in the harness.
Before going through all the pain of removing the harness from the car, if I disconnect the Purple wire from the Starter Solenoid and the wire is Good, it would have infinite resistance to ground, yes? If it is still well grounded then that would Prove the wire is damaged, yes?
Before going through all the pain of removing the harness from the car, if I disconnect the Purple wire from the Starter Solenoid and the wire is Good, it would have infinite resistance to ground, yes? If it is still well grounded then that would Prove the wire is damaged, yes?
Answer is ... purple is still grounded. Interestingly, the purple wire has a companion wire going into the same stake on which is maybe a light orange-brownish color with a fusible link within inches of the starter solenoid connection. No other wires have continuity at the C500 connector to the melted green or purple wire. Perhaps this means the fusible link is blown? Of course none of this sheds any light on why the Warning Lights are ON even when the key is OFF.
I'm ready to concede ... looks like this weekend I'll be pulling the wiring harness and taking it apart.
The cap is now off the C500 connector which has allowed me to confirm the pin assignment:
E2 - purple wire (with battery disconnected, reads <1 ohm to ground) A2 - melted, light green wire (with battery disconnected, reads <1 ohm to ground)
CLICK FOR FULL SIZE
As per above the Purple wire goes to the Starter Solenoid. That should NOT be at ground, right? So that would mean the Light Green and the Purple wire have melted together 'somewhere' in the harness.
Before going through all the pain of removing the harness from the car, if I disconnect the Purple wire from the Starter Solenoid and the wire is Good, it would have infinite resistance to ground, yes? If it is still well grounded then that would Prove the wire is damaged, yes?
C500 A2 is a Ground connected to other grounds including at lest 2 in Cabin. FSM says Dk Grn but may had color change from 30+ years of oil etc on it plus heat now... Other end is likely part of lugs on starter above...
CLICK FOR FULL SIZE
Cook ground(s) may or not short out unless burn other like purple one might have but any cooked wires will have problem carrying power loads and water will eat them fast. Very likely other wires are burn too. Should pull the console to look at G202 for a start. Screw to the tunnel near ECM. Pull C500 body side for same reason. I think 2 small screws plus plastic "duct" and whatever go w/ that to protecting the wires.
Starter and solenoid is a ground path so have to disco the purple wire before testing. Might pass but insulation still burn by it or A2 and have problem later. Purple wire is bigger and less heat in it vs A2 when burning. Or A2 burn into other small wires and have same problem or is shorted now. IOW burn A2 wire can burn any to all wires in the engine harness near it. Not just C500 wires but ECM wires go directly thru rear firewall. Plus same issue for body side C500 wires etc.
May cooked I-switch and clutch switch. If not bad right now can bite you later.
Note that XΩ to ground or pretty much anything w/ any normal meter means very little here. Wires > 18awg is too large to really test w/ any Ω meter using 9v or smaller battery. Can use Voltage Drop testing w/ car running but is dangerous w/ possible burn wires. Are tools to test iffy wires but very few has access to them or know how to use them. These "meters" called collectively Meggers can generate Hundreds to Thousands of Volt to look for bad insulation etc. (Megger is a brand name but others are called that name regardless name on label. Even many Commercial Electricians don't have them because real ones that meet safety standards etc cost a lot w/ "Cheap" ones > $500)
[This message has been edited by theogre (edited 01-30-2020).]
Originally posted by ltlfrari: According to an 87 wiring diagram I have (I assume all years are the same), the reversing light circuit is hot in run, bulb test, or start only.
True But You didn't read this thread? Or are you one of using a phone/tablet or other small screen/window to read and can't/won't to really look at images? Because I already posted 88 BU light wiring in https://www.fiero.nl/forum/F.../HTML/143417.html#p8 Image: BUlight88.png Dimensions: 1456 x 1068 px, 38.5 x 28.3 cm, 15.17 x 11.13 inches And Why I use Img Thumb for them so can read the text w/o big images all of the time. Nice that new img button takes PNG but often need to save big images and use whatever or Print to view because of new img auto size.
Besides that the rest of the thread found the problem and I posted more data from 88 FSM...
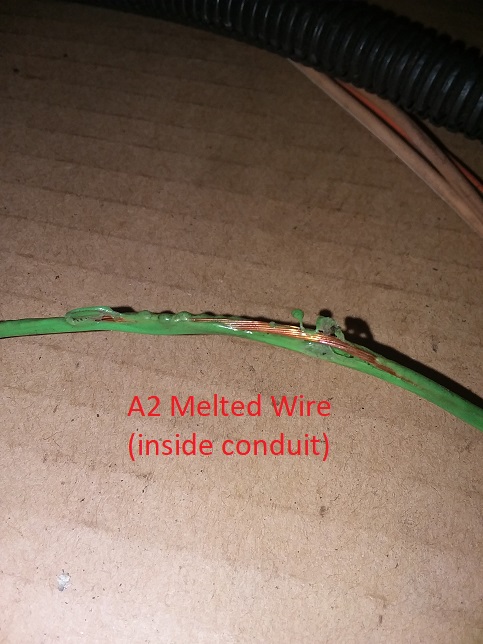
As noted at the beginning of the Post I am adding a second line of questioning here. After removing the gray heat tape and the polyethylene conduit a few things became obvious.
1) The conduit section closest to the exhaust but protected with heat tape was very brittle, it cracked apart with very light hand pressure. Conduit farther away but still covered with the gray heat tape was flexible and in excellent shape.
2) I traced the A2 light green wire that was melted closest to the battery and discovered several areas inside the conduit that were also melted. However, there was no collateral damage to any of the adjacent wires in any section where the Light Green wire was running, melted or not melted. This seems like a good development and if it wasn't for observation #3 I would clean and remake my harness and reinstall. This picture shows one such thoroughly melted area, but again, neighboring wires weren't melted or discolored at all.
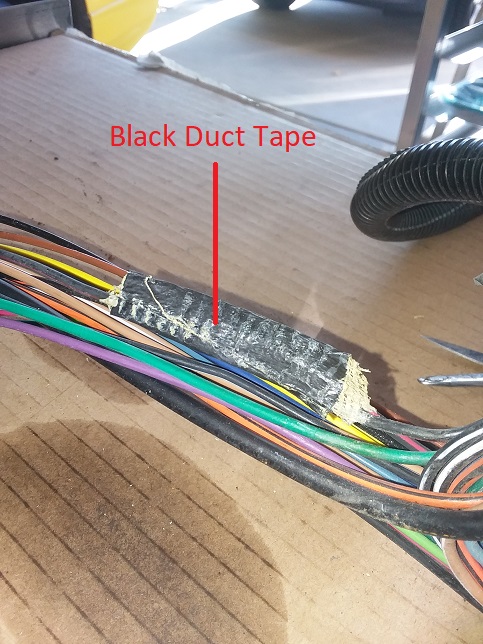
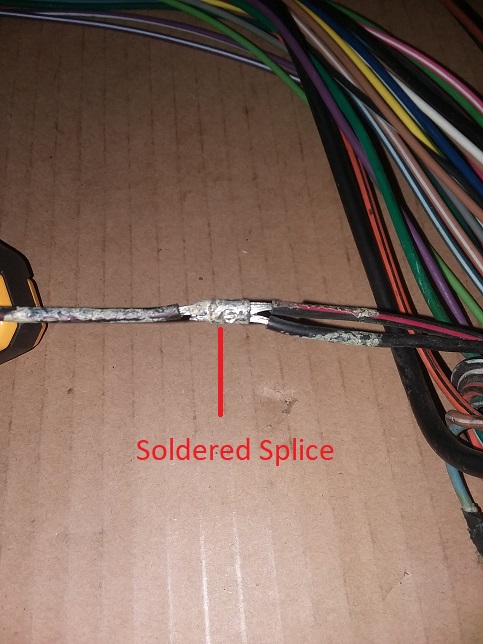
3) And here are the supporting pictures showing Defeat perhaps snatched from the jaws of Victory. There are at least 7 splices that I found hiding inside the conduit! These are covered in what appears to be black duct tape (suspiciously not OEM) but underneath they look professionally spliced and soldered. So my basic question is, did the 88 gt, 5spd, with A/C come with existing splices like this or has my harness been hacked? Keep in mind that all systems on the car function normally. At first I thought perhaps a prior owner was replacing damaged wires from some earlier incident but he would have had to use the correct OEM wires -- all of them match perfectly. Taking a closer look these splices are not eliminating a wire that was damaged b/c they do not terminate in another slice leading to two wires, they all go somewhere that looks OEM to me, like a sensor or a pin block. What has happened here???
p.s. I haven't traced all these splices to show where the wires are really going. At this point I'm just trying to understand if this is the stock OEM situation or if I am screwed.
That's good that didn't burn others. Likely because only tried to start 1 to a few times. I've seen 1 wire that burn everything they touch... that's then 1 wire didn't burn the whole car and worse. Is why many positive wires have fuses and/or fusible link to prevent battery dumping > 300a to a short. Even then one iffy part can fry the whole car.
Yes, there Are many splice in the engine bay and the rest of car. Most to All should S5xx numbers as shown in above pages I posted.
Example: should have several splices for injectors (4), ECM sensors (~4) and Cold start injector (1 or 2 depending just how the fusible link is installed.) Most links are splice then plastic molded cover. Rest of car would have problems w/ same plastic on splice in the harness. Plus cost more money for GM.
Splices are same type as FSM shows dealers how to slice.
If you want to follow all get 88 Fiero FSM or go to alldatadiy.com pay for a year or two.
Black tape on splice for ground mainly just protect others for any sharp edges. Other pic w/ more splices look normal but is a small pic... If looks bad on other splice w/ power thru them then fix covering or add more w/ Good Tape like 3M Super 33 or 88 electrical tape. 88 is thicker then 33 but same high resistance to UV rays, abrasion, moisture, alkalis, acids, corrosion and varying weather conditions etc. and rated heat 0 to 221 degrees F but still stay put even at higher and lower temps. Cheap tapes like HF and many others sell can fail very easy and quickly and many don't meet UL testing and other standards. (just ignore YT and other fools saying most or all E/tapes are same.)
Other black tape over the harness in some areas Is Not electrical tape. Is made for just that job as won't make a sticky mess. I think eastwood.com has/had right tape for this but not digging to find it right now.
Originally posted by theogre: Other black tape over the harness in some areas Is Not electrical tape. Is made for just that job as won't make a sticky mess. I think eastwood.com has/had right tape for this but not digging to find it right now.
For wire bundling purposes, I like Tesa 51036 in the 19 mm and 25 mm widths.
That's good that didn't burn others. Likely because only tried to start 1 to a few times. I've seen 1 wire that burn everything they touch... that's then 1 wire didn't burn the whole car and worse. Is why many positive wires have fuses and/or fusible link to prevent battery dumping > 300a to a short. Even then one iffy part can fry the whole car.
Yes, there Are many splice in the engine bay and the rest of car. Most to All should S5xx numbers as shown in above pages I posted ...
That is such a relief it was GM and not a hacker ... thank you Ogre! I'll see if I can spot those splices in your diagram.
quote
Originally posted by pmbrunelle:
For wire bundling purposes, I like Tesa 51036 in the 19 mm and 25 mm widths.
Many thanks for the recommendation. I shall use that instead of the electrical tape. You have just spared some future owner from dealing with a sticky mess
[This message has been edited by Notorio (edited 02-05-2020).]
Many thanks for the recommendation. I shall use that instead of the electrical tape. You have just spared some future owner from dealing with a sticky mess
I previously did a harness with sticky tape, and then regretted it later... that's what motivated me to find the correct stuff this time around.
quote
Originally posted by Notorio: As noted at the beginning of the Post I am adding a second line of questioning here. After removing the gray heat tape and the polyethylene conduit a few things became obvious.
1) The conduit section closest to the exhaust but protected with heat tape was very brittle, it cracked apart with very light hand pressure. Conduit farther away but still covered with the gray heat tape was flexible and in excellent shape.
You shouldn't be using polyethylene split loom close to the engine/exhaust; it can melt with the heat.
Nylon split loom is more heat-resistant and will hold up better in an engine bay. Nylon split loom is somewhat hard/expensive to get, so where the stock loom hasn't turned crumbly/fragile, you can just wash it and reuse it.
Nylon split loom is often identified with a white stripe printed on it lengthwise.
Edit to add: in theory, nylon should sink in water, whereas polyethylene should float. Maybe you could verify the type of plastic by filling your bathtub and putting unknown wire loom in it. However, with all the ridges in wire loom, I am not sure if nylon would float due to trapped air bubbles.
[This message has been edited by pmbrunelle (edited 02-06-2020).]
yea, many loom covers sold a many car part stores and other places are not rated for engine bay heat, UV light, etc. and often very soon starts cracks and eventually falls apart.
UV? Fiero engine parts see more to much more then normal because of the vents. Big example is EVAP can is black but some to all of it turn gray to white from UV. Mine has "white" strips on top because of later vent design.
Above only shows a few splices. Others listed are in drawings for V6 EFI etc. can tell how many and what colors are in a splice to say like this is S504 etc.
[This message has been edited by theogre (edited 02-06-2020).]
GOOD: The repaired harness is installed and now the lights and fuel pump work normally. No smoke, no flames. I cranked with coil disconnected and kept going until the oil pump showed life on the gauge.
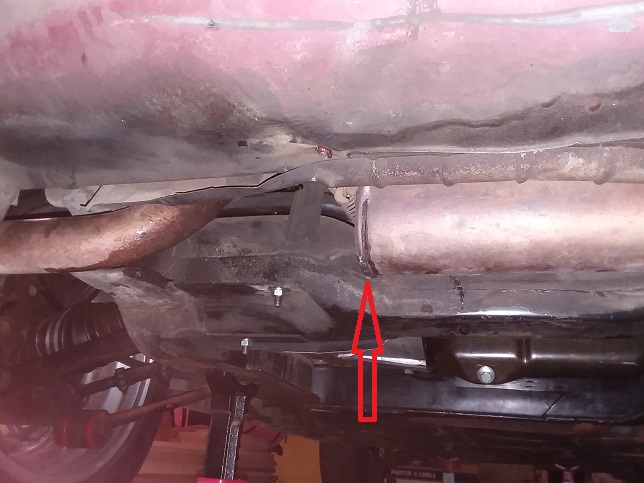
BAD: Connecting the coil the engine just sputters along a bit. Looking under the car I was amazed to see Water pouring out of the little vent/weep hole in the muffler.
Fearing a head gasket disaster I took all the plugs out. No sign of water and a slight gas smell. Taking a closer look at the 'water' I noticed it wasn't my 50:50 anti-freeze mix but clear water. Does this mean my fuel tank is full of water from standing 18 months??
There might be water in your tank, especially if your fuel had ethyl alcohol in it.
Alcohol will suck up water from the atmosphere.
In general, an engine won't run correctly on stale gas.
You may wish to dump some pure alcohol (methyl or ethyl) into the tank to get whatever water's in there mixed with the fuel.
Then, if your tank isn't currently full, you may wish to top it up with fresh fuel.
If your tank is already full, I guess you can burn off the fuel by driving the car the way it is, or you can transfer some junk fuel into another vehicle you own... then top up with fresh fuel.
You could drain a bit of oil from the sump to make sure that there's no coolant in the oil.
[This message has been edited by pmbrunelle (edited 02-13-2020).]
Cold Exhaust get water and is it Normally and OEM mufflers often has a drain hole to deal w/ it. Should stop when The Exhaust is hot and may take some time in cold to very cold weather. Engine hot is not = to Exhaust is hot.
1% to 10% Ethanol in gas won't matter to water in the muffler or out thru tailpipe(s). "Real"/"Pure" gas can always do this. Water can condense and main source is a byproduct of the cat.
Year + old gas may have "Gone Stale." More so if Gas Cap is off/loose/bad etc. Just what do to depend how much gas in the tank. Under ~ ½ just add fresh 87 octane gas and wait until < ½ to ¼ before filling again. Full tank, siphon some out then do same. To get rid of rest of old, wait to burn the rest in engine then dump 1-3 gallons then rest fresh until gone. Dump gas on dirt etc is illegal in most places. If you suck out water watch putting old gas in to use.
[This message has been edited by theogre (edited 02-14-2020).]
So here's what I did with the water-gas mixture: since the tank was about half full I dumped in a bottle of Iso-Heet and then added 2 gallons of new gas. I let this sit over night and then started up, barely catching after many attempts. Again several ozs of water dripped out of the muffler weep hole and clouds of steam issued from the exhaust tips. After about five minutes the water stopped dripping and the clouds disappeared and the idle improved but is still a bit rough. I stopped the engine a few times to significantly top up 50:50 coolant at the neck on the engine. At this point I noticed that the temperature gauge continued to climb until the needle was pinned high. So at that point I shut the car off.
Today, after out guests leave I will start her up again and see how the idle is doing and if the temp stabilizes will go ahead and set the timing, which is probably way off. Is there anything else I should be worrying about?
Low coolant can make engine to run hot. If finally full still take some time to catch up. Plus Rad Fan won't turn on until that engine switch sees ~ 235°F normally and freak out many people. Then add Low coolant can cause any/all coolant temp sender/sensor to read off doesn't help.
Most Sender/sensors are made so really needs coolant on them to read right. Low coolant in many cars often = dry sensor = big errors and can't trust anything connected to them until the system is full or close enough to immerse the tip.
Trying to fill the coolant system and other engine work may help when: If has AC... Pull AC clutch relay plug and turn on AC in the cabin to force run the rad fan and engine blower. No AC... carefully back probe Rad fan switch and ground the wire. Can unplug it but every time you do may wreck the plug, sender or both just from old age.
Fill following direction in my Cave, Coolant Fill That Should get most air out before starting w/ right rad cap on it. Run some then add some should get most of the rest. System will purge air entirely over next few heat cycles by itself when cap, overflow tube and tank are good.
1) I have confirmed the coolant is full per instructions in The Cave and when the gauge is pinned High the actual temperature at the bottom of the fill neck (taking thermostat out) is only about 90 C / 195 F (i.e. measured with thermometer). This was a new sensor I put in so perhaps the wiring is bad? Or maybe the sensor was damaged in the Short that I previously caused? The fan cycles on/off per normal operation so I am going to ignore the gauge for now.
2) The engine fires immediately up during cranking but the slight misfire / sputtering continues after the car is all warmed up and driven around the block several times. Since the 18 month-old gas had been full of water and was merely treated with one bottle of IsoHeet plus a few fresh gallons of gas added, should I expect the engine to run Smoothly now or will the entire tank of gas/isopropanol/water produce this sputtering?
3) When I short the A-B terminals to put the ECM into diagnostic mode it doesn't Stop flashing 1, 2 after three times, it keeps on flashing 1,2 for as long as the key is in the accessory position. This seems wrong compared to some write ups here ...
I believe that the trouble light will continue to flash 3 x "12s" forever if there are no trouble codes......Just checked and mine keeps doing 12 forever!
I believe that the trouble light will continue to flash 3 x "12s" forever if there are no trouble codes......Just checked and mine keeps doing 12 forever!


 I'll try what you suggested in the morning. As far as I can tell the melted wire is a light green, no trace. There are a couple darker green but it looks like they may have traces. I'm going to have to clean the grime off of these so I can get a better look.