As some have said from the Mall posting, I've also been looking for these for a while. I have an 85' GT with 3400 and AT. I have everything from an 88' GT including the 5spd and these were some of the last pieces needed for the conversion.
I'm not interested in making parts, but also want to supply anyone who wants a template.
Not 100% sure how best to do this? I don't have CAD, but could put something together and post it as a PDF or Doc?
Save/print as PDF. Any free method will work. I use CutePDF Writer for 15+ years because look like a local printer and doesn't need "Cloud services" BS. Doc/Docx has charge some to a lot every version of Word. Current Default is DOCX unless you save as older versions which should do if you use word because many other programs also access 97-2003 doc files "better" then Docx format.
if you take pictures remember to include a ruler with obvious markings. If/When printed, users will need to scale up/down and need something to do that.
------------------ Dr. Ian Malcolm: Yeah, but your scientists were so preoccupied with whether or not they could, they didn't stop to think if they should. (Jurassic Park)
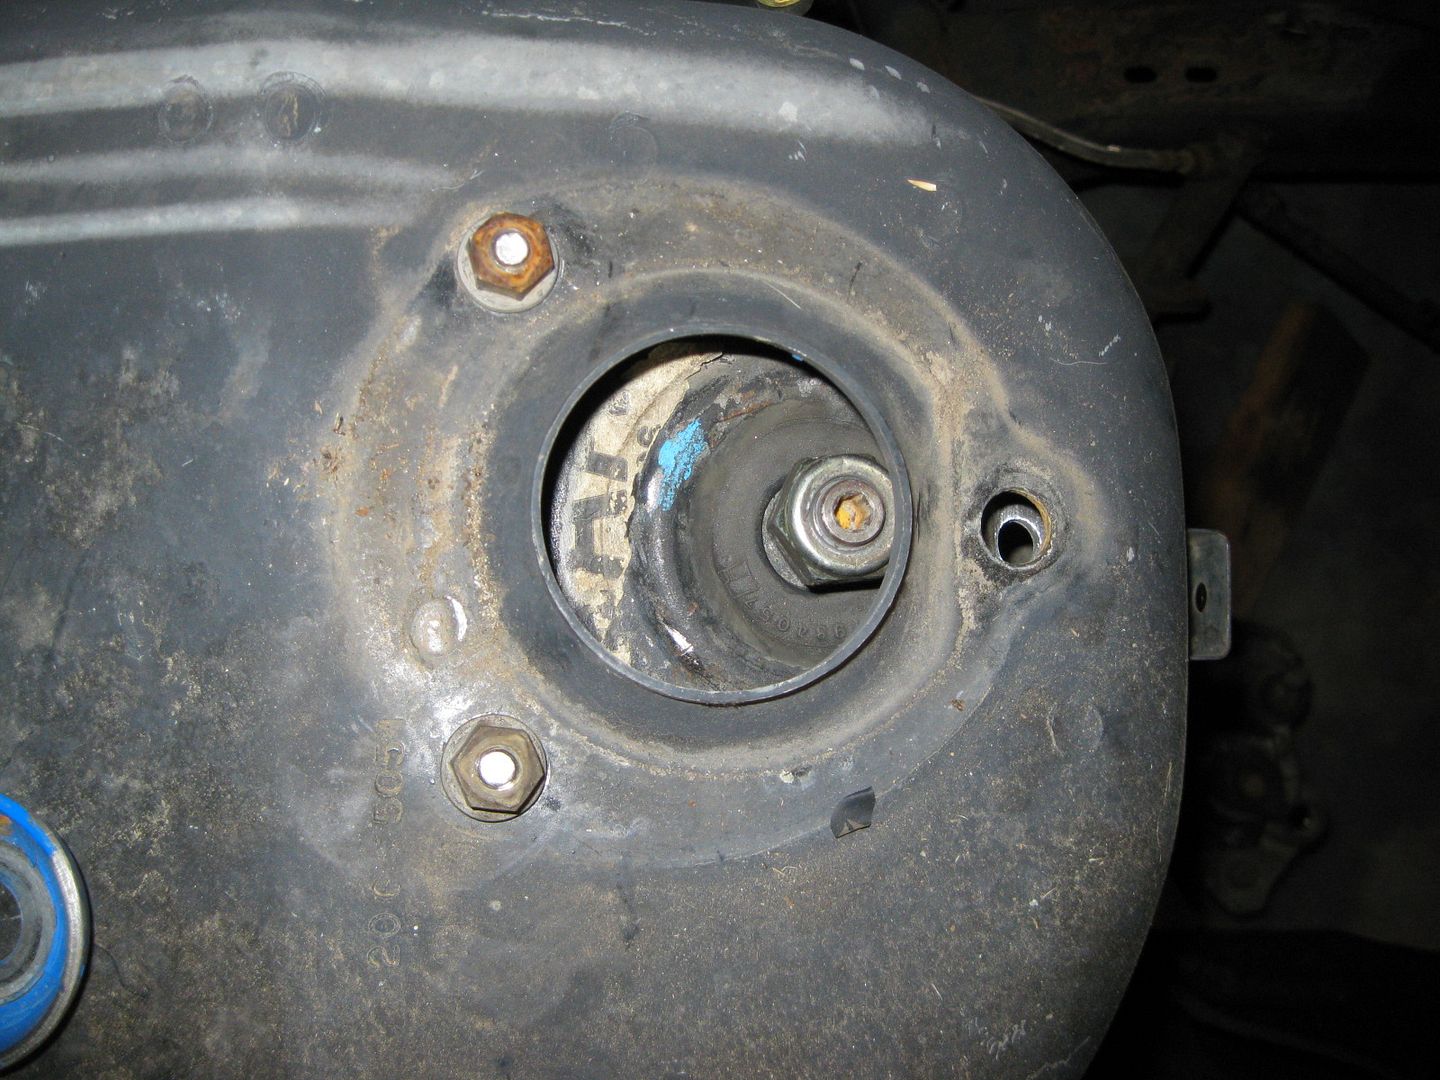
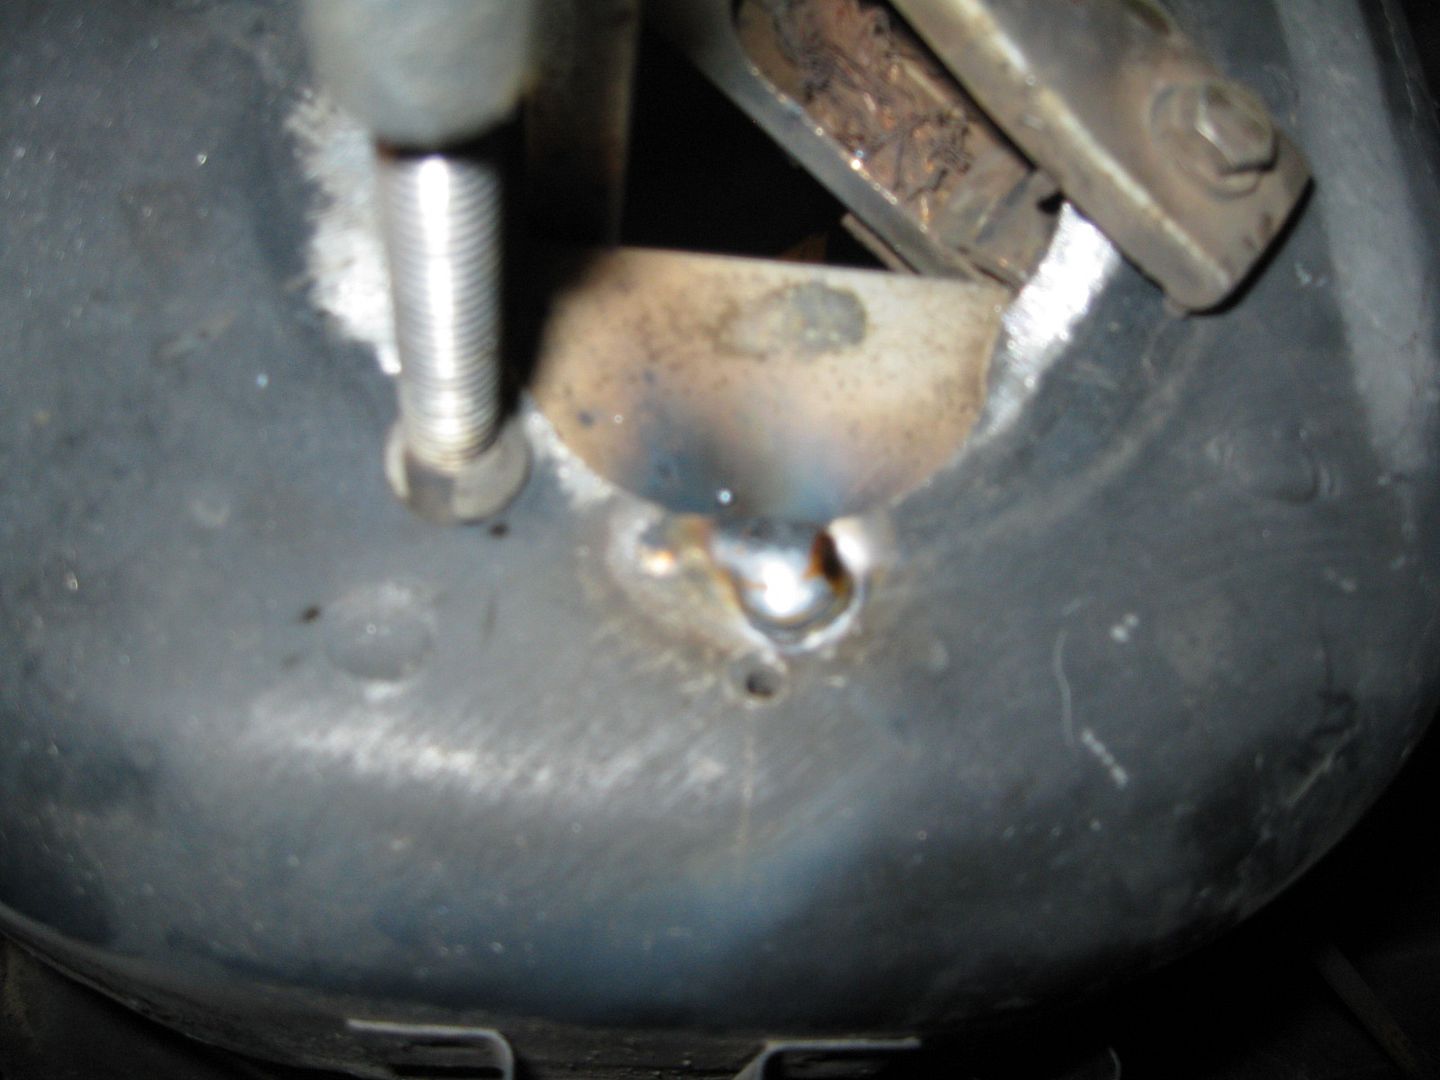
The 87 with 88 cradle I had wasn't done with the plates. They just drilled a hole inboard of the stock location and I think welded in a large washer. The pics I took got corrupted in translation on the phone they were taken on.
Originally posted by sourmash: The 87 with 88 cradle I had wasn't done with the plates. They just drilled a hole inboard of the stock location and I think welded in a large washer.
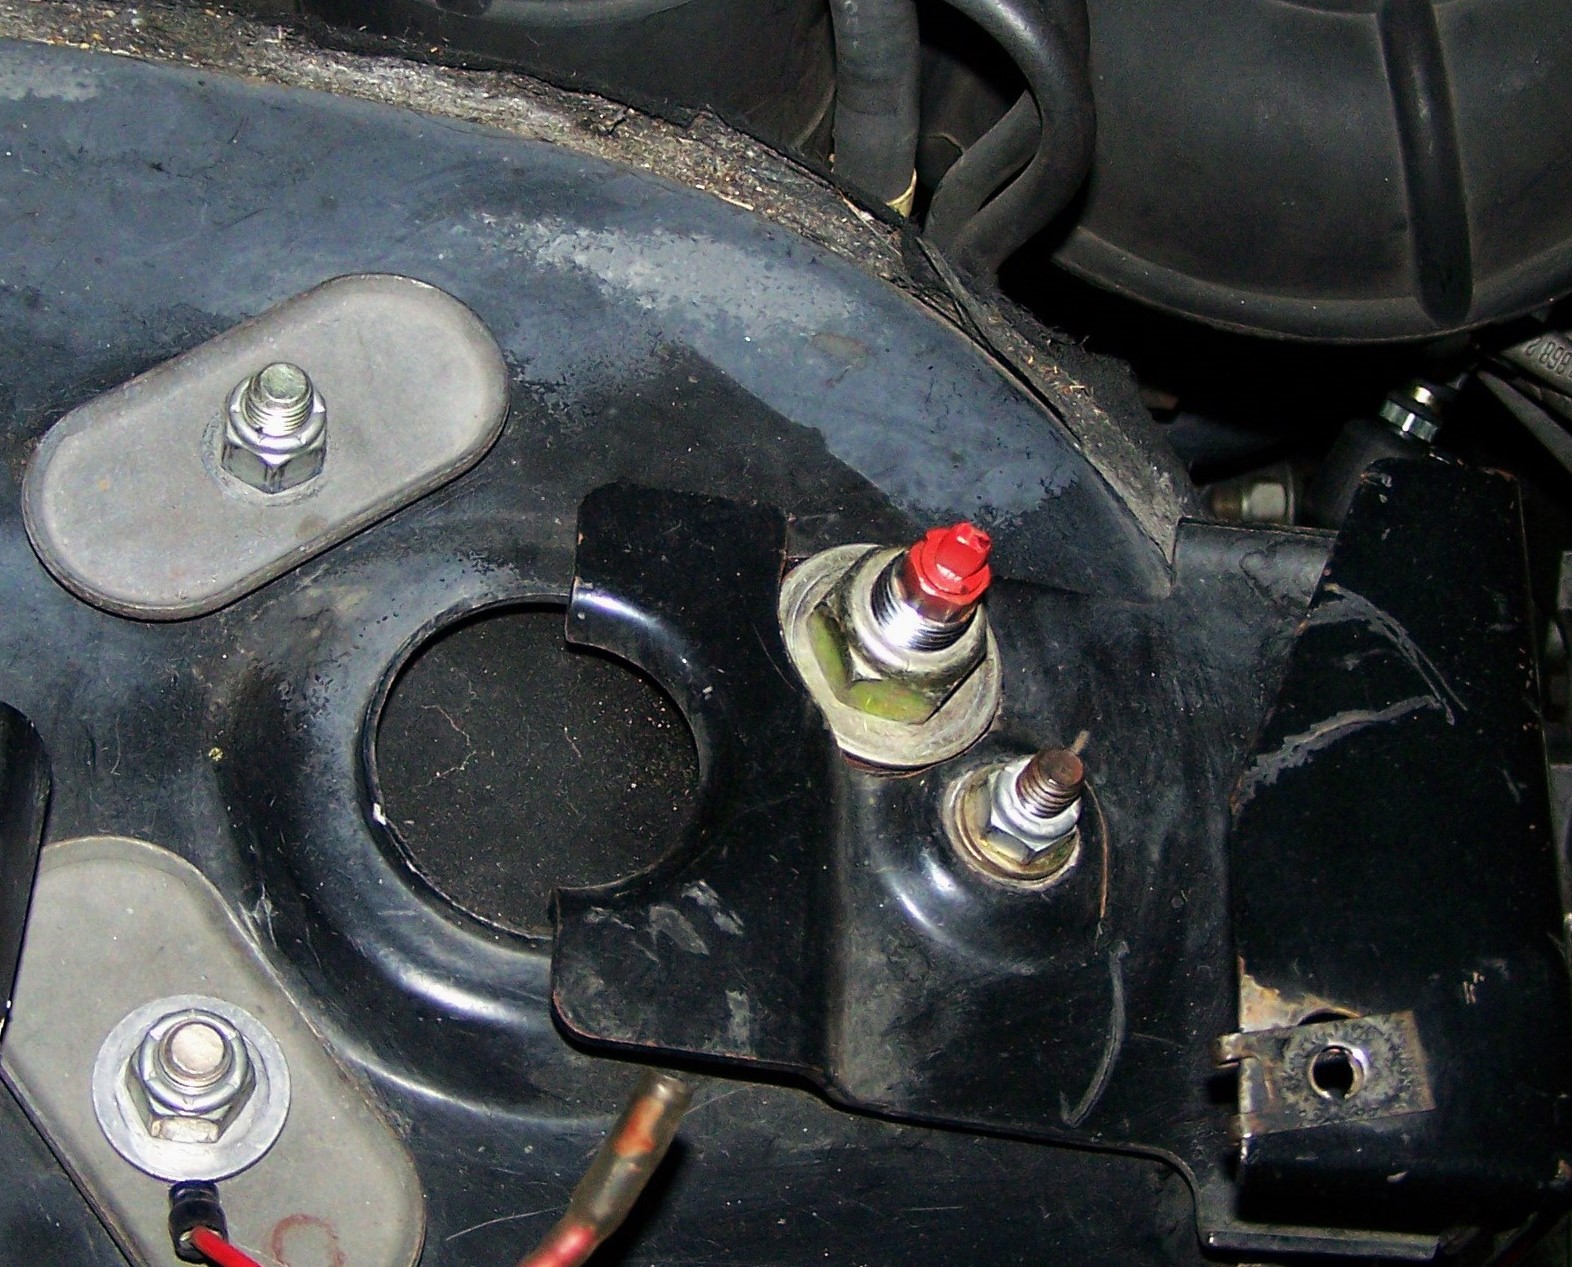
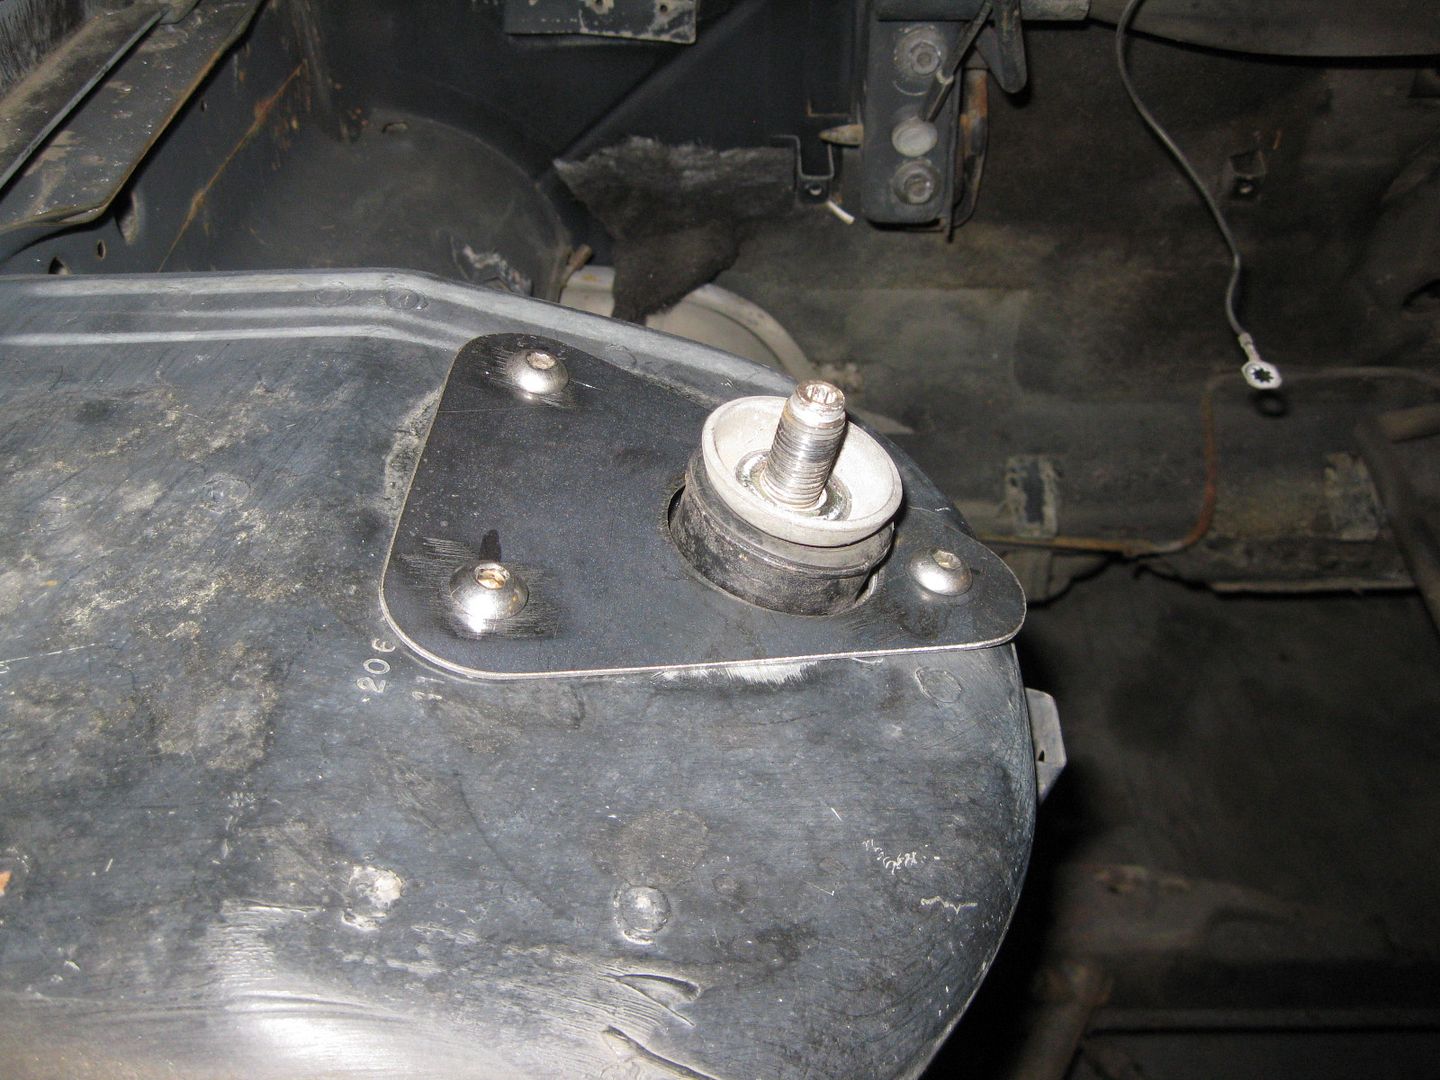
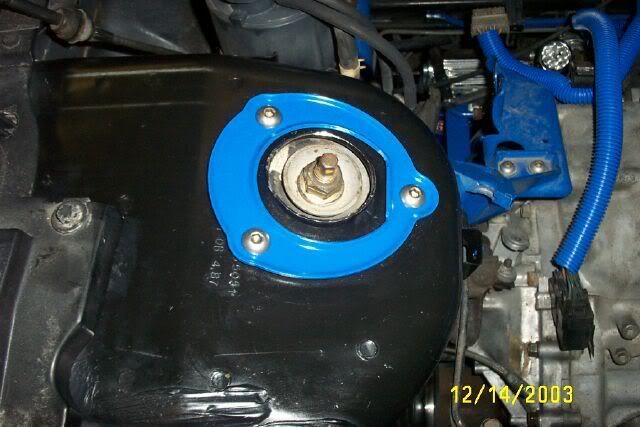
That sounds pretty sketchy. The strut towers are made of thin sheet metal. That's why the stock setup has a large load bearing plate, with a bushing to absorb vibration, and 3 mounting studs spread around the outer periphery of the strut tower.
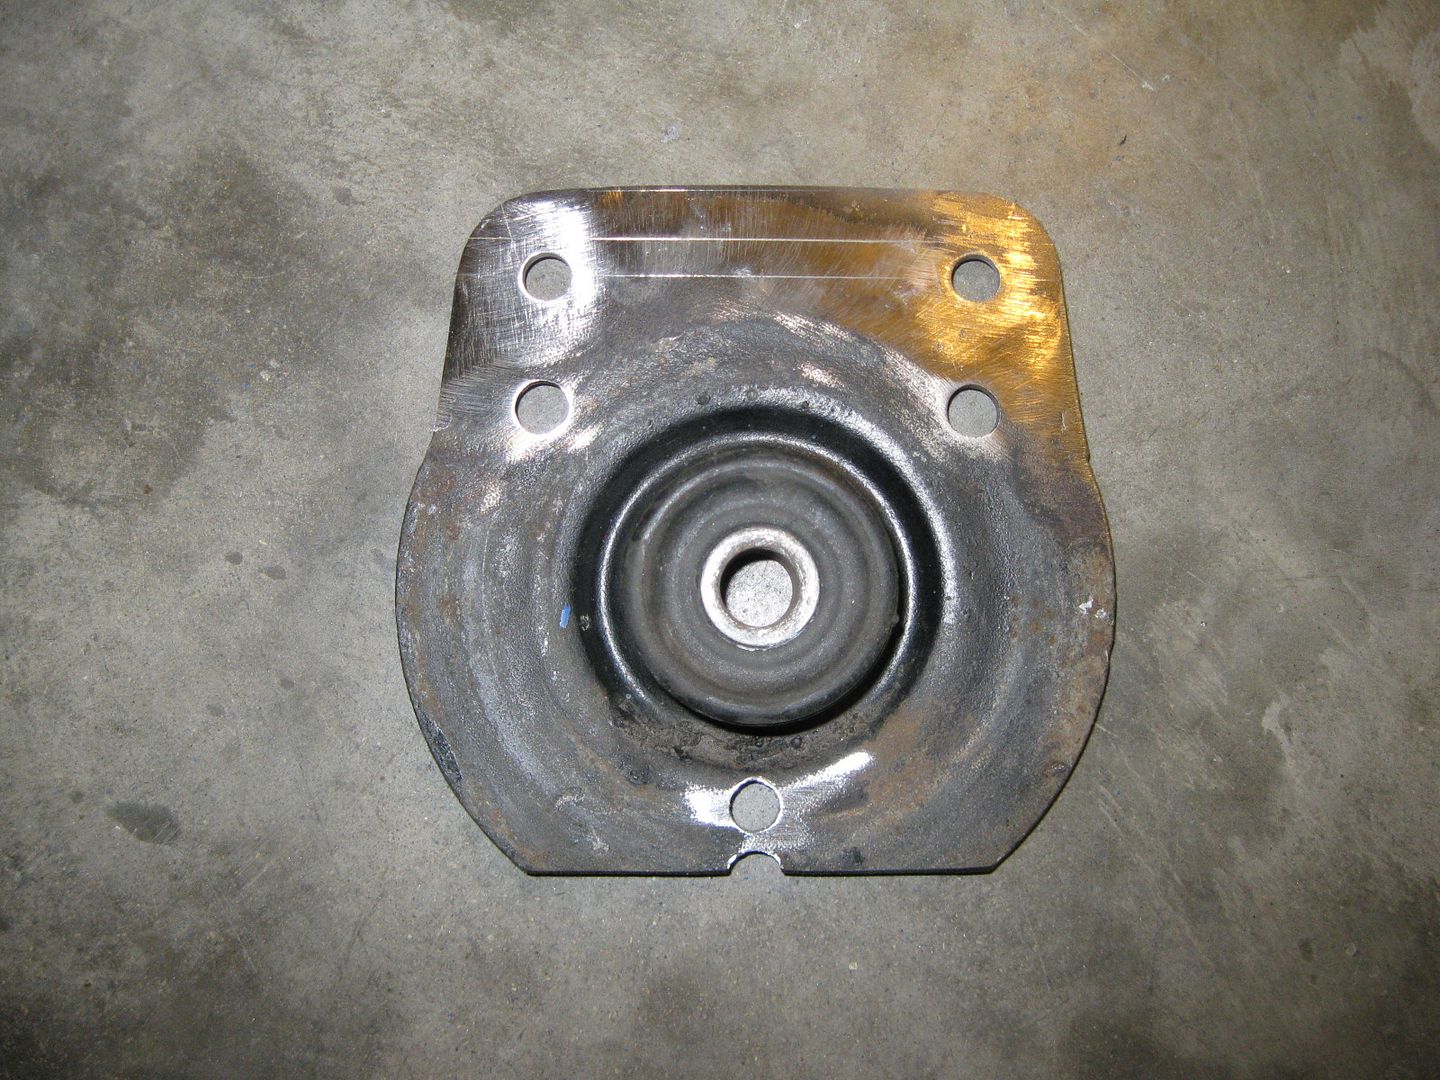
Anyone happen to snag a few measurements from a set of these plates? If anyone can get a napkin sketch together I would be more than happy to make drawings/templates/waterjet/laser files.
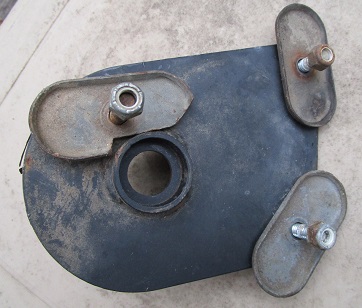
I bought a set of these from Arraut back ten years ago or so......A simple plate with three studs and the bushing holder and spring holder welded on...Not rocket science. No 88 rear subframe/suspension should ever go to the crusher! this is a great upgrade.
Why someone isn't making these is beyond me.....At least get a Template that people can print out with the offset that is needed. I have two friends who could weld something like this up with quality. But some people don't have access to a good trusted welder.
A few people don't want to make these because they don't look "Show quality"....Come on, this is the best driving upgrade you can do to the Fiero beyond HP increases. I carefully cut and ground the opening for this in my shock tower- A piece of 1/32" metal will fit between but nothing wider- all the way around. If you want show quality then make a cap that mounts on the top.
[This message has been edited by cvxjet (edited 05-10-2020).]
Originally posted by cvxjet: A few people don't want to make these because they don't look "Show quality"....Come on, this is the best driving upgrade you can do to the Fiero beyond HP increases.
Actually, this is what I said when you asked me to look into make them...
quote
Originally posted by fieroguru: the primary reason I don't offer the 88 cradle swap to an 84-87 chassis is I just don't like the finished look. If I wouldn't install the part on one of my cars, I simply won't sell it.
I bought a set of these from Arraut back ten years ago or so......A simple plate with three studs and the bushing holder and spring holder welded on...Not rocket science. No 88 rear subframe/suspension should ever go to the crusher! this is a great upgrade.
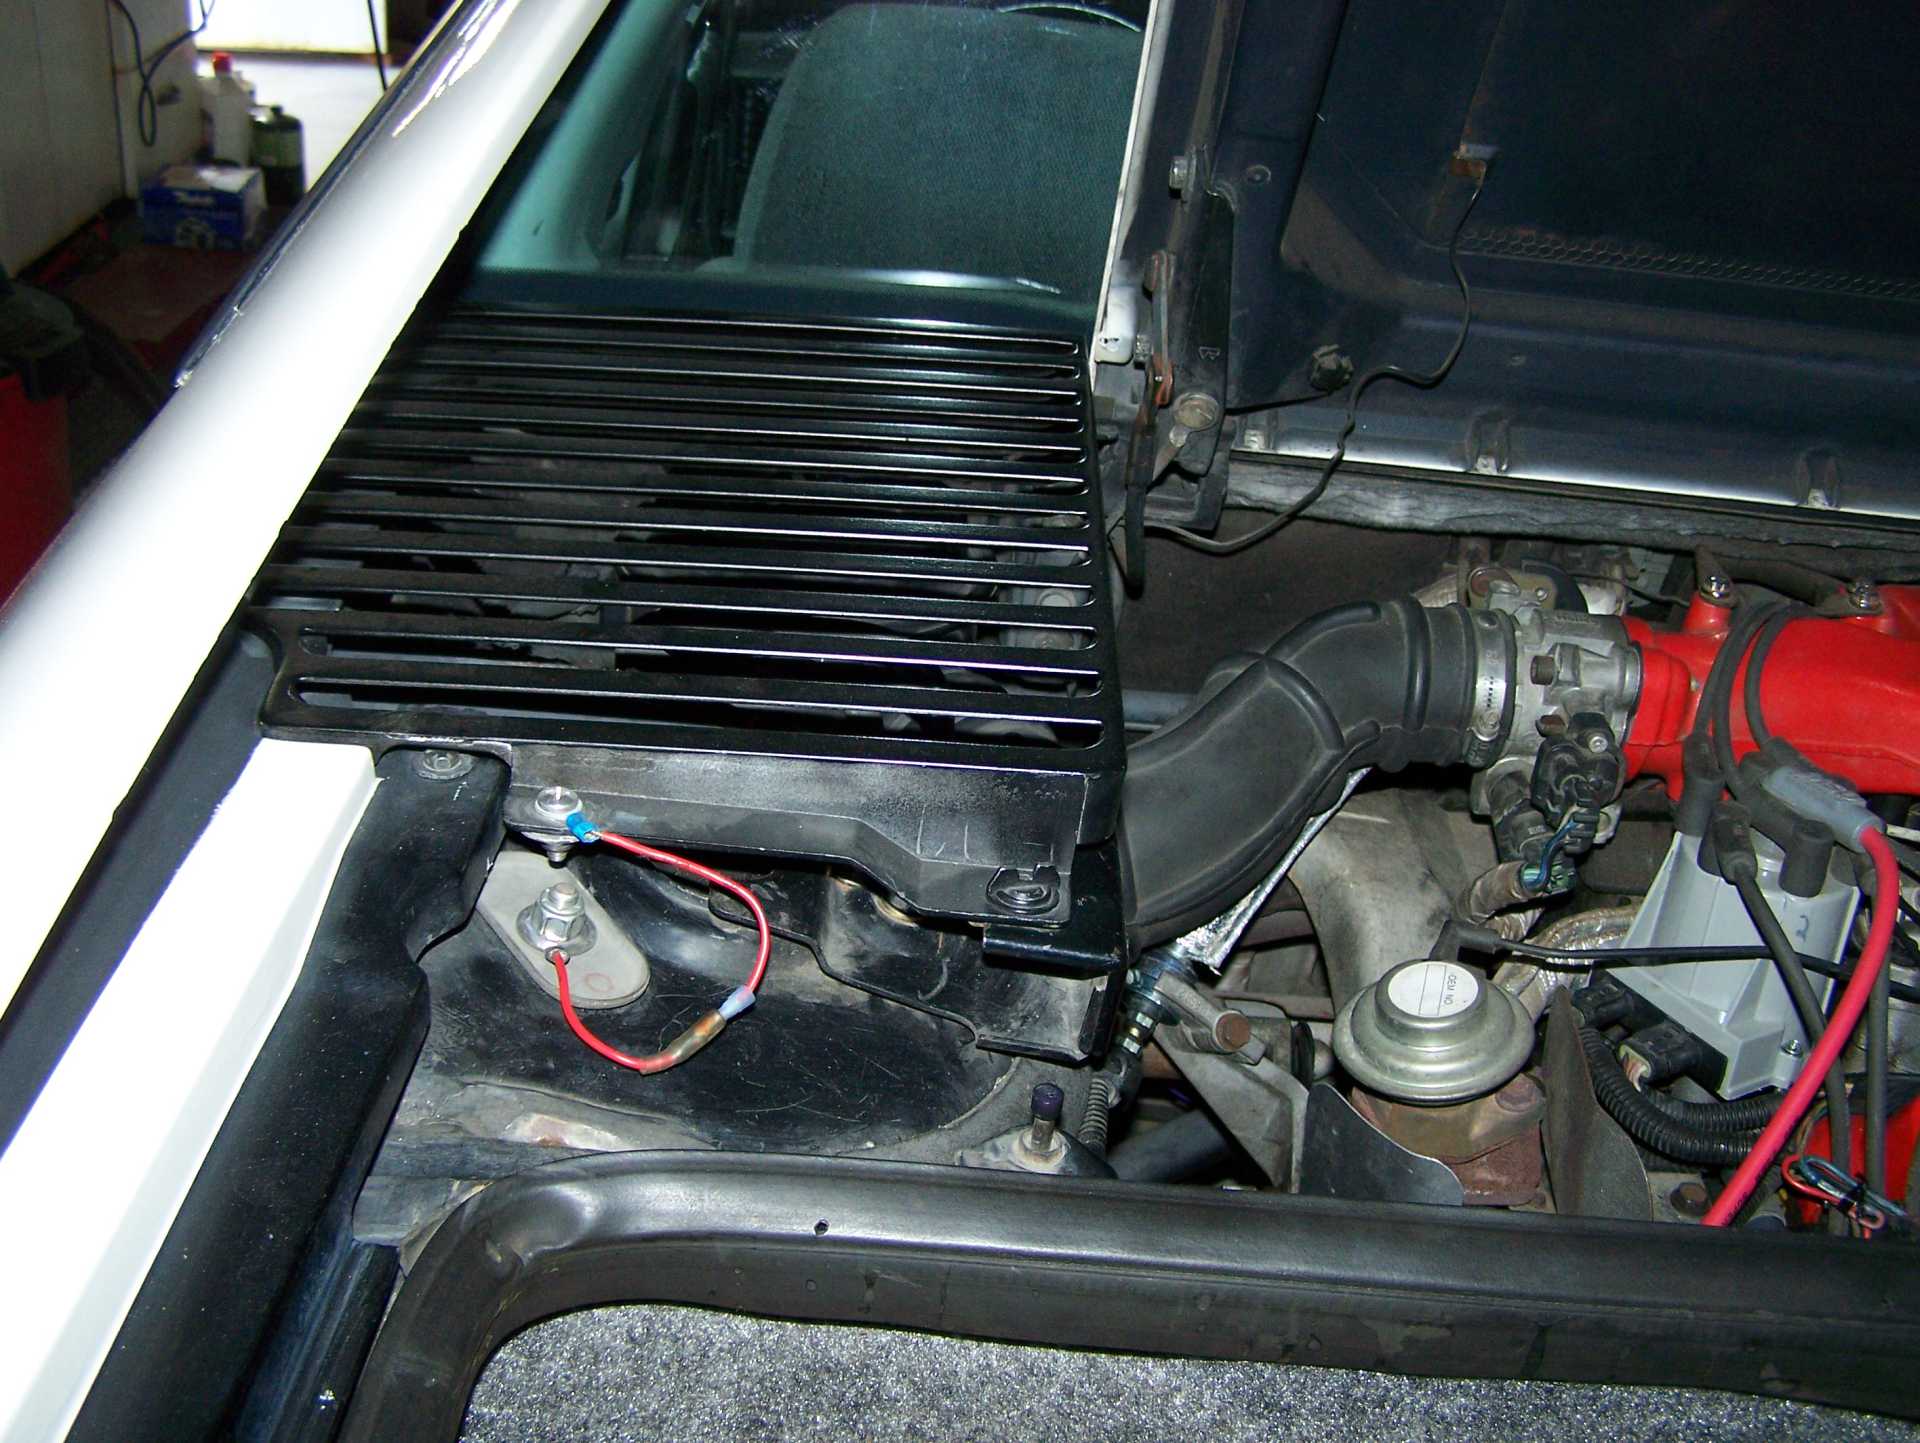
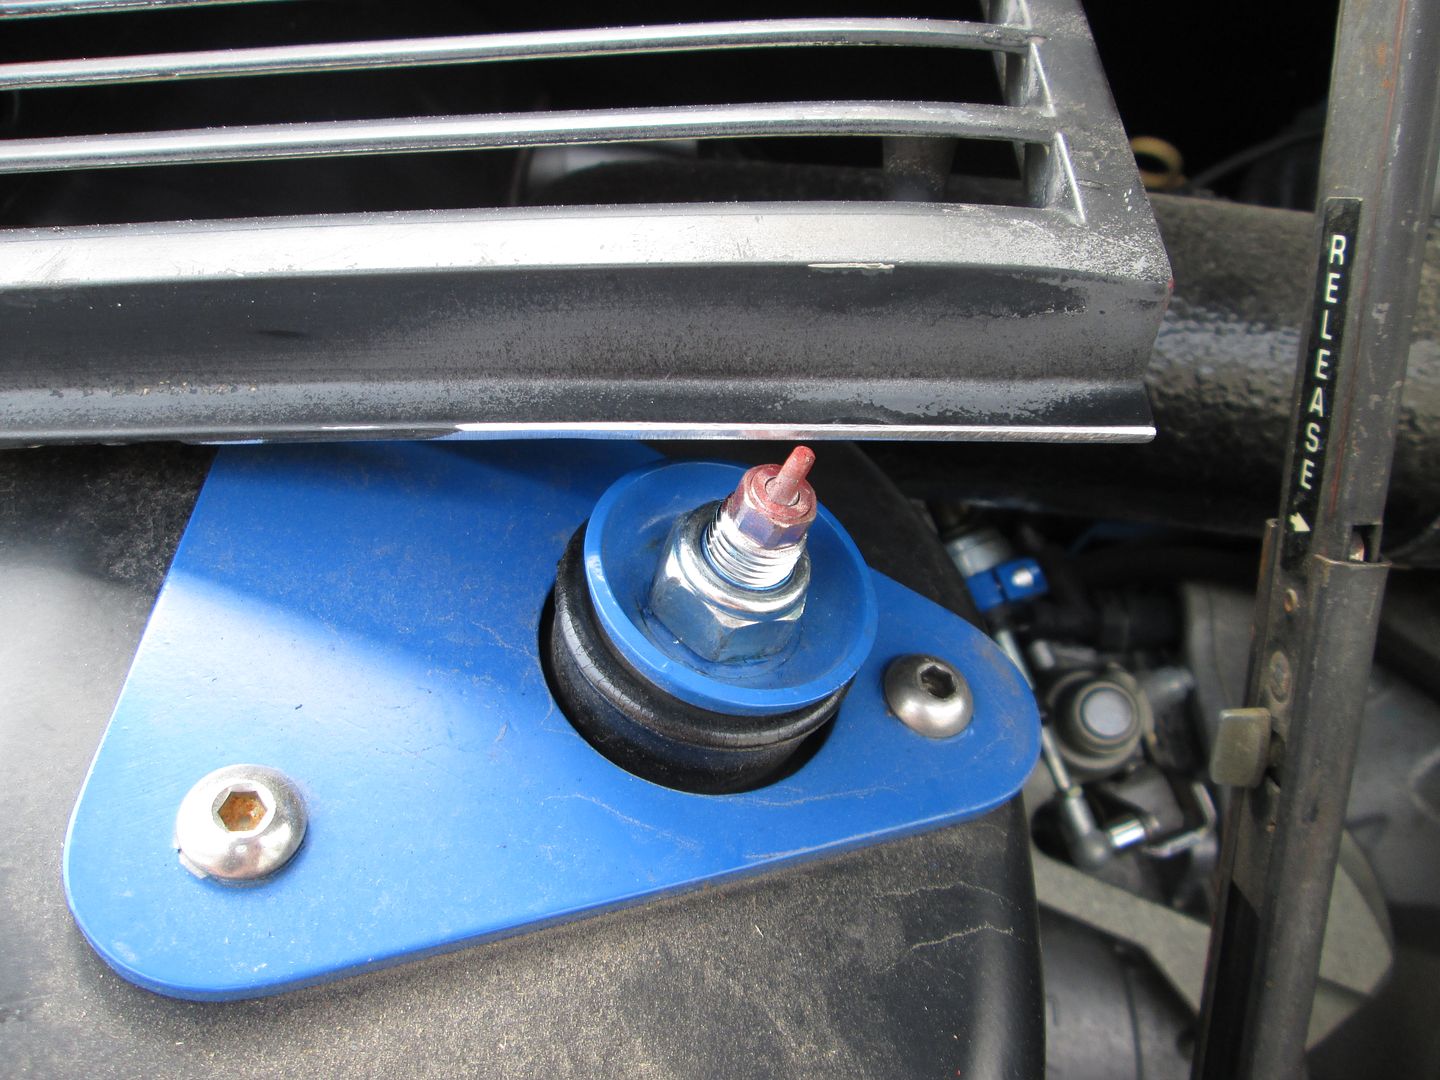
What is the purpose of the red wire in your photos? Is it a ground for the grill? If so, why?
When looking "DOWN" from the top of the 84-87 engine bay, (and standing behind the rear of the car facing forward), the new 88 strut shaft location will be:
First, yes I have the shield plate but recently I tested it for ground and I suspect the ground clip is not making a good connection- I am considering how to solve that above and beyond cleaning/grinding the interfaces.
Two, thank you for the measurements, Arbakken.
Guru, I know what you said, and I was trying not to get personal....I even agree with you to some extent- I have spent the time since your original message trying to figure out some kind of strut-tower cap that could make it look really good- and I am apparently stumped. I will keep trying but if you smell smoke, send the fire department!
[This message has been edited by cvxjet (edited 05-12-2020).]
Originally posted by cvxjet: Guru, I know what you said, and I was trying not to get personal....I even agree with you to some extent- I have spent the time since your original message trying to figure out some kind of strut-tower cap that could make it look really good- and I am apparently stumped.
What I have suggested to another member is to try and install the 88 cradle by just moving the strut inboard from the 84-87 spot and forget about moving it forward. The slight change in caster angle won't be a big deal and the impact this change would have on toe control would "probably" be minimal. Most 88's look like the wheel is to far forward and keeping the stuts in the 84-87 loction (front/back will move the wheel rearward about 1/8" to 1/4").
Then the conversion would be as straightforward as what I did with my 88. All that would be needed is to add a section of material to the stock strut hat to extend the outboard hole mounting location, then relocate the inboard hole and trim the excess off the strut hat.
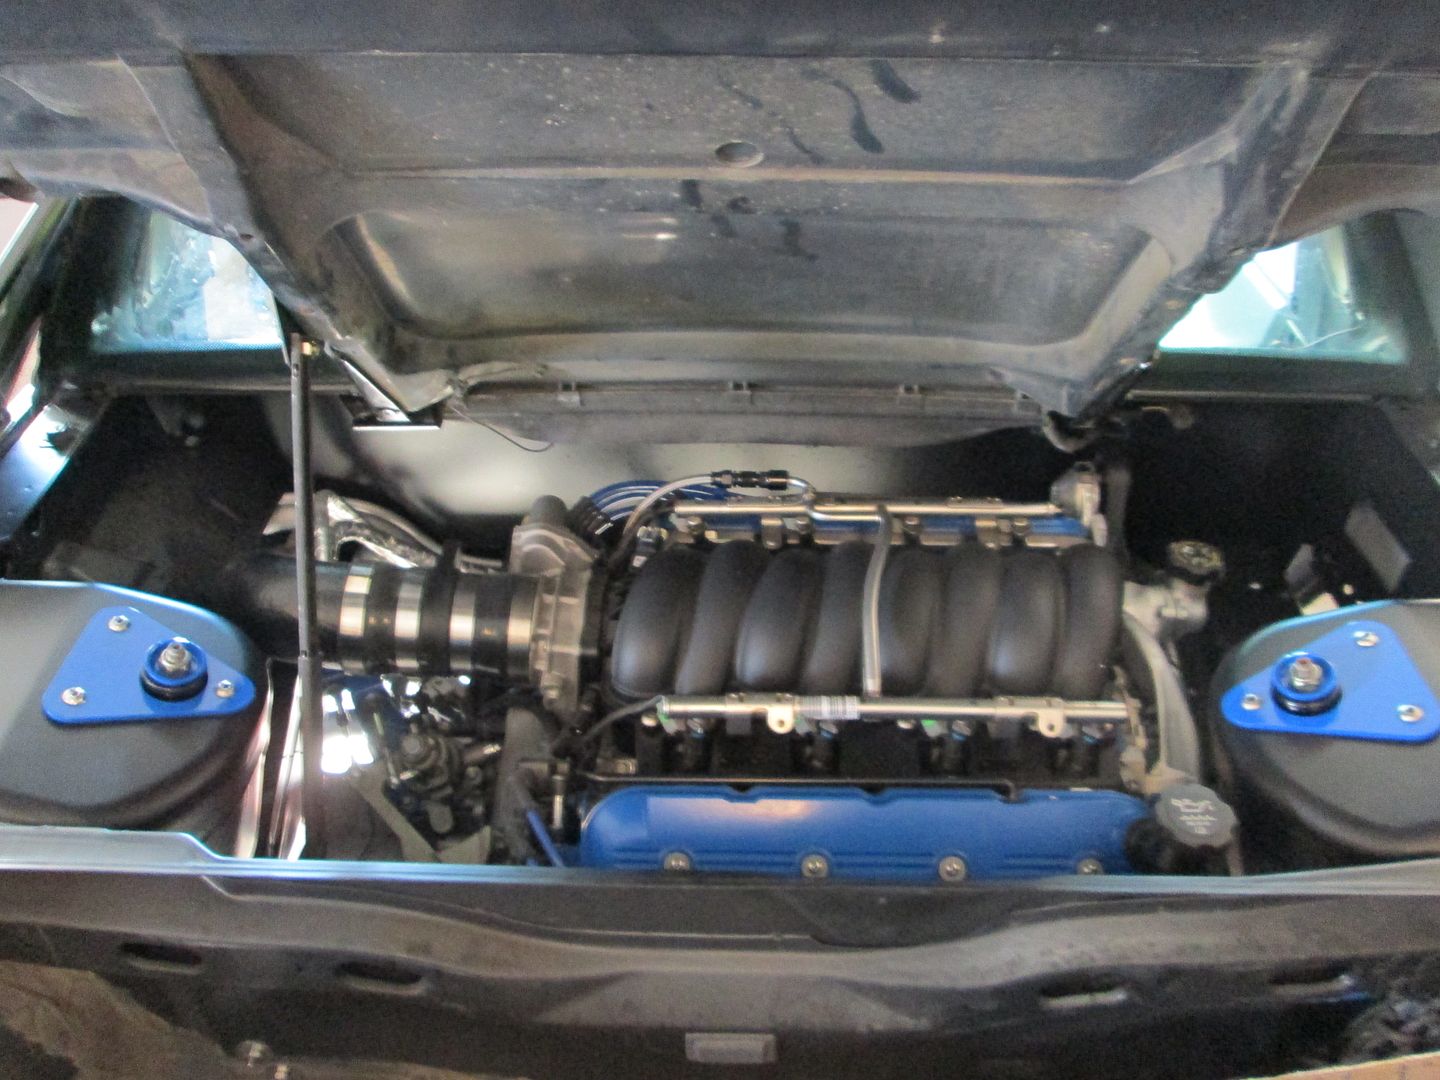
The engine decklid vent brackets will need some clearance work, or do what I did and eliminated them entirely. The decklid vents stay put with the 3 points of contact. I even trimmed off the engine vent moutning flange on mine to clear the Konis with the flipped hat.
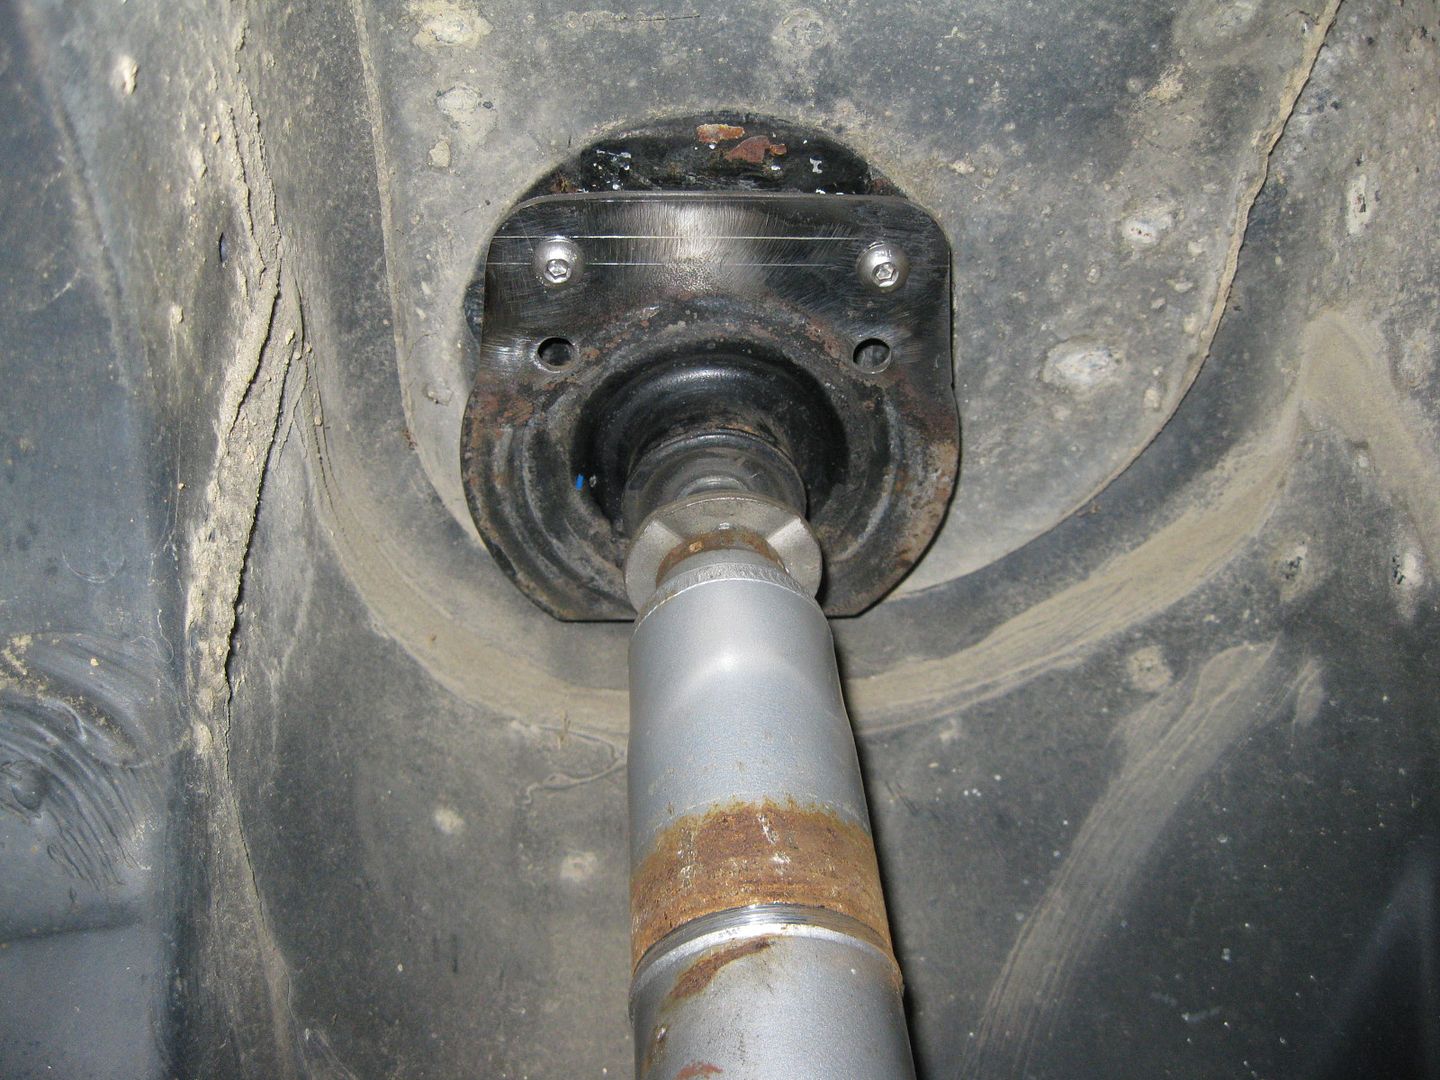
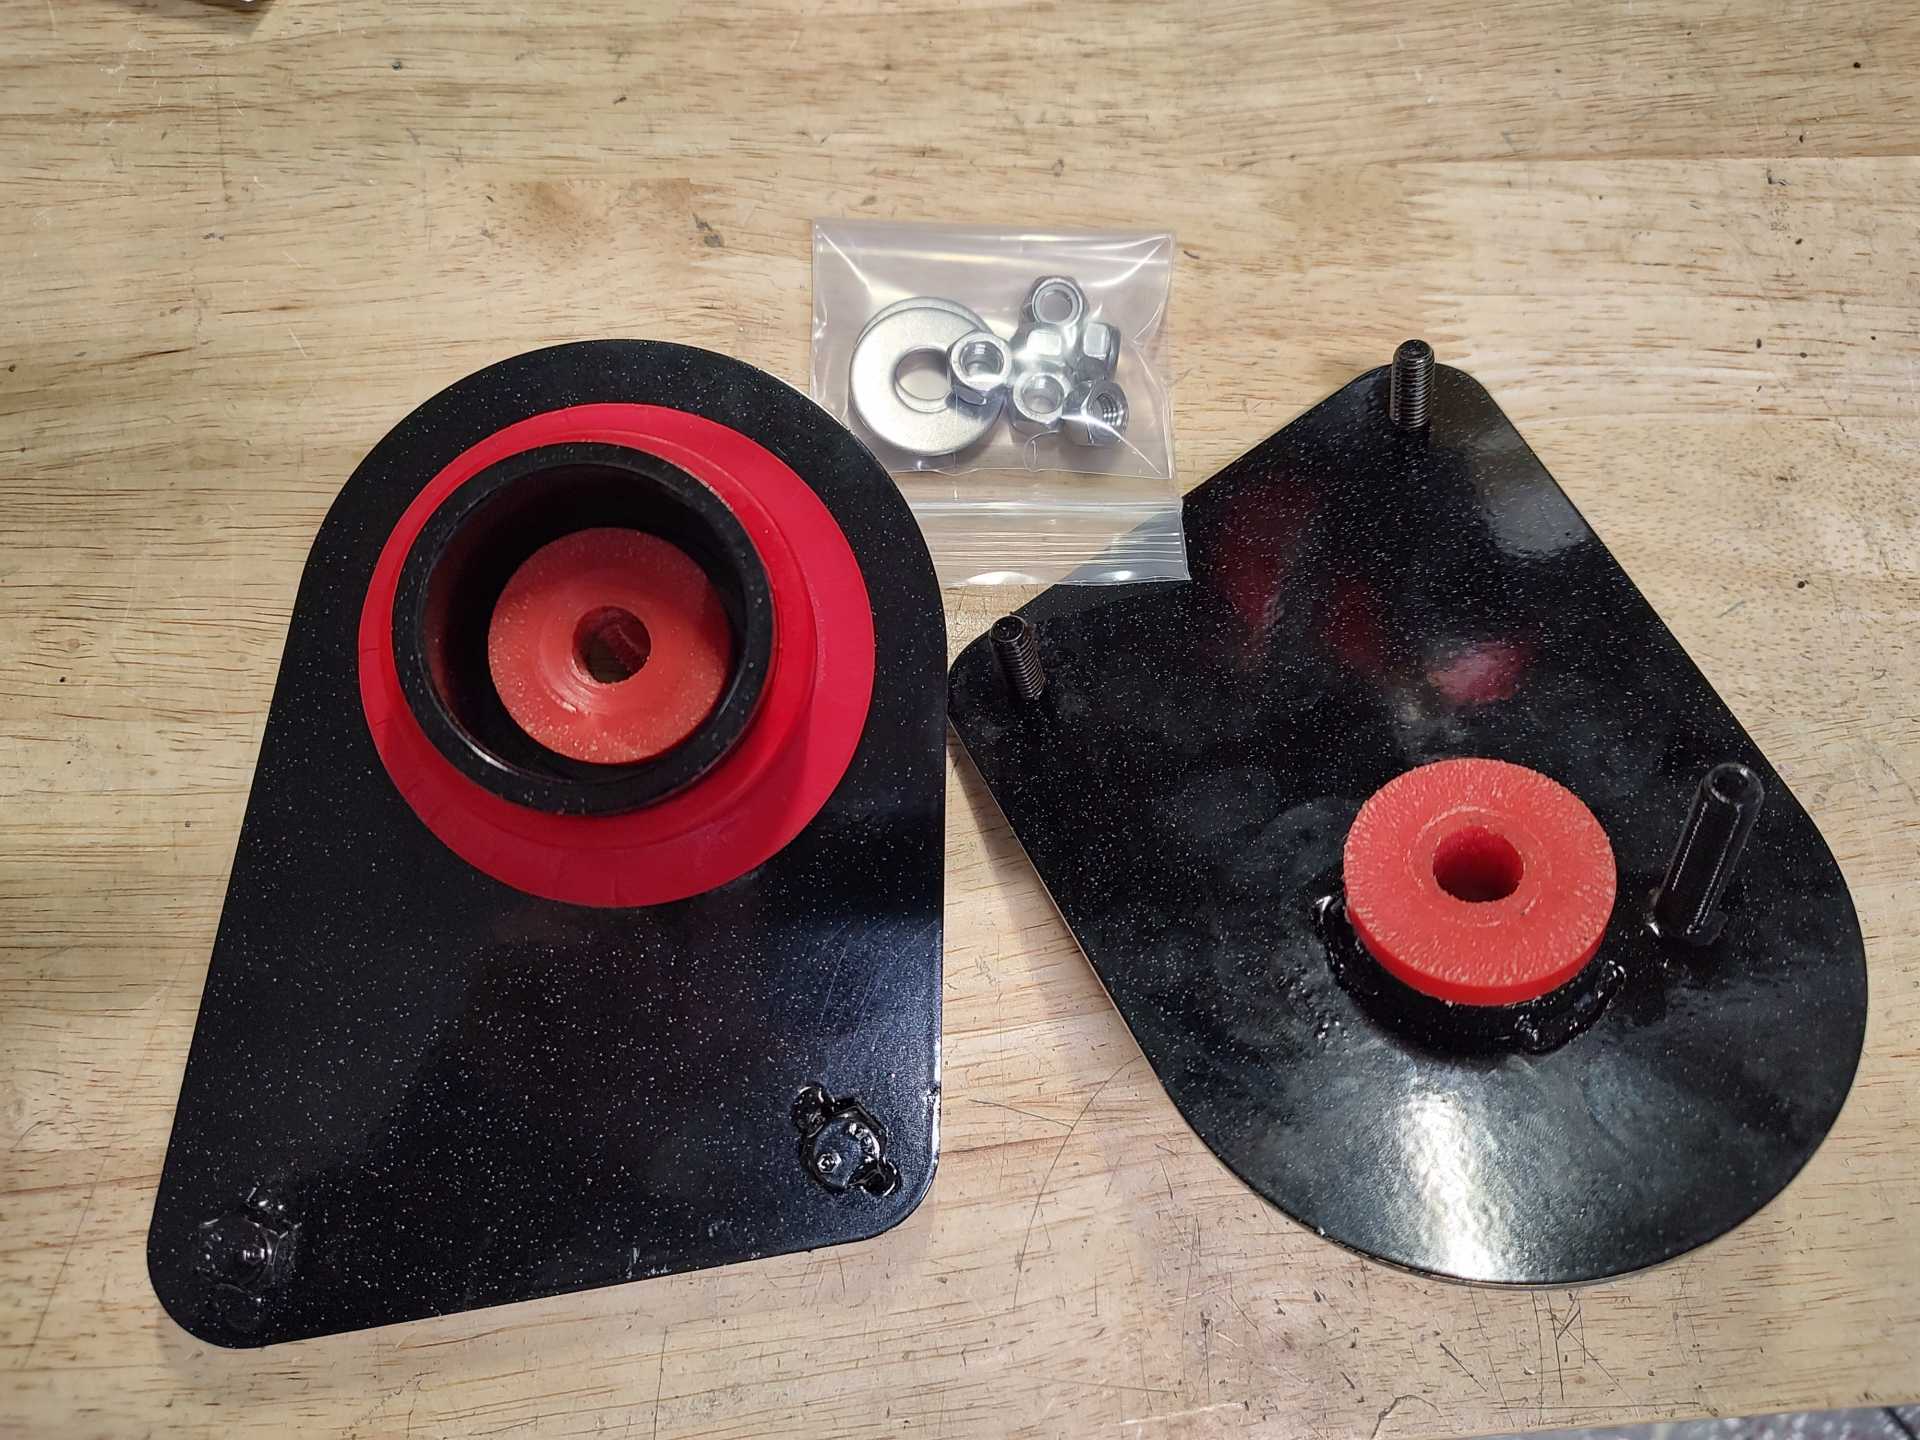
Here are the details of my relocation of the upper strut mount 1" inboard on my 88.
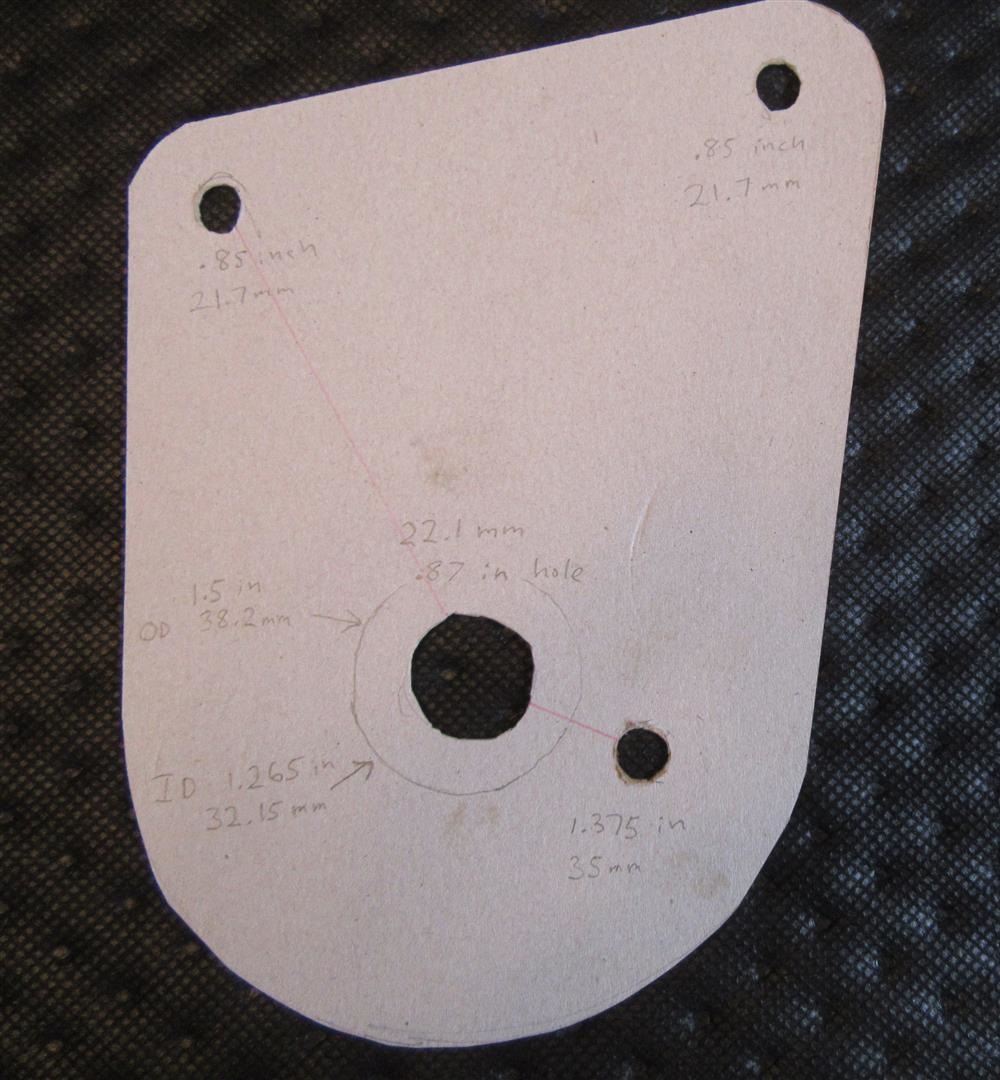
I've got a paperboard cutout of the plate in my image above. The long bolt extends 1.375", the others extend .85". The strut hole is .87". The OD of the small ring is 1.5". ID is 1.265". The big radius about the strut hole is sorta like 2.1". If you can see the the red line between the 2 mounting points the measurements are about 3.5" and 1.2" center to center. That doesn't give you everything you need but it's a start if someone wants to put this thing into CAD. Not sure anyone is so interested at this point.
I didn't write the measurements on the other side of the paperboard because it's a Priority Mail envelope with printed material on it. Anyway, it's pertinent to the other side of the car, too.
[This message has been edited by sourmash (edited 05-12-2020).]
Guru- I don't think the hole in the pre-88s is large enough for the offset.....and now you tell me not to move the mounting point "forward"; I have noticed that my rear wheels are actually located approx' 1/2 inch too far forward in the wheel well......Obviously, not re-positioning forward would have "Solved" that problem.....And, also, there isn't a lot of need for caster angle on the rear suspension.....
It is amazing what you learn when you open your mind (And I have no fear of anything falling out!)
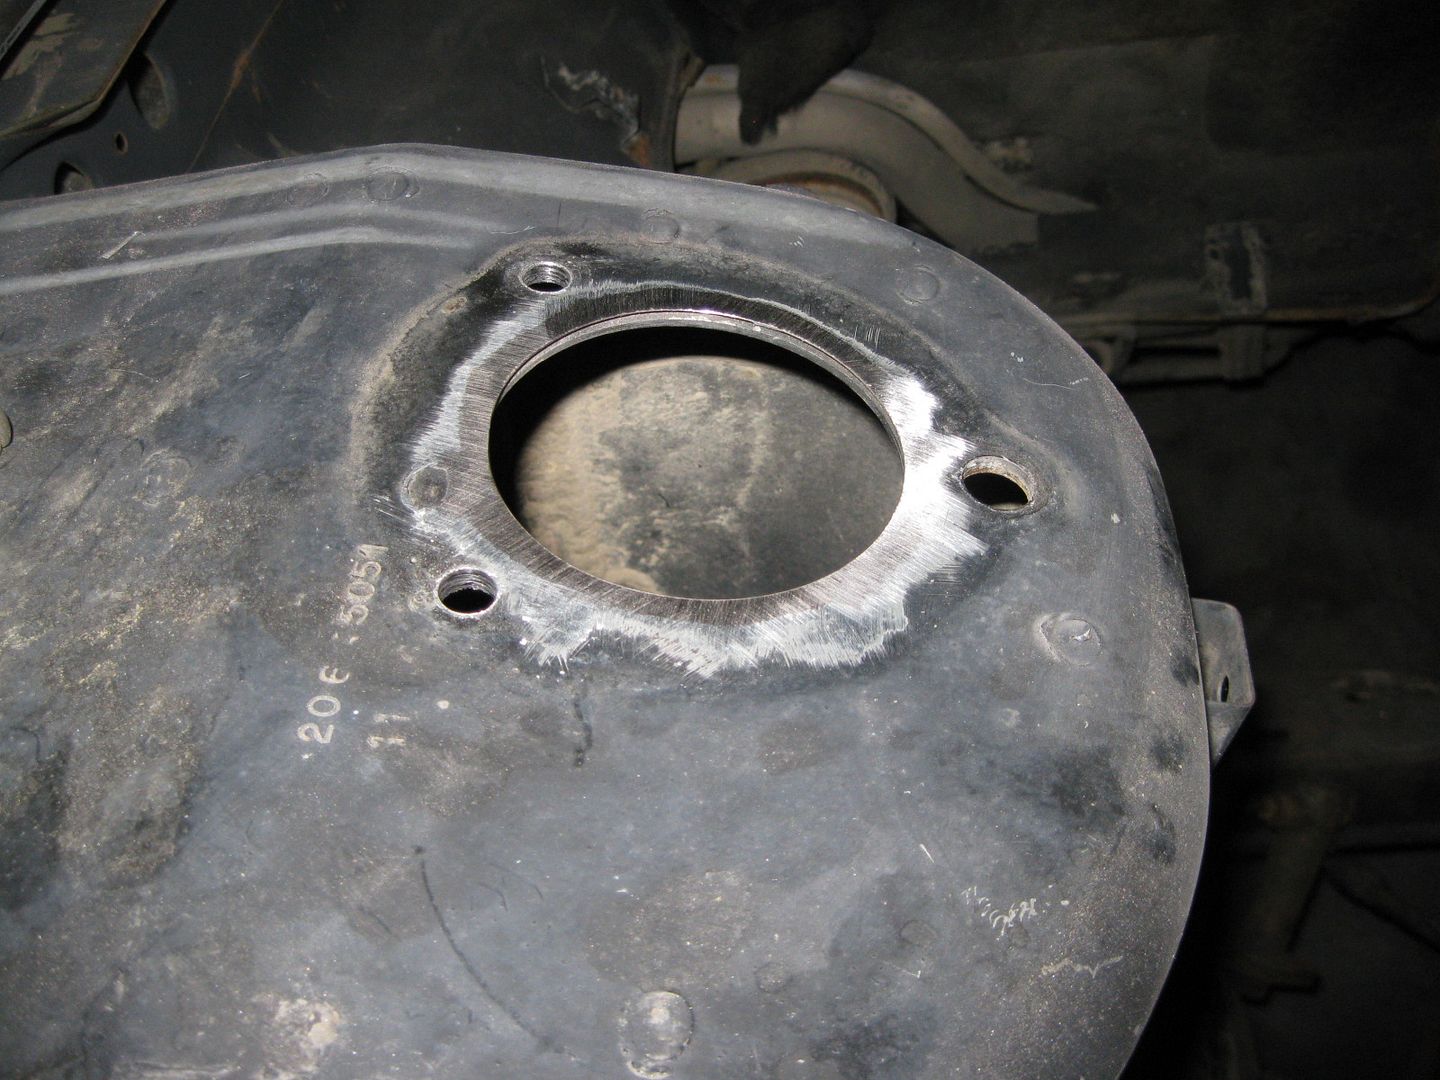
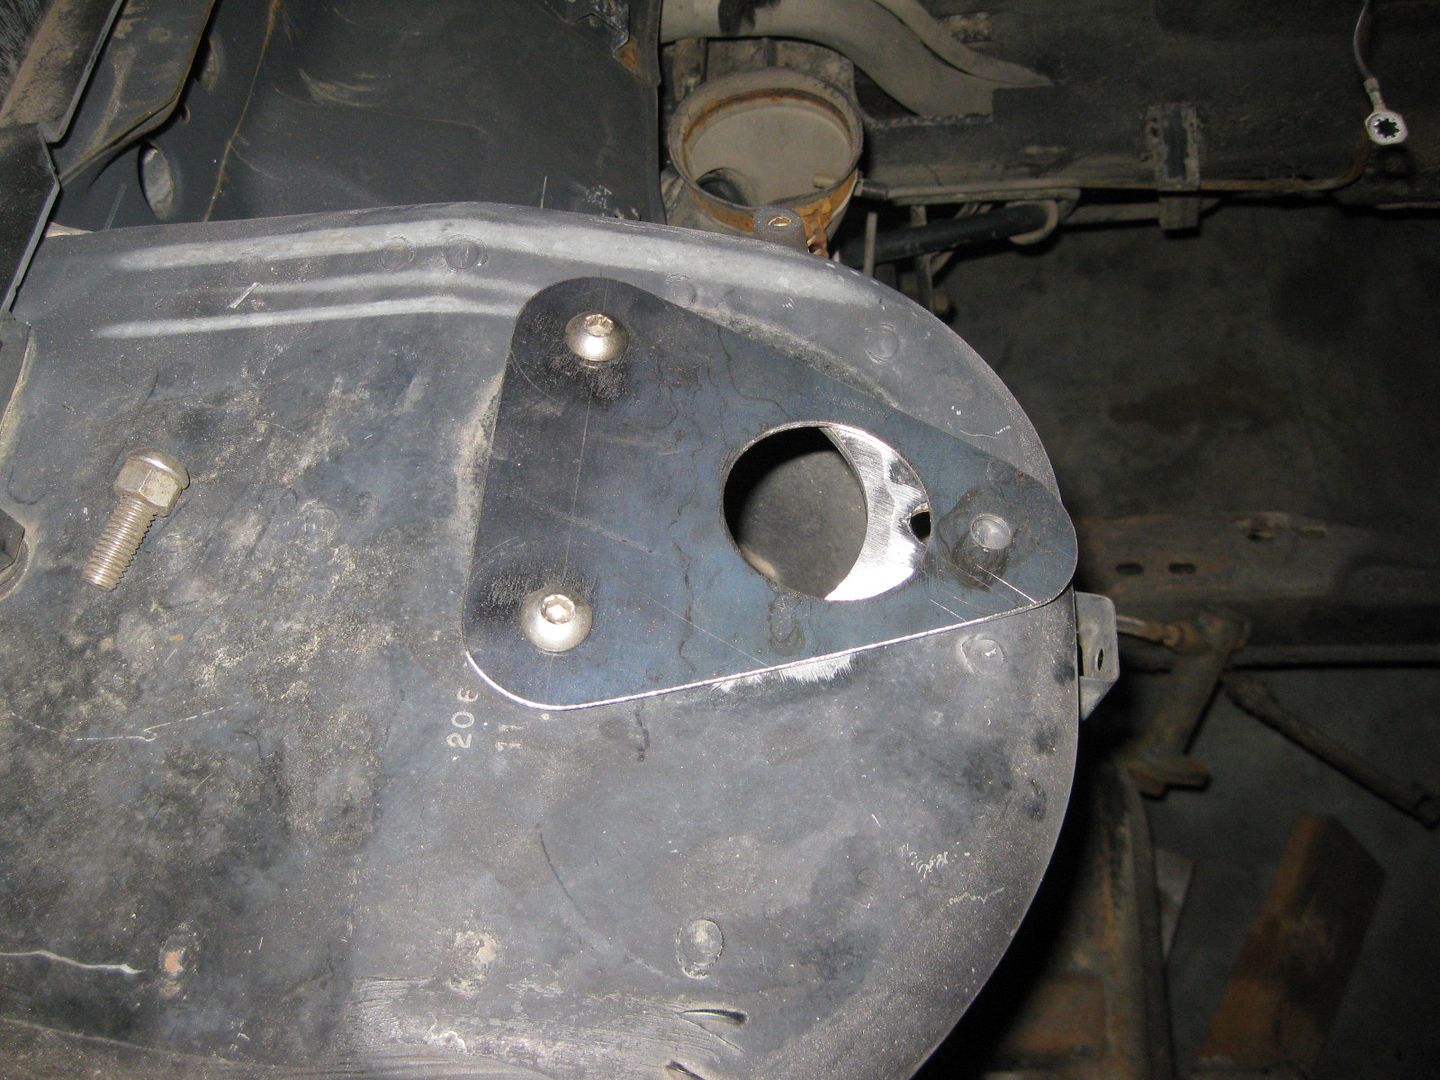
The hole wasn't big enough for my move either. Step one is grind the strut hole boss down flush with the stut tower - this makes the hole much larger, but still not large enough. The main purpose of this step is to make it flat so you can install a nice cover plate. Then slot it the enlarged opening the needed amount and make a cover plate.
Sourmash, that's great! I got a little bored earlier and drew this up before you posted your measurements, but they seem to line up pretty well. Do you want to print this out (100% scale) and check it against your template? What are the dimensions on the ring on the bottom? How does the coil isolator not interfere with that close bolt (I assume it's notched)
I was planning on using Energy Suspension 9.8103 for the shock bushings, which line up with your top cup and hole measurements. For the isolator, probably 9.6121 You'd need a 2 1/16 OD ring on the bottom to locate the isolator.
I've always wanted to understand how changing suspension geometry changes handling and tire wear characteristics, but I don't. For 88, the Pontiac engineers chose to put the struts in that location and require a new die for stamping the part out. I'd prefer to try and keep that location. That isn't to say that I wouldn't take fieroguru's car over any other I've seen on here, because IMO it's the best one.
Anyways, hopefully this link will work, never shared a file like this before. I'll make a better drawing in the future with the correct hole sizes (I wanted to make the "hole" close to the side you'd have to saw out for the upper ring), and ring dimensions. I'll also make a dxf for waterjet/laser/plasma. If people are interested it probably makes sense to have a bunch of plates jet out at the same time rather than everyone doing it themselves. Maybe someone has access to a machine? I know a company that does fairly inexpensive waterjet, but it'd still cost a decent amount.
Fieroguru, one of my other questions was mounting the decklid vents after moving the strut inboard but you did answer that. You mean to tell me they do not move around at all while driving? The only other issue I would need to work out is finding a new mount point for my decklid strut as mine is current attached to the mounting brackets of the vent. I am sure I can weld up something easy enough for that.
Fieroguru, one of my other questions was mounting the decklid vents after moving the strut inboard but you did answer that. You mean to tell me they do not move around at all while driving? The only other issue I would need to work out is finding a new mount point for my decklid strut as mine is current attached to the mounting brackets of the vent. I am sure I can weld up something easy enough for that.
The front 2 attachments are "C" notches (you can use a couple of layers of heat shrink tubing on the studs to make these tighter and reduce vibration), the rear outboard attachment is pinned and bolted. The missing rear inboard attachment doesn't do much but allow you to walk on the vent if you want to (which I don't). There is a lower lip on the rear inboard corner for a rubber pad to help keep it from vibrating against the bottom side of the decklid.
I haven't had the inboard decklid vent brackets on my cars for about 17 years and don't miss them one bit. Here is when I first started doing it by cutting the tab off the stock 88 upper ring. This is also when I switched to using stainless button head bolts vs. stuts for the upper strut attachment.
I have seen people drill and tap the side of the strut tower for the ball end of the decklid lift cylinder vs. using the bracket.
What I have suggested to another member is to try and install the 88 cradle by just moving the strut inboard from the 84-87 spot and forget about moving it forward. The slight change in caster angle won't be a big deal and the impact this change would have on toe control would "probably" be minimal. Most 88's look like the wheel is to far forward and keeping the stuts in the 84-87 loction (front/back will move the wheel rearward about 1/8" to 1/4"
Guru, couldn't you use your adjustable lower links to move the hub rearward, and compensate (at least some) for the caster change brought on by not moving the strut top forward? Frank
Originally posted by Franked: Guru, couldn't you use your adjustable lower links to move the hub rearward, and compensate (at least some) for the caster change brought on by not moving the strut top forward? Frank
Not without causing other more significant issues than caster (which is probably the least significant suspension geometry parameter for the Fiero rear suspension).
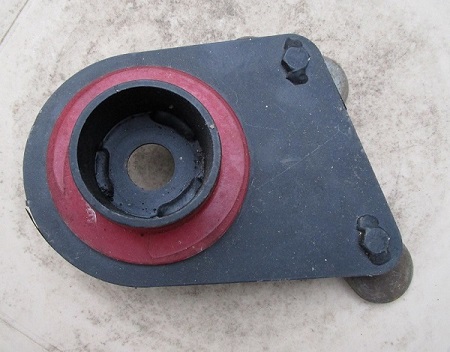
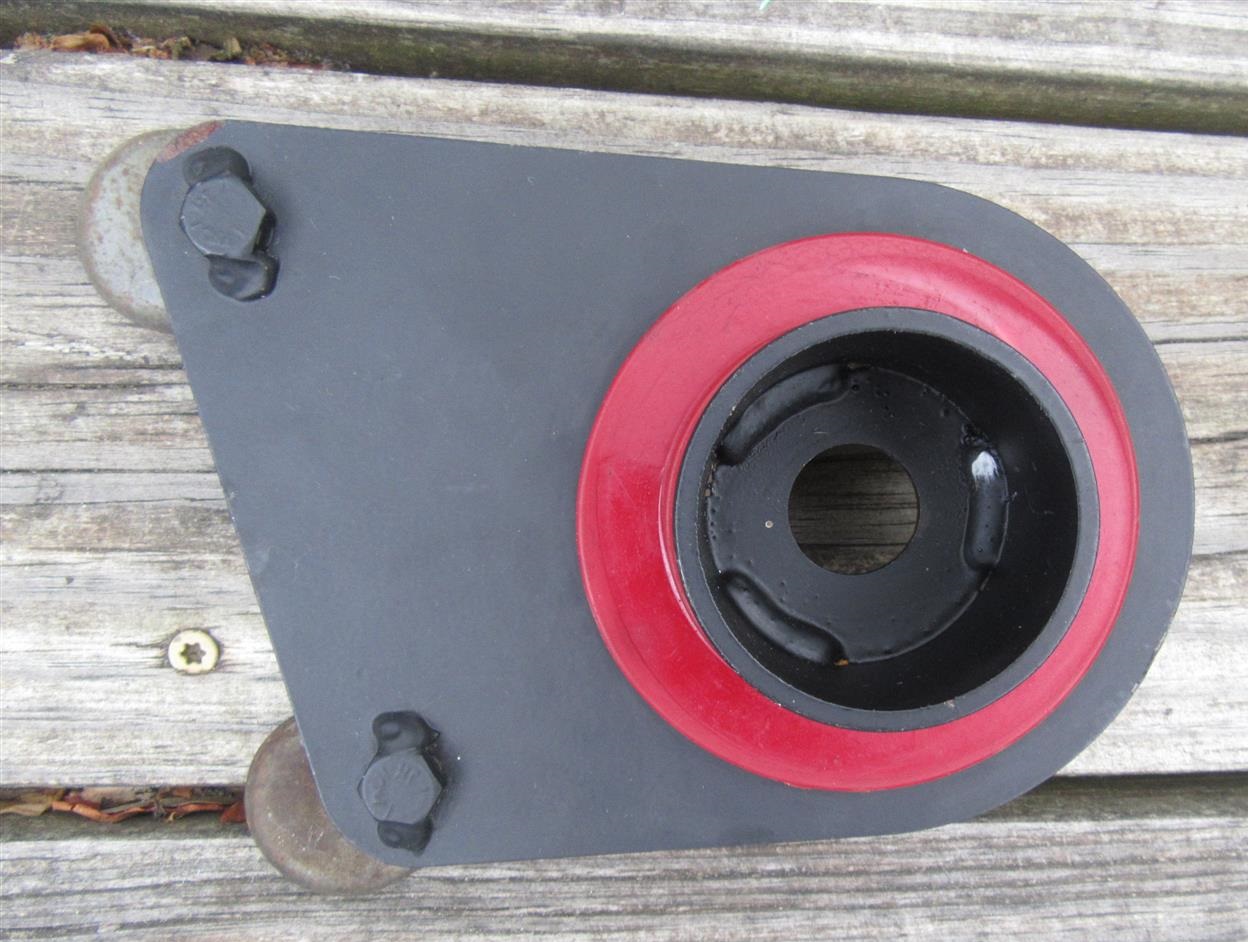
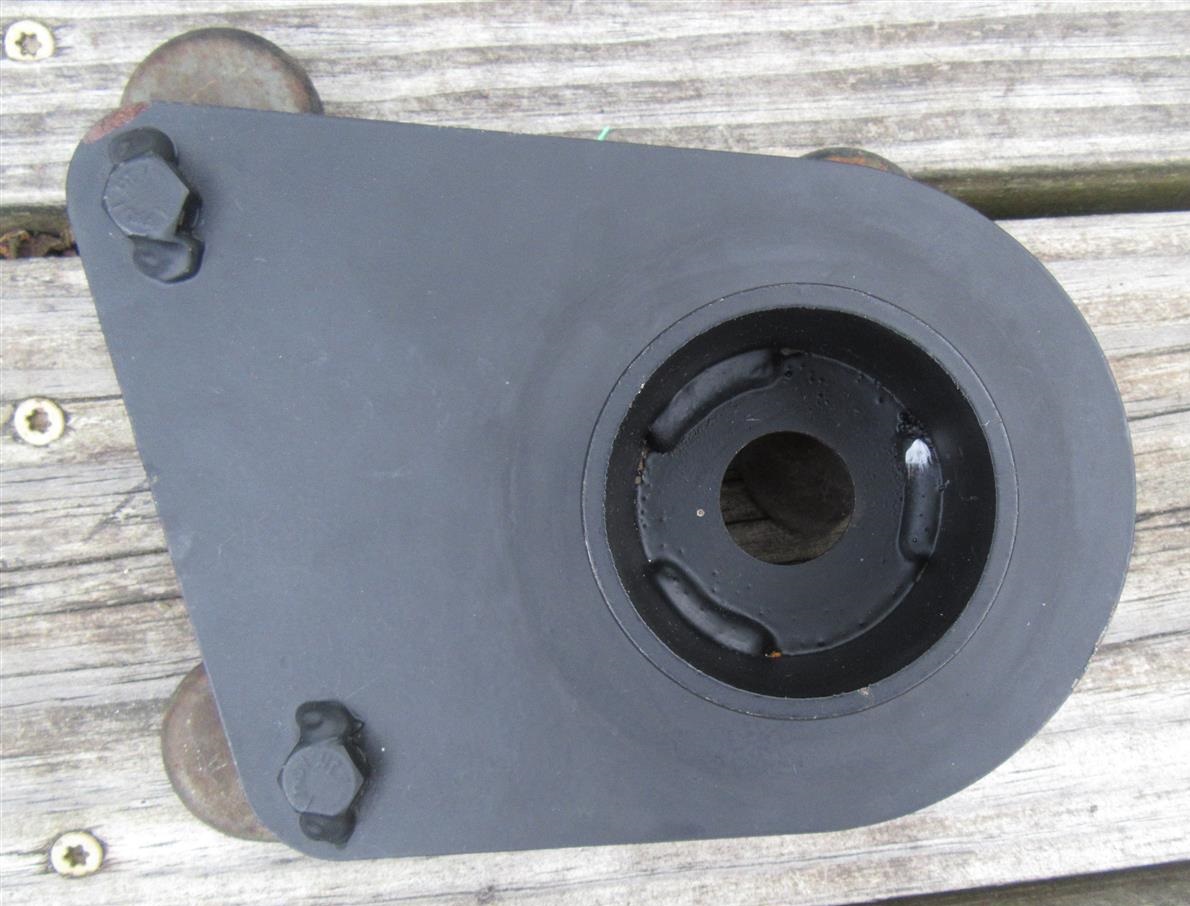
I have been working on these parts for a few months now. They are exact copies of the adapters on my 87 gt with a 88 cradle. The metal parts were easy to make but sourcing the poly bushings and spring isolators has been a tough task. I now have a very limited number of these adapters available. They include all the poly mounts for the spring and shocks. Buyer will need to provide shocks, coilover sleeves and 2.5" ID springs. Parts are powder coated black. Cost is $235 for a pair.