Just found out today my misfire and coil going bad is due to a bad spark plug or plugs. Going to change all 6, just need to know the best way to change them.
I found that the best way is to place something sturdy (but nothing to harsh) over the trunk opening and use it to support your self as you lay on it and then it is just a matter of getting in there and feeling around blindly and do it. It gets easier each time. Never easy, just easier. Make sure the engine is cooled down.
If you take 5 minutes to remove the decklid it makes accessing those firewall side plugs a lot less irritating. It's still tight back there but at least you won't struggle to get your arms between the decklid and the engine to reach the plugs.
Gap the plugs. I don't remember off the top of my head what the gap should be, however...
The ones closest to the trunk are obvious! However the ones by the rear glass are a bit harder...
Step 1: REACH IN ANDS SOAK THE PLUGS WITH PENETRATING OIL FOR A FEW HOURS/DAYS BEFOREHAND SO THEY DON'T BREAK IN THE HEAD IF THEY HAVE BEEN IN THERE AWHILE. Better safe than sorry.
Step 2: Mark the deck lid hinge to the decklid with a marker so you can line up where it's mounted easily. Unplug the harness for the trunk latch. Remove the decklid with help from a friend; four bolts. Put somewhere safe that it won't fall down or scratch!
Step 3: You should be able to reach the plugs with relative ease now. It's easier on your back if you actually stand in the trunk. Remove one, replace one. Nice and slow being careful not to drop em. Put a *small* amount of anti seize on the threads for guaranteed easy removal in the future.
Step 4: Put the deck lid back on, re plug in the harness for the latch, lining up the marks you made earlier and enjoy!
------------------ "Discord" Red 1988 GT under restoration!
There is no 'Best Way'! If you don't know when they were last changed or if they were ever changed it can be an adventure. The trunk side are easy to get to and generally cause little trouble. The window side is a different story. Some will say you need to remove the engine cover, some will say leave it in place. Regardless the window side is pretty much done by feel, prayer and luck. Mark the plug wires with tape so you know where they go. Always clean the area around the plugs with compressed air. If you don't know when they were last done, take a couple of days to spray them down with a quality penetrating oilr and let it soak in. Do the trunk side first.... easy By feel, and one at a time, remove a rear plug wire. Locate the bare plug by touch and slide on the plug socket. Very often a universal is helpful along with an extension. Go slow and easy. If it won't break lose spray it again and wait. If you snap a plug you are in for a real adventure so go easy.
Upon reassembly, anti seize is your friend!
When in doubt. reassemble and drive it to a professional mechanic and let them fight it out. Sometimes It's worth the money to pay to have it done.
I second on standing ( in ) the trunk.. much, MUCH easier. I also take my shoes off to keep the carpet clean...
----->>> I also recommend to go to harborfreight and buy the socket 3 pack small ratchet set.. the handles have a break in them for tight spaces.. just need the multi angle attachment, a small extension attachment plus the spark plug socket.. job done!
-->> I also leave the deck lid on but have to bear hug the engine, wrapping my arms to the spark plug location..
---->>> finger tips "are" your eye balls.. feel first, then proceed with the tool...
--------
$11.00 ---- best tool for any job
3 Pc Flex Head Stubby Ratchet Set at harbor frieght... look it up on the internet or stop in...
Pittsburgh® 46742 3 Piece Flex Head Stubby Ratchets 3 Pc Flex Head Stubby Ratchet Set 46742 alternate photo #1 Pittsburgh® - Item#46742 (107) ReviewsWrite A Review Stubby ratchets with 7 position handles Only:$10.99
V6 remove the front... many remove 1 dog bone bolt and pull engine to trunk a bit to get more clearance. Don't pull to much or can damage motor/trans mounts etc. If you are pulling deck lid Marks the lid and hinges first!
New plugs... 1. Use better plugs w/ nickle/whatever coating on base of plug. Platinum etc plugs can help but the coating prevent rust far better then "basic" standard plugs.
2. Do Not over tighten plugs. W/ iron heads, Will cause stress in the plug bases to start then can break when removing after. W/ Aluminum heads you will strip the hole(s) and if you manage to install like that will fight you to remove and have to use Helicoil etc. If you find torque spec, ignore them. Only applies to clean dry threads that most never sees. For Taper plugs use standard method w/o torque wrench... IOW tighten by fingers until plug taper hits the head then tighten 1/16-1/8 of a turn. (depends on brand) See https://www.sparkplugs.com/...lug-torque-settings.
------------------ Dr. Ian Malcolm: Yeah, but your scientists were so preoccupied with whether or not they could, they didn't stop to think if they should. (Jurassic Park)
Don't go over the top of the engine to access the front bank!
To access the front bank plugs, remove the inlet air tube and reach around the front side of the engine. All three plugs are easily accessable, just follow the plug wires with your fingers.
Use a small screwdriver or pick to loosen the debris around the base of each plug so that the plug socket fits over the plug. This is important, as it prevent rounding off the plug hex!
A little penetrating oil doesn't hurt either.
Once the debris is removed from the plug well, a standard rachet, short extension and plug socket is all that is needed.
Be sure the plug socket fully seats around the plug!
This job is not that difficult!
Removal of debris around the plug is key to not rounding off the plug base!
Penetrating oil, a pick to loosen the debris, and compressed air to blow the loosened debris out of the plug well are your best tools to get the plug socket to fully seat around the plug base.
[This message has been edited by olejoedad (edited 01-16-2018).]
Actually, I stand in the trunk (Old towel protects trunk carpet) and used a flex head ratchet.....and definitely spray some penetrating oil in the holes and let it soak in for a day. The idea to remove the lid and/or tilt the engine is good also (I would loosen the engine mounts a touch and then you can really tilt the engine).....
Actually, I stand in the trunk (Old towel protects trunk carpet) and used a flex head ratchet.....and definitely spray some penetrating oil in the holes and let it soak in for a day. The idea to remove the lid and/or tilt the engine is good also (I would loosen the engine mounts a touch and then you can really tilt the engine).....
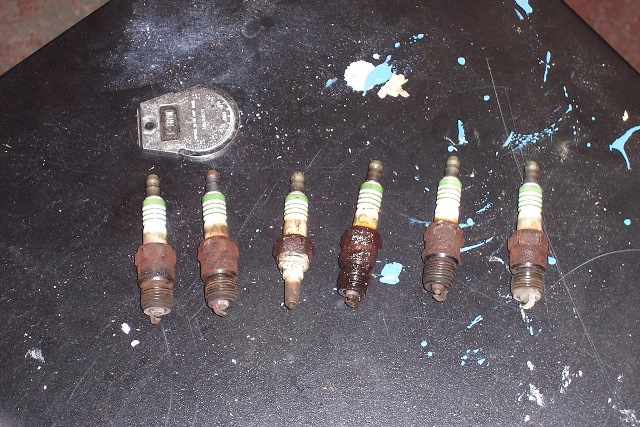
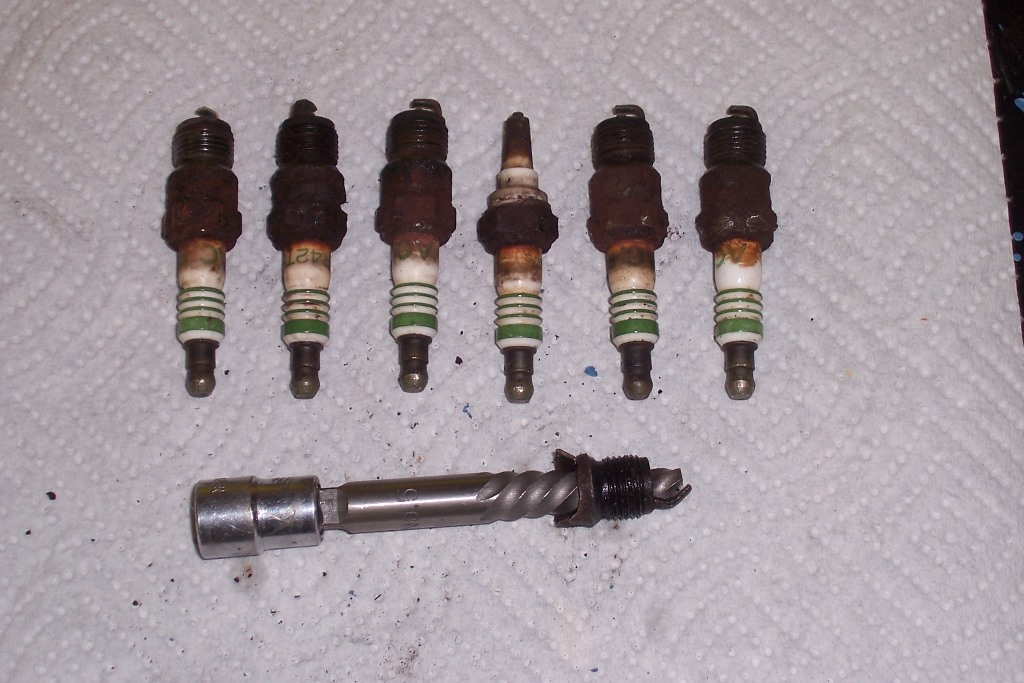
Someone is using my old OEM plugs. For sure antiseize the new ones. Silver or copper both do the job.
[/QUOTE]
Yeah that was a lot of fun getting those out... especially the one in the middle against the window! Came out on the last turn of the easy-out after multiple days of soaking with penetrating oil and then heating with a torch and freezing with 134A. Yes anti-seize was then applied.... If I take to many left hand turns the plugs might unscrew and fall out
No doubt, those came out of a Fiero. Did any one mention the blood given in the process?
One of our cars got the easy-out treatment. Twenty six years, 36,000 miles, and they looked like that. Really stinks when the hex breaks off from the threads. Though much easier to deal with than a broken exhaust manifold bolt.
[This message has been edited by Kevin87FieroGT (edited 01-16-2018).]
To access the front bank plugs, remove the inlet air tube and reach around the front side of the engine. All three plugs are easily accessable, just follow the plug wires with your fingers.
I also do the "reach-around" trick to get the front spark plugs. It's easier than removing the decklid, and doesn't put undue stress on the motor mounts.
It's also important to clean out any debris from around the spark plugs. The rear ones shouldn't be bad, but the front ones will get filled up with debris. Not only does that make it harder to get a socket on the spark plug, but some of that stuff will fall into the engine when you remove the plug.
Easy job on the 4 cylinder, I use anti-seize and replace them every 5 years or so. The V6, not so much, especially the front bank. They tend to rust up
Be very careful if you remove the decklid, the hinges are sprung and they will snap back and break your window if you don't carefully remove it.
Unless the cable restraints are rotted/missing, that's not going to happen... but to be double-sure, a short piece of plank (or multiple layers of cardboard) can be temporarily positioned against the rear window.
quote
Originally posted by Patrick:
I take the decklid off the hinges. (...not the hinges off the body!)