I am back at it again after spending a lot of time trying to get someone over to my place to weld a nut on it. The person I planned to have come over never had the time, and maybe that is a good thing. He was an old farmer, and not a professional welder. Welding a nut on this exhaust bolt at the angle it sits, and still in the car, would have been difficult, I believe.
But I am hear to tell you, there is an answer to a broken extractor. I spent a lot of time doing research, and finally found what I was looking for. The owner even called me after I contacted him - now that I did not expect. I don't want it to sound too much like a advertisement, but it worked for me It is called a Rescue Bit, and you can learn more about it here. They are a little expensive, but in my case, worth every penny. Just to see what it would do when I first got them, I tried drilling through the extractor body itself, and in only 10 seconds, it did this...
It drilled into the body of the extractor about 1/8 of an inch. The Rescue Bit works a little differently than normal drill bits. You cannot use oil, and you should only use slight pressure. Also, the harder the metal you are drilling through, the faster you need to spin it. In fact, I found a die grinder worked best. In all, I worked on it for less than 20 minutes, and it was gone. Or at least enough of it was gone, that it pushed through the back of the bolt. You can kind of see it here.
I found this video on Youtube showing the Rescue Bit in action. I know that some videos are fake, but this one seems to show pretty much what I experienced. If you have any questions about it, you can use the link in one of my previous posts to ask the creator of it. He answered all my questions and made a few recommendations to make the job easier.
So, all of you with broken extractors on your exhaust bolts - there is an answer.
I should have the bolt drilled out with a regular drill bit by the end of the week, and be re-assembling the car by this weekend... no welding skills required.
Things are finally looking up.
[This message has been edited by computer_engineer (edited 04-08-2017).]
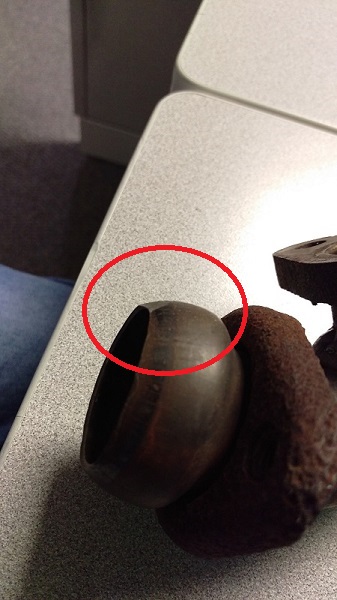
I am getting ready to put the exhaust headers back on, and after getting one of them welded, I had to take it back to that same shop and get them to fix it, since one of the "feet" was slightly off. They didn't tie it down when they welded it. When they were fixing it, they tried sanding them flat, but the end that goes to the "Y" pipe took a hit. You can see it here...
Here is a better angle to see where it presses against the "Y" pipe.
Does anyone see this as a problem - possible leak potential???
I don't want to pressure the welding shop unnecessarily, but I am thinking about having them fix this, if they can. If they can't, is there a seal of some kind I can put between the header and the "Y" pipe to prevent a leak?
[This message has been edited by computer_engineer (edited 04-05-2017).]
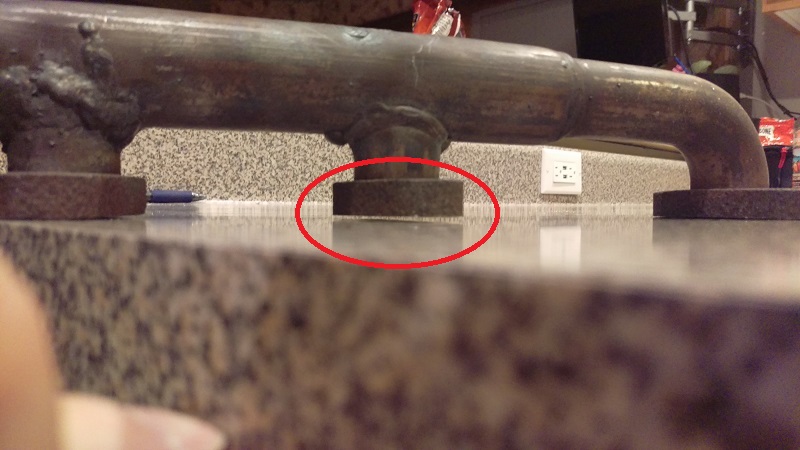
I tried to get the welding shop to repair the damage, and they were able to fix the "Y" pipe connector, but not the "feet". Below you can see a few photos of them. I thought I was okay, now I am not so sure. I tried to take the picture flat, so you can see the light shining beneath the foot.
Here is another photo showing one of the feet at a slant. I guess this concerns me more, since it will tend to twist the manifold if the bolts hold it tight enough - or will it??? Are these things to be concerned about, or is this "normal" and I should just tighten the bolts down and give it a "whirl"???
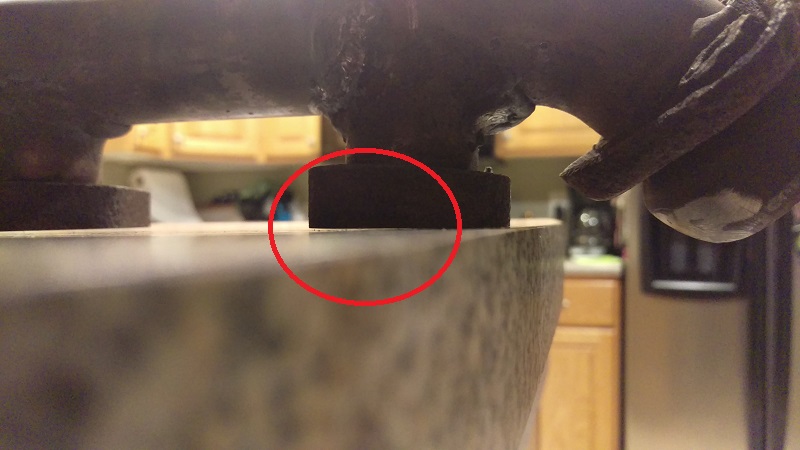
The other header is not perfect, but they are much closer to each other than the front header that was welded a few times.
I know. I believe I may have found an auto machine shop that may be able to mill them all flat to the same plane (I do not have a belt sander). Do you think I will need to worry about the welds inside the ports? The more surface they need to take off the feet, the closer to the welds they get - then I may have a new problem.
I have also been giving some thought to just replacing both headers, instead of fussing and farting around with the old ones. I know West Coast Fiero's has some for 500 - 600, and with all the time fooling around with the front one, and now maybe having to mill the back one too, it may be worth the money. But only in light of having things torn this far apart. I don't want to mess with the headers again - at least not for a while.
Thoughts?
[This message has been edited by computer_engineer (edited 07-25-2017).]
I believe I may have found an auto machine shop that may be able to mill them all flat to the same plan (I do not have a belt sander).
Heck, I'd rent a belt sander for an hour. (You'll also need a vice or some other way of holding the exhaust header while it's being sanded.) I suspect this would be a whole lot cheaper that having a machine shop mill them.
quote
Originally posted by computer_engineer:
Do you think I will need to worry about the welds inside the ports?
We didn't even weld inside the ports on my manifolds when we ported them... so I wouldn't worry about it.
I took the headers to an auto machine shop. The guy there, said it looks like there has been some work done on them before, since there are sanded spots that have significant amounts of rust built up on them. I haven't ever had them off before, so it must have been the previous owner. In any case, the guy at the machine shop said he couldn't guarantee what would happen if he sanded it enough to make all the flanges flat. There is already a significant portion of the weld missing on two of the three ports of the front header, but the back header looks like it hasn't been touched, since the welds are sunk down a bit from the flange.
So, since I have it apart, and I don't really want to waste time going through this exercise again, I am thinking of spending the money to get some new headers. Anything good or bad to say about the West Coast Fiero Shorty Headers??? I don't think I can afford the ceramic coating or stainless steel, but it should be almost as good to give it three or four coats of high-temp paint.
Has any one had any personal experience with the West Coast Fiero headers? In particular, did it fit in place without too many modifications? Either the short or long tube headers? I am mainly concerned about the stuff that can't be moved, like the front and rear firewalls. Even the cables and hoses, as that would be a pain to relocate some of that. I am hoping to get them so that it will fit right up to the pipe coming from the CAT. I plan to remove the CAT and/or replace the mufflers with glass packs or hi-flow muffler down the road.
Also, is painting the regular steel headers with high temperature paint enough? I have seen some high temp paint meant for BBQ grills and such. Stands up to 1200 degrees. Seems good enough. The stainless ones would be nice, but my engine compartment is not that shiny And they would stain and rust after some time anyway, just as the factory ones did. Not sure if they are really worth the extra money.
Thoughts? Opinions?
[This message has been edited by computer_engineer (edited 07-25-2017).]
I held out for OEM manifolds. Took a while to find a set, but in the end, I wound up with a good front manifold for $60 and I am very happy with the patient approach I took. As for your existing manifold, you can certainly use VW gaskets made from aluminum, the kind that crushes to fill imperfections. Even double up if you insist, to ensure the Gap is accounted for.
In reality, the manifold tubes aren't so rigid that they won't tweak as you tighten the bolts to the head. The flange may actually tweak itself straighter as you torque it down. At this point, the pipes themselves are under excess load, and that is where my concern might be.
Originally posted by computer_engineer: ... Also, is painting the regular steel headers with high temperature paint enough? I have seen some high temp paint meant for BBQ grills and such.
The Performa Chrome is a great insulator. Holds the heat inside the header. Helps to keep the engine compartment cooler. Get your Y-pipe done, too. I'll be very surprised if both headers and the Y-pipe cost more than $200 to coat. Way cheaper than Jet Hot, IIRC. Be sure to make sure your pieces are clean. They will charge extra if they are nasty.
They are south of Atlanta, and they do ship.
------------------ Raydar 88 Formula IMSA Fastback. 4.9, NVG T550 Praise the Lowered!
I finally pulled the trigger and ordered headers from West Coast Fiero. I had a few questions, and as busy as they were, the owner (Chris I think), took the time to answer my questions and even offer a few opinions of his own. They have had a lot of orders for the headers, and the guy that makes them has been making them non-stop for the last several weeks. He told me to check back in 2 - 4 weeks to see how they are doing, but based on what he was telling me, I don't expect to see them for at least 4 weeks. Should have ordered them sooner.
I am still concerned about the front headers and the heat they are going to create, so I am still thinking of getting them ceramic coated. I was planning on wrapping them with header wrap, and with that in mind, I am getting them made from stainless steel. I tortured myself for several weeks on this decision, but my wife (yes, my wife) told me that if I plan to have the car for a while, that it would be a good investment. Can't argue with that. I rationalized that if the headers are stainless, and I do wrap them, then they will be less likely to rust out prematurely. Also, the inside of the tubes will be less likely to rust as well. But if I have them coated, then the insides of the tubes will still be protected by the stainless steel. I am assuming that ceramic coating of stainless steel is still possible?
I will try to send some pictures when I get them and when they are installed.
Sorry if I missed it, but what are you doing for the rest of the exhaust system? Cat/no cat, muffler, etc?
Right away, nothing will change with the rest of the exhaust. But a few years or so down the road, I plan to remove the CAT, and put lower restriction mufflers on. It's really a question of money, how much (or rather how little) of it I will be able to spend on the car.
[This message has been edited by computer_engineer (edited 08-05-2017).]
I don't know if the shorty header's tubes are long enough so as to be flexible... flexible enough to not develop crack-inducing stresses despite the thermal expansion of the header trying to make it grow while it is fixed to the relatively immobile head.
I decided to keep stock manifolds, but nip the problem in the bud. I bought 4 bellows; one bellows in between each pair of adjacent cylinders.
I just used fieroguru's weld a nut to the stub method, and it worked wonderfully to extract a broken bolt.
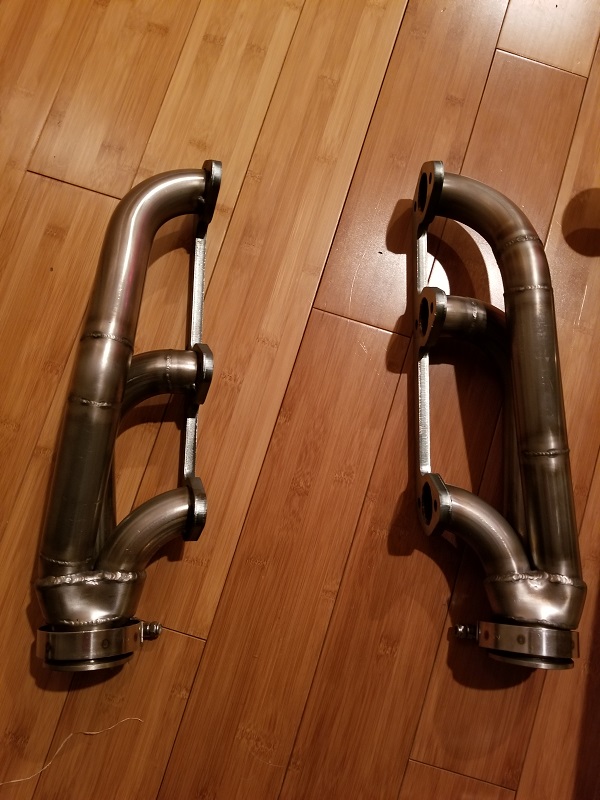
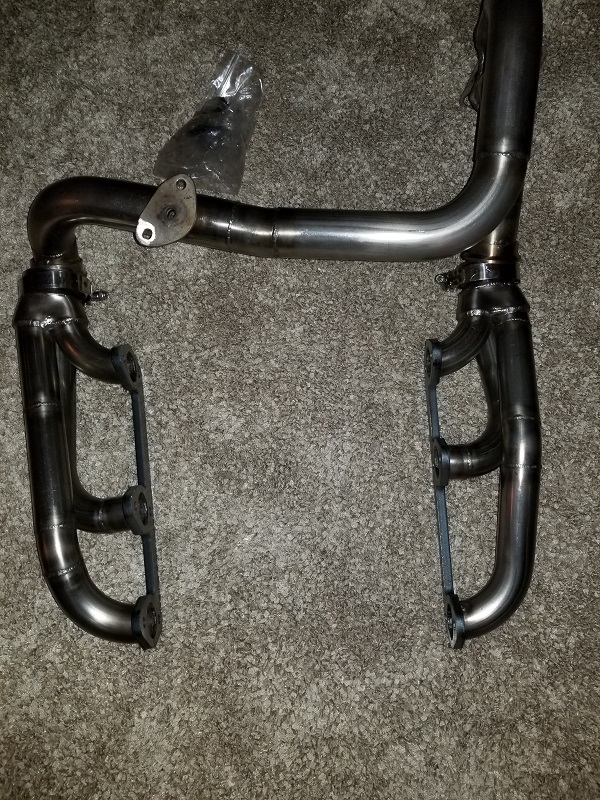
The headers finally came - yeah, it took a LOT longer than I thought it would. But they are here now, and I can start putting the car the rest of the way back together. I promised pictures, so let's get that out of the way.
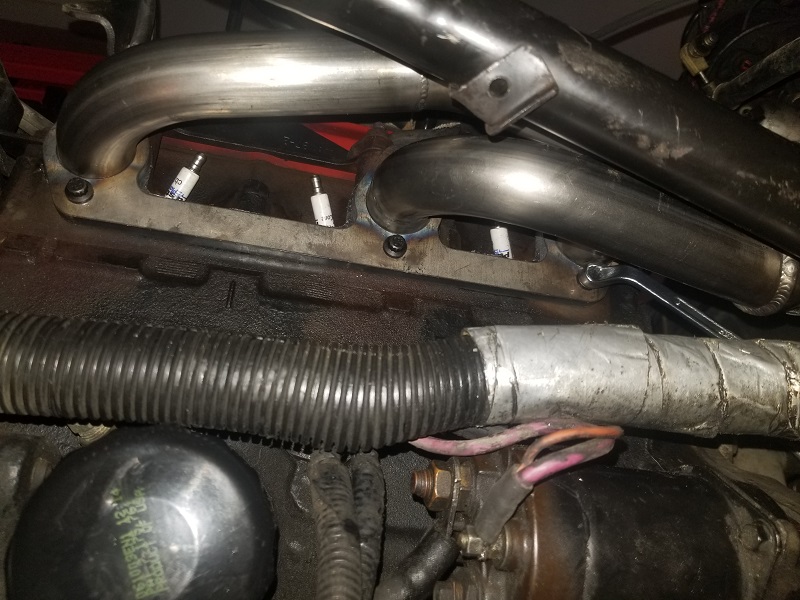
They really do look nice, so maybe they were worth the wait. The issue I have now, is that the bolt I had to drill out must have been drilled a little off (I used Rodney's drill plate), and it compromised some of the threads. When I tried to tighten it, the threads stripped out and the bolt just spins now.
If you look carefully you can see part of one of the threads hanging out of the hole.
QUESTION: Now what? Do I tap the hole with one size up larger thread, and just get a different bolt to go in it, or do I get a heli-coil kit? What have you guys done?
Thanks
[This message has been edited by computer_engineer (edited 03-04-2018).]
The issue I have now, is that the bolt I had to drill out must have been drilled a little off (I used Rodney's drill plate), and it compromised some of the threads. When I tried to tighten it, the threads stripped out and the bolt just spins now.
Now what? Do I tap the hole with one size up larger thread, and just get a different bolt to go in it, or do I get a heli-coil kit?
Damn, if it's not one thing it's another.
Depending on clearance, one potential problem of going up one thread size is if you can still get a wrench on the larger bolt head without the header tube being in the way.
IMO, a heli-coil is the "proper" way to fix this type of issue, but perhaps see what other members here report having done with stripped threads in this particular location.
Slot the hole in the flange first. Then try a longer bolt of the same size. Hopefully only the first half of the threads are stripped and a longer bolt can get to good threads deeper into the hole. If you can catch some good threads, you might try a bottom tap to tap the threads deeper into the existing hole.
Depending on clearance, one potential problem of going up one thread size is if you can still get a wrench on the larger bolt head without the header tube being in the way.
Yeah - I figured that might be the main reason that you can't do that.
quote
IMO, a heli-coil is the "proper" way to fix this type of issue, but perhaps see what other members here report having done with stripped threads in this particular location.
I have seen some inserts similar to the heli-coil brand of thread repairs, that have red lock-tite on them. Seems like a good choice for the insert, and I don't have to worry about them coming out if I need to take that bolt out.
What do you mean by "slot the hole" ??? I am afraid I don't understand.
The issue was caused by the hole in the flange not lining up with the hole in the head. First thing you should do is take a round file and remove some material from the hole in flange to better align the holes. This will make the hole look more like an oval or a slot (vs. being perfectly round), but will allow you to properly thread a bolt into the hole.
Those headers do look nice. I know why you made the purchase for these headers was not based on performance strictly but I am curious how much they actually add.
The issue was caused by the hole in the flange not lining up with the hole in the head. First thing you should do is take a round file and remove some material from the hole in flange to better align the holes. This will make the hole look more like an oval or a slot (vs. being perfectly round), but will allow you to properly thread a bolt into the hole.
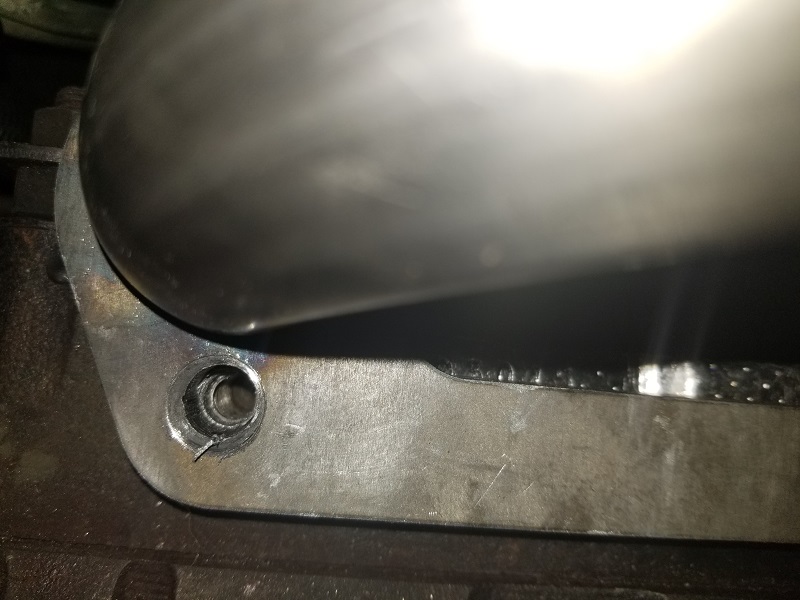
No, I think that is just the way it looks. The holes line up. It might look that way just because of the angle the photo was taken.
The reason I think it was something I did when I drilled out the broken bolt, is that during the process, I pulled out the old threads from the old bolt in the hole, and they were slightly off centered toward the back, like the drill bit wasn't exactly straight. That seems to indicate my drill bit took off some of the threads in the head - not good. It was Rodney's kit, which I am not blaming - pretty sure it was me leaning on the drill.
But then, maybe the kit's hole was slightly off. Anyone else used one of the recent drill plates?
[This message has been edited by computer_engineer (edited 03-08-2018).]
Has anyone used any of the threaded inserts for exhaust bolt holes? I have heard that even though heli-coil inserts are the most popular, they are not the best. I have seen some information on the EZ-LOK and Time-Sert thread repairs. They both seem better than Heli-coil, but one is formed to the bottom of the new hole (Time-Sert), while the other used red loktite. I don't want to make this harder in the end, but I want to do it once, and do it right.
The EZ-LOK's seem nice, and they come with Red Loctite already applied, but I am wondering how much that matters when it will be right next to the exhaust. Won't that just loosen the loctite and render it useless? The Time-Sert seems like the best solution, since the insert is mechanically held in place. The other thing I am wondering about, is whether these inserts can be used in steel. All the demos I see seem to be for aluminum.
Depending on clearance, one potential problem of going up one thread size is if you can still get a wrench on the larger bolt head without the header tube being in the way.
You could go up a size & install a socket head cap screw...
You could go up a size & install a socket head cap screw...
Good idea... but if I was in this position, I'd make sure I couldn't implement fieroguru's suggestion before seeking other options. It's the obvious first choice.
quote
Originally posted by fieroguru:
Then try a longer bolt of the same size. Hopefully only the first half of the threads are stripped and a longer bolt can get to good threads deeper into the hole. If you can catch some good threads, you might try a bottom tap to tap the threads deeper into the existing hole.
[This message has been edited by Patrick (edited 03-10-2018).]
I am going to gauge the hole and see how deep it is, then try and run my tap as far back as is possible without making the hole any deeper...maybe get that bottoming tap. I have already gotten a longer M8 bolt, so we will see how it goes.
[This message has been edited by computer_engineer (edited 03-11-2018).]
I thought I would post an update, as I kinda left this one hanging.
I ended up using a set of studs from the Fiero Store and a bottoming tap. I drove the studs in with a 5mm socket, and tightened them down until they were "solid". The problem I then had was with the nuts that they sent with them. They had a slightly wider bottom and a crowned top, and were locking nuts. This made it difficult for them to fit in place next to the header tubes, but they are in place now, so I'm not changing them. The other obvious issue was that I was not able to use a socket and a torque wrench on most of them. Had to use a claw-foot type wrench to even tighten them down. Wow - what a pain in the *ss.
I used Vibrant brand bellows from Summit Racing. They are available for a variety of pipe diameters.
If you can get one, I would suggest keeping a spare head as a welding jig (the welder will find it handy). If you didn't already know, the 2.8 uses the same head for both banks.
For your exhaust, I would suggest the following if there are problems:
1. 2x bellows, partial fix, may be good enough Add bellows to the outlets of cylinders 1 and 2 For reference, see this aftermarket Jeep 4.0 exhaust: https://www.youtube.com/watch?v=xkXlkSErRh4
2. 4x bellows, belt-and-suspenders approach Add bellows to the outlets of cylinders 1, 2, 3 and 4 It might be hard to add bellows to #3 and #4 due to radial clearance issues with the #1 and #2 pipes.
There is also the Y-pipe which we haven't discussed. Normally, a full belt-and-suspenders approach would include a bellows in the Y-pipe, to alleviate the length conflict between the Y-pipe and the engine.


 It is called a Rescue Bit, and you can learn more about it
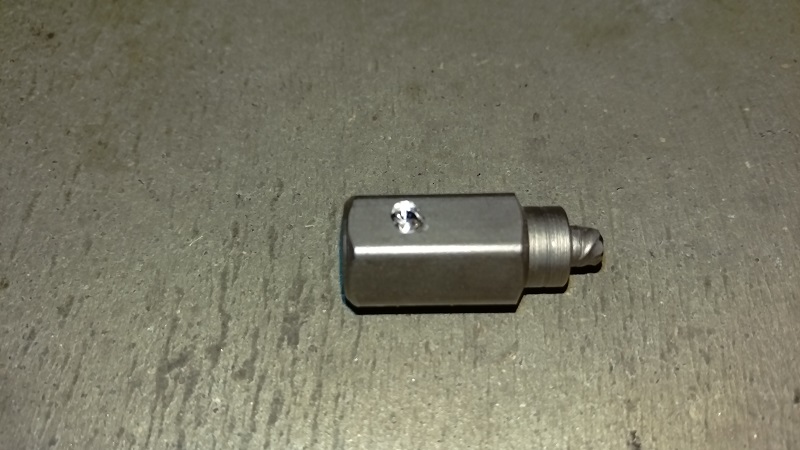


 I rationalized that if the headers are stainless, and I do wrap them, then they will be less likely to rust out prematurely. Also, the inside of the tubes will be less likely to rust as well. But if I have them coated, then the insides of the tubes will still be protected by the stainless steel. I am assuming that ceramic coating of stainless steel is still possible?