Figured id try this in t&d, just changed my clutch and everything is hooked back up but im getting no power. No dome lights absolutely nothing is getting powered. The wiring harness is plugged in correctly, the battery and all the wires and plugs in that area are plugged in. Negative ground is tight. The only ground that is not connected is the engine block ground but when i got the car the wire was broke so i doubt thats it. Theres a ground coming out of the harness near the slave cylinder that i figured was the tranny to chassis ground i saw in the "removing v6 by the numbers" thread so i put it on one of the studs to the bellhousing. Im stumped here ive been vheckin everything over and over. Just wanna drive my car again can anyone point me in some directions to look? Battery is charged.
Battery charged (and tested)? Wire from starter to battery good? Ground strap from battery to engine/frame good?
(yeah not helpful, but if you have zero power, then I would check the main cables)
Brand new battery and was fine when i took it out but ill throw it on charge just to see. I tried jumping it and when the cables were connected still no lights or anything. Ground strap to frame i assume is the ground strap coming off of the negative battery cable? Thats connected.
Can you tell me which wire is the one to the starter? My service manual says the positive cable goes to the starter. That ones fine.
Im going to try checking individual wires. I need to know which wires in particular can cause this issue ad ill change all the eyelets i can get to.
Cmon where are my electrical guys at ? so flustered i just spent like 700$ on equipment and parts and 2 weeks everyday workiny on it just to have an electrical issue.
Check your positive off the battery. I had this happen today when I put my battery back on. It wasn't making contact and I turned it slightly and it worked. Not real scientific yet, so I have to track the real problem, but, it worked. And it wouldn't even jump, so something is loose from the positive on mine. Could be your problem as well. Just replaced the water pump and wanted to start it up to check it and start adding coolant. No lights nothing.
1 - Connect up your engine to ground strap. The two little wires in the engine harness are way too small to function as a ground strap.
2 - When you are at the parts store buying the ground strap also purchase a $5.00 12v test light. Use the test light to first check and make sure you have 12v at the battery terminals. Then "walk" away from the battery with the leads, checking for 12v at the positions farther away from the battery. So after seeing you have 12v across the battery, then check for 12v from the power distribution posts to engine ground. Then check for 12v from the power distribution posts to chassis ground. Do this before randomly replacing parts.
You do have the short red lead from the positive battery terminal connected to the power distribution posts correct?
Also if for some reason you don't have the double ring terminal on one of the power distribution posts wires, the two posts are not electrically connected. So if that broke off and you replaced it with a single (normal) ring terminal, power won't be on both posts. It needs to be.
[This message has been edited by phonedawgz (edited 07-06-2016).]
Check your connections at the Power Junction Block.
The heavy cable to the starter only runs the starter. All other power to the car goes through the small wire from the Positive post to the Power Junction Block.
1 - Connect up your engine to ground strap. The two little wires in the engine harness are way too small to function as a ground strap.
2 - When you are at the parts store buying the ground strap also purchase a $5.00 12v test light. Use the test light to first check and make sure you have 12v at the battery terminals. Then "walk" away from the battery with the leads, checking for 12v at the positions farther away from the battery. So after seeing you have 12v across the battery, then check for 12v from the power distribution posts to engine ground. Then check for 12v from the power distribution posts to chassis ground. Do this before randomly replacing parts.
You do have the short red lead from the positive battery terminal connected to the power distribution posts correct?
Also if for some reason you don't have the double ring terminal on one of the power distribution posts wires, the two posts are not electrically connected. So if that broke off and you replaced it with a single (normal) ring terminal, power won't be on both posts. It needs to be.
Yes the power distribution post has the double eyelet on it, the positive battery eyelet on the bottom post and im not at my car right now but the top post has an eyelet from one of the fuse links. Battery negative wire ground strap is bolted down on the battery tray.
The c500 is plugged in all the way ive made sure of it. Ill buy a new eyelet for the engine ground strap (the one im speaking of isthe braided wire that goes to the decklid hinge. Besides that theres a ground strap coming from the harness right above the starter, can you or anyone tell me what this ground is? I put it on a bellhousing stud but i dont have a nut on hand as i lost the studs nut. Id feel like a real dumbass if this was the issue.
Thanks for you answer i will get a 12v tester tomorrow, just checking which one is the power distribution box to chassis ground and engine ground? They are the 2 posts below the c500 correct? Only the 2 red wires and the double eyelet one are attached there.
Thank you dr cool and fierosound i tried these but ill try again just to be sure ill make sure everything is correct. Ive spent the past 3 days staring intothe engine compartment looking for anything that isnt connected properly scratching my head like a monkey so im beginning to think perhaps its something with ecm. Tomorrow im going to try all this with my last hopes before calling my mechanic
[This message has been edited by painandgain99 (edited 07-06-2016).]
One of the two wires with fusible links that run to the body at the power distribution posts runs to the fuse box and everything running via the key. The other one runs to the headlights. So if both are dead most likely your problem is between the power distribution posts and the battery, or the grounds. You should have these working even if C500 was unplugged.
The wires that come from the engine harness to the power distribution posts are for the alternator output (big wire) and the ECM power/battery backup.
I've cut up literally hundreds of engine harnesses to make swap 3800 harnesses so I have seen them. Most have a small green wire attached to a small black wire. Those two run to C203 and C500 and would provide a minimal engine to chassis ground. Some harnesses also have a larger black wire that is a engine to chassis strap. You really need more than one, but I don't think this is your root problem. Even with no engine to body grounds your engine should at least still crank.
It is real important that the negative battery cable is connected to a good connection to the battery block. Do not try to crank the engine with this cable loose.
So on your 12v tester start with putting the alligator clip right on the negative battery bolt and then touch the positive battery bolt. You should have a light. Then move the clip from the negative post to a good ground on the engine. This could be any clean non-painted part. Again you should get a light. Than try with the alligator clip on a clean connector to a clean metal part of the chassis and see what happens. If those all work then try moving the place you are connecting the probe from the positive bolt to the power distribution posts.
If you get lights all the time and are being confused, try turning on the headlights and repeat the test. There might need to be a load on the system for the trouble to show itself.
Most likely you will find this easily once you get a tester and it will be a simple fix. Don't be surprised if the trouble is in the connection between the battery cables and the battery itself. Unbolt the cables and clean both surfaces with a wire brush.
Will do and post results tomorrow 👍 thank you very much i really appreciate it
Got it running today not sure what it was but i replaced a few eyelets and viola did the trick thanks everyone very much.
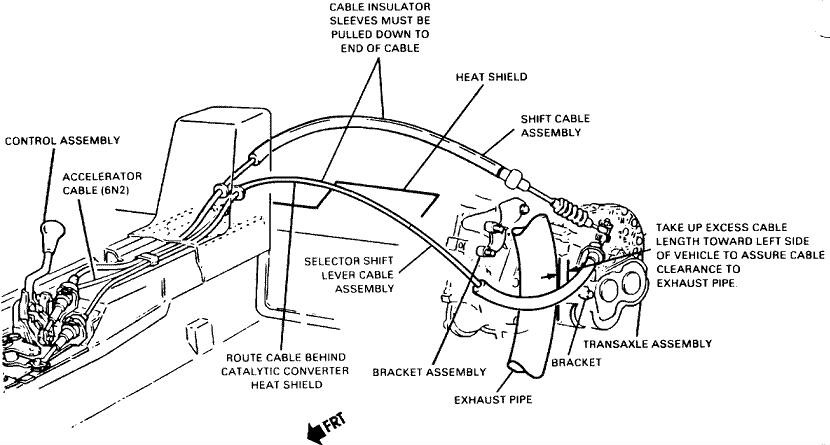
Just curious if anyone knows the answer to this, when feeding my select cable back through its little hole i bent the tip of it and heard a pop. The part that moves back and forth is no longer straight it kind of moves around freely. It goes into all gears fine but it wont go into 5 or reverse because the lever wont move all the way right. Goes into 5th and reverse fine when i move the little selecter arm on the trans. Could this be the routing of the cable or is it definite that i broke it?
If thats the case would i be able to grab a select cableoff a fiero from the pick and pull yard? They have manual 4 cylinders only
Ahh i see alright thank you very much for all your help. Ill try messing with the routing of it a bit if that doesnt fix it ill try getting a new cable
Which eyelets did you replace? The ones at the power distribution block near the battery?
No only the ground eyelets. Engine to chassis ground and the battery negative ground.
I got the car on the road and ive put about 50 miles on her so far taking it easy. A new problem now exists. Im sure its a simple fix but one of my rear brakes is dragging. I replaced these brake pads only because the others are pretty new but i damaged them while taking the caliper off so they were replaced. This is the only one dragging. Its not the e brake as thats disconnected because im nota big fan of the fiero ebrake mechanics and im puttingin a hydraulic one. Can anyone point me in the right direction as to what this can be? I bled the system, and to get the pads on i rotated the piston. Could it be i didnt rotate it enough? The brake pads werent touching the rotor until after the bleed now they slightly dragging. Enough to make that rotor VERY hot
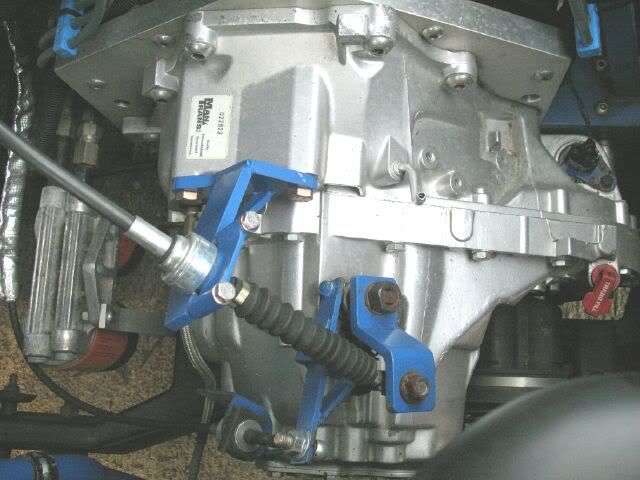
Still trying to rule out why my lever wont go into the right slot, i think i may have bent like select cable bracket. I hung the trans by this while reinstalling it for extra support trying to get the clutch shaft in. I got a picture
The select cable end was sticking straight out, not sideways. I put bent it putting it onto the arm on the trans. Can anyone verify if the brackets bent? If it is should i try to bend it back somehow? Maybe with a heavy hammer
------------------ 87' GT 5 speed 😤 16 years old My IG for daily motivation: Alpha_Photos
[This message has been edited by painandgain99 (edited 07-10-2016).]
The cable sure looks bent to me. The bracket looks bent as well.
I would take a large C-Clamp pliers and bend the bracket back, and then use the mouth of the pliers (without squeezing the cable too much) and bend the cable back to straight. If you can get in there with a hammer, a couple of taps might work, but then if you are like me, I tap in the wrong place could put you in worse shape.
If it doesn't work, then you will most likely need a new cable.
Hammers should be forbidden in the vicinity of aluminum. Especially cast aluminum. I would lean towards removing the bracket for repair or replacement. A very stout pair of vise-grips at the worst.
Hammers should be forbidden in the vicinity of aluminum. Especially cast aluminum. I would lean towards removing the bracket for repair or replacement. A very stout pair of vise-grips at the worst.
Thanks yea i realized the bracket could be removed and thats what im going to try to do, and thanks for the routing pics those will help
My left rear brake is still dragging, not gonna drive the car anymore until its fixed i dont wanna ruin the rotor. I greased the slider pins that didnt do anything. I doubt its hydraulic but i dont know. My guesses are its either something to do with when i rotated the piston or since i have the ebrake removed, the little nut on the back that the ebrake mechanism goes on may be twisted to engaged. But im not sure if that how it works. Can anyone verify that for me? Perhaps i can try rotating the nut left?
So what i basically got to from researching what was said in that thread is that the ebrake has to be installed for the rear brakes to work properly.... silly me. I bent the little clip that holds the two sides of the cables together but besides that i have all the parts. Does anyone know a tutorial thread off hand on installing the (actuator arm) i believe its called? And the spring. Wires should be kind of self explanatory
(The discovery of the problem)the other day the car was running a little strange and i went over a speed bump and saw a puff of steam come out of my vent, thought nothing of it but then i saw my temp was at 220... its usually between 100 and 220 right in the middle. But i wasnt thinking and later that night drove home and the temperature was all over the place. Shot past the red line then the dummy lighr came on and i pulled over and let it cool down then rushed home.
(Problem itself ) I had to put a fitting on a hose i cut which is right below the big hose coming out of the thermostat housing, it goes into the wall behind and under the battery area. Got a proper fitting and tightened the hell out of the clamps (theres no way its leaking there) tightened the hell out of the new clamps on the bottom radiator hoses. And still theres a little bit of coolant i see leaking from the bottom of the car. Then today i burped the coolant properly for the 3rd time since clutch change. And then a huge puddle under my car a few hours later.
(The question)I can only see it dripping off of the cradle as i havent jacked it up yet, but it seems to be in the middle of the back side of the engine. When it was overheating i opened the decklid and heard a loud hissing when the engine was off, like air escaping. This only happened when it was overheating. The initial steam i believe was from the loose fitting but im not sure where its leaking from. Can anyone point me in the right direction? When i changed the clutch and lifted the body up i had forgetten to remove one thing and it was that hose and it got kinked pretty badly so i imagine it might have cracked it. If this is likely the cause can anyone tell me what this hose is/ how hard it is to replace? Can provide photos tomorrow
(The question)I can only see it dripping off of the cradle as i havent jacked it up yet, but it seems to be in the middle of the back side of the engine. When it was overheating i opened the decklid and heard a loud hissing when the engine was off, like air escaping. This only happened when it was overheating. The initial steam i believe was from the loose fitting but im not sure where its leaking from. Can anyone point me in the right direction? When i changed the clutch and lifted the body up i had forgetten to remove one thing and it was that hose and it got kinked pretty badly so i imagine it might have cracked it. If this is likely the cause can anyone tell me what this hose is/ how hard it is to replace? Can provide photos tomorrow
The smaller hose coming off the thermostat housing is the coolant supply hose to the heater core. Check the clamp at the other end. You may have cracked the pipe.
[This message has been edited by fierosound (edited 07-18-2016).]
The smaller hose coming off the thermostat housing is the coolant supply hose to the heater core. Check the clamp at the other end. You may have cracked the pipe.
My car has a different hose orientation than that but i will check. The other end isnt clamped, it looks like its crimped on. It has the crimp marks that the end of the ac hoses have. Ill provide a picture whej i get by the car!
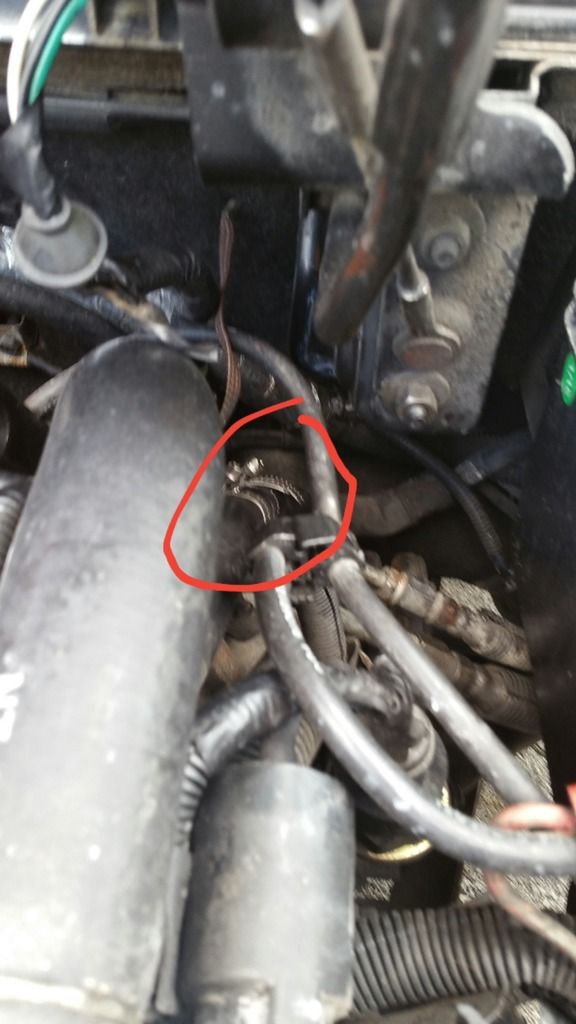
This is the hose i spliced, i believe was leaking before and causing the steam and loss of coolant. But i have a proper fitting on it now with a lip on it and the hose clamps wont got any tighter without breaking
And heres where the leak is
The only other thing i could imagine itd be is the coolant hose the runs next to the tranny, its metal but clamps on to a rubber part near the thermostat housing. I never removed this hose but i may have tried to and forgot to tighten the clamps. Will try to gain access today
[This message has been edited by painandgain99 (edited 07-18-2016).]
The only other thing i could imagine itd be is the coolant hose the runs next to the tranny, its metal but clamps on to a rubber part near the thermostat housing. I never removed this hose but i may have tried to and forgot to tighten the clamps. Will try to gain access today
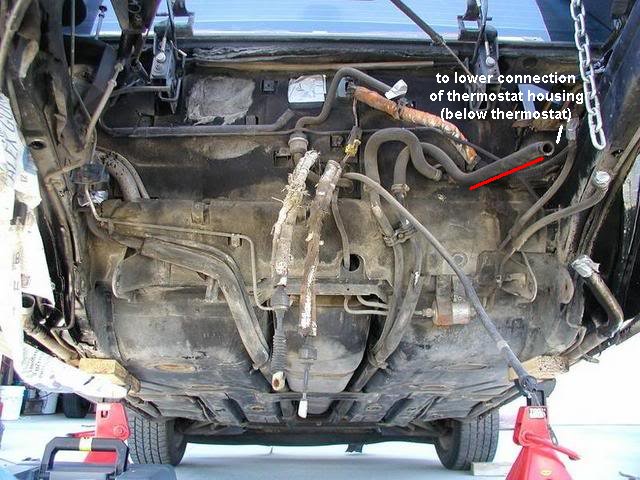
The coolant crossover runs from thermostat housing to hose and coolant pipe and on driver's side. Checking that hose and the hose clamps there is probably a good idea. (black pipe in this pic I found on PFF...)
[This message has been edited by fierosound (edited 07-18-2016).]
The coolant crossover runs from thermostat housing to hose and coolant pipe and on driver's side. Checking that hose and the hose clamps there is probably a good idea. (black pipe in this pic I found on PFF...)
Ok so several clamps were loose. The drivers side end of the coolant crossover pipe was good, but it was loose where it connects to the hose that goes to the therm housing and the hose AT the thermostat housing was loose. And the small hose under it where i have it spliced, was loose where it connects to the housing. Now EVEYRTHING is type and i havent seen any leaking yet. If another leak appears then something has to be broken. My guess is it was leaking where the crossover pipe meets the hose and then was dripping on the catalyst converter . Will keep updating.
Some good news, i fixed my shift bracket! Reverse and 5th are no working great thank you everyone for your help
Ill be replacing my vacuum lines soon, was wondering if anyone had a good method of making or fixing the boots? Alot of mine are dry rotted, a few torn. Was thinking plastic tubing with a clamp or small heat shrink sleeves for the ones still viable


 can anyone point me in some directions to look? Battery is charged.


 so flustered i just spent like 700$ on equipment and parts and 2 weeks everyday workiny on it just to have an electrical issue.


.JPG)