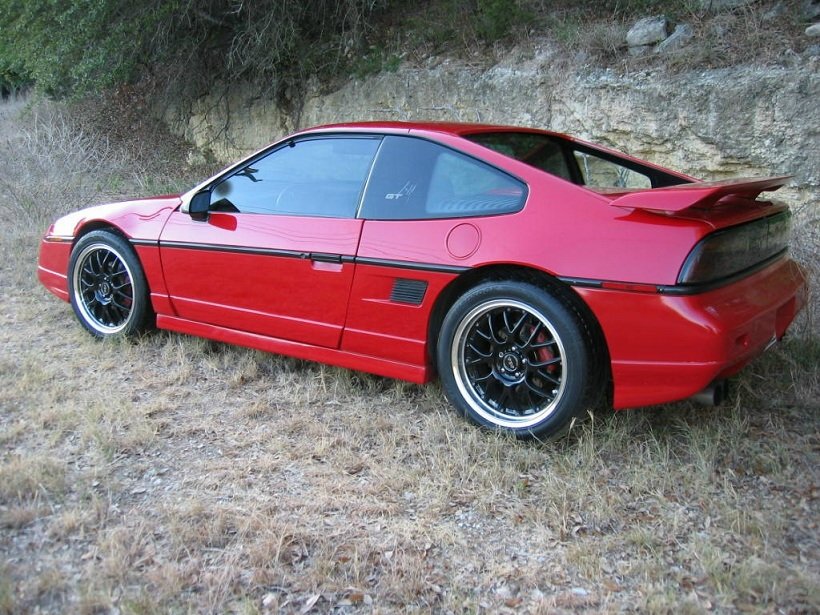
Story so far, I bought a 86 Fiero GT about a year ago. (Dream car achieved!) I quickly fixed a few things on it to get it drive-able, headlights didn't work, windows didn't work, overheating, and rebuilt the suspension. My ultimate goal was a V8 or 3800 SC swap. After some research a 3800 SC swap was decided on. During that time, a buddy bought an 85 iron duke with an auto that someone had started a swap on. (very loose use of the term started) They had a 3800 almost fully disassembled and mated to a F40 and mounted to a cradle. But that was about it. My buddy bought the car for his son and the intent was, I take the swap parts and he takes my 2.8 and automatic. We completed the swap out of my car into his a, got it running and on its way. This left me with an empty engine bay and a transmission I had no plans to use. I kinda tucked it away for the last year and I am just now getting back into the swing of completing the swap. Here are some pics of my baby.
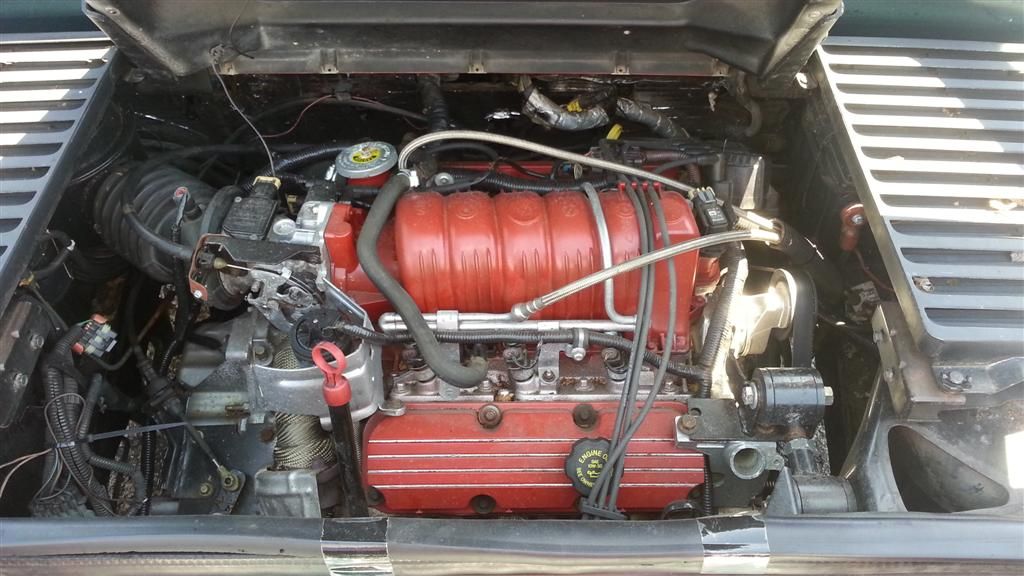
The motor is out of a 2000 Grand Prix from best I can tell. The accessory brakcets, oil filter adapter, and PCM all kinda point to that direction. I bought a new cradle since the old mounts were home grown affairs that were welded in. Currently I'm prepping the cradle for paint and I'm reassembling the engine on a stand.
Excuse the garage, I know where everything is ok?
I still haven't decided if I am going to do the harness myself or not. I need to do it myself, I'm an expert solderer, it just looks daunting. The engine is very clean so I couldn't be happier with the condition it is in.
Which brings be to my first dilemma. What year transmission to go with. The PCM is Part 09357440 and came out an any number of GM cars but along with all the other evidence of parts I see it looks to be a 2000. Is there any reason to go with a newer 4t65E-HD or is one from 98-2000 ok to use?Any major difference other than the pin vs bolt mounting?
Second dillemma, and honestly I have only started to research this, I see a lot of people plugging the water inlet on the timing cover, any reason for this? Is it possible to use it or is this just not needed and I should use the one off the LIM? I appreciate any feedback.
------------------ Current: 1986 Pontiac Fiero GT 2.8L AT 2010 Mazdaspeed3
Previous: 2011 Buick Regal Turbo T07 - Trifecta Tuned - Myrtle 79 Jaguar XJ6L w/ Chevy 350 & 700r4 - Lord British 2004 Pontiac GTO 385RWHP/395RWTQ - The Aussie Cow
Forgot to post this as well. As part of my first round fixes on the car, I re-wrapped the steering wheel and had a new trans boot made.
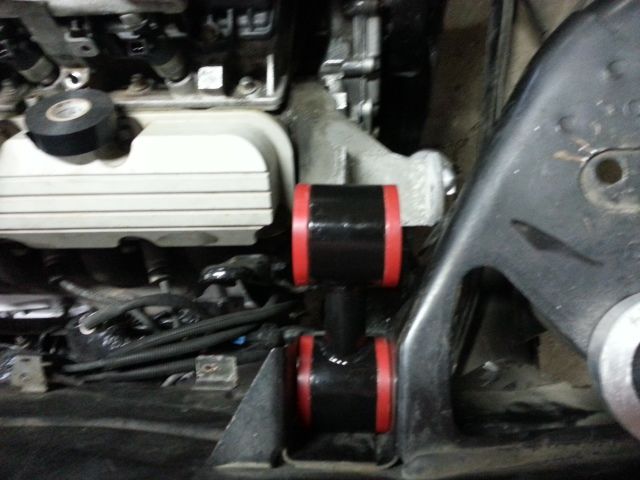
So on the coolant lines, rather than plugging them, it is possible to reuse the original tubes pictured below and just attach the heater core lines to these? Along with mounting the lines so that these do not experience any force? It appears the one on the timing cover is the inlet and the one on the LIM is the outlet. Am I just adding complications where there doesn't need to be any?
Looking over the brackets I have for this motor, I think I have everything I need. I have the coil pack bracket with the dog bone mount that needs to have the dog bone cut off
I also have this pulley here but I need to replace it, or oil it or something, it is not smooth. This sits below the supercharger tensioner, any ideas anyone?
And lastly I have this great dogbone bracket, but I think it should have a tensioner with it. It isn't anywhere in the box of parts I have, am I nuts or does anyone know where to find one?
After that I think I need a lower alternator mount. Unfortunately a welder I am not, so going to have to buy one of these. Considering my options on motor mounts as well. Trying to decide to go with premade off the shelf or go junk yard hunting for the OEM brackets to make it all work.
Figured out the belt tensioner on the alternator. I will be cutting the tensioner bracket that has the collant hoses to fit over the dog bone bracket, following 85SilverGT's setup here. https://www.fiero.nl/forum/F...2/HTML/112125-2.html
Last part to figure out here is the alternator mount.
The lace wheels on my car went with the car we swapped the motor into, meaning I needed some new wheels. I ordered them today, should be here by Friday. Will post some pics when I get them in. I went with the ASA AR-1's.
TXGOOD has them on his, and I really like the look.
Rob did get work getting my 2004 set up. The wiring is different but there is a lot of great information on the belt tensioner, alternator and the coolant set up.
Great thread, thank you, I hadn't seen that one yet.
I am starting to come to the conclusion that this swap isn't really, harder without being able to weld, it is really just more expensive. I looked at the possibility of using some of the stock part mounting options, but with the variability of parts out there and a bit of vagueness about the whole thing, I decided it most likely isn't worth the trouble it would bring. In the end I have decided to order mounts from Fierorog or the BrandX mounts. I am hitting the pick and pull on Saturday so I am waiting until I have my transmission in hand before ordering anything. I'll be hitting MstangsBware for the axle for the swap. He has helped me a lot before answering questions.
The engine sits about 1" lower in the compartment then the other options. On my 3800na in the pictures, I used rubber motor mounts. On my 3800sc I am using Rodney Dickman poly mounts. I have another set of brackets if you are interested, but you do have to slot the cradle.
Originally posted by Lancer-AM: Looking over the brackets I have for this motor, I think I have everything I need. I have the coil pack bracket with the dog bone mount that needs to have the dog bone cut off
You do need to cut the dogbone part of the mount off. The coil packs wont fit in the stock location... unless you get crazy like I did. I cut the hinge box out, used decklid brackets like fieroguru and used the Transport mount to lower it in the engine bay...
quote
Originally posted by Lancer-AM: I also have this pulley here but I need to replace it, or oil it or something, it is not smooth. This sits below the supercharger tensioner, any ideas anyone?
you need to keep the mount, but you can get a new wheel/bearing.
quote
Originally posted by Lancer-AM: And lastly I have this great dogbone bracket, but I think it should have a tensioner with it. It isn't anywhere in the box of parts I have, am I nuts or does anyone know where to find one?
That dogbone bracket would be on the front of the motor if it was in a stock GM car... it is on the right and the coild pack dogbone bracket you are cutting off is on the left..
I try to think of it like you are standing at the back of the Grand Prix and just moving the motor straight back to the trunk (Fiero)...
Figured out the belt tensioner on the alternator. I will be cutting the tensioner bracket that has the collant hoses to fit over the dog bone bracket, following 85SilverGT's setup here. https://www.fiero.nl/forum/F...2/HTML/112125-2.html
I've seen plenty of people do that, but mine didn't line up. Maybe it was the Transport mounts, maybe it was the way I centered my engine in the compartment...
I just made a plate that I could drill the holes into the top of the alternator bracket. Hard to see, but there is a brace that also goes down to the block.
Thanks guys, yeah I have seen the stock dogbone mount not working and being offset, and from best I can tell it happens with the transport mounts, I am still researching it to understand better. I am going to see what mounts I can locate while I am out at the pick and pull to see what may or may not work. I haven't yet given up on using that dogbone mount.
Thank you Mike, I would really like to look over your setup some time. I met you once before at Bombshell's one night but Stephen was still working on your swap at the time.
I figured out how I will make my alternator bracket, also I have contingent in place if the Dogbone doesn't line up after mounting. I'll make a new adjustable solid dogbone that will be thinner than the stock and use steel sleeves to position it. I'll do this with steel heim joints and a grade 8 threaded rod. It should be more than strong enough. I'll get additional vibrations from the solid mount but that is ok.
MulletProofMonk, sent you an IM about your mounts.
Tirerack is fast with shipping. The new wheels came in last night.
I figured since I had the wheels off I could snap some pics of the suspension work I did on the front. All new busings, tie rod ends, end links, and ball joints. Thank you MulletproofMonk, I used your thread heavily while I was getting this all done.
Here are the new wheels, I can't really get much better pics until I have the ability to put the car on the ground once again. They are ASA AR-1's 17x8 +35MM with Sumitomo HTR ZIII 235/45/17's. It is one of the best budget tires I ever Autocrossed with. I figure I have a long time before this car will hit the AutoX course so it is ok to save a little on the tires for now.
Excuse my phone's potato quality. I'll get better pics once she is ready for some glamour shots.
Well this weekend turned some interesting bits. First off, Austin crowd, there is a 04 supercharged L67 sitting already pulled at the austin Wrench-A-Part location. It is from a 2004 Impala SS. The computer was destroyed and the harness would need some help, but the engine otherwise looked great. Unfortunately out of all the yards this was the best transmission we found. Being that it is a 2004, it puts a couple of speed bumps in my original plans.
The Trans Sport mounts that I get from MulletproofMonk, won't work for this transmission. It is a pin style mount, so doh. Also with the 03+ transmission they moved the gear selection sensor inside the transmission. Not really a problem, I just have to add an external one. I could also re-pin the transmission harness to move the wire in there, but it is easier just to put the select sensor on it.
My two buddies helped me wrestle the engine and trans out of that mess. I at least know the transmission was working good enough to get in a front end collision. There was a GTP in the yard, that had never been in a wreck but had 230k miles on it. We left that transmission there. We figured,, no wreck but it is sitting there, most likely for a reason.
Thank god these guys were there to help me out.
[This message has been edited by Lancer-AM (edited 02-28-2016).]
Ordered a set of BrandX mounts and a passenger side axle from MstangsBware. IwannaIRM said he should be getting his new poly today or tomorrow. So hopefully those will ship out soon after. I'll get a bunch of picks once I have them mounted. Tonight I am going to get my LIM installed on the engine and possibly the supercharger.
Quick question for anyone that can answer. I need to swap the Oil Pressure sender to a Fiero one to work with the gauge correct? Any reason not to swap to the 88 sender while I'm at it?
Does anyone see any issue with this plan for the fuel system?
Going to use the stock fuel rail for the series II, this has both a feed and return line.
I plan to use quick connect to -6 AN fittings on the fuel rail stainless steel lines to the fuel pump connections 3/8" feed line through high pressure fuel filter -6 AN fittings Hard line 3/8" and 5/16" hard line compression fittings to -6 AN fittings and connect them to the stainless steel lines I will leave the evap system in place using standard tubing from the tank to the canister.
Just want to check before I buy all the parts but it looks like a solid plan.
[This message has been edited by Lancer-AM (edited 03-01-2016).]
While I am waiting for parts I power washed the new cradle and will hit it with a wire wheel tonight to prep it for por15 and then paint.
Finished off the rear control arms. I took a long time painting these, wasnt in a big rush so I gave them a day between coats with 4 solid coats. Put in the new poly bushings and new ball joints.
Not a lot to update on currently. Still waiting on parts.
The BrandX mounts haven't shipped as far as I am aware. I am going to send him a follow up email today.
The Passenger side axle hasn't shipped but that is no problem, he let me know it would be a few weeks due to spring break. He said he has started to receive the parts to build it.
Unfortunately we have a solid week of rain scheduled this week, so painting the cradle will be a problem. May just wait until next week for this. I really need to get on it when the mounts ship. For now it isn't a big deal
I installed a new AC Delco EP381 in the tank last night. It was not as drop in as some folks have said. It technically was but the hose was smaller than the stock fireo hose which made fitting it a PITA. I eventually got it on but had to use different hose clamps in the end. I got it from RockAuto so I'm not too worried about it being a fake one, we will see.
I ordered a new 3.4" pulley for the supercharger. I got a modular system as I hope to go to a 3.2 soon. I want to see if a e85 mix is possible without starvation with the EP381. If not I may just be forced to move to a larger pump. Not really a problem, since this is further down the line. For those not familiar with a E85 mix, it is where you run about 30% E85 and 70% 93 Octane. It is easier on fuel systems overall and you get the knock reductions without having to run full E85. This is a standard practice in the Mazda community when not wanting to run a 5th injector. We will see how it goes on this setup eventually.
Biggest thing I need to do is finish putting the motor back together so I can start wiring. Sorry for no pictures, nothing truly exciting is happening yet.
Forgot to update on the exhaust. I had a Jones Full Boar crossflow muffler I had originally plan to install on the 2.8 that is still sitting here. Since I wasn't able to find anyone actually using these on the Fiero I figure why not. It has a 3" inlet and 2 2.5 outlets. I am going to combine that with a magnaflow high flow cat and some dynomax 2.5" to 4" exhaust tips. Just need to find a welder here to put it all together.
[This message has been edited by Lancer-AM (edited 03-08-2016).]
Got out to POR15 the cradle. We didn't have any rain this afternoon luckily and humidity was only like 70% Oh well, it was close enough. Tomorrow if the rain can hold out, I'll paint it. Need to give the POR15 24 hours to set.
I also decided to put in my new hub seals, was going to install the hubs as well until I realized I need to go get some axle grease, I appear to be out.
While I was out in the garage I sealed up the fuel tank and started working on the fuel setup. So here is my brilliant idea to deal with the fuel lines. I wanted to try running the stock return line fuel rail, so to get the lines behind the motor instead of up front I decided to use 6AN u joints. The quick connect setup was retained with quick connect to 6AN adapters. Should look really good with the stainless steel lines running back. I have always wanted to do an AN style fuel setup so that was a bit of the motivation.
[This message has been edited by Lancer-AM (edited 03-08-2016).]
I installed the new hubs, and finally got the old supercharger gasket cleaned off. That took a long time. It was cemented on I think. After getting it cleaned and a good alcohol cleaning, I got the supercharger installed as well as the new waterpump. The old waterpump didn't really have any play and the bearings felt good, but I figured why not. My new pulley shipped out, going with a 3.4" modular setup. I bought a pulley puller as well but will just turn around and sell it after the new modular hub is installed if anyone needs a puller.
I don't know how tight of a budget your build is, but have you considered Fierofreaks modified fuel rails that he sells in the mall? https://www.fiero.nl/forum/Forum4/HTML/065100.html They make for such a clean looking fuel system, and are fairly affordable compared to aftermarket rails.
I am going to be getting close to my budget on the project for now. Not being able to use the Trans Sport mounts cut into it. If I could weld in general this entire endeavor would have been a lot cheaper. I still have to plan for exhaust welding, belts, fluids, new plugs and words, a dogbone, And whatever else I have missed along the way. The cost of the swap looks pretty cheap from 1000 feet up but when you get down in the details it starts to add up.
I also spent a bit of my budget to get some new quarter panel windows as one of the plastic ones on the car were broken. In all this round of spending I hope to be out around 2000 not including the wheels. Those were an extra 1100. But this car I hope to be a journey, not a sprint so I have plenty more planned for it as we go.
I got my 3.4 modular pulley setup in. Here it is compared to the stock pulley.
Yay, my 3.8 is pullied.
I also finished prepping the cradle. I am still having to do a bit more sanding on one of the bushing couplers so I can get my aluminum bushings installed.
The BrandX motor mounts came in and they look great. I will say I am slightly disappointed that at $400 it didn't come with the bolts to actually mount it to the cradle. Oh well, home depot here I come.
Since I hope to mount the motor and trans, I figured now was a good time drop the trans pan on my junk yard transmission and see how bad it looked. I am happy to report some excellent findings. No metal shavings anywhere and a good consistent color to the fluid, along with no odor. Got it all cleaned up and a new filter in place. It is ready to go. Hitting the pick and pull tomorrow to get the shift position switch to go on it.
Finally, the new exhaust tips came in as well. These are Dynomax 2.5" to 4" double walled tips. They should look awesome coming out the backend. The exhaust will go to a magnaflow 3" high flow cat, into a Jones Full Boar 3" to dual 2.5" crossflow muffler and exit these tips.
[This message has been edited by Lancer-AM (edited 03-13-2016).]
Taking the family camping for spring break so not going to really have much in updates this week. Last night I started to mount the trans to the cradle. I also got the other aluminum cradle mount installed.
I got the transmission selector switch put on the trans. That is what is going to allow me to use the newer trans with my 2000 PCM. In 2001 they moved the circuitry inside the trans and added the pins to the transmission harness. If you want to use a newer trans, you have two options. 1. Do what I did and add the switch, or 2. Move the wiring to the trans harness.
While I was at the pick and pull I found a beefy trans cooler on a ford ranger I am going to try out. It had some good mounting bra let's that I think will work nicely. I also grabbed a grand Prix front sway that will go on the back sometime in the future once I beef up the front bar.
I have some pictures of all of this that I'll post once I'm home later this week.
We'll fuuuuuuuck, what is the saying? Don't buy someone else's project? Remember i got this all in a bunch of boxes. Got to start on the wiring. Pulled all of the loom and tape off and started to unpin and label everything. While doing that I noticed something weird. There were some pins that shouldn't been there and some pins were missing that should have been there. Got through all of the blue connector before I decided to see what was going on. Turns out this harness is a 3400 harness not a 3800. Grrrrr. Looks like I have a date with the pick and pull again and there goes most of my day I spent on this harness.
Oh well. I have the engine and trans on the cradle now. I'll post up some pics tonight after I calm down a bit.
[This message has been edited by Lancer-AM (edited 03-20-2016).]
You are correct, which is why I got as far as I did. Almost all of the wires are even the same color. Unfortunately I can't repin the blue and white connectors. It isn't that big of a deal just a pain. The pick and pull is 30 minutes from here, and I have to disconnect everything to get it off. The new harness should be pretty cheap. The yard said the harnesses are $9 an arm lenth. Weird measure but I'll take it.
Hmm interesting. I figured it was plastic and I didn't want to mangle it trying to repin it. I've pulled about 60 pins through it, you would have figured I would have worked out it was rubber. I'll finish off the white connector and see what I have left to work with. So far most of the major connections I have accounted for. Thanks for the info, maybe I can make it work.
This has been a very busy week. With it being Easter week, mostly I have had to focus on family stuff so I haven't had a chance to work on the car let alone post. I am soldiering on with the wiring.
Here are the obligatory messy wiring pictures that must accompany any swap thread.
Stripping the harness
Removing the pins from the connectors and taking inventory on all of the wires and connections.
And starting to lay out the harness.
A few questions for folks,
1. Which way do you normally route the injector wires? The stock harness had them going under the intake but I have seen a few harnesses route them under the supercharge snout. Is this primarily to keep them away from the exhaust? 2. The crank and cam position sensors are on a harness that also has the ICM connections on it and that routes to a seperate connector that runs to the rest of the harness. Do you normally remove this connection and hard wire everything or retain the additional connector?
This next week I need to finish bolting the motor mounts to the cradle. I have just been lazy in doing it.
[This message has been edited by Lancer-AM (edited 03-28-2016).]
Just an update. Progress has been slow. I have a 2010 Dodge Ram 5.7 that decided to collapse a lifter. The dealer wanted $4300 to replace the lifters and the cam. I decided if I am going to have to spend money on it, I would spend half of that and go the performance route. So it is currently at the shop waiting for a custom cam, new lifters, and a dyno tune. Unfortunately this was money that was to be spent on the Fiero. It also kinda drained my will to work on it a lot right now. I spent a whole weekend diagnosing that truck before coming to the realization that it was major mechanical and I was supposed to be spending that weekend working on the fiero.
Finally got it back in me to get out and work on it more. I have started on the wiring harness, I am actually almost done with it. This is really the part I feared the most out of the swap. It hasn't been that bad, just a lot to keep track of. Also if you look at some of my earlier posts you will see I am actually working with a 3400 harness which is mostly the same but does have a few small things to have to deal with. The biggest issue I have faced is on the position selection switch on the transmission the harness with the power connections does not seem to have all of the wires a 3800 would (See picture 3). I am considering hitting the pick and pull to cut off the one I need. Also the knock sensor connections on the harness are two different sizes but the knock sensors on the block have the same sized connections on both sides. I ordered a new replacement connection just to move things along.


 Oh well, it was close enough. Tomorrow if the rain can hold out, I'll paint it. Need to give the POR15 24 hours to set.


