Still no luck on the water pump. Guy making my header flange promises it will be here in a few days.
Odd on the differences on those pumps...
For my SD4, I bought a brand new regular Duke water pump with pulley attached. It looked the same as the "SD4" pump I took off the engine, I didn't see any differences at all. The "Duke" pump fits and seems to works perfectly fine.
[This message has been edited by fierosound (edited 09-05-2025).]
I got my header flange it fits pretty good. Though its not quite as thick as I would have liked. I hope that it holds up. Also got the water pump rigged up. I got a 3 belt pulley from a 70's era Chevy which aligned pretty closely with the pulley flange that came with my SD build kit. The bolt holes didn't line up, but it was easy to drill new ones. And with a 3 groove I had pretty good chances that the belt would align, and it did. That is where the good news ends. I am beginning to see why so many people never finish and/or loose interest in projects like this.
I had the new engine all bolted to the cradle and getting close to shoving it back under the car, when I've experienced the following. 1. Alternator / Dog Bone bracket doesn't fit. a. The intake manifold was not sufficiently clearanced for the bracket. Had to grind the manifold to get it to fit. b. No hole/stud in the top of the manifold for the 'arm' of the bracket to bolt to. Drilled and tapped a new hole. However manifold is not very thick and I stripped the threads. c. The deck height of the block is different on this block from stock, and head thickness is also different. Had to grind out/slot the bolt holes in the bracket going into the head d. Helicoil in one of the bracket holes ripped out. I stuck a larger bolt in with some thread locker. Hope it holds.
2. The 'bung' that I fitted in the oil pan for the oil return happens to be right in front of the axle and I can't get the hose on. I spend 35 bucks for an AN elbow, but it didn't help. Still doesn't fit. I am going to have to remove the engine from the cradle, take off the oil pan. Get the hole welded shut and move the bung. Can't wait to scrape and grind off all that RTV sealant. Probably dont have enough RTV left to replace so now have to buy more.
3. Thank god I decided to pour some oil into the Tranny prior to putting it back under the car. I was seeing oil leaking on the floor after doing this. At first I thought it was just leaking out the axle holes since the axles weren't installed yet. But after a few days of this, I realized its leaking between the two halves of the transmission. So now this has to come off the cradle for further investigation. This is a salvage yard tranny that I took apart last fall to inspect. I resealed it with Anaerobic sealer, and it sat dry all winter until I filled it a week ago. No clue why the sealer failed.
I'm feeling a bit defeated right now. Especially knowing that I haven't even got to what I thought would be the hardest part of the project yet... Learning now to tune the computer to make the darn thing run.
You've already made tremendous progress. Give it a rest for a few days then go back to it. We are rooting for you. Can't wait to see the finished installation.
This TBi is from a V6 Blazer, bores are about 1.75, so it won't be quite as bad as the one from the 454. I figure that engine was rated at 165 hp. I hope to be at 180 or roughly double a stock Duke, so this 2 BBL TBI should just about cover me. For management, I haven't made a final decision, but currently leaning toward http://www.dynamicefi.com/
I'm liking this thread.
I just put a 350 CFM Holley on mine. It runs good, but it feels like it could use some tuning. Interested in how the EFI works out. I was thinking about swapping the SD into another car, and trying to utilize a GM EFI of some sort.
Engine is back in the car. And its actually running, but not without more problems.
The dual TBI I got is only firing from one of the injectors. It took me a while to decide it was a defective injector rather than this being a design feature at idle or a problem with the computer programming. I stuck my old stock Fiero injector in there, just to prove it would fire both injectors. Though the Fiero injector is supposedly about 60 lb/hr. That is waay to much fuel and I am too rich now. So I am going to have to spend 50 bucks to buy a smaller injector.
The engine is running very rough, while troubleshooting I pulled out the plugs to find them all black and when I put them back, one wouldn't tighten up even tough I always start them them with my fingers. Years of prior abuse on this engine is really trying my patience with all the stripped threads. Now I am trying to do a sparkplug thread repair without removing the head. Also in trying to figure out why it was running so rough, I was shooting the headers with an infrared thermometer and found 2 of 4 cylinders are running much cooler than the other too. So I went out to buy a compression tester to make sure the compression was there. All are between 195 and 220. A lot of variation on a new engine, but nothing that should produce the results I am seeing. Not sure if this is because unburned fuel is cooling some of the tubes, or if they are not firing completly. Any suggestions on how to determine that??
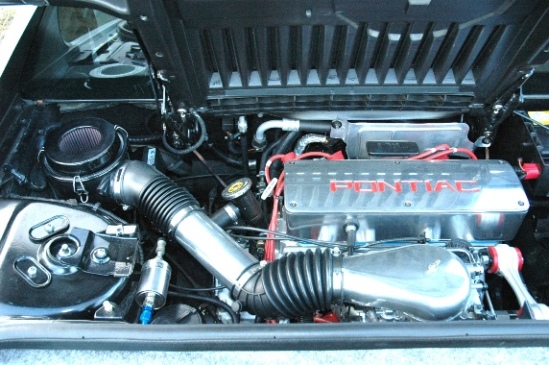
The air intake that I bought is too tall, and the deck lid won't close.
Even with the air intake removed the deck lid still wont close, because the passenger side hinge is hitting the giant SD valve cover. I am really surprised I dont ever remember reading that no one had this problem before. No idea how to resolve this.
Also with these Hooker headers, I can't believe how hot the engine bay is now. I am melting every wire loom that is within even a foot of header. I am going to have redo all that and find something more heat tolerable. Even wires running behind the heat shield are melting. (oh yeah and the A/C heat shield no longer fits. I had to bend and hammer that to get it back in.)
The EBL Flash programmer is great. Very powerful and easy to use. I just wish I had the knowledge of how to tune so I could take advantage of it. I see a lot of hours of tuning in my future.
Maybe in another week, I'll be ready to try to take a drive. I guess I will probably go ghetto and bungee strap the deck lid down for the maiden voyage around the block.
... the passenger side hinge is hitting the giant SD valve cover. I am really surprised I dont ever remember reading that no one had this problem before. No idea how to resolve this.
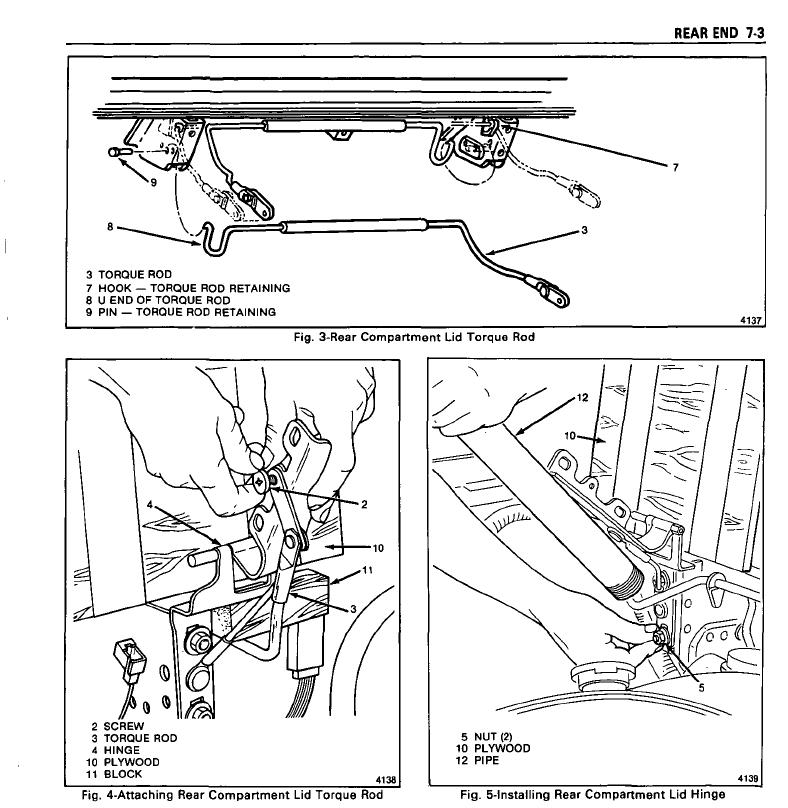
I think the SD4 block/head is slightly "taller" than a regular Duke. On the passenger side torque rod arm, I shortened the torque rod connector by drilling a new hole further down and cutting off the end.
See Fig 4 - I drilled a new hole for Bolt #2. I did this without removing torque rod from car (just removed decklid) Left side is about 2" center-to-center and shortened one on passenger side is 1-3/16" center-to-center.
[This message has been edited by fierosound (edited 06-01-2015).]
Fierosound - thanks for the suggestion on fixing the decklid !!! I made the same modification to mine, and now the lid closes.
My latest problem is that when I was out on my first drive around the block, I melted the accelerator cable. So engine was running, but I couldnt move the car. Had to push it home. New cable on order from Fierostore. Can't do much more until that arrives. It is unbelivable how hot these headers run compared to the stock manifold. I'm needing to protect everything on the exhaust side of the engine, even if its not really anywhere near the exhaust.
I had the same problem with the 4 speed in my 84 that you had. Leaking between the case halves. It's strange how that happens suddenly. One day not a drop and the next day puddle. Luckily mine is right at the bottom so a good bead of silicone will hold it until it's time for a new clutch, then I can split the case and fix it right.
I melted a bunch of harness covers. I have a different engine than you but I think the same problem might be causing your heat issues - or at least might cause them. I didn't know I had my ignition retarded. It actually melted the ceramic coating off the headers. This happened just running the car in the shop. With the timing where it should be the under hood temps really dropped. I haven't cooked anything after getting the timing set right. I have really enjoyed following your thread. You have come a long way!
I have been following this build. It is a very interesting project and your ability to deal with the build issues is commendable. While I am unfamiliar with the SD4 build process; it is one of the most reliable and most powerful 4 cyl engines to have come from GM. We can compare it to the Cosworth used in the Chevy Vega but I believe that engine is British. IIRC, the SD4 used in the original Indy Fiero put out 270 crank HP @7000 RPM. That's very impressive for a 150 Cu In engine. Is that the goal here?
------------------ " THE BLACK PARALYZER" -87GT 3800SC Series III engine, custom ZZP /Frozen Boost Intercooler setup, 3.4" Pulley, Northstar TB, LS1 MAF, 3" Flotech Afterburner Exhaust, Autolite 104's, MSD wires, Custom CAI, 4T65eHD w. custom axles, HP Tuners VCM Suite. "THE COLUSSUS" 87GT - ALL OUT 3.4L Turbocharged engine, Garrett Hybrid Turbo, MSD ign., modified TH125H " ON THE LOOSE WITHOUT THE JUICE "
Thanks Dennis. The real Indy pace car as you mentioned turned 7000 rpm, and had a very large cam. Running flat out on a 2.5 mile track, I am sure it was a beast, but I'm guessing not so good around town, at less than 4000 rpm. My cam is much less agressive, though still a huge jump over stock. I want something that I can drive to work once a week during the summer or around town on Saturday. I doubt I would cross the 200hp barrier. Honestly if I am in the 160 to 180 range, knowing that I just about doubled the stock horse power, I'd be happy as a pig in slop.
This project was never about building a superfast car. (I have a Corvette for that). I just wanted to do something that is a little different from the typical 3.4/3.8 swap, but not reinvent the wheel. My stock Duke was going to be needing a rebuild anyway, so I figured the SD would be a good project. Though for anyone thinking about this swap, I hope you have deep pockets. This is not a cheap swap.
I'm with woody, your car shouldn't be running hot enough to melt everything within arms reach. Something is not right and I would start with your timing.
Originally posted by edfiero: .... The air intake that I bought is too tall, and the deck lid won't close.
Even with the air intake removed the deck lid still wont close, because the passenger side hinge is hitting the giant SD valve cover. I am really surprised I dont ever remember reading that no one had this problem before. No idea how to resolve this.
Also with these Hooker headers, I can't believe how hot the engine bay is now. I am melting every wire loom that is within even a foot of header. I am going to have redo all that and find something more heat tolerable. Even wires running behind the heat shield are melting. (oh yeah and the A/C heat shield no longer fits. I had to bend and hammer that to get it back in.)
My 350 Holley, on the Edelbrock 2V manifold, also sits quite high. I had to find a low profile air filter. (The element is only 1" tall. The base plate adds maybe 1/4 inch. And I had to fabricate a strap clamp to hold it all together. The stud and nut were too tall.) My hinge doesn't hit the SD valve cover. I have never looked to see how much clearance there is, there.
You probably need to have your header (and the C500 heat shield) thermal coated. There's a place near me that did both for $175. www.headercoatings.com I recommend them highly.
I also used an infrared/laser thermometer to check my header temps. It's how I figured out where the Dellorto carbs were acting up (other than the obvious poor running.) Also, when I first installed the Holley, before I adjusted the mixture screws, it was running a bit lean. Turned the header red, even through the thermal coating.
Nothing new to report. Engine still running very rich and exhaust super hot. But thought I'd take a break and post a few new pictures. This shows the Harbor Freight engine hoist. Didn't fit that well, but got the job done. Also see 4x4 post as a lift point behind the doors.
In this next one you can see the custom header plate.
Spec stage 1 clutch. I know most guys go for stage 3, but Spec said this could handle 160hp no problem, and would give the most stock like feel.
With the header installed
This isnt that clear, but shows the remote located oil filter, oil return from the head, and the dual TBI.
[This message has been edited by edfiero (edited 06-21-2015).]
I've had a couple different threads going on various issues, so just want to summarize here.
I did buy a new injector to replace the one that wasn't firing and that solved that problem. I actually bought a smaller injector. 33lb/hr vs the 45lb that it came with. So the combo of these two still gives me more than the stock duke injector but less than I had originally with this throttle body. The idea being it will be easier to get rid of the rich condition I'm seeing by supplying less fuel. I can always put the stock injector in there if I ever find out I need more fuel.
As I mentioned earlier, I melted the original throttle cable, and got a Fiero Store replacement. (Installing that is a PIA) The new cable lasted about 20 minutes before something happened to it and it froze up and wouldn't work any more. I had a heat sleeve on the cable and there was no obvious signs that it melted but it had to be removed none the less. Did I mention dealing with this cable is a PIA. So got a warranty replacement from TFS and put it in 2 heat sleeves. The new one has close to 2 hours on it now and is ok so far (knock on wood).
Related to the throttle, I had to make a couple of custom brackets to hold the end of the cable since the new Throttle Body is oriented differently than the stock one. It looks a little ghetto, but it is functional.
The tuning package I'm using EBL Flash does have a self learn for the Fuel portion of the tune, but it does a maximum correction of 12% at a time, so its a very slow process to get it right. I am still rich, but it is ever so slowly getting better. I'm guessing tuning is usually easier since you start out with a base tune that is original to your car or to the donor engine. In this case I am starting with a 4.3 V6 tune as I couldn't find any EBL bins for a 4 cylinder.
As for the timing I have the base timing set at 8 degrees, same as the Duke, and it seems to be OK with that. But has far as the curve, and how much total advance to give, I'm just shooting in the dark.
While I was waiting on the the replacement throttle cable, I fixed the tension on the deck lid to correct a problem with the lid not staying open. (Thanks Fierosound) for this tip.) My tension pins were in the first position giving the least amount of support. Very surprising since mine came from the factory with a luggage rack, so it needed extra support. A fixed now. What a joy to have the lid stay open after 20+ years of being hit in the head and/or propping the lid open with a stick.
I am making good progress on the tune. The A/F ratio is gradually getting better as I do the 'learn' process. And after I found the stock Duke timing curve showing me that I needed to really advance the tming, the drivability greatly improved. I did a 0 to 60 run tonight and it looks like just over 8 seconds. But I was only about 65% on throttle position. So conservatively that would be about 150hp. Hopefully at full throttle and more refinement of the tune I'll be at 175HP.
An update from the last two months: The new throttle cable is holding up ok so far (knock on wood) thanks to being wrapped in 3 layers of insulation.
I got a 'carb hat' for my Throttle Body, looks very much like the pic that Fierosound posted earlier. I even got a matching V6 air cleaner assemble but I can't get it mounted in my 84. The wall of the engine bay must have changed slightly in 85 to allow for this air cleaner. So for now, I just have the air filter laying on top of the air inlet, where the stock air intake would attach.
I've learned that its hard to get a good tune when you have mechanical issues. The fact that I was running rich for so long was due to two different bad sets of spark plug wires combined with the fact that when I started the tuning process I didn't have an Intake Air Temp sensor. The 84 Fiero didn't come with one, but this ECU was expecting it, otherwise the temp defaulted to -40F for a super rich mixture.
Still haven't done much with adjusting the timing since the A/F is not completely dialed in. Its hard to see the effect of timing while fighting lean or rich conditions. Lately I noticed that with each gear shift, when I get back on the throttle, I get a super lean condition. I adjusted the Accelerator Enrichment settings in the tune, which helped some but didn't cure it. Well, the injector was hitting 100% duty cycle here, so there was no more fuel to give.
I decided to replace the 33lb hr injector with another 45 lb one. Got a Standard Motor Products one from Rock Auto. Well, just discovered this weekend that the new injector was bad, as my A/F went super lean on me. Got a used 45 lb one from the junk yard and found it to run better, but still hitting 98% duty cycle on the injector and the lean spike isn't gone yet. So today I'll try to order injectors for the 5.0 Firebird and Camaro. Those should be 55 lb. I don't need that much at WOT, but I think this is the only way to get over the lean spike hump. That should help my acceleration time some. Though I don' t think I'm going to reach my earlier target of 175 hp. I think 160 is about all she has in her. It's a bit of a disappointment knowing the potential the SD4 has ,but it will still be a 3 + second drop in my 0-60 from where I started, so that is nothing to sneeze at.
As for the timing I have the base timing set at 8 degrees, same as the Duke, and it seems to be OK with that. But has far as the curve, and how much total advance to give, I'm just shooting in the dark.
You have a PM.
Here's the Spark table for the 86 Duke with 5-speed - PROM FAU2975
[This message has been edited by fierosound (edited 10-01-2015).]
Time for the final post for 2015 since I parked the car for the winter on Saturday and probably final post on the build. I am within spitting distance of that target of 175hp.
I've got the 55lb/hr injectors in and am still tweaking the tune for them. Surprisingly they are still hitting 100% duty cycle when shifting gears. Though I am going to keep these and not try to go any bigger, for another 5hp or whatever its not worth it since I am not racing the car.
Though what really seemed to put me over the top was the new cat back exhaust I got from WCF. I did a couple of quick 0-60 runs on Saturday (no quarter miles because the new exhaust is literally hanging on by a thread and needs some welding to complete the install) Anyway I had a 6.9 second run with a lot of wheel spin taking off. Then I had another run where I punched from 9mph up to 60 and that was 6.1 seconds. So that is probably enough to say that I am probably around 6.6 seconds from a stop once I perfect the launch. That should put me in the 175 ballpark. I can only guess that the 200hp+ claims from the SD4 were when running a more aggressive cam and spinning the engine tighter. I've never rev'd over 5900rpm.
My to-do list for next spring is pretty short. 1. Get the exhaust welded so it doesn't fall out on the road. 2. Tweak the IAC a bit as I am at zero counts at warm idle and its idling faster than what the ECU is calling for. 3. Put the final touches on the ECU tune. 4. Clean up the engine bay a bit and replace the temporary connection between the throttle cable and the TBI with a permanent one. 5. Attempt a drive more than 15 minutes from home. So far I've stuck near home incase of any problems, now that I'm building a bit of confidence around the engine, I'll try to tackle a 30 mile drive over to my parents house, or to my office.
I would venture to say that the engine is making 200HP. For a 6 second 0-60 it has to. For a four the power is impressive but if its a concern; the engine might not prove to be economical. Nice achievement overall!
------------------ " THE BLACK PARALYZER" -87GT 3800SC Series III engine, custom ZZP /Frozen Boost Intercooler setup, 3.4" Pulley, Northstar TB, LS1 MAF, 3" Spintech/Hedman Exhaust, Autolite 104's, MSD wires, Custom CAI, 4T65eHD w. custom axles, HP Tuners VCM Suite. "THE COLUSSUS" 87GT - ALL OUT 3.4L Turbocharged engine, Garrett Hybrid Turbo, MSD ign., modified TH125H " ON THE LOOSE WITHOUT THE JUICE "
Could you post pics of the engine in the engine bay? I'd like to see clearances of the TBI around the trunk firewall and what you have used for air cleaner/induction...
Could you post pics of the engine in the engine bay? I'd like to see clearances of the TBI around the trunk firewall and what you have used for air cleaner/induction...
Thanks.
Although I have the TBI I am using a carb hat very similar to the one you have.
I promise you that if you thermal coat the header, you won't be sorry. It's well worth the investment. I didn't have to insulate my throttle cable at all, other than what was already on it, where it came through the firewall. I also had the firewall heat shield - the one that covers C500 - coated. I may have also wrapped that heat shield with header tape. Coating both pieces cost me less than $200.
Edit - Hard to tell about the heat shield from the pic. Maybe the tape was before I had it coated.
[This message has been edited by Raydar (edited 06-26-2016).]
I promise you that if you thermal coat the header, you won't be sorry. It's well worth the investment. I didn't have to insulate my throttle cable at all, other than what was already on it, where it came through the firewall.
I totally agree that it would be a good idea, but most places won't warranty their coating on a fresh engine. And in my case my AFR and timing was so off when I first started up, I had the header glowing red and would have burned the coating right off. Even today, almost a year later, I am still trying to get the AFR dialed in. I am currently seeing too much AE on light tip in of the throttle. I'm working to get that eliminated. Hopefully MPG will improve when I am done, as of right now I am only getting about 19.
Anyway right now its probably too much trouble to get the header back off, with the locking fasteners and all, just to do the coating, but if I ever take it back off for some other reason, I would definitely get it coated.
As the end of the 2016 driving season is coming to an end, I thought I'd leave another update. The Fiero found its way on to the back of a flat bed twice this summer. Once for a bad fuel pump relay and once for a bad fuel pump. The relay was a quick fix. Pump proved to be more challenging. The first pump had the wrong pump in the box, so it didn't fit. No one stocks them locally and shipping across country was time consuming.
After the new pump I had to take 10 steps backward on my fuel tuning, as I was trying to tune with a weak pump putting out about 9psi, now the new one is over 14. So all the fuel tables had to get re adjusted.
I switched to a 180 degree thermostat which seemed to help a lot with the heat under the decklid, but this also necessitated a tweak to the tune.
I can't say enough good things about EBL and DynamicEFI. Great product. The engine idles smooth at 100 and runs great. Gas mileage is up to about 21.3. There might be a bit more to be had there. However I never found any more power. 0-60 time remains about 6.9 - 7.1 seconds.
Overall OK for my first engine swap. Though I appeared to have screwed up the piston ring install because I am burning a lot of oil. I pulled the spark plugs to see what was up and cylinders 3 and 4 have black looking plugs. Next summer I'll try one of those "Miracle in a Can" fixes to see if that will slow the consumption a bit. Assuming that doesn't work, I guess the engine will comeback out sometime in the future to check the piston rings, and then I can get that header coated.
The car was running pretty well this spring with the exception of the thirsty oil consumption. Not sure where its all going. I am not seeing black smoke in the rear view mirror when driving, but I burn thru a quart in about 400 miles. The other problem is some sort of clutch/fly wheel problem. I get a lot of jerking of the engine when taking off from a stop. Subsequent shifts are much smoother, but not perfect.
I drove the car to the Chevy National car show in Carlisle about 90 miles from home. She ran great until pulling into the show field when I heard a screeching coming from the engine. When it came time to leave, I started up the car and it seemed normal, with the exception of an occasional backfire, so I started home. Bad decision. Got about half way when it started loosing power and back firing real bad. Had to be towed the rest of the way home.
Engine is now out of the car. The first problem seen was the cylinder head broke at one of the rocker stud 'perches'. The stud came right out of the head. Several push rods are bent. No damage internally to the engine. Cam, Pistons, crank all look fine, though I do see that some of the valves have hit the top of the pistons. However when I remove the timing cover, here is the cause of all the problems.....
I was using one of the Aluminum timing gears, thinking it would be stronger than the fiber composite gear. Well maybe it was, but it wasn't strong enough. The fat part of the gear where it goes on to the cam separated completely from the outside of the gear with the teeth. Also on closer examination it looks like the gear rotated on the cam, throwing the timing off and probably causing the valve to piston interference seen earlier.
I am guessing all could have been avoided if I would have used the steel super duty cam gear. Seems the aluminum couldn't take the stress from my large valve springs.
The head is currently being welded, and new valves are on order. I honed the cylinder heads and put on new rings. Hopefully this will help with the oil consumption, though I didn't see any problems in this area. All rings were installed correctly before. I got my header JET coated. So hopefully no more issues with heat, and it looks nicer now. Also had the fly wheel turned, fingers crossed this helps with the first gear jerkiness. Otherwise the clutch looks fine.
The car was running pretty well this spring with the exception of the thirsty oil consumption. Not sure where its all going. I am not seeing black smoke in the rear view mirror when driving, but I burn thru a quart in about 400 miles.
Sorry to hear that you had major engine problems. I just wanted to mention that black smoke would indicate too rich of a mixture whereas blue smoke would indicate oil consumption.
Do you have any type of PCV system? I wasn't surprised to see the fuel pump was a large part of your tuning issues. I hope you used a bolt to hold the cam gear on? The stock set-up is a press fit. No good for heavy valve springs. Also question your shimming of cam end play. Did the shims fail and allow cam to walk? Check oil pump drive and distributor gears for wear. These are definitely NOT for an inexperienced engine builder. Better have deep pockets as they are quite finicky to get assembled correctly because 70% of the components are custom fit.
Do you have any type of PCV system? I wasn't surprised to see the fuel pump was a large part of your tuning issues. I hope you used a bolt to hold the cam gear on? The stock set-up is a press fit. No good for heavy valve springs. Also question your shimming of cam end play. Did the shims fail and allow cam to walk? Check oil pump drive and distributor gears for wear. These are definitely NOT for an inexperienced engine builder. Better have deep pockets as they are quite finicky to get assembled correctly because 70% of the components are custom fit.
Yes, I drilled a hole in the valve cover so that I could hook up a PCV valve. I did not observe any cam end play. Yes I am running the bolt/washer combo on the end of the cam. Gears look good. I was running with added zinc/break in fluid all the time.
I wonder if you can adjust valve lash for solid lifters with the engine running? I have a modified 88 duke, with big block Chevy roller rockers, and a SD4 valve cover. Since you can take the lid off the SD4 cover to work on the valve train, that's how I adjusted the valve lash, with the engine running. I was able to get a quieter, smoother running engine that way than with the normal adjustment method.
I wonder if you can adjust valve lash for solid lifters with the engine running? I have a modified 88 duke, with big block Chevy roller rockers, and a SD4 valve cover. Since you can take the lid off the SD4 cover to work on the valve train, that's how I adjusted the valve lash, with the engine running. I was able to get a quieter, smoother running engine that way than with the normal adjustment method.
I had a 96 Impala SS that I put new heads and rocker arms on, and I am familiar with adjusting the rockers with engine running. But I've never come across any info that suggested using that procedure with solid lifters. It might be possible, but I've never tried it. On this particular engine, I wouldn't try because there is too much oil squirting from the push rods.... I'd soak everything if I took that cover off.
As for an update..... the engine is back in the car and I've driven about 10 miles so far. I need to re-do the fuel table a bit and I'm still trying to dial in the timing, but over all, it seems to be running well. Turning the flywheel did solve most of the problem I was having with the clutch engagement when taking off from a stop.
I had a 96 Impala SS that I put new heads and rocker arms on, and I am familiar with adjusting the rockers with engine running. But I've never come across any info that suggested using that procedure with solid lifters. It might be possible, but I've never tried it. On this particular engine, I wouldn't try because there is too much oil squirting from the push rods.... I'd soak everything if I took that cover off.
I have hydraulic roller lifters....
But when I adjust the rockers with engine running, after I remove the top of the SD4 valve cover I lay tin foil inside and just have holes punched for the rocker nuts so I can adjust them.


.JPG)


